1
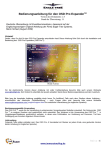
Wireless LAN Adapter
Quick Installation Guide
Guide d’installation rapide
Anleitung zur Schnellinstallation
Guida Veloce all’Installazione
Guía rápida de instalación
Version 2.0
Table of Contents
English
1.Utility and Driver Installation......................................................................... 2
2.Hardware Installation.................................................................................... 4
3.Wireless Network Setup ............................................................................... 5
Français
1..Installation de l’utilitaire et du gestionnaire .................................................. 6
2..Installation du matériel ................................................................................ 8
3..Réglage du réseau sans fil.......................................................................... 9
Deutsch
1.Installation von Hilfsprogramm und Treiber ................................................ 10
2.Hardware-Installation ................................................................................. 12
3.Setup des kabellosen Netzwerkes ............................................................. 13
Italiano
1.Installazione dell’Utility e del Driver ............................................................ 15
2.Installazione dell’Hardware......................................................................... 17
3.Installazione Rete Wireless ........................................................................ 18
Español
1.Instalación del programa utilitario y el controlador ..................................... 19
2.Instalación del hardware ............................................................................ 21
3.Configuración de la red inalámbrica ........................................................... 22
1
Copyright statement
No part of this publication may be reproduced, stored in a retrieval system, or
transmitted in any from or by any means, whether electronic, mechanical,
photocopying, recording, or otherwise without the prior writing of the
publisher.
MAY. 2005
WLAN Adapter Quick installation Guide
Note: Do not insert the WLAN adapter in
your computer until you have finished
installing the utility and Driver.
Utility and Driver Installation
1.
2.
3.
4.
Turn “On” your computer. Insert the driver CD for the WLAN Adapter.
Browse the CD content and find the “ Setup.exe ”.
Double click the “ Setup.exe ”.
Click “Next” and then follow the instructions on the screen to continue the
installation.
2
5. Click the Finish button in this screen; both the driver and the Configuration
Utility are installed on your computer.
3
Hardware Installation
For PCMCIA or USB adapters, simply insert or connect the adapter after
running the setup file.
For PCI cards, you must shut down the computer, install the card in an
available PCI slot, and restart the operating system.
After the computer boots back up, it will detect the wireless card and then start
the New Hardware Found wizard. Respond to the prompts displayed by the
wizard, and select the option, “Install the software automatically
(Recommended) ”; the operating system will find the driver automatically.
You can launch the Configuration Utility by clicking the left mouse button on
the Configuration Utility icon and selecting Advanced Configuration.
If the Configuration Utility icon is not displayed in the System Tray, you can
restart the Configuration Utility from the Start Menu by selecting Programs and
Wireless Network Utility Configuration.
The Configuration Utility consists of window with four tabs: Link Information,
AP List, Profile Setting, and About. Please find information about these tabs in
the User’s Guide (from the CD contents, select User’s Guide that shown with
PDF format.)
4
Wireless Network Setup
1. Peer-to-Peer: Connects with other wireless client(s). This does not
require Access Point. Please make sure the “Network Name” (SSID or
ESSID) and “Peer-to-Peer” channel are the same for all clients in the
same wireless network. Double click on the Configuration Utility icon to
open the utility.
- Click on “Profile Setting” tab and “Add” to create a new profile.
- Enter a name that the profile correspond, click “Next”.
- Select the “Network Type”, click on the drop-down arrow and select
“Peer-to-Peer”, and then at “Peer-to-Peer Channel”, use the up/down
arrows to select the channel number, and then click “Next”.
- Select the Authentication Mode to enable the “Encryption” if you have
any security concern. Once you enable the encryption function, then
you should input the corresponding key. Click “Next”.
- On IP Setting select “Enable” or “Disable” to make used of it. Click
“Complete” to finish the configuration.
2. Access Point: Connects to wired Ethernet network via Access Point.
- Click “AP List” tab.
- Select the listed Wireless Network to Join.
- Click “Connect” to join the network.
* Note: You might need to configure a Profile before if the destination
network had a “WEP KEY” protected.
5
Déclaration de Copyright
Aucune partie de cette publication ne peut être reproduite, stockée ou
transmise que quelque forme ou par quelque moyen que ce soit,
électronique, mécanique, par photocopie, enregistrement, ou autrement
sans l’autorisation par écrit de l’auteur.
MAI. 2005
Guide d’installation rapide de
l’adaptateur WLAN
Note: N’insérez pas l’adaptateur WLAN
dans votre ordinateur avant d’avoir
installé le gestionnaire et le logiciel.
Installation de l’utilitaire et du gestionnaire
1.
2.
3.
4.
Allumez votre ordinateur. Insérez le CD pour le gestionnaire WLAN Adapter.
Trouvez “ Setup.exe ” sur le CD.
Double clic sur “ Setup.exe ”.
Cliquez « Suivant » puis suivez les instructions à l’écran pour poursuivre
l’installation.
6
5. Cliquez sur le bouton « Fini »; l’utilitaire et le gestionnaire sont installés sur
votre ordinateur.
7
Installation du matériel
Pour les adaptateurs PCMCIA ou USB, insérez ou branchez l’adaptateur une
fois le fichier « setup » lancé.
Pour les cartes PCI, vous devez éteindre l’ordinateur, installer la carte dans
une fente PCI disponible, et relancer le système d’opération.
Une fois l’ordinateur redémarré, il détectera la carte sans fil et lancera
l’assistant de Nouveau matériel. Répondez aux questions affichées par
l’assistant et choisissez l’option, « Installez Logiciel Automatiquement
(Recommandé) »; le système d’opération trouvera le gestionnaire
automatiquement.
Vous pouvez lancer l’utilitaire de configuration en cliquant sur l’icône
correspondant et en choisissant la configuration avancée.
Si l’utilitaire de configuration n’est pas affiché dans le plateau de système,
vous pouvez relancer l’utilitaire à partir du menu Démarrer en choisissant
Programmes et Configuration d’utilitaire de réseau sans fil.
L’utilitaire de configuration comprend une fenêtre avec quatre languettes :
Information de Line, Liste AP, Réglages de Profil, et À propos. Veuillez trouver
l’information dans le guide de l’utilisateur (À partir des contenus du CD,
choisissez le guide de l’utilisateur en format PDF.)
8
Réglage du réseau sans fil
1. Pair à Pair: Établit une connexion avec d’autres client(s) sans fil. Ceci
ne requiert pas de point d’accès. Veuillez vous assurer que le « Nom de
réseau » (SSID ou ESSID) et le canal « Pair à Pair » sont les mêmes
pour tous les clients d’un même réseau sans fil. Double clic sur l’icône
de l’utilitaire de configuration pour ouvrir l’utilitaire.
- Cliquez sur la languette « réglage de profil » et « ajouter » pour créer un
nouveau profil.
- Entrez un nom pour le profil et cliquez sur « Suivant ».
- Choisissez « type de réseau », cliquez sur la flèche déferlante et
choisissez « Pair à Pair », puis « Canal Pair à Pair », et servez vous des
flèches pour choisir le numéro de canal, puis cliquez « Suivant ».
- Choisissez le mode d’authentification pour permettre « l’Encryptions » si
vous avez des inquiétudes quant à la sécurité. Une fois cette fonction
permise, entrez un mot de passe. Cliquez « Suivant ».
- Pour les réglages IP choisissez « Permettre » ou « Arrêter ». Cliquez
« terminé » pour terminer la configuration.
2. Point d’Accès: Point de connexion au réseau Ethernet.
- Cliquez “Liste AP”.
- Choisissez le réseau sans fil à intégrer.
- Cliquez « Connexion » pour intégrer le réseau.
* Remarque: Vous devrez peut être configurer un profil si le réseau a une
protection “WEP KEY”.
9
Erklärung zu den Urheberrechten
Kein Teil dieser Anleitung darf ohne die vorherige Erlaubnis des
Herausgebers reproduziert, in einem Abfragesystem gespeichert, oder in
irgendeiner Form oder durch irgendwelche Mittel versendet werden, seien
sie elektronisch, mechanisch, Fotokopie, Aufnahme oder irgendeiner
anderen Art.
MAI, 2005
WLAN-Adapter-Schnellinstallation
Anmerkung: Nicht den WLAN-Adapter in
den Computer stecken, bevor Hilfsprogramm und Treiber nicht installiert sind.
Installation von Hilfsprogramm und Treiber
1.
2.
3.
4.
Den Computer auf “An” schalten. Die Treiber-CD für den WLAN Adapter einlegen.
Den CD-Inhalt durchgehen und “ Setup.exe ” suchen.
Doppelklick auf “ Setup.exe ”.
“Next/Weiter” anklicken und dann den Anweisungen auf dem Bildschirm
folgen, um die Installation weiterzuführen.
10
5. Beim untenstehenden Bild den “Finish/Fertig”-Knopf drücken: sowohl der
Treiber wie die Konfiguration des Hilfsprogrammes werden auf Ihrem
Computer installiert sein.
11
Hardware-Installation
Für PCMCIA oder USB-Adapter einfach den Adapter einstecken oder indirekt
anschließen, nachdem die Setup-Datei zum Laufen gebracht worden ist.
Für PCI-Karten müssen Sie den Computer herunterfahren, die Karte an einen
passenden PCI-Anschluß anschließen und das Betriebssystem neustarten.
Nachdem der Computer gebootet hat, wird er die kabellose Karte entdecken
und dann das Assistenzprogramm für „Neue Hardware gefunden“ starten.
Antworten Sie auf die vom Assistenzprogramm angezeigten Anfragen und
wählen Sie die Option “Install the software automatically/Software
automatisch installieren” (das wird empfohlen). Das Betriebssystem wird
den Treiber automatisch finden.
Sie können das Hilfsprogramm zur Konfiguration starten, indem Sie mit dem
linken Mausknopf auf das entsprechende Zeichen auf der Bildschirmanzeige
drücken und „Advanced Configuration“ (erweiterte Konfiguration) auswählen.
Wenn Zeichen für die Konfigurtation mittels Hilfsprogramm in der
Anzeigeleiste nicht erscheint, können Sie diese Konfiguration vom Startmenü
aus wiederholt zu starten versuchen, indem Sie „Programme“ auswählen und
dann „Konfiguration Kabelloses Netzwerk“.
Das Hilfsprogramm zur Konfiguration besteht aus einem Fenster mit vier
Abteilungen: Verbindungsinformation, AP-Liste, Profileinstellung und
Themenliste. Für Informationen über diese Abteilungen schauen Sie bitte in
die Bedienungsanleitung (unter dem CD-Inhalt die im PDF-Format gehaltene
Bedienungsanleitung auswählen.)
12
Setup des kabellosen Netzwerkes
1. Peer-to-Peer: Verbindet mit anderen kabellosen Klienten. Dazu ist kein
Zugriffspunkt erforderlich. Bitte stellen Sie sicher, daß der
“Netzwerkname” (SSID oder ESSID) und der “Peer-to-Peer”-Kanal für
alle Klienten im selben Netzwerk derselbe ist. Doppelklick auf das
Zeichen für die Konfiguration (mittels Hilfsprogramm), um das
Programm zu öffnen.
- Klick auf die Abteilung “Profileinstellung” und “Hinzufügen”, um ein
neues Profil zu kreieren.
- Den Namen, der dem Profil entspricht, eingeben und “Weiter”
drücken.
- Den “Netzwerktypen” auswählen und auf den nach unten (oben)
weisenden Pfeil klicken und “Peer-to-Peer” auswählen, dann beim
“Peer-to-Peer”-Kanal den besagten Pfeil nutzen, um die
Kanalnummer auszuwählen und dann „Weiter“ drücken.
- Den Authentifizierungsmodus auswählen, um die “Verschlüsselung”
auszuwählen, falls Sie irgendwelche Sicherheitsbedenken hegen.
Wenn Sie die Verschlüsselungsfunktion einmal aktiviert haben,
sollten Sie den entsprechenden Schlüssel eingeben. Klicken Sie auf
„Weiter“.
- Beim IP-Einstellen wählen Sie “Enable” (eingeschaltet) oder “Disable”
(ausgeschaltet), um Gebrauch davon zu machen. Klicken Sie auf
“Complete” (Fertigstellen), um die Konfiguration abzuschließen.
2. Access Point (Zugriffspunkt): Stellt eine Verbindung zum verkabelten
Ethernet-Netzwerk via Access Point her.
- Klicken Sie die Abteilung “AP-Liste” an.
13
- Wählen Sie aus der Liste das Netzwerk, das Sie benutzen wollen.
- Drücken Sie “Verbinden” , um die Verbindung mit dem Netzwerk
herzustellen.
* Anmerkung: Möglicherweise müssen Sie zuvor ein Profil einstellen, wenn
das Zielnetzwerk als Schutz einen “WEP KEY” genutzt hat.
14
Dichiarazione del Copyright
Nessuna parte di questa pubblicazione potrà essere riprodotta, memorizzata
in un sistema di richiamo, o trasmessa in qualsiasi forma o con qualsiasi
mezzo, elettronico, meccanico, fotocopia, registrazione, o altrimenti senza
l’autorizzazione scritta dell’editore.
MAGGIO 2005
Guida Veloce all’Installazione
dell’Adattatore WLAN
Nota: Non inserire l’adattatore WLAN nel
computer fino a che non si è finito
d’installare l’utility e il Driver.
Installazione dell’Utility e del Driver
1.
2.
3.
4.
Accendere (“On”) il computer. Inserire il CD del driver per l’Adattatore WLAN.
Sfoglaire il contenuto del CD e trovare “ Setup.exe ”.
Cliccare due volte “ Setup.exe ”.
Cliccare “Avanti” e poi seguire le istruzioni sullo schermo per continuare
l’installazione.
15
5. Cliccare il pulsante Finisci in questo schermo; sia il driver che l’Utility della
configurazione sono installati nel vostro computer.
16
Installazione dell’Hardware
Per gli adattatori PCMCIA o USB, basta inserire o collegare l’adattatore dopo
avere eseguito il file d’installazione.
Per le schede PCI, dovete spegnere il computer, installare la scheda in uno
slot PCI disponibile, e poi riavviare il sistema operativo.
Dopo che il computer si è avviato, riscontra la scheda wireless e poi avvia il
mago di Trovato Nuovo Hardware. Rispondere alle domande mostrate dal
mago e selezionare l’opzione, “Installa automaticamente il software
(Consigliato) ”; il sistema operativo troverà automaticamente il driver.
Potete lanciare l’Utility della Configurazione cliccando il pulsante sinistro del
mouse sull’icona Utility di Configurazione e selezionando Configurazione
Avanzata.
Se l’icona Utility di Configurazione non viene mostrata nel Piatto del Sistema,
potete riavviare l’Utility di Configurazione da Menu di Avvia selezionando
Programmi e Utility di Configurazione Rete Wireless.
L’Utility di Configurazione consiste in una finestra con quattro tabule:
Informazioni di Link, Elenco AP, Impostazione Profilo, e Informazioni. Trovare
le informazioni riguardanti queste tabule nella Guida per l’Uso (dal contenuto
del CD, selezionare Guida per l’Uso mostrata nel formato PDF.)
17
Installazione Rete Wireless
1. Peer-to-Peer: Collega con altri clienti wireless. Questo non richiede il
PUnto di Accesso. Assicurarsi che il “Nome della Rete” (SSID o ESSID)
e il canale “Peer-to-Peer” siano gli stessi per tutti i clienti della stessa
rete wireless. Cliccare due volte sull’icona Utility di Configurazione per
aprire l’utility.
- Cliccare sulla tabula “Impostazione Profilo” e “Aggiungi” per creare un
nuovo profilo.
- Scrivere un nome a cui corrisponde il profilo, cliccare “Avanti”.
- Selezionare il “Tipo di Rete”, cliccare sulla freccia drop-down e
selezionare “Peer-to-Peer”, e poi in “Canale Peer-to-Peer”, usare le
frecce su e giù per selezionare il numero del canale, e poi cliccare “Avanti”.
- Selezionare la Modalità Autenticazione per attivare la “Encryption” se
avete qualche preoccupazione per la sicurezza. Quando avete
attivato la funzione di encryption, dovete input la chiave
corrispondente. Cliccate “Avanti”.
- Nell’Impostazione IP selezionare “Attiva” o “Disattiva” per usarla.
Cliccare
“Completa” per finire la configurazione.
2. Punto di Accesso: Collega alla rete Ethernet a filo attraverso il Punto
di Accesso.
- Cliccare la tabula “Elenco AP”.
- Selezionare la Rete Wireless elencata per unirsi (Join).
- Cliccare “Collega” per unirsi alla rete.
* Nota: Potreste avere bisogno di configurare prima un Profilo se la rete di
destinazione aveva una “WEP KEY” protetta.
18
Declaración de derechos de propiedad intelectual
Ninguna parte de esta publicación puede ser reproducida, almacenada en
un sistema de lectura, o transmitida de ninguna forma o por ningún medio,
ya sea electrónico, mecánico, fotocopia, grabación o de otro modo, sin el
permiso escrito del publicador.
MAYO DE 2005
Guía de instalación rápida del adaptador
WLANAN
Nota: no inserte el adaptador WLAN en su
ordenador hasta que haya finalizado la
instalación del utilitario y el controlador.
Instalación del programa utilitario y el controlador
1.
2.
3.
4.
Encienda el ordenador. Inserte CD de controlador del Adaptador WLAN.
Explore el contenido del CD y encuentre el archivo “ Setup.exe ”.
Haga doble clic en “ Setup.exe ”.
Haga clic en “Siguiente” . Siga las instrucciones en pantalla para instalar.
19
5. Haga clic en botón Finalizar en esta pantalla; el controlador y el Utilitario de
Configuración están ya instalados en su computadora.
20
Instalación del hardware
Para los adaptadores PCMCIA o USB, simplemente inserte o conecte el
adaptador después de ejecutar el archivo de instalación (setup.exe).
Para las tarjetas PCI, debe apagar la computadora, instalar la tarjeta en una
ranura PCI disponible y luego reiniciar el sistema.
Después que el ordenador arranque, detectará la tarjeta inalámbrica y luego
lanzará el Asistente para nuevo hardware encontrado. Responda a las
preguntas del asistente, y seleccione la opción, “Instalar el software
automáticamente (Recomendado) ”; el sistema operativo encontrará el
controlador automáticamente.
Usted puede lanzar el Utilitario de Configuración haciendo clic con el botón
izquierdo del ratón en el icono Utilitario de Configuración y seleccionando
Configuración Avanzada.
Si el icono del Utilitario de Configuración no se ve en la Bandeja del Sistema,
usted puede reiniciar el Utilitario de Configuración a partir del Menú de Inicio,
seleccionando Programas y Utilitario de Configuración de Redes
Inalámbricas.
El Utilitario de Configuración consiste de una ventana con cuatro viñetas: Link
Information (Información del vínculo), AP List (Lista de puntos de acceso),
Profile Setting (Configuración de perfiles), y About (Acerca de). Puede
encontrar más información acerca de estas viñetas en la Guía del Usuario (de
los contenidos del CD, seleccione la Guía del Usuario que se muestra en
formato PDF).
21
Configuración de la red inalámbrica
1. Punto a Punto (Peer-to-Peer): Conecta con otros clientes
inalámbricos. Esta no requiere un Punto de acceso. Asegúrese que el
“Nombre de la red” (SSID o ESSID) y el canal “Peer-to-Peer” (Punto a Punto)
son iguales para todos los clientes en la misma red inalámbrica. Haga
doble clic en el icono del Utilitario de Configuración para abrir el utilitario.
- Clic en la viñeta “Profile Setting” y en “Add” para crear nuevo perfil.
- Ingrese un nombre que corresponda con el perfil. Clic en “Next”.
- Seleccione el “Tipo de red” (“Network Type”). Clic en la flecha del
menú desplegable. Seleccione “Peer-to-Peer” (Punto a Punto), y
luego en el “Peer-to-Peer Channel” (Canal de Punto a Punto), use las
flechas arriba/abajo para seleccionar el número del canal, y luego
haga clic en “Siguiente”.
- Seleccione un Modo de Autentificación (Authentication Mode) para
activar la Encriptación (“Encryption”), si tiene inquietudes acerca de
la seguridad. Una vez activa la función de encriptación, ingrese la
clave correspondiente. Haga clic en “Next”.
- En la Configuración IP (IP Setting), seleccione “Enable” (“Activar”) o
“Disable” (Desactivar”) para usar la IP. Haga clic en “Complete”
(“Completar”), para finalizar.
2. Punto de acceso Conecta a la red Ethernet alámbrica vía el Punto de
acceso.
- Haga clic en la viñeta “AP List”. Seleccione la lista de redes
inalámbricas a las que se puede conectar.
- Haga clic en “Connect” para conectarse a la red.
* Nota: Tal vez tenga que configurar un perfil (Profile) antes, si la red de
destino tienen una clave WEP (“WEP KEY”) protegida.
22
The equipment has been tested and found to comply with FCC and CE
Rules.Operation is subject to the following two conditions:
(1)
This device may not cause harmful interference.
(2)
This device must accept any interference received including interference that may
cause undesired operation.
23
Federal Communication Commission Interference Statement
This equipment has been tested and found to comply with the limits for a Class B
digital device, pursuant to Part 15 of the FCC Rules. These limits are designed to
provide reasonable protection against harmful interference in a residential installation.
This equipment generates, uses and can radiate radio frequency energy and, if not
installed and used in accordance with the instructions, may cause harmful interference
to radio communications. However, there is no guarantee that interference will not
occur in a particular installation. If this equipment does cause harmful interference
to radio or television reception, which can be determined by turning the equipment off
and on, the user is encouraged to try to correct the interference by one of the
following measures:
-
Reorient or relocate the receiving antenna.
Increase the separation between the equipment and receiver.
Connect the equipment into an outlet on a circuit different from that to which
the receiver is connected.
Consult the dealer or an experienced radio/TV technician for help.
This device complies with Part 15 of the FCC Rules. Operation is subject to the
following two conditions: (1) This device may not cause harmful interference, and (2)
this device must accept any interference received, including interference that may
cause undesired operation.
FCC Caution: Any changes or modifications not expressly approved by the party
responsible for compliance could void the user's authority to operate this equipment.
IMPORTANT NOTE:
FCC Radiation Exposure Statement:
This equipment complies with FCC radiation exposure limits set forth for an
uncontrolled environment. This equipment should be installed and operated with
minimum distance 20cm between the radiator & your body.
If this device is going to be operated in 5.15 ~ 5.25GHz frequency range, then it is
restricted in indoor environment only.
This transmitter must not be co-located or operating in conjunction with any other
antenna or transmitter.
The WL711A/760A/785A ( FCC ID: RYK-WL711A/760A/785A ) is limited in
CH1~CH11 for 2.4 GHz by specified firmware controlled in U.S.A.
24