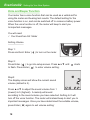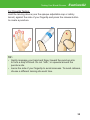
1
Dear EvenCare G2 Owner
EvenCareG2
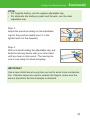
Dear EvenCare G2 Owner,
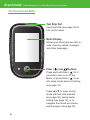
Thank you for choosing the EvenCare G2 Blood Glucose Monitoring
System to help you in monitoring your diabetes. We designed the
EvenCare G2 Blood Glucose Monitoring System to be accurate and
easy to use. The added convenience of the voice feature can be used
as a verbal aid for using the meter and hearing test results by visually
impaired users. This manual contains all of the information needed to
use and to maintain your new blood glucose meter.
Please read it carefully before use.
If you need assistance, please call Medline’s Technical Service
Center at 1-866-274-2131 Monday through Friday between 8:00 a.m.
and 5:00 p.m.(Central Time). Contact your Healthcare Provider at all
other times.
1
EvenCareG2
Dear EvenCare G2 Owner
Intended Use
The EvenCare G2 Blood Glucose Monitoring System is intended for
the quantitative measurement of glucose in fresh capillary whole blood
samples drawn from the fingertips, forearm, or palm. Testing is done
outside the body (In Vitro diagnostic use). The meter includes voice
functionality to assist visually impaired users. It is intended for both
lay use by people with diabetes and in a clinical setting by healthcare
professionals, as an aid to monitoring levels in Diabetes Mellitus.
It is not intended for the diagnosis or screening of diabetes or for
neonatal use.
IMPORTANT:
• Alternate Site Testing (AST) with the EvenCare G2 Blood Glucose
Monitoring System can be used only during steady-state blood
glucose conditions.
• Dehydration – Severe dehydration may lead to inaccurate blood
glucose test results. If you suspect you are severely dehydrated,
contact your healthcare professional immediately.
• Hematocrit range – A hematocrit range that is higher than 55% or
lower than 30% can cause inaccurate blood glucose test results.
2
Table of Contents
EvenCareG2
Table of Contents
Understanding Your New Blood Glucose System
The EvenCareG2 Meter
Meter Display Screen
The EvenCareG2 Test Strip
EvenCareG2 Glucose Control Solution (Recommended)
6
8
10
11
Setting Up Your New System
The Set Up Screen
Setting the Clock
Setting the Alarms
Voice and Beeper Function
12
13
16
18
Language Selection
19
Voice Function Table
20
Control Solution Testing
Performing a Control Solution Test
Control Solution Trouble Shooting
25
29
Testing Your Blood Glucose
Preparing Your Lancing Device
Important Information on Alternate Site Testing (AST)
Performing Blood Glucose Test
30
32
34
Understanding Your Blood Glucose Test Results
38
Viewing Your Meter’s Memory
39
Caring for the Meter
Changing the Battery
Cleaning the Meter
42
43
3
EvenCareG2
Table of Contents
Storage and Precautions
43
Solving Problems
44
Product Warranty
47
Specifications
48
4
Understanding Your New Blood Glucose System
EvenCareG2
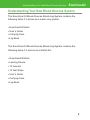
Understanding Your New Blood Glucose System
The EvenCare G2 Blood Glucose Monitoring System contains the
following items if it arrives as a meter only system:
• EvenCareG2 Meter
• User’s Guide
• Carrying Case
• Log Book
The EvenCare G2 Blood Glucose Monitoring System contains the
following items if is arrives as a Starter Kit:
• EvenCareG2 Meter
• Lancing Device
• 10 Lancets
• 10 Test Strips
• User’s Guide
• Carrying Case
• Log Book
5
EvenCareG2
Understanding Your New Blood Glucose System
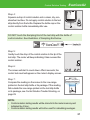
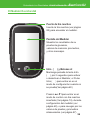
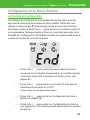
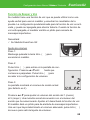
The EvenCareG2 Meter
Test Strip Port
Insert test strip (see page 34) to
turn on the meter.
Meter Display
Shows your blood glucose test results, memory values, averages,
and other messages.
Enter (
) and ▲▼ buttons
Press and hold Enter ( ) for 2
seconds to turn on or off the
Meter, or press Enter ( ) to go
into setup mode when not testing
(see page 12)
Press ▲or▼ to enter control
mode with test strip inserted
(see page 26), during meter
setting (see page 12), or to
navigate the stored test values
and averages (see page 39)
6
Understanding Your New Blood Glucose System
EvenCareG2
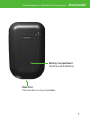
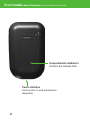
Battery Compartment
Holds two AAA batteries
Data Port
This function is not yet available.
7
EvenCareG2
Understanding Your New Blood Glucose System
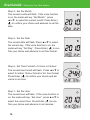
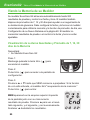
Meter Display Screen
BATTERY
Appears when batteries need to
be changed (see page 42).
CABLE
Indicates the meter is in data
transfer mode to PC*
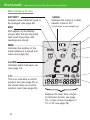
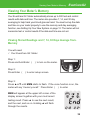
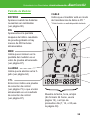
END
Will appear on the display
screen after the last recorded
test result if less then 300
readings are stored.
*This function is not available yet.
MEM
Indicates the number in the
meter display is a stored test
value (see page 39).
mem
ALARM
Indicates alarm has been set
(see page 16).
CTL
This icon indicates a control
solution test (see page 25) or
the stored value is a control
solution result (see page 39).
mg /dL
ctl
DAY
AVG
AM
PM
Displays the date, time, am/pm
(in 24-hours format, see page
12), or type of day averages (7,
14, or 30, see page 39)
mem
8
Understanding Your New Blood Glucose System
EvenCareG2
BEEPER
Set sound volume (see page 18).
TEMPERATURE
Appears when it is either too hot or too cold to
test (outside the ranges of 50˚F~104˚F).
CLOCK
Indicates the meter is ready to set up time and date (see page 13).
VOICE
Indicates the voice feature is on (see page 18).
UNITS
Unit of measurement for your blood glucose is mg/dL.
BLOOD DROP and ARROW
Indicate the meter is ready for testing (see page 34).
9
EvenCareG2
Understanding Your New Blood Glucose System
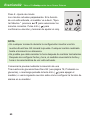
The EvenCareG2 Blood Glucose Test Strip
Contact Points
Insert this end to the test
strip port on the meter.
Sampling End
Apply blood or control
solution here.
The EvenCare G2 Test Strips are glucose specific, biosensor-based
test strips that require very little blood sample to quickly test glucose in
fresh capillary whole blood. The test results are plasma-calibrated for
easy comparison to lab results, however results may be 10% to 15%
higher than results obtained from whole-blood referenced blood glucose
assays. The test strip is also equipped with under-fill detection to alert you
when there is not enough blood to perform a test, so you can be assured
that every reading you get is an accurate and meaningful result.
IMPORTANT:
• Immediately close the vial cap of the test strip bottle tightly after
each use. Keep the unused test strips in its original bottle.
• DO NOT leave any test strips outside the bottle while not in use.
• DO NOT reuse test strips.Test strips are for single use only.
• Carefully discard used test strips and lancets in proper
waste containers.
10
Understanding Your New Blood Glucose System
EvenCareG2
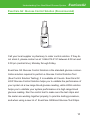
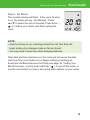
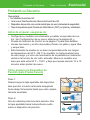
EvenCare G2 Glucose Control Solution (Recommended)
Low
Control Soluon
Suitable for Self-tesng
Use within 3 months after first opening
or before the expiration date
15
Storage Temperature
IVD
www.medline.com
©2010 Medline Industries, Inc.
Manufactured for Medline Industries, Inc.,
Mundelein, IL 60060 USA Made in Taiwan
1-800-MEDLINE RK10APB
Patent# 7655128
Call your local supplier or pharmacy to order control solution. If they do
not stock it, please contact us at 1-866-274-2131 between 8:00 am and
5:00 pm (central time), Monday through Friday.
EvenCare G2 Glucose Control Solution is the standard glucose concentration solution required to perform a Glucose Control Solution Test
(See Control Solution Testing). It is available at 2 levels. EvenCare G2
LOW Glucose Control Solution helps you to validate the performance of
your system at a low range blood glucose reading, while HIGH solution
helps you to validate your system performance at a high range blood
glucose reading. Run the control test to make sure the test strips and
the meter are working together properly, to practice testing procedure,
and when using a new lot of EvenCare G2 Blood Glucose Test Strips.
11
EvenCareG2
mem
Setting Up Your New System
Setting Up Your New System
The Setup Screen
The Setup Screen of the EvenCare G2 Meter lets you take advantage
of the advance functions of this meter. Simply use ▲▼ buttons to
navigate to the desired function icon, and press the Enter ( ) button
to enter the function when the icon is flashing. Navigate to End at the
PM will also announce
display screen to exit the Setup Screen. The Meter
each function when the voice feature is on.
mem
mem
code
code
mem ..........Press
code
code
mem
mem
mem
ctl
mmol/dL
ctl
12
DAY
AVG
ctl
Enter ( ) to enter Memory Recall to retrieve stored results. Your meter can memorize up to
PM300 memories with
date and time. (see page 39)
..........Press Enter (
onto a PC*
) to enter PC Link Mode for data transfer
*This function is not available yet.
..........Press Enter ( ) to enter Time and Date Setup
(see page 13).
..........Press Enter ( ) to enter Alarm Setup (see page 16).
Your meter can have as many as 3 alarm settings.
mo /dL
ctl
PM
PM
Setting Up Your New System
mem
..........Press Enter (
mem
mem
EvenCareG2
mem
) to enter Volume Setup (see page 18).
mg/dL
mg /dL
mg/dL
..........Press Enter
( ) to enter Language
Selection
DAY
DAY
AVG
AVG
(see page 19).
DAY
AVG
ctl
ctl
End ..........Exit Setup Screen and return to testing.
mmol/dL
Setting
the Clock
mmol/dL
You will need:
√ DAY
Your EvenCare G2 Meter
AVG
DAY
AVG
NOTE
AM
memset, test or
If date
and time on the EvenCare G2 Meter has not been
PM
AM
PM
control
result will not be stored in memory.
mem
code
Step 1:
ctl
Press and hold Enter
(
mo /dL
mo /dL
mg /dL
PM
PM
PM
) to turn onctl
the meter.
mem
mem
Step 2:
Press Enter ( ) to go into setup screen, then
press ▲or▼ until
start to flash. If the voice
function is on, the meter will say, “Set date and time.”
Press Enter ( ) to enter clock setup.
code
mem
PM
Step 3-Set the Year
mem
mem
The current year will flash. If the voice function is
ctl
on, the meter will say,
“Set Year.” press ▲or▼to
select the correct year. Press Enter ( ) to confirm your choice and advance to set the month.
mmol/dL
DAY
AVG
PM
PM
PM
mem
13
mem
PM
EvenCareG2
Setting
mem Up Your New System
mem
PM
mo /dL
ctl
ctl
mem
mem
mo /dL
Step 4 - Set the Month:
PM
PM
The current monthmem
will flash. If the voice
mem function
mg/dL
is on, the meter will say, “Setmg/dL
Month.” press
DAY
mem DAY
AVG
▲or▼ to select the correct
month. Press AVG
Enter (
) to confirm your choice and advance to set the
date.
PM
mg /dL
PM
code
mg /dL
DAY
AVG
mem
PM
PM
PM
Step 5 - Set the Date:
mem
mem
The current date will flash. Press ▲or▼ to select
the correct day. If the voice function is on, the
mo /dL Enter
mo /dL
ctl(
meter will say, “Set Day.” Press
) to conPM
firm your choice and advance to
set time format. PM
PM
ctl
mo /dL
ctl
ctl
mem
PM
Step 6 - Set
to 12-hour or 24-hour:
The current time format
will flash. Press ▲or▼ to
mem
select for either 12-hour format
hour format.
mo /dLor 24-ctl
mo /dL
PressmgEnter
(
)
to
confirm
your
choice
and ad- PM
PM
/dL
mg /dL
ctl
mg /dL
AM
DAY
DAY
vance
toAM
set hour.
PM
PM
AVG
AVG
PM
PM
14
mg /dL
mem
PM
code
mem
DAY
AVG
PM
code
mol/dL
PM
PM
PM
mem
mem
mg/dL
code
PM
mem
mem
PM
Step 7 - Set the Hour:
mem
mem
The current hour will flash. If the voice function is
on, the meter will say, “Set Hour.” press ▲or▼ to
select the correct hour. Press Enter ( ) to confirm your choice and advance to set minutes.
PM
mg/dL
DAY
AVG
mo /dL
Timemem
Format
code
mem
mem
PM
PM
mem
mem
mem
mem
mem
mem
Setting Up Your New System
PM
EvenCareG2
Step 8 - Set Minute:
mem
mem
The current minutes will flash. If the voice function
is on, the meter will say, “Set Minutes.” Press
▲or▼ to select the correct minutes. Press Enter (
) to confirm your choice and finish setting the
PM
PM
clock.
PM
mem
NOTE:
• Anytime during set up, inserting a EvenCare G2 Test Strip will
/dL
mo /dL
begin testing. Any changes mo
made
soctl
far are stored.
DAY
PM
PM
AVG
• You may need to reset time after
changing batteries.
mem
mg/dL
After date and time has been set, the meter will announce the date
and time if the voice feature is on. Begin testing by inserting an
EvenCare G2 Blood Glucose Test Strip (see page 30, Testing Your
Blood Glucose), or press and hold Enter ( ) to turn off the meter, or
see the next section on how to set up the alarm feature on your meter.
15
PM
EvenCareG2
mem
PM
Setting Up Your New System
mem
mem
Setting the Alarms
mem
mem
You can set up to three alarms on the EvenCare G2 Meter. You must
set the clock before you can set the alarms. When an alarm sounds,
mg /dL
mg/dL
mg /dL
mg/dL
the meter
will turn on, and
a melody will sound
for 30 seconds.DAY
DAY
DAY
DAY
AVG
AVG
AVG
AVG
Pressing Enter ( ) or inserting a test strip will silence the alarm.
You can set up one or all three alarms.
You will need:
√ Your EvenCare G2 Meter
Step 1:
Press and hold Enter (
) to turn on the meter.
mem
mem
code
Step 2:
mo /dL (
ctl
Press Enter
mo /dL screen.
)ctl
to enter setup
PM
PM
mg /dL
mg /dL
PM
PM
mem
code
mem
mem
Step 3:
Press ▲or▼ until
starts to flash. If the voice function is on,
the meter will say, “Set testing Alarm.” Press Enter ( ) to enter
alarm setting.
PM
PM
ctl
mem
mem
Step 4:
mmol/dL
The display screen will indicate alarm 1 status
(the default is OFF). You can turn it on or off by
DAY
AVG
pressing ▲or▼
PM
16
PM
PM
PM
AM
PM
mem
mem
mem
ctl
Step 5:
mo /dL
PM
ctl
PM
System
mo /dLSetting Up Your New
mg /dL
PM
EvenCareG2
mg /dL
PM
PM
PM
Press Enter ( ) and
code Press
mem
mem the hour will flash.
mem
▲or▼ to select the hour. Press Enter ( ) to
mem
confirm your choice and advance to set minutes.
PM
PM
PM
PM
PM
PM
Step 6:
mem
memwill flash. Press ▲or▼ to
current minutes
select the correct minutes. Press Enter ( ) to
confirm your choice and advance to set alarm 2.
mo /dL
ctl
mo /dL
PM
PM
PM
PM
mem
mem
mem
The
mg/dL
DAY
AVG
mg/dL
DAY
AVG
PM
PM
Step 7:
mem
mem finished
Set alarm 2 and 3 following steps 4 through
6. After you have
setting up alarm 3, press Enter ( ) to exit alarm setup.
mo /dL
mo /dL
mg/dL
mg/dL
NOTE:
DAY
DAY
PM
PM
AVG
AVG
• Alarm will not sound during testing.
• Alarm will follow the time format (12-hour or 24-hour) you choose
when setting up the clock.
• Alarm settings will not be erased when changing batteries.
ctl
Begin testing by inserting a EvenCare G2 Blood Glucose Test Strip (see
page 30, Testing Your Blood Glucose), or press and hold Enter ( )
to turn off the meter, or see the next section on how to set up the voice
feature on your meter.
17
mem
DAY
AVG
DAY
AVG
DAY
AVG
EvenCareG2
Setting Up Your New System
Voice and Beeper Function
Your meter has a voice function that can be used as a verbal aid for
using the meter and hearing test results. The default setting for the
voice function is on, and can be switched off to conserve battery power.
When the voice function is off, the meter will beep to alert you
to important messages.
mem
mem
You will need:
√ Your EvenCare G2 Meter
/dL
ctl
mo /dL
mg /dL
mg /dL
PM
PM
PM
Setting Volume
PM
code
Step 1:
code
Press and hold Enter (
the meter.
) to turn on mem
mem
PM
Step 2:
Press Enter ( ) to go into setup screen. Press ▲or▼ until
PM
to flash. Press Enter ( ) to enter volume setting.
starts
ctl
mem
Step3:
The display screen will show the current sound
volume (default is 2).
PM
/dL
DAY
AVG
PM
PM
PM
mmol/dL
AM
PM
PM
Press ▲or▼ to adjust the sound volume from 1
(lowest) to 5 (highest). A melody will sound
to 0 will
according to the sound
mem
mem selected. Setting
mem volume you have
turn off the voice function. The meter will instead beep to alert you to
important messages. Once you have determined the suitable volume,
press Enter ( ) again to exit volume setting.
mo /dL
ctl
PM
PM
18
mg /dL
mg/dL
mg/dL
DAY
AVG
DAY
AVG
DAY
AVG
Setting Up Your New System
EvenCareG2
Language Selectioncode
mem
mem
Step 1:
Press and hold Enter
mem(
/dL
PM
Step 2:
mo /dL
Press Enter (
ctl
PM
) to turn on the meter.
mg /dL
mg /dL
PM
PM
) to enter setup screen.
Step 3:
code
The meter will announce
starts to flash.mem
Press ▲or▼ until
“Language Selection.”
ctl
PM
PM
/dL
PM
Step 4:
(1 on the display screen)
The default language
mmol/dL
PM
is announced. Press ( ) to change the language.
another language. Press
Press ▲or▼ to select
DAY
AVG
mem
( ) when you have finished selecting the
language and exit language selection. English and
AM
Spanish are the two PMoptions.
PM
PM
PM
PM
NOTE:
mem
mem
mem
• Any time during set up you can insert an EvenCare G2 Test Strip
and begin testing. Any changes made so far are stored.
• Your choice of language and volume settings will not be erased
batteries. mg/dL
when changing
mo /dL
mg /dL
mg/dL
ctl
PM
DAY
AVG
DAY
AVG
DAY
AVG
Begin testing by inserting an EvenCare G2 Blood Glucose Test Strip
(see page 30, Testing Your Blood Glucose) or press and hold Enter
( ) to turn off the meter.
19
EvenCareG2
Voice Function Table
Voice Function Table
The voice function can be used as an aid for you to hear the test results
and use the meter. The following table lists WHEN the meter will speak
and WHAT the meter will say.
Testing blood and control solutions (see page 25 , Control Solution Testing, and page 30, Testing your blood glucose)
WHEN the meter will speak…
WHAT the meter will say…
Turned on.
Greeting Tone will sound.
Prompt user to insert test strip.
“Please insert test strip”
Test strip is inserted and the
meter is ready to test (with flashing arrow and blood drop).
“Blood glucose test. Please apply
blood to the test strip.”
Blood Glucose test is completed
and the result is shown on screen.
“Your blood glucose reading is
(number) milligram per deciliter.”
Blood Glucose test result is
BELOW the measurement range
of 20 mg/dL.
“Your blood glucose reading is
below 20 mg/dL.”
Blood Glucose test result is
ABOVE the measurement range
of 600 mg/dL.
“Your blood glucose reading is
above 600 mg/dL.”
20
Voice Function Table
EvenCareG2
WHEN the meter will speak…
WHAT the meter will say…
Temperature is out of range (between 50˚F~104˚F).
“Temperature is out of range”
When the meter is turned off.
Melody will sound.
Test Strip is inserted and press ▲ or ▼ (CTL showing next to the test
strip icon) .
“L1 control solution
test. Please apply
control solution onto
the test strip.”
▲
▲
▼
▼
“Blood glucose test.
Please apply blood
onto the test strip.”
▲
▼
“L2 control solution
test. Please apply
control solution.”
21
EvenCareG2
Voice Function Table
Setting Meter Functions via the Setup Screen
(see page 12, setting up your new system)
Pressing Enter (
turned on)
) to enter setup screen (after the meter has been
▲
▼
Exit Function
Mode
▲
▼
Language
Selection
▼
▲
Memory
Recall
▼
▲
▼
Set Date
and Time
▲
▼
WHEN the meter will speak…
Set Testing
Alarm
▼
Set Sound
Volume
WHAT the meter will say…
During date and time setup,
setting up the year
“Set Year”
During date and time setup,
setting up the month
“Set Month”
During date and time setup,
setting up the date
“Set Date”
During date and time setup,
setting up the hour
“Set Hour”
22
▲
▲
PC Link*
* This function is not
available yet.
Voice Function Table
WHEN the meter will speak…
EvenCareG2
WHAT the meter will say…
During date and time setup,
setting up the Minutes
“Set Minutes”
After finishing setting up date
and time
“The date and time is (year)
(month) (date) (hour) (minutes)”
Setting alarm 1, 2, or 3
“Set Alarm (number)”
When sending data to PC
“Sending data to PC”
*This function is not available yet.
Finish sending data to PC
“Data transmission complete”
*This function is not available yet.
23
EvenCareG2
Voice Function Table
Other warning messages (see page 44, Solving Problems)
WHEN the meter will speak…
WHAT the meter will say…
Meter date and time
has not been set
“Please set date and time”
Meter failure
“Error 1 Meter Failure”
Used test strip
“Error 3 used test strip”
Not enough blood or
control solution
“Error 4 not enough sample”
24
Control Solution Testing
EvenCareG2
Control Solution Testing
The purpose of the control solution testing is to make sure the EvenCare G2 Meter and the EvenCare G2 Test Strip are working properly.
You should perform control solution testing when:
• Using the meter for the first time
• Using a new bottle of EvenCare G2 Blood Glucose Test Strips
• You left the test strip bottle cap open for awhile
• You dropped the meter
• You suspect your meter and test strips are not working properly
• The blood glucose test results do not reflect how you feel
• You want to practice the testing procedure
IMPORTANT:
• Use only the EvenCare G2 Glucose Control Solutions with the
EvenCare G2 Test Strips. Other brands of control solution will
produce inaccurate results.
• Always check the expiration date. DO NOT use control solutions
if they are expired.
• DO NOT FREEZE. Store the control solutions at room temperature.
You will need:
√ EvenCare G2 Control Solution (Low and High)
√ Your EvenCare G2 Meter
√ A new EvenCare G2 Blood Glucose Test Strip
Step 1:
Take out an EvenCare G2 Test Strip from the
test strip bottle and close the bottle immediately.
Insert the test strip to turn on the meter.
25
EvenCareG2
Control Solution Testing ctl
mo /dL
ctl
mo /dL
PM
PM
IMPORTANT:
• Check the expiration date printed on
memthe test strip bottle and its
package. Do not use expired test strips.
• Use each test strip immediately after removing it from the bottle.
• Do not use wet or damaged test strips.
• Keep away from direct sunlight and heat. Store the test strip bottle
in a dry, cool place.
PM
• Record the "date opened" on the bottle label. Discard the bottle
and any remaining test strip after 6 months from date of opening.
mem
• Test under the temperature range of
50˚F to 104˚F. mem
Your meter will not work outside these ranges.
• Must insert test strip properly.
• Must see a flashing blood drop icon if the test strip has
been fully inserted.
PM
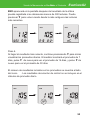
Step 2:
Wait until the flashing blood drop and arrow
icons appear on the meter display screen. The
meter will also announce, “Please apply blood mo /dL
onto the test strip” if you have the voice feature PM
turned on. Press ▲ or ▼ to enter L1(LOW) control
solution testing.
code
PM
mem
ctl
mo /dL
PM
Step 3:
ctl icon will appear next to the test strip icon and L1 will appear on the
meter display screen. The meter will also announce “L1 control solution
test, please apply control solution onto the test strip.” If you decide not
to do a control solution test, Press ▲ or ▼until ctl disappears from the
meter display.
26
Control Solution Testing
EvenCareG2
Step 4:
Squeeze a drop of control solution onto a clean, dry, nonabsorbent surface. Do not apply control solution to the test
strip directly from the bottle. Replace the bottle cap on the
control solution bottle immediately after use.
Use within 3 months after first opening
Low
Control Soluon
or before the expiration date
Suitable for Self-tesng
IVD
15
Storage Temperature
DO NOT touch the Sampling End of the test strip with the bottle of
control solution. See illustration of Sampling End below.
Step 5:
Gently touch the drop of the control solution to the tip of the
mem
test strip. The meter will beep indicating it has received the
control solution.
6: mg /dL
mg /dL
AM
DAY
PM start to count down.
TheAVG
screen will
PMAfter 6 seconds, the PM
control test result will appear on the meter’s display screen.
code
ctlStep
code
code
Step 7:
Compare the reading on the screen to the Low range
printed on the test strip bottle or its package. If the reading
mol/dL
falls outside the Low range printed on the test strip bottle
or its package, see Control Solution Trouble Shooting, onPM
page 29.
mem
mem
mem
PM
code
code
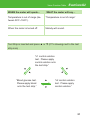
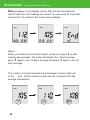
Low 53¡ª79
High 135¡ª203
Low
High
mmol/dL
mol/dL
PM
mg/dL
DAY
AVG
mg /dL
mg/dL
DAY
AVG
mem
mem
NOTE:
• Control solution testing results will be stored into the meter memory and
indicated by ctl icon.
• Control solution testing results will not be used for calculating averages.
DAY
AVG
DAY
AVG
mg /dL
27
EvenCareG2
Control Solution Testing
Step 8:
Removed the used test strip. The meter will automatically turn off.
Discard the used test strip.
IMPORTANT:
Do not reuse test strips.
Follow steps 3 through 8 to do High control solution testing and compare the result with the High range printed on the test strip bottle.
28
Control Solution Testing
EvenCareG2
Control Solution Trouble Shooting
If your control solution testing is out of range (too high or too low), it
may be caused by the following:
Possible Causes
What you can do…..
• Wrong brand of Control
Solution being used
• Make sure you are using
EvenCare G2 Control Solution.
• Control solution not at room
temperature
• Make sure the testing environment is between 50˚F to 104˚F.
• Expired or contaminated
control solution or damaged
test strip.
• Check the expiration and open
bottle date on both the control
solution and test strips. Repeat
testing using a new test strip.
If the result is still out of range,
use a new bottle of control
solution and retest.
• Meter malfunction
• If the problem persists, please
call Medline’s Technical Service
Center at 1-866-274-2131
Monday through Friday between
8:00 a.m. and 5:00 p.m.(Central
Time). Contact your Healthcare
Provider at all other times.
29
EvenCareG2
Testing Your Blood Glucose
Testing Your Blood Glucose
You will need:
√ Your EvenCare G2 Meter
√ A new EvenCare G2 Blood Glucose Test Strip
√ Lancing device with a clean, unused lancet (or safety lancets)
√ Clear cap for Alternate Site Testing (AST) on palm and forearm
Before you begin, make sure:
• To set up your meter properly and run a control test. See Setting Up
Your New System on page 12, and Control Solution Testing on page
25 for details.
• Wash your hands and the testing site thoroughly with soap and warm
water, and dry well.
• You are testing in an area between the temperature ranges of
50˚F~104˚F. Your meter will not test outside of this range and will
display thermometer icon with verbal indication if the voice feature is
turned on. Move the meter into an area that is between 50˚F~104˚F,
and let it sit for 10 to 15 minutes before testing again.
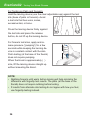
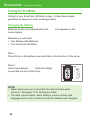
Step 1:
Unscrew the adjustable cap of the lancing
device and insert the lancet by pushing down
firmly until it is fully seated.
Step 2:
Twist the protective cover off the lancet. Twist
the adjustable cover clockwise back onto the
lancing device.
30
3 4 5
Preparing Your Lancing Device (for Home Testing)
Testing Your Blood Glucose
EvenCareG2
3 4 5
Step 3:
Adjust the puncture setting on the adjustable
cap for the puncture depth level (1 is the
lightest and 5 is the deepest).
3 4 5
NOTE:
• For fingertip testing, use the opaque adjustable cap.
• For alternate site testing on palm and forearm, use the clear
adjustable cap.
3 4 5
Step 4:
With one hand holding the adjustable cap, pull
back the lancing device with your other hand
until you hear a click sound. The lancing device is now ready for blood sampling.
3 4 5
IMPORTANT:
Use a new sterile lancet every time you test to avoid cross contamination. If alcohol wipes are used to cleanse the fingers, make sure the
area is dry before the blood sample is obtained.
3 4 5
¡ı
3 4 5
¡ı
31
EvenCareG2
Testing Your Blood Glucose
Important Information on Alternate Site Testing (AST)
The EvenCare G2 Blood Glucose
Monitoring System can test for blood
glucose from areas other then your
fingertip such as palm and forearm
(alternate site testing, or AST).
Alternate site testing can be less
painful then fingertip testing, but
because of the physiological differences between your fingertip and
palm and forearm1; alternate site test
results maybe significantly different
then results from fingertip testing under certain conditions.
You should consult with your doctor or healthcare professional before
using alternate site testing.
DO AST ONLY in the following intervals:
• In a pre-meal or fasting state (more than 2 hours since the last meal)
• 2 hours or more after taking insulin.
• 2 hours or more after exercise.
Alternate Site Testing SHOULD NOT be used when:
• You are Hypoglycemic unaware (not able to tell if you have
low blood sugar)
• Within 2 hours of a meal, exercise, or medication
• You will be operating machinery or driving a car.
• During times of stress.
• You are sick
• You think your blood glucose is low.
• Your AST results do not match the way you feel.
• You are testing for hyperglycemia.
• Your routine glucose results are often fluctuating.
32
Testing Your Blood Glucose
EvenCareG2
NOTE:
• Rubbing forearm until warm before lancing will help minimize the
difference with fingertip test results. The palm (at the base of the
thumb) does not require rubbing before testing.
• If results from alternate site testing do not agree with how you feel,
use fingertip testing instead.
1. Jungheim K., Koschinsky T.: “Risky delay of hypoglycemia detection by glucose monitoring
at the arm.” Diabetes Care 2001:24(7):1303-04.
33
EvenCareG2
Testing Your Blood Glucose
Performing a Blood Glucose Test
Step 1:
Take out an EvenCare G2 Test Strip from the
test strip bottle and close the bottle immediately.
Insert the test strip to turn on the meter.
ctl
mo /dL
ctl
PM
IMPORTANT:
• Check the expiration date printed on the test strip bottle
and its
mem
package. Do not use expired test strips.
• Use each test strip immediately after removing it from the bottle.
• Do not use wet or damaged test strips.
• Keep away from direct sunlight and heat. Store the test strip bottle
in a dry, cool place.
PM
• Record the "date opened" on the bottle label. Discard the bottle and
any remaining test strip after 6 months from date of opening.
• Must see a flashing blood drop icon if the test strip has been
mem
inserted properly.
Step 2:
Wait for a flashing blood drop and an arrow icon to
appearon the meter display screen. The meter will
also announce, “Please apply blood onto the test
strip” if you have the voice feature turned on.
PM
mo /dL
Step 3:
Obtain blood sample.
34
mem
PM
ctl
3 4 5
Testing Your Blood Glucose
EvenCareG2
5
3
4
¡ı
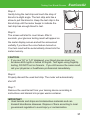
For Fingertip Testing:
Hold the lancing device (use the opaque adjustable cap or safety
lancet) against the side of your fingertip and press the release button
to create a puncture.
TIP:
• Gently massage your hand and finger toward the puncture site
to form a drop of blood. Do not “milk,” or squeeze around the
puncture site.
• Lance the side of your fingertip to avoid soreness. To avoid calluses,
choose a different lancing site each time.
35
Testing Your Blood Glucose
3 4 5
EvenCareG2
For Testing on Palm and Forearm:
Hold the lancing device (use the clear adjustable cap) against the test
site (base of palm or forearm). Avoid
a test site that has veins, moles,
excessive hair, or bone.
3 4 5
¡ı
Press the lancing device firmly against
the test site and press the release
button, do not lift up the lancing device.
For forearm test sites, apply and release pressure (“pumping”) for a few
seconds while keeping the lancing device in constant contact with the skin.
Palm testing (at the base of the thumb)
does not require pumping.
When the blood is approximately ( )
size, lift the lancing device straight up
without smearing the blood.
NOTE:
• Rubbing forearm until warm before lancing will help minimize the
difference with fingertip test results. The palm (at the base of the
thumb) does not require rubbing before testing.
• If results from alternate site testing do not agree with how you feel,
use fingertip testing instead.
36
Testing Your Blood Glucose
EvenCareG2
Step 4:
Gently bring the test strip and touch the drop of
blood at a slight angle. The test strip acts like a
straw to pull the blood in. Keep the test strip in the
blood drop until the meter beeps to indicate the
test strip has enough blood to test.
Step 5:
The screen will start to count down. After 6
mem
seconds, your glucose testing result will appear on
the meter display screen and will be announced
verbally if you have the voice feature turned on.
/dL
result
will be automatically
stored into the
ctlYour test mg
mg /dL
AM
DAY
PM
PM
AVG memory.
PM
meter
code
Use within 3 months after first opening
PM
Low
Control Soluon
or before the expiration date
Suitable for Self-tesng
IVD
code
CAUTION:
code
code
15
Storage Temperature
code
• If you see “HI” or “LO” displayed, your blood glucose level may
be above 600 mg/dL or below 20 mg/dL. Test again using fingertip
testing, DO NOT test on forearm. If you still receive the same result,
call your physician or healthcare professional immediately.
mol/dL
mmol/dL
mol/dL
PM
PM
Step 6:
Properly discard the used test strip. The meter will automatically
mem
mem
mem
mem
shut off.
Step 7:
Remove the
used lancet frommg/dL
your lancing device
according to
mg /dL
mg/dL
DAY
DAYinto proper waste DAY
DAY
instructions
and
discard
container.
AVG
AVG
AVG
AVG
mem
mg /dL
IMPORTANT:
• Used lancets and strips are biohazardous materials and can
transmit bloodborne diseases. Dispose of them according to local
government regulation to avoid injury or contamination.
37
EvenCareG2
Understanding Your Blood Glucose Test Results
Understanding Your Blood Glucose Test Results
Blood glucose values will vary depending on food intake, medication,
health, stress, and exercise. The ideal range for adults with and without
diabetes should be1:
• 70 to 100 mg/dL before meals, and
• 70 to 140 mg/dL after meals
It is important to consult with your physician or healthcare professional
to determine an appropriate target range for you.
What to do if you get a high or low reading
If the Meter displays results that are HI or LO, or you get a result that is
more than 250 mg/dL or below 50 mg/dL AND you feel ill:
• Treat your diabetes according to the instruction from your doctor
and/or consult your healthcare provider.
If the Meter displays results that are “HI” or “LO,” or you get a result that
is more than 250 mg/dL or below 50 mg/dL AND you DO NOT feel ill:
• Test your meter with a control solution, refer to page 25,
Control Solution Testing.
• Test again using fingertip.
If you still get a high or low reading, contact your health care professional.
NOTE:
• Inaccurate results may occur in severely hypotensive individuals
or patients in shock.
• Inaccurate low results may occur for individuals experiencing a
hyperglycemic-hyperosmolar state, with or without ketosis.
• Critically ill patients should not be tested with blood glucose meters.
Reference:
1. American Diabetes Association. Standards of Medical Care in Diabetes—2008. Diabetes Care. 2008;31:S12–S54.
38
PM
Viewing Your Meter’s Memory
EvenCareG2mem
mem
Viewing Your Meter’s Memory
Your EvenCare G2 Meter automatically stores up to 300 test and control
results with date and time. The meter also provides 7, 14, and 30 DAY
day mg/dL
AVG
averaging to help track your blood glucose trend. You must set up the date
and time on your meter properly to use the memory and day averaging
function, see Setting Up Your New System on page 12. The meter will not
memorize test or control results if the date and time are not set.
Viewing Stored Readings and 7, 14, 30 Days Average from
Memory
You will need:
√ Your EvenCare G2 Meter
Step 1:
Press and hold Enter (
Step 2:
Press Enter (
) to turn on the meter.
) to enter setup screen.
ctl
mo /dL
ctl
PM
mem
Step 3:
Press ▲or▼ until MEM starts to flash. If the voice function is on, the
PM
meter will say “memory recall.” Press Enter ( ) to enter.
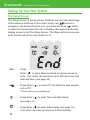
MEM will appear at the upper left corner of the
display screen together with your most recent
testing result. Press ▲ to see the next result,
and the next, and so on. Holding ▲ will flash
through the results.
mem
mem
PM
39
DAY
AM
AVG
PM
DAY
AVG
DAY
AVG
DAY
AVG
DAY
AVG
AM
PM
EvenCareG2
code
PM
DAY
AVG
PM
DAY
AVG
Viewing Your Meter’s Memory
code
PM
code
code
END will appear on the display screen after the last recorded test
result if less then 300 readings are stored. You can press ▼ to go back
viewing from the oldest to the most recent readings.
mol/dL
mmol/dL
mol/dL
PM
PM
PM
mem mem
ctl
mem
mem
mg /dL
mo /dL
ctl mg /dL
mg/dL
mo /dL
PM
DAY
PM
AVG
PM
DAY
PM
AVG
mg /dL
mg/dL
mem
mem
mem
mg /dL
mg /dL
DAY
PM
AVG
mg /dL
DAY
PM
AVG
code
mem
mem
mem mem mem
mem
mem
code
mem
mem
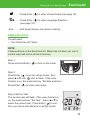
Step 4.
When you reach the most recent result, continue to press ▼ to start
viewing day averages. The meter
will display the 7 day’s average,
mg /dL mg /dL
ctl mg /dL ctl mg /dLctl mg /dL ctl mg /dL ctl mg /dL
mg /dL
mg /dL
AM
AM
AM
AM
AM
AM
DAY
DAY
DAY
DAY
DAY
PM
PM see 30
PM again
press
▼
to
see
14
day’s
average,
and
pressPM ▼PMagain to
PM
PM
PM
PM
PM
PM
PM
PM
AVG
AVG
AVG
AVG
AVG
PM
PM
day’s average.
code
mem
mem
code
mem
code
mem
code
code
code code
mem
PM
code
PM
code code
mem
The number of results included in the averages is shown right next
to the
icon. Control solution results are not included in the day
mo /dL
mo /dL
mg
/dLmmol/dL
ctl
ctl
mg /dL mol/dL
mol/dL
mol/dL
mol/dL
average
calculations.
PM
PM
PM
PM
PM
mem
40
PM
mem
mem mem
mem
mo /dL
mg/dL
PM
PM
PM
mem mem
mem
DAY
AVG
PM
PM
ctl
DAY
DAY
AVG
AVG
PM
mo
/dL
mg/dL
mg/dL
mg/dL
DAY
AVG
DAY
PM
AVG
mem
PM
code
mem mem
mem
mg /dL
mg/dL mg/dL
DAY
DAY
AVG
AVG
PM
DAY
DAY
AVG
AVG
mg/dL mg /dL
DAY
AVG
PM
PM
PM
PM
mem mem
mem
mg/dL
DAY
AVG
PM
PM
DAY
DAY
AVG
AVG
mg/dL
mg
/dL
DAY
AVG
PM
mem
PM
PM
PM
mem mem
mg /dL mg /dL
DAY
AVG
mmol/dL
mol/dL
DAY
DAY
AVG
AVG
mg /dL
DAY
AVG
Viewing Your Meter’s Memory
EvenCareG2
NOTE:
• Control testing results are flagged by ctl on the bottom left corner of
the display screen in addition to MEM.
• When the meter memory is blank, the display screen will show nil.
• When there are no day average data available, the display screen
will show 4 dashes.
• If the meter memory is full, adding a new test result will cause the
oldest one to be deleted.
• Memorized test results and day averages will not be erased
when changing batteries.
• You can begin testing anytime by inserting a test strip.
41
EvenCareG2
Caring for the Meter
Caring for the Meter
Caring for your EvenCare G2 Meter is easy. Follow these simple
guidelines to keep your meter working properly.
Changing the Battery
Batteries need to be changed when the
meter display.
icon appears on the
Materials you will need:
√ Two Alkaline AAA Batteries
√ Your EvenCare G2 Meter
Step 1.
Press firmly on the battery cover and slide in the direction of the arrow.
Step 2.
Insert new batteries
. Slide the battery
cover back into the meter firmly.
NOTE:
• Meter will prompt you to reconfirm the date and time when
turned on. See page 13 for Setting the Clock.
• The date, stored results, alarm settings, volume setting, and
language choice stay in memory when the batteries are changed.
42
Table of Contents
EvenCareG2
43
EvenCareG2
44
Table of Contents
EvenCareG2
Table of Contents
Caring for the Meter
Cleaning the Meter
• If the meter gets dirty, use a moist (NOT WET) lint-free cloth
dampened with a mild detergent.
• Do not get water inside the meter or hold it under running water.
• Do not use glass or household cleaners on the meter.
• Do not try to clean the test strip holder.
Storage and Precautions
• Handle the Meter with care- severe shock, such as dropping the
meter, could damage the electronics.
• The meter and test strips are designed to be used within the
temperature ranges between 50˚F to 104˚F.
• Avoid leaving the meter in extremely hot or cold place, such as near
a heat source or in an extremely hot or cold car.
• Do not store or use the meter or test strips in high humidity levels,
such as bathroom or kitchen.
• Always close bottle cap immediately after removing a test strip and
make sure it’s closed tightly.
• Do not take the meter apart as doing so will void the warranty. If
there are technical problems or questions, please call Medline’s
Technical Service Center at 1-866-274-2131 Monday through Friday
between 8:00 a.m. and 5:00 p.m.(Central Time). Contact your
Healthcare Provider at all other times.
45
Y
G
Y
G
Y
G
PM
PM
code
Table of Contents
EvenCareG2
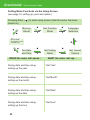
Solving Problems
mmol/dL
mol/dL
PM
mol/dL
mg /dL
mmol/dL
This section
details the significant
display screen messages and error
codes you will encounter when using your EvenCare G2 meter and
code
EvenCare
G2 test
mem
memstrips.
mg /dL
mg /dL
What
PM
PM
code
mg /dL
PM
PM
mem
What the
You See
“Error
1
code
Meter
Failure”
mmol/dL
mol/dL
mol/dL
mmol/dL
PM
PM
mg /dL
PM
What it
meter
says
The
meter
code
electronic or
test strip is
damaged
PM
mem
mem
PM
PM
mg /dL
mg/dL
PM
mol/dL
mg /dL
AM
PM
code
DAY
AVG
mg /dL
PM
code
PM
mem
mem
Used or
mol/dL
damagedmmol/dL
test strip
PM
mem
PM
mg/dL
mem
mg/dL
mem
mo /dL
mg /dL
PM
PM
PM
PM
code
mem
mg /dL
DAY
AVG
mg /dL
mg /dL
DAY
AVG
DAY
AVG
mg/dL
mg /dL
What Should
• RemoveMeansYou
the battery Do
and
turn on the meter again.
• Remove the test strip and
insert a new test strip
code
again. mg /dL
• If the problem persists,
please call 1-866-274-2131
mem
Monday through Friday,mg /dL
8:00 a.m.- 5:00 p.m.(CST).
Contact your Healthcare
code
Provider at all other times.
PM
PM
PM
DAY
AVG
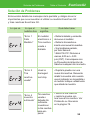
“Error 3
used testmol/dL
strip”
Y
G
Y
G
Solving Problems
“Error 4
not
enough
sample”
mem
• Repeat the test with a new
mol/dLRemember to
mg /dL
mmol/dL
test strip.
add sample only when
you see the prompt on the
mem
display screenmem
or the
meter verbally prompts
you to add sample.
PM
PM
DAY
AVG
mg /dL
PM
PM
mem
Not enough
sample on
the test strip
to start
mem
PM
• Remove the Test Strip
and repeat the test with
a new test strip. See
Testing Your Blood Glucose on page 30.
46
EvenCareG2
Table of Contents
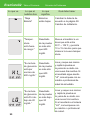
Solving Problems
mg /dL
PM
“Low
Battery”
What
Batteries
are low
What itWhat Should You See
MeansYou Do
Change the battery accordingWhat
to page
the 42,
Changing
the
Battery.
meter says
PM
PM
PM
Temperature
out of range.
Move the meter into an
area that is between
50˚F~104˚F, and allow
10 to 15 minutes for it to
reach the new temperature.
“Your blood
glucose
reading is
above 600
mg/dL.”
Test result is
higher than
600 mg/dL
Wash and dry your hands
and repeat the test on
your fingertip with a new
test strip. If the result is
still “HI,” contact your
physician or healthcare
professional immediately.
“Your blood
glucose
reading is
below 20
mg/dL.”
Test result is
lower than
20 mg/dL
Wash and dry your hands
and repeat the test on
your fingertip with a new
test strip. If the result is
still “LO,” contact your
physician or healthcare
professional immediately.
“Temperature is out
of range”
PM
mem
mg/dL
mg /dL
AY
G
DAY
AVG
PM
PM
mg /dL
PM
mg /dL
Y
G
mg /dL
PM
mol/dL
mmol/dL
mg /dL
PM
PM
mem
mol/dL
mmol/dL
mg /dL
PM
PM
mem
47
PM
PM
code
Solving Problems
mmol/dL
mol/dL
mol/dL
mmol/dL
PM
PM
mg /dL
AY
G
PM
What
What Should
You See
AY
G
EvenCareG2
mg /dL
Not
mem
Applicable
mem
Table of Contents
There are no
memorized
results in the
meter
What the
meter says
• Check if the date and
time on your meter is
set up. See Setting Up
Your New System on
page What
12. it
• Start testing your
bloodMeansYou
glucose, see
Do
Testing Your Blood
Glucose on page 30.
mg /dL
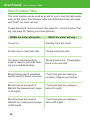
PM
PM
PM
PM
PM
mem
mg/dL
mg /dL
DAY
AVG
48
EvenCareG2
Table of Contents
Product Warranty
Product Warranty
The EvenCare G2 Blood Glucose Meter is warranted to be free of
defects in workmanship and materials for a period of five (5) years
from the date of purchase. Medline’s liability for warranty claims is
limited to repair or replacement, and in no event shall Medline be
liable for indirect or consequential damages, or for any loss arising
from misuse, improper use, abuse, neglect, unauthorized repair or
modification.
This warranty is void and of no force and effect in the event of product
misuse, improper use, abuse, neglect, unauthorized repair or modification. This warranty specifically excludes EvenCare G2 Test Strips and
EvenCare G2 Control Solution.
THIS WARRANTY IS THE SOLE AND EXCLUSIVE WARRANTY TO
THE EXCLUSION OF ALL OTHER WARRANTIES, EXPRESS OR
IMPLIED, ALL OF WHICH ARE WAIVED AND DISCLAIMED.
All warranty claims must be directed to Medline’s Technical Service
Center at 1-866-274-2131. This warranty is extended only to the original
purchaser of the meter.
49
Specifications
Table of Contents
EvenCareG2
Specifications
Test Strips:
EvenCare G2 Blood Glucose Test Strips
Test Range:
20 - 600 mg/dL
Calibration:
Plasma
Test Time:
6 Seconds
Sample Size:
Larger than 1uL
Hematocrit Range:
30-55%
Display Type:
Large LCD screen
Memory:
300 blood test results with date and time
Result Averaging:
7, 14, and 30 days averaging
Dimension:
93L x 58W x 20.5H (mm)
Weight:
79g
Battery:
2 Alkaline AAA Battery
Battery Life:
1000 tests of continuous use or 1 year
Automatic Power-off:
After 2 minutes of nonuse
Operating Temperature:
50˚F to 104˚F.
Relative Humidity:
Less than 85%
Storage Condition:
Meter at 39˚F ~ 122˚F
50
Estimado Propietario EvenCare G2
EvenCareG2
Test
at 39˚F ~ G2,
86˚F
Estimado Propietario
deStrips
EvenCare
Gracias por elegir el Sistema de Monitoreo de Glucemia EvenCare G2
para ayudarle en el control de su diabetes. Hemos diseñado el
For
additional
information,
refer to the
EvenCare
Test
Strip
insert.
Sistema
de Monitoreo
de Glucemia
EvenCare
G2G2
para
ser
exacto
y
fácil de usar. La conveniencia de la función de voz se puede utilizar
como una ayuda verbal para el uso del medidor y escuchar los resultados del examen para usuarios con deficiencia visual. Este manual contiene toda la información necesaria para usar y dar mantenimiento a su
nuevo medidor de glucemia. Por favor, lea con cuidado antes de usar.
Si necesita ayuda, llame al Centro de Servicio Técnico de Medline
al 1-866-274-2131 de lunes a viernes entre las 8:00 am
y las 5:00 pm (Hora del Centro). Comuníquese con su proveedor de
atención médica todas los otras veces.
51
49
Estimado Propietario EvenCare
Table
G2 of Contents
EvenCareG2
Uso Previsto
El Sistema de Monitoreo de Glucemia EvenCare G2 está diseñado
para la medición cuantitativa de glucemia en muestras de sangre entera capilar fresca tomadas de yema de los dedos, el antebrazo o la
palma. Las pruebas se hacen fuera del cuerpo (uso diagnóstico in
vitro). El medidor incluye funcionalidad de vozpara ayudar a los usuarios con discapacidad visual. Está destinado para uso lego por personas
con diabetes y en un entorno clínico de profesionales de salud, como
una ayuda para controlar los niveles en la Diabetes Mellitus. No está
diseñado para el diagnóstico o detección de la diabetes o para
uso neonatal.
IMPORTANTE:
• Prueba de Sitio Alterno (AST) con el Sistema de Monitoreo de
Glucemia EvenCare G2 sólo puede utilizarse durante condiciones de
glucemia en fase estable
• Deshidratación - La deshidratación severa puede llevar a resultados
inexactos de pruebas de glucemia. Si sospecha que está gravemente
deshidratado, contacte con su profesional de la salud inmediatamente.
• Rango de Hematocrito - Un rango de hematocrito que es superior al
55% o inferior al 30% puede causar resultados inexactos de prueba
de glucemia.
52
EvenCareG2
Table of Contents
Índice
EvenCareG2
Índice
Entendiendo Su Nuevo Sistema de Glucemia
El Medidor EvenCareG2 6
Pantalla de Medidor 8
Tira reactiva EvenCareG2 10
Solución de Control de Glucosa EvenCareG2 (recomendado)
54
56
58
59
Configuración de su Nuevo Sistema
La Pantalla de Configuración
Ajuste del Reloj
Ajuste de Alarmas
Función Voz y Beeper
Selección de Idioma
60
61
64
66
67
Tabla de Funciones de Voz
68
Prueba de Solución de Control
Realización de una prueba con solución de control
Solución de problemas de Solución de Control
73
77
Testing Your Blood Glucose
Cómo preparar su Dispositivo de Punción
Información importante sobre Pruebas en Sitios Alternos (AST)
Realización de una prueba de glucemia
78
80
82
Entendiendo los Resultados de su Prueba de Glucemia
86
Viendo la Memoria de su Medidor
87
Cuidado del Medidor
Cambio de la Batería
Limpieza del Medidor
53
90
91
53
Índice
Table of Contents
EvenCareG2
Almacenamiento y Precauciones
91
Solución de Problemas
92
Garantía del Producto
95
Especificaciones
96
54
EvenCareG2
Table
Entendiendo
of Contents
Su Nuevo Sistema de Glucemia
Entendiendo Su Nuevo Sistema de Glucemia
El Sistema de Monitoreo de Glucemia EvenCare G2 contiene
los siguientes elementos:
• Medidor EvenCareG2
• Guía del Usuario
• Funda de transporte
• Libro de registro
55
Entendiento los Resultados deTable
su Prueba
of Contents
de Glucemia
EvenCareG2
El Medidor EvenCareG2
Puerto de tira reactiva
Inserte la tira reactiva (ver página
82) para encender el medidor.
Pantalla del Medidor
Muestra los resultados de su
prueba de glucemia,
valores de memoria, promedios,
y otros mensajes.
Intro (
) y Botones st
Mantenga pulsada la tecla Intro
( ) por 2 segundos para activar
o desactivar el Medidor, or Pulse
Intro ( ) para entrar en en el
modo de configuración cuando no
se prueba(Ver página 60)
Presion ▲o▼ tpara entrar en el
modo de control con tira reactiva
insertada (Ver página 74), durante
configuración del medidor (ver
página 60), o para navegar por los
valores de prueba y promedios
almacenados (ver página 87)
56
Entendiento
Tablelos
of Contents
Resultados de su Prueba de Glucemia
EvenCareG2
Compartimiento de Batería
Contiene dos baterías AAA
Puerto de Datos
Esta función no está actualmente
disponible.
57
Entendiento los Resultados deTable
su Prueba
of Contents
de Glucemia
EvenCareG2
Pantalla de Medidor
BATERÍA
Aparece cuando las baterías
necesitan ser cambiadas
(ver página 90).
FIN
Aparecerá en la pantalla
después del último resultado
de prueba grabado si hay
menos de 300 lecturas
almacenadas.
MEM
Indica que el número en la
pantalla del medidor es un
valor de prueba almacenado
(ver página 87).
ALARMA
Indica que la alarma se ha fijado (ver página 64)
CTL
Este icono indica una prueba
de solución de control
(ver página 73) o que el valor
almacenado es un resultado
de solución de control
(ver página 87).
CABLE
Indica que el medidor está en modo
de transferencia de datos a PC *
* Esta función no está disponible todavía.
mem
mg /dL
ctl
DAY
AVG
AM
PM
Muestra la fecha, hora, am/pm
(En formato 24 horas, vea la
página 12), o el tipo de
promedios día (7, 14, o 30,vea
la página 39)
mem
58
Entendiento
Tablelos
of Contents
Resultados de su Prueba de Glucemia
EvenCareG2
ZUMBADOR
Configuración del volumen de sonido (ver página 66).
TEMPERATURA
Aparece cuando está demasiado caliente o demasiado frío para
prueba (fuera de los rangos de 50˚F ~ 104˚F).
RELOJ
Indica que el medidor está listo para configurar la hora y fecha
(ver página 61).
VOZ
Indica que la función de voz está activada (ver página 66).
UNIDADES
Unidad de medida de glucemia es mg/dL.
GOTA DE SANGRE y FLECHA
Indica que el medidor está listo para la prueba (ver página 34).
59
Entendiento los Resultados deTable
su Prueba
of Contents
de Glucemia
EvenCareG2
La tira reactiva de Glucemia EvenCareG2
Puntos de Contacto
Inserte este extremo al
puerto de tira reactiva en
el medidor.
Extremo de Muestreo
Aplique sangre o
solución de control aquí.
Las tiras reactivas EvenCare G2 son tiras de prueba específicas de glucosa, basadas en biosensor que requieren muy pequeña muestra de sangre para probar rápidamente la glucosa en sangre entera capilar fresca.
Los resultados del ensayo son calibrados por plasma para facilitar la comparación con los resultados de laboratorio, sin embargo los resultados
pueden ser de 10% a 15% superiores a los resultados obtenidos a partir
de ensayos de glucemia referenciada de sangre entera. La tira reactiva
está también equipada con detección de subllenado para que le avise
cuando no hay suficiente sangre para realizar una prueba, por lo que
puede estar seguro de que cada lectura que se obtiene es un resultado
preciso y significativo.
IMPORTANTE:
• Cierre inmediatamente con fuerza el tapón del vial de la botella de
tiras reactivas después de cada uso. Mantenga las tiras reactivas no
utilizadas en su envase original.
• NO deje tiras de prueba fuera de la botella, mientras no esté en uso.
• NO reutilizar las tiras reactivas.Las tiras reactivas son para un solo uso.
• Elimine con cuidado las tiras reactivas y lancetas usadas en
contenedores de residuos apropiados.
60
Entendiento
Tablelos
of Contents
Resultados de su Prueba de Glucemia
EvenCareG2
Solución de Control de Glucosa EvenCare G2 (recomendado)
Low
Control Soluon
Suitable for Self-tesng
Use within 3 months after first opening
or before the expiration date
15
Storage Temperature
IVD
www.medline.com
©2010 Medline Industries, Inc.
Manufactured for Medline Industries, Inc.,
Mundelein, IL 60060 USA Made in Taiwan
1-800-MEDLINE RK10APB
Patent# 7655128
Llame a su proveedor o farmacia local para pedir la solución de control.
Si no la tienen, por favor contacte con nosotros al 1-866-274-2131
entre las 8:00 am y 5:00 pm (hora del centro), de lunes a viernes.
La Solución de Control de Glucosa EvenCare G2 es la solución de concentración de glucosa estándar requerida para realizar una Prueba de
Solución de Control de Glucosa (Véase Ensayo de Solución de Control). Está disponible en dos niveles. EvenCare G2 Solución de Control
de Glucosa BAJA le ayuda a validar el rendimiento de su sistema en un
rango de lectura de glucemia baja, mientras que la solución ALTA
le ayuda a validar el rendimiento del sistema en una lectura de glucosa
en sangre de rango alto. Ejecute la prueba de control para asegurarse
de que las tiras reactivas y el medidor están trabajando juntos de manera adecuada, para practicar los procedimientos de prueba, y cuando
utilice un nuevo lote de Tiras de Prueba de Glucemia EvenCare G2.
61
mem
Configuración de su Nuevo Sistema
Table of Contents
EvenCareG2
Configuración de su Nuevo Sistema
La Pantalla de Configuración
La Pantalla de Configuración del medidor EvenCare G2 le permite
aprovechar funciones avanzadas de este medidor. Sólo tiene que
utilizar los botones ▲o▼ para navegar hasta el icono de la función
deseada y pulsar el botón Intro ( ) para entrar PM
en la función cuando el
icono parpadea. Navegue hasta el Final en la pantalla para salir de la
Pantalla de Configuración. El Medidor también anunciará cada función
cuando la función de voz está activada.
mem
mem
..........Pulse Intro ( ) para entrar Recuperar Memoria para
recuperar los resultados almacenados.
PM Su medidor puede
memorizar hasta 300 memorias con fecha y hora. (Ver
página 87)
..........Pulse Intro ( ) para entrar en el modo PC Link para la
transferencia de datos en un PC *
*Esta función no está disponible todavía.
..........Pulse Intro ( ) para entrar en Configuración de hora y
fecha (ver página 78)
..........Pulse Intro ( ) para entrar en Configuración de Alarma
(ver página 61). Su medidor puede tener hasta tres ajustes
de alarma.
mo /dL
PM
ctl
62
mem
PM
EvenCareG2
PM
Table of Contents
Configuración de su Nuevo Sistema
mem
mem
mem
mem
..........Pulse Intro ( ) para ingresar a la configuración de
volumen (ver página 66).
mg/dL
mg/dL
DAY
AVG
mg /dL
DAY
AVG
DAY
AVG
..........Pulse Intro ( ) para entrar a selección de idioma
(ver página 67)
ctl
ctl
Fin ............Salir de la pantalla de configuración y volver a prueba
mmol/dL
Ajuste del Reloj
mmol/dL
Necesitará: √ Su Medidor EvenCare G2
DAY
AVG
DAY
NOTA
AVG
Si la fecha y la hora en el medidor EvenCare G2 no se ha establecido,
AM
mem
el PM
resultado de prueba o control no se almacenará en la memoria.
AM
PM
mem
code
Paso 1:
mo /dL (
Mantenga pulsada
ctlla tecla Intro
PM
cender el medidor.
) para
ctl
en- mo /dL
mg /dL
PM
PM
code
Pasomem
2:
mem
Pulse Intro ( ) para entrar en la pantalla de
Configuración, a continuación, Presione ▲o▼
until
hasta que empiece a parpadear. Si la
función de vozestá activada, el medidor dirá: "Ajuste la fecha y la hora."
Pulse Intro ) para entrar en PM
la configuración del reloj.
mem
Paso 3:-Configurar el Año
mem
memde voz
El año actual parpadeará.
Si la función
está activada, el medidor dirá: "Ajuste Año."
presione
ctl ▲o▼ para seleccionar el año correcto.
Pulse Intro ( ) para confirmar su elección y
avance a ajustar el mes.
mmol/dL
63
DAY
AVG
PM
PM
PM
mem
mem
PM
Configuración
de su Nuevo
Table of Contentsmem EvenCareG2mem
mem
memSistema
PM
mo /dL
mo /dL
ctl
ctl
mg /dL
Paso 4 - Configurar el mes: PM
PM
El mes actual parpadeará.
Si la función
mem
memde voz
mg/dL"Ajuste mes". premg/dL
está activada, el medidor dirá:
DAY
mem DAY
AVG
AVG
sione ▲o▼ para seleccionar
el mes correcto.
Pulse Intro ( ) para confirmar su elección y
avance a ajustar la fecha.
PM
PM
code
mg /dL
DAY
AVG
mem
PM
PM
PM
Paso 5 - Ajuste de la fecha:
mem
mem
La fecha actual parpadeará. Presione ▲o▼ para
seleccionar el día correcto. Si la función de voz
mo /dL"Ajuste
mo /dL
ctldía". Pulse
está activada, el medidor dirá:
PM
Intro ( ) para confirmar su selección
y avance PM
para configuración de formato PMde hora.
PM
ctl
mo /dL
PM
mem
ctl
mem
mem
mg/dL
DAY
AVG
PM
Paso 6 de Hora a 12 horas o
24 horas: El actual
formato de hora aparecerá en
mem
pantalla. Pulse ▲o▼ para Seleccionar
mo /dL
ctl ya sea mo /dL
formato
de
12
horas
o
de
24
horas.
Pulse
Intro PM
PM
mg /dL
mg /dL
ctl
mg /dL
AM confirmar suDAY
AM y avanzar
DAY
(AVG
) para
elección
PM
PM
AVG
PM
para configurar la hora.
PM
Paso 7 - Ajuste demem
hora:
mem
La hora actual parpadeará. Si la función de voz
está activada, el indicador va a decir, "Ajustar
Hora." presione ▲o▼ to select the correct hour.
para seleccionar la hora correcta. Pulse Intro ( )
PM
PM
para confirmar su elección y avanzar
a ajustar losPM
mem
mem
minutos.
mem
PM
mo /dL
memFormato
Establecer
code
mem
ctl
mem
mg /dL
mem
PM
code
mem
mem
mg/dL
DAY
AVG
PM
code
code
mol/dL
PM
PM
mem
mem
mem
64
mem
EvenCareG2
Table of Contents
Configuración de su Nuevo Sistema
PM
Paso 8 - Ajuste demem
minuto:
mem
Los minutos actuales parpadearán. Si la función
de voz está activada, el medidor va a decir, "Ajustar Minutos." presione ▲o▼ para seleccionar los
minutos correctos. Pulse Intro ( ) para
PM
confirmar su elección y terminar
de ajustar el reloj.PM
PM
mem
NOTA:
• En cualquier momento durante la configuración insertar una tira
mo /dLla prueba.
mo /dL cambio realizado
ctl
mg/dL
reactiva EvenCare G2 iniciará
Cualquier
DAY
PM
PM
AVG
hasta el momento se almacena.
• Es posible que deba reiniciar la hora después de cambiar las baterías.
Después de configurar fecha y hora, el medidor anunciará la fecha y
hora si la característica de voz está activada.
Comenzar la prueba mediante la inserción de una
Tira reactiva de glucemia EvenCare G2 (vea página 78, Probando su
glucemia), o mantenga pulsada la tecla Intro ( ) para apagar el
medidor, o vea la siguiente sección sobre cómo configurar la función de
alarma en su medidor.
65
mem
PM
Configuración de su Nuevo Sistema
Table of Contents
mem
mem
mem
Configurando las Alarmas
PM
EvenCareG2
mem
mem
Puede configurar hasta tres alarmas en el medidor EvenCare G2.
Debe ajustar el reloj antes de poder ajustar las alarmas. Cuando suena
mg /dL
mg/dL
mg /dL
mg/dL
unaDAY
alarma, el medidorDAY
se enciende, y unaDAYmelodía sonará durante
30
DAY
AVG
AVG
AVG
AVG
segundos. Pulsar Intro ( ) o insertar una tira reactiva silenciará la
alarma.
Necesitará:
√ Su Medidor EvenCare G2
Paso 1:
Mantenga pulsada la tecla Intro (
cender el medidor.
Paso 2:
mo /dL
Pulse Intro (
ctl
PM
ctl
) para enmem
mem
mo /dL
mg /dL
mg /dL
PM
PM
PM
) para acceder a la pantalla de configuración.
code
mem
3:
Presione ▲o▼ hasta que
comience a parpadear. Si la función de
voz está activada, el medidor va a decir, "Configurar Alarma de
prueba". Pulse Intro ( ) para ingresar el ajuste de la alarma.
mem
Paso
PM
PM
Paso 4:
mem
pantalla indicará
el estado de alarma 1
(El valor predeterminado es OFF). Puede activarla
o desactivarla presionando ▲o▼
mem
La
PM
PM
PM
PM
mem
mem
66
mem
EvenCareG2
mo /dL
ctl
PM
Table
of Contents
Configuración
de su Nuevo mg
SistemaT
mo /dL
ctl
/dL
PM
PM
Paso 5:
Pulse Intro ( ) y mem
la hora parpadeará.code
Presione
mem
mem
▲ o▼ para seleccionar la hora. Pulse Intro ( )
para confirmar su elección y avanzar a ajustar
los minutos
PM
mg /dL
PM
PM
PM
mem
PM
PM
PM
PM
PM
Paso 6:
Los minutos actuales parpadearán. Presione
mem
mem
mem
▲ o ▼ para seleccionar
los minutos correctos.
Pulse Intro ( ) para confirma su elección y
avanza al ajuste de la alarma 2.
mo /dL
ctl
mo /dL
PM
PM
PM
PM
mem
mem
mg/dL
DAY
AVG
mg/dL
DAY
AVG
PM
PM
Paso 7:
Configurar la alarma 2 y 3 siguiendo los pasos 4 a
mem
mem 3, pulse
6. Después de haber terminado la configuración
de la alarma
Intro ( ) para salir de la configuración de alarma.
mo /dL
mo /dL
ctl
mg/dL
mg/dL
NOTA:
DAY
DAY
PM
PM
AVG
AVG
• La alarma no sonará durante la prueba.
• La alarma seguirá el formato de hora (12 horas o 24 horas) que
usted elija al configurar el reloj.
• Los ajustes de alarma no se borran al cambiar las baterías.
Comenzar la prueba mediante la inserción de una tira reactiva de
glucemia EvenCare G2 (ver página 78, Probando su Glucemia), o
mantenga pulsada la tecla Intro ( ) para apagar el medidor, o cosulte
la siguiente sección sobre cómo configurar la función de voz de su
medidor.
67
mem
DAY
AVG
DAY
AVG
DAY
AVG
Configuración de su Nuevo Sistema
Table of Contents
EvenCareG2
Función de Beeper y Voz
Su medidor tiene una función de voz que se puede utilizar como una
ayuda verbal para usar el medidor y escuchar los resultados de la
prueba. La configuración predeterminada para la función de voz es activada, y puede ser apagada para ahorrar batería. Cuando la función de
un pitido para avisarle de
el medidor emitirá mem
voz está apagada,mem
mensajes importantes.
/dL
PM
Necesitará:
mo /dL EvenCare G2mg /dL
√ Su Medidor
PM
PM
/dL
PM
PM
PM
Ajuste de volumen
code
Paso 1:
Mantenga pulsada la tecla Intro (
encender el medidor.
PM
mg /dL
ctl
mem
) para
Paso 2:
Pulse Intro ( ) para entrar en la pantalla de con-PM
hasta que
figuración. Presione ▲o▼until
comience a parpadear. Pulse Intro ( ) para
mem
acceder a la configuración de volumen.
Paso 3:
La pantalla mostrará el volumen de sonido actual
PM
(por defectoPMes 2).
PM
PM
Presione ▲o▼ para
mem
memdel sonido del 1 (menor)
memajustar el volumen
al 5 (mayor). Una melodía sonará de acuerdo con el volumen del
sonido que ha seleccionado. Ajustar a 0 desactivará la función de voz.
El medidor dará un pitido para de alertarle de mensajes importantes.
mo /dL haya determinado
mg/dL
ctlUna vez que
mg/dL el volumen adecuado,
pulse Intro ( mg /dL)
DAY
DAY
DAY
PM
AVG
ajuste de volumen.AVG
salir delAVG
de nuevo para
68
EvenCareG2
Table of Contents
Configuración de su Nuevo Sistema
Selección de Idioma
code
mem
Paso 1:
Mantenga pulsada la tecla Intro (
cender el medidor.
mem
o /dL
PM
ctl
mo /dL
mem
) para enmg /dL
mg /dL
Paso 2:
PM
PM
PM
Pulse Intro ( ) para acceder a la pantalla de configuración.
code
mem
Paso 3:
hasta que comience a parpadear. El medidor anunPresione ▲o▼
ciará "Selección de Idioma".
ctl
PM
Paso 4:
PM
(1 en la pantalla) es anunciado.
El idioma por defecto
mmol/dL
Pulse Intro ( ) para cambiar el idioma. Presione
mem
otro idioma. Presione Intro
▲o▼ para seleccionar
DAY
AVG
( ) cuando haya terminado de seleccionar el
idioma y salido de la selección de idioma. Inglés y
AM
PM
opciones.
español son las dos
o /dL
PM
PM
PM
PM
PM
NOTA:
insertar una
puede mem
durante la configuración
• En cualquier momento
mem
mem
tira reactiva EvenCare G2 y comenzar la prueba. Cualquier cambio
realizado hasta el momento se almacena.
• Su elección de configuración de idioma y volumen no se borrará
mo /dL las baterías.
mg /dL
mg/dL
ctl al cambiar
mg/dL
PM
PM
DAY
AVG
DAY
AVG
DAY
AVG
Comenzar la prueba mediante la inserción de una tira reactiva de
glucemia EvenCare G2 (Vea página 78, Probando su glucemia) o
mantenga pulsada la tecla Intro ( ) para apagar el medidor.
69
Tabla de Función de Voz
Table of Contents
EvenCareG2
Tabla de Función de voz
La función de voz se puede utilizar como una ayuda para que usted pueda
escuchar los resultados de las pruebas y usar del medidor. En la tabla
siguiente se lista CUANDO el medidor hablará y QUÉ dirá el medidor.
Pruebas de sangre y soluciones de control (vea página 73, Prueba de de
Solución de Control, y página 78, Probando su glucemia)
CUANDO el medidor hablará …
LO QUE el medidor dirá…
Encendido
Sonará el Tono de Saludo.
Pide al usuario que inserte la tira
reactiva.
"Por favor, introduzca la tira reactiva"
La tira reactiva se inserta y la
medidor está listo para probar
(con flecha parpadeante
y gota de sangre).
El examen de glucemia se
completa y el resultado se
muestra en la pantalla.
El resultado de la prueba
de glucemia está por
DEBAJO del rango de medición
de 20 mg/dL.
Resultado de la prueba de
glucemia está por ENCIMA del
rango de medición de
600 mg/dL.
"Prueba de glucemia. Por favor
aplique sangre a la tira reactiva. "
"Su lectura de glucemia es
(Número) miligramos por decilitro."
"Su lectura de glucemia es
por debajo de 20 mg/dL. "
"Su lectura de glucemia es
por encima de 600 mg/dL. "
70
EvenCareG2
Table of Contents
Tabla de Función de Voz
CUANDO el medidor hablará…
LO QUE el medidor dirá...
La temperatura está fuera de
rango (entre 50 ˚F ~ 104 ˚F).
"La temperatura está fuera de
rango"
Cuando el medidor está
apagado.
Sonará una melodía.
La tira reactiva se inserta y pulse ▲ o ▼ (CTL se muestra junto al icono
de tira reactiva).
"Prueba de solución
de control de L1. Por
favor aplique solución
de control en la
tira reactiva. "
▲
▲
▼
▼
"Prueba de
glucemia. Por favor
aplique sangre e
la tira reactiva."
71
▲
▼
"Solución de control
L2. Por favor aplique
solución de control. "
Tabla de Función de Voz
Table of Contents
EvenCareG2
Ajuste de las Funciones del Medidor a través de la Pantalla de
Configuración (Consulte la página 60, configuración de su nuevo sistema)
Pulsar Intro ( ) para entrar en la pantalla de configuración (después
de que el medidor ha sido encendido)
▲
Función Salir
Modo
▼
▲
▼
Idioma
Selección
▼
▲
Memoria
Recuperar
▼
▲
▼
Configurar
fecha y Hora
▲
▼
Configurar
Pruebas Alarma
CUANDO el medidor hablará ...
Durante la configuración de
fecha y hora, configuración
del año
▲
▼
▲
PC Link*
* This function is not
available yet.
Configurar Sonido
Volumen
LO QUE el medidor dirá...
"Configurar Año"
Durante la configuración de
fecha y hora, configuración del
mes
"Configurar Mes"
Durante la configuración de
fecha y hora, configuración de la
fecha
"Configurar Fecha"
Durante la configuración de
fecha y hora, configuración de
la hora
"Configurar Hora"
72
EvenCareG2
Table of Contents
CUANDO el medidor hablará...
Tabla de Función de Voz
QUÉ dirá el medidor ...
Durante la configuración de
fecha y hora,
configuración de minutos
"Configurar Minutos"
Después de terminar la
Configurar de fecha y hora
"La fecha y la hora es (año) (mes)
(fecha) (hora) (minutos) "
Ajuste de alarma 1, 2, ó 3
"Configurar Alarma (número)"
Al enviar los datos al PC
"Enviando datos a PC"
* Esta función no está disponible todavía.
Finalizar el envío de datos a PC
* Esta función no está disponible todavía.
73
"Transmisión de datos completa"
Tabla de Función de Voz
Table of Contents
EvenCareG2
Otros mensajes de advertencia (consulte la página 92, Resolución
de Problemas)
CUANDO el medidor hablará ...
LO QUE el medidor dirá...
La fecha y hora del medidor no
se han establecido
"Por favor, configure fecha y hora"
Fallo de Medidor
"Error 1 Fallo de Medidor"
Tira reactiva usada
"Error 3 Tiras reactiva usada"
No hay suficiente sangre o
solución de control
"Error 4 muestra insuficiente"
74
EvenCareG2
Table of ContentsPrueba de Solución de Control
Prueba de Solución de Control
El propósito de la prueba de solución de control es asegurarse que el
medidor Evencare G2 y la tira reactiva EvenCare G2 están funcionando
adecuadamente. Debe realizar pruebas de solución de control cuando:
• Utilice el medidor por primera vez
• Use una nueva botella de tiras reactivas de glucemia EvenCare G2
• Dejó la tapa de la botella de tiras reactivas abierta por un tiempo
• Se le ha caído el medidor
• Sospecha que su medidor y las tiras reactivas no están funcionando
adecuadamente
• Los resultados de la prueba de glucemia no reflejan cómo se siente
• Desea practicar el procedimiento de prueba
IMPORTANTE:
• Utilice sólo soluciones de control de glucosa EvenCare G2 de con las
tiras reactivas EvenCare G2. Otras marcas de solución de control
producirán resultados inexactos.
• Siempre revise la fecha de vencimiento. NO use soluciones de control
si han caducado.
• NO CONGELAR. Almacene las soluciones de control a temperatura
ambiente.
Necesitará:
√ Solución de Control EvenCare G2 (baja y alta)
√ Su Medidor EvenCare G2
√ Una nueva Tira Reactiva de Glucemia EvenCare G2
Paso 1:
Saque una Tira Reactiva EvenCare G2 del
frasco de tiras reactivas y cierre el frasco
inmediatamente. Inserte la tira reactiva para
encender el medidor.
75
Prueba de Solución de Control
Table ofmoContents
/dL
mo /dL
ctl
ctl EvenCareG2
PM
PM
IMPORTANTE:
• Verifique la fecha de caducidad impresa en el frasco de tiras reactivas
y su paquete. No utilice las tiras reactivas
caducadas.
mem
• Use cada tira reactiva inmediatamente después de sacarla de la botella.
• No utilice tiras reactivas mojadas o dañadas.
• Manténgase alejado de la luz solar directa y el calor. Almacene e
frasco de tiras reactivas en un lugar seco y fresco.
• Registre la "fecha de apertura" en la etiqueta del PMfrasco. Deseche la
botella y cualquier tira reactiva restante después de 6 meses desde la
fecha de apertura.
• Prueba bajo el rango de temperaturamem
de 50˚F a 104˚C. mem
Su medidor no funcionará fuera de estos rangos.
• Debe insertar la tira reactiva correctamente.
• Debe ver un icono de gota de sangre intermitente si la tira reactiva ha
sido insertada completamente.
PM
Paso 2:
Espere hasta que los iconos de gota de sangre y
flecha parpadeantes aparezcan en la pantalla del
medidor. El medidor también anunciará "Por favor
aplique sangre en la tira reactiva "si usted tiene mo
la/dL
característica de voz activada. Presione ▲ o ▼ PM
para introducir prueba de solución de control L1
(BAJA).
code
PM
mem
ctl
mo /dL
PM
Paso 3:
El icono ctl aparecerá junto al icono de la tira reactiva y L1 aparecerá
en la pantalla del medidor. El medidor también anunciará "prueba de
solución de control L1, por favor aplique la solución de control en la tira
reactiva." Si usted decide no hacer una prueba con solución de control,
pulse ▲ o ▼ hasta que ctl desaparezca de la pantalla del medidor.
76
EvenCareG2
Table of ContentsPrueba de Solución de Control
Paso 4:
Exprima una gota de solución de control en una superficie
limpia, seco, absorbente. No aplique solución de control a
la tira reactiva directamente de la botella. Vuelva a colocar
la tapa de la botella en la botella de solución de control inmediatamente después de su uso.
Use within 3 months after first opening
Low
Control Soluon
or before the expiration date
Suitable for Self-tesng
IVD
15
Storage Temperature
NO toque el Extremo de Muestreo de la tira reactiva con la botella de
solución de control. Vea la ilustración del Extremo de Muestreo a continuación.
Extremo de Muestreo
Paso 5:
Toque suavemente la gota de la solución de control con la
yema de la tira reactiva. El medidor emitirá un pitido que inmem
dica que ha recibido lasolución de control.
code
Paso 6:
La pantallamgempezará
la cuenta atrás. Después de 6 se/dL
ctl
mg /dL
AM
DAY
gundos,
el resultado
de la prueba de
control aparecerá en
PM
PM
AVG
PM
la pantalla del medidor.
code
code
Paso 7:
Compare la lectura en la pantalla a la gama baja
impresa en el frasco de tiras reactivas o de su paquete.
Si la lectura cae fuera del rango Bajo impreso en la
mol/dL
botella de tiras reactivas o su paquete, consulte Solución
PM
de Problemas de Control, en Página 77
mem
NOTA:
mem
mem
PM
code
code
Low 53¡ª79
High 135¡ª203
Low
High
mmol/dL
mol/dL
PM
mem
mem
• Los resultados de la prueba de solución de control se almacenarán en la
memoria del medidor y se indican por el símbolo ctl.
• Los resultados de la pruebas de solución de dontrol no serán utilizados para el
mg /dL
mg /dL
mg/dL
cálculo mg/dL
de promedios.
DAY
AVG
77
DAY
AVG
DAY
AVG
DAY
AVG
Prueba de Solución de ControlTable of Contents
EvenCareG2
Paso 8:
Retirada la tira reactiva usada. El medidor se apagará automáticamente.Deseche la tira reactiva usada.
IMPORTANTE:
No vuelva a usar las tiras reactivas.
Siga los pasos del 3 al 8 para hacer las pruebas de control de solución
Alta y comparar el resultado con el rango Alto impreso en el envase de
tiras reactivas.
78
EvenCareG2
Table of ContentsPrueba de Solución de Control
Solución de Problemas de Solución de Control
Si su prueba de solución de control está fuera de rango (demasiado
alta o demasiado baja), puede ser causado por lo siguiente:
Causas posibles
Qué puede hacer ...
• Solución de Control usada
de marca errónea
• Asegúrese de que está
utilizando Solución de Control
EvenCare G2.
• Solución de control no está a
temperatura ambiente
• Asegúrese de que el entorno de
prueba esté entre 50 ˚F a 104 ˚F.
• Solución de control caducada
contaminada o dañada tira
reactiva.
• Compruebe la fecha de caducidad y apertura de la botella la
solución de control y en las tiras
reactivas. Repetir prueba utilizando una nueva tira reactiva.
Si el resultado sigue estando
fuera de rango, use una nueva
botella de solución de control y
vuelva a probar.
• Mal funcionamiento del Medidor
• Si el problema persiste, por favor
llame al Centro de Servicio Técnico Medline al 1-866-274-2131
De lunes a viernes entre las 8:00
am y 5:00 pm (Hora Centro). Comuníquese con su Proveedor de
Antención de Salud en cualquier
otro momento.
79
Probando su Glucemia
Table of Contents
EvenCareG2
Probando su Glucemia
Necesitará:
√ Su Medidor EvenCare G2
√ Una nueva Tira Reactiva de Glucemia EvenCare G2
√ Dispositivo de punción con una lanceta limpia, sin uso (o lancetas de seguridad)
√ Tapa transparente para Prueba de Sitio Alterno (AST) en palma y antebrazo
Antes de empezar, asegúrese de:
• Configurar su medidor correctamente y realizar una prueba de control. Ver Configuración de su nuevo sistema en la página 60, y
Prueba de Solución de Control en la página 73 para más detalles.
• Lávese las manos y el sitio de prueba a fondo con jabón y agua tibia,
y seque bien.
• Está haciendo la prueba en un área comprendida entre los rangos
de temperatura de 50˚F~104˚F. Su medidor no hará pruebas fuera
de este rango y el icono de termómetro de la pantalla con indicación
verbal si la función de voz está activada. Mueva el medidor a un
área que esté entre 50˚F ~ 104˚F, y deje que repose durante 10 a 15
minutos antes probar de nuevo.
Paso 1:
Desenrosque la tapa ajustable del dispositivo
dwe punción e inserte la lanceta empujando
hacia abajo firmemente hasta que esté completamente asentada.
3 4 5
Cómo preparar su Dispositivo de
Punción (para Prueba Casera)
Paso 2:
Gire la cubierta protectora de la lanceta. Gire
la tapa ajustable hacia la derecha de vuelta
sobre el dispositivo de punción.
80
EvenCareG2
Table of Contents
Probando su Glucemia
3 4 5
NOTE:
• Para la prueba de yema de los dedos, use la tapa ajustable opaca.
• Para pruebas en sitios alternos en palma y antebrazo, use la
tapa ajustable transparente
3 4 5
Paso 3:
Ajuste la configuración de punción en la tapa
ajustable para el nivel de profundidad de punción
(1 es el más ligero y 5 es el más profundo).
3 4 5
Paso 4:
Con una mano sosteniendo la tapa ajustable, tire del dispositivo de
punción con la otra mano
hasta que escuche un sonido de clic. El dispositivo de punción ya está listo para tomar muestras de sangre.
3 4 5
IMPORTANTE:
Utilice una lanceta nueva estéril cada vez que haga la prueba para
evitar la contaminación cruzada. Si se utilizan toallitas con alcohol para
limpiar los dedos, asegúrese de que el área esté seca antes de obtener
la muestra de sangre.
3 4 5
¡ı
81
3 4 5
¡ı
Probando su Glucemia
Table of Contents
EvenCareG2
Información Importante sobre Pruebas en Sitios Alternos (AST)
El Sistema de Monitoreo de glucemia
EvenCare G2 puede hacer pruebas
de glucosa desde áreas distintas a la
yema de los dedos como la palma y
el antebrazo (Pruebas en sitios alternos, o AST). La Prueba de sitio alterno puede ser menos dolorosa que
la prueba en la yema del dedo, pero
debido a las diferencias fisiológicas
entre la yema del dedo y palma y antebrazo1; los resultados de prueba
de sitio alterno pueden ser significativamente diferentes
a los resultados de las pruebas de la yema del dedo en determinadas
condiciones. Usted debe consultar con su médico o profesional de la
salud antes de usar pruebas en sitios alternos.
HACER AST ÚNICAMENTE en los intervalos siguientes:
• Antes de una comida o en ayunas (más de 2 horas desde la última comida)
• 2 horas o más después de tomar insulina.
• 2 horas o más después del ejercicio.
Alternate Site Testing SHOULD NOT be used when:
• Usted no está consciente de hipoglucemia (no puede decir si tiene
baja azúcar en la sangre)
• Dentro de las 2 horas de una comida, ejercicio o medicamentos
• Usted va a operar maquinaria o conducir un coche.
• Durante los momentos de estrés.
• Usted está enfermo
• Usted cree que su glucemia es baja.
• Sus resultados de AST no son iguales a como se siente.
• Usted está haciendo prueba para hiperglicemia.
• Sus resultados de glucosa de rutina a menudo son fluctuantes.
82
EvenCareG2
Table of Contents
Probando su Glucemia
NOTA:
• Frotar el antebrazo hasta que se caliente antes de punción ayudará a
minimizar la diferencia con los resultados del examen de yema del
dedos. La palma (en la base del pulgar) no requiere ser frotada
antes de la prueba.
• Si los resultados de las pruebas en sitios alternos no están de
acuerdo con cómo se siente, use prueba de yema de dedos.
1. Jungheim K., Koschinsky T.: “Risky delay of hypoglycemia detection by glucose monitoring
at the arm.” Diabetes Care 2001:24(7):1303-04.
83
Probando su Glucemia
Table of Contents
EvenCareG2
Realización de una prueba de glucemia
Paso 1:
Saque una Tira Reactiva EvenCare G2 del
frasco de tiras reactivas y cierre el frasco
inmediatamente. Inserte la tira reactiva para
encender el medidor.
ctl
mo /dL
ctl
PM
IMPORTANTE:
• Verifique la fecha de caducidad impresa en el frasco de
tiras
mem
reactivas y su paquete. No utilice las tiras reactivas caducadas.
• Use cada tira reactiva inmediatamente después de sacarla de la botella.
• No utilice tiras reactivas mojadas o dañadas.
• Manténgase alejado de la luz solar directa y el calor. Almacene e
frasco de tiras reactivas en un lugar seco y fresco.
PM
• Registre la "fecha de apertura" en la etiqueta del frasco. Deseche e
frasco y cualquier tira reactiva restante después de 6 meses desde
la fecha de apertura.
mem
• Debe ver un icono de gota de sangre intermitente si la tira reactiva
ha sido insertada correctamente.
Paso 2:
Espere a que una gota de sangre intermitente y un icono de flecha
aparezcan en la pantalla del medidor. El medidor
también anunciará: "Por favor aplique sangre en la
tira reactiva" si tiene la función de voz activada.
Paso 3:
Obtener muestra de sangre.
mem
PM
mo /dL
PM
84
ctl
3 4 5
EvenCareG2
Table of Contents
Probando su Glucemia
5
3
4
¡ı
Para la prueba de yema del dedo:
Mantenga el dispositivo de punción (use la tapa opaca ajustable o
lanceta de seguridad) contra el lado de la yema del dedo y presione el
botón de liberación para crear una punción.
CONSEJO:
• Frote suavemente su mano y el dedo hacia el lugar de la punción
para formar una gota de sangre. No "ordeñe", ni apriete alrededor
del sitio de punción.
• Pinche el lado de la yema del dedo para evitar hinchazón. Para
evitar los callos, elija un sitio de punción diferente cada vez.
85
Table of Contents
EvenCareG2
3 4 5
Probando su Glucemia
Para las pruebas de Palma y Antebrazo:
Mantenga el dispositivo de punción (use la tapa ajustable clara) contra
el sitio de prueba (base de palma o
antebrazo). Evitar un sitio de prueba
que tenga venas, lunares, pelo
excesivo, o hueso.
3 4 5
¡ı
Presione el dispositivo de punción
firmemente contra el sitio de prueba y
presione el botón de liberación, no
levante el dispositivo de punción.
Para sitios de prueba en el antebrazo,
aplique y libere presión ("bombeo") por
unos pocos segundos, mientras
mantiene el dispositivo de punción
en constante contacto con la piel.
La prueba de Palma (en la base del
pulgar) no requiere de bombeo. Cuando
la sangre es de tamaño aproximadamente ( ), levante el dispositivo de
punción hacia arriba sin que se corra la sangre.
NOTA:
• Frotar el antebrazo hasta que se caliente antes de punción ayudará
a minimizar la diferencia con los resultados del examen de yema del
dedos. La palma (en la base del pulgar) no requiere ser frotada
antes de la prueba.
• Si los resultados de las pruebas en sitios alternos no están de
acuerdo con cómo se siente, use prueba de yema de dedos.
86
EvenCareG2
Table of Contents
Probando su Glucemia
Paso 4:
Pase suavemente la tira reactiva y toque la gota de
sangre en un ligero ángulo. La tira reactiva actúa
como una paja para extraer la sangre. Mantenga la
tira reactiva en la gota de sangre hasta que el
medidor emita un pitido para indicar que la la tira
reactiva tiene suficiente sangre para la prueba.
Paso 5:
pantalla empezará la cuenta atrás. Después 6
segundos, el resultado de su prueba de glucosa
aparecerá en la pantalla del medidor y se anunciará verbalmente si usted tiene la función de voz
mg /dL
ctl
mg /dL
activada.
ElAMresultado de la prueba se almacena
DAY
PM
PM
AVG
PM
automáticamente en la memoria del medidor.
code
mem
La
Use within 3 months after first opening
PM
Low
Control Soluon
or before the expiration date
Suitable for Self-tesng
IVD
code
code
mem
mem
la tira reactiva
usada. El medidor
se apagará mem
automáticamente.
mem
code
code
15
Storage Temperature
PRECAUCIÓN:
• Si aparece "HI" o "LO", su nivel de glucemia puede
estar por encima de 600 mg/dL o por debajo de 20 mg/dL. Pruebe
de nuevo con la prueba de yema del dedo, NO pruebe en el antebrazo. Si sigue recibiendo el mismo resultado,
llame a su médico
o
mol/dL
mmol/dL
mol/dL
profesional de salud inmediatamente.
PM
PM
Paso 6:
mem
Deseche
Paso 7:
mg /dL
mg/dL
mg /dL
mg/dLde punción de acuerdo
Retire la lanceta
del dispositivo
con
DAY
DAY
DAY
DAY
AVG
AVG
AVG
AVG
las instrucciones
y deseche
en un contenedor
de residuos adecuado.
IMPORTANTE:
• Lancetas y tiras usadas son materiales biopeligrosos y pueden
transmitir enfermedades de transmisión sanguínea. Deséchelos
según las normativas locales
87
Entendiendo los Resultados de
Table
su Prueba
of Contents
de Glucemia
EvenCareG2
Entendiendo los Resultados de su Prueba de Glucemia
los valores de glucemia pueden variar dependiendo de la ingesta de alimentos, medicamentos, salud, estrés y ejercicio. El rango ideal para
adultos con y sin diabetes debe ser de 1:
• 70 a 100 mg/dL antes de las comidas, y
• 70 a 140 mg/dL después de las comidas
Es importante consultar con su médico o profesional de la salud
para determinar un intervalo de referencia apropiado para usted.
Qué hacer si obtiene una lectura alta o baja
If the Meter displays results that are HI or LO, or you get a result that is
more than 250 mg/dL or below 50 mg/dL AND you feel ill:
• Treat your diabetes according to the instruction from your doctor
and/or consult your healthcare provider.
• Trate su diabetes de acuerdo a las instrucciones de su médico y/o consulte con su proveedor de atención médica. Si el Medidor
muestra resultados que son "HI" o "LO", o bien obteine un resultado que
es superior a 250 mg/dL o inferior a 50 mg/dL y NO se siente enfermo:
• Pruebe su medidor con una solución de control, consulte la página
73, Prueba de Solución de Control.
• Pruebe de nuevo con la yema del dedo. Si aún así obtener una lectura alta o baja, contacte con su profesional de la salud.
NOTA:
• Resultados inexactos también pueden producirse en individuos
severamente hipotensos o pacientes en estado de shock.
• Los resultados inexactos bajos puede producirse para individuos que
experimentan un estado hiperglucémico-hiperosmolar, con o sin cetosis.
• Los pacientes críticamente enfermos no deben ser probados con
medidores de glucemia.
Referencia:
1. American Diabetes Association. Standards of Medical Care in Diabetes—2008. Diabetes Care. 2008;31:S12–S54.
88
EvenCareG2
PM
Table of Contents
Viendo la Memoria de su Medidor
mem
mem
Viendo la Memoria de su Medidor
Su medidor EvenCare G2 almacena automáticamente hasta 300
mg/dL
resultados de pruebas y control con fecha y hora. El medidor también
DAY
AVG
dispone de promedios de 7, 14 y 30 días para ayudar a un seguimiento de
su tendencia de glucemia. Debe configurar la fecha y la hora en el medidor
correctamente para utilizar la memoria y la función de promedio de día, vea
Configuración de su Nuevo Sistema en la página 60. El medidor no
memorizar resultados de prueba o el control si la fecha y hora no están
ajustadas.
Visualización de Lecturas Guardadas y Promedio de 7, 14, 30
días de la Memoria
Necesitará:
√ Su Medidor EvenCare G2
Paso 1:
Mantenga pulsada la tecla Intro (
encender el medidor.
) para
Paso 2:
Pulse Intro ( ) para acceder a la pantalla de
configuración.
ctl
mo /dL
ctl
PM
mem
Paso 3:
Presione ▲ o ▼ hasta que MEM comience a parpadear. Si la función
de voz está activada, el medidor dirá "recuperación de la memoria." PM
Pulse Intro ( ) para entrar.
MEM aparecerá en la esquina superior izquierda
de la pantalla junto con su más reciente
resultado de prueba. Presione ▲ para ver el resultado siguiente, y el siguiente, y así sucesivamente.
Sostener ▲ destellará los resultados.
89
mem
mem
PM
DAY
AM
AVG
PM
DAY
AVG
DAY
AVG
DAY
AVG
DAY
AVG
AM
PM
PM
DAY
AVG
PM
DAY
AVG
PM
Viendo la Memoria de su Medidor
code Table of Contents
code
code
EvenCareG2
code
END aparecerá en la pantalla después del resultado de la última
prueba registrada si se almacenan menos de 300 lecturas. Puede
presionar ▼ para volver viendo desde la más antigua
a las lecturas
mol/dL
mmol/dL
mol/dL
más recientes.
PM
PM
PM
mem mem
ctl
mem
mem
mg /dL
mo /dL
ctl mg /dL
mg/dL
mo /dL
PM
DAY
PM
AVG
PM
DAY
PM
AVG
mg /dL
mg/dL
mem
mem
mem
mg /dL
mg /dL
DAY
PM
AVG
mg /dL
DAY
PM
AVG
code
mem
mem
mem mem mem
mem
mem
code
mem
mem
Paso 4.
Al llegar al resultado más reciente, continúe presionando ▼ para iniciar
visualizar los promedios diarios.
El medidor mostrará el promedio de 7
mg /dL mg /dL
ctl mg /dL ctl mg /dLctl mg /dL ctl mg /dL ctl mg /dL
mg /dL
mg /dL
AM
AM
AM
AM
AM
AM
DAY
DAY
DAY
DAY
PMnuevoDAY
PM
PM
días,
pulse
▼
de
para
ver
elPM promedio
de PM14 días,
y pulse
▼PM dePM
PM
PM
PM
PM
PM
PM
PM
PM
AVG
AVG
AVG
AVG
AVG
PM
nuevo para ver el promedio de 30 días.
mem
mem
code
code
mem
code
mem
code
code
code code
mem
code
PM
code code
El número de resultados incluidos en los promedios se muestra al lado
mem
del icono
. Los resultados de solución de control no se incluyen en el
cálculos de promedio diario.
mo /dL
ctl
PM
PM
PM
PM
PM
mem
PM
mem
mem mem
mem
mo /dL
mg/dL
PM
mg /dL mol/dL
PM
PM
mem mem
mem
DAY
AVG
mo /dL
ctl
PM
PM
ctl
DAY
DAY
AVG
AVG
PM
mo
/dL
mg/dL
mg/dL
mg/dL
DAY
AVG
DAY
PM
AVG
PM
code
mem mem
mem
mg /dL
mg/dL mg/dL
DAY
DAY
AVG
AVG
PM
DAY
DAY
AVG
AVG
mg/dL mg /dL
DAY
AVG
mol/dL
mg
/dLmmol/dL
mol/dL
mol/dL
PM
PM
PM
PM
mem mem
mem
mg/dL
DAY
AVG
PM
PM
DAY
DAY
AVG
AVG
mg/dL
mg
/dL
DAY
AVG
PM
mem
PM
mem
90
PM
PM
mem mem
mg /dL mg /dL
DAY
AVG
mmol/dL
mol/dL
DAY
DAY
AVG
AVG
mg /dL
DAY
AVG
EvenCareG2
Table of Contents
Viendo la Memoria de su Medidor
NOTA:
• Los resultados de las pruebas de control se marcan por ctl en la
esquina inferior izquierda de la pantalla, además de MEM.
• Cuando la memoria del medidor está en blanco, la pantalla mostrará nil.
• Cuando no se dispone de datos de promedio diario, la pantalla
mostrará cuatro guiones.
• Si la memoria del medidor está llena, la adición de un nuevo resultado
de prueba hará que el más antiguo sea borrado.
• Resultados de pruebas memorizadas y promedios diarios no se bor
rarán al cambiar las baterías.
• Puede empezar a probar en cualquier momento mediante la inserción
de una tira reactiva.
91
Viendo la Memoria de su Medidor
Table of Contents
EvenCareG2
Cuidado del Medidor
El cuidado de su medidor EvenCare G2 es fácil. Siga estas simples
directrices para mantener su medidor funcionando correctamente.
Cambio de Batería
Las baterías deben ser cambiadas cuando el icono
pantalla del medidor.
aparece en la
Materiales que necesitará:
√ Dos baterías alcalinas AAA
√ Su Medidor EvenCare G2
Paso 1.
AverigPresione firmemente sobre la tapa de la batería y deslícela en la
dirección de la flecha.
Paso 2.
Inserte baterías nuevas
. Deslice la batería
Reponga la cubierta en el medidor con firmeza.
NOTA:
• El medidor le pedirá reconfirmar la fecha y la hora de activación. Vea
página 61 para Configuración del Reloj.
• La fecha, resultados almacenados, ajustes de alarma, ajuste de volumen, y elección del idioma permanecen en la memoria cuando se
cambian las baterías.
92
EvenCareG2
Table of Contents
Limpieza del Medior
Limpieza del Medidor
• Si el medidor se ensucia, utilice un paño húmedo (NO MOJADO) sin
pelusa humedecido con un detergente suave.
• No introducir agua en el medidor ni ponerlo bajo el chorro de agua.
• No utilice limpiadores de cristales o caseros en el medidor.
• No trate de limpiar el soporte de tiras reactivas.
Almacenamiento y Precauciones
• Maneje el medidor muicho cuidado contra impactos, pues, dejar caer
el medidor podría dañar los componentes electrónicos.
• El medidor y las tiras reactivas están diseñados para ser utilizados
en el rango de temperatura de 50˚F a 104˚C.
• Evite dejar el medidor en lugares extremadamente cálidos o fríos,
como cerca de una fuente de calor o en un coche extremadamente
caliente o frío.
• No guarde o utilice el medidor o las tiras reactivas en niveles d
humedad alta, como el baño o la cocina.
• Siempre tape el frasco inmediatamente después de retirar una tira
reactiva y asegúrese de que está bien cerrado.
• No despiece el medidor ya que al hacerlo, se anulará la garantía. Si
hay problemas técnicos o preguntas, por favor llame al Centro de
Servicio Técnico Medline al 1-866-274-2131 de lunes a viernes
entre las 8:00 am y 5:00 pm (Hora del Centro). Póngase en contacto
con su Proveedor de atención médica en cualquier otro momento.
93
Y
G
Y
G
Y
G
PM
PM
code
Table of Contents
EvenCareG2
Solución de Problemas
mmol/dL
mol/dL
PM
mol/dL
mg /dL
mmol/dL
Esta sección
detalla los mensajes
de la pantalla y códigos de error
importantes que se encuentran al utilizar su medidor EvenCare G2
y tiras
reactivas EvenCare
G2 .code
mem
mem
Lo que ve
mg /dL
mg /dL
Lo que el
medidor dice
PM
PM
mem
mol/dL
mmol/dL
mol/dL
PM
PM
mg /dL
AM
PM
mg /dL
PM
Qué debe hacer
mg /dL
PM
El medidor
code
electrónico o
Tira reactiva
usada o
mol/dL
dañada mmol/dL
PM
mem
mem
PM
PM
mg /dL
mg/dL
Lo que
significa
PM
“Error 1
code
Fallo
Medidor”
code
mg /dL
PM
PM
code
DAY
AVG
mg /dL
PM
code
“Error 3
Tira
reactiva
usada"
mem
mem
mg/dL
mem
mg/dL
mol/dL
PM
Used or
mol/dL
damagedmmol/dL
test strip
PM
mem
mo /dL
mg /dL
PM
PM
PM
PM
code
mem
mg /dL
DAY
AVG
mem
mg /dL
DAY
AVG
DAY
AVG
mg/dL
• Retire la batería y encienda
de nuevo el medidor.
• Retire la tira reactiva e
inserte una nueva tira reactiva
code
• Si el problema
persiste,
mg /dL
por favor llame al
1-866-274-2131 De lunes a
mem
viernes,
8:00 a.m.- 5:00 mg /dL
p.m.(CST). Comuníquese con
su
Proveedor de Antención de
code
Salud en cualquier otro momento.
PM
PM
DAY
AVG
PM
Y
G
Y
G
Solución de Problemas
Tira reactiva
“Error 4
muestra mg /dL usada o
suficiente” dañada No
suficiente.
mem
muestra en
la tira reactiva
para emmem
mem
pezar
PM
PM
PM
mg /dL
DAY
AVG
PM
PM
• Repita la prueba con una
mol/dL
mg /dL
mmol/dL
nueva tira
reactiva. Recuerde
añadir la muestra sólo cuando
vea el indicador en la pantalla o
mem
mem
el
medidor indique
verbalmente
que añada la muestra.
• Retire la tira reactiva
y repita la prueba con
una nueva tira reactiva. Ver
Probando su Glucemia
en la página 78.
94
EvenCareG2
mg /dL
Lo que ve
Table of Contents
Lo que el
medidor dice
PM
Solución de Problemas
Lo que
significa
Qué debe hacer
"Baja
Bateria"
Baterías
están bajas
Cambiar la batería de
acuerdo a la página 90.
Cambio de la Batería.
"Temperatura
está fuera
de rango "
Resultado
de la prueba
es más alto
que 600
mg/dL
Mueva el medidor a un
área que esté entre
50˚F ~ 104˚F, y permita
10 a 15 minutos para que
alcance la nueva temperatura.
"Su lectura
de glucemia
está por
encima de
600 mg/dL.”
Resultado
de la prueba
es más alto
que 600
mg/dL
Lave y seque sus manos
y repita la prueba en
la yema de su dedo con
una nueva tira reactiva. Si
el resultado sigue siendo
"HI", comuníquese con su
médico o profesional de
salud de inmediato.
"Su lectura
de glucemia
está Por debajo de 20
mg/dL.”
Resultado
de la prueba
es más bajo
que 20
mg/dL
PM
PM
PM
PM
mem
mg/dL
mg /dL
AY
G
DAY
AVG
PM
PM
mg /dL
PM
mg /dL
Y
G
mg /dL
PM
mol/dL
mmol/dL
mg /dL
PM
PM
mem
mol/dL
mmol/dL
mg /dL
PM
PM
mem
95
Lave y seque sus manos
y repita la prueba en
la yema de su dedo con
una nueva tira reactiva.
Si el resultado es todavía
"LO", comuníquese con
su médico o profesional
de salud.
PM
PM
code
Solución de Problemas
Lo que ve
mmol/dL
mol/dL
mol/dL
mmol/dL
PM
PM
Lo que el
mg /dL
medidor dice
No hay
resultados
memorizados en el
medidor
mg /dL
AY
G
AY
G
EvenCareG2
Qué debe hacer
PM
No es
mem
Aplicable
mem
Lo que
significa
Table of Contents
• Compruebe si la fecha y
hora en su medidor están
configuradas. Ver Confi
uración de su Nuevo Si
tema en la Página 60.
• Comience su prueba
glucemia, vea
Probando su Glucemia
en la página 78.
mg /dL
PM
PM
PM
PM
PM
mem
mg/dL
mg /dL
DAY
AVG
96
EvenCareG2
Table of Contents
Garantía del Producto
Garantía del Producto
El medidor de glucemia EvenCare G2 está garantizado libre de
defectos de fabricación y materiales por un período de cinco (5) años
a partir de la fecha de compra. La responsabilidad de Medline para
reclamaciones de garantía está limitada a la reparación o reemplazo, y
en ningún caso Medline será responsable de daños indirectos o consecuentes, o por cualquier pérdida que surja por el mal uso, uso inapropiado, abuso, descuido, reparaciones no autorizadas o modificación.
Esta garantía será nula y sin vigencia y efecto en el caso mal uso, uso
inapropiado, abuso, descuido, reparaciones no autorizadas o
modificación del producto. Esta garantía excluye específicamente las
tiras reactivas EvenCare G2 y la Solución de Control EvenCare G2.
ESTA GARANTÍA ES LA ÚNICA Y EXCLUSIVA GARANTÍA, CON
LA EXCLUSIÓN DE CUALQUIER OTRA GARANTÍA, EXPRESA O
IMPLÍCITA, TODAS LAS CUALES SON ANUADAS Y RENUNCIADAS.
Todas las reclamaciones de garantía deben ser dirigidas al Centro de
Servicio Técnico de Medline al 1-866-274-2131. Esta garantía se extiende únicamente al comprador original del medidor.
97
Especificaciones
Table of Contents
EvenCareG2
Especificaciones
Tiras Reactivas:
Tiras reactivas de glucemia EvenCare G2
Rango de Prueba:
20 - 600 mg/dL
Calibración:
Plasma
Tiempo de Prueba:
6 segundos
Tamaño de muestra:
Mayor que 1uL
Rango de Hematocrito:
30-55%
Tipo de Pantalla:
Pantalla LCD grande
Memoria:
300 resultados de análisis de sangre con
Resultado promedio:
7, 14, y 30 días promedio
Dimensión:
93L x 58W x 20.5H (mm)
Peso:
79g
fecha y hora
Batería:
2 baterías alcalinas AAA
Duración de la batería:
1000 pruebas de uso continuo o 1 año
Apagado Automático:
Después de 2 minutos de inactividad
Temperatura de
funcionamiento:
50˚F a 104˚F.
Humedad relativa:
Menos del 85%
Condiciones de
Medidor a 39˚F ~ 122˚F
almacenamiento:
Tiras Reactivas at 39˚F ~ 86˚F
Para obtener información adicional, consulte el inserto Tira Reactiva
EvenCare G2.
98