1
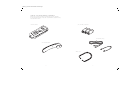
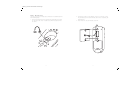
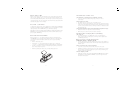
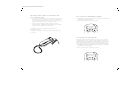
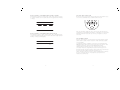
Qwest pid_manual 10200 10/3/00 4:10 PM Page 1
PID99-EL
Call Waiting ID
Telephone
Español
Telephone
Call Waiting ID
PID99-EL
Qwest pid_manual 10200 10/3/00 4:10 PM Page 2
The PID99 Call Waiting ID Telephone has been designed to provide a
TELEPHONE OVERVIEW
clear and crisp telephone calling experience while incorporating features
MESSAGE WAITING AND
NEW CALL LIGHT
that make the latest phone company services like Caller ID and Call Waiting
AM
CALL#
easier to use.
This phone combines Call Waiting with Caller ID. As with Caller ID, the
REVIEW CALLER ID HISTORY
DIAL NUMBER DISPLAYED
ON SCREEN
REMOVE ONE OR
ALL CALLS FROM
CALL HISTORY
phone lets you know who is calling before you answer it. The service
displays the caller’s name and phone number, and the date and time of
HANDSET TAB
each call. All caller information is stored in the order in which it was
received for up to 99 calls.
Call Waiting ID enables you to identify an incoming caller when you are
already on the phone by showing the caller’s information on the Caller ID
RETRIEVE VOICE
MESSAGING MESSAGES
PLACE CURRENT CALLER
ON HOLD
ANSWER CALL WAITING
CALLS BY PRESSING
THE FLASH KEY OR MAKE
3-WAY CALLS
STORE UP TO 10 SPEED DIAL
NUMBERS IN MEMORY
display. You can then choose to answer the new call or not.
REDIAL LAST NUMBER DIALED
RINGER VOLUME SWITCH
PULSE/TONE SWITCH
HANDSET VOLUME SWITCH
Qwest pid_manual 10200 10/3/00 4:10 PM Page 3
TA B L E O F C O N T E N T S
Set-Up Instructions
6
Installation with a Telephone Answering Machine
9
Wall Mounting
10
Adjusting Handset Volume
12
Adjusting Ringer Volume
12
Function Keys
13
MESSAGE Key
13
Flash Key
14
3-Way Key
14
Redial Key
15
Speed Dial Key
15
Hold Key
16
Call Waiting Service
16
Caller ID Service
16
Arrow Keys
17
Delete Key
17
Dial Key
17
New Call and Message Waiting Light
18
Display Messages
19
Date and Time
20
Display Contrast
20
Battery Replacement
20
Troubleshooting Tips
21
Maintenance
22
Hearing Aid Compatibility
22
FCC Information
23
Warranty
24
Safety Information
25
Qwest pid_manual 10200 10/3/00 4:10 PM Page 4
CHECK YOUR PACKAGE CONTENTS
Make sure you have received the following items in the package.
If any items are missing, contact the Consumerware customer service
line at 800-456-6076.
PID99 TELEPHONE BASE
SIZE “C” BATTERIES (3) - INSTALLED
TELEPHONE LINE CORDS (2)
PID99 TELEPHONE HANDSET
HANDSET CORD
4
5
Qwest pid_manual 10200 10/3/00 4:10 PM Page 5
S E T- U P I N S T R U C T I O N S
Step 2 Select the Language (English or Spanish):
S t e p 1 C o n n e c t C o rd s
•
Connect the handset cord from the jack at the bottom of the handset
to the jack at the bottom of the phone.
a) Press and hold the DIAL key while pressing the left ARROW key to see
the selections.
•
Connect telephone line cord from the jack at the top of the phone to
the telephone wall jack.
b) Release the DIAL key to confirm the setting.
•
Lift the handset to confirm that a dial tone is present.
•
Display will read CONNECTIONS OK immediately after phone line cord
is connected.
ENGLISH
For diagram showing installation with an answering machine, see p.9
For instructions on wall mounting, see p.10
DIAL
Step 3 Select Dialing Rule
The phone can automatically dial phone numbers that appear in the display.
To do this, the settings must reflect your local dialing rules. If you use
seven digits to dial local calls, select the DIAL 7 DIGITS setting. If you are
required to dial 10 digits in your local area (area code + phone number),
select the DIAL 10 DIGITS setting.
a) Press and hold the DIAL key while pressing the right ARROW key to
see the selections.
b) Release the DIAL key to confirm the setting.
DIAL 7 DIGITS
DIAL
6
7
S t e p 4 S e l e c t To n e / P u l s e D i a l i n g M o d e
I N S TA L L AT I O N W I T H A T E L E P H O N E
ANSWERING MACHINE
Depending on your dialing system, set the Dial Mode switch as follows:
If your dialing system is:
Set switch to:
To n e
Pulse
T
P
If you are not sure of your dialing system, make a trial call with the Dial
Mode switch set to T. If the call connects, leave the switch as is; otherwise,
set to P.
P
OUTLET
PHONE
ANSWERING MACHINE
T
PULSE/TONE
S t e p 5 P ro g r a m m i n g Yo u r Vo i c e M a i l A c c e s s N u m b e r
If you subscribe to Voice Mail, you can automatically
dial your Voice access number with a touch of the
MESSAGE key.
To program your Voice Messaging access number:
a) When the MESSAGE key is first pressed, the display will show
ENTER PHONE NUM.
b) Enter the Voice Messaging access number exactly as you would normally
dial it to retrieve your voice messages.
c)
Press the MESSAGE key again to store the number in memory.
The display will show NUMBER STORED.
To change your Voice Mail access number previously stored in memory,
press and hold the MESSAGE key until the display shows ENTER PHONE
NUM. Then enter the new number and press the MESSAGE key again to
store it in memory.
Once the number is stored, simply lift the handset, wait for dial tone and
press the MESSAGE key. The phone will automatically dial your Voice
Mail access number.
8
9
JACK
Qwest pid_manual 10200 10/3/00 4:10 PM Page 7
WALL MOUNTING
The base of the phone is designed to be mounted on a standard telephone
wall-mounting plate.
1. Reverse the handset tab. This tab holds the handset when you hang
up. The end of the “hook” should face up when inserted back into
the phone.
10
2. Using the short phone cord supplied, connect one end of the cord to
the jack at the top of the phone and the other end to a telephone jack
with wall plate.
3. Hook the phone onto the wall plate as shown.
11
ADJUSTING HANDSET VOLUME
FUNCTION KEYS
The handset volume can be adjusted to High and Low volume settings.
Using the Volume switch on the side of the phone, set it to H (high)
or L (low).
The phone has a row of keys that help you access various calling services.
H
L
VOLUME
ADJUSTING THE RINGER VOLUME
The ringer volume can be adjusted to High, Low or Off. Using the Ringer
switch on the side of the phone, set it to H (high), L (low) or Off.
You must subscribe to some of these services in order for the associated
features of the phone to work. For more information on these services and
availability in your area, contact your local phone company.
MESSAGE KEY
Voice Mail service takes your calls while you are
away from your phone or even while you are on another call.
OFF L
RINGER
H
If the indicator light flashes red and the display shows MESSAGE WAITING,
you know you have new voice messages waiting. To retrieve your messages,
press the MESSAGE key to automatically dial your Voice Messaging
access phone number. When connected, enter your PIN code to retrieve
your voice messages.
You must subscribe to Voice Mail from your phone company in order to take
advantage of this feature, and you must program your Voice Mail
access phone number into the phone (see Programming Your Voice
Mail Access Number on Page 8 for set-up instructions).
12
13
FLASH KEY
REDIAL KEY
When a Call Waiting call comes in, you can press the FLASH key to switch
to the new call. To return to the original conversation, press the FLASH
key again.
To redial the last number called, simply lift the handset and press the
REDIAL key.
SPEED DIAL KEY
3 - WAY K E Y
You can store up to 10 phone numbers (0-9) into the Speed Dial memory.
Talk to two people in separate locations at the same time with
Three-Way Calling. Adding a third person to your call is as easy as touching
a button. You can use this service for local, regional or
long distance calls.
H o w t o a c t i v a t e T h re e - Wa y C a l l i n g
1. While talking to one person, press the 3-Way button. This places the
person on hold. Listen for three brief tones followed by a dial tone.
2. Dial the number of the person you want to add to your conversation.
When that person answers, you may talk privately before completing
the three-way connection.
3. Press the 3-Way button again. This adds the first person back to the
line and completes the three-way connection.
•
If the second number is busy or there is no answer, press the 3-Way
button to return to the original call, then press it once more to disconnect
the busy or unanswered number.
•
To end either call, ask one person to hang up.
•
All three connections automatically disconnect when the Three-Way
Calling subscriber hangs up.
Note: Three-Way Calling is a pay-per-use and subscription calling feature
offered the phone company and is not available in all areas. Contact your
local provider for rates and availability.
When the Speed Dial button is first pressed, a message on the display
will read:
UNPROGRAMMED
HOLD SPEED DIAL
TO PROGRAM NEW
NUMBER
To e n t e r a n e w S p e e d D i a l p h o n e n u m b e r :
1. Press and hold down the SPEED DIAL key until ENTER PHONE NUM
is displayed.
2. On the telephone keypad, enter the number exactly as you want it to
be dialed, then press SPEED DIAL. If you make a mistake while entering
the number, replace the handset in the cradle and begin at Step 1
again.
3. The display will show the entered phone number and display
SELECT 0-9.
4. Press the number on the telephone keypad (0-9) where you would
like the phone number to be stored. The display will then show
NUMBER STORED.
To d i a l a p h o n e n u m b e r s t o re d i n S p e e d D i a l :
1. Lift the handset and wait for a dial tone.
2. Press the SPEED DIAL button.
3. Enter the location (0-9) of the stored phone number.
4. The display will show the phone number dialing and make
the connection.
To a d d a d d i t i o n a l S p e e d D i a l p h o n e n u m b e r s :
Simply press and hold the SPEED DIAL key again and follow the
steps above.
14
15
HOLD KEY
To place a caller on hold, simply press the HOLD key and HOLD will appear
on the display. To take a caller off hold, simply press the HOLD key again
to resume the conversation.
on seperate telephones in the same location, you will hear the Call Waiting
beep but the phone display will read EXT IN USE. This notifies you that the
Caller ID information was sent by the phone company but because two or
more phones were off-hook at the same time, the information could not
be displayed.
CALL WAITING SERVICE
With Call Waiting, if a call comes in while you’re on the line, a brief tone
signals you that another caller is trying to get through. The brief Call
Waiting tone is easily recognizable while you’re on the phone.
When you hear it, you have the option to take the new call or not. To
switch over to the new call, just press and release the FLASH button.
To switch back to the first call, press and release the FLASH button again.
You can also deactivate Call Waiting on an as-needed basis – for example,
before placing an important call or connecting to the Internet. Just
hit *70 before dialing the number to ensure you are not interrupted during
the call.
CALLER ID SERVICE
The phone is designed for Caller ID service by the phone company.
The caller’s information will be displayed after the first ring, provided that
you have subscribed to Caller ID service. The phone can store information
for up to 99 calls, including the time and date the call was received. The
Caller ID information is stored from the most recent to the oldest call.
ARROW KEYS
Press the ARROW keys to scroll through the stored call entries.
Calls are displayed in the order they were received.
The left ARROW key displays entries from newest to oldest
(from 99 to 1).
The right ARROW key displays entries from oldest to newest
(from 1 to 99).
When you reach the end of the call history, the screen displays
END OF LIST.
DELETE KEY
To erase the entry shown on the display, press the DELETE key. The display
will show DELETED and move to the next entry.
To erase all entries, press and hold the DELETE key for approximately five
seconds until CALLS DELETED appears on the display.
If you subscribe to Call Waiting ID service, when a Call Waiting call is
received, the new caller’s name and phone number will be displayed.
DIAL KEY
To dial a phone number shown in the display, simply press the ARROW
keys until the number you want to dial is displayed.
DELETE
DIAL
If the number in the display is a local call, press the DIAL key once. The
phone will dial the last seven digits or all ten digits, according to your
setting for local dialing. (See Select Dialing Rule on page 7 to set up local
dialing rules.)
If the number in the display is a long distance call, press the DIAL key twice
within one second, and the phone will dial a “1” before dialing the area
code and number.
Note that Call Waiting ID information cannot be received by the PID99
phone if another telephone is simultaneously off-hook on the same telephone
line. If a Call Waiting call comes in when two or more people are talking
16
17
NEW CALL AND MESSAGE WAITING LIGHT
•
Green – if you have received new calls that have not been reviewed.
•
Red – if you subscribe to Voice Messaging service and you have at least
one new message waiting.
D I S P L AY M E S S A G E S
PRIVATE CALLER
UNKNOWN CALLER
DELETE
The calling party is blocking name
and number information.
Unable to receive information about
the caller’s name and number.
DIAL
LINE ERROR
The New Call Indicator and Message Waiting Light flashes green when you
have received any new calls that have not yet been reviewed. If you subscribe
to Voice Mail service through the phone company, the light will flash red]
whenever you have a new Voice Mail message waiting. For Voice Mail
subscribers, the PID99 phone detects FSK / Visual Message Waiting Indication.
MESSAGE WAITING
An error occurred while receiving
the Caller ID information.
You have received new voice mail
messages in your Voice Mail service.
The total number of new calls received.
5 NEW CALLS
EXT IN USE
18
A Call Waiting call has just come in while
another telephone extension was off hook.
Caller ID information could not be displayed.
19
D AT E A N D T I M E
TROUBLESHOOTING TIPS
When not showing Caller ID information, the current Date and Time will
appear on the display. There is no need to enter the date and time as it
is transmitted automatically when Caller ID data is sent from the provider.
receiving the first call, the current Date and Time will be entered and will
automatically appear on the display.
C a l l c a n n o t b e c o n n e c t e d e v e n i f d i a l e d c o r re c t l y.
D I S P L AY C O N T R A S T
To adjust the contrast of the screen display, press and hold the left ARROW
key while repeatedly pressing the DELETE key to cycle through the contrast
settings. Release the left ARROW key to confirm the setting.
Important: Do not press and hold the DELETE key without pressing the left
REVIEW key. You could accidentally erase all the Caller ID entries if you
press only the DELETE key.
B AT T E RY R E P L A C E M E N T
Replace all three “C” size alkaline batteries when the display flashes
LOW BATTERY. Use only high quality alkaline batteries for full operation
of telephone features. (Batteries last for about one year, depending
upon use).
•
Check to confirm that the dialing mode of Pulse or Tone is
set properly.
The unit does not ring.
•
The Ringer selector is set to Off. Set to High or Low.
•
If there are several other telephones on the same line, try disconnecting
some of the other telephones. Having too many telephones connected
can also create problems such as low ringer volume or impaired sound
quality during calls.
Caller ID information does not display when the phone rings.
•
Wait until the phone rings twice before answering.
•
Make sure your Caller ID service has been activated.
I n f o r m a t i o n d o e s n o t d i s p l a y w h e n a C a l l Wa i t i n g
call comes in.
•
You must subscribe to Call Waiting ID service for this feature to
work. Call your phone company to confirm you have signed up for
Call Waiting ID service.
W h e n y o u re c e i v e a c a l l t h e d i s p l a y s h o w s
U N K N O W N C A L L E R o r P R I VAT E C A L L E R .
•
In some calling areas, the name display service may not be available or
the calling party has blocked the Caller ID data from being transferred
with the call.
•
Remove the battery door.
•
Install three “C” size alkaline batteries. Make sure to match the
“+” and “-“ of the batteries with the diagram inside the compartment.
•
Put the cover back in its position and push gently until you hear the
door snap securely into place.
T h e re i s n o d i a l t o n e o n t h e t e l e p h o n e .
•
Check all cords to make sure that all connections are secure.
•
Batteries typically last about one year depending upon use.
•
Unplug the telephone and connect it to another modular jack. If it still
does not work, and other telephones in your home are working, the
problem is with this telephone.
The LCD display is dim.
•
20
Adjust the contrast control using the DELETE and ARROW keys to darken
the display. See the DISPLAY CONTRAST section on Page 20 of this
manual for instructions.
21
FCC INFORMATION
M e s s a g e Wa i t i n g I n d i c a t o r L i g h t d o e s n o t f l a s h a n d
M E S S A G E WA I T I N G d o e s n o t a p p e a r.
•
Make sure FSK/ Visual Message Waiting Indication is offered by your
local provider and that it has been turned on.
LINE ERROR message is displayed.
•
•
LINE ERROR appears on the display if the phone detects anything other
than valid Caller ID information during the silent period after the first
ring. If the telephone is answered between the first and second ring,
the Caller ID information may not be received properly.
LINE ERROR may indicate the presence of noise or static on your
telephone line. If this condition persists, call your local phone company.
C a l l e r I D i n f o r m a t i o n s t o re d i n m e m o r y i s d e l e t e d
•
•
The Caller ID information showing on the display will be erased when
the DELETE button is pressed.
All Caller ID information stored in memory will be lost when the
batteries run down.
MAINTENANCE
Clean the outside of the phone with a soft damp cloth. Do not use any
type of abrasive pad, scouring powder or solvent such as alcohol or benzene
as they may damage the finish of the phone cabinet.
H E A R I N G A I D C O M PAT I B I L I T Y
The PID99 is compatible with inductively coupled hearing aids.
This product is registered with the Federal Communications Commission
and is in compliance with parts 15 and 68, FCC Rules and Regulations.
To comply with FCC regulations, the following conditions must be met:
This device complies with Part 68 of the FCC rules.
The label on the bottom of this device contains the FCC registration number
and ringer equivalence number.
If requested by the telephone company, the FCC registration number of
this device and the ringer equivalence number must be reported. USOC
jack RJ11. For reliable operation, the sum of the ringer equivalence numbers
for devices connected to a single telephone line should not exceed five.
This device must not be installed on coin operated telephone lines or
party lines.
R i g h t s o f t h e Te l e p h o n e C o m p a n y
Should your equipment cause trouble on your line which may harm the
telephone network, the telephone company shall, where practicable, notify
you that temporary discontinuance of service may be required. Where prior
notice is not practicable and the circumstances warrant such action, the
telephone company may temporarily discontinue service immediately. In
case of such temporary discontinuance, the telephone company must: (1)
promptly notify you of such temporary discontinuance, (2) afford you the
opportunity to correct the situation and (3) inform you of your right to
bring a compliant to the Commission pursuant to procedures set forth in
Subpart E of Part 68, FCC Rules and Regulations.
The telephone company may make changes in its communications facilities,
equipment, operations of procedures where such action is required in the
operation of its business and not inconsistent with FCC Rules and
Regulations. If these changes are expected to affect the use or performance
of your telephone equipment, the telephone company must give you
adequate notice, in writing, to allow you to maintain uninterrupted service.
This device complies with Part 15 of the FCC rules.
Operation is subject to the following two conditions:
1. This device may not cause harmful interference.
2. This device must accept any interference received, including
interference that may cause undesired operation.
Repair work on this device must be done by Consumerware, Inc.
or an authorized repair station.
22
23
Qwest pid_manual 10200 10/3/00 4:10 PM Page 14
LIMITED WARRANTY
S A F E T Y I N F O R M AT I O N
Consumerware, Inc. warrants this product to be free from manufacturing
defects for a period of one year from the original date of consumer purchase.
This warranty is limited to the repair or replacement of this product only
and does not extend to consequential or incidental damage to other
products that may be used with this unit. This warranty is in lieu of all
other warranties expressed or implied. If the unit should prove defective
within the warranty period, please call Consumerware Customer Service
at 1-800-456-6076 for product return information.
This symbol is to alert you to important operating or servicing
instructions that may appear in this user’s manual. Always follow
basic safety precautions when using this product to reduce the
risk of injury, fire, or electric shock.
1. Read and understand all instructions.
2. Follow all warnings and instructions marked on the product.
3. Unplug this product from the wall outlet before cleaning. Do not use
liquid cleaners or aerosol cleaners. Use a damp cloth for cleaning.
4. Do not use this product near water, for example, near a bathtub, wash
bowl, kitchen sink, or laundry tub, in a wet basement, or near a
swimming pool.
5. Do not place this product on an unstable cart, stand, or table. This
product may fall, causing serious damage to the product.
6. Install this product in a protected location where no one can step on
or trip over the line cord. Protect cords from damage or abrasion.
7. Slots or openings in the cabinet and the back and bottom are provided
for ventilation, to protect it from overheating. These openings must
not be blocked or covered. The openings should never be blocked by
placing the product on a bed, or other similar surface. This product
should never be placed near or over a radiator or heat register.
8. To reduce the risk of electric shock, do not disassemble this product,
but take it to a qualified serviceperson when some service or repair
work is required. Opening or removing covers may expose you to
dangerous voltages or other risks. Incorrect reassembly can cause
electric shock when the appliance is subsequently used.
9. Unplug this product from the wall jack and refer servicing to qualified
service personnel under the following conditions:
a) When the telephone line cord is damaged or frayed.
b) If liquid has been spilled into the product.
c) If the product does not operate normally by following the operating
instructions. Adjust only those controls that are covered by the operating
instructions because improper adjustment of other controls may result
in damage and will often require extensive work by a qualified technician
to restore the product to normal operation.
d) If the product has been exposed to rain or water.
e) If the product has been dropped or the cabinet has been damaged.
f) If the product exhibits a distinct change in performance.
24
25
26
d) Si el producto ha sido expuesto a la lluvia o al agua.
e) Si el producto se dejó caer o el alojamiento está dañado.
f) Si el producto exhibe algún cambio notable en su funcionamiento.
C o n s u m e rwa r e C u s t o m e r S e r v i c e l i n e a t 1 - 8 0 0 - 4 5 6 - 6 0 7 6
For questions regarding the operation of this product, call the
10. Evite el uso de un teléfono (a menos que sea inalámbrico) durante una
tormenta eléctrica. Podría haber un riesgo remoto de choque eléctrico
causado por los rayos.
11. No utilice el teléfono para reportar una fuga de gas si se encuentra
cerca de la fuga.
S i s u p ro d u c t o u t i l i z a p i l a s , d e b e r á o b s e r v a r l a s s i g u i e n t e s
p re c a u c i o n e s a d i c i o n a l e s :
S AV E T H E S E I N S T R U C T I O N S .
1. Use únicamente el tipo y tamaño de pila(s) especificados en el manual
del usuario.
2. No tire la(s) pila(s) al fuego. Podrían explotar. Consulte los reglamentos
locales por si existen instrucciones especiales para su eliminación.
3. No abra la(s) pila(s) ni la(s) mutile. El electrolito liberado es corrosivo
y podría causar daño a los ojos o la piel. Podría ser tóxico en caso de
ser ingerido.
4. Proceda con cautela cuando esté manejando las pilas a fin de no
producir un cortocircuito con materiales conductivos, tales como anillos,
pulseras y llaves. La pila o el conductor se podría sobrecalentar y
producir quemaduras.
5. No intente recargar la(s) pila(s) proporcionadas con este producto o
identificadas para usar con este producto si no son pilas recargables.
Las pilas podrían emanar electrolito corrosivo o podrían explotar.
6. No intente rejuvenecer la(s) pila(s) proporcionadas con este producto
o identificadas para usar con este producto sometiéndolas a calor.
Podría ocurrir una liberación repentina del electrolito de la pila el cual
causa quemaduras o irritación de los ojos y la piel.
6. Do not attempt to rejuvenate the battery(ies) provided with or identified
for use with this product by heating them. Sudden release of the battery
electrolyte may occur causing burns or irritation to eyes or skin.
5. Do not attempt to recharge the battery(ies) provided with or identified
for use with this product that are not intended to be charged. The
batteries may leak corrosive electrolyte or explode.
4. Exercise care in handling batteries in order not to short the battery
with conducting materials such as rings, bracelets, and keys. The battery
or conductor may overheat and cause burns.
3. Do not open or mutilate the battery(ies). Released electrolyte is corrosive
and may cause damage to the eyes or skin. It may be toxic if swallowed.
2. Do not dispose of the battery(ies) in fire. They may explode. Check
with local codes for possible special disposal instructions.
1. Use only the type and size battery(ies) specified in the user manual.
I f Yo u r P ro d u c t U t i l i z e s B a t t e r i e s , T h e F o l l o w i n g A d d i t i o n a l
P re c a u t i o n s S h o u l d B e O b s e r v e d :
C O N S E RV E E S TA S I N S T R U C C I O N E S .
S i t i e n e p re g u n t a s a c e rc a d e c ó m o u t i l i z a r e s t e p ro d u c t o ,
l l a m e a l a l í n e a d e a t e n c i ó n a l c l i e n t e d e C o n s u m e rwa r e
11. Do not use the telephone to report a gas leak in the vicinity of
the leak.
10. Avoid using a telephone (other than a cordless type) during an electrical
storm. There may be a remote risk of electric shock from lightning.
al 1-800-456-6076
26
Qwest pid_manual 10200 10/3/00 4:10 PM Page 15
El teléfono PID99 con identificación de llamada en espera fue
GENERALIDADES DEL TELÉFONO
diseñado para proporcionar una experiencia telefónica nítida a la vez que
incorpora funciones que facilitan el empleo de los más modernos servicios
AM
de las compañías telefónicas, como por ejemplo Identificación de llamada
e Identificación de llamada en espera.
CALL#
INDICADOR LUMINOSO DE
MENSAJE EN ESPERA Y
LLAMADA NUEVA
REVISAR HISTORIA DE
IDENTIFICACIÓN DE LLAMADAS
BORRAR UNA O TODAS
LAS LLAMADAS DE LA
HISTORIA DE LLAMADAS
MARCAR EL NÚMERO MOSTRADO
EN LA VENTANILLA
Este teléfono combina Llamada en espera con Identificación de llamada.
Al igual que con Identificación de llamada, el teléfono le indica quién está
LENGÜETA DEL AURICULAR
llamando antes de que conteste. El servicio muestra el nombre y el número
de la persona que está llamando, y la fecha y la hora de cada llamada.
Toda la información de llamadas se almacena en el orden en que se
recibieron las llamadas, hasta un máximo de 99 llamadas.
ESCUCHAR UN
MENSAJE DE CORREO
PONER LA LLAMADA
ACTUAL EN ESPERA
RESPONDER A LLAMADAS
EN ESPERA OPRIMIENDO EL
BOTÓN FLASH O HACER
LLAMADAS CON TRES
ALMACENAR HASTA 10
NÚMEROS DE MARCADO
RÁPIDO EN LA MEMORIA
La identificación de llamada en espera le permite identificar la llamada que
está entrando cuando usted ya se encuentra hablando por teléfono, pues
VOLVER A MARCAR EL ÚLTIMO
NÚMERO MARCADO
le muestra la información de la llamada en la pantalla de identificación de
llamadas. De esa manera, usted decide si desea contestar la nueva llamada.
AJUSTE DEL VOLUMEN DEL REPIQUE
INTERRUPTOR DE IMPULSOS/TONO
AJUSTE DEL VOLUMEN DEL AURICULAR
Qwest pid_manual 10200 10/3/00 4:10 PM Page 17
CONTENIDO
Instrucciones para la instalación
6
Instalación con una máquina contestadora
9
Instalación en la pared
10
Ajuste del volumen del auricular
12
Ajuste del volumen de repique
12
Teclas de función
13
Tecla MESSAGE
13
Tecla Flash
14
Tecla 3-Way
14
Tecla Redial
15
Tecla Speed Dial
15
Tecla Hold
16
Servicio de llamada en espera
16
Servicio de identificación de llamada
16
Teclas de flecha
17
Tecla Delete
17
Tecla Dial
17
Indicador de llamada nueva y mensaje en espera
18
Mensajes en pantalla
19
Fecha y hora
20
Contraste de la pantalla
20
Cambio de las pilas
20
Sugerencias para resolver problemas
21
Mantenimiento
22
Compatibilidad con audífonos
22
Información de la FCC
23
Garantía
24
Información de seguridad
25
Qwest pid_manual 10200 10/3/00 4:10 PM Page 18
REVISE EL CONTENIDO DEL PAQUETE
Cerciórese de que haya recibido todos los elementos siguientes en el
paquete. Si falta algo, llame a la línea de atención al cliente de
Consumerware al 800-456-6076.
BASE DEL TELÉFONO PID99
PILAS TIPO “C” (3) - INSTALADAS
CABLES PARA LA LÍNEA TELEFÓNICA (2)
AURICULAR DEL TELÉFONO PID99
CABLE PARA EL AURICULAR
4
5
Qwest pid_manual 10200 10/3/00 4:10 PM Page 19
I N S T R U C C I O N E S PA R A L A I N S TA L A C I Ó N
Paso 2 Seleccionar el idioma (English o Español):
Paso 1 Conectar los cables
•
Conecte el cable del auricular al conector situado en la parte inferior
del auricular y al conector situado en la parte inferior del teléfono.
a) Mantenga presionada la tecla DIAL mientras oprime la tecla de FLECHA
izquierda para ver las alternativas.
•
Conecte el cable para la línea telefónica en el conector situado en la
parte superior del teléfono y en el conector de la pared.
b) Suelte la tecla DIAL para confirmar su selección.
•
Levante el auricular para verificar que haya tono de marcar.
•
La pantalla indicara CONNECTIONS OK exactamente en el momento
en que conecte el cable para la línea telefónica.
ESPANOL
En la página 9 se muestra un diagrama de la instalación con
máquina contestadora.
DIAL
En la página 10 se detallan las instrucciones para instalar el teléfono
en la pared.
P a s o 3 S e l e c c i o n a r l a re g l a d e m a rc a d o
El teléfono puede marcar automáticamente los números que se muestran
en la pantalla. Para hacerlo, el teléfono se debe ajustar de acuerdo con las
reglas de marcado de su localidad. Si utiliza siete dígitos para hacer llamadas
locales, seleccione MARC 7 DÍGITOS. Si tiene que marcar 10 dígitos en su
zona (código de área + número de teléfono), seleccione MARC 10 DÍGITOS.
a) Mantenga presionada la tecla DIAL mientras presiona la tecla de FLECHA
derecha para ver las alternativas.
b) Suelte la tecla DIAL para confirmar su selección.
MARC 7 DIGITOS
DIAL
6
7
P a s o 4 S e l e c c i o n a r e l m o d o d e m a rc a d o d e t o n o s o i m p u l s o s
I N S TA L A C I Ó N C O N U N A M Á Q U I N A
C O N T E S TA D O R A
Elija el ajuste apropiado para el modo de marcado según su sistema
de marcado:
S i s u s i s t e m a d e m a rc a d o e s p o r :
Ponga el interruptor en:
Tonos (Tone)
Impulsos (Pulse)
T
P
ENCHUFE
TELÉFONO
MÁQUINA CONTESTADORA
Si no sabe con certeza cuál sistema de marcado tiene, trate de hacer una
llamada con el interruptor de modo de marcado en T. Si la llamada se
conecta, deje el interruptor en esa posición; de lo contrario, póngalo en P.
P
T
PULSE/TONE
P a s o 5 P ro g r a m a c i ó n d e s u n ú m e ro d e a c c e s o
a mensajes de voz
Si es abonado del servicio de mensajes de voz (Voice Mail), puede marcar
automáticamente su número de acceso al servicio
con tan sólo oprimir la tecla MESSAGE.
Para programar su número de acceso a mensajes de voz:
a) Oprima la tecla MESSAGE; la pantalla indicará MARC NUM TELEF.
b) Indique el número de acceso al correo de voz exactamente como lo
marcaría para escuchar sus mensajes de voz.
c)
Oprima la tecla MESSAGE otra vez para grabar el número en
la memoria. La pantalla indicará NUM GRABADO.
Para cambiar el número de acceso al correo de voz grabado en la memoria,
oprima la tecla MESSAGE hasta que la pantalla indique MARC NUM TELEF.
Luego indique el nuevo número y oprima la tecla MESSAGE otra vez para
grabarlo en la memoria.
Una vez que haya grabado el número, simplemente levante el auricular,
espere a que se escuche el tono de marcar y oprima la tecla MESSAGE.
El teléfono marcará automáticamente su número de acceso a
mensajes de voz.
8
9
CONECTOR
Qwest pid_manual 10200 10/3/00 4:10 PM Page 21
I N S TA L A C I Ó N E N L A PA R E D
La base del teléfono está diseñada para que se pueda montar sobre una
placa corriente para instalación de teléfonos sobre la pared.
1. Invierta la lengüeta del auricular. Esta lengüeta sirve para sujetar el
auricular cuando lo cuelgue. El extremo del “gancho” debe ir hacia
arriba al insertarlo nuevamente en el teléfono.
10
2. Conecte un extremo del cable telefónico corto suministrado al conector
situado en la parte superior del teléfono y el otro en el conector de la
placa para montaje de pared.
3. Cuelgue el teléfono sobre la placa como se muestra.
11
AJUSTE DEL VOLUMEN DEL AURICULAR
TECLAS DE FUNCIÓN
El volumen del auricular se puede ajustar en Alto y Bajo. Ajuste el selector
de volumen situado sobre el costado del teléfono según prefiera: H (Alto)
o L (Bajo).
El teléfono cuenta con una hilera de teclas que sirven para obtener acceso
a los servicios de llamadas de su compañia telefónica local.
H
L
VOLUME
AJUSTE DEL VOLUMEN DEL REPIQUE
El volumen del repique se puede ajustar en Alto, Bajo o Apagado. Ajuste
el selector del repique situado sobre el costado del teléfono según prefiera:
H (Alto) o L (Bajo) u Off (Apagado).
Debe ser abonado de algunos de estos servicios para que funcionen las
características correspondientes del aparato. Comuníquese con su proveedor
para más información acerca de esos servicios y averiguar si se ofrecen
en su zona.
TE C L A M E S S A G E
El servicio de mensajes de voz (Voice Mail) contesta las llamadas cuando
cuando usted no puede contestar el teléfono o incluso cuando esté ocupado
con otra llamada.
OFF L
RINGER
H
Si el indicador luminoso parpadea con una luz roja y la pantalla indica
MENSAJE, significa que tiene nuevos mensajes de voz en su buzón. Para
escuchar sus mensajes, oprima la tecla MESSAGE para marcar
automáticamente su número de acceso a mensajes de voz. Una vez
conectado, marque su código PIN para escuchar sus mensajes de voz.
Para poder utilizar esta función debe ser abonado del servicio de mensajes
de voz (Voice Mail) y deber á programar su aparato con el
número de teléfono de acceso al servicio (bajo Programación de su número
de acceso a mensajes de voz, en la página 8, se proporcionan las
instrucciones para hacerlo).
12
13
TECLA FLASH
TECLA REDIAL
Cuando entre una llamada en espera, puede oprimir la tecla FLASH para
contestar esa llamada. Para volver a la conversación original, oprima la
tecla FLASH otra vez.
Para volver a marcar el último número marcado, simplemente levante el
auricular y oprima la tecla REDIAL.
TECLA SPEED DIAL
T E C L A 3 - WAY
Con la función de llamada con tres personas (Three-Way Calling) puede
hablar simultáneamente con dos personas que se encuentran en diferentes
lugares. Incorporar a la tercera persona en la llamada es tan fácil como
oprimir un botón. Este servicio lo puede utilizar para llamadas locales,
regionales o de larga distancia.
C ó m o a c t i v a r u n a l l a m a d a c o n t re s p e r s o n a s
Si lo desea, puede grabar hasta 10 números de teléfono (0-9) en la memoria
de marcado rápido. Cuando oprima el botón Speed Dial, la pantalla indicará:
NO PROGRAMADO
OPRI SPEED DIAL
PARA PROGRAMAR
NUEVO NUMERO
P a r a p ro g r a m a r u n n u e v o n ú m e ro d e t e l é f o n o d e
m a rc a d o r á p i d o :
1. Mientras está hablando con una persona, oprima el botón 3-Way. Con
esto pondrá a la primera persona en espera. Espere hasta escuchar tres
tonos breves seguidos del tono de marcar.
1. Oprima la tecla SPEED DIAL hasta que la pantalla indique
MARC NUM TELEF.
2. Marque el número de la persona que desea incorporar a la conversación.
Cuando esa persona conteste, si lo desea puede hablar con ella en
privado antes de completar la conexión de llamada con tres personas.
2. Marque en la botonera el número exactamente como quiera que se
marque y luego oprima SPEED DIAL. Si se equivoca al marcar el número,
cuelgue el auricular y comience con el Paso 1 otra vez.
3. Oprima el botón 3-Way otra vez. De esta manera incorporará a la
primera persona otra vez a la línea y completará la conexión de la
llamada con tres personas.
3. La pantalla indicará el número marcado y mostrará
SELECCIONAR 0-9.
4. En la botonera del teléfono, oprima el número (0-9) donde desee grabar
el número de teléfono. La pantalla indicará NUM GRABADO.
•
Si el segundo número está ocupado o no contesta, oprima el botón 3Way para volver a la llamada original y luego oprímalo otra vez para
desconectar el número ocupado o que no contesta.
•
Para colgar cualquiera de las llamadas, pídale a esa persona que cuelgue.
P a r a m a rc a r u n n ú m e ro d e t e l é f o n o g r a b a d o e n l a f u n c i ó n d e
m a rc a d o r á p i d o :
•
Las tres conexiones se desconectan automáticamente cuando el suscriptor
del servicio Three-Way Calling cuelga.
1. Levante el auricular y espere hasta que se escuche el tono de marcar.
Nota: El servicio de llamada con tres personas (Three-Way Calling) se paga
cada vez que se usa. Ofrece por suscripción, aunque no en todas las zonas.
Comuníquese con su proveedor local para conocer las tarifas y disponibilidad.
2. Luego, pulse el botón SPEED DIAL.
3. Oprima el número (0-9) en el que grabó el número de teléfono.
4. La pantalla indicará el número mientras lo marca y se hará la conexión.
Para programar otros n úmeros de tel éfono de marcado r ápido:
Oprima la tecla SPEED DIAL otra vez y siga los pasos anteriores.
14
15
TECLA HOLD
Para poner una llamada en espera, simplemente oprima la tecla HOLD; la
pantalla indicará EN ESPERA. Para volver a la llamada en espera, simplemente
vuelva a oprimir la tecla HOLD para reanudar la conversación.
SERVICIO DE LLAMADA EN ESPERA
Con el servicio de llamada en espera (Call Waiting), si entra una llamada
mientras está en la línea, escuchará un tono breve que le indica que otra
persona le está llamando. El tono breve de llamada en espera se reconoce
fácilmente cuando está hablando con otra persona.
El teléfono PID99 no puede recibir información de identificación de llamada
en espera si algún otro teléfono que utiliza la misma línea está descolgado.
Si entra una llamada mientras dos o más personas están hablando en
teléfonos separados en el mismo lugar, escuchará el tono de llamada en
espera, pero la pantalla indicará EXT EN USO. Esto le avisa que la compañía
de teléfonos envió la información de identificación de llamada pero que,
debido a que había dos o más teléfonos descolgados al mismo tiempo, no
fue posible mostrar la información en la pantalla.
TECLAS DE FLECHA
Cuando lo escucha, tiene la opción de contestar la llamada nueva o no
contestarla. Para contestar la llamada nueva, oprima el botón FLASH.
Oprima las teclas de FLECHA para desplazarse a través de todas las llamadas
grabadas.
Para volver a la primera llamada, vuelva a oprimir el botón FLASH. También
puede desactivar la función de llamada en espera cuando lo desee; por
ejemplo, antes de hacer una llamada importante o antes de conectarse a
la Internet. Lo único que tiene que hacer es marcar *70 antes de marcar
el número para asegurarse de que no le interrumpa otra llamada mientras
está hablando.
Las llamadas se muestran en el orden en que fueron recibidas.
La tecla de FLECHA izquierda muestra las llamadas desde la más reciente
hasta la más antigua (desde la 99 hasta la 1).
La tecla de FLECHA derecha muestra las llamadas desde la más antigua
hasta la más reciente (desde la 1 hasta la 99).
Cuando llegue al final de la lista de historia de llamadas, la pantalla indica
FIN DE LA LISTA.
SERVICIO DE IDENTIFICACIÓN DE LLAMADA
El aparato fue diseñado para aprovechar el servicio de identificación de
llamada (Caller ID). La información de la persona que
llama se mostrará después del primer repique, siempre y cuando sea
abonado del servicio de Caller ID. El teléfono es capaz de almacenar la
información de hasta 99 llamadas, incluida la hora y la fecha en que llegó
la llamada. La información de identificación de llamada se graba desde la
llamada más reciente hasta la más antigua.
Si es suscriptor del servicio de identificación de llamada en espera (Call
Waiting ID), cuando entre una llamada mientras está ocupando el teléfono,
la pantalla indicará el nombre y el número de teléfono de la llamada en
espera.
TECLA DELETE
Para borrar la entrada mostrada en la pantalla, oprima la tecla DELETE. La
pantalla indicará BORRADA y mostrará la siguiente entrada.
Para borrar todas las entradas, oprima la tecla DELETE durante
aproximadamente cinco segundos hasta que la pantalla indique LLAMS
BORRADAS.
TECLA DIAL
Para marcar el número de teléfono que se muestra en la pantalla, oprima
las teclas de FLECHA hasta que aparezca el número que desea marcar.
Si el número mostrado en la pantalla es local, oprima la tecla DIAL una
vez. El teléfono marcará los últimos siete dígitos o todos los 10 dígitos,
según como haya configurado el teléfono para marcar llamadas locales.
(Consulte Seleccionar la regla de marcado en la página 7 para configurar
las reglas de marcado local.)
DELETE
DIAL
16
Si el número mostrado en la pantalla es una llamada de larga distancia,
oprima la tecla DIAL dos veces seguidas; el teléfono marcará un “1” antes
de marcar el código de área y el número de teléfono.
17
INDICADOR DE LLAMADA NUEVA Y MENSAJE
EN ESPERA
•
Verde – si recibió llamadas nuevas que no ha revisado.
•
Rojo – si tiene el servicio de mensajes de voz (Voice Mail) y tiene
por lo menos un mensaje nuevo en su buzón.
M E N S A J E S E N PA N TA L L A
NUM PRIVADO
NUM DESCONOCIDO
DELETE
La persona que llama está bloqueando
la información de nombre y teléfono.
Su localidad no puede recibir la
información referente al nombre y número
de teléfono de la persona que llama.
DIAL
El indicador luminoso de llamada nueva y mensaje en espera parpadea con
una luz verde si recibió llamadas nuevas que aún no ha revisado. Si es
abonado del servicio de mensajes de voz (Voice Mail), el
indicador luminoso parpadea con una luz roja cada vez que llegue un nuevo
mensaje de voz en espera. En el caso de los que tienen el servicio de
mensajes de voz (Voice Mail), el teléfono PID99 detecta FSK / Indicación
visual de mensaje en espera (Visual Message Waiting Indication).
ERROR DE LINEA
Ocurrió un error al recibir la información de
identificación de llamada.
MENSAJE
Tiene nuevos mensajes de correo de voz en
su servicio de mensajes de voz.
El número total de nuevas llamadas recibidas.
5 NUEVAS LLAMADAS
EXT EN USO
18
Acaba de entrar una llamada en espera
pero otra extensión del teléfono estaba
descolgada. No se pudo mostrar la
información de identificación de llamada.
19
FECHA Y HORA
S U G E R E N C I A S PA R A R E S O LV E R P R O B L E M A S
Cuando no se muestra la información de identificación de llamada, la
pantalla indica la fecha y la hora actual. No es necesario que el usuario
programe la fecha y la hora pues estas son transmitidas automáticamente
cuando su proveedor envía los datos de identificación de llamada. Después de
que reciba la primera llamada, el teléfono recibirá la fecha y hora actual
y se mostrarán automáticamente en la pantalla.
N o p u e d e c o n e c t a r s e c o n l a l l a m a d a , a u n c u a n d o l a m a rc a
c o r re c t a m e n t e .
•
L a u n i d a d n o re p i c a .
•
El selector de repique está apagado (Off). Seleccione Alto (H)
o Bajo (L).
•
Si hay otros teléfonos en la misma línea, pruebe desconectando algunos
de ellos. Tener demasiados teléfonos conectados también puede
ocasionar problemas, como por ejemplo volumen de repique bajo o
mala calidad del sonido durante las llamadas.
C O N T R A S T E D E L A PA N TA L L A
Para ajustar el contraste de la pantalla, oprima la tecla de FLECHA izquierda
mientras oprime repetidamente la tecla DELETE para recorrer los ajustes
de contraste. Suelte la tecla de FLECHA izquierda para confirmar su selección.
Importante: No oprima sin soltar la tecla DELETE sin oprimir la tecla de
FLECHA izquierda. Podría borrar accidentalmente todas las entradas de
identificación de llamada si sólo oprime la tecla DELETE.
La información de identificación de llamada no se muestra
cuando suena el teléfono.
•
Espere hasta que el teléfono suene dos veces antes de contestar.
•
Verifique que su servicio de identificación de llamadas (Caller ID)
esté activado .
CAMBIO DE LAS PILAS
Cuando la pantalla indique PILA BAJA, cambie las tres pilas alcalinas tipo
“C”. Use únicamente pilas alcalinas de buena calidad para que funcionen
correctamente todas características del teléfono. (Las pilas duran
aproximadamente un año, dependiendo del uso.)
•
Quite la tapa del compartimento de las pilas.
•
Instale tres pilas alcalinas tipo “C”. Cerciórese de instalar las pilas de
acuerdo con los símbolos “+” y “-” del diagrama que se encuentra en
el interior del compartimento.
•
Ponga la tapa del compartimento y oprima suavemente hasta que
escuche que cierra completamente.
•
Las pilas por lo general duran aproximadamente un año, dependiendo
del uso.
Verifique que haya seleccionado el modo de marcado correcto: Impulsos
(P) o Tonos (T).
La información no se muestra en la pantalla cuando entra una
l l a m a d a e n e s p e r a ( C a l l Wa i t i n g ) .
•
Debe estar suscrito al servicio de identificación de llamada en espera
(Call Waiting ID) para que funcione esta característica. Llame su
proveedor local para confirmar que tiene el servicio.
C u a n d o re c i b e u n a l l a m a d a l a p a n t a l l a i n d i c a N U M
D E S C O N O C I D O O N U M P R I VA D O .
•
En algunas zonas, es posible que no se disponga del servicio que
muestra el nombre o bien, la persona que llama bloqueó su teléfono
para que no envíe los datos de identificación de llamada.
N o s e e s c u c h a e l t o n o d e m a rc a r e n e l t e l é f o n o .
•
Revise todos los cables para verificar que todas las conexiones estén
bien hechas.
•
Desconecte el teléfono y conéctelo en otro conector modular. Si aún
no funciona pero otros teléfonos de su casa si funcionan, el teléfono
está descompuesto.
La pantalla está atenuada.
•
20
Ajuste el control de contraste por medio de las teclas de FLECHA y la
tecla DELETE para oscurecer la pantalla. Consulte la sección CONTRASTE
DE LA PANTALLA en la página 20 de este manual, para obtener las
instrucciones.
21
INFORMACIÓN DE LA FCC
La luz del indicador de mensaje en espera no parpadea y la
pantalla no indica MENSAJE.
•
Cerciórese de que su proveedor ofrece FSK / Visual Message Waiting Indication
y de que el servicio esté activado.
A p a re c e e l m e n s a j e E R R O R D E L I N E A .
•
•
El mensaje ERROR DE LINEA aparece en la pantalla si el teléfono detecta
alguna cosa que no sea información válida de identificación de llamada
durante el período de silencio que sigue al primer repique. Si contesta
el teléfono entre el primer repique y el segundo, no se recibirá
correctamente la información de identificación de llamada.
ERROR DE LINEA podría indicar la presencia de ruido o estática en la
línea telefónica. Si persiste este problema, llame a su compañía de
teléfonos.
Se borra la informaci ón de identificaci ón de llamadas que est á
grabada en la memoria.
•
La información de identificación de llamada que aparece en la pantalla
se borrará cuando el usuario oprima el botón DELETE.
•
Cuando se gasten las pilas se borrará toda la información de
identificación de llamada que esté grabada en la memoria.
MANTENIMIENTO
Limpie el exterior del teléfono con un paño suave humedecido. No use
ningún tipo de esponja abrasiva, polvo de fregar ni disolvente, como por
ejemplo alcohol o benceno, pues podrían dañar el acabado del aparato.
C O M PAT I B I L I D A D C O N A U D Í F O N O S
El teléfono PID99 es compatible con los audífonos de acoplamiento inductivo.
22
Este producto está registrado con la Federal Communications Commission
(FCC) y cumple con las partes 15 y 68, Reglas y Reglamentos de la FCC.
Para cumplir con los reglamentos de la FCC, se deben satisfacer
las siguientes condiciones:
Este dispositivo cumple con la Sección 68 de los reglamentos de la FCC.
La etiqueta que aparece en la parte inferior de este dispositivo contiene
el número de registro de la FCC y el número de equivalencia de repique.
Si se lo pide la compañía telefónica, usted deberá proporcionar el número
de registro de la FCC de este aparato, al igual que el número de equivalencia
de repique. Conector RJ11 de USOC. Para un funcionamiento confiable,
no deberá pasar de cinco la suma de los números de equivalencia de los
repicadores de los aparatos conectados a una sola línea. Este dispositivo
no deberá instalarse en líneas telefónicas operadas con monedas o en
líneas colectivas.
D e re c h o s d e l a c o m p a ñ í a d e t e l é f o n o s
En caso de que su equipo causara problemas en la línea que pudieran dañar
la red telefónica, la compañía de teléfonos le notificará, siempre que sea
práctico, que podría ser necesario desconectar su servicio temporalmente.
En el caso en que no sea práctico avisarle de la desconexión y las
circunstancias dicten dicha acción, la compañía de teléfonos podrá
desconectar su servicio inmediata y temporalmente. En el caso de dicha
desconexión temporal, la compañía de teléfonos deberá: (1) notificarle
oportunamente de dicha desconexión temporal, (2) brindarle la oportunidad
de corregir la situación y (3) informarle de su derecho de presentar una
queja ante la FCC en virtud de los procedimientos dispuestos en la Subparte
E de la Parte 68, Reglas y Reglamentos de la FCC.
La compañía de teléfonos podrá hacer modificaciones en sus instalaciones
de comunicación, equipo, operaciones de procedimientos cuando sea
necesaria dicha acción para el funcionamiento de su negocio y siempre y
cuando no esté en contraposición a las Reglas y Reglamentos de la FCC.
Si estas modificaciones tendrán algún efecto sobre el uso o rendimiento
de su equipo telefónico, la compañía de teléfonos deberá avisarle
oportunamente, por escrito, para permitirle que mantenga el servicio sin
interrupción.
23
Qwest pid_manual 10200 10/3/00 4:10 PM Page 28
INFORMACIÓN DE SEGURIDAD
E s t e d i s p o s i t i v o c u m p l e c o n l a S e c c i ó n 1 5 d e l o s re g l a m e n t o s
de la FCC.
El uso está sujeto a las siguientes dos condiciones:
1. Este aparato no deberá causar interferencia dañina.
Este símbolo es para alertarle de las instrucciones de modo de
empleo o servicio importantes que pudieran aparecer en este
manual del usuario. Siempre observe las precauciones de
seguridad básicas cuando utilice este producto para reducir el
riesgo de lesión, incendio o choque eléctrico.
2. Este aparato deberá aceptar cualquier interferencia recibida, incluyendo
la interferencia que pudiera causar un funcionamiento indeseable.
1. Lea todas las instrucciones hasta que las entienda perfectamente.
Todas las reparaciones de este aparato deberán ser realizadas por
Consumerware, Inc. o por un taller de servicio autorizado.
3. Desconecte este producto del enchufe de pared antes de limpiarlo. No
utilice limpiadores líquidos ni limpiadores en aerosol. Use un paño
húmedo para limpiar el aparato.
2. Observe todas las advertencias e instrucciones marcadas en el producto.
4. No use este producto cerca del agua, por ejemplo, cerca de una tina
o bañera, lavabo o fregadero, en un sótano mojado ni cerca de una
piscina.
G A R A N T Í A L I M I TA D A
Consumerware, Inc., garantiza que este producto estará libre de defectos
de manufactura por un período de un año contado a partir de la fecha en
que el consumidor adquiera el producto. Esta garantía se limita
exclusivamente a la reparación o reemplazo de este producto y no incluye
daños consecuentes o incidentales a otros productos que pudieran utilizarse
con esta unidad. Esta garantía sustituye a cualquier otra garantía, bien sea
expresa o implícita. En el caso de que la unidad presentara algún defecto
durante el período de garantía, sírvase llamar al departamento de atención
al cliente de Consumerware al 1-800-456-6076 para que le indiquen cómo
devolver el producto.
5. No coloque este producto sobre una mesa rodante, base o mesa
inestable. Este producto se podría caer y sufrir daños graves.
6. Instale este producto en un lugar protegido donde nadie pueda pisar
el cable o pueda tropezarse con el mismo. Proteja los cables contra
daño o abrasión.
7. Las ranuras o aberturas del alojamiento y de la parte trasera e inferior
están previstas como medios de ventilación para proteger el teléfono
contra el sobrecalentamiento. No debe bloquear ni cubrir esas aberturas.
No coloque el producto sobre una cama u otra superficie similar pues
se podrían bloquear las aberturas. Este producto nunca se deberá
colocar cerca ni encima de un radiador o registro de calefacción.
8. Para reducir el riesgo de choque eléctrico, no desarme este producto;
llévelo a un técnico calificado si requiere servicio o reparación. Abrir
o quitar las tapas podría exponerlo a voltajes peligrosos u otros riesgos.
El rearmado incorrecto podría causar un choque eléctrico al utilizar el
aparato.
9. En los siguientes casos, desconecte el teléfono de la pared y acuda a
un técnico calificado:
a) Cuando el cable telefónico esté dañado o pelado.
b) Si derramó algún líquido sobre el producto.
c) Si el producto no funciona correctamente al seguir las instrucciones
de modo de empleo. Ajuste únicamente los controles que se explican
en las instrucciones de modo de empleo, pues el ajuste incorrecto de
otros controles podría resultar en daño y a menudo es necesario que
un técnico calificado haga una gran cantidad de reparaciones para que
el producto vuelva a funcionar correctamente.
24
25