1
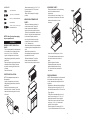
HARDWARE:
• Attach casters using 1/4-20 x 7/16
hex screws and 1/4-20 hex nuts.
Wrench tighten.
• Return the roll-away to its upright
position.
1/4-20 Hex Nut
1/4-20 x 7/16 Hex Screw
8-32 x 1/4 Pan Head Screw
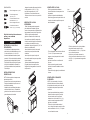
MOUNTING INTERMEDIATE
CHEST:
• Remove all drawers necessary in
order to attach units. Follow the
drawer removal and installation
instructions in the operation section.
• Position the intermediate chest on the
cabinet. Using the intermediate chest
bottom as a template, mark the
mounting hole locations onto the
roll-away top. At each mark drill a
5/16" diameter hole.
• Attach the cabinet to the intermediate
chest using the bolts supplied with the
units.
• Attach the top chest to the
intermediate chest using the bolts
supplied with the units.
• Reinstall all drawers. Follow the
drawer removal and installation
instructions in the operation section.
8-32 Hex Nut
10-16 x 1/2 & 1/4-14 x 5/8
Sheet Metal Screw
NOTE: Not all instructions apply
to your specific unit.
ASSEMBLY
REMOVE CHEST FROM ROLLAWAY:
• The unit comes with the chest secured
to the inside of the roll-away by either
two or four 1/4-14 x 5/8 screws.
• Lay the roll-away down on its back.
• Use packaging material to protect the
paint finish.
• Remove the securing screws from the
underside of the roll-away. Save the
screws for mounting the chest to the
roll-away.
• Remove the chest.
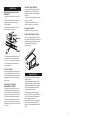
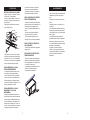
CASTER INSTALLATION:
NOTE: Use adequate manpower for
this operation.
• Lay the roll-away down on its back.
• Use packaging material to protect the
paint finish.
• Mount both swivel casters on the
same side of the roll-away. The swivel
caster with the brake goes to the front
of the unit.
MOUNTING CHEST:
• Remove the drawer from the roll-away
(refer to the drawer removal
instructions).
• Lift the chest onto the roll-away. Line
up the holes in the bottom of the chest
with the holes in the top of the
roll-away.
• Attach the chest using two 1/4-14 x
5/8 screws that were used to secure
the chest to the bottom of the rollaway.
• Wrench tighten all screws.
• Replace the drawer (refer to the
drawer installation instructions).
• To remove the chest, reverse the
procedure.
RISER ASSEMBLY:
NOTE: When assembled, the riser should
be the same size, left to right, as the
chest. Use adequate manpower for this
operation.
• Assemble the sides and the back (flange
side up) together using four 8-32 x 1/4
pan head screws and four 8-32 hex nuts.
Finger tighten.
• Position the riser assembly on the rollaway. Secure using four 10-16 x 1/2
sheet metal screws. Wrench tighten.
• Position the chest on the riser. Secure
using four 10-16 x 1/2 sheet metal
screws. Wrench tighten.
• Wrench tighten the risers four 8-32 x
1/4 pan head screws and 8-32 hex nuts.
3
4