1
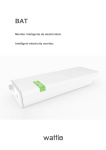
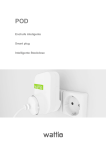
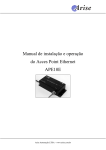
DOOR Sensor de puertas y ventanas Door and window sensor Contenido - Content Manual del DOOR 3 Descripción 3 Presentación del Equipo 4 Instalación 5 Funcionamiento 9 Características técnicas 9 Normas y estándares 9 DOOR manual 11 Description 11 Device presentation 12 Installation 13 Operation 17 Technical features 17 Norms and standards 17 2 Manual del DOOR Descripción El DOOR es un sensor magnético que monitoriza la apertura de puertas y ventanas y ayuda a proteger propiedades. Además, combinado con otros dispositivos Wattio, ofrece la posibilidad de automatizar acciones como encender la luz al entrar o apagar la calefacción al abrir una ventana. A través de alarmas, conocerás lo que ocurre en tu hogar estés donde estés y para la máxima comodidad, se ofrece también la opción de activar y desactivar las alarmas en su totalidad desde el Smartphone, ¡una opción muy práctica! Es un sensor muy discreto que apenas necesita instalación. Además el pack incluye el dispositivo con cinta de doble cara listo para su colocación y dos pilas de botón (2x 3V CR2450). 3 Presentación del Equipo DESCRIPCIÓN DE ELEMENTOS. 1 Indicador luminoso (verde o rojo) 2 Botón B2 1. 3 Botón B1 2. Imán 4 5 3. DIMENSION ES GENERALES: 1 1 1 4 Instalación ES IMPORTANTE QUE TOME ALGUNAS PRECAUCIONES: Por favor lea y actúe según la información contenida en las páginas siguientes. Dispositivos para uso en el interior. No guardar en zonas húmedas, sucias, de calor o frío extremo. No agitar, tirar ni golpear. No pintar ni limpiar con agentes químicos agresivos o inflamables. No es resistente al agua. Usar en ambientes de temperatura entre -10ºC y 50ºC. Es imprescindible utilizar el tipo de pila indicada (2x 3V CR2450). Asegurar que las pilas se colocan con la polaridad correcta y sobre el dispositivo con los contactos limpios. No arrojar las pilas al fuego y acudir a atención médica inmediatamente si fueran ingeridas. Todos los trabajos de reparación deben ser realizados únicamente por personal técnico cualificado. PASOS A SEGUIR PARA LA INSTALACIÓN DEL DOOR Al comenzar la instalación, le recomendamos que anote el código destacado del DOOR para facilitar su registro más adelante. 5 Presionar para retirar la tapa protectora de las pilas. Colocar las pilas, respetando la polaridad y cerrar la tapa. Acercarse a la zona en la que se va a colocar el dispositivo y encender el dispositivo presionando el B2. El indicador parpadeará rojo una vez, (tras unos segundos) verde cinco veces y (tras unos segundos) rojo seis, indicando que queda conectado. Si no, verificar que el GATE está encendido y que se respetan los requisitos de cobertura. Si no, resetear el sensor presionando ambos botones simultáneamente (ver apartado RESET) y volver a encender el dispositivo. NOTA: pegar ambos elementos sobre una superficie plana y limpia. La distancia los dos elementos que conforman el sensor debe ser menor a 2cm cuando la puerta/ventana esté 6 cerrada. El dispositivo debe quedar unido en el lado del label, no en el de los botones. Colocar al revés si necesario. REGISTRO DEL DISPOSITIVO Entrar en myhome.wattio.com e iniciar sesión. El asistente guiará su configuración y la instalación quedará finalizada. Si no es la primera vez que accede a la plataforma web tendrá que lanzar el asistente haciendo click sobre su icono. 7 Una vez registrados, el usuario debe crear alarmas en la plataforma web para recibir notificaciones. Hay que crear una alarma con sus correspondientes acciones y notificaciones si procede y asignársela al dispositivo pertinente. RESET Si el sensor no se conecta correctamente al sistema, puede que sea necesario resetear y volver a encender. Para resetear a configuración de fábrica, mantener presionados el B1 y B2 simultáneamente y el indicador parpadeará en rojo dos veces. Mantener presionado (aprox. 15 segundos) hasta que el indicador parpadee rojo otra vez 20 veces. Se recomienda, que se retiren las pilas si el dispositivo va a estar apagado para un periodo largo de tiempo. 8 Funcionamiento La plataforma web cuenta con una interfaz dedicada al dispositivo DOOR donde se da información sobre el estado del sensor. Además existe otro apartado dedicado a detallar el listado de alarmas ocurridas. Desde la app para Smarphones, se pueden activar y desactivar las alarmas de seguridad de una forma muy práctica gracias al botón habilitado para este fin. Por supuesto, también en la app móvil se puede consultado el listado de alarmas. Nota: Recibirá las notificaciones de alertas en su Smartphone en pocos segundos, si no es así, chequee la configuración de su teléfono móvil para que las alertas no sean retenidas. Importante tener en cuenta que para recibir notificaciones de alarmas, estas han tenido que ser previamente creadas en la plataforma web. Características técnicas Alimentación Tensión de alimentación Pilas de botón 2x 3V CR2450 Vida de las pilas Máximo de 6 años (sujeto a uso) Generalidades Color del frontal de la carcasa Blanco y verde Dimensiones 57*48*14mm Normas y estándares WATTIOCORP SL Parque Tecnológico Miramón, Pº Mikeletegi, 61, 1ª planta, 20.009 San Sebastian, España declara que el producto contenido en esta caja, el DOOR, cumple, cuando fuese de aplicación, con lo dispuesto en la Directiva 1999/5/EC. 9 TESTs: EN 301 489-1 V1.9.2: 2011-09 ETSI EN 301 489-17 V2.1.1: 2009-05 ETSI EN 300 328 V1.7.1:2006-10 EN62311:2008 EN 60950-1:2006+A11:2009+A12:2011 USA This device complies with part 15 of the FCC Rules. The operation is subjected to the following two conditions: (1) This device may not cause harmful interference, and (2) this device must accept any interference received, including interference that may cause undesired operation. Conformidad del producto con la legislación de la UE. Conformidad del producto con la directiva de residuos de aparatos eléctricos y electrónicos. NOTA: las declaraciones de conformidad de las normas CE y FCC están accesibles en www.wattio.com/doc. 10 DOOR manual Description The DOOR IS A MAGNETIC sensor that monitors the opening of doors and Windows and helps to protect your properties. In addition, combined with other Wattio gadgets, it allows to automate actions such as switching on the lights when coming back home or switch the heating off when opening a window. You will receive notifications on your Smartphone, to help you to get a better knowledge of what is going on at home wherever you are and with the maximum convenience. The mobile app offers a switch button to make the activation and the deactivation of the alerts easy and quick. It is a very discrete sensor that almost needs no installation. The pack includes batteries and a double side tape for its placement on any surface. 11 Device presentation ELEMENT DESCRIPTION: 1 LED Indicator (Green and red) 2 B2 button 4. 3 B1 button 5. Magnet 4 5 6. GENERAL DIMENSION S: 1 1 1 12 Installation IT IS IMPORTANT THAT YOU OBSERVE SOME SIMPLE PRECAUTIONS: Please read and act upon the important information on the following pages. Indoor use only. Do not store in dirty or humid areas, with extremely hot/cold temperatures. Do not drop, knock or shake the device. Do not paint it or clean it with strong or inflammable chemicals. It is not water resistant. Use the product in environments between -10ºC and 50ºC. It is a must to replace the batteries by the indicated type (2x 3V CR2450). Make sure that the batteries respect the correct polarity indicated and make sure to place them within clean contacts. Do not throw the batteries to the fire. Seek medical attention immediately if a battery is swallowed. All the reparation works must be carried out by qualified professionals. INSTALLATION STEPS First of all, it is recommended to note down the product’s ID code, highlighted in black to make its installation easier. 13 Press on the flap as shown, to open the protection cover and place the batteries respecting their polarity as shown below. Get close to the area where the DOOR will be places and switch it on, pressing the B2. The indicator will flash red once, then green five times, and after few seconds, six more times red showing that it has been correctly connected. If it does not flash following the correct sequence, verify that the GATE is switched on and that the signal requirements are respected. If it does not work, reset the sensor pressing both buttons together (look at the reset section below) and switch the device on again. Stick both elements on a smooth and clean surface. The distance between the sensor elements must be under 2cm when the door/window is closed. 14 The device must be connected on the label side, not on the button side. Place it upside down if necessary. DEVICE REGISTRATION Enter myhome.wattio.com session. and initiate The wizard will guide the registration process and the installation will be finished. In case it is not the first time you Access the web app, the wizard must be launched manually, clicking on its icon on the bottom right. 15 Once registered, the alarms must be created on the web app, to receive notifications. An alarm must be created with its corresponding actions and notifications in case and to make it work, the alarm must be assigned to the corresponding device. The notifications must be activated and deactivated on the mobile app. RESET In case the sensor does not connect correctly to the GATE, it could be necessary to reset the device and switch it on again. To reset to the original configuration status, keep pressed both buttons together until the indicator flashes red twice and then twenty times. It is recommended to remove the batteries if the device will be switched off for a long time. 16 Operation The web platform has an interface dedicated to the DOOR, with information about the device status. There is also a notification list where you can check the occurred alerts in detail. From the mobile app, the notification alarms can be easily switched on and off. You can find the switch button over the notification list, in the security section. It is a very down to earth option for the day to day usage of the security devices. NOTICE: Your will receive alert notifications on your Smartphone after few seconds. In case you don’t, verify the set up of your Smartphone so that the notifications are not held. Take into account that the alerts must be previously set up on the web app. Technical features Source Source voltage Button batteries 2x 3V CR2450 Battery autonomy Maximum of 6 years (according to usage) General Case color White and green Dimensions 57*48*14mm Norms and standards WATTIOCORP SL Miramon Technologic Park, Pº Mikeletegi, 61- first floor, 20.009 San Sebastian, Spain declares that the product in the box, the DOOR, accomplishes, when subjected to conditions, the statements disposed in the Directive 1999/5/EC. 17 TESTs: EN 301 489-1 V1.9.2: 2011-09 ETSI EN 301 489-17 V2.1.1: 2009-05 ETSI EN 300 328 V1.7.1:2006-10 EN62311:2008 EN 60950-1:2006+A11:2009+A12:2011 USA This device complies with part 15 of the FCC Rules. The operation is subjected to the following two conditions: (1) This device may not cause harmful interference, and (2) this device must accept any interference received, including interference that may cause undesired operation. Product conformity according to the EU legislation. Product conformity according to the residue directive for electric and electronic devices. NOTICE: the conformity declarations of the CE and the FCC standards are accessible on www.wattio.com/doc. 18