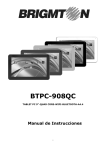
1
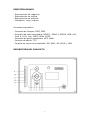
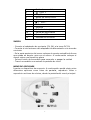
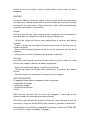
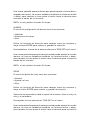
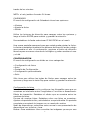
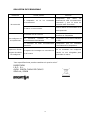
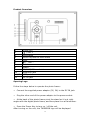
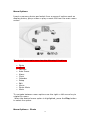
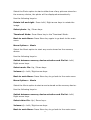
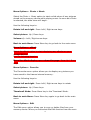
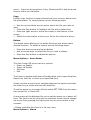
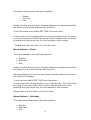
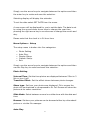
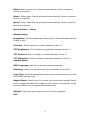
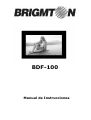
BDF-100
Manual de Instrucciones
CONTENIDO
SEGURIDAD
CONTENIDO
ESPECIFICACIONES
DESCRIPCIÓN DEL PRODUCTO
INICIO
MENÚ DE OPCIONES
FOTOS
MÚSICA
VÍDEOS
AUDIO+FOTOS
EBOOK
FAVORITOS
EDICIÓN
AUTO ENCENDIDO
ALARMA
RELOJ
CALENDARIO
CONFIGURACIÓN
SOLUCIÓN DE PROBLEMAS
SEGURIDAD
● Limpie la unidad sólo con un paño húmedo.
● No bloquee ninguna de las entradas de ventilación. Realice la
instalación de acuerdo con las instrucciones del fabricante.
● No use el dispositivo cerca de fuentes de calor tales como radiadores,
registros de calor, estufas u otros aparatos (incluyendo amplificadores)
que produzcan calor.
● Utilice sólo los accesorios especificados por el fabricante.
● Desenchufe la unidad cuando no lo utilice durante largos períodos de
tiempo.
● Remita todas las reparaciones a personal de servicio calificado.
CONTENIDO
-
Marco de fotos digital 10”
Adaptador para uso doméstico
Adaptador para uso en automóvil
Mando a distancia
Soporte trasero
Manual de instrucciones
1
ESPECIFICACIONES
-
Reproducción de
Reproducción de
Reproducción de
Calendario, reloj
imágenes
música
películas
y alarma
Formatos soportados:
- Formatos de Imagen: JPEG, BMP
- Formatos de vídeo soportados: MPEG 1, MPEG 2, MPEG4, VOB, AVI,
DivX 6, XviD, 3ivx, M4S2, MP4s, MJPG
- Formatos de audio soportados: MP3, WMA
- Formato de eBook: TXT
- Tarjetas de memoria compatibles: MS, MMC, SD, SDHC y USB
DESCRIPCIÓN DEL PRODUCTO
2
1
2
3
4
5
6
7
8
9
10
11/12
13
Botón de encendido
/ VOL +
Play/Pausa
Botón de Menú/Volver
Siguiente
/ VOL –
Anterior
Soporte
Entrada de tarjetas
Salida de auriculares
Entradas USB
Entrada de corriente
INICIO
- Conecte el adaptador de corriente (5V, 2A) a la toma DC IN.
- Conecte el otro extremo del adaptador de alimentación a la toma de
corriente.
- En la parte posterior del marco coloque el soporte extraíble de forma
que quede en ángulo recto con el marco. A continuación coloque el
marco sobre una superficie plana
- Pulse el botón de encendido para encender o apagar la unidad
- Tras el encendido se mostrará la pantalla de inicio.
MENÚ DE OPCIONES
Inserte un dispositivo de memoria. A continuación podrá elegir entre
diferentes opciones como fotos de pantalla, reproducir vídeo o
reproducir archivos de música, desde la pantalla del menú principal.
3
El menú principal presenta las siguientes 12 opciones:
•
•
•
•
•
•
•
•
•
•
•
•
Fotos
Ebook
Favoritos
Auto-Encendido
Alarma
Reloj
Calendario
Configuración
Editar
Vídeos
Fotos+Música
Música
Para navegar entre las opciones del menú utilice el botón de
movimiento derecha/izquierda.
Cuando la opción de menú que desee esté resaltada, pulse el botón de
reproducción para seleccionarla.
FOTOS
Seleccione la opción Fotografías para iniciar una presentación de
diapositivas de las imágenes almacenadas en la memoria del
dispositivo, las fotos se mostrarán automáticamente.
Utilice los siguientes botones para:
Gire a la izquierda y a la derecha: Pulse Izquierda/Derecha para girar
la imagen.
Seleccione una foto: Use los botones Arriba/Abajo.
Modo miniaturas: pulse el botón Menú para el modo de vista en
miniatura.
Volver al menú principal: Pulse la tecla Menú para volver al menú
principal.
MÚSICA
Seleccione la opción de música para iniciar cualquier tipo de música
almacenada en el dispositivo de memoria.
Utilice los siguientes botones para:
Cambie entre la selección memoria del dispositivo y la lista del archivo
usando los botones Izquierda/Derecha.
Seleccione el archivo de música con los botones Arriba/Abajo.
Volumen +/-: Use los botones Izquierda/Derecha.
Volver al menú principal: Pulse la tecla Menú para volver al menú
4
principal.
VÍDEOS
Seleccionar la opción de vídeos para iniciar una película almacenada
en el dispositivo de memoria.
Utilice los siguientes botones para:
Cambie entre la selección memoria del dispositivo y la lista del archivo
usando los botones Izquierda/Derecha.
Seleccione el archivo de vídeo con los botones Arriba/Abajo.
Volumen +/-: Use los botones Izquierda/Derecha.
Volver al menú principal: Pulse la tecla Menú para volver al menú
principal.
AUDIO+FOTOS
Seleccione la opción Foto+Música para iniciar una presentación de
diapositivas de las imágenes almacenadas en el dispositivo de
memoria durante la reproducción de música. Tan pronto como se
selecciona una foto, la presentación de diapositivas se iniciará.
Utilice los siguientes botones para:
Gire a la izquierda ya la derecha: Pulse Izquierda/Derecha.
Selecciona la imagen: Arriba/Abajo.
Volumen +/-: Use los botones Izquierda/Derecha.
Volver al menú principal: Pulse la tecla Menú para volver al menú
principal.
EBOOK
Seleccione la opción eBook para mostrar libros electrónicos en
cualquier dispositivo de almacenamiento.
Use los botones Arriba/Abajo para mover la pantalla.
FAVORITOS
La opción del menú Favoritos le permite mostrar las imágenes que ha
guardado en la memoria interna.
Utilice los siguientes botones para:
Gire a la izquierda y a la derecha: pulse Izquierda/Derecha
Selecciona la imagen: Arriba/Abajo.
Modo de miniaturas: pulse el botón Menú para el modo de vista en
miniatura.
5
Volver al menú principal: pulse el botón Menú para volver al menú
principal.
EDICIÓN
La opción Editar le permite copiar o borrar archivos de su dispositivo
de memoria. Cuando seleccione la función Editar en el menú principal
encontrará tres opciones: Copiar, Eliminar y Salir. Utilice las teclas de
dirección para hacer su selección.
Copiar:
Utilice la función de copia para guardar imágenes en el dispositivo.
Para guardar las imágenes realice los pasos siguientes:
- Utilice las teclas de flecha para seleccionar el archivo que desea
guardar.
- Pulse el botón de reproducción para seleccionar el archivo con un
cuadro amarillo.
- Pulse la flecha derecha para mover el cursor a la parte inferior de la
pantalla.
- Seleccione el botón Guardar para guardar el archivo.
Eliminar:
La opción de eliminar permite borrar archivos de la memoria. Para
borrar una imagen realice los pasos siguientes:
- Pulse la flecha hacia abajo y seleccione Eliminar.
- Utilice las teclas de flecha para seleccionar el archivo que desea
borrar.
- Pulse el botón de reproducción para borrar la imagen.
AUTO ENCENDIDO
El apagado automático presenta cuatro opciones:
• Habilitar Encender.
• Habilitar Apagar.
• Seleccionar tiempo.
• Salir.
Esta función permite que el marco se apague o encienda a una
determinada hora previamente especificada.
Sólo tiene que utilizar las teclas de dirección para navegar entre las
opciones y luego la tecla ENTER para realizar y guardar la selección.
Para ajustar el encendido o apagado de tiempo, seleccione TIME SET
en el menú y luego encender o apagar.
6
Una nueva pantalla aparecerá para que pueda ajustar el encendido o
apagado de tiempo. La hora se establece mediante los botones arriba
y abajo, para cambiar la hora pulse el botón hacia la derecha para
moverse a través de los minutos.
NOTA: el reloj está en formato 24 horas.
ALARMA
El menú de configuración de alarma tiene tres opciones:
• Habilitar.
• Seleccione el tiempo.
• Salir.
Utilice los botones de dirección para navegar entre las opciones y
luego la tecla ENTER para realizar y guardar la selección.
Para establecer la hora de la alarma seleccione TIME SET en el menú.
Una nueva pantalla aparecerá para que usted pueda ajustar la hora de
alarma. La hora se establece mediante los botones arriba y abajo,
para cambiar la hora pulse el botón hacia la derecha para moverse a
través de los minutos.
NOTA: el reloj está en formato 24 horas.
RELOJ
El menú de ajuste del reloj tiene tres opciones:
• Mostrar
• Ajustar la hora
• Salir
Utilice los botones de dirección para navegar entre las opciones y
luego el botón ENTER para realizar y guardar la selección.
Selección de la pantalla le dará la opción de mostrar o bien el reloj o el
reloj y el calendario
Para ajustar la hora seleccionar TIME SET en el menú.
Una nueva pantalla aparecerá para que usted pueda ajustar la hora de
alarma. La hora se establece mediante los botones arriba y abajo,
para cambiar la hora pulse el botón hacia la derecha para moverse a
7
través de los minutos.
NOTA: el reloj está en formato 24 horas.
CALENDARIO
El menú de configuración de Calendario tiene tres opciones:
• Mostrar
• Ajuste la fecha
• Salida
Utilice los botones de dirección para navegar entre las opciones y
luego el botón ENTER para realizar y guardar la selección.
Para establecer la fecha seleccionar FIJAR FECHA en el menú.
Una nueva pantalla aparecerá para que usted pueda ajustar la fecha.
La fecha se establece mediante los botones de dirección arriba y abajo
para cambiar el año. A continuación, presione el botón de dirección
derecha para moverse a través de los dígitos y poder cambiar el mes
y el día.
CONFIGURACIÓN
El menú de configuración se divide en cinco categorías:
•
•
•
•
•
Configuración de fotos.
Auto.
Pantalla de Configuración.
Configuración personalizada.
Salir.
Sólo tiene que utilizar las teclas de flecha para navegar entre las
opciones y luego use la tecla Play para realizar y guardar la selección.
Configuración de fotos
Intervalo de tiempo: Permite configurar las fotografías para que se
muestran en intervalos entre 5 segundos a 3 minutos o desactivarla.
Efecto de transición: Establece el efecto que se muestra entre los
cambios de fotos.
Formas de mostrar fotos: Establece cómo sus fotos se muestran.
Ajustar a la pantalla la foto, estirándola o comprimiéndola. En pantalla
completa se mostrará la imagen con su resolución nativa.
Modo de diapositivas: seleccione entre normal o una presentación de
diapositivas con la fecha y hora.
Buscar: Para establecer cómo consultar las imágenes ya sea por una
8
imagen en miniatura o mediante el administrador de archivos.
Auto
Inicio: Permite que las fotos se reproduzcan automáticamente cuando
un dispositivo de memoria se inserte.
Música: Permitir que los archivos de música se reproduzcan
automáticamente cuando un dispositivo de memoria se inserte.
Película: Permitir que los archivos de vídeo se reproduzcan
automáticamente cuando un dispositivo de memoria se inserte.
Configuración de pantalla
Brillo: Ajuste el brillo de la pantalla. Seleccione entre normal, brillante
o suave.
Contraste: Ajuste el contraste de la imagen en una escala de 4 a -4.
Brillo TFT: Ajuste el brillo de la pantalla en una escala de 4 a -4.
Contraste TFT: Ajuste el contraste de la pantalla en una escala de 4 a
-4.
Saturación TFT: Ajuste la saturación de la pantalla en una escala de 4
a -4.
Configuración personalizada
Idioma OSD: Ajuste el idioma de la pantalla de visualización.
Codificación: seleccione el tipo de subtítulos para archivos de película
compatibles.
Modo de repetición: seleccione el modo de repetición de los archivos.
Seleccione una para repetir el mismo archivo, carpeta de repetir sólo
el contenido de la carpeta actual o todo para repetir todos los archivos
disponibles.
Por defecto: Reiniciar el marco de fotos a los valores predeterminados
de fábrica.
9
SOLUCIÓN DE PROBLEMAS
Problema
Causa posible
Solución
Compruebe
El
adaptador
no
se
ha
conectado
correctamente
negras alrededor
las imágenes
alimentación está correctamente
Pulse el botón de encendido en la
parte posterior
Compruebe que el formato de los
El formato no es correcto
Aparecen líneas
de
corriente está encendida
El marco no se enciende
se reproducen
cable
conectado y que la toma de
No enciende
Las imágenes no
que
La
memoria
archivos es compatible
externa
no
está
Compruebe que se ha formateado
correctamente formateada
en FAT
La memoria no está correctamente
Compruebe
insertada
correctamente el dispositivo
El aspecto de la imagen no coincide con
el del marco
que
ha
Así se muestran las imágenes
cuando no son alargadas para
ajustarlas al marco.
“Las especificaciones pueden cambiar sin previo aviso”
IMPORTADO
I.R.P., S.L.
AVDA. SANTA CLARA DE CUBA 5
SEVILLA, SPAIN
10
insertado
DECLARACIÓN DE CONFORMIDAD
I.R.P., S.L. declara bajo su responsabilidad que el aparato indicado
cumple los requisitos de las siguientes directivas:
DIRECTIVAS EMC
EN55022:2006
EN55024:1998+A1: 2001+A2: 2003
EN61000-3-2:2006
EN61000-3-3:1995+A1:2001+A2:2005
Descripción del aparato:
Modelo BRIGMTON BDF-100
MARCO DE FOTOS DIGITAL
Importador: I.R.P., S.L.
Dirección: Avda. Santa Clara de Cuba 5, 41007, Sevilla.
11
BDF-100
Instruction Manual
12
CONTENTS
SAFETY
SPECIFICATIONS
PRODUCT OVERVIEW
OPENING LOGO
MENU OPTIONS
PHOTO
MUSIC
MOVIE
PHOTO MUSIC
EBOOK
FAVORITE
EDIT
AUTO-POWER
ALARM
CLOCK
CALENDAR
SETUP
TROUBLESHOOTING
13
Safety
● Clean only with a damp cloth.
● Do not block any of the ventilation openings. Install in accordance
with the manufacturer’s instructions.
● Do not install near any heat sources such as radiators, heat registers,
stoves or other apparatus (including amplifiers) that produce heat.
● Only use attachments/accessories specified by the manufacturer.
● Unplug this apparatus during lighting storms or when unused for
long periods of time.
● Refer all servicing to qualified service personnel. Service is required
when the apparatus is damaged in any way, such as when the
power-supply cord or plug is damaged, liquid has been spilled or
objects have fallen into the apparatus, the apparatus has been
exposed to rain or moisture, does not operate normally, or has been
dropped.
● Operating ambient temperature 0~40°C.
● To reduce the risk of fire or electric shock, do not expose to rain.
● The marking plate is located on the bottom enclosure of the main
unit.
Package Contents
1. Digital Photo Frame
2. Power adapter
3. Remote control
4. User manual
5. Stand
Specifications
Features
• Picture playback
• Music Playback
• Movie Playback
• Calendar, Clock functions
• Alarm clock
Specifications
• Supported Picture formats: JPEG, BMP
• Supported Video Formats: MPEG 1, MPEG 2, MPEG4, VOB, AVI,
DIVX 6, XVid, 3ivX, M4S2, MP4S, MJPG
• Supported Audio Formats: MP3, WMA
• Supported eBook format: TXT
• Supported memory cards: MS, MMC, SD, SDHC and USB
14
Product Overview
1
2
3
4
5
6
7
8
9
10
11/12
13
Power key
/ VOL +
Play/pause
Menu key back to main menu
Next
/ VOL –
Previous
Stand
SD/MMC/MS card slot
Earphone jack
USB port
DC IN jack
Opening Logo
Follow the steps below to operate the photo frame:
•
Connect the supplied power adaptor (5V, 2A) to the DC IN jack.
•
Plug the other end of the power adaptor to the power socket.
• At the back of the photo frame pivot the stand so it is at right
angles with the digital photo frame, and then place it on a flat surface.
• Press the Power Key to turn on / off the unit
After turning on the unit, the THOMSON logo will be displayed
15
Menu Options
Insert a memory device and select from a range of options such as
display photos, play a video or play a music file from the main menu
screen
The photo frame main menu has the following 12 options:
•
•
•
•
•
•
•
•
•
•
•
•
Photo
eBook
Favorite
Auto Power
Alarm
Clock
Calender
Setup
Edit
Movie
Photo-Music
Music
To navigate between menu options use the right or left arrow key to
rotate the menu.
When the desired menu option is highlighted, press the Play button
to select the option.
Menu Options – Photo
16
Select the Photo option to start a slide show of any pictures stored on
the memory device, the photo will be displayed automatically.
Use the following keys to:
Rotate left and right: Press Left / Right arrow keys to rotate the
image.
Select photo: Up / Down keys.
Thumbnail Mode: Press Menu key to the Thumbnail Mode.
Back to main Menu: Press Menu key again to go back to the main
menu
Menu Options – Music
Select the Music option to start any music stored on the memory
device.
Use the following keys to:
Switch between memory device selection and file list: Left /
Right arrow keys.
Select music file: Up / Down keys.
Volume+/-: Left / Right arrow keys.
Back to main Menu: Press Menu key to go back to the main menu
Menu Options – Movie
Select the Movie option to start a movie stored on the memory device.
Use the following keys to:
Switch between memory device selection and file list: Left /
Right arrow keys.
Select video file: Up / Down keys.
Volume+/-: Left / Right arrow keys.
Back to main Menu: Press Menu key to go back to the main menu
17
Menu Options – Photo + Music
Select the Photo + Music option to start a slide show of any pictures
stored on the memory device while playing music. As soon as a Photo
is selected, the slide show will begin.
Use the following keys to:
Rotate left and right: Press Left / Right arrow keys.
Select picture: Up / Down keys.
Volume+/-: Left / Right arrow keys.
Back to main Menu: Press Menu key to go back to the main menu
Menu Options – eBook
Select the eBook option to start displaying any eBooks on your
storage device.
Use the following keys to:
Move the eBook display up or down the page: Press Up / Down
keys.
Menu Options – Favorite
The Favourite menu option allows you to display any pictures you
have saved to the frames internal memory.
Use the following keys to:
Rotate left and right: Press Left / Right arrow keys to rotate
Select picture: Up / Down keys.
Thumbnail Mode: Press Menu key to the Thumbnail Mode.
Back to main Menu: Press Menu key again to go back to the main
menu
Menu Options – Edit
The Edit menu option allows you to copy or delete files from your
memory device. When you first select the Edit function from the main
18
menu, there are three options: Copy, Delete and Exit. Use the arrow
keys to make your selection.
Copy:
Use the copy function to save pictures from your memory device onto
the photoframe. To save pictures use the following steps:
• Use the up and down arrow keys to select the file your wish to
save.
• Press the Play button to highlight the file with a yellow box.
• Press the right arrow to move the curser to the bottom of the
screen.
• Select the save button to save your file to the internal memory.
Delete:
The delete option allows you to delete files from the photo frame
internal memory. To delete a picture use the following steps:
•
•
•
Press the down arrow and select delete.
Use the arrow keys to select the file you wish to delete.
Press the Play button to delete the picture.
Menu Options – Auto-Power
The Auto Power Off menu has four options:
• Power on Enable.
• Power off Enable.
• Set time.
• Exit.
The Power on enable and Power off enable allow you to have the photo
frame turn itself on or off at a pre specified time.
Simply use the arrow keys to navigate between the options and then
the enter key to make and save the selection.
To set the power on or power off time select SET TIME from the menu
then power On or Power Off.
A new screen will be displayed for you to set the power on or power off
time. The time is set by using the up and down arrow keys to change
the hours then pressing the right arrow key to move across to the
minutes.
* Please note that the clock is in 24 hour time
Menu Options – Alarm
19
The Alarm setting menu has three options:
●
●
●
Enable.
Set time.
Exit.
Simply use the arrow keys to navigate between the options and then
the enter key to make and save the selection.
To set the alarm time select SET TIME from the menu.
A new screen will be displayed for you to set the alarm time. The time
is set by using the up and down arrow keys to change the hours then
pressing the right arrow key to move across to the minutes.
* Please note that the clock is in 24 hour time.
Menu Options – Clock
The Clock setting menu has three options:
•
•
•
Display
Set time
Exit
Simply use the arrow keys to navigate between the options and then
the enter key to make and save the selection.
Selecting display will give you the option to display either the clock or
the clock and calendar
To set the time select SET TIME from the menu.
A new screen will be displayed for you to set the time. The time is set
by using the up and down arrow keys to change the hours then
pressing the right arrow key to move across to the minutes.
Please note that the clock is in 24 hour time
Menu Options – Calendar
The Calender setting menu has three options:
•
•
•
Display
Set date
Exit
20
Simply use the arrow keys to navigate between the options and then
the enter key to make and save the selection.
Selecting display will display the calendar.
To set the date select SET DATE from the menu.
A new screen will be displayed for you to set the date. The date is set
by using the up and down arrow keys to change the year then
pressing the right arrow key to move across to change the month and
day.
Please note that the clock is in 24 hour time
Menu Options – Setup
The setup menu is broken into five categories:
•
•
•
•
•
Photo Setting.
Auto-Play.
Display Setup.
Custom Setup.
Exit.
Simply use the arrow keys to navigate between the options and then
use the Play key to make and save the selection.
Photo Setting
Interval Time: Set the time photos are displayed between 5 Sec to 3
Min or turn it off.
Transition Effect: Set the effect shown between photo changes.
Show type: Set how your photos are displayed. Fit to screen the
photo will be stretched or compressed to fit. Full Screen will show the
picture at its native resolution.
Slide Mode: Select between normal or a slide show with the date and
time.
Browse: Set how your pictures can be browsed either by a thumbnail
picture or via the file manager.
Auto-Play
21
Photo: Allow photos to be played automatically when a memory
device is inserted.
Music: Allow music files to be played automatically when a memory
device is inserted.
Movie: Allow video files to be played automatically when a memory
device is inserted.
Menu Options – Setup
Display Setup
Brightness: Set the brightness of the screen. Select between Normal,
Bright or soft.
Contrast: Set the picture contrast between 4 and -4
TFT Brightness: Set the display brightness between 4 and -4
TFT Contrast: Set the display contrast between 4 and -4
TFT Saturation: Set the display saturation between 4 and -4
Custom Setup
OSD Language: Set the on screen display language
Encoding: Select the subtitle type for compatible movie files.
Logo Type: Select a background picture from internal memory or use
the default background.
Repeat Mode: Select how if you wish your pictures to repeat. Select
one to repeat the same file, folder to only repeat the contents of the
current folder or all to repeat all available files.
Default: Reset the photo frame back to factory defaults.
Exit
22
Troubleshooting
Issue
Cause
Solution
The power adapter isn’t plugged in
correctly.
Check the power cable is properly
connected and the power point is
turned on.
No Power
The photo frame is not turned on
Turn the photo frame on at the
back of the unit.
Check the files types you are
Files are in the wrong format
using are compatible with the
photo frame
Pictures will not
Memory device is incorrectly formatted
play
Memory device is incorrectly inserted
Black lines
around some
pictures
Aspect ratio of the picture does not
match the photo frame
Ensure that the memory device
you are using is formatted as FAT
Ensure that your memory device
is correctly inserted.
This is the digital frames way of
displaying a picture without
stretching it.
“Features can change without notice”
Imported: I.R.P., S.L.
Avda. Santa Clara de Cuba 5
41007 Sevilla
Spain
23
DECLARATION OF CONFORMITY
I.R.P., SL declare under our responsibility that the equipment meets
the requirements indicated in the following directives:
EMC DIRECTIVES
EN55022:2006
EN55024:1998+A1: 2001+A2: 2003
EN61000-3-2:2006
EN61000-3-3:1995+A1:2001+A2:2005
Description of apparatus:
BRIGMTON Model BDF-100
DIGITAL PHOTO FRAME
Importer: I.R.P., SL
Address: Avenida Santa Clara de Cuba 5, 41007, Sevilla.
24