1
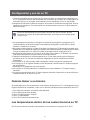
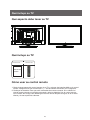
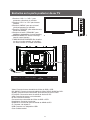
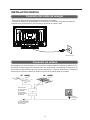
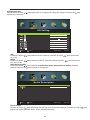
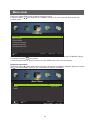
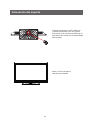
LEDTV MIIAVISION 40” Full HD MIIA MTV-C40DLEFHD ES Manual de instrucciones Índice Contents Instrucciones de seguridad importantes........................................................ 5 Important safety instructions................................................. 1 Configuración y uso de su TV........................................................................ Setting up and using your TV.......................................... ...... 48 Qué incluye su TV........................................................................................... What's included with your TV.............................................. 610 Sockets on lathe back of your TV........................................... Enchufes en parte posterior de su TV........................................................711 Basic installation ................................................................ 8 Instalación básica........................................................................................... 12 Remote Control Instruction........ .......................................... . 13 Instrucciones control remoto. ................................................................... 17 Select Inputdel Source... ...................... .......... ........... ................ 15 Seleccionar fuente de entrada.................................................................... 19 ........................................... 15 Basic menulaoperation................ USB Multimedia p l ayback format ............................................... 31 Operación del menú básico........................................................................... 19 If you’re having problems..................................................... 35 Formato de la reproducción multimedia USB................................................ 35 Your Tv’s specification................................... ...... ................. 36 En caso de problemas.................................................................................... 38 Wall mount installation................................... ...... ................. 37 Especificaciones de su TV............................................................................. 40 Attaching the stand................................... ...... ...................... 38 Instalación de montaje en pared.................................................................... 41 Colocación del soporte.................................................................................. 42 3 Important safetyde instructions Instrucciones seguridad importantes Warning Advertencia Do not let your TV become wet(for example, by keeping it in a damp · No deje que itsuoutside TV se humedezca ej., on conservándolo en un ambiente room, leaving or dripping(por water it) . húmedo, a la intemperie o con goteos de agua sobre este) You must dejándolo not put objects filled with water on your TV (including · No debe colocar objetos que contengan agua sobre su TV (incluidos floreros vases of water). con agua). 1. instrucciones 1. Lea Readestas these instructionsatentamente. carefully. 2. Conserve estas instrucciones en 2. Keep these instructions un lugar seguro. in a safe place. 7. Nonot coloque su TV TV cerca de ninguna fuente de calor 7.Do put your near any heat source (comoasradiadores (such radiators oorestufas), stoves),oorcerca nearde equipos (incluidos los amplificadores) que that produzcan calor. equipment (including amplifiers) produce heat. 3. Siga todas lasinstructions. instrucciones. 3.Follow all the 4. No not coloque su TV agua. 4.Do put your TVcerca near del water. 5.Only clean su your with dry cloth. 5. Solo limpie TVTV con un apaño seco. 8. Su TV está equipado con un enchufe polarizado o con un descarga a tierra. El enchufe 8.Your TVenchufe is eithercon fitted with a polarised polarizado tiene dos patillas, más ancha que plug or grounding - type plug.una A polarised la otra. enchufe conexión a tierra plug hasEn two bladescon with one wider thantiene dos patillas y un tercer diente a tierra. patilla más the other. A grounding - type plugLa has ancha o el tercer es para suprong. seguridad. Si two blades and a diente third grounding el enchufe suministrado no se adapta The wide blade or the third prong is a su salida, provided your safety. If the provided solicite alfor electricista que sustituya la caja de enchufe plug does tal notque fit into your ask de modo admita eloutlet, enchufe dean su TV. electrician to replace your plug socket so that pise, it fits apriete, your TVenganche plug. 9.No o dañe el cable de energía. Preste atención para no traccionar del cable, especialmente en las cajas de enchufe y en 9.Do not walk trap, el lugar por on, donde salepinch de la or TV.damage the power cord. Take care that the cord is not pulled, especially at plug sockets and where it comes out of the TV. 6.Do block las theaperturas ventilationde openings. 6. No not bloquee ventilación. 10.Only attachments and accessories 10. Useuse únicamente dispositivos y accesorios (included with TV)that we have (incluidos conyour su TV) aprobados. approved. 1 5 Important safetyde instructions Instrucciones seguridad importantes 11. Use su TV únicamente sobre carros, 12. Desenchufe su TV tanto de la energía como soportes, trípodes o mesas aprobadas por 12.Unplug de la your antena durante las tormentas eléctricas TV both power and 11.Only use TV trolleys , stand s , tripods or nosotros. Si usa su TV sobre un carro/mesa, antenna o cuando no la utilice durante during lightning stormsuna or semana o table s that we approve. If you use a tenga cuidado al moverla para que no se más. when you won't be using it for a week trolley /table with your TV, be careful caiga.you move it. S o that it doesn't tip or more. when over. 13.If TVnecesita needs repairing, a qualified service If you damage 13. Siyour su TV reparación,use emplee a un técnico detechnician. servicio cualificado. Si dañayour su TV, TV, it will need to be serviced. tendrá que ser reparada. 14. Tenga cuidado al enchufar el cable de energía en el enchufe. No sobrecargue los enchufes de 14.Be careful when you su plug power cord a socket. not overload wall sockets. pared. Pueden dañar TV,the ocasionarle un into shock eléctricoDo o provocar incendios. Compruebe They could damagedeyour TVde and give you an electric su shock a fire. un el cable de energía su TV vezcould en cuando y desenchufe TV siorelcause cable presenta Check your TV's power cord from time to time , and unplug your TV if the power aspecto desgastado. Deje de utilizarla hasta sustituir el cable de energía mediante un técnico cord looks worn. Stop using it until you have had de theenergía. power cord replaced by a cualificado. No retuerza, apriete o enrosque el cable qualified technician.Do not twist, kink or pinch the power cord. 15. Eliminación de su TV. La lámpara fluorescente dentro de su TV contiene una pequeña cantidad de mercurio. Llame a su municipio para obtener información acerca del centro de reciclaje más cercano, y para asegurarse de que la TV sea eliminada según las normas del 15.Disposing ofyyour TV. The fluorescent lamp inside your TV has a small amount of Reino Unido la UE. mercury in it. Phone your local council to find out where your nearest recycling centre is located to ensure the TV is scrapped in compliance with UK & EU regulations . Importante Note - Si su TV fría, there puedemay haber parpadeos encenderla. es normal -If your TVestá is cold, bepequeños some small 'flickers'alwhen you turnEsto it on.This is y su TV noand presenta alguno. normal thereproblema is nothing wrong with your TV. - Evite touching tocar la pantalla LED con cualquier o con el dedoyour contra esta,against ya que it as -Avoid the LED screen with anyobjeto object or holding finger podría dañarla. this may cause damage. 2 6 You will see th Important safetyde instructions Instrucciones seguridad importantes This symbol m If you touch the Advertencia. Para reducir el riesgo de shock eléctrico, no exponga este producto a la lluvia o humedad. Precaución. Riesgo de shock eléctrico. No abrir. This symbol m further action. You seeautoadhesivos these stickersen onsuyour Veráwill estos TV. TV. This there your notaislados. insulated. Este symbol símbolomeans significa que are haywires cablesinen su TV TV which que noare están IfSiyou wires, yousufrir mayun getshock an electric shock. tocatouch estosthese cables, puede eléctrico. -You should not If your TV brea This you should servicing guide before you take Este symbol símbolomeans significa que debe read leer lathe guía de servicio antes de tomar further action. cualquier medida. [Precaución] -You not service TV unless you cualificado are qualified to esto. do so.Si - Noshould debe reparar su TVyour a menos que esté para Ifsuyour TVrompe, breakscontacte down, contact a qualified engineer. TV se un ingeniero de TVTV cualificado. -Make sure you in your securely. - Asegúrese deplug enchufar suTV TV en condiciones de seguridad. -Make sure you -If you use your use as a scree with a high leve screen perman How to clean your TV 1 Wipe the TV screen with a 2 Do not use solvent methy - Si utiliza su TV para reproducir vídeo juegos o para conectar su ordenar para usarla como pantalla, mantenga el brillo y el contrastescreen. -If you use your TV to play video games or connect to your computer to sure you switch the 3 Make en un nivel bajo. Las imágenes con alto nivel de brillo o contraste use as a screen, keep brightness and contrast at a low level. Images puede quemar la pantalla de forma permanente. with a high level of brightness or contrast may burn on to the screen permanently. How to clean your TV Cómo limpiar su TV 1 Wipe the TV screen with a soft, dry cloth Do un notpaño use solvent methylsobre benzene. 12Pase seco y limpio su TV.Strong chemicals may damage your TV screen. 2 No use metilbenceno disolvente. Los productos químicos fuertes pueden dañar la pantalla 3 Make sure you switch the TV off before you clean it. de su TV. 3 Asegúrese de desconectar su TV antes de limpiarla. 3 7 Setting up and using Configuración y uso your de suTV TV 1.Check voltage shown on theenserial number or rating label on TV, and 1. Controlethe la tensión que se muestra el número de serie o la etiqueta de your clasificación en make your TV compatible with con the la voltage home. If you not de su TV, ysure asegúrese de is que sea compatible tensiónindeyour su hogar. Si no estáare seguro sure about you have in yourcon home, please contact your distributor la tensión quethe hayvoltage en su hogar, comuníquese su distribuidor o con un electricista. an electrician. 2. or Asegúrese de conectar el cable de energía en el enchufe en condiciones de seguridad. Si tiene 2.Make sure you plugsuthe cable con intolathe socket securely. you have problemas al conectar TV,power comuníquese tienda donde compró suIfTV para sustituir el cable de energía. problems plugging in your TV, please contact the shop you bought your TV from to replace the power cable. The plug está is designed only fit solo one de way . manera. Si tiene s o that it will colocarse El enchufe diseñado,para que pueda una If you have problems plugging in the socketcomuníquese properly, please problemas al conectar el enchufe adecuadamente, con la tienda donde compró suthe TV. shop you bought your TV from . contact 1.Do not overload power sockets or extension cords when you are setting up your you overload the power sockets orcables extension cords, you receive 1.TV.If No sobrecargue los enchufes de energía o los de prolongación al could configurar su TV. an electric shock or cause a fire.o los cables de prolongación, podría sufrir un shock Si sobrecarga los enchufes de energía 2.Do not place any objects on the power cord when you are setting up your TV. eléctrico u ocasionar un incendio. Keep your ningún TV screen fromde any sharp asMantenga screw drivers or de la 2.No coloque objetoaway en el cable energía al objects configurarsuch su TV. la pantalla knives that don t scratch or damage TV screen.Only use the pantalla so de su TV you alejada de' objetos punzantes comothe destornilladores o cuchillos para no dañar correct when youuse setel up your ni rayar lapower pantallacord de su TV. Solo cable de TV. energía correcto al configurar su TV. 3.Make suredeyou turn off your when are not using you won'tuna be semana using o 3. Asegúrese desconectar su TVTV cuando noyou lo utilice. Si no usaráit.If su TV durante your TV for a week poweraéreas. and aerial connections. más, desconecte tantoor la more, energíaunplug como lasboth conexiones 4.The vents at the backenof are todelet air son cool the inside TV,so 4. Todas las ventilaciones la your parte TV posterior su TV para permitir queofseyour refrigere el aire dentro' tdeoverheat. su TV, para Please que no recaliente. Asegúrese de que ventilaciones it doesn make sure the vents arelas not blocked. no estén bloqueadas. 5.Do not put your TV on a bed, sofa or carpet.This may block the vents. 5. No not coloque TV TV sobre sofás o space, alfombras. Podrían bloquear las ventilaciones. 6.Do put su your in camas, an enclosed such as on a bookshelf or in a TV 6.cabinet.Doing No coloque su TVthis en lugares cerrados, como bibliotecas o armarios para TV. Podrían bloquear may block the vents. las ventilaciones. 7.Keep your TV away from direct sunlight. 7. Mantenga su TV alejada luzunsteady solar directa. 8.Do not place your TV de onlaan shelf or desk.The TV could fall and 8.injure No coloque you. su TV sobre escritorios o estantes que no sean estables. La TV podría caerse y lesionarlo. 9.Do not put objects inside the TV (such as children's toys).Doing this could 9.give No coloque dentro de la (como juguetes infantiles). sufrir un shock eléctrico u you anobjetos electric shock orTV damage the parts insidePodría your TV. ocasionar daños en el interior de su TV. When you must call a technician If any of the following your TV and contact the shop Cuándo llamarhappens,unplug a un técnico you bought your TV from or a qualified technician to repair your TV. Si sucede algo de lo que se describe a continuación, desconecte su TV y comuníquese con el 1.If the power cord or plug is damaged negocio donde la ha comprado, o bien con un técnico cualificado para la reparación de su TV. 2. If liquid gets into the screen dampoorelwet 1.3. SiIfelyour cableTV deisenergía enchufe están dañados your TV alcanza is damaged 2.4. SiIfun líquido la pantalla doesn't properly. 3.5. SiIfsuthe TVTV está húmedawork o mojada 4. Si su TV está dañada The your TV will work in 5. Si latemperatures TV no funciona correctamente Las temperaturas dentro de las cuales funciona su TV Your TV will only work when the temperature is in the range of 0℃- 40℃. Su TV solo funcionará cuando la temperatura se encuentre en el rango de 0℃- 40℃. 4 8 Setting up and using Configuración y uso your de suTV TV No not tratetry detoreparar TV usted mismo. Dentro esta hay alta tensión Do repairsu your TV yourself. There de is high voltage inside yit podrían and recibir un shock eléctrico. you could receive an electric shock. Safety notice de seguridad Información Su TV cuenta con marcado CE. Esto significa que su TV cumple tanto la directiva EMC (89/336/ Your TV has a CE marking. This means your TV meets both the EMC directive EEC), (93/68/EEC) como la Directiva de baja tensión (73/23/EEC) emitida por la Comunidad (89/336/EEC), (93/68/EEC) and the Low Voltage Directive (73/23/EEC) that the Europea. European Community have issued. Cuando eliminar suaway TV When younecesite need to throw your TV Comuníquese conthe la tienda que le ha vendido la TV TV cuando desee desecharla. Please contact shop that sold you your when you need to throw it away. 1.No su vieja TVold conTV losaway residuos 1.Doelimine not throw your withdomésticos. your household waste. 2.También puede con su municipio saber puedenyour recoger 2.You can alsocomunicarse contact your local council tolocal seepara if they cansi collect old su TV.vieja TV. Si su Tvyour en un vertedero, químicos peligrosos de su TV pueden filtrarse If elimina you throw TV away at los a landfill site,dangerous chemicals from youren TVel suelo y pueden alcanzar la cadena can leak into the groundalimenticia. and get into the food chain. 3.Al sustituir su TV por una nueva, la tienda donde ha comprado su TV es legalmente responsable 3 .When you replace your TV with a new one, the shop who sold you your TV de tomar su vieja TV y eliminarla. are legally responsible for taking your old TV and throwing it away. ELIMINACIÓN AL FINAL DE LA VIDA ÚTIL END OF LIFE DISPOSAL Warning ! ThisEste logo logo set on the product thatsignifica the recycling this ¡Advertencia! colocado en elmeans producto que elofreciclaje del apparatus thedel framework Directive 2002/96/CE of January aparato secomes efectúawithin dentro marco deoflathe Directiva 2002/96/CE del 27 de enero 27, 2003 concerning the Waste of Electrical and Electronic Equipment (WEEE). de 2003, en materia de Residuos de Equipos Eléctricos y Electrónicos (WEEE, This symbol means that used andlos electronic products should not be por sus siglas en inglés). Esteelectrical símbolo que productos eléctricos y electrónicos mixed with household waste. There isdomésticos a separate collection for usados no general deben mezclarse con los residuos generales.system Existe un these products. sistema de recolección separado para estos productos. debe eliminar este equipo, utilice el contenedor de use residuos ordinario! IfSiyou want to dispose of this¡no equipment, please do not the ordinary dust bin ! -The presencedeofsustancias dangerous substances in equipos the electrical and yelectronic equipments can -La presencia peligrosos en los eléctricos electrónicos pueden tener have potential consequences the environment and human health in ciclo the cycle of consecuencias potenciales en elon medioambiente y el la salud humana en el de reprocesamiento de reprocessing this product. este producto. -Therefore, at the end of its lifetime, this product shall not be disposed with other non-Por lo tanto, al final de su vida útil, este producto no debe ser eliminado con otros residuos no reciclados. recycled waste. Used electrical and electronic equipment must be treated separately and in Los equipos with eléctricos y electrónicos deben proper ser tratados por separados las normasofque requieren accordance legislation that requires treatment, recoverysegún and recycling used un tratamiento adecuado, equipment. la recuperación y el reciclaje de los equipos eléctricos y electrónicos. electrical and electronic -Las autoridades y los revendedores cuentanprocedures con procedimientos especiales para recolectar y -Local authoritieslocales and resellers have set special for the purpose of collecting and recycling this product (please contact local authority for further You have reciclar este producto (comuníquese con sus your autoridades locales para obtenerdetails). más detalles). Usted tiene the obligationdetousar uselos thesistemas selective collection put in place a bysuyour local por sus la obligación dewaste recogida selectivasystems de residuos puestas disposición authority. autoridades locales. -If used electrical equipment has batteries or accumulators, please -Siyour su equipo electrónicooroelectronic eléctrico usando tiene baterías o acumuladores, elimínelos separadamente con dispose of these separately beforehand according to local requirements. anterioridad, según las normas locales. -By disposing.of this product correctly you will help ensure that the waste undergoes the -Al eliminar treatment, este producto correctamente, ayudaráand a asegurar que los residuosnegative se someterán al tratamiento, effects on necessary recovery and recycling thus prevent potential tratamiento, recuperación y reciclaje previniendo efectos en el medioambiente y the environment and human healthnecesarios, which could otherwiselos arise duenegativos to inappropriate waste en la salud humana que podrían producirse debido a la incorrecta manipulación de residuos. handling. Esta unidad cumple la Directiva del Consejo Europea 2006 / 95 This unit complies with European Council Directive 2006 / 95 CE (Directivas de compatibilidad electromagnetica y de baja tensión) CE (Electromagnetic Compatibility & Low Voltage Directives) 5 9 Whatincluye is included Qué su TV with your TV What TV should likesu Qué your aspecto debelook tener TV Qué incluye su TV What is included with your TV guide GuíaUser del usuario Control remoto Remote control Manual del usuario Cómo usar suremote control remoto How to use your control 1.Take backtrasera cover del off control your TV remote put two AAAdos batteries 1. Retirethe la tapa remoto de and su TV y coloque bateríasinto AAAthe en remote el control control. Make suredethe + los andsímbolos - symbols your match the . remoto. Asegúrese que + yon – de las batteries baterías coincidan condiagram el diagrama. 2.Replace So que theyestén are facing the right way.If you won't beutilizará using the 2. Sustituyathe las batteries. baterías. Para orientadas de manera correcta. Si no el remote controldurante for a long time,take the batteries yourUse remote control control remoto un período prolongado, retireout.Use las baterías. el control remoto carefully.Do drop.Keep the remote controlremoto away from water, direct con cuidado. not No lo deje caer. Mantenga el control alejado del agua, desunlight la luz solar and hotysurfaces. directa de las superficies calientes. 6 10 SS o o cc kk e ts o on n thla e cc kk o oposterior ff yy o ou V de su TV Enchufes enth parte e ts e ba ba u rr TT V 1.Presione “VOL+” o “VOL-” para 1.Press “VOL+” or “VOL-” to increase 1.Press “VOL+” or “VOL-” to increase oraumentar decrease the volume. el volumen. disminuir or decrease o the volume. 2.Press “CH+” or “CH-” to scan 2.Presione “CH+” or “CH-”para buscar 2.Press “CH+” or “CH-” to scan through channels. canales. through channels. 3.Press “MENU” to bring up the main 3.Press “MENU” to bring up que the main 3.Presione “MENU” para el menú menu on the screen. menu on the screen. en pantalla. principal aparezca 4.Press “SOURCE” to select the input 4.Press “SOURCE” to select the input 4.Presione “SOURCE” para seleccionar la source. source. fuente de entrada. 5.Press “STANDBY” button to turn 5.Press “STANDBY” button to turn standby mode on or off. 5.Presione el botón “STANDBY” para standby mode on or off. 6.REMOTE Infrared sensorstandby. habilitar SENSOR: o deshabilitar el modo 6.REMOTE SENSOR: Infrared sensor for the remote control. 6.SENSOR REMOTO: for the remote control. Sensor infrarrojo 7. POWER INDICATOR:Show red in 7. POWER INDICATOR:Show red in para el control remoto. standby mode, show green or blue mode, show green or blue 7.standby INDICADOR DE ENERGÍA: Se visualiza when youren TVmodo is switched on. se visualiza en rojo standby; Remote Sensor Power Indicator VOL - CH - VOL + CH + MENU SOURCE V id e o R L Y Pb Pr S C A R T PC A U D IO VGA C oax Video:Connect the Video output jack of DVD or VCR. R/L AUDIO:Connect the Video/YPbPr AUDIO output jack of DVD. SCART:Connect the SCART jack of VCR or DVD Video: Conecta la the toma de output salida jack de Vídeo PC AUDIO: Connect Audio of PC.de DVD o VCR. R/L AUDIO: Conecta la toma de salida de Vídeo/YPbPr AUDIO de DVD. SCART: Conecta la toma de SCART (eurconector) de VCR o DVD VGA: Connect a computer to these jacks. RF Connect the antenna. PCIN:AUDIO: Conecta la toma de salida de Audio del PC. VGA: Conectathe lasYPbPr tomasoutput a un jack ordenador. YPbPr:Connect of DVD or VCR. RF IN: Conecta la antena. Conecta la toma de salida de Vídeo de DVD o VCR. HDMI1/2/3: Connect the HDMI output jack of DVD. Headphone: Conecta el auricular. CI:Connect to the CI card. HDMI1/2/3: Conecta la toma de salida de HDMI del PC. CI: Conecta a la tarjetausb CI. device. USB: Connect to portable USB: Conecta a un dispositivo USB. Coax: Coax output. Coax: Salida coaxial. Headphone: Connect the earphone. 7 11 TV Head H D MI1 H D MI2 H D MI3 C I U S B ph o n e en verde cuando su TV está encendido. STANDBY BASIC INSTALLATION INSTALACIÓN BÁSICA Powerdel Cord Connection Conexión cable de energía -- Conecte el cable energía correctamente según se muestra. Connect the powerde cord correctly as shown. Press the el STANDBY switch your LED en TV su to switch the TV unitLED on. The indicator on the front -- Presente interruptor de of STANDBY televisor parapower encender la unidad. El panel lights up inde green or blue. indicador energía sobre el panel frontal se enciende en verde o azul. Cable de energía Antennas Connection Conexión de antena Para asegurar una buena imagen y un buen sonido, necesita instalar el sistema de antena de TV. To picture según and sound,TV antenna system needs to be installed. The antenna systemdeasTV, El ensure sistemagood de antena se muestra pueden ser suministrado en las tiendas de equipos shown can be sourced from TV equipment shops, which will provide service for correct installation que pueden brindar servicios para una correcta instalación y conexión. Después de la instalación, and connection. After installation, insert the 75-OHM antenna plug into the antenna jack as shown. introduzca la clavija de la antena 75-OHM en la toma de la antena según se muestra. AMPLIFICADOR DE ANTENA PARA EXTERIORES AMPLIFICADOR DE ANTENA PARA INTERIORES CLAVIJA DE ANTENA 75 OHM CLAVIJA DE ENERGÍA DEL AMPLIFICADOR DE LA ANTENA 8 12 AV Connection Conexión AV Conecte deand salida de VÍDEO y AUDIO del DVD o VCR lasINtomas IN the AV set delusing equipo Connect la thetoma VIDEO AUDIO output jack of the DVD or VCR to theaAV jacks on usando cable RCA (amarillo [vídeo], rojo [audio izquierdo y derecho]). the RCAelcable (Yellow [video], White and blanco RED [lefty & Right audio]). Seleccione la input fuente de entrada AVSOURCE usando button el botón SOURCE Select the AV source using the on the remote (fuente) control. del control remoto. Video R L PC AUDIO SCART VGA RF Cable de vídeo DVD o VCR parte posterior Conexión YPbPr Conecte la salida YPbPr/YCbCr del DVD o VCR a la entrada YPbPr del equipo. La calidad de Connect the YPbPr/YCbCr output of the DVD or VCR to the YPbPr input on the set.The picture imagen es mejor en comparación con la conexión a un entrada de vídeo VCR estándar. Conecte la quality is improved compared to connecting a regular VCR to the video input. Connect the Audio output of salida de audio del DVD or VCR de las tomas de entrada de Audio del equipo usando el cable RCA the DVD or VCR to the Audio input jacks on the set using the RCA cable.(3.5mm plug-2 X RCA plug) (enchufe de 3,5 mm -2 X enchufe RCA). Haga que coincidan los colores de las tomas: Y es verde, Match the jacks colours: Y is green, Pb is blue, Pr is red, Audio left is white and Audio right in red. Pb es azul, Pr es rojo, Audio izquierdo es blanco y Audio derecho es rojo. Select YPbPr input source using the SOURCE button on the remote control. Seleccione la fuente de entrada YPbPr usando el botón SOURCE (fuente) del control remoto. Video R L SCART PC AUDIO VGA Head YPbPr phone HDMI1 HDMI2 HDMI3 CI USB Coax Cable de Audio Cable YPbPr 9 13 RF VGA(PC) Connection Conexión VGA(PC) Conectethe laRGB salida RGBofdel toma delthe equipo. Conecte salidaoutput AUDIO delPC PCtoathe la toma Connect output thePC PC a tola the VGAVGA jack on set. Connect the la AUDIO of the PC PC AUDIO del equipo. Seleccione la fuente de entrada PC usando el botón SOURCE (fuente) del control remoto. AUDIO jack on the set. Select the PC input source using SOURCE button on the remote control. Video R L SCART PC AUDIO VGA RF Conexión HDMI La conexión HDMI permite que usuario transfiera tanto señales de control HDMI connection allows the user to el transfer both audio and videolas control signals throughde onevideo-audio cable only. a través de un único cable. Estas señales se transfieren en digital. These signals are transferred in digital. Head YPbPr phone HDMI1 HDMI2 HDMI3 CI USB Coax 10 14 Connection ConexiónSCART SCART (euroconector) Connectelthe SCART connector onel the external video device the SCART connector onTV theLED LEDusando TV Conecte contector SCART en dispositivo externo deltoconector SCART en la un using a SCART cable. cable SCART. Video R SCART L PC AUDIO MEDIA Connection Conexión MEDIA USB:Connect Conecta a un dispositivo USB. USB: to portable usb device. Head YPbPr phone HDMI1 HDMI2 HDMI3 CI USB Coax PUERTO USB 11 15 VGA RF Headphone Conexión delConnection auricular Head Auricular phone -You can connect a headphone to your TV if you wish to watch program without -Puede conectar unaround auricular a su TV si desea ver un programa sin molestar a la gente a su disturbing people you. alrededor. -Insert some standard headphone with a 3.5mm jack plug into the 3.5mm jack on the -Introduzca un auricular estándar con clavija de toma de 3,5 mm en una toma 3,5 mm en la parte back of the TV (see diagram). posterior de la TV (ver el diagrama NOTE: IMPORTANTE: 1.HEADPHONE VOLUME 1.ADVERTENCIA SOBRE ELWARNNING. VOLUMEN DEL AURICULAR. Connectlos headphones volume set low and increase it if required. Conecte auriculareswith conthe el volumen bajo, y auméntelo si fuera necesario. Escuchar por tiemposthrough prolongados mediante ciertos auriculares a un volumen alto puede ocasionar Prolonged listening some headphones at high volume settings can result in daño auditivo. hearing damage. 2.No recibirá sonido the de la TV cuando conecte los you auriculares sistema. 2.You will notelreceive sound from the TV when connectalheadphones to the system. 12 16 Remote instruction Instrucciones del control remoto Remote control control instruction Remote control instruction este botónto para encender para 1. STANDBY 1 Press this button switch yoursu TVTVono or putcoloit STANDBY Presione 1 STANDBY carlo enthis standby. Press button to switch your TV on or put it into standby. 1 STANDBY Press this button to switch your TV on or put it into standby. MUTE MUTE Presione MUTEto(silencio) sonido into standby. Press MUTE turn offpara the desactivar sound on el your TV.de su TV. Presione MUTE nuevamente para volver a restaurar Press MUTE to turn the sound onback your TV. Press MUTE again tooff put the sound on your elPress sonido en su TV. Press MUTE to turn off the sound on your TV. MUTE again to put the sound back on your TV. Press MUTE again to put the sound back on your TV. TV. 22 Botones Numbernuméricos buttons 2 Number buttons Press 0~9 button to select a TV channel. 2 Number buttons Press 0~9 button to select a TV channel. -/-Press this button toto go back the Presione los botones 0~9 paratoaseleccionar el you canal de TV. Press 0~9 button select TV channel channel. MUTE MUTE -/--/-- -/-- Presspreviously this buttonwatching. to go back to the channel you were Press this button to go back to the channel were previously watching. Presione este botón para volver al canal que you esta viendo were previously previamente. Returns to the watching. previous channel. 11 1 22 2 Returns to the previous channel. Returns to the previous channel. TV model). Vuelve althe canal anterior. Opens 8 Day TV Guide(Digital EPG Opens the 8 Day TV Guide(Digital TV model). EPG Opens the 8 Day TV Guide(Digital TVdigital). Abre la Guía de TV diaria 8 (modelo de TV EPG To switch the dialogue at the bottom ofmodel). the SUBTITLE EPG To switch the dialogue at the bottom of the SUBTITLE screen(on/off). switch the dialogue at the bottom of the SUBTITLE To screen(on/off). Para activaraudio el diálogo en lafrom parteL-R inferior la pantalla (on/off). screen(on/off). Switches output anddeMono-Stereo. SUBTITLE AUDIO Switches audio output from L-R and Mono-Stereo. AUDIO l/ll l/ll Conmuta laaudio salidaoutput de audiofrom de izquierda-derecha Switches L-R and Mono-Stereo. 33 AUDIO AUDIO l/ll yTodeswitch Mono-Stereo. off the screen when listening to radio. 3 DISPLAY 3 To switch off the screen when listening to radio. 3 DISPLAY DISPLAY Para apagar la the pantalla escuchar la between radio. toTV switch screen when listening radio. 33. DISPLAY Switch to off Digital TValand switch and TV/RADIO To Switch Digital TV and switch between TV and TV/RADIO radio in to Digital TVDigital mode. TV/RADIO Para conmutar a TV y conmutar entre TV y radio Switch to Digital TV and switch between TV and TV/RADIO radio in Digital TV mode. en modo TV Digital. radio in you Digital TV mode. Allows to navigate the on-screen menus and Allowsthe yousystem to navigate the to on-screen menus and adjust your preference. Permite navegar en lossettings menús y ajustar Allows navigate thede on-screen menuslasand adjust you the to system settings topantalla your preference. configuraciones del sistema según su preferencia. adjust the system settings to your preference. To display OSD menu. MENU MENU Para visualizar el menú OSD. To display OSD menu. MENU To display OSD menu. MENU To exit all menus. EXIT EXIT Para salirall de menus. todos los menús. To exit EXIT exit the all menus. 44 4 EXIT VOL+/VOL- To Press buttons topara increase/decrease losVOL botones de VOL aumentar/disminuirthe 4 VOL+/VOLVOL+/VOL- Presione Press the VOL buttons to increase/decrease the 4. el nivel the de sonido. sound level. 4 4 VOL+/VOL- Press VOL buttons to increase/decrease the sound level. CH+/CHPress level. the buttons go obtener throughla the list. sound CH+/CHPresione los CH botones de CHtopara lista channel de las cadenas. CH+/CHPress the CH buttons to go through the channel list. FAV Displays Favourites list. CH+/CHPress the CH buttons to go through the channel list. FAV Visualiza la lista de favoritos. FAV Displays Favourites list. AUTO To auto adjust the screen. FAV Displays Favourites list. AUTO Para ajustar automáticamente AUTO To auto adjust the screen.la pantalla. ASPECT To auto chang the aspect of your TV. AUTO To adjust the screen. ASPECT To chang aspect de of su your ASPECT Para cambiarthe el aspecto TV. TV. ASPECT To of your TV. SOURCE To chang displaythe theaspect input/source menu. SOURCE Para To display the input/source menu. SOURCE 55 visualizar el menú de entrada/fuente. SOURCE To display the input/source menu. PMODE Scrolls through picture mode options. PMODE Scrolls through picture mode options. 5 PMODE Se desliza a través de las opciones de modo de imagen. SMODE Scrolls through through picture sound mode PMODE Scrolls mode options. options. SMODE Scrolls through sound mode options. SMODE Se desliza a travéssound deto lascycle opciones de modo SLEEP Press repeatedly through the de sonido. SMODE Scrolls through mode options. SLEEP Pressoptions. repeatedly to cycle through the sleep Presione repetidamente para ver las opciones SLEEP Press to cycle through the de “suspender”. sleeprepeatedly options. SLEEP sleep options. To enter Teletext mode. 5 TEXT To enter Teletext mode. 5 TEXT TEXT Para ingresar en el modo Teletexto. 5. To display the index page. INDEX To enter Teletext mode. 5 TEXT To display the index page. INDEX TVdisplay and TXT picture mixed together Para visualizar la index páginaare índice. MIX INDEX To the page. INDEX TVtransparent and TXT picture are mixed together MIX in background. TV and TXT MIX picture mixed together MIX in transparent background. Las imágenes TV y are TXT se mezclan en un fondo transparente MIX Teletext mode-To reveal or hide the REVEAL in transparent background. Teletext mode-To reveal or hide thelas palabras escondidas. REVEAL hidden words. Modo Teletexto - Parareveal mostraror o esconder REVEAL Teletext mode-To hide the REVEAL hidden words. Teletextwords. mode-Hold current page which HOLD hidden Modo Teletexto - Mantiene la página actual visualizada. HOLD Teletext mode-Hold current page which HOLD is displayed. Teletext mode-Hold current page which HOLD is displayed. Acceso de página SUBPAGE Sub coded pagesubcodificada. access. SUBPAGE is displayed. SUBPAGE Sub coded page access. To switch the between the SIZE Para conmutar lascreen pantalla entre las diferentes formatos de imagen. Sub coded page access. SIZE SUBPAGE To switchpicture the screen between the SIZE different formats. To switch the screen between the SIZE different picture formats. Para cancelar la visualización. CANCEL To cancelpicture the display. different formats. CANCEL To cancel the display. CANCEL cancel thepara display. CANCEL En modo mode,press DTV ejecutar la funciónthe de conmutación de tiempo. TIMESHIFT In DTV to execute TIMESHIFT To In DTV mode,press TIMESHIFT time shift function. to execute the DTVshift mode,press TIMESHIFT Intime function. to execute the time shift function. 13 13 13 17 MUTE MUTE MUTE STANDBY STANDBY STANDBY 1 1 1 4 4 4 7 7 7 -/--/-EPG -/-EPG EPG 2 2 2 5 5 5 8 8 8 0 0 SUBTITLE 0 SUBTITLE SUBTITLE DISPLAY DISPLAY DISPLAY 3 3 3 6 6 6 9 9 9 AUDIO AUDIO I/II AUDIO I/II TV/RADIO I/II TV/RADIO TV/RADIO OK OK OK MENU MENU MENU + ++ _ __ VOL VOL VOL FAV FAV FAV AUTO AUTO AUTO ASPECT ASPECT ASPECT EXIT EXIT EXIT + ++ _ __ CH CH CH SOURCE PMODE SMODE SLEEP SOURCE PMODE SMODE SLEEP SOURCE PMODE SMODE SLEEP TEXT INDEX TEXT INDEX TEXT INDEX HOLD SUBPAGE HOLD SUBPAGE HOLD SUBPAGE TIMESHIFT REC TIMESHIFT REC TIMESHIFT REC MIX REVEAL MIX REVEAL MIX REVEAL SIZE CANCEL SIZE CANCEL SIZE CANCEL FAVFAV+ FAVFAV+ FAVFAV+ Remote controldel instruction Instrucciones control remoto 5 REC FAVFAV+ To Record what currently on Para grabar lo queis actualmente se ve en televisión. television. 1 program. 2 Presionar aumentar programa favorito. Press to para increase yoursu favourite Para funcionamiento/pausa To play/pause. Para detener la reproducción. To stop the playback. Para el funcionamiento en modo retroceso rápido To play in fast rewind mode. Para el funcionamiento en forward modo avance rápido To play in fast mode. To restart theactual. current chapter. Para reiniciar el capítulo To advance Para avanzar al próximoforward capítulo.to the next MUTE STANDBY Press to para decrease your Presionar disminuir sufavourite programa favorito. program. Solo funciona cuando Only operates when un dispositivo USB a compatible USB compatible está device is connected. conectado. chapter. 1 2 3 4 5 6 7 8 9 -/-- 0 EPG SUBTITLE AUDIO I/II BOTONES DE COLOR COLOR BUTTONS DISPLAY For navigating as prompted Para navegar cuando aparecen enon la pantalla. screen. TV/RADIO 3 OK MENU EXIT FAV 4 + _ AUTO VOL ASPECT SOURCE PMODE SMODE 5 TEXT INDEX HOLD SUBPAGE TIMESHIFT REC 14 18 + _ CH SLEEP MIX REVEAL SIZE CANCEL FAV- FAV+ Select Input Source Seleccionar la fuente de entrada SOURCE DTV ATV SCART AV YPbPr HDMI1 HDMI2 HDMI3 PC USB SOURCE:Exit Basic Menu Operation Operación del menú básico Press SOURCE button on the remote control to display the input source list . Presione el botón SOURCE en el control remoto para visualizar la lista de fuente de entrada. Press ▼ / ▲ button to select the input source you want to watch. Presione el botón / para seleccionar la fuente de entrada que desea ver. Press OK button to enter the input source. Presione el botón OK para introducir la fuente de entrada. Press EXIT button to quit. Presione el botón EXIT para salir. 15 19 Picture Menu Menú imagen Presione el botón MENU para visualizar el menú principal. Presione el botón / para seleccionar PICTURE (imagen) en el menú principal. Este marcará la primera opción. Press MENU button to display the main menu. Press ◄ / ► button to select PICTURE in the main menu,it will highlight the first option. Picture Picture Mode Standard Brightness 50 Contrast 50 Sharpness 50 Saturation 50 Hue 0 Color Temp Standard Full Aspect Ratio Move Adjust MENU:Return EXIT : Exit 1. Pressel ▼botón / ▲ button selectseleccionar the option that want to adjust in the PICTURE menu. 1. Presione / to para layou opción que desea ajustar en el menú PICTURE (imagen). 2. Presione / topara ajustar. 2. Pressel ◄botón / ► button adjust. 3. Después de finalizar el ajuste, presione el botón MENU para volver al menú anterior. 3. After finishing your adjustment, Press MENU button to return back to the previous menu. Modo Imagen Picture Mode Presione el botón / para seleccionar Picture Mode (modo de imagen); después presione el botón OK para Pressen ▼ el / ▲submenú. button to select PictureelMode, OKseleccionar. button to enter sub-menu.Press ▼ / ▲ button to select. ingresar Presione botónthen/press para (Available Picture mode: Dynamic, Standard,Mild,Personal). (Modo de imagen disponible: dinámica, estándar, media, personal). Youcambiar can change the value contrast, brightness, coloryand sharpness when picture está is in Personal mode. modo (modo Puede el valor delofcontraste, brillo, color nitidez cuando lathe imagen en Personal TIPS: You can press PMODE button on the remote control to change the Picture Mode directly. personal). Brightness CONSEJOS PRÁCTICOS: Puede presionar el botón PMODE en el control remoto para cambiar el modo de imagen directamente. Press ▼ / ▲ button to select Brightness,then press OK button to enter sub-menu.Press ◄ / ► button to adjust. BrilloContrast Pressel ▼ botón / ▲ button/to select OK button to enter sub-menu.Press ◄ el / ►botón button OK to adjust. Presione para Contrast,then seleccionar press Brightness (brillo); después presione para ingresar en el submenú. Presione el botón / para ajustar. Sharpness Contraste Press ▼ / ▲ button to select Sharpness,then press ◄ / ► button to adjust. Presione el botón / para seleccionar Contrast (contraste); después presione el botón OK para ingresar en Saturation el submenú. Presione el botón / para ajustar. Adjust Nitidez the saturation of the color based on your own like. Presione Hue el botón / para seleccionar Sharpness (nitidez); después presione / para ajustar. Use in compensating color changed with the transmission in the NTSC code. Saturación Ajuste la saturación del color según sus preferencias. Color Temp Tonalidad Press ▼ / ▲ button to select Color Temperature,then press ◄ / ► button to select. (Available Color Temperature: Utilícelo para compensar el color cambiado con la transmisión del código NTSC. Standard,Cool,Warm). Temp. del color Aspect Presione el Ratio botón / para seleccionar Color Temperature (temperatura del color); después presione / Press ▼ / ▲ button to select Aspect Ratio ,then press ◄ / ► button to select. (Available Aspect Ratio:Full,Zoom1,Zoom2,4:3). para seleccionar. (Temperatura de color disponible: estándar, fría, cálida). Aspecto de pantalla Presione el botón / para seleccionar Aspect Ratio (aspecto de pantalla); después presione el botón / para seleccionar. (Aspecto de pantalla disponible: completa, Zoom1, Zoom2, 4:3). 16 20 Configuraciones avanzadas Advanced Settings Advanced Settings NR Medium MPEG NR Medium Dynamic Contrast Move Off Adjust MENU:Return 17 21 EXIT : Exit Menú sonido Sound Menu Presione el botón MENU para visualizar el menú principal. Presione el botón / para seleccionar Sound (sonido) en el menú principal. Este marcará la primera opción. Press MENU button to display the main menu. Press ◄ / ► button to select Sound in the main menu,it will highlight the first option. Sound Sound Mode Standard Treble 0 Bass 0 Balance 0 Surround Sound Off EQ Setting AVL Off PCM SPDIF Move Adjust MENU:Return EXIT : Exit Press ▼ / ▲ button to select the option that you want to adjust in the SOUND menu. 1.1.Presione el botón / para seleccionar la opción que desea ajustar en el menú SOUND (sonido). Press ◄ / ► 2.2.Presione el button botónto adjust. / para ajustar. 3.3.Después de finalizar el ajuste, presione botón MENU para volver al menú After finishing your adjustment, Press MENU el button to return back to the previous menu.anterior. Sound Mode Modo sonido Press ▼ / ▲ button to select Sound Mode, then press OK button to enter sub-menu.Press ▼ / ▲ button to select. Presione el botón / para seleccionar Sound Mode (modo de sonido); después presione el botón OK (Available Sound mode: Standard,Music,Movie,Sports,Personal). para ingresar en el submenú. Presione el botón / para seleccionar. You can change the value of Treble and Bass when the sound is in Personal mode. (Modo de can sonido estándar, música, personal). TIPS: You pressdisponible: SMODE button on the remote controlpelícula, to changedeportes, the Sound Mode directly. Puede cambiar el valor de Agudos y Bajos cuando el sonido esté en modo Personal. Treble CONSEJOS PRÁCTICOS: Puede presionar elAdjust botón SMODE en el control remoto para cambiar el modo Press ▼ / ▲ button to select Treble,then press OK button to enter sub-menu.Press ◄ / ► button to adjust. Back Select de sonido directamente. Bass Press ▼ / ▲ button to select Bass,then press OK button to enter sub-menu.Press ◄ / ► button to adjust. Bajo Balance el botón Presione / para seleccionar Bass (bajo); después presione el botón OK para ingresar en el Press ▼ / ▲Presione button to select Balance,then press OK button to enter sub-menu.Press ◄ / ► button to adjust. submenú. el botón / para ajustar. Agudo Surround Sound Presione el button botónto select / para seleccionar Treble botón OK para ingresar en Press ▼ / ▲ Surround press(agudo); Press ◄ /después ► button topresione select On el or Off. Sound ,then el submenú. Presione el botón / para ajustar. Balance Presione el botón / para seleccionar Balance; después presione el botón OK para ingresar en el submenú. Presione el botón / para ajustar. Sonido envolvente Presione el botón / para seleccionar; después, presione el botón Surround Sound (sonido envolvente) / para seleccionar On u Off. 18 22 Configuración EQ Setting el botón / EQ SEQ Presione ingresar en el submenú. para seleccionar la configuración; después, presione el botón OK/ para Press ▼ / ▲ button to select EQ Setting, then press OK/ ►button to enter submenu. EQ Setting EQ Mode Off 120 Hz 0 300 Hz 0 500 Hz 0 1 . 2 Khz 0 3 . 0 Khz 0 7 . 5 Khz 10 0 KHz Move 0 Adjust MENU:Return EXIT : Exit AVL Presione el botón / para seleccionar AVL; después, presione el botón / para seleccionar On u Off. Press ▼ / ▲ button to select AVL ,then press Press ◄ / ► button to select On or Off. SPDIF Presione el botón / para seleccionar SPDIF; después presione el botón / para seleccionar SPDIF Off, Auto, PCM. Press ▼ / ▲ button to select SPDIF ,then press Press ◄ / ► button to select Off,Auto,PCM. Descripción de audio Description Audio Presione el botón / para seleccionar Audio Description (descripción de audio); después, presione el botón OK/ para ingresar en el submenú. Press ▼ / ▲ button to select Audio Description , then press OK/ ►button to enter submenu. AVL Audio Description Mode Off Volume Move 60 Adjust MENU:Return EXIT : Exit Tipo de sonido Sound Type Presione el botón / para seleccionar Sound Type (tipo de sonido); después, presione el botón Press ▼ / ▲ button to select Sound Type ,then press Press ◄ / ► button to select Stereo,Duall,Dual ll,Mixed . seleccionar Stereo (estéreo), Dual l, Dual ll, Mixed (mezclado). 19 23 / para Channel Menu Menu canal Menú Channel Presione el botón MENU para visualizar el menú principal. Presione el botón / para seleccionar CHANNEL (canal) en el menú principal. Este marcará la Press MENU button to display the main menu. Press ◄/► button to select CHANNEL in the main menu,it will highlight the first option. primera opción Channel Auto Scan Manual Scan Channel Edit Common Interface Signal Information CICAM Profile Edit OK:Select Move MENU:Return EXIT : Exit 1.1. Presione botón / para seleccionar la opción ajustar en el menú CHANNEL (canal). Press ▼ / ▲elbutton to select the option that you want to adjustque in thedesea CHANNEL menu. 2.2. Presione el botón / para ajustar. Press ◄ / ► button to adjust. 3. Después de finalizar el ajuste, presione el botón MENU para volver al menú anterior. 3. After finishing your adjustment,Press MENU button to return back to the previous menu. Búsqueda Auto Scan automática Presione el button botónto select / para Auto (búsqueda automática); después, presione el botón Press ▼ / ▲ Auto seleccionar Scan , then press OK/Scan ►button to enter submenu. (Default password is ‘0000’) OK/ para ingresar en el submenú. (La contraseña por defecto es ‘0000’) Auto Scan ltaly County Mode DTV+ATV Start Move Adjust MENU:Return 20 24 EXIT : Exit Búsqueda manual Presione el botón / Manual Scan para seleccionar Manual Scan (búsqueda manual); después, presione el botón Press ▼ / ▲ button to select Manual Scan , then press OK/ ►button to enter submenu. OK/ para ingresar en el submenú. (La contraseña por defecto es ‘0000’) (Default password is ‘0000’) Manual Scan Digital Manual Scan Analog Manual Scan OK:Select Move MENU:Return EXIT : Exit Búsqueda manual digital Presione el botón / para seleccionar Digital Manual Scan (búsqueda manual digital); después, Press ▼ / ▲ el button to select Scan, press OK/ ► button to enter submenu. presione botón OK/ Digital paraManual ingresar en then el submenú. Digital Manual Scan Digital Manual Scan Digital Scan CH D Start Frequency Strength Move 177.50 MHz 0 Adjust 0~9:lnput MENU:Return EXIT : Exit Búsqueda manual analógica / para seleccionar Analog Manual Scan (búsqueda manual analógica); después, presione el botón OK/ para ingresar en el submenú. Presione el botón Analog Manual Scan Press ▼ / ▲ button to select Analog Manual Scan , then press OK/ ► button to enter submenu. Analog Manual Scan Analog Scan 44.25 MHz Channel to Save Color System CH001 Auto Sound System Auto AFC Off Start Move Adjust 0~9:lnput MENU:Return EXIT : Exit 21 25 Editar canal Presione el botón / para seleccionar Channel Edit (editar canal); después, presione el botón OK/ Press / ▲ button select Channel(la Edit , then press OK/ enter submenu (Default password is ‘0000’) . para▼ingresar ento el submenú contraseña por►button defectoto es “0000”). Channel Edit Channel Edit Skip Delete Move Move Page OK:Select MENU:Return EXIT : Exit Las tecla coloreada tres es la tecla rápida para programar el canal. Primero presione / para marcar que desea borrar, desplazar o saltear, después: The three colored key el is canal the shortcut key for programming the channel. Presione el ▼ botón borrar el First press / ▲ para to highlight thecanal. channel you want to delete or move or skip, then: Red Press the el button deleteel the channel. Presione botón paratosaltear canal. Greenelbutton Press to skip the select channel. (Su TVthe salteará canal automáticamente al usar CH+/- para visualizar los canales.) (Your TV set will skip the channel automatically when CH+/- to view the channels.) Presione el botón para configurar el canal a estado deusing desplazamiento; después, presione / Bluecolocarlo. Press button to to set the channel to moving state. then press▼ / ▲ to move la cualthe desea para desplazarlo a la posición en it to the position you want to put. Interfaz común Presione el botón / para seleccionar Common interface (interfaz común); después, presione el botón Press / ▲ button to select interface , then press OK/ ►button to enter submenu. OK/ ▼para ingresar en Common el submenú. Only available únicamente when there is Clcuando card under DTV.una tarjeta Cl en DTV. Disponible haya Common interface Common lnterface Irdeto Access IRDETO-MAIN 1.Status 2.Messages 3.Languages Setup 4.Update Software Press ‘OK ’ to select;Press ‘EXIT’ to quit. Move OK:Select MENU:Return EXIT : Exit Información de señal Presione el botón / para seleccionar Signal Information (información de señal), después, presione Signal lnformation Press / ▲ button to selectlaSignal Information, then de press EnterDisponible button to seeúnicamente the detail information Enter▼para visualizar información acerca la the señal. cuando haya señal en DTV. about the signal. Only available when there is signal under DTV. Signal Information Network Name Channel Crystal Palace Ch21 Frequency 474.00 MHz Modulation 64 QAM Strength Quality 100 100 MENU:Return EXIT : Exit 22 26 Edición de perfil CICAM CICAM Profile Edit Presione el botón / para seleccionar CICAM Profile Edite (editar el perfil CICAM); después, presione ▼ / OK/ ▲ button to select CICAM Edite , then press OK/ ►button to enter submenu. elPress botón para ingresar enProfile el submenú. CI+1.3 Installed Profile List empty... empty... empty... empty... empty... Delete Update Now Exit:Close 23 27 MenúMenu bloquear Lock Press MENU button to displaypara the main menu. el menú principal. Presione el botón MENU visualizar Presione botónto select / para seleccionar LOCKwill (bloquear) enfirst el menú Press ◄ / el ► button LOCK in the main menu,it highlight the option. principal. Este marcará la primera opción. LOCK System Enter Password Enable On Channel Locks Parental Rating None Lock Keypad Off Hotel mode New Password Clear Lock 0~9:lnput Move MENU:Return EXIT : Exit 1. Presione el botón / para seleccionar la opción que desea ajustar en el menú LOCK (bloqueo). 1. Press ▼el/ ▲ button to/ select theajustar. option that you want to adjust in the LOCK menu. 2. Presione botón para 2. Press ◄de / ►finalizar button to el adjust. 3. Después ajuste, presione el botón MENU para volver al menú anterior. Introducir la contraseña 3. After finishing your adjustment, Press MENU button to return back to the previous menu. Presione el botón / para seleccionar Enter Password (introducir contraseña); después presione el botón Enter Password OK Press para ▼ que las siguientes 4 opciones sean válidas. / ▲ button to select Enter Password , then press OK button to make the following 4 options valid. (La contraseña por defecto es ‘0000’) (Default password is ‘0000’). Habilitar Enable Presione el botón / para seleccionar Enable (habilitar); después, presione el botón / para seleccionar Press / ▲ bloqueos button to select press Press ◄parental / ► buttonyto select On botonera or Off. On u Off.▼Los de Enable canal, ,then la clasificación bloquear están disponibles cuando Channel Locks,Parental Enable (habilitar) está enRating On and Lock Keypad are available when Enable is On Bloqueos canal Channelde Locks Presione el botón / para seleccionar la Channel Locks (bloqueos de canal); después, presione el botón Press ▼ / ▲ button to select Channel Locks , then press OK/ ►button to enter submenu. OK/ para ingresar en el submenú. Lock System Select channel(s) to lock. 24 28 Clasificación parental Presione el botón / para seleccionar Parental Rating (clasificación parental); después presione el botón / para Parental Rating seleccionar. BloquearPress botonera ▼ / ▲ button to select Parental Rating , then press ◄ / ► button to select. Se configura evitar que sea utilizada por niños pequeños contra una utilización no prevista. Lockpara Keypad Presione Set el botón / it para seleccionar (bloquear botonera); después, presione el botón / para to prevent from being used by Lock young Keypad child ren,or other unexpected usage. Press ▲ button to select Lock Keypad , then press◄ / ► button to selec On or Offt. seleccionar On▼u /Off. Modo Hotel Hotel mode Presione Press el botón para Hotel,, hen mode (modo hotel); presione el botón para ingresar en el ▼ / ▲ /button to seleccionar select Hotel mode press ► button to después, enter submenu. submenú. Hotel mode Active Hotel Mode Max Vol. Default Vol. Source Lock Default Source Default Dtv program Default Atv program Backup to USB Off 100 20 DTV ---- Restore from USB Recall Move EXIT : Exit Adjust Nueva contraseña Presione el botón / para seleccionar New Password (nueva contraseña). Después, introduzca el número de 4 New Password dígitos que desea dos New veces. Press ▼ / ▲configurar button to select Passwor,,then enter a 4-digital number you want to set twice Lock EliminarClear bloqueo ▼ / ▲ button to select Clear Lock , then press ◄ / ► button to select. PresionePress el botón / para seleccionar Clear Lock (eliminar bloqueo); después presione el botón / para seleccionar. 25 29 Setup Menú Menu configuración Presione el botón para Press MENU buttonMENU to display the visualizar main menu.el menú principal. Presione el botón / para seleccionar SETUP (configuración) en el menú principal. Este marcará la Press ◄ / ► button to select SETUP in the main menu, it will highlight the first option. primera opción. Setup English OSD Language Audio Languages Subtitle Teletext Time Settings PVR Settings First Time Setup Reset Move Adjust MENU:Return EXIT : Exit Idioma OSD OSD Language Presione el botón / para seleccionar OSD Language (idioma OSD); después, presione el botón OK Press ▼ / ▲ button to select OSD Language , th en press OK button to enter sub-menu . Press ▼ / ▲ /◄ / ►button para ingresar en el submenú. Presione el botón / / / para seleccionar el idioma OSD. to select OSD Language . Idiomas de audio Presione el botón / para seleccionar Audio Languages (idiomas de audio); después, presione el botón Enter Audio Languages para ingresar en el submenú. Press ▼ / ▲ button to select Audio Languages, then press Enter button to enter submenu. Presione el botón / / / para seleccionar Audio Primary Language (idioma principal de audio) y Audio Press ▼ / Language ▲ /◄ / ► button to select the Audiode Primary Language and Audio Secondary Language Secondary (idioma secundario audio). Audio Languages Audio Primary Language English Audio Secondary Language English Move Adjust MENU:Return 26 30 EXIT : Exit Subtítulo Presione / para seleccionar Subtitle (subtítulo); después, presione el botón OK para Subtitle el botón ingresar el submenú. Press ▼ / en ▲ button to select Subtitle, then press OK button to enter submenu. Subtitle On Mode Subtitle Primary Language English Subtitle Secondary Language English Hearing impaired Off Adjust Move MENU:Return EXIT : Exit Teletexto Teletext Ajustar las configuraciones de teletexto. Solo disponible con fuente ATV y DTV. Presione el botón / Only para seleccionar Teletext (teletexto); Adjust Teletext settings. availa ble under DTV and ATV source. después, presione el botón OK/ ▲ button to select Teletext, then press OK/► button to enter submenu. Press ▼ /en ingresar el submenú. Teletext Teletext Digital Teletext Language Italiano Digital Teletext Language Italiano Decoding Page Language West EUR Decoding Page Language West EUR Move Adjust para MENU:Return Move EXIT : Exit Adjust - Debajo de DTV SOURCE pulse el boton / para seleccionar IDIOMA Teletexto Digital -Under DebajoDTV de ATV SOURCE pulse el/ boton / to para seleccionar IDIOMA Decodifica Pagina source,press◄ ►button select Digital Teletext Language MENU:Return EXIT : Exit Under ATV source,press◄ / ► button to select Decoding Page Language Configuraciones de tiempo Presione el botón / para seleccionar Time Settings (configuraciones de tiempo); después, presione Time Settings el botón OK para ingresar en el submenú. Press ▼ / ▲ button to select Time Settings, then press OK button to enter submenu. Time Settings Off OSD Time Sleep Timer Off Auto Sleep 4 hours Time Zone Time Move Adjust MENU:Return EXIT : Exit 27 31 Configuración PVR PVR Setting Presione botón / para seleccionar PVR); Press ▼ / ▲elbutton to select PVR Setting , then PVR press Setting OK button(configuración to enter submenu. OK It willpara checkingresar the USB en el submenú. Comprobará el dispositivo USB Configuración inicial después, presione el botón First TimeelSetup Presione botón para seleccionar First time Setup (configuración inicial); después, presione Press ▼ / ▲ button to select First time Setup, then press OK button to enter botón OK para ingresar / y el First Time Setup OSD Language English ltaly DTV+ATV Country Auto Scan Start Move Adjust MENU:Return Restablecer Reset Presione el botón / para seleccionar Reset (restablecer); Press ▼ / ▲ button to select Reset, then press OK button to enter Setup Reset OSD Language English Audio Languages Subtitle PVR Settings Teletext Yes No Time Settings PVR Settings First Time Setup Reset Move OK:Select MENU:Return If areseguro sure to reset,press Yesrestablecer, to reset Siyou está que desea EXIT : Exit presione SÍ. 28 32 EXIT : Exit después, presione el botón OK para ingresar Menú PC PC Menu Presione el botón visualizar Press MENU button toMENU display para the main menu. el menú principal. Presione el botón / para seleccionar SETUP (configuración) en el menú principal. Este marcará Press ◄ / ► button to select SETUP in the main menu, it will highlight the first option. la primera opción. PC Setting Auto Adjust H Position 0 V Position 0 Phase 0 Clock 0 Move OK:Select MENU:Return EXIT : Exit 1. Press ▼ / ▲elbutton to select the option that you want to adjust in the SCREEN menu. 1. Presione botón / para seleccionar la opción que desea ajustar en el menú SCREEN (pantalla). 2. Press OK button to adjust. 2. Presione el botón OK para ajustar. 3. Después deyour finalizar el ajuste, el botón para guardar y volver al menú anterior. 3. After finishing adjustment, Presspresione MENU button to saveMENU and return back to the previous menu. Auto ajuste Auto Adjust Presione el botón / para seleccionar Auto Adjust (ajuste automático); después, presione el botón Press ▼ / ▲ button to select Auto Adjust, then press OK button to start adjusting automatically. OK para iniciar el ajuste automático. H Position H Posición Presione elbutton botónto select / para seleccionar H Position (posición H); después presione el botón OK para Press ▼ / ▲ H Position , then press OK button to enter sub-menu.Press ◄ / ► button to adjust. ingresar V Positionen el submenú. Presione el botón / para ajustar. Posición Press ▼ / ▲Vbutton to select V Position , then press OK button to enter sub-menu.Press ◄ / ► button to adjust. Presione el botón / para seleccionar V Position (posición V); después, presione el botón OK para Phase ingresar en el submenú. Presione el botón / para ajustar. Press ▼ / ▲ button to select Phase, then press OK button to enter sub-menu.Press ◄ / ► button to adjust. Fase Clock Presione el botón / para seleccionar Phase (fase); después presione el botón OK para ingresar en Press ▼ / ▲ button to select Clock, then press OK button to enter sub-menu.Press ◄ / ► button to adjust. el submenú. Presione el botón / para ajustar. Reloj Presione el botón / para seleccionar Clock (reloj); después presione el botón OK para ingresar en el submenú. Presione el botón / para ajustar. 29 33 1. La configuración de PC en el menú PICTURE (imagen) está disponible en Entrada PC únicamente. El modo de pantalla en el menú PICTURE (imagen) y Control HDMI CEC en el menú SETUP (configuración ) está disponible en Entrada HDMI únicamente. 2. Descripción de audio y Tipo de sonido en el menú AUDIO no es válida. 3. El modo SCART / HDMI / AV / YPbPr /PC no cuenta con menú CHANNEL (canal). 4. La Clasificación parental y los Bloqueos de canal en el menú PARENTAL CONTROL (control parental) no son válidos en el modo SCART / HDMI / AV / YPbPr /PC. La Clasificación parental no es válida para el modo ATV. El modo PC no cuenta con el menú PARENTAL CONTROL (control parental). 5. Las configuraciones de Idiomas de audio, Subtítulo y PVR en la opción SETUP (configuración) no son válidas para el modo SCART / AV / PC. Las configuraciones de Idiomas de audio, Subtítulo, Teletexto y PVR en la opción SETUP (configuración) no son válidas para el modo HDMI / YPbPr. 30 34 Media Menu Menú multimedios Importante: Antes de operar el menú USB, conecte el dispositivo USB, presione el botón INPUT (entrada) para seleccionar la fuente de entrada para en USB. Presione el botón / para seleccionar USB en el menú Source (fuente); después presione el botón Enter para ingresar. Presione el botón / para seleccionar la opción que desea ajustar en el menú principal USB. Después, presione Enter para ingresar. Fotos Presione el botón / Enter para ingresar. Presione el botón / ingresar. Presione el botón / para seleccionar PHOTO (fotos) en el menú principal; después presione el botón para seleccionar la unidad de disco que desea ver. Después, presione Enter para para seleccionar la opción regresar y volver al menú precedente. 31 35 Música Presione el botón / Enter para ingresar. Presione el botón / ingresar. Presione el botón / para seleccionar MUSIC (música) en el menú principal; después presione el botón para seleccionar la unidad de disco que desea ver. Después, presione Enter para para seleccionar la opción regresar y volver al menú precedente. Al resaltar la opción que ha seleccionado, la información sobre el archivo aparecerá a la derecha. Película Presione el botón / Enter para ingresar. Presione el botón / para ingresar. Presione el botón / para seleccionar MOVIE (película) en el menú principal; después presione el botón para seleccionar la unidad de disco que desea ver. Después, presione Enter para seleccionar la opción regresar y volver al menú precedente. 32 36 Texto Presione el botón para ingresar. Presione el botón ingresar. Presione el botón / para seleccionar TEXT (texto) en el menú principal; después presione el botón Enter / para seleccionar la unidad de disco que desea ver. Después, presione Enter para / para seleccionar la opción regresar para volver al menú precedente. Al resaltar la opción que ha seleccionado, la información sobre el archivo aparecerá a la derecha. 33 37 If you're problems En caso having de problemas If you are having problems with your TV, carry out the following checks first. Si tieneIf problemas con su TV,problems, en primerunplug lugar realice las and siguientes verificaciones. you are still having your TV contact the service centre. Si sigue experimentando problemas, desconecte su TV y comuníquse con el centro de servicios. Problems and how to fix them There isynosoluciones sound and no picture coming from my TV. Problemas -Check that you have connected the TV power cord properly and switched the wall socket on. -Check that the power switch at the rear of the TV is set to " ON" . No hay-Check sonido ni you imagen mi TV. that have en turned on the POWER button on your TV. -Compruebe ha conectado cable de energía de la TV correctamente y que ha encendido el -Check que the picture contrastel and brightness setting. interruptor del enchufe de pared. There is a normal picturede but no sound coming from my TV. -Compruebe que el interruptor energía en la parte posterior de la TV se encuentre en “ON”. -Check que that ha your TV is not muted or has the volume down. -Compruebe encendido el botón POWER (energía) en su TV. -Switchlathe channel, the problem may be with the -Compruebe configuración de contraste y brillo de channel imagen.you're on, not the TV. -Check that your audio cable input has been plugged in properly. If you are using an Hay una imagen normal. pero no sale sonido de mi TV. external a mplifier -Controle que su TV no esté en silencio (mute) o que el volumen esté bajo. -Cambie canal.control Tal vez does el problema sea del canal y no de la TV. Thede remote not work. -Check que to see there isdel anycable objectde between your enchufada TV (such ascorrectamente. a piece of furniture) that -Compruebe la ifentrada audio esté could block the remote Si usa un amplificador externo.control from connecting with the sensor on your TV. -Have you put the batteries into the remote control the right way? ( So + to + and - to -) El control remoto no funciona. -Correct remote operating mode was set (such as TV or VCR). -Controle que no haya ningún objeto entre su TV (por ej.; un mueble) que pueda bloquear la conexión con -The not positioned in bright sunlight . el sensor deTV suisTV. -Try fitting new batteries if none of the above work. -¿Ha colocado las baterías en el control remoto correctamente? (+ en + y - en -) -Compruebe configurado el modo operativo remoto correcto (tal como TV o VCR). The TVque has haya turned off suddenly. -La TV-Check no debe estar en sleep luz solar brillante. that you posicionada have not set the timer. -Check thatnuevas you have not setsithe timer controlno thefunciona. socket which has your TV power -Intente colocar baterías todo lo to anterior cord on. La TV se apaga de forma imprevista. -Check that you have not set auto standby with the broadcast signal (sleep sourcetimer). which is -Compruebe que no haya configurado el temporizador de suspensión connected to your TV. -Compruebe que no ha configurado el temporizador para controlar el enchufe al cable de energía de su TV. The picture on my TV appears slowly after I have switched it on. -Compruebe que no ha la fuente deyou señal deswitched emisiónthe que está conectada This is normal. Theconfigurado image takesauto a fewstandby secondscon to appear after have TV on. Please contact your service centre if picture has not appeared after five minutes. a su TV. La imagen en mi TV aparece lentamente después de haberla encendido. is no poor quality colour or a poor picture on my TV. Esto esThere normal. Laorimagen tarda algunos segundos en aparecer después de haber encendido la TV. -Change the colour setting on the PICTURE MENU. Comuníquese con el centro de servicios si la imagen no aparece después de cinco minutos. -Keep a distance between your TV and any VCR you may be using No hay-Try color o el color de channel. la imagen deproblem mi TV es insuficiente. watching another The may be with the channel you're watching. -Cambie la the configuración color en PICTURE MENU (menú imagen). -Are video cablesde installed properly? -Mantenga unathe distancia su TV y cualquier VCR que MENU. esté utilizando. -Change setting entre of picture brightness on PICTURE -Trate de mirar otro canal. El problema puede residir en el canal que está mirando. There are vertical barsinstalados? on the screen, the picture is shaking. -¿Los cables de horizontal vídeo estánand correctamente -Check if any signal interference activitiesen is PICTURE going on nearby, as imagen). an electrical -Cambie la configuración de brillo de imagen MENUsuch (menú appliance or power tool is in operation. Hay líneas horizontales y verticales en la pantalla, la imagen se sacude. -Compruebe que no haya señales de channels. interferencia cercanas, como las que puede emitir un artefacto The reception is poor on some eléctrico o una herramienta funcionamiento. -The TV channel you'reen watching may be having problems. Change to another channel and seede if the same is happening. La recepción algunos canales es deficiente. -TVde broadcasting is weak or has been interrupted. -El canal TV que estásignal mirando puede tener problemas. Cambie de canal y fíjese si sucede lo mismo. -Check whetherde signal sources anyinterrumpido. possible interference. -La señal de emisión TV es débil have o se ha -Controle si las fuentes de señal tienen posibles interferencias. There are lines or streaks on the pictures. Hay líneas o manchas en damage las imágenes. -Check if there is any to the aerial on the roof, try to change the direction of the -Compruebe no haya daños en la antena del techo; intente cambiar la dirección de la antena para aerial que to receive a better signal. recibir una mejor señal. One the TV's speakers does not work. Uno de losofparlantes de la TV no funciona. -Check la the sound balance on SOUND MENU. -Compruebe configuración desetting balance de sonido en SOUND MENU (menú sonido). 34 38 If you're having problems En caso de problemas Note: This page only refer to Video Graphics adaptor (VGA) problems. Importante: Esta página se refiere únicamente a los problemas del adaptador de gráficos de vídeo Problems (VGA). and how to fix them Problemas y soluciones The signal is out of range. -Change the resolution, La señal está fuera de rango.horizontal or vertical frequency of your source(PC etc. ) . -Check whether the signal cable is connected from the PCfuente to your(PC,etc. TV properly. -Cambie la resolución, la frecuencia horizontal o vertical de su ). -Check si the source connected de properly. -Compruebe elsignal cable input de señal estáisconectado la PC a su TV correctamente. -Compruebe que la fuente de entrada de señal esté correctamente conectada. There is a vertical bar or stripe on my TV screen. Hay una barra o franja vertical en pantalla de mi TV. or vertical frequency position. -Turn on the auto configure or la change the horizontal -Active la configuración automática o cambie la posición de frecuencia vertical u horizontal. Screen colours aren't appearing as they should be or single colour. Los colores pantalla no aparecen debieran o son de un solo color. -Checkde if the video signal cable is como connected properly. -Controle que elyour cable devideo señalcard de cable esté correctamente if the signal source is from conectado. your computer. -Reinstall PC -Reinstale su tarjeta de vídeo PC si la fuente de señal es desde su ordenador. Maintaining Mantenimiento de your su TVTV Si limpia su TV conyour cuidado y regularidad, prolongar vida delonger. su TV. Asegúrese de If you clean TV carefully and contribuirá regularly, ita helps yourlaTV toútil last Make sure desconectar la energía y deoff desenchufar cable de energía deyour su TV antes de comenzar limpiarla. you turn the power and unplugelthe power cord on TV before you beginato clean it. Limpieza de la pantalla 1. Existe una formathe excelente de eliminar el polvo de su pantalla. Humedezca un paño húmedo con Cleaning screen una mezcla de Agua templada y una pequeña cantidad de líquido de limpieza o suavizante para ropa. Escurra paño hasta que esté seco úselooff para limpiar la pantalla. 1 .elHere's a great way tocasi keep theydust your screen. Wet a soft cloth in a mixture of 2. Asegúrese de quewater no haya de aguaofenfabric la TV softener cuando haya terminado deliquid. limpiarla. lukewarm anduna exceso small amount or washing-up Wring the cloth until it's almost dry and then use it to wipe the screen. Limpieza desure las partes de suonTV 2 . Make there is plásticas no excess water your TV when you have finished cleaning it. Limpie las partes plásticas de su TV con un paño libre de pelusas, seco y suave. No utilice paños húmedos. Cleaning the plastic parts of your TV Wipe the plastic parts of your TV with a soft, dry, lint-free cloth. Do not use a wet cloth. If Si you going to be away for a while seare ausentará durante un cierto período Si noare utilizará su TVtodurante un período cuando va de If you not going use your TV for adeterminado while (such(como as when you go on vacaciones), debe desenchufar cable cord de energía de la toma yand desconectar holiday), you should unplug theelpower from the socket disconnect la antena proteger suTV TV against contra posibles daños ocasionados por rayos your aerial para to protect your possible damage from lightning or o subidas de tensión. power surges. 35 39 Your TV's specification Especificaciones de su TV Panel LED Medida de píxeles LED panel 28 pulgadas 28 inch 0,27675(O) x 0,27675(V) Resolución 1366x768 0.27675(H)x 0.2 7675(V) Aspecto de pantalla 1366x768 Colores de visualización 16: 9 16:9 16,7M colores Vida de retroiluminación 16.7M colours30.000 horas Suministro de energía 30,000 hours 100-240V~50/60Hz Consumo de energía 32 W 100-240V~50/60Hz Rated power consumption 50 W Consumo máximo de energía 50 W 2x8 W Consumo de energía en standby < 0,5 W Parlante 2x8 W We want to improve our products all the time.We have the right mejorar nuestros productos constantemente. el derecho de to Deseamos change the design and the specifications of thisTenemos TV without cambiar el diseño y las especificaciones esta TV or sinin the instructions telling you.The symbol below on thede product comunicárselo. símbolothrow debajoyour del producto o en las electronic instrucciones means that you Elshould electrical and significa que debe eliminar su equipo eléctrico y electrónico equipment away separately from your household waste.There are de forma separada respecto de sus residuos domésticos. Existen separate for recycling European sistemascollection de recogidasystems separada para el reciclaje in en the la Unión EuropeaUnion (UE). (EU). For more information, pleasecomuníquese contact your authoritylocales or your Para obtener más información, con local sus autoridades o con retailer whereque youlebought your TV. el distribuidor ha vendido la TV. Las especificaciones y el diseño están sujetos a posibles modificaciones sin aviso previo debido a mejoras. 36 40 Instalación de montaje en pared Wall mount installation INSTALACIÓN Y EXTRACCIÓN DEL SOPORTE INSTALLING / REMOVING THE BASE STAND DE BASE LED DLED isplay v ery frágil f ragiley, and m ust b e p rotected a t a ll momento t imes w henal r emoving he soporte b ase WARNINGLa: The ADVERTENCIA: pantalla esi smuy debe protegerla en todo extraert el de base. Stand. Asegúrese de que ningún objeto punzante ni de otro tipo pueda rayar o dañar la pantalla LED. that no hard sharp object or anything could or damage the LED display momento, comes into ya que se Si entraBe ensure contacto con or esta, NO ejerza presión that sobre el scratch frente de la unidad en ningún . NOT exert pressure on the front of the unit at any time because the screen could crack . contact with it Do podría quebrar la pantalla. 1 Disconnect all cables or cords connected to the unit. 1 Desconecte todos los cables o alambres conectados a la unidad. . make sure to place a soft 2 . Lay the unit down on a flat surface with the back side facing up Please 2 Coloque la pantalla sobre una superficie plana con la parte posterior hacia arriba. Asegúrese de colocar un cushioned material such as a pillow or thick piece of foam beneath the screen. material3suave, tal como una almohada o una pieza de goma espuma debajo de la pantalla. . To remove the base stand loosen , screws off the holes then pull downwards to release 3 Para retirar el soporte the base stand. de base, afloj MOUNTING ON THE WALL MONTAJE EN PARED Thises unit is VESA-compliant, and is to be wall-mounted with aen VESA-compliant La unidad compatible con VESA, y designed fue diseñada para el montaje pared con un8”x4” kit de montaje compatible (200mm x 100mm) kit designed for flat-panel to con VESA de 8”x4” (200mounting mm x 100 mm) diseñado paraTVs TV (not consupplied). pantalla Mount plana this TV unit (no according suministrado). Monte esta the instructions included in the mounting kit. unidad según las instrucciones que se incluyen en el kit de montaje. Length of screw should not exceed 10 mm. La longitud del tornillo no debe exceder los 10 mm. NOTE IMPORTANTE Remove the base stand before mounting the unit on the wall. Retire el soporte de base antes de montar la unidad en la pared. 8” 4” Cuatro orificios de montaje (tamaño M5 de tornillo M5) 37 41 Attaching thedel stand Colocación soporte Coloque el soporte en la TV. Introduzca Place the stand on the TV,mm insert y apriete los tornillos 4x12 (que se and tighten the screws encuentran en la caja de4x12mm accesorios) en el (found in the del accessories in área dentro círculo conbox) el destornillador thesuministrado. circled area with the screwdriver provided. Then the TV is ready for use now. Ahora, la TV se encuentra lista para ser utilizada. 38 42 Producido r por: Futura Grafica Spa Via Domenico Fontana 12 00185 Rom - Italy MADE IN CHINA Modello Alimentazione TV MTV-C40DLEFHD AC 100-240 ~ 50/60HZ Consumo in funzione 65W Consumo in standby <1W