1
Tel. ++34(9)73 451072
Fax ++34(9)73 445000 – 448400
Partida Horta d’Amunt, s/n – Apartado de Correos nº 149
25600 BALAGUER (Lleida)
E-mail: [email protected] – Internet: http://www.gespasa.es
MGE-250 1”
MGE-250 1 ½”
MGE-400
CÓDIGO Code 32503
CÓDIGO Code 32523
CÓDIGO Code 32592
ELECTRONIC METERS
MEDIDORES ELECTRÓNICOS
INSTRUCTION MANUAL
WARRANTY AND CONFORMITY DECLARATION
MANUAL DE INSTRUCCIONES
GARANTÍA Y DECLARACIÓN DE CONFORMIDAD
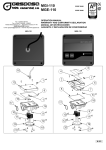
MGE-250
Nº
1
2
3
4
5
6
7
8
9
10
11
12
13
DESCRIPTION
DENOMINACIÓN
MECHANIZED BOTTOM COVER
Tapa inferior mecanizada
D.108x4 mm NBR JOINT
Tórica NBR D.108x4 mm
D.6x40 mm DIN.7979 PIN
Pasador D.6x40 mm DIN.7979
METER GEAR
Engranaje medidor
F1” ALUMINIUM FLANGE
Brida aluminio H1”
M-8x20 mm DIN.912 ZINC-PLATED SCREW
Tornillo M-8x20 mm DIN.912 zincado
D.38x2.5 mm NBR JOINT
Tórica D.38x2,5 mm NBR
D.138.94x1.78 COVER JOINT
Tórica D.138,94x1,78 tapa
D.3.5x9.5 mm DIN.7981 SCREW
Tornillo D.3,5x9,5 mm DIN.7981
REED PLATE
Placa Reeds
111.4x34.9x2 mm TRANSPARENT METHACRYLATE
Metacrilato transparente 111,4x34,9x2 mm
M-4x8 mm DIN.912 ZINC-PLATED SCREW
Tornillo M-4X8 mm DIN.912 ZINCADO
METER SILK-SCREEN PRINT
Serigrafía medidor
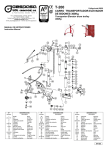
MGE-400
CODE
CÓDIGO
Nº
325101009
14
803100062
15
804000014
16
325101004
17
800003021
18
805400021
19
803100056
20
020602007
21
805404002
22
326004011
23
803802013
24
805400016
25
DESCRIPTION
DENOMINACIÓN
ELECTRONIC PROTECTION COVER
Tapa protección electrónica
ELECTRONIC BATTERY BOARD
Placa electrónica a batería
DL2450 BUTTON BATTERY
Pila botón DL2450
MGE-250 MECHANIZED METER BODY
Cuerpo medidor mecanizado MGE-250
F1 1/2" METER FLANGE
BRIDA MEDIDOR H1 1/2"
M-8x30 mm ZINC-PLATED SCREW
Tornillo M-8x30 mm DIN.912 ZINCADO
MGE-250 GEAR SHAFT
Eje engranaje MGE-250
D.56x4 mm NBR JOINT
Tórica D.56x4 mm NBR
MGE-400 MECHANIZED METER BODY
Cuerpo medidor mecanizado MGE-400
M-8x40 mm DIN.912 ZINC-PLATED SCREW
Tornillo M-8x40 mm DIN.912 ZINCADO
F2” BSP ALUMINIUM FLANGE
Brida aluminio H2” BSP
MGE-400 GEAR SHAFT
Eje engranaje MGE-400
CODE
CÓDIGO
326001003
326004000
322209002
325101101
325201001
805400037
325101005
803101034
325801101
805401006
325801002
325801003
326004008
M-89c
MGE-250 · MGE-400 INSTRUCTION MANUAL
MANUAL DE INSTRUCCIONES
MGE-250
MGE-400
1. TECHNICAL SPECIFICATIONS
1. CARACTERÍSTICAS TÉCNICAS
The meter has an aluminium measuring chamber and 2 high accuracy oval
gears. It is suitable for the transfer of mineral oil, diesel, heating oil, motor
oil up to SAE-140 (please, ask for other liquids). It is inserted into the fuel
and oil distribution line, and its operation is private. The calibration
parameters and the totalizer litres are saved in a PERMANENT memory.
El medidor posee una cámara de medición de aluminio y 2 engranajes
ovalados de gran precisión. Está concebido para el transvase de aceite
mineral, diésel, petróleo para calefacción, aceite para motores hasta SAE140 (consultar otros líquidos). Se intercala en la línea de distribución de
carburantes y aceites y su uso es privado. Los parámetros de calibración y
totalizador de litros están almacenados en memoria NO VOLÁTIL.
This also has built-in a keypad and LCD-Display to make easier its Dispone además un teclado y un gran Display-LCD para obtener así una
visualization.
visualización fácil y sencilla.
Flow
Caudal
Channels
Phase-out channel
Canales
Desfase canales
Pulses per channel
Pulsos por canal
Max. pressure loss
Max. pressure
Temperature
Max. humidity
Viscosity
Accuracy
Noise
Repetitivity
Inlet-outlet connections
Pérdida presión máxima
Presión máxima
Temperatura
Humedad máxima
Viscosidad
Precisión
Ruido
Repetitividad
Conexiones entrada-salida
Dimensions
Dimensiones
Weight
Peso
2. WARNINGS
MGE-250
MGE-400
10-250 l/min (diesel)
10-150 l/min (lubricant)
2
180º
11 pulses x litre and channel
pulsos x litro y canal
0.3 bar (diesel)
45 bar
-10 / +50 ºC
95 H.R.
2-2000 cSt
±0.5 %
LEQA < 70dBA
0.2 %
1" ó 1 1/2” BSP Flange / Brida
159 x 100 x 141 mm (1”)
183 x 100 x 141 mm (1 1/2")
2.3 kg (1”)
2.5 kg (1 1/2")
20-400 l/min (diesel)
20-300 l/min (lubricant)
2
180º
5.5 pulses x litre and channel
pulsos x litro y canal
0.3 bar (diesel)
45 bar
-10 / +50 ºC
95 H.R.
2-2000 cSt
±0.5 %
LEQA < 70dBA
0.2 %
2" BSP Flange / Brida
193 x 145 x 141 mm
4.3 kg
2. ADVERTENCIAS
Please, read all the instructions carefully before using the product. Leer con cuidado todas las instrucciones antes de utilizar el producto.
The people who do not know these instructions must not use it.
Las personas que no conozcan las instrucciones para el uso no deben
utilizarlo.
This manual describes how to use the meter according to the project El presente manual describe el modo de utilizar el medidor según las
hypothesis, the technical features, the types of installation, the use, the hipótesis del proyecto, las características técnicas, los tipos de instalación,
maintenance, and the training regarding to possible dangers.
el uso, el mantenimiento y la formación relativa a los posibles riesgos.
The operation manual must be considered as a part of the electronic El manual de instrucciones debe considerarse como una parte del
meter and keep it for future inquiries during all its working life. We medidor y conservarse para futuras consultas durante toda la vida útil
suggest keeping it in a dry and protected place.
de la misma. Se aconseja conservarlo en lugar seco y protegido.
The manual reflects the technical situation at the moment of the meter sale El manual refleja la situación técnica en el momento de la venta del
and cannot be consider inadequate for the reason of being updated medidor y no puede considerarse inadecuado por el hecho de ser
afterwards according to the new experiences. The manufacturer is keeping posteriormente actualizado según las nuevas experiencias. El fabricante se
the right to update the production and the manuals without being forced to reserva el derecho de actualizar la producción y los manuales sin estar
update the production and previous manuals.
obligado a poner al día la producción y los manuales anteriores.
3. SECURITY INSTRUCTIONS
3. INSTRUCCIONES DE SEGURIDAD
The meter security with regard to the material quality and reliability is
determined by the EC Directive Regulations and is endorsed by the quality
controls of the leader enterprises in the sector, and it also guarantees the
toxicity absence and the negative ecological effects. To avoid the possible
accidents, it is advisable to read the following warnings and cautions
carefully:
La seguridad de los medidores, en cuanto a calidad y fiabilidad de los
materiales, viene determinada por las reglamentaciones de la Directiva de
la CE y avalada por los controles de calidad de las empresas líderes en el
sector, garantizando además la ausencia de toxicidad y efectos ecológicos
negativos. Para evitar posibles accidentes, recomendamos leer
detenidamente los siguientes avisos y precauciones:
3.1. ATENCIÓN:
Una mala instalación o uso de este medidor puede causar
graves consecuencias, tanto físicas como materiales o
medioambientales.
Se aconseja la instalación de un filtro para evitar la entrada
de sólidos en la cámara de medición.
3.1. ATTENTION:
A wrong meter installation or use can cause serious effects
both physical and material.
It is advisable to install a filter in order to avoid the solid
inlet in the measuring chamber.
MGE-250 · MGE-400 INSTRUCTION MANUAL
MANUAL DE INSTRUCCIONES
3.2. ATTENTION:
When the flammable fluids, hydrocarbons are transferred,
do not smoke in the work environment.
A FIRE CAN BE CAUSED.
3.2. ATENCIÓN:
No fumar en el ambiente de trabajo cuando se utilicen
líquidos inflamables, hidrocarburos.
PUEDE ORIGINARSE UN INCENDIO.
3.3. ATTENTION:
Make sure of the correct installation of the decanting
circuit, checking the leak absence.
3.3. ATENCIÓN:
Asegurarse de la correcta instalación del
hidráulico, comprobando la ausencia de fugas.
4. INSTALLATION
circuito
4. INSTALACIÓN
4.1. The fluid direction makes no difference when the MGE-250 and MGE- 4.1. La dirección del fluido es indiferente a la hora de instalar el medidor
400 meter is installed. It must be assembled in the delivery, after the pump. MGE-250 y MGE-400. Se debe montar en la impulsión, después de la
bomba.
4.2. The meter is assembled in such a way that the digit reading and its 4.2. El medidor se suministra montado de tal forma que la lectura de los
keys are aligned with the tube inlet/outlet holes.
dígitos y las teclas están alineados con los agujeros de entrada/salida de
las tuberías.
If you want to turn 90º the frontal cover to make easier its reading and key Si se desea girar la tapa frontal 90º para facilitar la lectura y la manipulación
handling, unscrew the 4 screws (12) with an Allen screwdriver and put the de las teclas del medidor, destornillar los 4 tornillos (12) con una llave tipo
cover in the desired position.
Allen y colocar la tapa en la posición deseada.
Before closing the cover, check that the joint (2) is well-positioned and Antes de cerrar, verificar que la junta tórica (2) se encuentra en la posición
screw again the screws (12) in its holes.
correcta y volver a roscar los tornillos (12) en sus orificios
correspondientes.
4.3. ATTENTION:
4.3. ATENCIÓN:
Use sealing elements carefully. Please, take care no
Utilizar elementos sellantes con sumo cuidado. Sobre todo,
remains go into the measuring chamber. This can cause a
que no entren restos en la cámara de medición. Se podría
meter breakdown.
producir una avería en el medidor.
4.4. It is necessary to use sealing components on the installation pipes and 4.4. En las tuberías y roscas de la instalación es necesario utilizar
threads, which are resistant to the products to be transferred.
componentes de estanqueidad que sean resistentes a los productos a
transvasar.
4.5. It is very important the leak absence in the suction and delivery lines 4.5. Es muy importante la ausencia de fugas en las líneas de aspiración e
because a small air inlet would affect the kit accuracy.
impulsión ya que una pequeña entrada de aire afectaría a la precisión del
equipo.
5. OPERATION INSTRUCTIONS
5. INSTRUCCIONES DE FUNCIONAMIENTO
5.1. User Mode
5.1. Modo usuario
5.1.1. Counter
RESET: equivalent to NO: not to accept, exit (it depends on the selection).
TOTAL: equivalent to YES: accept, enter.
The device is always ready to make a volume measurement, when the
liquid passes through the meter body. This counts it.
5.1.1. Contador
RESET: equivalente a NO: no aceptar, salir (depende de la selección)
TOTAL: equivalente a SÍ: aceptar, entrar.
El dispositivo está siempre preparado para realizar una medida de
volumen, cuando pasa líquido a través del cuerpo del medidor. Éste lo
contabiliza.
No dispone de sistema de encendido. Está siempre conectado, listo para
contar.
La pantalla nos muestra el volumen con 2, 1 o ningún decimal, en función
del número que se visualice. Por ejemplo, si el número está entre 0,00 y
999,99 se visualizan dos decimales; si está entre 1000,0 y 9999,9 sólo se
mostrará un decimal; y si es igual o superior a 10000 no se mostrará
ningún decimal. Cada vez que se hace pasar líquido por el contador se
incrementan los 2 contadores, tanto el parcial como el total.
5.1.2. Borrado del contador parcial
Para borrar el contador parcial sólo hay que pulsar el pulsador “RESET”, al
soltarlo la pantalla se pone a 0,00 y ya está preparado para volver a contar.
5.1.3. Lectura del contador total
Para visualizar el contador total se debe pulsar el pulsador “TOTAL” y
aparecerá por la pantalla el total de litros. Al soltar el pulsador vuelve a
visualizarse el contador parcial.
5.1.4. Número de serie y estado de la batería
Si mantenemos pulsada la tecla “RESET”, a los 2 segundos se muestra el
número de serie.
Una vez se suelte la tecla, si la batería tiene un voltaje inferior a 2,3 V, la
pantalla enseña el mensaje ‘bAt’.
It does not have a starting system. It is always connected, ready to count.
The display shows the volume with 2, 1, or no decimal, according to the
number that is displayed. For example, if the number is among 0.00 and
999.99, two decimals are displayed; if it is among 1000.0 and 9999.9, it
shows only one decimal; if it is equal to or greater than 10,000, no decimal
will be displayed. Every time the liquid passes through the meter, the 2
counters increase both the partial and the total.
5.1.2. Partial Counter Deletion
To delete the partial counter, you have to press only the RESET key; when
it is released, the display shows 0.00, and it is ready to count again.
5.1.3. Total Counter Reading
To see the Total counter, you have to press the TOTAL key, and the
display will show the litre total. When it is released, the display shows the
partial counter again.
5.1.4. Serial Number and Batteryl State
If you press the RESET key continuously, after 2 seconds the serial number
is shown.
Once it is released, if the battery has a voltage lower than 2.3 V, the display
shows the message ‘bAt’.
5.2. Calibration
ATTENTION:
The meters are precalibrated in factory approximately.
YOU MUST CALIBRATE AGAIN THE METER in the
installation.
5.2. Calibración
ATENCIÓN:
Los medidores vienen con una precalibración aproximada en
fábrica.
SE RECOMIENDA CALIBRAR NUEVAMENTE EL MEDIDOR
en la instalación.
MGE-250 · MGE-400 INSTRUCTION MANUAL
MANUAL DE INSTRUCCIONES
Press TOTAL and RESET (13 s). The display will show: ‘P’. If it does not
show ‘P’, it means that the meter is blocked. Call the TECHNICAL
SERVICE.
Fill an amount of liquid into a calibrated recipient. Maximum of litres: 99.99.
Then press RESET to accept. Note the liquid volume in litres (or in the
corresponding volume to be measured) and decimals with the maximum
resolution it is possible.
The display shows ‘L 0.00’ with the right digit blinking. The TOTAL key
makes the digit move forward.
The RESET key validates it and passes to the next digit. After the fourth
digit, accept it with RESET. The calculated calibration factor will be shown
blinking. Press RESET to accept and end the calibration process or press
TOTAL to cancel and not to save the calibration.
Pulsar TOTAL y RESET (13 segundos). En la pantalla aparecerá: 'P' (si no
aparece ‘P' significa que el medidor está bloqueado y habrá que que
contactar con un instalador).
Llenar una cantidad de líquido en un recipiente calibrado. Máximo de litros:
99,99. A continuación pulsar RESET. Anotar el volumen de líquido en litros
y decimales suministrados.
5.3. Battery replacing operation
5.3. Operación de sustitución de la batería
La pantalla muestra ‘L 0.00’ con el dígito de la derecha intermitente.
TOTAL incrementa el digito.
RESET valida y pasa al siguiente digito. Después del cuarto dígito pulsar
RESET para aceptar. Se mostrará intermitentemente el factor de
calibración calculado. Presionar RESET para aceptar y finalizar con la
calibración. Presionar TOTAL para cancelar y desestimar la calibración
realizada.
Err C: Calculation error · Err P: without pulses
Err C: Error en cálculo · Err P: sin pulsos
Err L: value 0.00
Err L: valor de litros 0,00
When it shows 'Err', it means it has not been calibrated correctly. Try to Cuando aparece 'Err', la calibración no es correcta. Calibrar de nuevo.
calibrate it again.
ATTENTION: The calibration process must be made with
ATENCIÓN: El proceso de calibrado debe realizarse con el
the meter at its maximum flow or the nominal operation
medidor al máximo caudal posible o en el caudal nominal
flow of the installation. Otherwise, the calibration will not
de funcionamiento de la instalación, ya que, de lo
be exact.
contrario, el calibrado que se realiza no es exacto.
The meter works with a button battery of lithium, DL2450 or C2450 model. El medidor funciona con una pila botón de litio modelo DL2450 ó CR2450.
Its estimated duration is approximately 4 years (according its application).
La duración estimada de esta batería es de aproximadamente 4 años (en
función de su uso).
To replace the battery, remove the screws (12), open the cover and also Para proceder a la sustitución de la batería, retire los tornillos (12), abra la
remove the screws (9) that are subjecting the electronic board.
tapa y quite también los tornillos (9) que sujetan la placa electrónica.
With the help of a little screwdriver, push the battery to one side.
Con la ayuda de un destornillador pequeño, empujar la batería existente
hacia el lateral.
Replace the old battery for the new one. The correct battery position is the Sustituir la pila antigua por una de nueva. La posición correcta de la pila es
negative pole (-) is placed looking at the bottom (touching the board).
de tal modo que el polo negativo (-) quede en la parte inferior (tocando a la
placa).
ATTENTION
ATENCIÓN
Do not put the battery on the wrong way. This can damage
No poner la pila al revés. Esto podría ocasionar la avería de
the electronics.
la electrónica
It is important to follow the battery manufacturer
Es importante seguir todas las instrucciones del fabricante
instructions. Do not throw it to the general rubbish; throw
de la batería. No la tire a la basura general, deposítela en
it to a recycling centre or where the batteries are picked
un centro de reciclaje o en los lugares de recogida de pilas
up.
y baterías.
Once the battery is changed, follow the above steps to assemble the meter Una vez cambiada la pila, realizar los pasos a la inversa para volver a
top.
montar la parte superior del medidor.
It is not necessary to make any other operation. The electronics remembers No es necesario realizar ninguna operación, la electrónica recuerda el
the total counter and saves the last calibration factor.
contador total y guarda el factor de calibración anterior.
6. METER ASSEMBLY & DISASSEMBLY
6. MONTAJE Y DESMONTAJE DEL MEDIDOR
TO GO TO THE GEARS (4) or THE MEASURING CHAMBER
PARA ACCEDER A LOS ENGRANAJES (4) o A LA CÁMARA DE
MEDICIÓN
6.1. Desenroscar los tornillos (19) de la tapa inferior y sacarlos. Sacar la
tapa trasera del medidor (1). Actuar con precaución ya que en su interior se
encuentran los engranajes (4) del mecanismo de medición.
6.2. Antes de sacar los engranajes, fijarse donde está montado el
engranaje con los imanes ya que, si los montamos a la inversa, el medidor
no funcionará correctamente.
6.3. Para proceder a su montaje, seguir a la inversa los pasos descritos
teniendo en cuenta la correcta colocación de los tornillos, pasadores y
tórica del cuerpo medidor.
6.1. Unscrew the screws (19) of the bottom cover and remove them.
Remove the back meter cover (1). Be careful because there are the gears
(4) of the measuring device in its inner.
6.2. Before removing the gears, take into account where the magnet gear is
assembled. If you assemble it the other way round, the meter will not work
correctly.
6.3. For its assembly, please follow the above described steps inversely,
taking into account the correct meter body screw, pin, and joint placing.
MGE-250 · MGE-400 INSTRUCTION MANUAL
MANUAL DE INSTRUCCIONES
OBSERVACIÓN: Tener en cuenta que los imanes tienen que
estar en la parte inferior de los engranajes, no visibles antes de
cerrar la tapa.
REMARK: Please, be careful the magnets must be in the gear
bottom, not visible before closing the cover.
7. MAINTENANCE
7. MANTENIMIENTO
It is possible that some liquids are dried up in the measuring chamber inner,
and block it. If this happens, this meter must be cleaned with a lot of care
and when it is going to be mounted, you have to make sure that it is done
correctly. Please, follow the instructions from the above Meter Assembly /
Disassembly no. 6 Section.
If you decide to store the meter for a long time, clean it conscientiously. It
will remain protected and ready to a new starting.
Puede ocurrir que ciertos líquidos se sequen en el interior de la cámara de
medición y la bloqueen. Si esto sucediera, los engranajes deben ser
limpiados con mucho cuidado y, al montarlos de nuevo, asegurarse que se
hace correctamente. Seguir las instrucciones del anterior apartado nº 6
Montaje-Desmontaje.
Si deciden almacenar el medidor por un largo período de tiempo, limpiarlo.
Quedará protegido y listo para una nueva puesta en marcha.
8. REPAIR
8. REPARACIÓN
Please, go to the place where you have bought it. There you will be advised
of what the best is. The meters must be cleaned and dried up before its
delivery to be repaired. If the meters are not used with oil or diesel, they
must be cleaned as many times as it is necessary, and you must enclose a
note indicating the chemical substances, which have been supplied with this
unit. When you order spare parts, make sure that you give the part number
and its correct description. This will guarantee the correct supply of the
requested spare part.
Acudir al punto de venta donde se haya adquirido. Allí se aconsejará lo que
proceda. Los medidores deben ser lavados y secados antes de su envío
para reparar. Si los medidores, por error, no se usan con aceites o gasóleo,
deben aclararse tantas veces como sea necesario y adjuntar una nota que
indique las sustancias químicas que se han suministrado con dicha unidad.
Recordamos que para solicitar un recambio, debe señalar con precisión el
código de la pieza. Esto garantizará el suministro correcto del repuesto
solicitado.
9. GUÍA DE PROBLEMAS
BREAKDOWN
It counts too quickly or slowly.
POSSIBLE CAUSE
- non-correct calibration
- air inlet
- blocked gears
Low flow
- impurities in the measuring chamber
The display is not switched on.
- dead battery
It is supplying, but it does not display - dead battery
anything.
- REED problem
Liquid leak
- joints in bad state
SOLUTION
- recalibrate the meter (please, see 5.2. Section).
- look for and repair possible leaks or air inlets in the system.
- clean or replace the gears.
- clean the measuring chamber.
- replace the battery (please, see 5.3. Section)
- replace the battery (please, see 5.3. Section)
- call the TECHNICAL SERVICE.
- replace the joints.
9. GUÍA DE PROBLEMAS
AVERÍA
Cuenta demasiado rápido o lento.
Bajo caudal
El display no se enciende.
Sale líquido y no marca.
Fuga de líquido
10. WARRANTY
POSIBLE CAUSA
- calibración incorrecta
- toma de aire
- engranajes obstruidos
- impurezas en la cámara de medición
- batería agotada
- batería agotada
- problema RESET
- juntas en mal estado
SOLUCIÓN
- recalibrar el medidor (ver apartado 5.2)
- buscar y reparar posibles fugas o entras de aire en el sistema
- limpiar o reemplazar los engranajes
- limpiar la cámara de medición
- reemplazar batería (ver apartado 5.3)
- reemplazar batería (ver apartado 5.3)
- ponerse en contacto con el SERVICIO TÉCNICO
- reemplazar juntas
10. GARANTÍA
1. All the products manufactured by TOT COMERCIAL SA have a 1. Todos los productos fabricados por TOT COMERCIAL SA tienen una
WARRANTY of 12 (twelve) months from their purchase, against any
GARANTÍA de 12 meses desde su compra, contra cualquier defecto de
manufacturing defect.
fabricación.
2. TOT COMERCIAL SA guarantees, in the warranty period, the 2. TOT COMERCIAL SA garantiza dentro del período de garantía, el
change/the devolution of the defective part or product. This material
canje/reposición de la pieza o del producto defectuoso, siempre que el
must be sent with prepaid freight to our factory, or any appointed
material sea enviado a portes pagados a nuestra fábrica, o a cualquier
technical service. After our technical inspection, it will be determined
servicio técnico designado. Después de nuestra inspección técnica se
whether the responsibility is from the manufacturer, the user, the
determinará si la responsabilidad es del fabricante, del usuario, del
installer, or the delivery.
instalador o del transporte.
3. The warranty does not cover: the inadequate use, the use out of the 3. La garantía no cubre: El uso inadecuado, el uso fuera de la normativa
specific regulations, the negligence, the corrosion, the abuse, the
específica, la negligencia, el abuso, la corrosión, la manipulación o la
manipulation, or the wrong installation of the products, a use of nonincorrecta instalación de los productos, el uso de repuestos no originales
original spare parts or not concerning to the specific model, the nono no correspondientes al modelo específico, las modificaciones o
authorized modifications or interventions, the total or partial instruction
intervenciones no autorizadas, el incumplimiento total o parcial de las
non-fulfilment. All the manufactured and/or commercialized equipment
instrucciones. Todos los equipos fabricados y/o comercializados por
must be installed according to the manufacturer’s instructions.
TOT COMERCIAL SA deben ser instalados de acuerdo con las normas
facilitadas por el fabricante.
4. The accessories and the products not manufactured by TOT 4. Los accesorios y productos no fabricados por TOT COMERCIAL SA
COMERCIAL SA are liable for their original manufacturer’s warranty.
están sujetos a la garantía de su fabricante original.
5. Because of the constant innovations and development, TOT 5. Por las constantes innovaciones y desarrollo, TOT COMERCIAL SA se
COMERCIAL SA keeps the right to modify the specifications of its
reserva el derecho de modificar las especificaciones de sus productos y
products and publicity, without prior notice
publicidad, sin previa notificación.
MGE-250 · MGE-400 INSTRUCTION MANUAL
MANUAL DE INSTRUCCIONES
11. CONFORMITY DECLARATION
Manufacturer:
11. DECLARACIÓN DE CONFORMIDAD
Fabricante:
TOT COMERCIAL sa Partida Horta d'Amunt s/n Apartado Correos nº 149
25600 BALAGUER (Lleida) ESPAÑA
STATES:
Under its own responsibility that the following:
TOT COMERCIAL sa Partida Horta d'Amunt s/n Apartado Correos nº 149
25600 BALAGUER (Lleida) SPAIN
DECLARA:
Bajo su única responsabilidad, que la siguiente máquina:
ELECTRONIC GEAR METER
MEDIDOR ELECTRÓNICO DE ENGRANAJES
Make: GESPASA
Marca: GESPASA
MGE-250
MGE-250
MGE-400
MGE-400
serial no.
nº serie
It is in accordance with the following Directives of the European
Parliament and the Council: "2006/42/EC of 17 May 2006 relating to
machinery", "2006/95/EC of 12 December 2006 on the harmonisation of
the laws of Member States relating to electrical equipment designed for
use within certain voltage limits", and "2004/108/EC of 15 December
2004 on the approximation of the laws of the Member States relating to
electromagnetic compatibility and repealing Directive 89/336/EC", and it
has been manufactured according to the following harmonized
regulations:
Es conforme con las Directivas del Parlamento Europeo y del Consejo
«2006/42/CE, de 17 de mayo de 2006, relativa a las máquinas»,
«2006/95/CE, de 12 de diciembre de 2006, relativa a la aproximación de
las legislaciones de los Estados miembros sobre el material eléctrico
destinado a utilizarse con determinados límites de tensión» y
«2004/108/CE, de 15 de diciembre de 2004, relativa a la aproximación de
las legislaciones de los Estados miembros en materia de compatibilidad
electromagnética» y por la que se deroga la Directiva 89/336/CE, y ha
sido fabricada de acuerdo con las siguientes normas armonizadas:
UNE-EN ISO 12100-1:2004 Safety machinery. Basic concepts, general
principles for design
Part 1: Basic terminology, methodology
(ISO 12100-1:2003)
UNE-EN 60204-1:2007
Safety of machinery. Electrical equipment
of machines
Part 1: General requirements (IEC 602041:2005, modified)
UNE-EN 55014-1:2008
Electromagnetic compatibility. Requirements for household appliances, electric
tools and similar apparatus
Part 1: Emission
UNE-EN 55014-2/A1:2002 Electromagnetic compatibility. Requirements for household appliances, electric
tools and similar apparatus
Part 2: Immunity. Product family standard
UNE-EN ISO 12100-1:2004 Seguridad de las máquinas. Conceptos básicos, principios generales para el diseño
Parte 1: Terminología básica, metodología
(ISO 12100-1:2003)
UNE-EN 60204-1:2007
Seguridad de las máquinas. Equipo eléctrico de las máquinas
Parte 1: Requisitos generales (IEC 602041:2005, modificada)
UNE-EN 55014-1:2008
Compatibilidad electromagnética. Requisitos para aparatos electrodomésticos, herramientas eléctricas y aparatos análogos
Parte 1: Emisión
UNE-EN 55014-2/A1:2002 Compatibilidad electromagnética. Requisitos para aparatos electrodomésticos, herramientas eléctricas y aparatos análogos
Parte 2: Inmunidad. Norma de familia de
productos
- Grado de protección IP-55
- Las bombas, medidores y las pistolas como casi máquinas no deben
ser puestas en servicio mientras la máquina donde va ubicada no haya
sido declarada de conformidad con los requisitos de la directiva
2006/42/CE (Máquinas).
BALAGUER (Lleida), febrero 2013
- IP-55 protection
The pumps, meters, and guns as nearly machines must not be on
service while the machine, where these are placed, does not meet the
2006/42/EC (Machines) Directive requirements.
BALAGUER (Lleida), February 2013
Andrés Pané
Andrés Pané