1
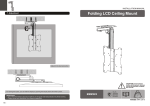
MANUAL DE INSTRUCCIONES
SOPORTE PARA TV LCD/LED EXTRA-DELGADO (17"-37")
WM-4838
ESTIMADO CLIENTE
Con el fin de que obtenga el mayor desempeño de su producto, por favor lea este manual de
instrucciones cuidadosamente antes de comenzar a utilizarlo, y guárdelo para su futura referencia.
Si necesita soporte adicional, no dude en escribir a: [email protected]
PRECAUCIÓN
RIESGO DE CHOQUE
ELÉCTRICO , NO ABRA
Precaución: Para reducir el riesgo de choque eléctrico, no
retire la cubierta, no hay partes manipulables por el usuario al
interior de la unidad.
Refiera todo mantenimiento o
intervención técnica a personal técnico calificado.
Este símbolo indica la existencia de voltaje peligroso al
interior de esta unidad, que constituye un riesgo de choque
eléctrico.
Este símbolo indica que hay importantes instrucciones de
operación y mantenimiento en la literatura que acompaña a
esta unidad.
LÍNEAS DE SERVICIO AL CLIENTE PREMIER
Venezuela:
Panamá:
Sitio Web:
E-mail:
0800 – ELECTRIC (353-2874)
300-5185
www.premiermundo.com
[email protected]
NOTA
Nos reservamos el derecho de modificar las especificaciones, características y/u operación de esta
unidad sin previo aviso, con el fin de continuar las mejoras y desarrollo del mismo.
P-1
INSTRUCCIONES DE SEGURIDAD
Lea este manual de instrucciones antes de iniciar el montaje e instalación.
• No exceda el peso de carga máximo soportado por esta unidad.
• Esta unidad fue diseñada para ser instalada y utilizada solo como se especifica en este manual de
instrucciones. Una instalación inadecuada de la unidad puede causar serios daños ó accidentes.
• El soporte debe ser instalado preferiblemente por una persona con habilidades mecánicas y
experiencia en instalación.
• Asegúrese que la superficie donde hará el montaje puede soportar el peso combinado del equipo y
todos los componentes.
• Si se hace el montaje en una pared de madera, asegúrese que los chazos son puestos
correctamente en el centro de las vigas. Se recomienda el uso de un buscador electrónico de vigas.
• Utilice la ayuda de una persona para levantar los equipos de manera segura.
• Apriete los tornillos con firmeza pero nos los sobre-apriete ya que puede llegar a romper las partes.
• Este producto está diseñado para uso en el hogar. No lo utilice en exteriores.
INSTRUCCIONES DE INSTALACIÓN
PIEZAS
NOTA: Asegúrese de que todas las piezas estén completas antes de comenzar. Si detecta cualquier
falla póngase en contacto con el fabricante.
Placa para pared (x1)
A
P-2
Soporte adaptador
izquierdo
B
Soporte adaptador
derecho
C
Paquete M
M4X14 (X4)
M-A
Arandela D5 (X4)
M-E
M5X14 (X4)
M-B
M6X14 (X4)
M-C
Arandela D8 (X4)
M-F
M8X20 (X4)
M-D
Separador Pequeño (X8)
M-G
Paquete W
ST6.3X55 (X3)
W-A
Perno para Concreto (X3)
W-B
Arandela D6 (X3)
W-C
P-3
MONTAJE EN PARED DE MADERA
Marque la ubicación
exacta de los agujeros
de instalación
Taladre agujeros guía
Atornille la placa
de pared en los
agujeros
•
•
•
IMPORTANTE
Asegúrese de que los chazos son puestos correctamente en el centro de las vigas. Se recomienda
el uso de un buscador electrónico de vigas.
Los instaladores son los responsable de suministrar el hardware para otros tipos de montajes.
Asegúrese que la superficie donde hará el montaje puede de hecho soportar el peso combinado del
equipo y todos los componentes.
P-4
MONTAJE EN PARED DE CONCRETO O LADRILLO
Marque la ubicación
exacta de los agujeros
de instalación
Taladre agujeros guía
Atornille la placa
de pared en los
agujeros
•
•
IMPORTANTE
Al instalar en paredes de bloque de hormigón, verifique que el grosor actual del concreto es de al
menos 1-3/8” (35mm) para usar los chazos para concreto. No taladre en las uniones de mortero.
Asegúrese de hacer el montaje en una parte sólida del bloque, generalmente 1” mínimo del lado del
bloque. Se sugiere utilizar taladro eléctrico en velocidad baja en lugar de martillo para evitar romper
la parte posterior del orificio al entrar en una abertura o cavidad.
El instalador debe verificar que la superficie donde hará el montaje puede de hecho soportar el peso
combinado del equipo y todos los componentes.
P-5
INSTALAR LOS SOPORTES ADAPTADORES
Parte superior del TV
Patallas con parte posterior plana
P-6
Pantalla con ranuras en la parte posterior ó acceso a entradas A/V
Ó
Nota:
• Elija los tornillos, arandelas y espaciadores apropiados (De ser necesario) de acuerdo al tipo de
pantalla.
• Coloque los soportes adaptadores tan cerca como sea posible del centro del televisor
• Atornille los soportes adaptadores en el televisor.
No sobreapriete los tornillos ya que se pueden quebrar algunas partes.
COLGAR EL TELEVISOR EN LA PLACA PARA PARED
Pared
Pared
Perno
Apriete los dos pernos usando un destornillador Phillips apropiado para asegurar el soporte.
P-7
AJUSTE
Perilla de ajuste de
Inclinación
Afloje la perilla de ajuste para inclinar el soporte al ángulo deseado luego apriétela.
MANTENIMIENTO
•
•
•
Una vez esté colocado el televisor en el soporte verifique que todo esté seguro y firme.
Revise los tornillos al menos cada 2 meses.
Si tiene cualquier duda sobre la instalación, póngase en contacto con el fabricante.
P-8
Super Slim LCD/LED TV Bracket (17"-37")
NOTE: Read the entire instruction manual before you start installation and assembly.
WARNING
• Do not begin the installation until you have read and understood the instructions
and warnings contained in this installation sheet. If you have any questions
regarding any of the instruction or warning, please contact your local distributor.
• This mounting bracket was designed to be installed and utilized ONLY as
specified in this manual. Improper installation of this product may cause damage
or serious injury.
• This product should only be installed by someone of good mechanical ability,
with basic building experiences and fully understanding of this manual.
• Make sure that the supporting surface will safely support the combined load of
the equipment and all attached hardware and components.
• If mounting to wood wall studs, make sure that mounting screws are anchored
into the center of the studs. Use of a stud finder is highly recommended.
• Always use an assistant or mechanical lifting equipment to safely lift and position
equipment.
• Tighten screws firmly, but do not over tighten. Over tightening can damage the
items, greatly reducing their holding power.
• This product intended for indoor use only. Using this product outdoors could
lead to product failure and personal injury.
2
Component Checklist
1a. Mount on Wood Stud Wall
55mm
(2.2")
((2.2"
2.2"))
IMPORTANT: Ensure that you have received all parts according to the component checklist prior to installing. If
any parts are missing or faulty, telephone your local distributor for a replacement.
ø 4.5mm
(ø 3/16")
1
2
Find and mark the
exact location of
mounting holes
wall plate (x1)
A
left adapter
bracket (x1)
B
right adapter
bracket (x1)
C
3
Drill pilot holes
Package M
√
M4x14 (x4)
M-A
M5x14 (x4)
M-B
M6x14 (x4)
M-C
D8 washer (x4)
M-F
X
M8x20 (x4)
M-D
W-A
D5 washer (x4)
M-E
X
small spacer (x8)
M-G
Screw the wall
plate onto the
wall
W-C
Package W
WARNING
• Make sure that mounting screws are anchored into the center of the studs. Use of a stud finder
is highly recommended.
ST6.3x55 (x3)
W-A
concrete anchor (x3)
W-B
D6 washer (x3)
W-C
3
• Installers are responsible to provide hardware for other types of mounting situations.
• Installers must verify that the supporting surface will safely support the combined load of the
equipment and all attached hardware and components.
4
2. Install Adapter Brackets
1b. Mount on Solid Brick and Concrete Block
60mm
((2.4")
2.4")
ø 10mm
(ø 3/8" )
Mark the exact 1
location of
mounting holes
Top of TV
2
Drill pilot holes
√
X
X
2-1. For Flat Back Screen
W-B
TV
W-C
W-A
Screw the wall
plate onto the
wall
WARNING
• When installing wall mounts on cinder block, verify the actual concrete thickness is at least
1-3/8" (35mm) for using the concrete anchors. Do not drill into mortar joints! Be sure to
mount in a solid part of the block, generally 1" (25mm) minimum from the side of the block.
It is suggested electric drill on slow setting is used to drill the hole instead of a hammer drill
to avoid breaking out the back of the hole when entering a void or cavity.
• Installers must verify that the supporting surface will safely support the combined load of the
equipment and all attached hardware and components.
5
TV
M-A
M-B
M-C
M-D
TV
6
M-E
M-F
4. Adjustment
2-2. For Recessed Back Screen or to Access A/V Inputs
Tilt adjusting
knob
M-D
0°
M-D
M-F
or
-10°
M-F
M-G
M-G
M-G
Note: Choose appropriate screws, washers and spacers (if necessary) according to the type of screen.
· Position the adapter brackets as close as possible to the middle of the TV.
· Screw the adapter brackets onto the TV.
Loose the adjusting knobs to tilt desired angle then tighten them.
Tighten all screws but do not over tighten.
Maintenance
• Check that the bracket is secure and safe to use at regular intervals(at least every three months).
• Please contact your dealer if you have any questions.
3. Hang TV onto the Wall Plate
wall
wall
Bolt
Tighten the two bolts by using a proper phillips screwdriver to secure bracket.
7
8