1
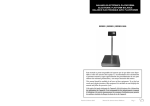
BALANZA ELECTRÓNICA CUENTAPIEZAS ELECTRONIC COUNTING BALANCE Modelo 5050 5050 Model Este manual es parte inseparable del aparato por lo que debe estar disponible a todos los usuarios del equipo. Le recomendamos leer atentamente el presente manual y seguir rigurosamente los procedimientos de uso para obtener las máximas prestaciones y una mayor duración del mismo. This manual should be available for all users of these equipments. To get the best results and a higher duration of this equipment it is advisable to read carefully this manual and follow the processes of use. Revisión 1 de Junio-03 Manual de instrucciones 55050XXX Pág. 1 ESPAÑOL Gracias por elegir una balanza NAHITA, su alta calidad mecánica le permitirá disponer de este instrumento por muchos años, no obstante le recomendamos leer atentamente el presente manual y seguir rigurosamente los procedimientos de uso para obtener las máximas prestaciones y una mayor duración de la misma. LEA DETALLADAMENTE ESTE MANUAL DE INSTRUCCIONES ANTES DE CONECTAR Y OPERAR CON ESTE EQUIPO. Tenga especialmente presente lo siguiente: Este manual es parte inseparable del aparato por lo que debe estar disponible a todos los usuarios del equipo. Guarde el manual para posteriores consultas. Cualquier duda puede ser aclarada contactando con el servicio técnico de NAHITA. Como instrumento de precisión, debe manipularse siempre con cuidado evitando los movimientos bruscos y los golpes. Nunca desmonte las diferentes partes de la balanza para repararlas usted mismo, además de perder la garantía, podría producir un funcionamiento deficiente de todo el conjunto. ¡ATENCION! NO SE ADMITIRA NINGUN APARATO PARA REPARAR QUE NO ESTE DEBIDAMENTE LIMPIO Y DESINFECTADO. INDICE DE CONTENIDOS 1. APLICACIONES 3 2. DESCRIPCIÓN 3 3. ESPECIFICACIONES TÉCNICAS 3 4. INSTALACIÓN 4 5. FUNCIONES DE LA BALANZA 6 6. MANTENIMIENTO Y LIMPIEZA 7 ANEXO I: GARANTIA 8 Pág. 2 Manual de instrucciones 55050XXX Revisión 1 de Junio-03 1. APLICACIONES Las balanzas electrónicas Nahita son unos instrumentos básicos en cualquier laboratorio para procesos de pesado, están desarrolladas con la última tecnología, son de gran fiabilidad y durabilidad, su sólido, limpio y ergonómico diseño es muy apropiado para uso industrial. La superficie lisa de la balanza permite su fácil limpieza. 2. DESCRIPCIÓN 1. Pantalla de conteo. 2. Nivel 3. Indicador de batería baja 4. Pantalla de peso. 5. Pantalla de peso unidad. 6. Teclado numérico. 7. ZERO 8. TARA 9. CLEAR 10. SET 11. ACCU 12. SAMP 13. Interruptor ON/OFF 14. Plato 3. ESPECIFICACIONES TÉCNICAS Referencia 55050330 55050360 55050410 55050430 Medidas del plato Tiempo estabilización Temperatura de trabajo Alimentación Revisión 1 de Junio-03 Capacidad Sensibilidad 3000 g 0.1 g 6000 g 0.2 g 15000 g 0.5 g 30000 g 1g 335 X 235 mm. 10 segundos 5 a 40º C 220V, 50 HZ Manual de instrucciones 55050XXX Pág. 3 ESPAÑOL Están diseñadas para todo tipo de aplicaciones en una gran variedad de campos, ya que dispone de función cuenta piezas . Su utilización se extiende desde enseñanza, laboratorios, farmacia hasta industria, química, etc... 4. INSTALACIÓN Inspección preliminar Desembale la balanza y asegúrese de que no presenta ningún daño debido al transporte. De ser así, comuníquelo inmediatamente a su transportista o suministrador. ESPAÑOL Guarde el embalaje, siempre se deben realizar las devoluciones en su embalaje original con todos los accesorios suministrados. Instalación Antes de comenzar a utilizar el instrumento, es conveniente familiarizarse con sus componentes y fundamentos básicos, así como con las funciones de sus controles. LEA DETALLADAMENTE ESTE MANUAL DE INSTRUCCIONES ANTES DE CONECTAR Y OPERAR CON ESTE EQUIPO. Colóquelo sobre una mesa plana, horizontal, manteniéndolo alejado de la humedad, calor, polvo, luz y vibraciones. Mantenerlo sin ninguna fuerza magnética, campo eléctrico, o aparato eléctrico que pueda generar campo de alta frecuencia. Coloque el plato en su lugar, tiene que insertar en los cuatro agujeros que tiene la carcasa. Compruebe que el nivel esté en la posición correcta (centrado), si no es así centre la burbuja con los mandos situados en las patas delanteras y traseras de la balanza. Carga de la batería Antes de comenzar a usar la balanza deberá cargar completamente la batería. Para ello inserte en la clavija shuko el cable que viene suministrado y enchufe a una toma de corriente que disponga de tierra. La batería se encontrará cargada cuando el indicador de batería se encuentre apagado. Aproximadamente dos horas. Ni el fabricante, ni el distribuidor asumirán responsabilidad alguna por los daños ocasionados al instrumento o por las lesiones producidas por cualquier persona debido a la inobservancia del correcto procedimiento de conexión. Condiciones ambientales de trabajo Temperatura de 5º-40ºC Humedad relativa 50-85% Pág. 4 Manual de instrucciones 55050XXX Revisión 1 de Junio-03 Puesta en marcha Presionar el interruptor ON/OFF, situado en el lateral derecho (13). Compruebe que el nivel (2) esté en la posición correcta (centrado), si no es así centre la burbuja con los mandos situados en las patas delanteras y traseras de la balanza. Se enciende las pantallas, y la balanza realiza un autotest, en las pantallas aparece 99999, hasta que se visualizará 0 ó 0.0 según graduación. cidad del modelo dividido por la graduación nos da la sensibilidad de pesada. Si trabajamos a la mayor graduación la balanza trabajara con la mejor sensibilidad. Referencia 55050330 Capacidad 3000 g 55050360 6000 g 55050410 15000 g 55050430 30000 g Graduación 3000 6000 15000 30000 3000 6000 15000 30000 3000 6000 15000 30000 Sensibilidad 1g 0.5 g 0.2 g 0.1 g 2g 1g 0.5 g 0.2 g 5g 2g 1g 0.5 g 3000 6000 15000 30000 10 g 5g 2g 1g Ya tiene lista la balanza para su uso. Apagar la balanza una vez acabado el trabajo. Pulse el interruptor ON/OFF situado en el lateral derecho (13). Recarga de la batería Procure cargar la batería sólo cuando este totalmente descargada, el indicador batería baja (3) se enciende. De esta manera prolongará la vida de la batería. Revisión 1 de Junio-03 Manual de instrucciones 55050XXX Pág. 5 ESPAÑOL Elija con el botón SET(10) la graduación/ sensibilidad con la que quiere trabajar. La capa- 5. FUNCIONES DE LA BALANZA Función Tara ESPAÑOL La tara se emplea cuando se desea pesar sustancias pero no el recipiente que lo contiene; por ejemplo cuando se quiere pesar líquidos o reactivos sólidos que luego se van a disolver. Para su uso: Asegurarse de que no haya nada en el plato (14) y comprobar que en la pantalla de peso (4) este a 0 ó 0.0 (dependiendo de graduación elegida). Coloque el recipiente en el plato (14) de la balanza, pulse TARA (8) y la pantalla de peso (3) mostrará 0 ó 0.0 (dependiendo de graduación elegida), la balanza ya está preparada para pesar. Una vez terminada la operación de pesada, retire el recipiente del plato de la balanza, en la pantalla quedará el peso del recipiente con valor negativo Para que se pueda seguir su manejo normal se debe poner a 0 ó 0.0 con la tecla TARA(8). Función cuentapiezas Asegúrese de que no haya nada en el plato (14), compruebe que la pantalla de peso(4) este a 0 ó 0.0 (dependiendo de graduación elegida). Si necesita colocar algún tipo de recipiente utilice el modo TARA antes de trabajar con la balanza. Coloque una unidad del producto a contar, tenga en cuenta la sensibilidad que dependerá según modelo. Si el peso de la pieza es menor de lo indicado colocar 10 productos. Cuando la balanza se encuentre estable marque con el teclado numérico (12) el peso de la unidad. En la pantalla de peso unidad (5), aparece lo marcado. Pulse ACCU (11), retire la pieza. Ya esta preparada para el conteo, coloque las piezas que quiera contar en pantallas aparecerá: - Pantalla de conteo (1) le indica el numero de piezas. - Pantalla de peso unidad (5) le indica el peso de cada pieza. - Pantalla de peso (4) le indica el peso total de las piezas. Una vez acabado el trabajo, para borrar los datos, pulse CLEAR(9), ACU (11) espere unos segundos y pulse de nuevo CLEAR(9). De esta manera borra los datos anteriores y puede comenzar de nuevo. Pág. 6 Manual de instrucciones 55050XXX Revisión 1 de Junio-03 6. MANTENIMIENTO Evite a la balanza de movimientos bruscos y golpes, así como de la luz directa del sol o corrientes de aire. Trate la balanza con cuidado, como un instrumento de precisión que es. Protéjala del polvo. No desmonte la balanza además de perder la garantía podría producir un daño importante en la balanza. te cierto tiempo o haya que enviarla a revisar. No eliminar los dispositivos de protección del sistema de mando, no realizar presión sobre la pantalla, no presionar los mandos con objetos punzantes. Utilice un paño suave ligeramente humedecido con una solución detergente poco concentrada, para limpiar la superficie accesible del instrumento No sumerja la balanza ni arroje líquido sobre ella. Nunca use productos corrosivos. Nota: Según la legislación vigente en el campo de "Instrumentos de pesaje de funcionamiento no automático" en el que se incluyen las balanzas, mediante la Orden del 22 de diciembre de 1994 (BOE 3/1/95), estas balanzas no se pueden utilizar para: - Realización de transacciones comerciales. - Cálculo de tasas, Aranceles, impuestos, remuneraciones, indemnizaciones y otros tipos de cánones similares. - Peritajes judiciales - Preparación farmacéutica de medicamentos por encargo así como realización de análisis efectuados en los laboratorios médicos y farmacéuticos. - Determinación del precio o importe total en la venta directa al público y el la preparación de preenvasados Revisión 1 de Junio-03 Manual de instrucciones 55050XXX Pág. 7 ESPAÑOL No tire el embalaje, guárdelo para transportarla o cuando no vaya a ser utilizada duran- GARANTÍA ESPAÑOL AUXILAB S.L. garantiza este equipo por un período de doce meses a partir de la fecha de adquisición contra cualquier defecto de fabricación que afecte a su funcionamiento, comprometiéndose a reponer las piezas cuya rotura, se deba a defecto de fabricación. El canje, durante el período de garantía, de estas piezas será gratuito y no implicará prolongación de la misma. Esta garantía quedará sin efecto cuando el aparato haya sido sometido a un uso indebido o manipulado por persona ajena a nuestro Servicio Oficial, así como por haber sido instalado incorrectamente o por haber utilizado recambios y accesorios no originales. Quedan, asimismo, excluidas de la Garantía las averías producidas por causas catastróficas (fuego, inundación...), atmosféricas, golpes y caídas. Los gastos ocasionados como consecuencia de esta reparación, tales como el transporte de los aparatos a nuestros Servicios Oficiales y su posterior devolución, serán por cuenta del usuario. Es necesaria la presentación del Certificado de Garantía debidamente cumplimentado (sin enmiendas ni tachaduras), para obtener cualquier intervención de nuestro Servicio Oficial sin cargo durante el período indicado. Esta garantía no cubre ni el mantenimiento del aparato ni las piezas o los daños producidos por desgaste natural del uso normal del equipo. Para facilitar un mejor servicio cuando nos envíen un aparato al Servicio Técnico les agradeceríamos nos indiquen los siguientes datos: Distribuidor: Equipo: Modelo: Número de Serie: Fecha: Breve descripción de la avería: AUXILAB, S.L. Polígono Morea Norte, 8 - 31191 BERIAIN (Navarra) Tel(948) 310 513 - Fax(948) 310 500 - 312 071 e-mail: [email protected] http://www.auxilab.es Pág. 8 Manual de instrucciones 55050XXX Revisión 1 de Junio-03 Thanks for choosing a NAHITA Electronic Balance, its high mechanical quality will allow you to make use of this equipment for a long years. Nevertheless to get the best results and a higher duration out of this instrument it is highly advisable to read this manual and follow the instructions of use. BEFORE CONNECTING, OPERATING THIS INSTRUMENT, READ THESE INSTRUCTIONS THOROUGHLY. In order to use this equipment, bear in mind the following points: This manual is inseparable from the balance and must be available for all users of this equipment. Any doubts can be clarified by getting in touch with the NAHITA service. As an accuracy instrument, it should be handled carefully avoiding the sudden movements and knocks. Never dismantle the different pieces of the balance to repair them yourself, since it could produce a defective use of the whole equipment and a loss of the product warranty. ATTENTION !! IF AN EQUIPMENT IS NOT PROPERLY CLEAN AND DISINFECTED, IT WOULD NOT BE ALLOWED TO REPAIR BY OUR TECHNICAL SERVICE. CONTENTS 10 2. DESCRIPTION 10 3. TECHNICAL SPECIFICATIONS 10 4. OPERATING INSTRUCTIONS 11 5. FUNCTIONS OF THE BALANCE 13 6. MAINTENANCE 14 ANNEX I: WARRANTY INFORMATION 15 Version 1 June-03 Instruction manual 55050XXX Page 9 ENGLISH 1. USES OF THE INSTRUMENT 1. USES OF THE INSTRUMENT NAHITA electronic balances are basic instruments in weighing tasks in every laboratory. They have been developed with the latest technology. They are of a great reliability and durability. Their solid, clean and ergonomic design is very suitable for any industrial usage. It's smooth surface makes the cleaning easier. They are designed for every kind of uses in lots of fields thanks to the function to count pieces. They are used in teaching, laboratories, pharmacy and industry, chemistry, etc... 2. DESCRIPTION 1. Number Display 2. Level 3. Low battery indicator 4. Weight Display 5. Unit weight Display 6. Number Key 7. ZERO Key 8. TARE Key 9. CLEAR Key 10. SET Key 11. ACCU Key 12. SAMP Key 13. Power ON/OFF 14. Pan ENGLISH 3. TECHNICAL SPECIFICATIONS Code 55050330 55050360 55050410 55050430 Pan’s size Stabilization time Working temperature Power source Page 10 Capacity Readability 3000 g 0.1 g 6000 g 0.2 g 15000 g 0.5 g 30000 g 1g 335 X 235 mm. 10 seconds 5 to 40º C 220V, 50 HZ Instruction manual 55050XXX Version 1 June-03 4. OPERATING INSTRUCTIONS Preliminary examination Remove the instrument from the packing material and examine it carefully to make sure no damage has occurred during shipping. If there is any damage, notify to your dealer. Keep all packing material until you are sure that the instrument works correctly. All defective items must be returned in the original packing together with any other supplied accessories. Installation Before using this instrument, please carefully read this manual for its correct use. BEFORE CONNECTING, OPERATING THIS INSTRUMENT, READ THESE INSTRUCTIONS THOROUGHLY. The instrument must be placed on a flat, horizontal desk. Avoid wetness, heat, vibrations and airflows. The environmental lighting must not be too bright. Keep away from any magnetic force, electric field or gadget with can produce a high frecuency fiel. Place the pan on its place, it must be inserted in the four holes that the balance has for this purpose. Check the level the balance incorporates in its back side is in the appropriate position (in the centre). If it is in a wrong position, try centering the bubble with the knobs close to the balance legs in the front and rear parts. Charging the batteries Before using the balance, its battery must be completely charged. In order to do so, insert the supplied cable in the schucko pin, the plug it in to an intake earth conection. The batteries is charged when the indicator of low battery is turned off. Approximatel within two hours. Environmental work conditions Working temperature range 5º-40ºC Relative humidity 50-85% Version 1 June-03 Instruction manual 55050XXX Page 11 ENGLISH Neither the manufacturer nor the distributor will take any responsibility on damaged equipments or personal injuries due to an inappropriate connection to electricity. Starting Switch on the power ON/OFF(13), on the right-hand side Check the level the balance incorporates in its back side (2) is in the appropriate position (in the centre). If it is in a wrong position, try centering the bubble with the knobs close to the balance legs in the front and rear parts. Balance begin self-testing until getting normal weighting condition. The displays will turn on and the balance will carry out a selftesting. To choose the graduation/sensibility you want to work withuse the SET key (10). Model ENGLISH capacity divided into graduation gives the weighting sensibility. The higher gradation, the better sensitivity the balance will work with. Code 55050330 Capacity 3000 g 55050360 6000 g 55050410 15000 g 55050430 30000 g Gradation 3000 6000 15000 30000 3000 6000 15000 30000 3000 6000 15000 30000 Readability 1g 0.5 g 0.2 g 0.1 g 2g 1g 0.5 g 0.2 g 5g 2g 1g 0.5 g 3000 6000 15000 30000 10 g 5g 2g 1g The balance will be ready to start weighting. Turn off (13). Recharging the batteries Try recharging the batteries once is completely discharged, low battery indicator (3) will turn on. By doing so, you will increase the battery duration. Page 12 Instruction manual 55050XXX Version 1 June-03 5. FUNCTIONS OF THE BALANCE Tare Function Tare function is used when you want to wheight any substance without but not the recipient containing it. For instance, when you want to weight liquids or solid reagents that you are going to dissolve afterwards. You should do the following: Make sure there is nothing on the pan (14) and check the display shows value 0 or 0.0 (depending on gradation you choose). Put the recipient on the balance´s pan (14) and then press TARE key (8). After this, you will read 0 or 0.0 on the weight display (depend gradation you choose). The balance will be now ready to start weighing. Once the weighting proccess is finished, remove the recipient from the balance. You will be able to read the recipient´s weight with a negative value on the display. To recover its usual mode press TARE key (8) again. The display should show 0 or 0.0 again. Piece-counting Function Make sure there is nothing on the pan (14), check weight display (4) reads 0 ó 0.0 (depending on the gradation you choose). If you need to put some recipient you will use tare function. Place a unit of product to be counted. Bear in mind sensitivity that will depend on the balace model. If the weight of the piece is smaller than indicated, then place 10 units. When the balance is stable, introduce the unit weight by pressing the numbers keys (6). On the unit weight display, you can read the weight as you press the key. Press ACCU(11) , Remove the piece. The balance is now ready to start counting. Place the product you want to count. On displays you will read: - Number display (1) shows the number piece. - Unit Weight display (5) shows the weight piece. Once the work is finished, for clearing data press CLEAR key (9), press ACCU key(11) and them wait for some seconds. Press again CLEAR key(9). Now, previous data is deleted and you can start again. Version 1 June-03 Instruction manual 55050XXX Page 13 ENGLISH - Weight display(4) shows the total weight piece. 6. MAINTENANCE Preserve the balance from heavy shocks and look for a dry place, away from dust, direct sun beams or air flows. Handle the balance gently, since it is an accurate instrument. Use a smooth gauze with a soapy solution to clean it. Never remove its mechanical components. You will not only lose your warranty, but also you can damage your balance seriously. Don´t throw away the package. It might be useful in case you need to move it, to send it if it needs repairing or you stop using it for a long time in the future. Save all packing material until you are sure that the instrument works correctly. All defective items must be returned in the original packing toghether with the supplied accessories. It is prohibited to use strong chemical solvent to clean the surface. Do not leave the balance exposed to direct sunlight for long periods of time. This may deform or discolor the cabinet and may also cause malfunctioning. Please take out the dry batteries if it's to be left unused for a long time, wipe the balance, enclose it with dryer in a plastic pocket. Do not press display, Do not press front panel with sharp objects.. Don't dip the balance into water, don't leave it out in the rain or even don't wash it with ENGLISH water. In case some water drops, please dry it inmediatly with a cloth. Page 14 Instruction manual 55050XXX Version 1 June-03 WARRANTY AUXILAB, S.L. warrants this equipment be free from defects in material and workmanship for a period of one year from date of purchase from AUXILAB S.L. or an authorised AUXILAB S.L. dealer. This warranty is limited to such purchaser and is not transferable. During the year warranty period, AUXILAB S.L. will repair or replace, at its option, any defective equipments or pieces at no additional charge, provided that the product is returned, shipping prepaid, to AUXILAB S.L., an authorised dealer or an authorised service location. The purchaser is responsible for insuring any returned product and assumes the risk of loss during shipping. All replaced parts become the property of AUXILAB. This limited warranty does not extend to any products which have been damaged as a result of accident, misuse, abuse or as a result of service or modification by anyone other than AUXILAB, an authorised dealer or an authorised service location. Except as expressly set forth above, no other warranties are expressed or implied, including, but not limited to, any implied warranties of merchantability or fitness for a particular purpose. AUXILAB expressly disclaims all expressed or implied warranties not stated herein. In order to obtain a free reparation or a free piece-replacement by our Technical Service over the above-mentioned period of time, it is absolutely necessary to submit the Warranty Certificate. This warranty doesn't apply for the maintenance of the equipment or for damaged caused by a natural, everyday use. Some states do not allow the exclusion or limitation of incidental or consequential damages for consumer products, and some states do not allow limitations on how long an implied warranty lasts, so the above limitations or exclusions may not apply to you. This limited warranty gives you specific legal rights, and you may also have other rights which vary from state to state. Dealer: Equipment: Model: Serial Number: Date: ENGLISH Brief failure description: AUXILAB, S.L. Polígono Morea Norte, 8 - 31191 BERIAIN (Navarra) Tel(948) 310 513 - Fax(948) 310 500 - 312 071 e-mail: [email protected] http://www.auxilab.es Version 1 June-03 Instruction manual 55050XXX Page 15