1
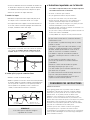
– Use a round kitchen tabletop or similar household item
as a template to bend the rail. Hold the rail, one hand at
each end, and bend the rail around the template starting
from the center and working towards the ends. Bend each
section separately.
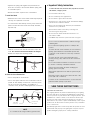
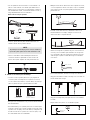
– Mark the remaining support locations on the rail no more
than 32" apart. It is acceptable for a support location to
fall directly over a rail joiner.
32”
6"
– Lift the rail to the ceiling, aligning the rail with the
transformer. Using a pencil, transfer the ceiling post
locations from the rail to the ceiling.
– Secure the pieces of the rail together by pushing the ends
firmly into the rail joiners.
NOTE
The set screws on top of the rail joiner may need to be
backed out (but not fully removed) prior to inserting the rail.
– Use Allen wrench provided to reinforce the electrical
connection by tightening the two set screws on the top of
each rail joiner.
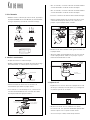
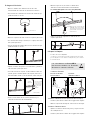
– Align the drywall anchor with the mark on the ceiling and
use a hammer to tap the anchor approximately 1/2" into
the ceiling. Stop just before the threaded portion of the
anchor enters the ceiling.
– Using a screwdriver, drive the anchor flush into the ceiling.
4. Install The Mounting Hardware
– Locate the three ceiling posts and ceiling post mounting
hardware packet, which contains (3) screws, (1) Allen
wrench, (3) drywall anchors and (3) threaded washers.
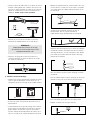
– Secure the threaded washer to the flushed anchor by
driving a screw into the anchor.
– Secure the ceiling post assembly to the threaded washer.
– Lay the assembled rail on the floor directly under the
transformer.
– The transformer and the ceiling posts will be used to
support the rail from the ceiling, providing a total of four
supports. Using a pencil and tape measure, mark two of
the support locations on the rail 6" from each end of the
assembled rail.
– Repeat these steps for the remaining posts.