1
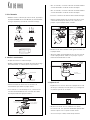
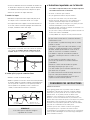
– Squeeze the spring ends together and put it back into
front of Focus head, in front of bulb. Release spring ends
to hold bulb in place.
9.
Important Safety Instructions
To reduce the risk of fire, electrical shock, exposure to excessive
UV radiation, or injury to person:
– Remove the fixture cap from each of the fixtures.
— Use this fixture indoors only.
7. Install the Heads
— Do not look directly at the lighted bulb.
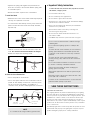
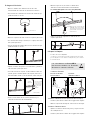
– Determine the location of the heads. Heads may be placed
over any unoccupied rail connectors.
– If a head location falls directly over the joiner, remove the
plastic insulator from the inside of the head; otherwise,
skip this step.
— Do not remain in light if skin feels warm.
— Risk of Fire: Use only the type of bulb and maximum wattage
indicated in this instruction manual.
— Never cover the halogen bulb and never place flammable
material close to your fixture.
— Never turn the fixture on and off by connecting and
disconnecting the halogen bulb.
— Do not touch the fixture shade while the fixture is on.
This surface is HOT.
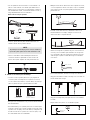
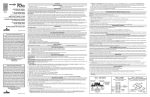
HEAD INSULATOR
Only remove the insulator
from a head connector if
it will be located over a
rail joiner.
— The MR16 lamp must have a protective front cover glass.
Do not conceal or extend bus bar conductors through
a building wall.
Do not install this lighting system in a damp or wet
location.
– Slide the connector onto the rail and screw a cap to the
head. The connection must be flush with the rail and tight.
Repeat this step for the remaining heads.
To reduce the risk of fire and burns, do not install this
lighting system where the uninsulated open bus bar
conductors can be shorted or contact any conductive
materials.
To reduce the risk of the system overheating and
possibly causing a fire, make sure all the connections
are tight.
Do not install fixture assemblies closer than six inches
to curtains or similarly combustible materials.
Turn the electrical power off before modifying the
lighting system in any way.
Only fixtures approved for use with the system may be
installed.
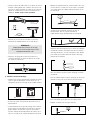
8. Check for Loose Connections
Minimum volume of the electrical box must be 6 cubic
inches (98 cubic centimeter).
– Turn on the power to electrical box.
– Turn on the system and let it run for 5 minutes. Turn the
system off and carefully check that all connection points
are not hot to the touch (warm is acceptable). If a
connection is hot, be sure to firmly tighten the connections.
FIXTURE
CONNECTIONS
ENSURE BULBS
POWER FEED
CONNECTION
ARE SECURE
NOTE
It is normal for the halogen bulbs to generate heat.
Load the circuit of the transformer to no more than the
maximum rated capacity as specified.
SAVE THESE INSTRUCTIONS
STATEMENT OF WARRANTY
Tech Lighting warrants all products manufactured by Tech Lighting
to be free from defects in material and workmanship under normal
use for a period of one year after the date of original purchase. Upon
confirmation of a defect or failure, at our discretion we will repair
or replace the item or will refund your purchase price if repair or
replacement is not possible or practical. Our warranty covers only the
product itself; we will assume no liability for labor costs, installation
costs, or other losses.
Your warranty rights will be honored only when the product has been
installed and used properly. Tech Lighting will not repair or replace
products damaged by improper use or faulty installation.