1
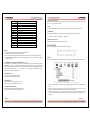
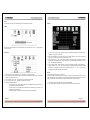
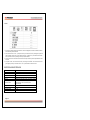
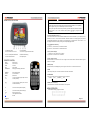
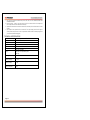
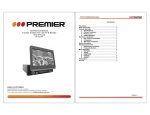
CONTENIDO
MANUAL DE INSTRUCCIONES
TELEVISOR/MONITOR LCD DE 7” PANTALLA ANCHA 16:9
PARA APOYA-CABEZA
TV-1851TFT
1. PRECAUCIONES
2
2. GUÍA DE INSTALACIÓN
2
3. DESCRIPCIÓN DEL MONITOR
3
4. CONTROL REMOTO
3
5. USO DEL MENÚ
5
6. ESPECIFICACIONES TÉCNICAS
8
ESTIMADO CLIENTE
Felicitaciones por su compra!
Por favor lea cuidadosamente este manual, y guárdelo para su futura referencia.
Si necesita soporte adicional, no dude en escribir a: [email protected]
Pagina 1
1. PRECAUCIONES
•
•
•
•
•
•
•
DESCRIPCIÓN DEL MONITOR
Este equipo está fabricado con muchas piezas electrónicas de precisión, las que podrían dañarse o
romperse si desarma o intenta modificar el equipo.
Evite tocar el panel LCD cuando esté usando este aparato.
Mantenga este equipo alejado de lugares muy calientes o muy fríos. La temperatura de operación
está en rango de 0º C a 33º C.
No deje caer el monitor ni lo someta a golpes contra objetos duros ya que podría causar daños
irreparables en la pantalla LCD o los componentes de iluminación posterior.
Si el equipo se recalienta o presenta algún fallo durante la operación, apáguelo de inmediato y
solicite servicio técnico. No intente repararlo por su cuenta.
La batería del control remoto tiene un tiempo de vida útil de aproximado de 5 meses. Para asegurar
un funcionamiento adecuado del control remoto, remplace la batería periódicamente.
No use productos químicos o solventes, ni detergentes abrasivos para limpiar la pantalla.
GUÍA DE INSTALACIÓN
PRECAUCIONES
• Este aparato debe ser instalado por personal calificado.
• Este aparato está diseñado para funcionar con un sistema eléctrico de 12V y el polo negativo
conectado a tierra.
• Desconecte el cable de tierra del borne de la batería antes de conectar el aparato al sistema
eléctrico.
• Use solamente los accesorios que se incluyen con este aparato, para evitar riego de incendios o
choques eléctricos.
• Este equipo se adapta a cualquier modelo de automóvil, ya que puede ajustar la distancia entre los
ejes.
1. Entrada de Audio/Video
2. Sensor del Remoto
3. AV/TV: Selector AV o TV
4. CH! / CH": Cambiar de canal
5. V+/V-: Volumen
6. MENU de configuración
7. POWER – Encender / Apagar
8. Salida para audífonos
CONTROL REMOTO
Aumentar
Reducir
Pagina 2
Pagina 3
MUTE
ON/OFF
TIME
SYS
VIEWMODE
MIRROR
VIDEO
MENU
P!
P"
V+
V–
0~9
-/--
Activar o desactivar la anulación de sonido
Encender / Apagar
Hora de apagado
Modo de audio
Proporción de la pantalla
Volcar imagen
Selector AV/TV
Menú principal
Siguiente canal / Desplazar el cursor hacia arriba
Canal anterior / Desplazar el cursos hacia abajo
Incrementar el volumen
Disminuir el volumen
Botones numéricos (0 al 9) y -/-Conmutador de decimales
RECALL
NOTAS:
1. Apunte el control remoto hacia el receptor infrarrojo del monitor.
2. No apriete, deje caer o desarme el control remoto.
3. No presione los botones demasiado seguido. Espere al menos 2 segundos entre cada operación.
4. Presione el botón POWER para encender el equipo antes de usar los botones P ! / P" para
cambiar de canal.
5. BOTÓN MUTE (Silenciar)
Presione este botón para interrumpir la salida de audio. Vuelva a presionarlo o presione los botones
VOL+ / VOL – para reactivar el sonido.
6. TIME
Use este botón para ajustar la hora de apagado automático en un lapso de hasta 120 minutos.
7. VIEW MODE
Presione el botón VIEW MODE para elegir una de las siguientes opciones de visualización:
ZOOM # AJUSTAR # NORMAL # COMPLETO
8. VIDEO (Selector AV/TV)
Presione este botón para elegir entre los modos AV o TV.
USO DEL MENÚ
Presione el botón MENU para acceder a las siguientes opciones:
PICTURE
En este menú puede ajustar el Contraste, Brillo, Color, Nitidez y Tono, como se muestra a continuación:
1. CAMBIAR DE CANAL (BOTONES NUMÉRICOS 0 ~ 9 y -/--)
Puede elegir entre un total de 255 (del 0 al 244) mediante el control remoto, utilizando los botones
NUMÉRICOS (0 ~ 9 y -/--). Si desea elegir un canal cuyo numeral sea de un solo dígito, simplemente
presione el botón NUMÉRICO correspondiente. Si desea elegir un canal cuyo numeral tenga más de un
dígito, presione primero el botón -/--. La indicación “-/--“ aparecerá en la pantalla antes de que
introduzca los números correspondientes.
2. BOTONES P ! / P"
Presione el botón P ! para subir de canal.
Presione el botón P " para bajar de canal.
3. BOTONES V+ / VPresione el botón V+ para aumentar el volumen.
Presione el botón V- para disminuir el volumen.
4. BOTÓN POWER (Encendido)
Presione este botón para encender o apagar el monitor.
Presione este botón para salir del modo de juegos.
Pagina 4
1. Presione el botón MENÚ para acceder a las siguientes opciones: Brillo, Color, Contraste, Nitidez y
Tono.
2. Ingrese a la opción PICTURE y use los botones CH! / CH" para elegir un ítem. El ítem
seleccionado aparecerá con una flecha al costado y las letras en color rojo.
3. Use los botones VOL+ / VOL – para cambiar el valor del ítem seleccionado. El botón VOL+ no
funcionará si ya a alcanzado el valor máximo (63) ni tampoco el botón VOL- si ha alcanzado el valor
mínimo (0).
Pagina 5
NOTA:
La opción de tono (TINT) sólo está disponible para el sistema de color NTSC.
PRESET
AUDIO
Es este menú sólo puede ajustar el nivel del volumen. Use los botones VOL+ / VOL – para incrementar
o reducir su valor.
FUNCTION
1. En este menú puede configurar el Idioma, el Calendario, el Juego y la Imagen.
2. Use los botones CH! / CH" para elegir un ítem. El ítem seleccionado aparecerá con una flecha al
costado y las letras en color rojo.
3. Use los botones VOL+ / VOL – para cambiar el valor del ítem seleccionado.
4. Use los botones VOL+ / VOL – para elegir el idioma Chino o Inglés.
5. JUEGO DIAMANTES RUSOS
o Presione el botón CH+ para cambiar la dirección de los diamantes. Presione el botón CHpara acelerar el descenso del diamante.
o Presione el botón CH+ para desplazar el diamante hacia la derecha y el botón VOL- para
desplazarlo hacia la izquierda.
o Para salir del juego y regresar al menú principal, presione el botón MENU.
Pagina 6
1. En este menú encontrará las siguientes funciones: Búsqueda automática, Búsqueda manual,
Modulación manual, Canal y Cancelar.
2. Entre al menú PRESET y use los botones CH! / CH" para elegir un ítem. El ítem seleccionado
aparecerá con una flecha al costado y las letras en color rojo.
3. Use los botones VOL+ / VOL – para cambiar el valor del ítem seleccionado. Si ha elegido la opción
de búsqueda o modulación manual, use los botones VOL+ para desplazarse hacia arriba y el botón
VOL – para desplazarse hacia abajo.
4. Use los botones CH! / CH" para elegir la opción de búsqueda automática (AUTO SEARCH) y
presione el botón VOL+ / VOL – para iniciar la búsqueda automática que memorizará los canales
detectados. La búsqueda se realiza en la siguiente secuencia: V-L # V-H # UHF. Una vez
completada la búsqueda regresará al primer canal.
NOTAS:
La búsqueda automática se inicia en el canal 0.
Cuando una señal es detectada durante la búsqueda, la barra de progreso cambiará de color rojo a
verde, indicando que se ha encontrado la posición óptima para almacenar dicha señal. Si se detecta un
canal con señal débil, este será saltado y el sistema considerará que no hubo recepción.
1. Todos los canales quedará registrados en la memoria EEPROM.
2. Si no realiza ninguna operación en 10 segundos, regresará automáticamente al menú.
Pagina 7
CLOCK
1. En este menú puede ajustar la hora de dormir, la hora de apagado, la hora de encendido, la alarma,
hora reservada y canal reservado.
3. Use los botones VOL+ / VOL – para ajustar lo hora y los botones CH+/CH- para elegir la opción ON
TIME. Presione el botón VOL- para cambiar las horas y el botón VOL+ para cambiar los minutos.
Use los botones CH+/CH- para elegir el ítem que desee modificar.
4. Ajuste el resto de los ítems de la misma manera. El tiempo máximo para los temporizadores es de
24 horas.
5. Al ajustar la hora, Use los botones CH+/CH- para elegir el ítem TIME. Use los botones CH+/CHpara elegir la posición y los botones VOL+ / VOL – para cambiar el número de canal.
ESPECIFICACIONES TÉCNICAS
ITEM
Sistema de imagen
Formato de la pantalla
Proporción de la pantalla
Área activa
Rotación
ESPECIFICACIÓN
Monitor TFT-LCD de 7”
480 x 234 x RGB
16:9
163 (An) x 123 (Al) mm
La imagen gira hacia arriba, abajo, la izquierda y derecha
Entrada de Video 47 – 870MHz
Fuentes de señal
Entrada de Video 1 VP-P (PAL/NTSC) *2PC
Entrada de audio
Temperatura de operación 0º C ~ 60º C
Humedad relativa
20% ~ 85%
Fuente de energía
DC +12V
Consumo de energía
< 10W
Pagina 8
GENERAL INFORMATION
Thank you very much for your purchase of this headrest with pillow LCD Monitor. Player please read this
instruction manual and keep it for future references.
INSTRUCTION MANUAL
7!16:9 HEADREST WITH PILLOW LCD MONITOR/TV
TV-1851TFT
PRECAUTIONS
1. It’s made up of many precision electronic elements, and any dismantlement or refit will make it
damaged or broken.
2. When operating the unit, please avoid contacting with the LCD panel.
3. Keep it away form the place where is too hot or too cold. Operating temperature of the unit is 3292 degrees Fahrenheit.
4. Do not drop the monitor or impact it with hard objects. This may cause permanent irreversible
damage to the LCD panel and/or the back light element.
5. During operation, if the unit over-heat or malfunction, switch off. Do not disassemble the unit by
yourself. Please consult the company or the dealer.
6. The battery of the remote control unit has an estimated life cycle of five months. To ensure proper
functionality, replace the battery on a timely manner.
7. Do not use any chemical solvent, cleaning agent or corrosive detergent when wiping the display
INSTALLATION GUIDE
Precautions:
1. This unit should be installed by a qualified service technician.
2. This product is designed to operate with a 12V DC, negative ground battery system.
3. Disconnect the ground wire from the battery terminal prior to connecting the unit to the electrical
system
4. Please use accessories that come with this unit. In order to avoid fire or electrical damage to it.
5. This unit fit any models of car, the distance between two poles can be adjust.
DEAR CUSTOMER
Congratulations for your purchase!
Please read this manual carefully, and keep it for future reference.
If you need extra support, please write to [email protected]
Pagina 1
MONITOR ILLUSTRATION
Notice
1.
2.
3.
4.
Please align the remote controller with the infrared-receiving window on TV in operation.
Never oppress, drop, wet or disassembly the remote controller.
Never press any button continuously and swiftly. Operation interval is at least 2 seconds.
Press power to turn on the machine before pressing P / P for program channel
selection.
1. Channel (digit key 0~9 and -/--):
There are 0~254 in total of 255 channels available on the remote controller for your option by the 1
buttons of 0~9 and -/-- on the remote controller. When the channel is a one-digit figure, just puss the
corresponding digit button, If the channel is a two-digit figure, you should press-/-- first to show-/ “--”on
the display screen before further pressing the corresponding digit buttons.
2. P / P (Channel selection)
1). Press CH+, The number of TV channels increases.
2). Press CH-, The number of TV channels decrease.
1> Video/Audio Input
3> AV/TV Switch from AV to TV
2> Incept window
4> CH+/CH- Program descend button
5> V+/V- Volume Reduction Button
6> MENU OSD Setting
7> Power ON/OFF button
8> Earphone jack
REMOTE CONTROL
3.V+/ V- (Volume adjust)
1). Press VOL+, the volume of TV in reduces.
2). Press VOL-, the volume of TV in reduces.
4. Power (power switch)
Press this button is to turn off the TV. Press it again to turn on the machine. Press this button in game
status is to exit game
MUTE
ON/OFF
TIME
SYS
VIEWMODE
MUTE on/off
Power switch
Off-time
Audio mode
Setting picture display dimension.
MIRROR
VIDEO
MENU
P
Mirror image setting
AV/TV selection
Main menu
To the next higher program (the cursor is
moved upwards)
P
To the next lower program (the cursor is
moved downwards)
9.VIDEO (AV/TV Selection)
Press this button is to realize switch between TV/AV pictures.
V+
Volume increase (submenu adjust)
MENU OPERATION
V0~9
-/-Q?
Volume decrease (submenu adjust)
Digit key (0~9) and -/-Tens digit channel select
Recall
5.MUTE (mute)
Press this button, sound disappears, press it again or VOL+/VOL- to resume normal sound.
6.TIME
Time setup of sleep off, it is used to set the tine off within 120 minutes.
8. VIEW MODE
Press “view mode” button, the following, Items are appeared:
ZOOM
JUST
NORMAL
FULL
Press MENU to display program as follows.
11
Pagina 2
Pagina 3
1. PICTURE.
Contrast. Bright. Color. Sharp and TINT display on the screen as illustrated below:
Q?
BRIGHT
COLOR
CONTRAST
SHARPNESS
TINT
11
35
25
30
32
50
a. Press CH+ to change diamonds’ direction. Press CH- to change it’s speed of downward
movement.
b. Press CH+ to make the diamonds to move right; press VOL- to make the diamonds to
move left
c. Quit the game, please press MUNE and return to FUNCTION Menu.
4. P/RESET
Q?
AUTO
SEARCH
FINE
BAND
PROGRAM
SKIP
11
1. Press Menu to display program as follows: Brightness, Color, Contrast, Sharpness and Tint.
2. Enter into PICTURE, press CH+/CH- to select the item which need to be set and it’s indicated by
arrowhead.. Characters are in red.
3. Press VOL+/VOL- to increase or reduce the number of the selected items. It won’t work when
pressing VOL+ to the maximum number, that is “63”; It won’t work when pressing VOL- to the
minimum number, that is “0”.
4. Notes: Only NTSC color system has TINT. Other color systems don’t have this item.
2. AUDIO
Q?
AUDIO
11
33
Here is only VOLUM item in AUDIO Menu. Press VOL+/ VOL- to increase or reduce its number
3. FUNCTION
Q?
11
LANGVAGE
CALENDAR
GAME
Q?
Q?
11
Q?
11
TUNE
UHF
23
OFF
1. Here are such functions are bellow: Auto Search, Search Be hand, Modulate By hand, Band,
Channel and Clear.
2. Enter into PRESET, press CH+/CH- to select the item which need to be set and it’s indicated by
arrowhead.. Characters are in red.
3. Press VOL+/ VOL- to set the number of the selected items. When it’s in modulate and search by
hand function, press VOL+ to move upwards, press VOL- to move downwards.
4. Press CH+/CH- t o choose the itch Auto Search. Press VOL+/VOL- to start Auto Search. and put
into automatic Remember and storage upon completion of Auto Search, Choose the channel in
the order of V-L
V-H
UHF. And return to program NO. Upon completion.
Notes:
a. Auto Search
Start from Program No. 0
b. When receive signal under Search. the Program Indication Bar should turn from red into
green, which means the optimum position for signal storage. If channel under weak signal
is received, the channel storage system wills automatically it as-no signal.
5. All the setting numbers will be preserved automatically in the EEPROM address.
6. It will quit the menu automatically if no any operation exceeds ten seconds.
5. CLOCK
NORMAL
NORMAL
ZOOM
11
1. Here are such functions in this Menu, as follows: Language, Calendar, Game and Picture.
2. Press CH+/ CH- to select the item, which need to be set, and it’s indicated by arrowhead.
Characters are in red
3. Press VOL+/ VOL- to set the number of the selected items.
4. Press VOL+/ VOL- can realize the switch of Chinese. English.
5. Russian Diamonds Game
Pagina 4
SEARCH
Q?
SLEEP
TIME
OFF TIME
ON TIME
ALARM
B. TIME
B. PR
11
0
--: ---: ---: ---: ---: ---: -Pagina 5
1. Here are such functions are bellow: Sleep Time, OFF Time, On Time, Attention, Booked Time
and Booked Chinned.
2. Press VOL+/VOL- to set up clock, then press CH+/CH- to choose ON Time. VOL-Adjust hour
VOL+ Adjust mute CH+/CH- Select items to be setup.
3. Adjustment of other items is the same as that of Clock, and setup of clock for all items is 24 hours
at most.
4. Upon setup of Clock, press CH+/CH- to choose CH- Time, upon setup, press CH+/CH- again to
choose position, and puss VOL+/ VOL- to adjust till the channel number of desired program, the
you will not miss the desired prigram.
TECHNICAL SPECIFICATIONS
TYPE
Display System
Display Format
Aspect Ratio
Active Area
Rotary Angle
Source
Headrest with pillow color TFT-LCD Monitor
7-inch TFT-LCD Monitor
480!234!RGB
16:9
163(W)!123(H)mm
Picture turn Up/Down and Right/Left
Video input 47-870MHZ
Video input 1VP-P (PAL/NTSC) *2PC
Audio input:
Operating Temperature
0!∼60!
Operating Humidity
20%∼85%
Operating Voltage
DC+12V
Power Consumption
<10W
Pagina 6


![English Manual AH-160C [Hardware & Software]](http://vs1.manualzilla.com/store/data/005931679_1-0c77ed47c849260a36e03decc8d56d96-150x150.png)