1
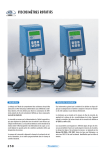
MANUAL DE INSTRUCCIONES CODIGO 80090
REV 0 05/04/05
(Sujetas a modificaciones sin previo aviso)
Pag.: 1
RONER/D
9999972
TERMOSTATO DE INMERSIÓN DIGITAL
DIGITAL CONTROL IMMERSION THERMOSTAT
ISO 9001
J.P. SELECTA s.a.
Ctra. NII Km 585.1 Abrera 08630 (Barcelona) España
e-mail: [email protected] - website: www.jpselecta.es
Tel 34 937 700 877 Fax 34 937 702 362
MANUAL DE INSTRUCCIONES CODIGO 80090
REV 0 05/04/05
(Sujetas a modificaciones sin previo aviso)
Pag.: 2
INFORMACIÓN GENERAL
GENERAL INFORMATION
1) Manipular el paquete con cuidado. Desembalarlo y
comprobar que el contenido coincide con lo indicado en el apartado de la “Lista de embalaje”. Si se
observa algún componente dañado o la ausencia
de alguno avisar rápidamente al distribuidor.
1) Handle the parcel with care. Unpack and check
that the contents coincide with the packing-list. If
any part is damaged or missing, please advise the
distributor immediately.
2) No instalar ni utilizar el equipo sin leer, previamente, este manual de instrucciones.
2) Do not install or use the equipment without reading this handbook before.
3) Estas instrucciones forman parte inseparable del
aparato y deben estar disponibles a todos los usuarios del equipo.
3) This handbook must always be attached to the
equipment and it must be available for all users.
4) Cualquier duda puede ser aclarada contactando con
el servicio técnico de J.P. SELECTA, s.a.
4) If you have any doubts or enquiries, please contact with your supplier or J.P. Selecta’s technical
service.
5) ¡ATENCIÓN! NO SE ADMITIRÁ NINGUNA MÁQUINA PARA REPARAR QUE NO ESTÉ DEBIDAMENTE LIMPIA.
5) IMPORTANT! WE WILL NOT ACCEPT ANY
APPARATUS TO BE REPAIRED IF IT IS NOT
CLEANED.
6) Toda modificación, eliminación o falta de mantenimiento de cualquier dispositivo de la máquina,
transgrede la directiva de utilización 89/655/CEE y
el fabricante no se hace responsable de los daños
que pudieran derivarse.
6) If any modification, elimination or lacking in maintenance of any device of the equipment by the user
transgress the directive 89/655/CEE, the
manufacturer is not responsible for the damage
that can occur.
7) No utilizar el equipo con fluidos que puedan desprender vapores o formar mezclas explosivas o
inflamables.
7) Do not use the apparatus with liquids which can
give off vapours capable of making explosive mixtures.
ÍNDICE
CONTENTS
INFORMACIÓN GENERAL
ÍNDICE
LISTA DE EMBALAJE
ESPECIFICACIÓN TÉCNICA
DESCRIPCIÓN DEL EQUIPO
INSTALACIÓN
OPERACIÓN
RECAMBIOS
ESQUEMA ELÉCTRICO
MANTENIMIENTO
GARANTÍA
DECLARACIÓN DE CONFORMIDAD “CE”
GENERAL INFORMATION
CONTENTS
PACKING LISTS
TECHNICAL FEATURES
EQUIPMENT DESCRIPTION
INSTALLATION
OPERATION
SPARE PARTS
ELECTRICAL DIAGRAM
MAINTENANCE
GUARANTEE
“EC” CONFORMITY DECLARATION
J.P. SELECTA s.a.
Ctra. NII Km 585.1 Abrera 08630 (Barcelona) España
e-mail: [email protected] - website: www.jpselecta.es
PÁG. / PAGE
2
2
3
3
3
4
4
10
11
12
12
12
Tel 34 937 700 877 Fax 34 937 702 362
MANUAL DE INSTRUCCIONES CODIGO 80090
REV 0 05/04/05
(Sujetas a modificaciones sin previo aviso)
Pag.: 3
LISTA DE EMBALAJE
PACKING LIST
El equipo estándar consta de los siguientes
componentes:
The standard equipment consist of the following
components:
Descripción
Description
Termostato RONER/D
Manual de intrucciones
RONER/D thermostat
Instruction manual
Código/Code
Cant/Qty
9999972
80185
1
1
ESPECIFICACIÓN TÉCNICA
TECHNICAL FEATURES
Tensión de alimentación 115-230V 50/60 Hz según
se indique en la placa de características de la
máquina.
Voltage supply 115-230V 50/60 Hz according to the
characteristics plate indications.
Rango de control/Control range
Temperatura ambiente +5ºC
hasta 100ºC
From room temperatura +5ºC
to 100ºC
Estabilidad/Stability
±0,05ºC
±0,05ºC
Rango de control/Control range
Temperatura ambiente +5ºC
Room temperatura +5ºC
Medidas exteriores (cm)
Overall dimensions (cm)
Temperatura ambiente +5ºC
Largo: 18 Ancho: 19 Alto: 28
Room temperatura +5ºC
Length: 18 Width: 19 Heigth: 28
Presión bomba/Pump pressure
150 mbar
150 mbar
Caudal bomba/Pump flow
12 l/min
12 l/min
Potencia/Power
2060 W
2060 W
Peso/Weight
4 kg.
4 kg.
DESCRIPCIÓN DEL EQUIPO
EQUIPMENT DESCRIPTION
Los termostatos de inmersión RONER/D permiten
controlar la temperatura del líquido con una estabilidad
de 0.05ºC desde temperatura ambiente +5ºC hasta 100
ºC.
RONER/D immersion thermostats allow the liquid
temperature control with a stability of 0.05ºC from
room temperature +5ºC up to 100 ºC.
Los termostatos van equipados con:
The thermostats are equipped with:
- Sensor de temperatura por termorresistencia Pt100.
- Bomba de circulación con caudal regulable para agitación.
- Termostato de seguridad.
- Temperatura de alarma superior e inferior
seleccionable.
- Temperatura máxima y mínima de trabajo
seleccionables.
- Corrección de lectura seleccionable.
- Conexion para sonda exterior.
- Lectura en grados Farenheit o Celsius.
-
J.P. SELECTA s.a.
-
Temperature sensor by Pt100 probe.
Circulation pump with adjustable flow for agitation and external temper.
Safety thermostat.
Adjustable upper and lower temperature of alarm.
Adjustable maximum and minimum working temperature.
Correction of adjustable reading.
Connection for external probe.
Reading in Fahrenheit or Celsius degrees.
Ctra. NII Km 585.1 Abrera 08630 (Barcelona) España
e-mail: [email protected] - website: www.jpselecta.es
Tel 34 937 700 877 Fax 34 937 702 362
MANUAL DE INSTRUCCIONES CODIGO 80090
REV 0 05/04/05
(Sujetas a modificaciones sin previo aviso)
Pag.: 4
INSTALACIÓN
INSTALLATION
Colocar la cubeta sobre una superficie plana, horizontal y nivelada, procurando dejar un espacio libre de 10
cm. por la parte posterior y por los laterales del equipo.
Place the apparatus on a flat, horizontal and level
surface, trying to leave a space at the bank and on
each side of about 10 cms..
Al utilizar el grifo desagüe situado en la parte frontal de la cubeta, tenga en cuenta que puede estar
a una gran temperatura. Deje que se enfrie o utilice algún tipo de protección.
When using the drainage tap placed at the front
part of the tank, take care that it can be at a
high temperature. Leave it to cool or use some
kind of protection.
Asegúrese que el equipo se conecta a una tensión de red que coincide con la indicada en la
placa de características.
Be sure that the voltage supply is the same as
the one indicated on the characteristic plate of
the apparatus.
No utilice el equipo sin estar conectada la toma
de tierra.
Do not use the apparatus if it is NOT earthed.
Si cambia la clavija de enchufe tenga en cuenta
lo siguiente:
If you have to change the plug bear in mind the
following:
Cable azul: Neutro.
Cable marron: Fase.
Cable Amarillo/Verde: Tierra.
Blue cable: Neutral.
Brown cable: Phase.
Yellow/green cable: Earth.
OPERACIÓN
OPERATION
PANEL DE MANDOS:
CONTROL PANEL:
1
4
5
6
3
2
7
1. Pantalla.
2. Interruptor general.
3. Pulsador “Enter”.
4. Pulsador de acceso a parámetros de configuración.
5. Pulsador para incrementar un valor.
6. Pulsador para disminuir un valor.
7. Pulsador de marcha/paro.
J.P. SELECTA s.a.
1.
2.
3.
4.
5.
6.
7.
Screen.
Main switch.
“Enter” pushbutton.
Parameters pushbutton.
Increase set value pushbutton.
Decrease set value pushbutton.
Starting-up /Stop pushbutton.
Ctra. NII Km 585.1 Abrera 08630 (Barcelona) España
e-mail: [email protected] - website: www.jpselecta.es
Tel 34 937 700 877 Fax 34 937 702 362
MANUAL DE INSTRUCCIONES CODIGO 80090
REV 0 05/04/05
(Sujetas a modificaciones sin previo aviso)
Pag.: 5
PUESTA EN MARCHA:
STARTING UP:
1. Fijar el termostato en un lateral de la cubeta.
2. Llenar la cubeta hasta que el líquido cubra la
resistencia y la bomba de circulación.
3. Conectar el termostato a la red
4. Accionar el interruptor de puesta en marcha (2).
5. Seleccionar la temperatura (SV) mediante los pulsadores (5) y (6)
6. Pulsar (7) para poner en marcha.
1. Fix the thermostat at one side of the tank.
2. Fill the tank to the liquid covers the heater element
and the circulation pump.
3. Connect the thermostat into the mains.
4. Switch on the main switch (2).
5. Select the temperature (SV) with the keys (5) and
(6).
6. Press (7) to start up.
Durante la marcha, PV (Point value) Indica la temperatura actual del líquido y SV (Set point) indica la
temperatura de consigna.
While working, PV (Point value) shows the current
liquid temperature and SV (Set point) shows the
desired temperature on the display.
PARÁMETROS POR DEFECTO:
-
Alarma sobretemperatura
Alarma baja temperatura
Límite inferior Tª de trabajo
Límite superior Tª de trabajo
Selección escala
Sonda externa
Calibración
DEFAULT PARAMETERS:
Overtemperature alarm
Undertemperature alarm
Minimum working temperature
Maximum working temperature
Scale selection
External probe
Calibration
OVERTEMP = OFF.
UNDERTEMP = OFF.
LOWER LIM = -20ºC
UPPER LIM = 100ºC
SELECCIÓN = CELSIUS.
EX SENSOR = NO.
CALIBRATE = 0ºC.
¡ATENCIÓN! IMPORTANTE PARA SU SEGURIDAD
CAUTION!!! IMPORTANT FOR YOUR SAFETY
Si se trabaja a temperaturas elevadas, una vez finalizada la tarea
es aconsejable parar la calefacción dejando la agitación en
funcionamiento. Así evitaremos la filtración de vapores en el equipo.
When working at high temperatures, once this is finished, it is
recommended to stop the heating and leave the stirring to work. Thus
vapour leak in the equipement is avoided
TERMOSTATO SEGURIDAD
SAFETY THERMOSTAT
El termostato de seguridad viene ajustado de fábrica.
En caso de disparo del mismo parar el equipo, dejar
enfriar el baño y rearmarlo pulsando la arandela de PVC
gris de la parte posterior
Safety thermostat is adjusted from . If it disconnect
bacause overtemperature, leave cold the liquid and
reset the thermostat pressing the PVC push button
on the rear part.
J.P. SELECTA s.a.
Ctra. NII Km 585.1 Abrera 08630 (Barcelona) España
e-mail: [email protected] - website: www.jpselecta.es
Tel 34 937 700 877 Fax 34 937 702 362
MANUAL DE INSTRUCCIONES CODIGO 80090
REV 0 05/04/05
(Sujetas a modificaciones sin previo aviso)
Vista A
View A
8
11
10
12
Pag.: 6
9
Vista A
View A
PARTE POSTERIOR
REAR PART
8 Mando de regulación del termostato de seguridad.
9 Mando de rearme manual del termostato (gris).
10 Conexión sonda Pt100.
11 Conexión RS232.
12 Portafusibles.
8.
9.
10.
11.
12.
ACCESO A LOS PARÁMETROS DE
CONFIGURACIÓN:
ACCESS
TO
PARAMETERS:
SOBRETEMPERATURA
OVERTEMPERATURE
- Pulsar (7) para parar el termostato. (STATUS:
STOP).
- Pulsar (3) una vez, en el display aparece:
“OVERTEMP”, pulsando (5) o (6) se seleccionan
los grados de sobretemperatura. La alarma se activa cuando la temperatura leída (PV) sobrepasa los
grados de sobretemperatura la temperatura de consigna (SV).
-
Press (7) to stop the thermostat (STATUS: STOP).
-
Press (3) one time, on the display appears:
“OVERTEMP”, by pressing (5) or (6) the
overtemperature degrees are selected. The alarm
is activated when the read temperature (PV) exceeds the overtemperature degrees of the selected
temperature (SV).
BAJA TEMPERATURA
UNDERTEMPERATURE
- Pulsar (7) para parar el termostato. (STATUS:
STOP).
- Pulsar (3) hasta que aparezca en el display:
“UNDERTEMP”, pulsando (5) o (6) se seleccionan
los grados de baja temperatura. La alarma se activa
cuando la temperatura leída (PV) es inferior a los
grados de temperatura indicados en la temperatura
de consigna (SV).
-
Press (7) to stop the thermostat (STATUS: STOP).
-
Press (3) one time, on the display appears:
“UNDERTEMP”, by pressing (5) or (6) the
undertemperature degrees are selected. The alarm
is activated when the read temperature (PV) is
below the undertemperature degrees of the
selected temperature (SV).
LÍMITE INFERIOR Tª DE TRABAJO
MINIMUM WORKING TEMPERATURE
- Accionar el pulsador (4) hasta que aparezca en pantalla LOWER LIM.
- Con los pulsadores (5) y (6), seleccionar el valor
deseado.
- Accionar repetidamente el pulsador (3) hasta que
aparezca la pantalla inicial.
-
Press (4) until the display shows LOWER LIM.
-
By pressing (5) and (6) select the desired value.
-
Press (3) until the display shows the initial screen.
J.P. SELECTA s.a.
Safety thermostat control screw.
Safety thermostat manual reset button (grey).
Pt100 probe connection.
RS232 connection.
Fuse carrier.
Ctra. NII Km 585.1 Abrera 08630 (Barcelona) España
e-mail: [email protected] - website: www.jpselecta.es
CONFIGURATION
Tel 34 937 700 877 Fax 34 937 702 362
MANUAL DE INSTRUCCIONES CODIGO 80090
REV 0 05/04/05
(Sujetas a modificaciones sin previo aviso)
Pag.: 7
LÍMITE SUPERIOR Tª DE TRABAJO
MAXIMUM WORKING TEMPERATURE
- Accionar el pulsador (4) hasta que aparezca en pantalla LOWER LIM.
- Accionar el pulsador (3) hasta que aparezca en pantalla UPPER LIM.
- Con los pulsadores (5) y (6), seleccionar el valor
deseado.
- Accionar repetidamente el pulsador (3) hasta que
aparezca la pantalla inicial.
-
Press (4) until the display shows LOWER LIM.
-
Press (3) until the display shows UPPER LIM.
-
By pressing (5) and (6) select the desired value.
-
Press (3) until the display shows the initial screen.
SELECCIONAR ESCALAS ºC ó FARANHEIT
WORK WITH FARENHEIT OR CELSIUS SCALE
- Accionar el pulsador (4) hasta que aparezca en pantalla LOWER LIM.
- Accionar el pulsador (3) hasta que aparezca en pantalla SELECT.
- Con los pulsadores (5) y (6), seleccionar la escala
deseada.
- Accionar repetidamente el pulsador (3) hasta que
aparezca la pantalla inicial.
-
Press (4) until the display shows LOWER LIM.
-
Press (3) until the display shows SELECT.
-
By pressing (5) and (6) select the desired scale.
-
Press (3) until the display shows the initial screen.
SONDA EXTERIOR
EXTERNAL PROBE
- Accionar el pulsador (4) hasta que aparezca en pantalla LOWER LIM.
- Accionar el pulsador (3) hasta que aparezca en pantalla EXT SENSOR.
- Con los pulsadores (5) y (6), seleccionar SÍ ó NO.
- Accionar repetidamente el pulsador (3) hasta que
aparezca la pantalla inicial.
-
Press (4) until the display shows LOWER LIM.
-
Press (3) until the display shows EXT SENSOR.
-
By pressing (5) and (6) select YES or NO.
Press (3) until the display shows the initial screen.
CALIBRACIÓN
CALIBRATION
- Accionar el pulsador (4) hasta que aparezca en pantalla LOWER LIM.
- Accionar el pulsador (3) hasta que aparezca en pantalla CALIBRATE.
- Con los pulsadores (5) y (6), seleccionar el valor
deseado.
- Accionar repetidamente el pulsador (3) hasta que
aparezca la pantalla inicial.
-
Press (4) until the display shows LOWER LIM.
-
Press (3) until the display shows CALIBRATE.
-
By pressing (5) and (6) select the desired value.
-
Press (3) until the display shows the initial screen.
Acceso a los parámetros de configuración:
Access to the configuration parameters:
LOWER LIM
PV
4
OVERTEMP
UPPER LIM
UNDERTEMP
SELECTION
EX SENSOR
CALIBRATE
J.P. SELECTA s.a.
Ctra. NII Km 585.1 Abrera 08630 (Barcelona) España
e-mail: [email protected] - website: www.jpselecta.es
Tel 34 937 700 877 Fax 34 937 702 362
MANUAL DE INSTRUCCIONES CODIGO 80090
REV 0 05/04/05
(Sujetas a modificaciones sin previo aviso)
Pag.: 8
ALARMAS QUE PUEDEN APARECER EN
PANTALLA:
ALARMS THAT CAN APPEAR ON THE
DISPLAY:
SOBRETEMPERATURA:OVERTEMP
OVERTEMPERATURE: OVERTEMP
- Cuando se activa la alarma se corta la calefacción
y aparece en pantalla lo siguiente:
-
UNDERTEMP
PV
Heater is sttoped and the following screen appears:
STATUS
ALARM
Donde PV es la temperatura actual leída.
Where PV is the present temperature read.
- Para desactivar la alarma accionar el pulsador (7),
dejar enfriar el líquido y volver a accionar el pulsador
(7) para poner en marcha.
-
Acción correctora:
1) Parar el equipo mediante el pulsador (7).
2) Resetear el termostato de seguridad fijado en
la parte posterior del equipo.
Revisar ajuste temperatura del termostato.
3) Poner en marcha mediante el pulsador (7).
Action to solve:
1) Stop the equipment pressing the key (7).
2) Reset the safety thermostat placed at the rear
part of the machine. Review the temperature
adjustement of the thermostat.
3) Start pressing (7).
BAJA TEMPERATURA:UNDERTEMP
UNDERTEMPERATURE:UNDERTEMP (See pag 7).
- Cuando se activa la alarma aparece en pantalla lo
siguiente:
LEVEL:
The following screen appears:
UNDERTEMP
PV
To remove the screen indications press (7), let cold
the liquid and press again (7) to start.
STATUS
ALARM
Donde PV es la temperatura actual leída.
Where PV is the present temperature read.
- Para desactivar la alarma accionar el pulsador (7),
dejar temperar el líquido y volver a accionar el pulsador (7) para poner en marcha.
-
SONDA:
PROBE:
1- Aparece en pantalla:
1- The screen shows:
RTD FAIL
INT OPEN
J.P. SELECTA s.a.
To remove the screen indications press (7), let cold
the fluid and press again (7) to start.
STATUS
ALARM
Ctra. NII Km 585.1 Abrera 08630 (Barcelona) España
e-mail: [email protected] - website: www.jpselecta.es
Tel 34 937 700 877 Fax 34 937 702 362
MANUAL DE INSTRUCCIONES CODIGO 80090
REV 0 05/04/05
(Sujetas a modificaciones sin previo aviso)
Pag.: 9
Fallo sonda 1:
Probe fail 1:
Causa: Sonda de temperatura abierta.
Efecto: Desactiva la calefacción.
Acción correctora:
1)Parar el equipo mediante el pulsador (7).
2)Desconectar de la red, sacar el equipo de baño.
3)Remitirlo al Servicio Técnico.
Cause: Temperature probe open.
Effect: Stops heating.
Action to solve:
1)Stop pressing (7).
2)Disconnect from the mains.
3)Take it to the Technical Service.
Fallo sonda 2:
Probe fail 2:
Causa: Sonda de temperatura cortocircuitada.
Efecto: Desactiva la calefacción.
Acción correctora:
1)Parar el equipo mediante el pulsador (7).
2)Desconectar de la red, sacar el equipo de baño.
3)Remitirlo al Servicio Técnico.
Cause: Shorted external temperature probe.
Effect: Cut heating off.
Action to solve:
1)Stop pressing (7).
2)Disconnect from the mains.
3)Take it to the Technical Service.
Fallo sonda 3:
Probe fail 3:
Causa: Sonda exterior de temperatura cortada o desconectada.
Efecto: Desactiva la calefacción.
Acción correctora:
1)Parar el equipo mediante el pulsador (7).
2)Comprobar que esté correctamente conectada la
sonda exterior.
3) Poner en marcha mediante el pulsador (7).
Si persiste la averia:
1)Parar el equipo mediante el pulsador (7).
2)Desconectar de la red, sacar el equipo de baño.
3)Remitirlo al Servicio Técnico.
Causa: External temperature probe cut or
disconnected.
Effect: Cut heating off.
Action to solve:
1)Stop pressing (7).
2)Check that the external probe is correctly connected.
4- Aparece en pantalla:
4-The screen shows:
Causa: Sonda exterior de temperatura cortocircuitada.
Efecto: Desactiva la calefacción.
Acción correctora:
1)Parar el equipo mediante el pulsador (7).
2)Comprobar que esté correctamente conectada la
sonda exterior.
3)Poner en marcha mediante el pulsador (7).
Causa: Shorted external temperature probe.
Effect: Cut heating off.
Action to solve:
1)Stop pressing (7).
2)Check that the external probe is correctly connected.
3)Start pressing (7).
Si persiste la averia:
1)Parar el equipo mediante el pulsador (7).
2)Desconectar de la red, sacar el equipo de baño.
3)Remitirlo al Servicio Técnico.
If the failure persists:
1)Stop pressing (7).
2)Disconnect from the mains.
3)Take it to the Technical Service.
FALLO DE RED:
Aparece en pantalla:
MAINS FAILURE:
The screen shows:
RTD FAIL
INT OPEN
J.P. SELECTA s.a.
3)Start pressing (7).
If the failure persists:
1)Stop pressing (7).
2)Disconnect from the mains.
3)Take it to the Technical Service.
STATUS
ALARM
Ctra. NII Km 585.1 Abrera 08630 (Barcelona) España
e-mail: [email protected] - website: www.jpselecta.es
Tel 34 937 700 877 Fax 34 937 702 362
MANUAL DE INSTRUCCIONES CODIGO 80090
REV 0 05/04/05
Causa: Fallo fluido eléctrico.
Efecto: Aparece en pantalla el mensaje POWER FAIL
y el termostato continua funcionando.
Acción correctora:
1)Accionando el pulsador (7) desaparece el mensaje
POWER FAIL.
2)Volver a accionar el pulsador (7) para poner en marcha
el aparato.
(Sujetas a modificaciones sin previo aviso)
Pag.: 10
Cause: Mains failure.
Effect: The message POWER FAIL appears on the
screen and the thermostat is still working.
Action to solve:
1)Pressing button (7) the message POWER FAIL
disappears.
2)Press again button (7) to start up the machine.
Conexión de sonda externa:
El DIGITERM puede utilizarse para calentar equipos externos a través de una circulación de liquido
y de una sonda externa. Para la instalación del circuito de circulación de agua ver el apartado
INSTALACIÓN. El conector de sonda externa se encuentra en la parte posterior del cabezal del
equipo y los contactos están dispuestos según la figura «1». Para que el equipo lea a través de
esta sonda seleccionar «EX SENSOR» según el diagrama de configuración siguiente:
External Probe connection:
DIGITERM can be used to heat external equipment through a liquid circulation and an external
probe. To install the water circulation circuit see section ‘’INSTALLATION’’. The connector of the
external probe is placed at the rear part of the apparatus head and the contacts are disposed
according to figure ‘’1’’. To read through this probe, select ‘’EX SENSOR’’ according to the following
configuration diagram:
CONEXION DE Pt100 EXTERNA
EXTERNAL Pt100 PROBE
RECAMBIOS / SPARE PARTS
Para garantizar la seguridad del equipo los recambios deben adquirirse a J.P.SELECTA, s.a.
To guarantee the safety of the equipment, the spare parts must be purchased from J.P.SELECTA,S.A.
Descripción/Description:
Código/Code:
Resistencia/ Heater element
Circuito control/Control circuit
Circuito display/Display circuit
Circuito pulsadores/Keyboard circuit
Sonda Pt100/Pt100 probe
Motor/Motor
J.P. SELECTA s.a.
39019
29122
29127
29114
43059
24017
Ctra. NII Km 585.1 Abrera 08630 (Barcelona) España
e-mail: [email protected] - website: www.jpselecta.es
Tel 34 937 700 877 Fax 34 937 702 362
MANUAL DE INSTRUCCIONES CODIGO 80090
REV 0 05/04/05
(Sujetas a modificaciones sin previo aviso)
Pag.: 11
ESQUEMA ELÉCTRICO / ELECTRICAL DIAGRAM
J.P. SELECTA
ABRERA
J.P. SELECTA s.a.
Ctra. NII Km 585.1 Abrera 08630 (Barcelona) España
e-mail: [email protected] - website: www.jpselecta.es
Tel 34 937 700 877 Fax 34 937 702 362
MANUAL DE INSTRUCCIONES CODIGO 80090
REV 0 05/04/05
(Sujetas a modificaciones sin previo aviso)
Pag.: 12
MANTENIMIENTO
MAINTENANCE
Antes de quitar la tapa del aparato desconectarlo
de la red eléctrica.
Before removing the side covers disconnect the
apparatus from the mains.
Si se utiliza agua normal de la red, se producirán
deposiciones calcáreas que se depositarán en la
cubeta y el elemento calefactor. Debe evitarse que
el calefactor funcione cubierto de cal ya que
pierde poder calorífico y se destruye más rápidamente.
If tapwater is used, there will be calcareous
depositions on the bottom of the tank and on the
heating element. Use of the heating element must
be avoided when covered with these depositions
because it loses calorific power and it is destroyed
quicker.
Es aconsejable que periódicamente se limpie la
cubeta interior y el calefactor con una solución al
10% de salfumán (ácido clorhídrico al 28%) o con
una solución de agua y vinagre (ácido acético).
Después aclarar con agua limpia.
It is advisable to clean the inner tank and heating
element periodically with a proportion of 10% of
hydrochloric acid or with a solution of water and
vinager (acetic acid). Then rinse it with clean
water.
GARANTÍA
GUARANTEE
Este producto tiene una garantía de un año. La garantía no cubre los daños causados por un uso indebido o
por causas ajenas a J.P. SELECTA, s.a.
This product is guaranteed for one year. The guarantee
does not cover damage caused by incorrect use of
causes beyond the contorl of J.P. SELECTA,S.A..
Cualquier manipulación del aparato por personal no
autorizado por J.P. SELECTA, s.a., anula
automáticamente los beneficios de la garantía.
Any manipulation of the apparatus by unathorized
personnel by J.P. SELECTA,S.A. cancels the
aguarantee automatically.
DECLARACIÓN DE CONFORMIDAD “CE”
“EC” CONFORMITY DECLARATION
El fabricante:
/
The manufacturer
J.P. SELECTA,s.a.
Ctra. NII Km 585,1
08760 ABRERA (BARCELONA)
SPAIN
declara que los equipos:
/
Modelo: / Model:
RONER/D
Declares that the equipment:
Código: / Code:
9999972
Cumplen las directivas siguientes:
/
Meet the following Directives:
73/23/CEE
Seguridad eléctrica.
89/336/CEE
Compatibilidad electromagnética.
Cumplen las siguientes Normas: /
EN 50081-1
J.P. SELECTA s.a.
Electrical safety.
Electromagnetical compatibility
Meet the following Standards:
EN 50082-1
EN 61010-1
RAMÓN Mª RAMÓN
DAVID PECANINS
Director Técnico
Responsable Calidad
Ctra. NII Km 585.1 Abrera 08630 (Barcelona) España
e-mail: [email protected] - website: www.jpselecta.es
Tel 34 937 700 877 Fax 34 937 702 362