1
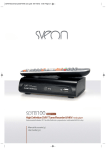
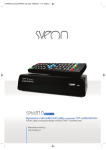
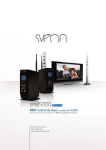
Manual de usuario (2)
User Guide (14)
SPM4000 Manual de usuario
Índice
1. Bienvenido
1.1 Instrucciones de seguridad
2. Características
3. Requisitos del sistema
4. Contenido del pack
5. Hardware
6. Mando a distancia
6.1 Instalación de las pilas
7. Conexión al PC
8. Conexiones TV
8.1 Conexión por AV
8.2 Conexión por HDMI
9. Primer uso de la unidad
9.1 Formateo del disco duro interno
9.2 Pantalla inicial
10. Funciones básicas
10.1 Reproducir Vídeo
10.2 Reproducir Fotos
10.3 Reproducir Música
10.4 Favoritos
10.5 Aplicaciones
10.6 Setup
11. Preguntas frecuentes
12. Solución de problemas
13. Información de interés
1. Bienvenido
SPM4000HD
Manual de usuario
Gracias por elegir la unidad SPM4000, el reproductor multimedia con sistema operativo AndroidTM de alta definición con
el que podrá reproducir sus archivos multimedia hasta 1080p desde su disco duro interno, sus puertos USB Host o su lector de tarjetas de memoria. Además, gracias a su sistema operativo AndroidTM 2.2 y a sus conexiones de red podrá navegar por internet, chequear su correo, acceder a las redes sociales y acceder a diferentes servicios como YoutubeTM,
PicassaTM, etc.
Índice
1. Bienvenido
1.1 Instrucciones de seguridad
2. Características
3. Requisitos del sistema
4. Contenido del pack
5. Hardware
6. Mando a distancia
A través de este manual le mostraremos cómo conectar y utilizar adecuadamente este dispositivo para obtener el máximo
rendimiento.
1.1 Instrucciones de seguridad
6.1 Instalación de las pilas
7. Conexión al PC
8. Conexiones TV
Seguridad
• Coloque los cables donde no se puedan pisar, pinchar o cortar.
• No exponga el aparato a la lluvia.
• No conecte la unidad en lugares húmedos como en el baño, piscina.
• No coloque objetos con agua como floreros, vaso de agua, en la parte superior de la unidad SPM4000.
• No coloque fuentes de llama, como velas cerca de la unidad SPM4000.
• No desmonte el producto.
• No permita que los niños introduzcan nada por los orificios de ventilación.
• El adaptador de corriente se mantendrá caliente mientras use la unidad. 30-40º o menos esta dentro de lo normal.
8.1 Conexión por AV
8.2 Conexión por HDMI
9. Primer uso de la unidad
9.1 Formateo del disco duro interno
9.2 Pantalla inicial
10. Funciones básicas
10.1 Reproducir Videos
10.2 Reproducir Fotos
10.3 Reproducir Música
10.4 Favoritos
10.5 Aplicaciones
10.6 Setup
Ventilación
• No tape la unidad.
• Coloque la unidad en lugares ventilados.
• No coloque la unidad en lugares con superficies irregulares como la cama o el sofá.
• No exponga la unidad al frío o a la luz solar directa.
• Dejar 10cm como mínimo entre la unidad y otros aparatos.
• No coloque ningún objeto encima de la unidad.
11. Preguntas frecuentes
12. Solución de problemas
13. Información de interés
2. Características
- Reproducción de películas y vídeos. Soporta los formatos más comunes: MKV (H.264 [email protected]/5.0), VCD, SVCD,
KVCD, MPEG-4, RM/RMVB, ISO, TS/M2TS/TP/TRP, DAT
- Reproducción de archivos de audio. Soporta los siguientes formatos: MP3, WMA, AAC, WAV, OGG, DOLBY DIGITAL
(AC3), DTS
- Reproducción de imágenes en formatos JPEG, BMP, PNG, GIF
- Subtítulos: SRT, SUB, SSA, SMI, UTF-8 (múltiples idiomas soportados)
- Conexión PC: USB 3.0 (compatible USB2.0)
- USB Host: 2 puertos USB Host 2.0 para almacenamiento externo..
- Lector de tarjetas SD/MMC compatibles con unidades SDHC
- Salida de audio digital Coaxial y Óptica. Conecte su SPM4000 a un equipo de sonido 5.1 a través de un cable coaxial
u óptico para disfrutar de sonido digital multicanal.
-Decodificador Dolby Digital (AC3) y DTS interno. Gracias al decodificador interno, la SPM4000 puede reproducir video
con audio Dolby Digital (AC3) o DTS por el mismo cable HDMI.
- HDMI. La unidad incluye salida de alta definición HDMI (V1.3), que transmite alta calidad de señal digital de video y audio
a través de un solo cable.
- Soporta el sistema de archivos NTFS y FAT32 en la reproducción multimedia.
- Soporta Discos duro SATA, SATA II. Hasta 2TB
3. Requisitos del sistema
-Ordenador portátil o PC con un puerto USB 2.0 (compatible 1.1).
-Windows XP/VISTA/W7.
4. Contenido del pack
- Reproductor multimedia SPM4000
- Adaptador de corriente 12V/2,5A
- Cable USB 2.0
- Cable HDMI
- Cable AV
- Mando a distancia
- Baterías para el mando a distancia (x2)
- Guía rápida
- Manual de usuario (en el CDROM)
5. Hardware
Panel frontal y superior
3
1
2
Español
3
1. LED STANDBY: Este LED se ilumina en rojo cuando la unidad está en modo standby (suspensión) y en azul cuando
la unidad esta encendida.
2. Sensor de Infrarrojos
3. Botón de encendido/Apagado
1
2
3
4
6
5
8
9
10
SPM4000HD
Manual de usuario
Índice
1. Bienvenido
1.1 Instrucciones de seguridad
2. Características
3. Requisitos del sistema
4. Contenido del pack
5. Hardware
6. Mando a distancia
6.1 Instalación de las pilas
7. Conexión al PC
8. Conexiones TV
8.1 Conexión por AV
8.2 Conexión por HDMI
9. Primer uso de la unidad
9.1 Formateo del disco duro interno
9.2 Pantalla inicial
7
Panel trasero
1. Conexión para adaptador de corriente.
2. Puerto USB Host 2.0
3. Puerto USB3.0 para la conexión al PC.
4. Salida HDMI.
5. Conector LAN
6. Salida de audio digital Coaxial.
7. Salida de Video Compuesto.
8. Salida de audio estéreo.
9. Salida de audio digital Óptica.
10. Ventilador.
10. Funciones básicas
10.1 Reproducir Videos
10.2 Reproducir Fotos
10.3 Reproducir Música
10.4 Favoritos
10.5 Aplicaciones
10.6 Setup
11. Preguntas frecuentes
12. Solución de problemas
13. Información de interés
Panel lateral
1. Lector de tarjetas SD y MMC.
2. Puerto USB Host 2.0: Entrada para dispositivos USB (pendrive, disco duro externo, etc).
1
2
6. Mando a distancia
1. POWER: Pulse para encender/apagar (modo Standby) la unidad.
2. MUTE: Activa/desactiva el sonido.
3. SOURCE:Cambia entre los dispositivos de almacenamiento conectados, disco interno/USB/Red/SD/MMC
4. MENU: Cuando use el navegador de Internet, pulse para mostrar el menú.
5. DELETE: En el navegador de Internet, borrar.
6. AUDIO: Cambia entre los pistas de audio disponibles (si las hubiera)
7. SUBTITLE: Activa/desactiva los subtítulos (si los hubiera).
8. MUSIC: Pulse para acceder a la sección de Música.
9. PHOTO: Pulse para acceder a la sección de Fotos.
10. MOVIE: Pulse para acceder a la sección de Películas.
11. RETURN: Pulse para volver al menú anterior.
12. HOME: Pulse para ir directamente al menú principal. .
13. ARRIBA/ABAJO: Cursores arriba/abajo; se usa para desplazarse por las pantallas del menú.
14. OK: Confirma una selección en un menú.
15. IZQUIERDA/DERECHA: Cursores izquierda/derecha; se usa para desplazarse por las pantallas del menú.
16. VOL+ :Aumenta el volumen.
17. VOL-: Disminuye el volumen.
18. PLAY/PAUSE: Pulse para reproducir o pausar un archivo..
19. STOP: Pulse para parar una reproducción.
20. FB: Reproducción rápida hacia atrás a velocidades x2, x4, x8, x16, x32, x64.
21. FF: Reproducción rápida hacia adelante a velocidades x2, x4, x8, x16, x32, x64.
22. PREV: Pulse para retroceder a la pista anterior.
23. NEXT: Pulse para pasar a la pista siguiente.
24. 0-9: Teclado numérico.
Español
4
25. TV SYSTEM: Pulse para cambiar la salida de vídeo.
26. INFO: Pulse para mostrar la información de archivo.
27. BOTÓN ROJO: Sin uso.
28. BOTÓN VERDE: Sin uso.
29. BOTÓN AMARILLO: Abre la ventana de dirección del navegador.
30. BOTÓN AZUL: Sin uso.
31. ZOOM IN: Pulse para aumentar la imagen.
32. ZOOM OUT: Pulse para reducir la imagen.
33. REPEAT: Pulse para seleccionar repetición “1 vez” “Todas”
“Cancelar repetición”
SPM4000HD
Manual de usuario
Nota: La disponibilidad de varios canales de audio o de subtítulos dependerá del archivo.
7. Conexión al PC
8. Conexiones TV
Índice
1. Bienvenido
1.1 Instrucciones de seguridad
2. Características
3. Requisitos del sistema
4. Contenido del pack
5. Hardware
6. Mando a distancia
6.1 Instalación de las pilas
8.1 Conexión por AV
8.2 Conexión por HDMI
9. Primer uso de la unidad
9.1 Formateo del disco duro interno
9.2 Pantalla inicial
10. Funciones básicas
10.1 Reproducir Videos
10.2 Reproducir Fotos
10.3 Reproducir Música
10.4 Favoritos
10.5 Aplicaciones
10.6 Setup
11. Preguntas frecuentes
12. Solución de problemas
13. Información de interés
6.1 Instalación de las baterías
• Retire la tapa, coloque las pilas AAA en el sentido correcto +/- y cierre la tapa
• La siguiente imagen le indica la forma correcta de insertar las pilas
• Para utilizar el mando a distancia, diríjalo hacia el panel frontal del receptor
• El mando a distancia tiene un alcance de 5 metros desde el receptor y un ángulo de hasta 60 grados.
7. Conexión al PC
Para conectar la unidad al PC, conecte el cable USB entre su SPM4000 y el PC o portátil. Después conecte el adaptador de corriente. El sistema reconocerá automáticamente el disco multimedia. Para acceder a él vaya a “Mi PC” y seleccione su SPM4000 que aparecerá como unidad externa.
Ya puede copiar los archivos que desee a su SPM4000. No obstante por favor siga las siguientes recomendaciones:
- No desconecte la unidad si está copiando/leyendo archivos
- No desconecte la unidad si, al conectarla al PC o portátil, su equipo no la detecta. En este caso por favor espere 20seg,
ya que es posible que su equipo esté ejecutando otra aplicación al mismo tiempo.
Español
5
8. Conexión a la TV
SPM4000HD
Manual de usuario
La unidad está diseñada con múltiples conexiones de salida, incluyendo salida de video analógico compuesto (AV) y digital HDMI. Seleccione la salida que desee acorde con sus necesidades teniendo en cuenta que cada una de ellas soporta una resolución de salida diferente. Si quiere obtener alta definición 1080p conecte su unidad por HDMI.
Índice
1. Bienvenido
8.1 Conexión por AV
Realice las conexiones de vídeo tal como se muestra en la imagen. Después conecte el adaptador de corriente, seleccione la entrada AV en su TV y espere unos segundos mientras se realiza la carga del sistema.
1.1 Instrucciones de seguridad
2. Características
3. Requisitos del sistema
4. Contenido del pack
5. Hardware
6. Mando a distancia
6.1 Instalación de las pilas
7. Conexión al PC
8. Conexiones TV
8.1 Conexión por AV
8.2 Conexión por HDMI
9. Primer uso de la unidad
9.1 Formateo del disco duro interno
9.2 Pantalla inicial
10. Funciones básicas
10.1 Reproducir Videos
10.2 Reproducir Fotos
10.3 Reproducir Música
10.4 Favoritos
10.5 Aplicaciones
10.6 Setup
11. Preguntas frecuentes
12. Solución de problemas
13. Información de interés
Si quiere disfrutar del sonido multicanal, utilice las salidas Óptica o Coaxial conectando su reproductor a un sistema 5.1.
con un cable óptico o coaxial (cables no incluídos)
8.2 Conexión por HDMI
Realice la conexión tal y como se muestra en la imagen. La salida HDMI contiene señal digital (audio/video) en el mismo
cable. Conecte el adaptador de corriente, seleccione la entrada HDMI en su TV y espere unos segundos mientras se realiza la carga del sistema.
Si quiere disfrutar del sonido multicanal, utilice las salidas Óptica o Coaxial conectando su reproductor a un sistema 5.1.
con un cable óptico o coaxial (cables no incluídos)
Español
6
9. Primer uso de la unidad
SPM4000HD
Manual de usuario
Antes de utilizar su SPM4000 por primera vez por favor:
Coloque las baterías en el mando a distancia.
Conecte la unidad a la televisión dependiendo de la salida deseada (siga las instrucciones del apartado 8 ).
Conecte el adaptador de corriente a la unidad.
Índice
Nota: Si ajustando la resolución de su SPM4000 selecciona la resolución 1080p y su televisor no la soporta, su pantalla
dejará de mostrar imagen. En este caso, espere durante unos segundos hasta que la unidad vuelva a la resolución anterior. Si sigue sin obtener ninguna imagen en su pantalla, conecte la unidad a través de AV y seleccione la resolución
correcta para su TV (1080i para TV no FullHD 1080p).
1. Bienvenido
1.1 Instrucciones de seguridad
2. Características
3. Requisitos del sistema
4. Contenido del pack
5. Hardware
6. Mando a distancia
6.1 Instalación de las pilas
7. Conexión al PC
8. Conexiones TV
8.1 Conexión por AV
8.2 Conexión por HDMI
9.1 Formateo del disco duro interno
9. Primer uso de la unidad
El disco duro interno de SPM4000 viene formateado de fábrica. Si desea dar formato manualmente se recomienda formatear en NTFS para el uso de archivos de gran capacidad.
10. Funciones básicas
9.2 Pantalla inicial
Una vez conectada y encendida, la unidad mostrará la pantalla inicial con las siguientes opciones:
9.1 Formateo del disco duro interno
9.2 Pantalla inicial
10.1 Reproducir Videos
10.2 Reproducir Fotos
10.3 Reproducir Música
10.4 Favoritos
10.5 Aplicaciones
10.6 Setup
11. Preguntas frecuentes
12. Solución de problemas
13. Información de interés
Vídeo: Acceso directo a las unidades de exploración de Video de la unidad.
Foto: Acceso directo a las unidades de exploración de Fotos de la unidad
Musíca: Acceso directo a las unidades de exploración de Música de la unidad.
Favoritos: Acceso directo a los Favoritos del navegador.
Aplicaciones: Acceso directo al menú de Aplicaciones de la unidad.
Setup: Acceso directo al menú de Configuración de la unidad.
10. Funciones Básicas
Cada vez que inicie la unidad y pulse sobre los iconos de Video, Foto o Música, la unidad le preguntará el dispositivo desde
donde desea reproducir: disco duro interno, dispositivo de almacenamiento externo USB, dispositivo conectado en RED
o tarjeta de memoria SD/MMC. Pulse la tecla “Source” del mando a distancia y seleccione el que desee.
10.1 Reproducir vídeos
Seleccione la opción “Vídeo” en el menú principal y seguidamente seleccione el modo en que desea mostrar los archivos (“Todo”; “Fecha”, Carpeta”, “Recientes”). Pulse el botón “OK” del mando a distancia. Cada vez que pare un video y
vuelva a reproducirlo le preguntará si desea continuar el vídeo desde el punto donde lo dejó o comenzar a verlo de nuevo
desde el inicio.
Presione el botón “Audio” de su mando a distancia para elegir entre los distintos canales de audio (si el vídeo los tuviera).
Español
7
Así mismo pulse el botón “Subtitle” para activar/desactivar los subtítulos así como para elegir entre las diferentes opciones que ofrezca (si las tuviera)
Para aumentar el tamaño de la imagen del vídeo presione el botón “Zoom IN” de su mando a distancia. Pulse repetidamente el botón para elegir los distintos niveles de ampliación y “Zoom OUT” para desactivar la función.
SPM4000HD
Manual de usuario
Índice
1. Bienvenido
1.1 Instrucciones de seguridad
2. Características
3. Requisitos del sistema
4. Contenido del pack
5. Hardware
6. Mando a distancia
6.1 Instalación de las pilas
7. Conexión al PC
8. Conexiones TV
8.1 Conexión por AV
8.2 Conexión por HDMI
9. Primer uso de la unidad
9.1 Formateo del disco duro interno
9.2 Pantalla inicial
10. Funciones básicas
10.1 Reproducir Videos
10.2 Reproducir Fotos
10.3 Reproducir Música
10.4 Favoritos
10.5 Aplicaciones
10.6 Setup
11. Preguntas frecuentes
12. Solución de problemas
13. Información de interés
10.2 Reproducir fotos
Seleccione la opción “Fotos” en el menú principal y seguidamente seleccione el modo en que desea mostrar los archivos
(“Todos”; “Fecha”, “Carpeta”, “Recientes”). Pulse el botón “OK” del mando a distancia. Seleccione la foto que quiera visualizar y presione el botón “OK” de su mando a distancia.
Puede utilizar los cursores de dirección izquierda y derecha para rotar las fotos.
10.3 Reproducir música
Seleccione la opción “Música” en el menú principal y seguidamente seleccione el modo en que desea mostrar los archivos (“Artista”; “Álbumes”, “Canciones”, “Listas de Reproducción”). Pulse el botón “OK” del mando a distancia.
Español
8
10.4 Favoritos
Seleccione la opción “Favoritos” para acceder a las direcciones web favoritas que haya seleccionado previamente. (Para
acceder a las webs debe tener conexión de Internet por Red o por Wifi con el adaptador SNT1012).
SPM4000HD
Manual de usuario
Índice
1. Bienvenido
1.1 Instrucciones de seguridad
2. Características
3. Requisitos del sistema
4. Contenido del pack
5. Hardware
6. Mando a distancia
6.1 Instalación de las pilas
7. Conexión al PC
8. Conexiones TV
8.1 Conexión por AV
8.2 Conexión por HDMI
9. Primer uso de la unidad
9.1 Formateo del disco duro interno
9.2 Pantalla inicial
10. Funciones básicas
10.1 Reproducir Videos
10.2 Reproducir Fotos
10.3 Reproducir Música
10.4 Favoritos
10.5 Aplicaciones
10.6 Setup
11. Preguntas frecuentes
12. Solución de problemas
13. Información de interés
10.5 Aplicaciones
Seleccione la opción “APK” para acceder al menú de aplicaciones y programas instalados en su unidad. En el menú
“APK” encontrará las siguientes opciones:
APK: Menú para instalar/desinstalar aplicaciones
y para reiniciar la unidad con los valores por defecto de fábrica.
Navegador: Pulse para abrir el navegador Web.
OI File Manager: Explorador e instalador de archivos.
PicassaTM: Aplicación de la web de gestión de
fotos a través de Internet.
YoutubeTM: Aplicación de la web para ver y compartir videos en streaming
Sveon solo dará soporte a las aplicaciones que vienen ya instaladas de fábrica y a las disponibles en
la web de Sveon.
Sveon no se hace responsable de las aplicaciones
y contenidos suministrados por terceros ni de la estabilidad operacional de los mismos, así como de
aplicaciones que por mal uso o por contener virus
puedan perjudicar el normal funcionamiento de la
unidad, quedando así anulada la garantía.
Español
9
10.6 Setup
Seleccione la opción “Setup” del menú principal para configurar las preferencias de su unidad. Aparecerá un listado de
preferencias que puede modificar para lo cual deberá presionar el botón “OK” del mando a distancia. Para volver al listado de preferencias pulse el botón “Return” de su mando a distancia.
SPM4000HD
Manual de usuario
Índice
1. Bienvenido
1.1 Instrucciones de seguridad
2. Características
3. Requisitos del sistema
4. Contenido del pack
5. Hardware
6. Mando a distancia
6.1 Instalación de las pilas
7. Conexión al PC
8. Conexiones TV
8.1 Conexión por AV
8.2 Conexión por HDMI
9. Primer uso de la unidad
9.1 Formateo del disco duro interno
9.2 Pantalla inicial
10. Funciones básicas
10.1 Reproducir Videos
10.2 Reproducir Fotos
10.3 Reproducir Música
10.4 Favoritos
10.5 Aplicaciones
10.6 Setup
En el menú encontrará las siguientes opciones:
11. Preguntas frecuentes
12. Solución de problemas
13. Información de interés
Conexiones inalámbricas y redes
WiFi: Active o desactive la opción de red WiFi. Para conectarse a una red WiFi deberá tener conectado a su SPM4000
el adaptador wifi (Sveon SNT1012). Seleccione e introduzca la clave de su Red.
Ajuste de WiFi: Al activar la red wifi, con el adaptador conectado, seleccione la red a la que desea conectarse e introduzca la clave de seguridad (puede ser WEP, WPA, WPA2)
Ethernet: Active o desactive la opción de Red Ethernet (cableada).
Ethernet Configuration: Seleccione el modo de conexión Automática-DHCP (los datos los proporciona el Router/Moden
automáticamente) o Static IP (los datos son introducidos manualmente)
Sonido
Seleccione la salida predeterminada para el Audio dependiendo si dispone de un decodificador de Audio o si
usa el interno de su SPM4000: HDMI PCM, S/PDIF
PCM, S/PDIF RAW, HDMI RAW.
Español
10
Pantalla
Brillo: Ajuste el nivel de brillo de la imagen con los cursores izquierda/derecha del mando a distancia.
Contraste: Ajuste el nivel de contraste de la imagen con los cursores izquierda/derecha del mando a distancia.
SPM4000HD
Manual de usuario
Índice
1. Bienvenido
1.1 Instrucciones de seguridad
2. Características
3. Requisitos del sistema
4. Contenido del pack
5. Hardware
6. Mando a distancia
6.1 Instalación de las pilas
7. Conexión al PC
8. Conexiones TV
8.1 Conexión por AV
8.2 Conexión por HDMI
9. Primer uso de la unidad
9.1 Formateo del disco duro interno
9.2 Pantalla inicial
10. Funciones básicas
HUE: Ajuste el nivel de saturación de color de la imagen con los cursores izquierda/derecha del mando a distancia.
Ajuste pantalla: Ajuste el tamaño de la pantalla en el que desea visualizar la imagen con los cursores izquierda/derecha
del mando a distancia.
10.1 Reproducir Videos
10.2 Reproducir Fotos
10.3 Reproducir Música
10.4 Favoritos
10.5 Aplicaciones
10.6 Setup
11. Preguntas frecuentes
12. Solución de problemas
13. Información de interés
CVBS: Si tiene conectada su SPM4000 mediante la salida de Video Compuesto, seleccione el modo de video PAL o
NTSC (dependiendo de su televisor).
Aspect Ratio: Seleccione el formato de salida de video que desea establecer como predeterminado: Original, 4:3 o 16:9.
Aplicaciones
Orígenes desconocidos:: Permite la instalación de aplicaciones no certificadas.
Administrar aplicaciones: Administra las aplicaciones instaladas y las que están en ejecución.
Desarrollo: Establece opciones de desarrollo de aplicaciones cuando está conectado por USB (Modo programación)
Privacidad
Restablecer datos de fabrica: Borra todos los datos y configuraciones manuales de la unidad y reestablece los valores
por defecto de fábrica.
Almacenamiento
Storages: Desde esta opción puede realizar la desconexión
segura de los dispositivos de almacenamiento externos USB
conectados a la unidad SPM4000. Seleccione la unidad a
desconectar, pulse el botón “Ok” del mando a distancia y confirme la desconexión del dispositivo volviendo a pulsar el
botón “OK”.
Espacio disponible: Muestra el espacio libre disponible en
la unidad para instalar aplicaciones.
Búsqueda
Búsqueda de Google: Configure la opción de si desea mostrar las sugerencias de Google al escribir un texto de búsqueda. También podrá seleccionar el elemento de búsqueda que se realiza en marcadores, historial del navegador o de
nombre de aplicaciones instaladas.
Idioma y teclado
Seleccionar idioma: Seleccione el idioma en el que desea mostrar los menús de su unidad SPM4000.
Teclado Android: Ajuste las configuraciones para el uso del teclado virtual.
Diccionario del usuario: Podrá editar o eliminar las palabras añadidas al diccionario.
Español
11
Red
Para poder hacer uso de la red y reproducir en streaming desde otros equipos, conecte un cable de red desde su
modem/router al conector RJ-45 de su SPM4000.
Si tiene activado el DHCP en su modem/router este le proporcionará automáticamente una IP para poder navegar.
SPM4000HD
Manual de usuario
Índice
1. Bienvenido
Si desea configurar su red manualmente, seleccione “Conectar manualmente” y rellene los campos dependiendo de la
configuración de su servidor de red.
1.1 Instrucciones de seguridad
2. Características
3. Requisitos del sistema
4. Contenido del pack
5. Hardware
6. Mando a distancia
6.1 Instalación de las pilas
7. Conexión al PC
8. Conexiones TV
8.1 Conexión por AV
8.2 Conexión por HDMI
9. Primer uso de la unidad
9.1 Formateo del disco duro interno
9.2 Pantalla inicial
10. Funciones básicas
10.1 Reproducir Videos
10.2 Reproducir Fotos
10.3 Reproducir Música
10.4 Favoritos
10.5 Aplicaciones
10.6 Setup
11. Preguntas frecuentes
12. Solución de problemas
13. Información de interés
Firmware Upgrade
La unidad SPM4000 permite la actualización de su firmware, lo que le permitirá contar siempre con las últimas actualizaciones de mejora. Las actualizaciones de firmware están disponibles en la web de Sveon www.sveon.com o solicitándolas directamente al Servicio de Asistencia Técnica a través del email [email protected]
Para actualizar el firmware de la unidad siga los siguientes pasos:
1. Copie el archivo de actualización a una memoria USB.
2. Conecte la memoria USB a uno de los puertos USB Host de la unidad.
3. En el Menú principal, seleccione la opción “Setup”> “Firmware Upgrade” >”Browse”
4. El sistema buscará automáticamente el archivo para actualizar mostrándolo en pantalla.
5. Seleccione el archivo y haga clic en el botón “OK” del mando a distancia.
Información SPM4000
Versión de Android: Este apartado indica la versión del sistema operativo Android bajo el que trabaja la unidad.
Versión de kernel: Versión de compilación de la unidad.
Ethernet MAC address: Dirección MAC de la tarjeta de red.
Numero de compilación: Versión del firmware de su unidad SPM4000.
Español
12
11. Preguntas Frecuentes
SPM4000HD
Manual de usuario
¿Puedo formatear el disco en mi PC?
Sí. Recomendado NTFS.
Índice
1. Bienvenido
1.1 Instrucciones de seguridad
El mando no me funciona.
Compruebe que tiene las pilas correctamente colocadas o que no están descargadas.
No tengo señal en la TV.
Compruebe que la salida seleccionada en la unidad corresponde con la conectada en la TV.
Pulse “TV SYSTEM” para ir pasando por los diferentes modos de video.
No me sale ninguna IP en el apartado RED
Compruebe que tiene el cable de red conectado o, si usa red WLAN, que tiene el adaptador WIFI SNT1012 de Sveon conectado. Compruebe así mismo que su router proporciona IP automática o, en su caso, si tiene bien configurada la IP manual.
2. Características
3. Requisitos del sistema
4. Contenido del pack
5. Hardware
6. Mando a distancia
6.1 Instalación de las pilas
7. Conexión al PC
8. Conexiones TV
8.1 Conexión por AV
8.2 Conexión por HDMI
9. Primer uso de la unidad
9.1 Formateo del disco duro interno
9.2 Pantalla inicial
10. Funciones básicas
No veo ningún archivo compartido por el entorno de Red
Verifique que tiene compartida la carpeta en el PC y que éste está conectado en red.
No puedo conectar por WLAN a mi router
Compruebe que su SSID (nombre de la red WiFi) es correcto y que está activado.
Compruebe que le llega suficiente señal (WiFi) para tener una óptima conexión.
10.1 Reproducir Videos
10.2 Reproducir Fotos
10.3 Reproducir Música
10.4 Favoritos
10.5 Aplicaciones
10.6 Setup
11. Preguntas frecuentes
12. Solución de problemas
13. Información de interés
12. Solución de problemas
Si tiene dudas sobre el uso de la unidad SPM4000 o sobre su puesta en marcha, lea detenidamente los capítulos del manual que hagan referencia a esos términos o póngase en contacto con el departamento técnico de Sveon a través del email
[email protected]
13. Información de interés
Declaración de conformidad CE
Sveon declara que su modelo SPM4000 cumple con los requisitos esenciales y cualesquiera otras disposiciones aplicables o exigibles de la Directiva 1999/5/CE.
Aviso
Este símbolo en el producto o sus baterías significa que ni este producto ni sus baterías deben desecharse junto con el resto de la basura doméstica.
En este caso, es su responsabilidad llevarlo a un punto de recogida adecuado para
el reciclaje de baterías y equipos eléctricos y electrónicos. la recogida selectiva y el
reciclaje ayudarán a conservar los recursos naturales y a evitar posibles consecuencias negativas para la salud del hombre y el medioambiente debidas a la posible presencia de sustancias peligrosas en baterías y equipos eléctricos y electrónicos
desechados de forma inadecuada.
Para obtener más información acerca de dónde desechar baterías y equipos eléctricos o electrónicos, póngase en contacto con la oficina local de su ciudad/municipio.
Español
13
SPM4000 User Guide
Index
1. Welcome
1.1 Safety Instructions
2. Features
3. System requirements
4. Content
5. Hardware
6. Remote Control
6.1 Installation of batteries
7. PC Connection
8. TV Connection
8.1 AV Connection
8.2 HDMI Connection
9. First time usage
9.1 Hard disk formatting
9.2 Main screen
10. Basic Operations
10.1 Video Playback
10.2 Photo Playback
10.3 Music Playback
10.4 Favourites
10.5 Applications
10.6 Setup
11. Frequently Asked Questions
12. Problem solving
13. Important Information
English
14
1. Welcome
SPM4000 User Guide
Thank you for choosing SPM4000, the high definition multimedia player with AndroidTM OS which will allow you to play multimedia files up to 1080p from its internal hard disk, its USB Host ports or its card reader. Besides, thanks to its operation
system AndroidTM 2.2 and to its network connections you will be able to surf the web, check your mail, access the social
networks and other services as YoutubeTM, PicassaTM, etc.
Index
Through this user manual we’ll show you how to connect and use this device properly to get its maximum performance.
1.1 Safety Instructions
1. Welcome
1.1 Safety instructions
2. Features
3. System Requirements
4. Content
5. Hardware
6. Remote control
6.1 Batteries installation
Safety
• The cables must be placed correctly, in a place where they can not be damaged.
• Do not expose the device to the rain.
• Do not connect the unit in damp.
• Do not put objects with water near the device.
• Do not place naked flame sources, such as candles near the SPM4000.
• Do not disassemble the product.
• Do not let children push anything through the vents.
• The power adapter will be hot while using the unit. 30-40º or less is normal temperature.
7. PC Connection
8. TV Connections
8.1 AV Connection
8.2 HDMI Connection
9. First time usage
9.1 Hard disk formatting
9.2 Main screen
10. Basic operations
10.1 Video playback
10.2 Photo playback
10.3 Music playback
10.4 Favourites
10.5 Applications
10.6 Setup
Ventilation
• Do not cover the unit.
• Do not place the device over irregular surfaces.
• Do not expose the unit to cold or sunlight.
• Leave 10cm between the device and another devices.
• Do not place anything on top of the unit.
11. Frequently Asked Questions
12. Problem solving
13. Important information
2. Features
- Movie and video files playback. The device supports the most common video formats: MKV (H.264 [email protected]/5.0), VCD,
SVCD, KVCD, MPEG-4, RM/RMVB, ISO, TS/M2TS/TP/TRP, DAT
- Audio files playback. Supported formats: MP3, WMA, AAC, WAV, OGG, DOLBY DIGITAL (AC3), DTS
- Picture files playback: JPEG, BMP, PNG, GIF
- Subtitles supported: SRT, SUB, SSA, SMI, UTF-8 (multiple languages supported)
- PC Connection: USB 3.0 (compatible USB2.0)
- Two 2.0 USB Host ports to connect external storage devices and play its files directly on TV, without the needing to copy
the files previously in the inner hard disk.
- SD/MMC card reader (also supports SDHC).
- Digital audio outputs: Optical and Coaxial, to connect your SPM4000 to a multichannel 5.1 speaker system and enjoy
the real surround sound.
-Dolby Digital (AC3) y DTS inner decoder. Thanks to this decoder, SPM4000 can play video files with Dolby Digital (AC3)
or DTS audio tracks through the HDMI cable.
- HDMI connection. SPM4000 includes high definition HDMI output (v1.3), which carries digital audio and video signal
through only one cable with a great quality.
- NTFS and FAT32 file system supported in the multimedia playback.
- Hard disk supported: SATA, SATAII. Maximum capacity supported. Up to 2TB.
3. System Requirements
-Laptop or PC with an USB 2.0 available port (it also supports USB 1.1).
-Windows XP/VISTA/W7
4. Content
- SPM4000 Multimedia Player
- 12V/2,5A power adapter
- USB 2.0 cable
- HDMI cable
- AV cable
- Remote control
- Batteries for remote control (x2)
- Quick User Guide
- User Manual (inside CDROM)
5. Hardware
Front panel and top side
3
1
2
English
15
1. Standby LED. This LED lights in red when it is in Standby status; the LED lights in blue when the unit is turned on.
2. Infrarred receiver.
3. POWER. Press to turn the unit on/off.
Rear panel
1
SPM4000 User Guide
Index
1. Welcome
2
3
4
6
5
8
9
10
1.1 Safety instructions
2. Features
3. System Requirements
4. Content
5. Hardware
6. Remote control
6.1 Batteries installation
7. PC Connection
8. TV Connections
8.1 AV Connection
8.2 HDMI Connection
9. First time usage
9.1 Hard disk formatting
9.2 Main screen
10. Basic operations
7
1. Power Input 12v
2. 2.0 USB Host port
3. 3.0 USB port for PC connection.
4. HDMI output.
5. LAN connector.
6. Digital Coaxial audio output.
7. Composite video output.
8. Stereo audio output.
9. Digital Optical audio output.
10. Fan.
10.1 Video playback
10.2 Photo playback
10.3 Music playback
10.4 Favourites
10.5 Applications
10.6 Setup
11. Frequently Asked Questions
12. Problem solving
13. Important information
Side panel
1. SD/MMC card reader.
2. 2.0 USB Host port for external storage devices like external hard disks, pen drives, etc.
1
2
6. Remote control
1. POWER: Press to turn the device on/off. When the device is turned off by pressing this button, it is in Standby mode.
Although in this mode the power consume is very low, you should disconnect the device from the power outlet to turn it
completely off.
2. MUTE: Enables/disables audio signal.
3. SOURCE: Selects the file source. Press to choose between the internal hard disk, external storage devices connected
to SPM4000, or SD/MMC memory cards.
4. MENU: When using the Internet browser, press to show the menu.
5. DELETE: When using the Internet browser, press to erase.
6. AUDIO: Press to choose between the different audio tracks in a file (subject to channel availabilitly)
7. SUBTITLE: Enables or disables the subtitles (subject to subtitles availabilitly)
8. MUSIC: Press to enter Music menu.
9. PHOTO: Press to enter Photo menu.
10. MOVIE: Press to enter Movie menu
11. RETURN: Press to return to previous menu.
12. HOME: Press to go directly to main menu.
13. UP/DOWN: Use these buttons to move the highlight up and down in the firmware screens.
14. OK: Confirms a selection done in the menu.
15. LEFT/RIGHT: Use these arrow buttons to move the highlight left and right in the firmware screens.
16. VOL+: Increases the volume
17. VOL-: Decreases the volume.
18. PLAY/PAUSE: Press to pause or to play a file.
19. STOP: Press to stop a playback.
20. FB: Press for fast backward. Press several times to choose between the different available speeds: x2, x4, x8, x16,
x32, x64.
21. FF: Press for fast forward. Press several times to choose between the different available speeds: x2, x4, x8, x16, x32,
x64.
22. PREV: Press to go to the previous track.
23. NEXT: Press to go to the next track.
24. 0-9: Numeric pad.
English
16
25. TV SYSTEM: Press to change video output.
26. INFO: Press to display information about the current file.
27. RED BUTTON: No function.
28. GREEN BUTTON: No function.
29. YELLOW BUTTON: Opens the browser window.
30. BLUE BUTTON: No function.
31. ZOOM IN: Press during a video o pictures playback to enlarge the image.
32. ZOOM OUT: Press during a video o pictures playback to
take the image to original size.
33. REPEAT: Press to chosee between different repeat options:
Once, Every, Random.
Note: Some options like subtitles or audio tracks are subject to
file availability.
SPM4000 User Guide
Index
1. Welcome
1.1 Safety instructions
2. Features
3. System Requirements
4. Content
5. Hardware
6. Remote control
6.1 Batteries installation
7. PC Connection
8. TV Connections
8.1 AV Connection
8.2 HDMI Connection
9. First time usage
9.1 Hard disk formatting
9.2 Main screen
10. Basic operations
10.1 Video playback
10.2 Photo playback
10.3 Music playback
10.4 Favourites
10.5 Applications
10.6 Setup
11. Frequently Asked Questions
12. Problem solving
13. Important information
6.1 Batteries installation
• Remove the lid, install the batteries in the correct position and close the lid.
• In the following picture you can find the correct way to install the batteries.
• Point the remote control to the front panel of the device
• The remote control has a coverage of up to 5 meters between the remote and the infrared receiver, in a maximum of 60º
degrees.
7. PC connection
Connect the device to your PC or laptop to copy the files you want to play in the inner hard disk of the multimedia player.
To complete this connection, take the USB cable provided and connect it between the SPM4000 and your computer or laptop. Then, connect the power adaptor to the power outlet. The computer will recognize directly the player: go to “My Computer” and double click on SPM4000, which should appear as an external unit.
Now you are able to copy all the files you want to play in the inner hard disk of SPM4000. Nevertheless, please read carefully these instructions:
- Do not disconnect the player from the power outlet or from the USB connection if you are copying or reading files from/to
its hard disk.
- If your computer doesn´t recognize automatically the device, please do not disconnect the player and wait during around
20 seconds; it is possible the computer is running more applications simultaneously and it could delay the recognition process.
English
17
8. TV Connection
SPM4000 User Guide
The unit includes a lot of output connections, incuding AV analog video output and HDMI digital output. Select the correct
output depending on your TV screen, keeping on mind that each output offers a different resolution. If you want to enjoy
high definition quality with up to 1080p of resolution, you must select HDMI output.
Index
8.1 AV Connection
2. Features
3. System Requirements
4. Content
5. Hardware
6. Remote control
1. Welcome
1.1 Safety instructions
Make the connections according to the following picture. Then, connect the power adaptor to the power outlet, select the
AV input in your TV screen and wait during the system loading process.
6.1 Batteries installation
7. PC Connection
8. TV Connections
8.1 AV Connection
8.2 HDMI Connection
9. First time usage
9.1 Hard disk formatting
9.2 Main screen
10. Basic operations
10.1 Video playback
10.2 Photo playback
10.3 Music playback
10.4 Favourites
10.5 Applications
10.6 Setup
11. Frequently Asked Questions
12. Problem solving
13. Important information
If you want to enjoy the real surrond sound, use the digital Coaxial or the digital Optical audio output to connect the device to a speaker system (cables not included)
8.2 HDMI Connection
Make the connections according to the following picture. The HDMI output includes audio and video digital signal in the
same cable, making easier the connection process. Then, connect the power adaptor to the power outlet, select the HDMI
inpunt in your TV screen and wait during the system loading process.
If you want to enjoy the real surrond sound, use the digital Coaxial audio output or the digital Optical audio output to connect the device to a speaker system (cables not included)
English
18
9. First time usage
Please read carefully the following before using SPM4000 for first time:
- Install the remote control batteries (provided with the unit)
- Connect the device to your TV screen (read the section 8 of the user guide)
- Connect the power adaptor to the power outlet and also to the unit
Note: Please pay special attention to the choosing of output resolution. SPM4000 supports up to 1080p of resolution, but
your TV screen may not be compliant. If you choose a 1080p of output resolution in the device and your TV screen doesn´t
support it, the screen will not display any image. In that case, wait some seconds until the unit goes back to original resolution; if the TV still doesn´t display pictures, connect the device through AV output and select the correct output resolution (1080i if your screen is not Full HD).
SPM4000 User Guide
Index
1. Welcome
1.1 Safety instructions
2. Features
3. System Requirements
4. Content
5. Hardware
6. Remote control
6.1 Batteries installation
7. PC Connection
8. TV Connections
8.1 AV Connection
8.2 HDMI Connection
9.1 Hard disk formatting
9. First time usage
The inner hard disk installed on your SPM4000 is formatted by default. If you want to format again we strongly recommend
to format the hard disk in NTFS format to allow the playback of big-size files.
10. Basic operations
9.2 Main Menu screen
This is the first menu which is displayed when the device is connected and turned on:
9.1 Hard disk formatting
9.2 Main screen
10.1 Video playback
10.2 Photo playback
10.3 Music playback
10.4 Favourites
10.5 Applications
10.6 Setup
11. Frequently Asked Questions
12. Problem solving
13. Important information
Video: Direct access to the available video files.
Photo: Direct access to the available picture files.
Music: Direct access to the available music files.
Bookmarks: Direct access to web browser favourites.
Application: Direct access to applications menu.
Setting: Direct access to setup menu.
10. Basic Operations
Each time you turn SPM4000 on, when entering Video, Photo or Music option in main menu, the device will ask you from
which storage unit you want to get the files for playingback: internal hard disc, external mass storage device, device conected to network (when there is network connection available) or memory card (SD/MMC) Press “Source” key from remote control to change the file source at any time.
10.1 Video playback
Select “Video” option in the Main Menu and then select the way in which you want the files to be shown: “All”; “Date”, “Folder”, “Recent”). Press “OK” button from remote control.
If the “Resume” option is enabled, you can resume a video playback in the same point in which you left it the last time
you watched it.
Press “Audio” button to chosee between the different audio tracks of the file (if the video file includes them). In addition,
English
19
you can press the button “Subtitle” to enable/choose/disable the subtitle options. The subtitle availability is subject to file
Press “Zoom In” button to enlarge the video file size. Use the arrow button to move the displayed picture and press several times to choose between the different sizes. Press “Zoom Out” to disable the “Zoom In” function.
SPM4000 User Guide
Index
1. Welcome
1.1 Safety instructions
2. Features
3. System Requirements
4. Content
5. Hardware
6. Remote control
6.1 Batteries installation
7. PC Connection
8. TV Connections
8.1 AV Connection
8.2 HDMI Connection
9. First time usage
9.1 Hard disk formatting
9.2 Main screen
10. Basic operations
10.1 Video playback
10.2 Photo playback
10.3 Music playback
10.4 Favourites
10.5 Applications
10.6 Setup
11. Frequently Asked Questions
12. Problem solving
13. Important information
10.2 Photo playback
Select “Photo” option in the Main Menu and then select the way in which you want the files to be shown: “All”; “Date”, “Folder”, “Recent”). Press “OK” button from remote control. Select the photo yo want to watch and press “OK” button from remote control.
You can use right and left arrow buttons to rotate the pictures.
10.3 Music playback
Select “Music” option in the Main Menu and then select the way in which you want the files to be shown: “Artist”; “Albums”,
“Songs”, “Playlist”). Press “OK” button from remote control. Select the music file yo want to listen and press “OK” button
from remote control.
English
20
10.4 Bookmarks
Select “Bookmarks” option to access to your favourite web addresses that you have previously selected (to access to
these websites you must have Internet connection through LAN or WiFi with SNT1012 adapter from Sveon)
SPM4000 User Guide
Index
1. Welcome
1.1 Safety instructions
2. Features
3. System Requirements
4. Content
5. Hardware
6. Remote control
6.1 Batteries installation
7. PC Connection
8. TV Connections
8.1 AV Connection
8.2 HDMI Connection
9. First time usage
9.1 Hard disk formatting
9.2 Main screen
10. Basic operations
10.1 Video playback
10.2 Photo playback
10.3 Music playback
10.4 Favourites
10.5 Applications
10.6 Setup
11. Frequently Asked Questions
12. Problem solving
13. Important information
10.5 Application
Select “Application” option to access to application and program menu installed in SPM4000. In this menu you will find the
following options:
APK: In this menu you will be able to install and
desinstall applications and also to reboot the unit
with default factory options.
Web browser: Press here to open web browser.
OI File Manager: Press here to open file manager.
PicassaTM: Picture management application for PicassaTM website.
YoutubeTM: Video watching and sharing application for YoutubeTM website.
Sveon only will give support to the applications that
are installed in the unit by default and the ones
available in Sveon website.
Sveon is not responsible of the applications and
contents offered by third parties neither it is of its
correct operation or of applications that, because
wrongly used or containing virus, can damage the
normal player functionality; if this may happen the
warranty would be null and void.
English
21
10.6 Setting
SPM4000 User Guide
Select “Setting” option from main menu to setup the SPM4000 preferences. You will see a list of preferences which you
can modify just pressing “OK” button in remote control. Once you have modified the preference you want press “Return”
button from remote control to go back to preferences list.
Index
1. Welcome
1.1 Safety instructions
2. Features
3. System Requirements
4. Content
5. Hardware
6. Remote control
6.1 Batteries installation
7. PC Connection
8. TV Connections
8.1 AV Connection
8.2 HDMI Connection
9. First time usage
9.1 Hard disk formatting
9.2 Main screen
10. Basic operations
10.1 Video playback
10.2 Photo playback
10.3 Music playback
10.4 Favourites
10.5 Applications
10.6 Setup
11. Frequently Asked Questions
12. Problem solving
13. Important information
In the preference list you will find the following options:
Network Controls
WiFi: Active or deactive the WiFi network option. To connect to a WiFi network you should connect SNT1012 WiFi adapter from Sveon to your SPM4000. Select and enter the network password.
WiFi settings: Once WiFi connection is already working (and SNT1012 adapter is connected) select the WiFi network you
want to connect and enter the security password (security password can be WEP, WPA or WPA2.)
Ethernet: Active or deactive the Ethernet LAN network connection (cable).
Ethernet Configuration: Select the way of connection to Ethernet network: Automatic-DHCP (data is provided by the
router automatically) or Static IP (data is entered by user)
Sound
Select the audio output you want to have by default depending on the unit using the internal decoder or using
an external decoder of a 5.1 speaker system: HDMI
PCM, S/PDIF PCM, S/PDIF RAW, HDMI RAW.
English
22
Display
SPM4000 User Guide
Brightness: Adjust the brightness level of the image pressing left and right buttons in remote control
Contrast: Adjust the contrast level of the image pressing left and right buttons in remote control.
Index
1. Welcome
1.1 Safety instructions
2. Features
3. System Requirements
4. Content
5. Hardware
6. Remote control
6.1 Batteries installation
7. PC Connection
8. TV Connections
8.1 AV Connection
8.2 HDMI Connection
9. First time usage
9.1 Hard disk formatting
9.2 Main screen
10. Basic operations
HUE: Adjust the hue level of the image pressing left and right buttons in remote control.
Over Scan Adjust: Adjust the size of the screen pressing left and right buttons in remote control.
10.1 Video playback
10.2 Photo playback
10.3 Music playback
10.4 Favourites
10.5 Applications
10.6 Setup
11. Frequently Asked Questions
12. Problem solving
13. Important information
Resolution: Select the default video output resolution you want to have on your SPM4000.
Aspect Ratio: Select the video output you want to have by default: Pan Scan 4:3, Letter Box 4:3, Wide Screen 16:9, Full
Screen (normal).
Applications
Unknown sources: It allows the installation of not certified applications.
Manage Application: Management of the applications already installed and those who are running.
Development: Development options for applications when it is connected through USB (programming mode)
Default Settings
Restore by default : Erase all data and configurations done by end user and restore the values by default.
Storage
Storages: From this option you can disconnect safely the
USB external mass storage devices connected to SPM4000.
Select the unit you want to disconnect, press “OK” button in
remote control and confirm the disconnection of the device
pressing “Ok” button again.
Available space: Here you can see the free space available
to install applications in the unit.
Search
Google search: You can choose if you want Google to show suggestions when typing a search text. Also you will be able
to select the search element that is set for Bookmarks, Browse records and application names.
Language and keyboard
Select language: Select the language in which you want to show the SPM4000 menus.
Latin input (Android keyboard): Setup the options for the virtual keyboard.
User Dictionary: Edit or erase the words added to the dictionary.
English
23
Samba
To use the network so you can play in streaming from other devices, connect the LAN cable from your modem/router to
the RJ-45 connector of your SPM4000.
If you have the DHCP activated in your modem/router, it will give an IP automatically to connect the network.
SPM4000 User Guide
Index
1. Welcome
1.1 Safety instructions
If you want to setup the configuration yourself, select “Connect manually” and fill in the information according to the network server configuration.
2. Features
3. System Requirements
4. Content
5. Hardware
6. Remote control
6.1 Batteries installation
7. PC Connection
8. TV Connections
8.1 AV Connection
8.2 HDMI Connection
9. First time usage
9.1 Hard disk formatting
9.2 Main screen
10. Basic operations
10.1 Video playback
10.2 Photo playback
10.3 Music playback
10.4 Favourites
10.5 Applications
10.6 Setup
11. Frequently Asked Questions
12. Problem solving
13. Important information
Firmware Upgrade
SPM4000 allows to update the firmware, which will allow you to have always the latest improvements updates for your unit.
Firmware update files are available in Sveon web www.sveon.com or asking for them to the Technical Department through
the e-mail [email protected]
To update the firmware please follow these steps:
1. Copy the update file to a USB memory pen drive.
2. Connect the USB memory pen drive to one of the USB Host ports of the unit.
3. In the Main Menu, select the option “Setup”> “Firmware Upgrade” >”Browse”
4. The system will look for the file automatiocally and will show you on the screen.
5. Select the file and click on “OK” button in the remote control.
About (SPM4000 Information)
Android Version: It shows the AndroidTM operation system version under which the unit is working.
Kernel Version: Compilation version of the unit.
Ethernet MAC address: Network card MAC address.
Build number: It shows the firmware version of SPM4000.
English
24
11. Frequently asked questions
¿Can I format the SPM4000 hard disk in my PC?
Yes. We recommend to format in NTFS.
The remote control does not work..
Check that batteries are correctly placed and that they are not discharged.
I do not receive signal on TV.
Check that seleted video output on SPM4000 matches with the video output connection to TV. Press “TV System” button
on remote control until image is showed on TV.
I can not see any IP on network section.
Check that LAN cable is correctly connected or, if you are using WiFi, that the SNT1012 adapter is connected. Also check
that your router can give automatic IP, or, in its case, if the router has manual IP configuration.
SPM4000 User Guide
Index
1. Welcome
1.1 Safety instructions
2. Features
3. System Requirements
4. Content
5. Hardware
6. Remote control
6.1 Batteries installation
7. PC Connection
8. TV Connections
8.1 AV Connection
8.2 HDMI Connection
9. First time usage
9.1 Hard disk formatting
9.2 Main screen
10. Basic operations
I can not see any shared file in the network.
Check if the folder on PC is shared and that PC is connected to network.
I can not connect to my router through the WLAN.
Check that your SSID (WiFi network name) is correct and activated.
Check that the WiFi signal is strong enough to connect to network correctly.
10.1 Video playback
10.2 Photo playback
10.3 Music playback
10.4 Favourites
10.5 Applications
10.6 Setup
11. Frequently Asked Questions
12. Problem solving
13. Important information
12. Problem solving
Si tiene dudas sobre el uso de la unidad SPM4000 o sobre su puesta en marcha, lea detenidamente los capítulos del manual que hagan referencia a esos términos o póngase en contacto con el departamento técnico de Sveon a través del email
[email protected]
13. Important Information
CE Declaration of Conformity
Sveon declares that his product SPM4000 is in compliance with the essential requirements and other relevant provisions
of Directive 1999/5/EC
Warning message
This symbol on the product or its batteries or its packaging means that this product and
any batteries it contains must not be disposed of with your household waste.
Instead, it is your responsability to hand this over to an applicable collection point for
the recycling of batteries and electrical and electronic equipment. This separate collection and recycling will help to conserve natural resources and prevent potential negative consequences for human health and the environment due to the possible
presence of hazardous substances in batteries and electrical and electronic equipment, which could be caused by inappropriate disposal.
For more information about where to drop off your batteries and electronic waste, please contact your local city/municipality office, your household waste disposal service or the shopw where you purchased the product.
English
25