Transcript
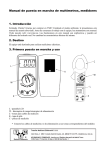
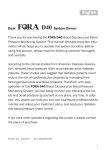
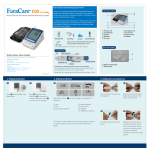
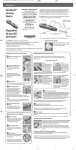
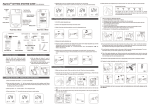
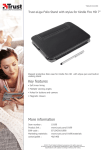
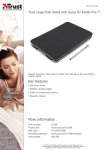
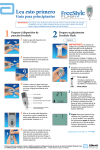
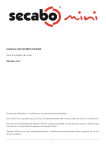
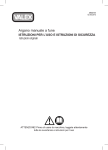
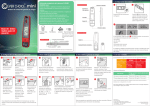
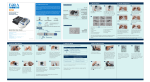
Ver 2.0 2014-02
318-5010200-047
LANCING DEVICE
Dispositivo de Punción
FORA Lancing Device allows you to collect your capillary blood from your fingertip (and
alternative sites) easily and virtually pain free.
Asidero de
la lanceta
Ejector
Lancet Holder
Cocking
Control
Cap
Depth Indicator
Arrow
Lock
A Clear Cap
(For AST use only)
Indicador de
profundidad
Flecha
Pestillo
Tapa
Botón de
transparente
liberación
(Solamente
Indicador de cierre para el uso LAP)
El dispositivo de punción le ofrece 6 niveles de profundidad de penetración en la
piel:
Shallow
Deep
Average skin
Control de
expulsión
Punta ajustable
The Lancing Device offers you 6 depths of skin penetration:
Soft or thin skin
Eyectar
Tapa
Adjustable Tip
Release
Button
Lock Indicator
El dispositivo de punción permite que se saque y recolecte sangre capilar de la yema
del dedo (así como de otros lugares alternativos), fácilmente y casi sin dolor.
Thick or calloused skin
The longer the length of the indicator line, the greater the depth of penetration.
WARNING
To reduce the chance of infection:
► Never share a lancet or the lancing device.
► Always use a new, sterile lancet. Lancets are for single use only.
► Avoid getting hand lotion, oils, dirt or debris in or on the lancets and the lancing
device.
► The used lancet may potentially be biohazardous. Discard it according to your
local regulations.
Setting up the Lancing Device
Superficial
Profundo
Piel suave o fina
Piel intermedia
Piel gruesa o callosa
A mayor profundidad en la línea del indicador, el dispositivo de punción tendrá mayor
penetración.
¡Advertencia!
Para reducir el riesgo de infección:
► Nunca comparta la lanceta o el dispositivo con nadie.
► Siempre utilice una lanceta nueva y esterilizada. Las lancetas deben ser utilizadas
solo una vez.
► Al utilizar las lancetas o el dispositivo de punción, evite el uso de crema de manos,
aceite, talco o cualquier tipo de sustancia contaminante.
► Las lancetas usadas son consideras un desecho de riesgo biológico. Por favor
desechar de acuerdo con las regulaciones de su localidad.
Preparando el dispositivo de punción
1
2
1
2
1. Twist and pull off the cap of the lancing
device.
2. Insert a lancet into the lancet holder
and push down firmly until it is fully
secured.
2
1. Gire y destape el casquillo o tapa del
dispositivo de punción.
1
2. Inserte una lanceta dentro orificio del
dispositivo y empújela firmemente hacia
abajo hasta que entre completamente en
2
su lugar.
1
3
3. Twist the protective disk off the lancet.
4. Replace and twist the cap to the right to
close the lock as shown in the picture until
you hear the click. When the lock is
properly closed lock indicator is in the
extreme right position.
3
3. Gire el disco protector hasta que se
separe de la lanceta.
4. Vuelva a colocar y gire el tapón a la
derecha para cerrar el pestillo como se
muestra en la imagen hasta que escuche
un chasquido. Con el pestillo correctamente cerrado, el indicador de cierre se
encontrará en la posición de la derecha.
Hold your fingers on the
body NOT the cap.
Mantenga los dedos sobre
el cuerpo, NO sobre la tapa.
5. Holding the cap select on the depth of
penetration by turning the adjustable tip
in either direction so that the arrow on the
cap points to the desired depth.
6. Pull the cocking control back until it
clicks. You will see a color change inside
the release button when it is ready.
► If it does not click, the device may
have been cocked when the lancet was
inserted.
5. Sujetando el tapón, seleccione la
profundidad de la penetración girando la
punta ajustable en cualquier dirección de
modo que la flecha del tapón señale la
profundidad deseada.
NOTE
Before collecting a drop of blood:
► Wash and dry your hands before you start.
► Select the puncture site at the fingertip.
► Rub the puncture site for about 20 seconds before penetration.
► Clean the site using cotton swab moistened with 70% alcohol and let it air dry.
7. Lancing the finger
Press the lancing device’s tip firmly
against the lower side of your fingertip.
Press the release button to prick your
finger, then a click indicates that the
puncture is complete.
8. Remove the device from the puncture
site. After penetration, remove the first
drop of blood with a clean cotton swab.
Gently squeeze the punctured area to
obtain another drop of blood. Be careful
NOT to smear the blood sample. Apply the
blood to the test strip.
9. Remove the lancet by twisting the cap
off first. Safely dispose of the used lancet
by placing the protective disk on a hard
surface, and pushing the exposed tip into
the disk.
10. Slide the ejector forward to remove the
used lancet. Dispose of the lancet
according to your local regulations.
► For collecting blood samples from
sites other than the fingertip, use the
clear cap.
Alternative Site Testing (AST)
NOTE
1
2
This option is not available for all
devices. Refer to the Intended Use in
your meter’s Owner’s Manual if you can
perform AST with your device.
Testing on sites other than the fingertip is referred to as alternative site testing (AST).
Please read the Alternative Site Testing section in your Owner’s Manual before you
perform AST. Substitute the lancing device cap with the clear cap for alternative site
testing. Pull the cocking control back until it clicks. When lancing the forearm, upper arm,
hand, thigh, or calf, avoid lancing the areas with obvious veins in order to prevent excess
bleeding.
Cleaning
• The lancet is disposable and is intended for single use only.
• The lancing device is reusable.
• To clean the lancing device, use a mild soap and water to wipe clean the lancing
device.
• DO NOT rinse the device under water.
• Disinfect the cap by placing it in 70% alcohol for 10 minutes and then allow it to air
dry.
• Do NOT place the device in a dishwasher or use detergents.
Distributed by ForaCare
ForaCare, Inc.
893 Patriot Dr., Suite D, Moorpark, CA 93021 USA
Products made in Taiwan
Toll Free: 1-888-307-8188 (7:00am-6:00pm PST, Mon.-Fri.)
For assistance outside of these hours, please contact your healthcare professional.
www.foracare.com
Read instructions before use.
6. Deslice el control de expulsión hasta
que haga un “clic”. Verá que el color en el
botón de liberación cambiará cuando está
listo.
► Si no hace un clic, es posible que el
dispositivo de punción fuera montado
cuando la lanceta fue insertada.
Atención
Antes de obtener la gota de sangre:
► Lávese y séquese bien las manos antes de empezar.
► Eliga el lugar de punción en la yema del dedo.
► Frote el sitio de punción al menos 20 segundos antes de la penetración.
► Limpie el lugar de punción con un algodón humedecido con 70% de alcohol y deje
secar al aire.
7. Perforando en la yema del dedo. Sujete
el dispositivo de punción firmemente
sobre el costado de su dedo. Presione al
botón de liberación, en seguida escuchará
un “clic” indicando que la punción ha sido
completada.
8. Quite el dispositivo cuidadosamente del
lugar de punción. Después de la
penetración, descarte la primera gota de
sangre con un algodón limpio. Presione el
lugar de punción gentilmente hasta
obtener otra gota de sangre. Por favor,
tenga cuidado de NO esparcir la muestra
de la sangre. Aplique la gota de sangre en
el canal absorbente de la tira reactiva.
9. Remueva la lanceta cuidadosamente
torciendo la tapa primero.Deseche
cuidadosamente la lanceta usada
poniéndola en el disco protector sobre una
superficie dura y empuje la punta
expuesta de la aguja dentro del disco
protector.
10. Luego deslice hacia delante el botón
de eyección para sacar la lanceta usada.
Deseche las lancetas de acuerdo con las
regulaciones locales.
► Para obtener sangre de otros lugares
que no sea la yema del dedo, use la tapa
o casquillo transparente.
Lugar Alternativo de Prueba (LAP)
Nota
1
2
Esta opción no esta disponible para todos
los dispositivos. Refiérase al Uso Previsto
mencionado en el Manual de Usuario si
puede hace LAP con su dispositivo.
El utilizar otras partes del cuerpo, aparte de la yema del dedo, para revisar sus niveles
de glucosa es lo que se conoce como el lugar alternativo de prueba (LAP). Por favor, lea
la sección de Lugar Alternativo de Prueba en el manual del usuario antes de realizar el
LAP. Reemplace la tapa o casquillo del dispositivo de punción por la tapa transparente
para hacer la prueba usando el lugar alternativo de prueba. Deslice el control de
expulsión hasta que haga un “clic”. Cuando haga una punción en el antebrazo, el brazo,
la pantorrilla o el muslo evite realizarla cerca de lugares cercanos a las venas, ya que
puede haber un exceso de sangrado.
Limpieza
• Las lancetas son desechables, deben ser utilizadas SOLO una vez.
• El dispensador es reutilizable.
• Para limpiar el dispositivo de la lanceta, use un detergente suave y agua para limpiar
el aparato.
• NO lo sumerja bajo el agua.
• Desinfecte la tapa poniéndola 10 minutos en alcohol de un 70% y déjela secar al aire.
• No ponga el dispositivo en una lava platos ni use detergentes.
Distribuido por ForaCare
ForaCare, Inc.
893 Patriot Dr., Suite D, Moorpark, CA 93021 USA
Productos hecho en Taiwan
Número de Teléfono Gratuito :1-888-307-8188 (7:00am~6:00pm N, Lunes a Viernes)
Para obtener asistencia fuera de estos horarios, póngase en contacto con el profesional de la salud.
www.foracare.com
Lea las instrucciones antes de utilizar.