1
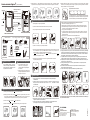
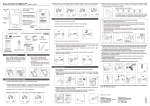
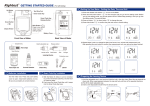
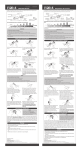
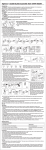
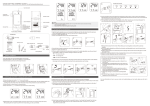
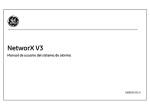
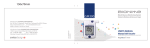
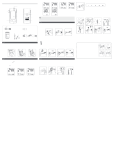
Rightest® GETTING STARTED GUIDE ( For self-testing )
5) Repeat steps 3 and 4 to change the date, time format, hour, and minute.
After pressing the main button to confirm the minute unit, your set-up has been finished.
5) Gently squeeze your fingertip to get a drop of blood. Our meter only needs a tiny blood sample.
Sample Size Example
1.0µL
Up Button
(
)
1.4µL
2.0µL
3.0µL
4.0µL
Test Strip Port
We suggest you to take 1.4~2.5µL to do the test on glucose
monitoring system. Blood sample size above 4.0µL is too much which
will contaminate the Smart Code Key.
Smart Code Key
Smart Code Key
Release Button
Down Button
(
)
4
Main Button (
)
Press to turn on/off
meter or go into
setting model.
Display Window
Preparing the Lancing Device
1) Pull off the depth adjustable cap.
2) Insert a new disposable lancet firmly into lancet carrier.
Battery Cover
3) Twist off and set aside the protective cover of the disposable lancet.
Back View of Meter
Front View of Meter
Sample Entry
Depth adjustable cap
Release button
Palm or forearm for alternative site test
1. Choose clear cap and follow step1 to step 5.
2. Massage the puncture area of palm or forearm for a few seconds.
3. Immediately after massaging the puncture area, press and hold the lancing device with the
clear cap against palm or forearm.
4. Then press the release button.
5. Continue holding the lancing device against palm or forearm and gradually increase
pressure for a few seconds until the blood sample size is sufficient.
6. Follow step 8~10 to discard the used disposable lancet.
Releasing
button
Lancing Device
Test strips
Pressing for
a few seconds
View Window
Lancet carrier
Safe switch
Hub
Plunger
4) Replace the depth adjustable cap
Protective cover
Test Strips
5) Choose a depth of penetration by rotating the top portion of the depth adjustable cap until the
setting depth matches the window. Settings are window.
Settings are based on skin type "
" for soft or thin skin; "
" for average skin; "
" for
thick or calloused skin.
Clear Adjustable Cap
Test strips vial
Control Solution
Check Key
1 Batteries Installation
Lancet
6) Hold the hub in one hand and pull on the plunger in the other hand. The device will be
cocked. Release the plunger, it will automatically move back to its original position near the
hub.
2 Smart Code Key Installation
1) With the Meter off, follow ① and ②
direction to put the new Smart Code Key
into the track on code key base.
2) Push down the Smart Code Key until it
snaps into the Smart Code Key base.
7) You will see the countdown mode on the screen. After 8 seconds, the test result appears. For more
information about your test results, please see your User Manual.
8) Pull off the depth adjustable cap. Without touching the used disposable lancet, stick the lancet tip
into the protective cover.9) Hold the release button in one hand and pull on the plunger in the other
hand will safely eject the used disposable lancet.
9) Discard the used disposable lancet into an appropriate puncture-proof or biohazard container.
10) Replace the depth adjustable cap after finishing the test.
5 Performing a Test
Bat ter y
-
Turn the meter over. Press and push
battery cover to open. Install both batteries
at once. Be sure to put battery in correct
direction.
6) Touch and hold the drop to the edge of sample entry until you hear a " beep " and the view window
is totally filled with blood. If the view window is not totally filled with blood or the test does not start.
Then discard the test strip and repeat the test with a new test strip.
+
+
1) Wash and dry your hands. Take one strip from the vial. Close the vial cap immediately.
Ba
tt e
ry
-
2) Insert the strip into the strip port on meter with the indication symbol facing up. Push the strip
in until it snaps and stops. The meter will turn on automatically.
1
3
2
Setting Up Your Meter - Setting the Date, Time and Unit
1) Press and release main button "
" to turn on the Meter.
2) Press and hold main button "
" for five seconds until you go into the setting mode. Before
you go into setting mode, you will see power off first. Please keep pressing it until you go into
the setting mode. The year will flash.
3) Press up button "
4) Press main button "
" or down button "
" to change the year.
" to confirm the year and move to month setting.
3) Make sure the code number on the meter screen matches the code number on the test strip
vial.
4) When you see the flashing blood drop, hold the lancing device to side of your fingertip and
press the release button.
For more information on how to use your meter and understand your test results, please see the
User Manual.
Guía de inicio de Rightest® ( para auto-análisis )
5) Repita los pasos 3 y 4 para cambiar la fecha, el formato de tiempo, la hora, y los minutos. Después
de presionar el botón principal para confirmar la unidad de medida, su configuración ha terminado.
Ejemplo del tamaño de la muestra
Abertura para insertar la
tira de análisis
Botón arriba
(
)
5) Apriete suavemente la punta de su dedo para obtener una gota de sangre. Nuestro medidor
necesita solo una muestra pequeña de sangre. Le sugerimos que obtenga un tamaño de muestra
de sangre alrededor de 1.4-2.5µl para analizarla.
1.0µL
1.4µL
2.0µL
3.0µL
4.0µL
Tecla de código inteligente
Le sugerimos que tome 1.4-2.5µL para realizar el análisis del sistema
de control de glucosa. Un tamaño de la muestra de sangre por encima
de 4.0ul es demasiado y contaminara la tecla de código inteligente.
Botón de liberación de la
tecla de código inteligente.
Botón abajo
(
)
4
Botón principal (
)
1) Extraiga la tapa con ajuste de profundidad.
Presionar para encender/apagar
el medidor y seleccionar
pantalla de función.
Pantalla
2) Inserte una nueva lanceta desechable firmemente en el portalancetas.
Cubierta de
las pilas
3) Gire y extraiga la cubierta protectora de la lanceta desechable.
Vista trasera del medidor
Vista frontal del medidor
Tapa con ajuste de profundidad
Entrada de la muestra
Preparación del dispositivo de punción
Botón Disparador
Palma o antebrazo como lugar alternativo para la realización de las pruebas
1. Seleccione una tapa limpia y siga los pasos 1 a 5.
2. Realice masajes en el área de punción de la palma o antebrazo durante algunos segundos.
3. Inmediatamente luego de masajear el área de punción, mantenga presionado el dispositivo
de punción con una tapa limpia sobre la palma o antebrazo.
4. Luego, presione el botón disparador.
5. Continúe sosteniendo el dispositivo de punción sobre la palma o antebrazo e incremente
gradualmente la presión durante algunos segundos hasta que el tamaño de la muestra de
sangre sea suficiente.
6. Siga los pasos 8~10 para desechar la lanceta desechable usada
Dispositivo
de Punción
Releasing
button
Tiras de análisis
Ventana de visión
Portalancetas
Interruptor de
seguridad
Cuerpo
Émbolo
5) Seleccione una profundidad de penetración girando la porción superior de la tapa con ajuste
de profundidad hasta que la profundidad deseada coincida con la que aparece en la
pequeña ventana. La configuración está basada en el tipo de piel.
"
" corresponde a la piel suave y fina; "
" corresponde a la piel promedio; "
"
corresponde a la piel gruesa o callosa.
Lancetas estériles
desechables
Recipiente de
tiras de análisis
Solución de control
Llave de prueba
Lanceta
6) Sostenga el cuerpo del dispositivo con una mano y apriete el émbolo con la otra. El
dispositivo quedará preparado.
2
Instalación de las pilas
Gire el medidor, presione y empuje la
cubierta de las pilas para abrirla. Instale
ambas pilas a la vez. Asegúrese de poner
las pilas en la dirección correcta.
Instalación de la tecla de código inteligente
1) Con el medidor apagado, siga las
direcciones 1 y 2 (ver figura) para
introducir la tecla de código inteligente
en el medidor.
2) Empuje hacia abajo y hacia atrás la tecla
de código Inteligente dentro del medidor
hasta que escuche “click”.
5
6) Ponga la yema del dedo con la gota con el borde de la entrada de muestras de la tira y manténgala
hasta que escuche la alárma y la ventana de visión de la tira esté totalmente llena de sangre. Si la
ventana de visión de la tira no se llena totalmente de sangre o la prueba no comienza, deseche la
tira de análisis y repita la prueba con una tira de análisis nueva.
7) La pantalla mostrará una cuenta regresiva. Después de 8 segundos aparecerá el resultado del
análisis. Para más información sobre los resultados de sus análisis, vea el manual del usuario.
8) Extraiga la tapa con ajuste de profundidad. Sin tocar la lanceta desechable usada, inserte la punta
de la lanceta en la cubierta protectora.
9) Sostenga el botón disparador con una mano y apriete el émbolo con la otra para expulsar la
lanceta desechable usada.
10) Deseche la lanceta desechable usada en un recipiente adecuado resistente a pinchazos o
diseñado para elementos biopeligrosos.
11) Vuelva a colocar la tapa con ajuste de profundidad luego de finalizar la prueba.
Realizar un análisis
+
+
Bat ter y
-
1) Lave y seque sus manos. Tome una tira del recipiente. Cierre la tapa del recipiente
inmediatamente.
2) Inserte la tira dentro de la ranura para las tiras en el medidor con la flecha hacia abajo.
Empuje la tira hacia adentro hasta que se escuche " click " . El medidor se enciende
automáticamente.
Ba
tt e
ry
-
1
3
2
Ajustando la hora, la fecha y la unidad
1) Presione y suelte el botón principal "
" para encender el medidor.
2) Mantenga presionado el botón principal "
" durante cinco segundos hasta que se active el
modo de ajuste. El medidor se apaga unos segundos antes de entrar en modo de ajuste.
Continúe presionando hasta que entre en modo de ajuste y vea el año parpadeando.
3) Presione el botón "
" o el botón "
4) Presione el botón principal "
" para cambiar el año.
" para confirmar el año y pasar a configurar el mes.
3) Asegúrese de que el número de código en la pantalla del medidor coincida con el número de
código del recipiente de las tiras de análisis.
4) Cuando vea el símbolo de la gota de sangre parpadeando, mantenga el dispositivo de
punción pegado a la yema de su dedo y pulse el botón de activación.
Para más información sobre cómo usar su medidor y entender los resultados de su análisis, por
favor, vea el Manual de usuario.
Manufacturer:
BIONIME CORPORATION
No. 100, Sec. 2, Daqing St., South Dist.,
Taichung City 40242, Taiwan
E-mail: [email protected]
http://www.bionime.com
USA Service Center:
BIONIME USA CORPORATION
1450 E. Spruce Street, Bldg. #B,
Ontario, CA 91761
Tel: +1 888 481-8485
Fax: +1 909 781-6970
101-3GM300-217
EN+ES(US)
1
Pressing for
a few seconds
4) Vuelva a colocar la tapa con ajuste de profundidad.
Cubierta protectora
Test Strips