1
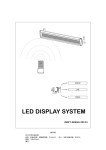
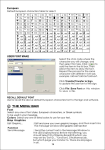
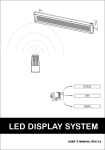
Letrero publicitario rotatorio de
LEDs de tres colores
DIS-100
Gracias
por la compra de este producto Steren.
Este manual contiene todas las funciones de operación y solución de
problemas necesarios para instalar y operar su nuevo Letrero publicitario
rotatorio de LEDs de tres colores Steren.
Por favor revise el manual completamente para estar seguro de
instalar y poder operar apropiadamente este producto.
Para apoyo, compras y todo lo nuevo que tiene Steren,
visite nuestro sitio Web en:
www.steren.com
2
La información que se muestra en este manual es de referencia sobre
el producto.
Debido a actualizaciones pueden existir diferencias. Por favor, consulte
nuestra página web (www.steren.com) para obtener la versión más
reciente del instructivo.
IMPORTANTE
• No intente abrir el equipo, puede ocasionar mal funcionamiento y se anulará la garantía.
• No exponga el equipo a temperaturas extremas.
• No use ni almacene este equipo en lugares donde existan goteras o salpicaduras de agua.
Puede causar un mal funcionamiento o un choque eléctrico.
• Evite las caídas del equipo, ya que podría sufrir daños.
• No coloque objetos pesados sobre el equipo ni sobre sus accesorios.
• No exponga el equipo ni sus accesorios a polvo, humo o vapor.
3
ÍNDICE
4
1. CARACTERÍSTICAS
5
2. CONTROLES
2.1 Control remoto
2.2 Letrero de LEDS
6
6
7
3. DIAGRAMA DE MENÚS
8
4. MODO DE USO
4.1 Usando el control remoto
4.2 Ejecutar hoja (s) de mensajes
4.3 Función PROG
4.4 Borrar todo el contenido del letrero
4.5 Ajustar dirección ID
4.6 Seleccionar brillo del letrero
4.7 Ajustar fecha/hora del letrero
10
10
10
11
12
13
13
13
5. CONEXIÓN
5.1 Conexión a una PC
14
14
6. SOFTWARE
6.1 Requerimientos del Sistema
6.2 Instrucciones de instalación del software
6.3 Pantalla del software
6.4 Comandos
6.5 Dibujo de fuente
6.6 Usar fuente predeterminada
6.7 Font
15
15
15
17
18
19
19
19
6.8 Colors (colores)
6.9 BMP graphics (gráficos BMP)
6.10 Functions (funciones)
6.11 Configuración del software
6.12 Enviar un mensaje
6.13 Editor de gráficos BMP
20
20
20
21
22
22
7. COMUNICACIÓN LAN
7.1 Cómo funciona
7.2 Instalación del controlador de la
impresora en el ET
7.3 Configuración del controlador de
la impresora en el ER
7.4 Enviar un mensaje a través de la LAN
7.5 Comunicación por e-mail
7.6 Configurar el letrero y el software en el ET
27
27
8. REFERENCIA RÁPIDA
30
9. ESPECIFICACIONES
31
27
28
28
29
29
1. CARACTERÍSTICAS
El letrero publicitario de LEDs es ideal para su uso en cualquier establecimiento comercial,
bancos y hospitales, permite configurar y programar cualquier mensaje ya sea fijo, con
movimiento o desplazamiento de las letras.
Su memoria interna puede almacenar gráficos y texto con capacidad de hasta 6500
caracteres. Con control remoto que permite la configuración del letrero o incluso puede ser
programado desde una PC, ajustando animación, desplazamiento, color e información a
presentar en el letrero.
Incorpora todos los accesorios y herrajes para su correcta instalación y funcionamiento.
• 100% programable.
• 3 colores (rojo, verde, amarillo).
• Permite letras y animaciones.
• Programación fácil y rápida.
Letrero
LED
Adaptador de
corriente
CD de instalación
Cable
RS232
Soportes y tornillos
5
2. CONTROLES
2.1 Control remoto
Teclas de comandos
• ON/OFF: Enciende/apaga el letrero.
• TIME/DATE: Muestra la hora/fecha en pantalla.
• Q-PROG: Permite escribir y programar
rápidamente un mensaje en la página A.
• ESC: Use para salir de las opciones.
• SHIFT: Selecciona el modo de teclado
(Mayúsculas, minúsculas, números y símbolos).
• EUROP-CHAR: Modifica una letra de acuerdo
a los caracteres europeos.
• PROG: Ingresa al menú de programación.
• FUNCT: Accede al menú de ajustes.
• COLOR: Durante la introducción de datos del
menú PROG modifica el color del texto.
• FONT: En la introducción de datos del menú
PROG modifica el tamaño de los caracteres.
• RUN-PAGE: Presione este botón seguido de la
letra de página (A-Z) que desea proyectar
• ENTER: Confirma ajustes.
• ← → ↑ ↓: Flechas de desplazamiento.
• SPACE: Inserta un espacio entre caracteres.
• DEL: Borra caracteres ingresados.
Teclado alfanumérico
6
Use este teclado para ingresar texto, números
y símbolos.
2. CONTROLES
2.2 Letrero de LEDS
1.- Entrada de alimentación.
2.- Entrada para cable RS232.
3.- Entradas de tornillos para soportes.
7
3. DIAGRAMA DE MENÚS
ON/OFF
TIME/DATE
ESC
Q PROG
Seleccionar
página a editar
PROG
Introducir
texto deseado
ENTER
Seleccionar
horario de
visualización
Entrada de texto
A...Z
SHIFT: a...z, 0...9, !...?
EUROP-CHAR: Ǻ...Ǎ
FONT: 4x7, 5x7, 6x7
ENTER
Seleccionar
con efecto
de entrada
Seleccionar tiempo
de visualización
con
Seleccionar
horario
A ...E
Página
(PAG) A-Z
ENTER
ENTER
Seleccionar año de finalización - ENTER
Seleccionar mes - ENTER
Seleccionar minuto - ENTER
8
ENTER
ENTER
ENTER
Seleccionar
con efecto
de salida
Seleccionar
velocidad con
1 (rápido), 2 (normal) y 3 (lento)
ENTER
Seleccionar año de inicio - ENTER
Seleccionar mes - ENTER
Seleccionar minuto - ENTER
Seleccionar
página a usar
A-Z
ENTER
3. DIAGRAMA DE MENÚS
FUNCT
Borrar todo
Clear all
ENTER
Seleccionar 00...FF
ENTER
Fijar brillo
(Brightness)
Seleccionar brillo A...D
ENTER
Fijar año
(year)
Seleccionar 00...99
ENTER
Fijar mes
(month)
Seleccionar 01...12
ENTER
Fijar día
(date)
Seleccionar 01...31
ENTER
Fijar hora
(hour)
Fijar minuto
(minute)
Seleccionar 00...23
ENTER
Seleccionar 00...59
ENTER
Fijar ID
RUN PAGE
Introducir letra de
página ABC...Z
ESC
ENTER
9
4. MODO DE USO
4.1 Usando el control remoto
ON/OFF
Presione ON (encender) / OFF (apagar) el letrero.
TIME/DATE
Si desea visualizar únicamente la hora y fecha presione la tecla TIME/DATE.
Presione ESC para salir de esta modalidad.
Q-PROG
Esta opción ingresa al modo de escritura rápida.
1.- Presione esta tecla e ingrese el texto que desea proyectar.
2.- Con las teclas del control remoto ingrese el texto. Si lo desea use
la tecla SHIFT para seleccionar el tipo de teclado: mayúsculas (1),
minúsculas (2), números (3) y símbolos (4).
Presione la tecla DEL para borrar caracteres.
3.- Use las teclas COLOR (color) y FONT (tamaño de fuente) para ajustar las
propiedades del mensaje.
4.- Presione ENTER para confirmar y proyectar el mensaje.
Los mensajes introducidos en esta la modalidad serán guardados en la página A.
4.2 Ejecutar hoja (s) de mensajes
Esta opción le permite ejecutar una o varias hojas (A...Z) que contengan texto.
10
1.- Presione el botón RUN-PAGE.
2.- Ingrese la letra o letras de las páginas que desea ejecutar.
3.- Confirme la selección con ENTER.
4. MODO DE USO
4.3 Función PROG
• PAG (Introducir texto)
Esta opción le permite escribir y ajustar un mensaje con efectos.
1.- Presione el botón PROG.
2.- Use la tecla para seleccionar la opción PAG.
3.- Use la tecla para activar el selector de letra (A-Z).
4.- Con ayuda de las teclas
seleccione la letra de la página a la que agregará
información.
5.- Presione ENTER para ingresar al editor de texto.
6.- Ingrese la información deseada, use las teclas COLOR (color) y FONT (tamaño de
fuente) para ajustar las propiedades del mensaje. Al finalizar presione nuevamente
ENTER.
7.- Use las teclas
para seleccionar el efecto de entrada ( ) del texto. Presione
ENTER para confirmar.
8.- Presione las teclas
para elegir el efecto de salida ( ) del texto. Presione ENTER
para confirmar.
EFECTOS:
• MMEDIATE - El texto se muestra sin efectos.
• XOPEN - El texto se despliega desde la parte media del letrero.
• CURTAIN UP - El texto se despliega desde la parte inferior del letrero.
• CURTAIN DOWN - El texto se despliega desde la parte superior del letrero.
• SCROLL LEFT - El texto se desplaza del lado izquierdo del letrero.
• SCROLL RIGHT - El texto se desplaza del lado derecho del letrero.
• VOPEN - El texto se despliega verticalmente desde la parte media del letrero.
• VCLOSE - El texto se despliega verticalmente desde la parte superior e inferior del letrero.
• SCROLL UP - El texto se muestra hacia arriba.
• SCROLL DOWN - El texto se desplaza hacia abajo.
• SNOW - El texto aparece con un efecto de cascada.
• TWINKLE - Efecto de entrada que simula circulación de luces en cada letra.
• BLOCK MOVE - Efecto de entrada que despliega el contenido del texto letra por letra.
• HOLD - Esta opción cancela la salida del texto dejandolo estático en el letrero.
• RANDOM - Efecto de entrada que despliega gradualmente el mensaje.
• HELLO WORLD - Muestra este mensaje preestablecido.
• WELCOME - Muestra este mensaje preestablecido.
9.- En la opción STAY, use las teclas
para establecer la duración de visualización del
texto (00.5 - 25.0). Presione ENTER para confirmar.
10.- Use las teclas
para establecer la velocidad “Speed” del efecto: 1 (rápido), 2
(normal) y 3 (lento). Presione ENTER para confirmar.
11
4. MODO DE USO
• SCH (Establecer horarios a páginas)
Esta opción le permite establecer un horario de activación/desactivación de textos
previamente almacenados.
Use las teclas
para seleccionar el número a editar y
para modificarlo.
1.- Presione el botón PROG.
2.- Use la tecla para seleccionar la opción SCH.
3.- Use la tecla para activar el selector de letra (A-E).
4.- Con ayuda de las teclas
seleccione la letra del horario que desea programar.
5.- Presione ENTER para ingresar a la configuración.
6.- En el campo SYR ingrese el año de activación del horario. Presione ENTER para
aceptar.
7.- En el campo SMO ingrese el mes de activación. Presione ENTER.
8.- En el campo SDY ajuste el día de activación. Presione ENTER.
9.- En el campo SHR ingrese la hora (en 24hrs) de activación. Presione ENTER.
10.- En el campo SMI ajuste el minuto de activación. Presione ENTER.
11.- Ahora deberá repetir los pasos 6 al 10 para fijar la fecha (TYR, TMO, TDAY) y hora
(THR,TMI) de desactivación del horario.
13.- A continuación ingrese la letra o letras de las paginas que desea proyectar en este
horario. Por ejemplo: A B C y presione ENTER para aceptar.
14.- Automáticamente el letrero se apagará y se activará en el horario configurado. Si
desea usar el letrero presione el botón ON/OFF y opere de manera normal.
Nota: Para borrar los horarios configurados simplemente presione la tecla FUNCT y
seleccione la opción CLEAR ALL Y? (¿Desea borrar todo?) y confirme con ENTER.
4.4 Borrar todo el contenido del letrero.
1.- Para borrar todos los datos (excepto hora/fecha) del letrero, presione la tecla
FUNCT del control remoto.
2.- Use la tecla para seleccionar la opción CLEAR ALL Y?
3.- Presione ENTER para aceptar o ESC para cancelar.
12
4. MODO DE USO
4.5 Ajustar dirección ID
Esta opción le permite ajustar una dirección ID para un mejor reconocimiento en caso
de que cuente con más de un letrero conectado en la misma red.
1.- Presione el botón FUNCT.
2.- Use la tecla para seleccionar la opción ADD00.
3.- Use las teclas
para activar el selector de carácter.
4.- Con ayuda de las teclas
seleccione el ID deseado.
5.- Presione ENTER para aceptar o ESC para cancelar.
4.6 Seleccionar brillo del letrero
1.- Presione el botón FUNCT.
2.- Use la tecla para seleccionar la opción BR (brillo).
3.- Use las teclas
para activar el selector de carácter.
4.- Con ayuda de las teclas
seleccione la letra del brillo deseado. Las opciones son:
A (mayor brillo), B, C, D (menor brillo).
5.- Presione ENTER para aceptar o ESC para cancelar.
4.7 Ajustar fecha/hora del letrero
1.- Presione el botón FUNCT.
2.- Use la tecla para seleccionar la opción que desea ajustar: YR (año), MTH (mes),
DAY (día), HR (hora) o MIN (minuto).
3.- Use las teclas
para activar el selector de carácter.
4.- Con ayuda de las teclas
modifique el número deseado.
5.- Presione ENTER para aceptar o ESC para cancelar.
13
5. CONEXIÓN
5.1 Conexión a una PC
1.- Conecte el extremo del cable (tipo teléfono) al letrero.
2.- En la parte posterior de su computadora, identifique un puerto COM. Si tiene
problemas para ubicar un puerto de estos, por favor consulte el manual de usuario de
la computadora o póngase en contacto con el fabricante.
3.- Conecte el extremo del conector de 9 pines al puerto COM que va a utilizar. Si el
conector de 9 pines no está conectado al puerto COM correcto, la comunicación con
el letrero no funcionará.
Entrada COM 9
pines
Si su computadora no cuenta con el puerto COM (9 pines) puede usar un Adaptador
USB a serial para conectar el letrero.
14
6. SOFTWARE
6.1 Requerimientos del Sistema
• Sistema operativo: Win98/Win ME/Windows NT/Windows XP 2000/Win XP/Win7
• CPU: Intel Pentium 166 ó superior.
• RAM: 32M ó superior.
• Monitor: Salida en Serie VGA o superior.
• Puerto RS232
6.2 Instrucciones de instalación del software
Las instrucciones de instalación y operación son para una computadora con
Windows 7. Pueden variar con diferentes versiones del sistema operativo.
Inserte el disco de instlación en la unidad
CD-ROM. El programa de instalación se ejecutará
automáticamente y la primera pantalla aparecerá.
Haga clic en INSTALL para iniciar la instalación.
Escoja EXIT para salir de la instalación.
Dé clic en INSTALL para continuar la instalación y
seleccione Siguiente (next) para continuar, haga
clic en Examinar para seleccionar el directorio en
el que va a instalar el programa.
El directorio predeterminado es C:\Archivos de
programa\Newsign.
15
6. SOFTWARE
Haga clic en Siguiente para continuar la instalación.
Elija Siguiente para copiar el archivo en el disco duro
de la PC. Elija Cancelar para salir del programa de
instalación o volver a cambiar la configuración del
directorio.
Una vez que la copia del archivo se haya completado,
haga clic en Finalizar. Esto terminará la instalación y
el icono de acceso directo estará en el escritorio.
Si quiere desinstalar el sistema, haga doble clic en
el unwise.exe en la carpeta \NewSign. Seleccione
Automático y haga clic en Siguiente. El programa se
desinstalará automáticamente.
16
6. SOFTWARE
5. SOFTWARE
6.3 Pantalla del software
Barra de menú
Recuento de
caracteres
Muestra el número
de caracteres
tecleados por el
usuario.
Ventana de mensajes
Área donde se puede escribir
y ver el mensaje que se
transmitirá al letrero.
Barra de herramientas
Botones que sirven
como atajos para
ejecutar comandos.
Barra de herramientas
Abre una nueva ventana de mensaje.
Abre un archivo existente.
Guarda el mensaje actual en la ventana de mensajes.
Corta la selección resaltada y la pone en el portapapeles.
Copia la selección resaltada y la pone en el portapapeles.
Pega el contenido del portapapeles.
Envía el mensaje en la ventana de mensajes al letrero.
Envía el mensaje a través de la red (LAN).
17
6. SOFTWARE
Barra de menús
• File:
New: abre una ventana nueva.
Open: abre un archivo existente.
Save: guarda el archivo abierto actualmente.
Set Com: le permite configurar el puerto de comunicación.
Exit: salir del programa.
• Edit:
Cut: corta la selección resaltada y la coloca en el portapapeles.
Copy: copia la selección resaltada y la coloca en el portapapeles.
Paste: pega el contenido del portapapeles en el documento activo.
Delete: utilice este comando para eliminar el contenido seleccionado de la ventana de
mensajes.
6.4 Comandos
- Leading: efectos de entrada de texto.
- Speed: controla la velocidad de movimiento de
la entrada y salida del texto.
- Display effect: indica el efecto a mostrar
mientras se despliega un texto
- Display time: tiempo que el mensaje aparecerá
en el letrero.
- Closing: efectos de salida de texto
- Special: permite introducir hora, fecha o un
sonido.
18
6. SOFTWARE
6.5 Dibujo de fuente
Seleccione el código de caracteres (Char code) que va a
cambiar, a continuación, seleccione el tamaño de fuente
(Font size).
Haga clic para agregar el elemento al cuadro de lista.
A continuación, seleccione esta opción
para dibujar la fuente. Repita el proceso
para el mismo caracter con distinto tamaño,
ejemplo: U40-4x7, 5x7 U40, U40 6x7.
Haga clic en Transfer | Transfer to Sign
para actualizar la fuente del usuario en el
letrero.
Haga clic en File|Save Font en esta
ventana para guardar un archivo.
6.6 Usar fuente predeterminada
Utilice para usar la fuente predeterminada, con los caracteres europeos que se
mostraron anteriormente, en el letrero y el programa.
6.7 Font
Seleccione uno de los estilos de fuente, los símbolos europeos o griegos para ser
utilizados en su mensaje.
19
6. SOFTWARE
6.8 Colors (colores)
Seleccione un color para el texto.
6.9 BMP graphics (gráficos BMP)
Edit Graphic...: edite y guarde gráficos, insértelos en la ventana del mensaje. Consulte
la sección de edición gráfica.
6.10 Functions (funciones)
• Send Message: envía el texto actual en la ventana de mensajes al letrero LED. Antes
de la transferencia, deberá seleccionar el número ID del letrero (este ID es configurado
con la función “Set ID…”). Al mismo tiempo, podrá escoger la página a la que lo
transmitirá. Hay 26 páginas en total.
• Run Page: use para ejecutar una página en el letrero LED.
• Link pages To Run: enlace algunas páginas con el fin de ejecutar más de una página.
Por ejemplo, escriba ‘abc’, el letrero mostrará la página A, página B y la página C de
forma consecutiva.
• Set ID: seleccione la ID del letrero LED.
Nota: ID00 representa un nombre global. Si tiene más de un letrero, es posible que
desee conectar a todas las señales en una red, por ejemplo, de ID01 a ID05 podrá
enviar mensajes a cualquier letrero de la red con identificación individual. Para
transmitir a todos los letreros, utilice ID00.
• Set Clock: establezca la fecha y hora del letrero del reloj del sistema.
20
6. SOFTWARE
• Set Brightness: ajuste el brillo de pantalla Set, hay 4 niveles de brillo.
• Mostrar por Horario: programe un mensaje para que se muestre. Usted puede hacer
que algunas páginas se muestren en otro momento. Puede configurar hasta 5 páginas.
• Delete page: elimine páginas en los mensajes que se están mostrando.
• Delete Schedule: elimine elementos en la tabla de programación.
• Delete All: borra todos los mensajes del letrero LED (excepto el reloj del sistema).
6.11 Configuración del software
1. Ir a File y Set Communication.
2. Haga clic en Aceptar cuando la configuración esté
completa.
21
6. SOFTWARE
6.12 Enviar un mensaje
El icono de envío de mensajes se utiliza para transmitir
el mensaje al letrero.
1. En la ventana de mensaje, escriba un mensaje de
prueba.
2. Haga clic en el icono
en la barra de herramientas
para que aparezca en el letrero.
Tiene las páginas A a la Z
disponibles.
Cada página se puede
utilizar para almacenar un
mensaje diferente.
3. Haga clic en OK para enviar el mensaje al letrero. Si el
letrero no recibe el mensaje, inténtelo enviar de nuevo.
6.13 Editor de gráficos BMP
Utilice el Editor de gráficos para editar o crear gráficos. Para abrir la ventana de Edición
Gráfica, haga clic en “Bmp graphics” en la barra de menú y, a continuación, haga clic
en “Edit Graphic”.
Ajustes
de
propiedades
Área de
edición
Herramientas de
edición
Selector de zoom
Selector de color
22
6. SOFTWARE
Ventana “Select Graph”.
Haga clic en cualquiera de los gráficos de la lista “Select Graph” para verlo
en la ventana de edición.
Botones de edición gráfica
Las funciones de los botones se describen a continuación.
SAVE: Guarda la imagen actual que se muestra en el “Gráfico”.
DELETE: Elimina un gráfico.
INSERT: Inserta el gráfico actual en su mensaje.
Herramientas de edición
Herramienta de pluma: haga clic en esta herramienta y mueva el ratón al área
de edición. Mantenga presionado el botón izquierdo del ratón y muévalo para
dibujar a mano alzada.
Herramienta de pincel: haga clic en esta herramienta y mueva el ratón al área
de edición. Mantenga presionado el botón izquierdo del ratón y muévalo para
obtener la función de pincel.
Herramienta de línea: seleccione esta herramienta. Mueva el cursor para
seleccionar el punto de partida de la línea. A continuación, mantenga pulsado
el botón izquierdo del ratón, muévase hasta el punto final de la línea y suelte el
botón del ratón.
23
6. SOFTWARE
Herramienta rectángulo de contorno: Haga clic en esta herramienta. Para
seleccionar el punto de partida mueva el cursor y mantenga pulsado el botón
izquierdo del ratón. Muévase al final y libere el botón.
Herramienta rectángulo: misma operación que la herramienta rectángulo de
contorno.
Herramienta elipse de contorno: misma operación que la herramienta rectángulo
de contorno.
Herramienta elipse: misma operación que la herramienta rectángulo.
Herramienta puntero: Haga clic en esta herramienta. Seleccione el área de
edición manteniendo pulsado el botón izquierdo del ratón. A continuación,
seleccione el área soltándolo. Puede mover el área manteniendo pulsado el
botón izquierdo del ratón hasta la posición que desee. Use el botón derecho del
ratón para fijar la posición.
Herramienta polígono: operación igual a la herramienta puntero.
Herramienta borrar: haga clic en esta herramienta. Sólo tiene que pulsar y
mantener pulsado el botón izquierdo del ratón y moverlo para borrar el área
que desea.
24
6. SOFTWARE
Herramienta limpiar: Haga clic en esta herramienta, mueva el cursor y haga clic
con el ratón. Toda el área de edición se convertirá en ese color. Si se selecciona
el color negro, toda el área de edición será cubierta por este color.
Herramienta de texto: Haga clic en esta herramienta. Mueva el cursor hacia el
punto de partida en el que desea poner el texto. Haga clic izquierdo en el ratón
y se abrirá la ventana de introducción de texto.
Puede escribir o usar cortar y pegar. A continuación, seleccione el tamaño de
la fuente. Haga clic en el botón Aceptar para finalizar la entrada de texto. A
continuación, mueva el objeto a la posición que desee y haga clic con el ratón
para arreglarlo.
Después de hacer clic en el botón Aceptar en el cuadro de diálogo, mueva el
área rectangular al lugar correcto y haga clic con el ratón para fijar la posición.
Selector de
tipo y tamaño
de fuente
Selector de
fuente
Campo de
texto
Campo de
visualización
25
6. SOFTWARE
Botón de función limpiar: haga clic en este botón para borrar toda la zona de
edición.
Botón de función BMP: haga clic en este botón, que puede exportar el contenido
de la edición a un archivo BMP o importar un BMP editado por otro programa.
Función zoom: El zoom se puede seleccionar de 1 a 8. 1 es el más pequeño. Puede
acercar o alejar el zoom para cambiar el área de trabajo.
Función de selección de color: De manera muy sencilla, sólo haga clic en el botón de
color deseado para seleccionarlo. Si edita un gráfico con 3 colores, usted tiene cuatro
cajas de colores para seleccionar. Si edita un gráfico de un solo color, entonces usted
puede seleccionar el cuadro de color rojo o negro.
26
7. COMUNICACIÓN LAN
7.1 Cómo funciona
El letrero se conecta por el puerto de comunicación serial de un ordenador en el
entorno LAN al que nos referiremos como Equipo Recepción (ER). El equipo que
transmite los mensajes al letrero que se conoce como el Equipo de Transmisión (ET).
Instale el software del ER en el ET. El siguiente paso es configurar un controlador de
impresora Generic / Text only en el ER y compartirlo con el ET.
Una vez que la instalación esté hecha y se haya escrito un mensaje, haga clic en el
botón de “Enviar a través de la red”, aparecerá la ventana de diálogo “Imprimir”.
A continuación, seleccione la
impresora Generic/Text only, haga
clic en “OK” y su mensaje será
enviado.
7.2 Instalación del controlador de la impresora en el ER
1. Comience haciendo clic en “Inicio”, “Panel de Control”, y “ Dispositivos e impresoras”.
Se abrirá la ventana de dispositivos e impresoras.
2. Haga clic en “Agregar una impresora”. Aparecerá el asistente para agregar una
impresora.
3. Seleccione “Agregar impresora local”.
27
7. COMUNICACIÓN LAN
4. Seleccione el puerto en el que está
conectado el letrero al ER.
En este caso será COM1 dentro de
la sección “Usar puerto existente”.
Presione “Siguiente”.
5. En “Fabricante”, busque “Generic” y seleccione “Generic/Text only”.
Haga clic en “Siguiente”.
7.3 Configuración del controlador de la impresora en el ET
1. Entre al entorno de red y seleccione la computadora a la que está conectado el
letrero.
2. Se debe mostrar la impresora “Generic/Text only”
.
3. Haga doble clic sobre ella y espere a que el controlador se instale.
7.4 Enviar un mensaje a través de la LAN
1. Inicie el programa y escriba su mensaje.
2. Haga clic en
para enviarlo a través de la red. Ingrese el “Sign ID Number”
(número de identificación del letrero) y “Page Number” (número de página), y haga
clic en “Aceptar”.
28
3. Seleccione la impresora “Generic/Text only” en el cuadro “Nombre de impresora” y
haga clic en “Aceptar”.
7. COMUNICACIÓN LAN
7.5 Comunicación por e-mail
El letrero se conecta al puerto de comunicación serial de la computadora en la
ubicación remota llamada Equipo de Recepción (ER). El equipo que va a transmitir el
mensaje se conoce como Equipo de Transmisión (ET). Tanto el ER como el ET deben
tener el software del letrero instalado. El usuario del ET debe crear un mensaje utilizando
el software proporcionado y guardarlo.
Una vez que el mensaje esté guardado, el usuario puede iniciar el programa utilizado
para enviar correo electrónico (como Microsoft Exchange, Outlook, Eudora Pro, Netscape,
etc), adjuntar el archivo de mensaje a un correo electrónico y enviarlo.
El destinatario en el ER recibirá una
notificación cuando reciba el correo.
Puede abrir en archivo adjunto y
enviar el mensaje al letrero.
Comience por instalar el programa
de software en el ER y ET.
7.6 Configurar el letrero y el software en el ET.
Instrucciones para el ET
1. Inicie el software en el ET y escriba un mensaje, guárdelo y salga del programa.
2. Iniciar el programa de e-mail y seleccione escribir un nuevo mensaje.
3. Escriba la dirección.
4. Ahora haga clic en el icono que le permitirá adjuntar un archivo. Seleccione el archivo
que desea que aparezca en el letrero.
5. Ahora envíe el mensaje de correo electrónico.
29
Instrucciones para el ER
1. El destinatario en el ER recibirá una notificación automáticamente cuando se reciba
el correo.
2. Descargue el archivo adjunto y ábralo con el software del letrero.
3. Simplemente deberá hacer clic en el icono de la barra de herramientas para enviar
el mensaje al letrero.
8. REFERENCIA RÁPIDA
Tabla código de colores
Para seleccionar un color, presione una vez COLOR.
30
LETRA
PRIMER PLANO DE FUENTE
COLOR DE FONDO
A
rojo
negro
B
verde
negro
C
amarillo
negro
D
negro
rojo
E
negro
verde
F
negro
amarillo
G
rojo
verde
H
verde
rojo
I
R/Y/G
negro
j
random
negro
Tabla de tamaño de fuente
Pulse FONT para alternar entre las fuentes que figuran a continuación.
LETRA
TAMAÑO DE LA FUENTE
A
normal
B
bold
C
italic
D
narrow
E
high
F
big
9. ESPECIFICACIONES
Alimentación: 12V- - - 2,5A
Convertidor
Alimentación: Salida:
100-240 V ~ 50/60Hz 800mA
12V- - - 2,5A
Consumo: 555 Wh/día
Consumo en espera: 1,1 Wh/día
El diseño del producto y las especificaciones pueden cambiar sin previo aviso.
31
Producto: Letrero publicitario rotatorio de LEDs de tres colores
Modelo: DIS-100
Marca: Steren
PÓLIZA DE GARANTÍA
Esta póliza garantiza el producto por el término de un año en todas sus partes y mano de obra, contra
cualquier defecto de fabricación y funcionamiento, a partir de la fecha de entrega.
CONDICIONES
1.- Para hacer efectiva la garantía, presente ésta póliza y el producto, en donde fue adquirido o en
Electrónica Steren S.A. de C.V.
2.- Electrónica Steren S.A de C.V. se compromete a reparar el producto en caso de estar defectuoso sin
ningún cargo al consumidor. Los gastos de transportación serán cubiertos por el proveedor.
3.- El tiempo de reparación en ningún caso será mayor a 30 días, contados a partir de la recepción del
producto en cualquiera de los sitios donde pueda hacerse efectiva la garantía.
4.- El lugar donde puede adquirir partes, componentes, consumibles y accesorios, así como hacer válida esta
garantía es en cualquiera de las direcciones mencionadas posteriormente.
ESTA PÓLIZA NO SE HARÁ EFECTIVA EN LOS SIGUIENTES CASOS:
1.- Cuando el producto ha sido utilizado en condiciones distintas a las normales.
2.- Cuando el producto no ha sido operado de acuerdo con el instructivo de uso.
3.- Cuando el producto ha sido alterado o reparado por personal no autorizado por Electrónica Steren S.A. de
C.V.
El consumidor podrá solicitar que se haga efectiva la garantía ante la propia casa comercial donde adquirió
el producto. Si la presente garantía se extraviara, el consumidor puede recurrir a su proveedor para que le
expida otra póliza de garantía, previa presentación de la nota de compra o factura respectiva.
DATOS DEL DISTRIBUIDOR
Nombre del Distribuidor
Número de serie
Fecha de entrega
En caso de que su producto presente alguna falla, acuda al centro de
distribución más cercano a su domicilio y en caso de tener alguna
duda o pregunta por favor llame a nuestro Centro de Atención a
Clientes, en donde con gusto le atenderemos en todo lo relacionado
con su producto Steren.
32
Centro de Atención a Clientes
01 800 500 9000
ELECTRONICA STEREN S.A. DE C.V.
Camarones 112, Obrero Popular, 02840, México, D.F.
RFC: EST850628-K51
STEREN PRODUCTO EMPACADO S.A. DE C.V.
Biólogo MaximIno Martínez No. 3408 Int. 3 y 4, San
Salvador Xochimanca, México, D.F. 02870,
RFC: SPE941215H43
ELECTRONICA STEREN DEL CENTRO, S.A. DE C.V.
Rep. del Salvador 20 A y B, Centro, 06000, México.
D.F. RFC: ESC9610259N4
ELECTRONICA STEREN DE GUADALAJARA, S.A.
López Cotilla No. 51, Centro, 44100, Guadalajara, Jal.
RFC: ESG810511HT6
ELECTRONICA STEREN DE MONTERREY, S.A.
Colón 130 Pte., Centro, 64000, Monterrey, N.L. RFC:
ESM830202MF8
ELECTRONICA STEREN DE TIJUANA, S.A. de C.V.
Calle 2a, Juárez 7636, Centro, 22000, Tijuana, B.C.N.
RFC: EST980909NU5
33
Rotary 3-colour LED
display
DIS-100
Thank You
on purchasing your new Steren product.
This manual includes all the feature operations and troubleshooting necessary
to install and operate your new Steren´s Rotary 3-colour LED display.
Please review this manual thoroughly to ensure proper
installation and operation of this product. For support, shopping,
and everything new at Steren, visit our website:
www.steren.com
2
The instructions of this manual are for reference about the product.
There may be differences due to updates.
Please check our web site (www.steren.com) to obtain the latest version
of the instruction manual.
IMPORTANT
• Do not try to open the device, may cause damages and warranty will be void.
• Do not expose to extreme temperatures.
• Do not use or store the equipment near wet places. May cause malfunction or shock
hazard.
• Avoid dropping the unit as this may cause damage.
• Do not put heavy objects on the device or accessories.
• Do not expose the device or accessories to dust, smoke or steam.
3
INDEX
4
1. HIGHLIGHTS
5
2. CONTROLS
2.1 Remote control
2.2 LED Display
6
6
7
3. MAP OF MENUS
8
4. HOW TO USE
4.1 Using the remote control
4.2 Displaying pre-loading message
4.3 PROG function
4.4 Resetting system
4.5 Setting ID address
4.6 Setting brightness
4.7 Setting system clock
10
10
10
11
12
13
13
13
5. CONNECTION
5.1 Connecting the cable
14
14
6. SOFTWARE
6.1 PC system required
6.2 Software installation instructions
6.3 Software screen
6.4 Commands
6.5 User font make
6.6 Recall default font
6.7 Font
15
15
15
17
18
19
19
19
6.8 Colors 6.9 BMP graphics
6.10 Functions 6.11 Configure software
6.12 Sending a message
6.13 BMP graphic editor
20
20
20
21
22
22
7. LAN COMMUNICATION
7.1 How it works
7.2 RC printer driver set-up
7.3 TC Printer Driver Set-Up
7.4 Sending a message through the LAN
7.5 Internet e-mail communication
7.6 Configure the sign and
software on the RTC
27
27
27
28
28
29
8. QUICK REFERENCE SECTION
30
9. SPECIFICATIONS
31
29
1. HIGHLIGHTS
The rotary display is perfect to use at business, banks, hospitals, schools, among others,
and let you configure the messages, easily.
Their internal memory can save graphics and text with up to 6500 characters, and can be
programmed through the remote control or even a PC, configuring animation, motion, colour
and data information,
It includes all the required fittings for a perfect installation.
• 100% programmable.
• Three colours (Red, Green, Yellow).
• Letters and animations allowed.
• Easy and quick programming.
LED Display
Power adapter
Software
RS232
Cable
Brackets and screws
5
2. CONTROLS
2.1 Remote control
Command keys
• ON/OFF.
• TIME/DATE: Displays time / date.
• Q-PROG: Allows to type quick messages on
the page A.
• ESC: Use to exit.
• SHIFT: Selects the keyboard (uppercase,
lowercase, numbers and symbols).
• EUROP-CHAR: Selects the european keyboard.
• PROG: Open the programming menu.
• FUNCT: Access to the settings menu.
• COLOR.
• FONT.
• RUN-PAGE: Press this button and select the
letter of the page (A-Z) that you want to display.
• ENTER.
• ← → ↑ ↓: Useful to navigate.
• SPACE.
• DEL.
Character keys
Use this section to type characters.
6
2. CONTROLS
2.2 LED Display
1.- Power input.
2.- Input for cable RS232.
3 .- Holes screws for brackets.
7
3. MAP OF MENUS
ON/OFF
TIME/DATE
ESC
Q PROG
Select
page edit
PROG
Input message
ENTER
Select
schedule
display
Set
8
Input message
A...Z
SHIFT: a...z, 0...9, !...?
EUROP-CHAR: Ǻ...Ǎ
FONT: 4x7, 5x7, 6x7
ENTER
Select
display time
Select
schedule
A ...E
close year - ENTER
month - ENTER
minute - ENTER
PAGE A-Z
Select
leading and
display effect
ENTER
Set
ENTER
Input display
pages
A-Z
ENTER
ENTER
ENTER
Select
closing
effect
Select moving
speed
start year - ENTER
month - ENTER
minute - ENTER
ENTER
ENTER
3. MAP OF MENUS
FUNCT
Clear all
ENTER
Select ID Adress 00...FF
ENTER
Set
Brightness
Select brightness A...D
ENTER
Set year
Select 00...99
ENTER
Set month
Select 01...12
ENTER
Set date
Select 01...31
ENTER
Set hour
Select 00...23
ENTER
Set minute
Select 00...59
ENTER
Set ID
RUN PAGE
Input page ABC...Z
ESC
ENTER
9
4. HOW TO USE
4.1 Using the remote control
ON/OFF
The sign will display on and off.
TIME/DATE
To display the time and date message only, press ESC to cancel time/date.
Q-PROG
This option allow to type a quick message.
1.- Press this key and type the desired text.
2.- Type the text using the character keys. Use the SHIFT key to
select a keyboard mode: uppercase (1), lowercase (2), numbers (3)
and symbols (4).
If you key-in a wrong character, press DEL to delete the last character.
3.- Use the keys COLOR and FONT to customize the text.
4.- Press ENTER to confirm.
This text will be saved in the page A.
4.2 Displaying pre-loading message
With this option you can display one or various pages (A...Z).
10
1.- Presss RUN-PAGE.
2 .- Enter the letter or letters of the pages you want to display.
3.- Confirme la selección con ENTER.
4. HOW TO USE
4.3 PROG function
• PAG (add a message)
After you complete message editing you can select the leading and closing effect.
1.- Select PROG.
2.- Press to select page editing function.
3.- Press to activate the selector character (A-Z).
4.- Use
to select the desired page.
5.- To edit the selected page press ENTER.
6.- Type your message and use the keys COLOR and FONT to customize the text.
Press ENTER to confirm.
7.- Use
to select the effect input ( ). Press ENTER to confirm.
8.- With
choose a closing effect. ( ) del texto. Press ENTER to confirm.
EFFECTS:
• XOPEN - Image will be shown from center and extend to 4 side.
• CURTAIN UP - Image will be shown one line by one line from bottom to top.
• CURTAIN DOWN - Image will be shown one line by line from top to bottom.
• SCROLL LEFT - Image will be scrolled to the right side.
• SCROLL RIGHT - Image will be scrolled from right to left.
• VOPEN - Image will be shown from center to top and bottom one line bye one line.
• VCLOSE - Image will be shown from top and bottom to center one line bye one line.
• SCROLL UP - Image will be scroll from bottom to top.
• SCROLL DOWN - Image will be scrolled from bottom to top
• SNOW - Pixels will be dropped down from top and stack up to build the image.
• TWINKLE - A blank diagonal line will be scrolling on the image.
• BLOCK MOVE - Displays the text letter by letter.
• HOLD - Previous screen will be kept.
• RANDOM - Random pixel will be appeared to build the image.
• HELLO WORLD.
• WELCOME.
9.- Use
keys to select the display time. (00.5 - 25.0). Press ENTER to confirm.
10.- Use
select leading and closing effect moving speed: 1 (fast), 2 (normal) and 3
(slow). Press ENTER to confirm.
11
4. HOW TO USE
• SCH (Adding schedule display)
Use these keys
to select the number and
to modify it.
1.- Press PROG.
2.- Use to select SCH.
3.- Use to activate the selector character (A-E).
4.- Press
to set up the Schedule display time, max 5 schedule can be set up from
A to E.
5.- Press ENTER.
6.- Select starting year. Press ENTER to confirm.
7.- In SMO option select starting year. Press ENTER to confirm.
8.- In SDY option select starting day. Press ENTER to confirm.
9.- In SHR option select starting hour (24hrs). Press ENTER to confirm.
10.- In SMI option select starting minute. Press ENTER to confirm.
11.- Repeat step 6 to 10 to complete the closing timer set up.
12.- You will see , press characters key A, B, C …Z to input display page for the
schedule, press ENTER.
Note: If you want to cancel the schedule display, please refer “resetting system” section.
4.4 Resetting system.
1.- To delete all configurations (except time / date) press FUNCT key.
2.- Use to select the CLEAR ALL Y? option.
3.- Press ENTER to confirm or ESC to skip the set up proces.
12
4. HOW TO USE
4.5 Setting ID address
Address ID set up only for more than one display sign connect with one data cable. That
the data can be separated send to the display from PC with ID address.
1.- Press FUNT.
2.- Use to select the option titled ADD00.
3.- Use
to activate the selector character.
4.- With
select an ID.
5.- Press ENTER to confirm or ESC to skip the set up proces.
4.6 Setting brightness
1.- Press FUNT.
2.- Use to select the option titled BR.
3.- Use
to activate the selector character.
4.- With
select the letter of the desired brightness. The options are: A (high
brightness), B, C, D (less bright).
5.- Press ENTER to confirm or ESC to skip the set up proces.
4.7 Setting system clock
1.- Press FUNT.
2.- Use to select the option that you want to set: YR (year), MTH (month), DAY, HR
or MIN (minute).
3.- Use
to activate the selector character.
4.- Press
to select the correct number.
5.- Press ENTER to confirm or ESC to skip the set up proces.
13
5. CONNECTION
5.1 Connecting the cable
1. Connect the phone clip end of the phone type cable to the sign.
2. On the back of your computer, identify a COM PORT. If you have trouble locating a
COM PORT on your computer, please reference your computer user manual or contact
the manufacturer.
3. Connect the 9-Pin connector end to the COM PORT you will be using. If the 9-pin
connector is not connected to the correct COM PORT, the communication will not work.
Input COM (9-Pin)
If your PC doesn’t has COM port (9 PIN), you can use an USB-SERIAL ADAPTOR
to connect your display.
14
6. SOFTWARE
6.1 PC system required
• Operating System: Win98/Win me/Win NT/ Win 2000/Win XP/Win7
• CPU: Intel Pentium 166 or above.
• RAM: 32M or above.
• Monitor: VGA or higher Serial Output.
• RS232 port.
6.2 Software installation instructions
Insert the LED Display System disk
into your CD-ROM drive. That will
auto-run and the first screen comes
up.
Click INSTALL to go installation.
EXIT will quit the installation.
Click INSTALL to go ahead the installation and
choose Next to continue, Click BROWSE to select
the directory to install the program.
The system preset is C:\Program Files\Newsign.
15
6. SOFTWARE
Click NEXT to keep on installation.
Choose NEXT to run the file installation to copy the
file to your PC hard disk. Choose CANCEL to quit
installation program or BACK to change the directory
setting.
After copying the file is complete, click on Finish.
Finish the installation, and shortcut icon for quick start
will be on the desktop screen.
If you want to uninstall the system, just double-click
the unwise.exe at the \NewSign foldec.
Select Automatic and click NEXT. The program will
automatically uninstall.
16
6. SOFTWARE
5. SOFTWARE
6.3 Software screen
Menu Bar
Character Count
Displays the
number of
characters typed by
the user.
Message Window
Area where you can type and
see the message that will be
transmitted to the sign.
Tool Bar
Buttons that serve
as shortcuts to
execute commands.
Toolbar
Opens a new Message Window.
Opens an existing File.
Saves the current message in the Message Window.
Cut the highlighted selection and put it on the clipboard.
Copy the highlighted selection and put it on the clipboard.
Paste the contents of the clipboard.
Sends the message in the Message Window to the sign.
Sends the message through LAN.
17
6. SOFTWARE
The menu bar
• File:
New: opens a new window.
Open: opens an existing file.
Save: saves the file currently open.
Set Com: allows you to set the communication port.
Exit: exit the software.
• Edit:
Cut: Cut the highlighted selection and put it on the clipboard.
Copy: copies the highlighted selection and put it on the clipboard.
Paste: pastes the contents of the clipboard onto the active document.
Delete: use this command to remove selected content from the Message Window.
6.4 Commands
Leading: how the text will appear.
Speed: control the leading and closing moving
speed.
Display effect: how the text will display.
Display time: how long the message will display.
Closing: how the text will disappear
Special: insert TIME, DATE, or a “BEEP”.
18
6. SOFTWARE
6.5 User font make
Select the char code where you will change the character,
and then select font size.
Click to add the item in the list box.
Then select this item to draw the font.
Repeat the process for the same character
with different font size.
Example:U40-4x7,U40-5x7,U40-6x7.
Click Transfer|Transfer to Sign to update
the user font of the sign.
Click File|Save Font on this window to save
a file.
6.6 Recall default font
Use for recall the above default European characters font to the sign and software.
6.7 Font
Select any one of font styles, European or Greek symbols to be used in your message.
19
6. SOFTWARE
6.8 Colors
Select any one of listed colors to use for your text.
6.9 BMP graphics
Edit Graphic…: Edit and save your own graphic images, and then insert into the
message window. Refer to the graphic edit section.
6.10 Functions
• Send Message: Send the current text in the Message Window to the LED Display
Board. Before transferring, you should Select ID of Display board (ID which you may
set by “Set ID…” function). Simultaneously, set which page you transfer to. There are
26 pages in all.
• Run Page: Run a specified page on the LED Display Board.
• Link pages To Run: Link some pages in order to run more than one page. For example,
type in ‘abc’, the sign will display page A, page B, page C content consecutively.
• Set ID: Set ID of the Led Display Board.
Note: ID00 represents global call. If you have more than one sign, you might want to
connect all the signs in a network, e.g. from ID01 to ID05 you can send message to any
sign in the network by individual ID. To broadcast to all the signs, use ID 00.
20
• Set Clock: Set the Date and Time of the Display Board system clock.
6. SOFTWARE
• Set Brightness: Set Display brightness, there are 4 levels of brightness.
• Display by Schedule: Schedule a message to be displayed. You may make some
pages display from sometime to another time. Max can set up to 5 Schedule items one
time.
• Delete page: Delete some pages in the running messages.
• Delete Schedule: Delete some items in Schedule table.
• Delete All: Delete all messages in the LED Display Board (Except system clock).
6.11 Configure software
1. Go to File and Set Communication.
2. Click on OK when your settings are complete.
21
6. SOFTWARE
6.12 Sending a message
The Send Message icon is used to transmit the message
to the board.
1. In the Message Window, type a test message.
2. Click on the
icon on the Toolbar to bring up the
message to the board.
You have pages A-Z
available.
Each page can be used to
store a different message.
3. Click on OK to send your message to the sign. If
your sign did not receive your message, try sending the
message again.
6.13 BMP graphic editor
Use the Graphic Editor to edit or create graphics of your own. To open the Edit Graphic
window, click on bmp Graphics on the menu bar, and then click on Edit Graphic.
Edit area
selection
Editor tools box
Editor area
Display zoom
Select color to edit
22
6. SOFTWARE
Select Graph
Click on any one of the graphics from the Select Graph list to view the
graphic in the Graphic window.
Edit graphic buttons
Functions of buttons are described below.
SAVE the current graphic displayed in the “Graphic” window.
DELETE a graphic from the “Library”.
INSERT the current graphic in the “Graphic” window into your message.
Editor tools box
Pen tool: click this tool, and move the mouse to Editor Area. Press and hold
down the left button of your mouse, and move your mouse to free hand draw.
Brush tool: click this tool, and move the mouse to Editor Area. Press and hold
down the left button of your mouse and move your mouse to get brushing
function.
Line tool: click this tool. Move your cursor to select the starting point of the line.
Then hold down the left button of your mouse, moving your mouse to the end
point of the line. Then release mouse button.
23
6. SOFTWARE
Outline rectangle tool: click this tool. To select the starting point by moving your
cursor and hold down the left button of your mouse. Then move at the end and
release mouse button.
Rectangle tool: same operation step as outline rectangle tool.
Outline ellipse tool: same operation step as outline rectangle tool.
Ellipse tool: same operation step as outline rectangle tool.
Pointer tool: click this tool. Select the edit area by press and hold down the left
button of your mouse. Then the select area be round by release your mouse
button. Moving the round area by hold down the left button of your mouse until the position you want. Then release the mouse button. Right click to fix the
position.
Polygon pointer tool: same operation step as pointer tool.
Erase tool: click this tool. Just press and hold down the left button of your mouse
and move your mouse to erase the area you want.
24
6. SOFTWARE
Clear tool: click this tool and select the color. Then moving cursor to edit area
left click your mouse. That the whole edit area will turn to that color. If you select
black color, the whole edit area will be covered by black in color.
Text tool: click this tool. Move cursor to the starting point you want to put the text.
Left click your mouse and text input will bring up. That you can type in your words
or use windows cut and paste function to input text.
Then select the font size. Click OK Button to finish the text input. Then move the
object to the position you want and right click your mouse to fix it.
After clicking the Ok button in dialog box, move the rectangle area to proper
position and right click the mouse to fix the information position.
Fonts and
size indication
Fonts selection
Text input
area
Text preview
25
6. SOFTWARE
Clear function key: left click this button to clear the whole edit area.
Bmp file function key: left click this button to export the editing content to a BMP
file, or import BMP file edited by other program.
Display zoom in, zoom out function: the zoom size can be selected from 1 to 8. 1 is the
smallest. You can zoom in or zoom out to affect your edit job.
Color selection function: just easily to left click the color button to select the color you
want. If you edit a triple color frame, then you have four color boxes to select as.
If you edit a single color frame, then you can select either red or black color box.
26
7. LAN COMMUNICATION
7.1 How it works
The display is first connected to the Serial Communication Port of a computer in the
LAN environment which we refer to as the Receiving Computer (RC). The computer that
will actually be transmitting messages to the display is referred to as the Transmitting
Computer (TC). Install the TMC software on the RSC.
The next step is to set-up a generic/text only printer driver on the RC and share it with
the TC. Once the set-up is done and a message created, a simple click on the button for
“Send via Network” will bring up the “PRINT” dialog window.
You then select the Generic/Text
Only printer created and click on
“OK” and your message is on its
way.
7.2 RC printer driver set-up
1 Start by clicking on “Start”, “Control Panel”, and “devices and printers”. The devices
and Printers window will open.
2. Click “Add a printer”. Display the wizard for adding a printer.
3. Select “Add local printer”.
27
7. LAN COMMUNICATION
4. Select the port that is connected to
the CR Board.
In this case it will be COM1 in the
section “Using existing port”. Press
“Next”
5. “Manufacturer”, search for “Generic”
and select “Generic/Text only”. Click
“Next”.
7.3 TC Printer Driver Set-Up
1. Enter the network environment and select the computer that is connected to the
board.
2. The “Generic / Text only”
printer should show.
3. Double-click on it and wait for the driver is installed.
7.4 Sending a message through the LAN
1. Start the software. Create your message.
2. Click on
click “OK”.
for “Send via Network”. Input the “Sign ID Number” and “Page Number”,
3. Select the “Generic/Text only” printer from the printer name box and click on “OK”.
28
7. LAN COMMUNICATION
7.5 Internet e-mail communication
The display is first connected to the serial communication port of the computer at the
remote location which we refer to as the Receive Computer (RC). The computer that will
be transmitting the e-mail is referred to as the Transmitting Computer (TC). Both the TMC
and RTC may have the display control software installed.
The user at the TC will create a message using the provided software and save it. Once
the message is saved, the user can start the software program used to send e-mail
(such as Microsoft Exchange, outlook, Eudora Pro, Netscape Mail etc) and attach the
saved message file to the e-mail message and send it.
The recipient at the RC is then
notified that new mail has arrived.
The user can then open at attachment
and send the message to the sign.
Begin by installing the software
program on the TC and RC.
7.6 Configure the sign and software on the RTC.
TMC instructions
1. Start the software program on the TC and create a message, save it and exit the
program.
2. Start the software program used to send e-mail and select to send a new message.
3. Type in the “TO” address.
4. Now click on the icon that will allow you to attach a file. Select the file you want to be
displayed in the sign.
5. Now send the e-mail message.
29
RTC instructions
1. The recipient at the RC should automatically be notified when new mail has arrived.
2. Download the attached file and open it with the software.
3. Now just click on the icon on the toolbar to send the message to the sign.
8. QUICK REFERENCE SECTION
Color Code Table
To select a COLOR, press COLOR once.
30
LETTER
FOREGROUND COLOR
BACKGROUND COLOR
A
red
black
B
green
black
C
yellow
black
D
black
red
E
black
green
F
black
yellow
G
red
green
H
green
red
I
R/Y/G
black
j
random
black
Font size table
To select a FONT SIZE, press FONT to toggle between the fonts listed below.
LETTER
CHARACTER FONT SIZE
A
normal
B
bold
C
italic
D
narrow
E
high
F
big
9. SPECIFICATIONS
Input: 12V- - - 2.5A
Power converter
Input: Output: 100-240 V ~ 50/60Hz 800mA
12V- - - 2.5A
Consumption: 555 Wh/day
Stand-by power consumption: 1.1 Wh/day
Product design and specifications are subject to change, without notice.
31
Product: Rotary 3-colour LED display
Part number: DIS-100
Brand: Steren
WARRANTY
This Steren product is warranted under normal usage against defects in
workmanship and materials to the original purchaser for one year from the
date of purchase.
CONDITIONS
1.- This warranty card with all the required information, invoice, product
box or package, and product, must be presented when warranty service is
required.
2.- If the product stills on the warranty time, the company will repair it free
of charge.
3.- The repairing time will not exceed 30 natural days, from the day the
claim was received.
4.- Steren sell parts, components, consumables and accessories to
customer, as well as warranty service, at any of the addresses mentioned
later.
THIS WARRANTY IS VOID IN THE NEXT CASES:
If the product has been damaged by an accident, acts of God, mishandling,
leaky batteries, failure to follow enclosed instructions, improper repair by
unauthorized personnel, improper safe keeping, among others.
a) The consumer can also claim the warranty service in the purchase
establishment.
b) If you lose the warranty card, we can reissue it, if you show the invoice
or purchase ticket.
32
RETAILER INFORMATION
Name of the retailer
Address
Product
Brand
Part number
Serial number
Date of delivery
In case your product
fails or have questions,
please contact your
nearest dealer. If you are
in Mexico, please give a
call to our Call Center.
Call Center
01 800 500 9000
33