1
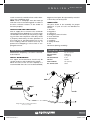
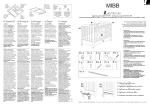
Lijadora Neumática Orbital
Orbital Jitterbug Air Sander
Manual de Usuario y Garantía.
User’s Manual and Warranty.
UP766
ATENCIÓN: Lea, entienda y siga las instrucciones de seguridad contenidas en este
manual, antes de operar esta herramienta.
WARNING: Read, understand and follow the safety rules in this manual, before operating this tool.
UP766 manual.indd 1
10/06/15 9:32
INTRODUCCIÓN
Esta herramienta neumática ha sido diseñada
para ser utilizada con lijas y abrasivos adecuados para lijar metales, maderas, piedras, plásticos y otros materiales. Sólo debe ser utilizada
para tales aplicaciones de lijado y dentro de sus
grados y capacidades marcados.
Se deben utilizar con esta herramienta sólo los
accesorios específicamente recomendados por
el distribuidor. Si se utilizara de cualquier otra
manera o con otros accesorios, podría crear
condiciones de funcionamiento inseguras. No
haga funcionar la herramienta en el agua o en
aplicaciones extremadamente húmedas.
La exposición al POLVO originado por la pieza
de trabajo y materiales abrasivos puede afectar
los pulmones o producir otra lesión física. Utilice el escape de aire local o extracción de polvo
adecuados según las indicaciones de seguridad. Use los elementos de protección aprobados y protéjase los ojos y la piel. El no respetar
esta advertencia puede ocasionar daños en los
pulmones y/o lesiones físicas.
ADVERTENCIAS DE SEGURIDAD
PARA HERRAMIENTAS NEUMÁTICAS
Para reducir los riesgos de todos los peligros
asociados con este producto:
• Lea, comprenda y siga toda la información
de seguridad contenida en estas instrucciones
antes de utilizar esta herramienta.
• Sólo el personal debidamente capacitado
puede realizar el servicio a esta herramienta.
• Siempre utilice protección ocular, auditiva y
respiratoria mientras opere este producto. Siga
las normas locales y nacionales para las gafas
de protección y otros requisitos sobre los equipos de protección personal.
Requisitos de las prácticas de seguridad.
Trabaje alerta. Use la indumentaria adecuada.
Nunca opere herramientas bajo los efectos del
alcohol o drogas de una manera inconsistente
con su uso específico.
Para reducir los peligros asociados con la ruptura o desintegración de los accesorios:
• Nunca exceda la presión de entrada máxima
marcada a 90 PSI.
• Sea cuidadoso al sujetar la máquina; siga las
instrucciones para asegurarse de que la lija
quede bien sujeta a la herramienta antes de
utilizarla.
Para reducir los riesgos asociados con los ruidos fuertes:
• Inmediatamente detenga el uso del producto si el silenciador para la reducción del ruido
se hubiera dañado o si no funcionara correctamente. Haga reparar el producto antes de
ponerlo en uso nuevamente.
Para reducir los riesgos asociados con las emisiones de vibraciones durante el uso:
• Si llegara a experimentar cualquier incomodidad física en manos/muñecas, deje de trabajar
rápidamente y busque atención médica. Las lesiones en las manos, muñecas y brazos pueden
ser causadas por movimientos y trabajos repetitivos y por la sobreexposición a la vibración.
Para reducir los riesgos asociados con los choques eléctricos:
• No permita que esta herramienta haga contacto con fuentes de suministro eléctrico ya
que la herramienta no está aislada contra las
descargas eléctricas.
• No haga funcionar la herramienta en o cerca de materiales explosivos, tales como líquidos inflamables, gases o polvo excesivo en el
aire. La herramienta/los abrasivos pueden crear
chispas al trabajar con ciertos materiales, pudiendo causar la ignición de los polvos o gases
volátiles.
PRECAUCIÓN
Para reducir los riesgos asociados con la presión neumática y otros peligros mecánicos:
• Mantenga las manos, cabello y ropa lejos del
extremo en funcionamiento de la herramienta.
• Nunca opere esta herramienta sin todas las
protecciones o características de seguridad con
respecto al orden y al perfecto estado de funcionamiento.
• Tenga presente que las mangueras y los accesorios indebidamente instalados pueden aflojarse inesperadamente y en cualquier momento, creando así un peligro de impacto/latigazo.
• Si nota cualquier ruido o vibración anormal
al operar este producto, detenga su uso inme-
2
UP766 manual.indd 2
10/06/15 9:32
E S P A Ñ O L • Ma n u a l
diatamente e inspeccione la lija para ver si se
encuentra gastada o dañada. Reemplace las
partes dañadas. Si aun percibiera ruidos o vibraciones anormales, devuelva el producto al
fabricante para que lo repare o realice un servicio. Lea las instrucciones de la garantía.
INSTRUCCIONES DE OPERACIÓN
PREVIO AL FUNCIONAMIENTO
La herramienta ha sido diseñada para funcionar manualmente. Siempre se recomienda que,
mientras se esté utilizando la herramienta, los
operadores permanezcan de pie sobre un piso
sólido, en una posición segura con un agarre y
una base firmes. Tenga en cuenta que la lijadora puede ocasionar una reacción de torque.
Vea la sección de “ADVERTENCIAS DE SEGURIDAD”.
Utilice un suministro de aire limpio y lubricado que provea a la herramienta una presión
medida de aproximadamente 90 PSI cuando la
herramienta se encuentre funcionando con la
palanca totalmente presionada. Se recomienda utilizar una línea de aire aprobada de 10
mm (3/8 pulgadas) x 8 m (25 pies) de longitud
máxima. No conecte la herramienta al sistema
de aire sin una válvula que cierre fácilmente el
aire. Se recomienda utilizar un filtro, regulador
y lubricador de aire, ya que este mismo brindará aire limpio y lubricado en la presión correcta
a la herramienta. Cuando la presión de suministro exceda el máximo marcado de la herramienta en cualquiera de los casos, se utilizarán
en todo momento reguladores de presión de
aire adecuados mientras la herramienta esté
en funcionamiento.
Se pueden obtener detalles de tal equipo a
partir de su distribuidor de herramientas. Si no
se utilizara tal equipo, la herramienta deberá
ser lubricada manualmente. Para lubricar manualmente la herramienta, desconecte la línea
de aire y coloque de 2 a 3 gotas del aceite lubricante adecuado para motores neumáticos
dentro del extremo de la manguera (entrada
de aire) de la herramienta. Reconecte la herramienta al suministro de aire y haga funcionar
la herramienta muy lentamente durante algunos segundos para permitir que el aire haga
circular el aceite. Si se utilizara la herramienta
con frecuencia, lubríquela diariamente o lubrí-
d e U su a ri o
quela si la herramienta comenzara a disminuir
su intensidad o a perder fuerza.
Se recomienda que la presión del aire en la
herramienta sea de 90 PSI mientras que la herramienta esté funcionando para que no se exceda el máximo de revoluciones por minuto. Se
puede hacer funcionar la herramienta a menor
presión pero nunca a más de 90 PSI. Si funcionara con una presión más baja, el rendimiento
de la herramienta disminuiría
PRECAUCIONES ADICIONALES DE SEGURIDAD
1. Lea todas las instrucciones antes de utilizar
la herramienta. Todos los operadores deben
estar ampliamente capacitados para usarla y
ser conscientes de estas medidas de seguridad.
2. Asegúrese de que la herramienta esté desconectada al suministro de aire. Elija un abrasivo
apropiado y asegúrelo a la base de la lija con
las pinzas de sujeción.
3. Siempre use el equipo de seguridad requerido al utilizar esta herramienta.
4. Cuando esté lijando siempre encienda la
herramienta sobre la pieza de trabajo. Esto
evitará que se produzcan abolladuras debido
al exceso de velocidad del abrasivo. Detenga
el flujo de aire hacia la herramienta a medida
que se retira de la pieza de trabajo.
5. Siempre retire el suministro de aire de la lijadora antes de colocar, ajustar o retirar una lija.
6. Siempre permanezca de pie con un agarre y
una base firmes y preste atención a la reacción
de torque que desarrolla la lijadora.
7. Siempre asegúrese de que el material que
está lijando esté sujetado con firmeza para evitar que se mueva.
8. Revise la manguera y los accesorios regularmente para detectar si hay desgaste. No mueva
la herramienta sosteniéndola de la manguera;
siempre tenga cuidado de evitar que la herramienta se encienda cuando la traslada con el
suministro de aire conectado.
9. No exceda el máximo de presión de aire recomendado. Utilice un equipo de seguridad
según se recomienda.
10. Antes de instalar cualquier accesorio abrasivo, siempre verifique la velocidad máxima
requerida impresa en el accesorio sea igual o
mayor a la indicada en el producto.
3
UP766 manual.indd 3
10/06/15 9:32
11. La herramienta no está aislada eléctricamente. No la utilice donde haya posibilidades
de contacto con corriente eléctrica, cañerías de
gas y/o cañerías de agua.
12. Mantenga las manos alejadas de la operación mientras este se encuentre en funcionamiento.
13. Si la herramienta pareciera estar funcionando mal, deje de usarla de inmediato y llévela a reparar.
14. No permita que la lijadora esté en operación sin tomar precauciones previas de seguridad para cualquier persona u objetos que
estén expuestos a los residuos que se puedan
desprender.
15. Suelte de inmediato la palanca de encendido en caso de que se produzca una alteración
de la presión; no intente volver a encenderla
hasta que se haya corregido la alteración.
mangueras de un latigazo en caso de que falle
o de que se desconecte.
INSTALANDO LA LIJA
· Voltee la lijadora.
· Posicione la lija alineandola con la base de la
lijadora, doble las partes de la lija que utilizará
para sujetarla a la lijadora un aproximado de
90˚, y vuelva a hacer otro dobléz envolviendo
la base.
· Coloque una de las partes dobladas insertando en una de las pinzas de sujeción de la base,
a continuación realice lo mismo del otro lado.
PRECAUCIÓN: El papel lija debe encontrarse bien instalado en la base de la lijadora. Una
lija mal colocada, causará un lijado irregular o
daño en la misma lija.
NOTA: La abertura de los agujeros de extracción de polvo en la hoja de lija y los agujeros
de superficie de lijado deben mantenerse alineados.
LUBRICACIÓN
Las partes que se muestran en el ensamble de
un buen funcionamiento de su herramienta
neumática (pag.7) se identifican de la siguiente manera:
1. Filtro de aire.
2. Regulador.
3. Lubricador.
4. Válvula de paso.
5. Diámetro de la manguera.
6. Tamaño de entrada de aire.
7. Válvula de corredera.
8. Cople de seguridad.
9. Aceite.
10. Grasa (Durante el montaje).
CONEXIÓN AL SUMINISTRO DE AIRE
Diseñe la línea de suministro de aire para asegurar la máxima presión de funcionamiento en
la entrada de aire de la herramienta. Vacíe el
condensado de las válvulas en los puntos inferiores de la tubería, filtro de aire y depósito del
compresor de forma diaria.
Instale un cople de seguridad (válvula de corredera) y utilice un dispositivo de retención de
manguera y coples en cualquier unión de manguera sin apagador interno para evitar que la
MANTENIMIENTO
La frecuencia de mantenimiento debe de ser
de acuerdo a como se muestra en la ilustración
de la pagina 7.
PIEZAS Y MANTENIMIENTO
La reparación y mantenimiento de esta herramienta sólo puede ser llevado a cabo por un
Centro de servicio autorizado y su personal
calificado.
Una vez que la vida útil de herramienta se termine, se recomienda desarmar la herramienta,
desengrasarla y separar las piezas de acuerdo
con el material del que están fabricadas para
su reciclado.
ESPECIFICACIONES TÉCNICAS
CAPACIDAD DE LIJA
9,3 cm x 16,5 cm
VELOCIDAD AL VACÍO
8 000 r/min
PESO
1,8 kg (4 lb)
CONSUMO DE AIRE
4 cfm
ENTRADA DE AIRE
1/4 NPT
DIÁMETRO DE MANGUERA
3/8" (10 mm)
PRESIÓN RECOMENDADA
90 PSI
4
UP766 manual.indd 4
10/06/15 9:32
E N G L I S H • U se r' s
INTRODUCTION
This pneumatic tool is designed to be used
with an appropriate abrasive for sanding metals, wood, stone, plastics and other materials. It
should only be used for such sanding applications and within its marked capacity and ratings. Only accessories specifically recommended by manufacturer should be used with this
tool. Use in any other manner or with other
accessories could lead to unsafe operating conditions. Do not operate tool in water or in an
excessively wet application.
Exposure to DUST generated from workpiece
and/or abrasive materials can result in lung
damage and/or other physical injury. Use
dust capture or local exhaust as stated in the
safety information sheet. Wear governmentapproved respiratory protection and eye and
skin protection. Failure to follow this warning
can result in serious lung damage and/or physical injury.
SAFETY RULES FOR PNEUMATIC
TOOLS
To reduce the risk of all hazards associated
with this product:
• Read, understand and follow the safety information contained in these instructions prior to
the use of this tool.
• Only personnel who are properly trained
should be allowed to service this tool.
• Always wear protection for eyes, ears and
respiratory protection while operating this
product. Follow local / national standards for
eyewear and other personal protective equipment requirements.
• Practice safety requirements. Work alert,
wear proper attire; never operate tools under
the infl uence of alcohol or drugs or in a manner inconsistent with its intended use.
To reduce the risks associated with accessory
rupture or disintegration:
• Never exceed marked maximum input pressure of 90 PSI.
• Use care in attaching sandpapers; follow the
instructions to ensure that it is securely attached to the tool before use.
• Never point this product in the direction of
yourself or another person.
ma n u a l
To reduce the risk associated with loud noise:
• Immediately discontinue use of product if its
noise reduction muffler system has been damaged or is otherwise not functioning properly.
Have product repaired before placing back
into use.
To reduce the risk associated with vibration
emissions during use of product:
• If any physical hand/wrist discomfort is experienced, stop work promptly and seek medical attention. Hand, wrist and arm injury may
result from repetitive work, motion and over
exposure to vibration.
To reduce the risk associated with electrical
shock and/or explosion:
• Do not allow this tool to contact electrical power sources as the tool is not insulated
against electrical shock.
• Do not operate the tool in or near explosive
materials, such as flammable liquids, gases or
excessive airborne dust. The tool/abrasives can
create sparks when working material, resulting
in the ignition of the flammable dust or fumes.
CAUTION
To reduce the risk associated with pneumatic
pressure and other mechanical hazards:
• Keep hands, hair and clothing away from the
working end of the tool.
• Never operate this tool without all guards or
safety features in place and in proper working
order.
• Be aware that incorrectly installed hoses and
fittings might unexpectedly come loose at any
time and create a whipping/impact hazard.
• If you notice any abnormal noise or vibration
when operating the product, immediately discontinue its use and inspect for worn or damaged backup sandpapers. Replace any damaged parts. If abnormal noise or vibration still
exists, return to the manufacturer for service or
repair. Refer to warranty instructions.
OPERATING INSTRUCTIONS
PRIOR TO THE OPERATION
The tool is intended to be operated as a hand
held tool. It is always recommended that while
using the tool, operators stand on a solid floor,
5
UP766 manual.indd 5
10/06/15 9:32
in a secure position with a firm grip and footing. Be aware that the sander can develop a
torque reaction. See the section “SAFETY PRECAUTIONS”.
Use a clean lubricated air supply that will give
a measured air pressure at the tool of 90 PSI
when the tool is running with the lever fully
depressed. It is recommended to use an approved 10 mm (3/8”) x 8m (25ft) maximum
length airline. Do not connect the tool to the
airline system without an easily accessible air
shut off valve. It is strongly recommended that
an air filter, regulator and lubricator (FRL) be
used as this will supply clean, lubricated air at
the correct pressure to the tool. In any case appropriate air pressure regulators shall be used
at all times while operating this tool where the
supply pressure exceeds the marked maximum
of the tool.
Details of such equipment can be obtained for
your tool distributor. If such equipment is not
used, the tool should be manually lubricated.
To manually lubricate the tool, disconnect the
airline and put 2 to 3 drops of suitable pneumatic motor lubricating oil into the hose end
(inlet) of the tool. Reconnect tool to the air
supply and run tool slowly for a few seconds to
allow air to circulate the oil. If the tool is used
frequently, lubricate it on a daily basis or lubricate it if the tool starts to slow or lose power.
It is recommended that the air pressure at the
tool be 90 PSI while the tool is running so the
maximum RPM is not exceeded. The tool can
be run at lower pressures but should never be
run higher than 90 PSI. If run at lower pressure
the performance of the tool is reduced.
SAFETY PRECAUTIONS
1. Read all instructions before using this tool.
All operators must be fully trained in its use
and aware of these safety rules.
2. Make sure the tool is disconnected from the
air supply. Select a suitable abrasive and secure
it to sander.
3. Always wear required safety equipment
when using this tool.
4. When sanding, always start the tool on the
workpiece. This will prevent gouging due to
excess speed of the abrasive. Stop air flow to
the tool as it is removed from the workpiece.
5. Always remove the air supply to the sander
before fitting, adjusting or removing the abrasive or back-up pad.
6. Always adopt a firm footing and grip and
be aware of torque reaction developed by the
sander.
7. Always ensure the material being sanded is
firmly fixed to avoid movement.
8. Check hose and fittings regularly for wear.
Do not carry the tool by its hose; always be
careful to prevent the tool from being started
when carrying the tool with the air supply connected.
9. Do not exceed maximum recommended
air pressure. Use safety equipment as recommended.
10. Prior to installing any sanding or polishing
accessory, always check that it’s marked maximum operating speed is equal or higher than
the rated speed of this tool.
11. The tool is not electrically insulated. Do not
use where there is a possibility of contact with
live electricity, gas pipes, and/or water pipes.
12. Keep hands clear of the operation.
13. If the tool appears to malfunction, remove
from use immediately and arrange for service
and repair.
14. Do not allow the tool to operate without
taking precautions to protect any persons or
objects from the loss of the abrasive or pad
ruptures.
15. Immediately release the start handle in the
event of any disruption of pressure; do not attempt to re-start until the disruption has been
corrected.
INSTALLING THE SANDPAPER
· Position the sander with its pad side facing
upward.
· Place the sandpaper on the pad so that the
center of the sandpaper is aligned with the
center of the pad and bend both ends of the
sanding paper at 90˚ angle. Then bend both
ends again as to cover the sander base.
· Insert one of the sandpaper ends and secure it
with the clamp, next insert the remaining bent
senction in the same way.
CAUTION: The sandpaper must be precisely
installed on the pad, ensuring that there is ample tension. Loosely installed sandpaper could
6
UP766 manual.indd 6
10/06/15 9:32
E N G L I S H • U se r' s
result in unevenly sanded surfaces and/or damage to the sandpaper itself.
NOTE: Holes in sandpaper must be lined up
with the holes in the backing pad in order for
the dust collection feature of the sander to
function properly.
ma n u a l
degreased and parts be separated by material
so that they can be recycled.
LUBRICACIÓN
The parts shown in the assembly for proper
operation of your air tools are identified as
follows:
1. Air filter.
2. Regulator.
3. Lubricator.
4. Emergency shut-off valve.
5. Hose diameter.
6. Thread size.
7. Coupling.
8. Safety Air Fuse.
9. Oil.
10. Grease (During assembly).
INSTALLATION AND LUBRICATION
Size air supply line to ensure tool’s maximum
operating pressure (PMAX) at tool inlet. Drain
condensate from valve(s) at low point(s) of piping, air filter and compressor tank daily. Install
a properly sized Safety Air Fuse upstream of
hose and use an anti-whip device across any
hose coupling without internal shut-off, to
prevent hose whipping if a hose fails or coupling disconnects.
TECHNICAL DATA
MAINTENANCE
Maintenance frequency is shown in the illustration below.
PARTS & MAINTENANCE
Tool repair and maintenance should only be
carried out by an authorized Service Center.
When the life of the tool has expired, it is
recommended that the tool be disassembled,
SANDER CAPACITY
9,3 cm x 16,5 cm
NO LOAD SPEED
8 000 r/min
WEIGHT
1,8 kg (4 lb)
AIR CONSUMPTION
4 cfm
AIR INLET
1/4 NPT
HOSE DIAMETER
3/8” (10 mm)
REC. AIR PRESSURE
90 PSI
48h
90 psi
24h
Diagráma de conexión de Aire /
Air line assembly
7
UP766 manual.indd 7
10/06/15 9:32
E S P A Ñ O L
E N G L I S H
POLIZA DE GARANTÍA
WARRANT POLICY
Urrea Herramientas Profesionales S.A. de C.V.
garantiza este producto por el termino de 1 año
en sus piezas, componentes y mano de obra contra cualquier defecto de fabricación a partir de la
fecha de entrega.
Urrea Herramientas Profesionales S.A. de C.V.
Warranties this product for a period of 1 year in
its parts, components and manual labour against
any manufacture defect from the purchasing date.
Fecha de venta: ____/____/____
Producto: ___________________
Marca: ______________________
Modelo: ____________________
Purchase date: ____/____/____
Product:____________________
Brand:______________________
Model:______________________
______________________________
Sello y firma de distribuidor
______________________________
Distributor seal and signature
Comercializado e Importado por:
Urrea Herramientas Profesionales S.A. de C.V.
km 11,5 Carretera A El Castillo, El Salto, Jalisco, México. C. P. 45680, Tel. (33) 3208 7900,
RFC UHP900402Q29
Sold and Imported by:
Urrea Herramientas Profesionales S.A. de C.V.
km 11,5 Carretera A El Castillo, El Salto, Jalisco, México. C. P. 45680, Tel. (33) 3208 7900,
RFC UHP900402Q29
Condiciones:
Para hacer efectiva la garantía deberá presentar
el producto junto con la poliza de garantia debidamente firmada y sellada por el establecimiento
donde la adquirio, en cualquiera de los centros de
servicio autorizados.
Los gastos de transportación que se deriven del
cumplimiento de la garantía seran cubiertos por:
Urrea Herramientas Profesionales S.A. de C.V.
Terms:
In order to make warranty effective you must present the product along with the warranty properly
fillled and signed to an authorized distributor or
service center.
Esta garantía no será valida en los siguientes
casos:
· Cuando el producto haya sido utilizado en condiciones distintas a las normales o al desgaste natural de sus partes.
· Cuando el producto no haya sido operado de
acuerdo al instructivo de uso que lo acompaña.
· Cuando el producto haya sido alterado o reparado por personas no autorizadas.
This warranty is not applicable in the following cases:
· When the product has not been used according
to normal conditions or natural wear of its parts.
· When the product has not been used according
with this user’s manual instructions.
· When the product has been fixed or modified by
unauthorized or unqualified person.
UP766
Urrea Herramientas Profesionales S.A. de C.V.
will cover the transportation cost related to the
warranty.
8
UP766 manual.indd 8
10/06/15 9:32