1
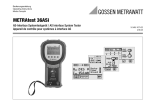
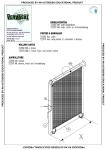
1. Check contents and Symbol Key. (See Overview) 2. Fully charge Type 4448 unit(s). (See Charge) 3. Turn on the unit(s). (See turn On and Off) 4. Configure unit(s) to desired use parameters. (See Configure at Startup) 5. Calibrate unit(s). (See Calibrate) 6. Mount units on the subject. Optional: Change mounting clips. (See Mount) 7. Perform the measurements. (See Measurement Control) 8. Access and review your data. (See Review Measurement Data and Download Data to a PC) Copyright © Brüel & Kjær. All rights reserved. NOTE: Consult Type 4448 User Manual for safety information 1 English First Use Charge Symbol key Left Key Right Key Status Indicator Display Windshield Infrared Sensor Press once Press and hold Press multiple times English Overview To Charge Type 4448 To Link Chargers Place the unit on the provided charger. Full charging from flat will take approximately 90 minutes. Charging: Flashing red light. Charged: Constant blue light. Ensure that Type 4448 has enough charge for the required measurement duration by looking at the screen, which will show the run time available for the current charge. Link the chargers using cable AO-1493 then connect power supply ZG-0864 to a charger with a free AC input (any AC input is fine). The power supply can drive a chain of up to four chargers. (example shows three times) 2 3 Configuration at Startup To Turn On Type 4448 Press the Left (L) key. Type 4448 will run through a start-up sequence. The first screen displays model number and firmware version. The second screen shows user defined text (can be configured using Type 7825 Protector). After startup, the instrument enters stand-by mode, alternatingly showing time and date and (if available) data from the last run. To Turn Off Type 4448 Hold down the ‘L’ key for 3 seconds. To Enter Configuration Mode Press and hold the ‘R’ key during startup. Parameters 3 sec 4 To Change Value CONTRAST LANGUAGE PRO. MODE DISPLAY MODE dB ALARMS PRESET MODE AUTO CLEAR MEMORY Press the ‘L’ key to change the parameter value. English turn On and Off To Select Parameter Press the ‘R’ key to confirm the value and move to the next parameter. Confirming the final screen returns the unit to standard operation. NOTE: If the memory is to be cleared, a second screen appears for confirmation. Change the option to ‘Yes’ by pressing the ‘L’ key, then press ‘R’ to confirm deletion. 5 Windshield English Calibration To Remove the Windshield Twist the black plastic ring (not the foam) counterclockwise and lift it off. NOTE: By default Type 4448 is set up for a calibration level of 94dB. You can change this using PC Software Type 7825 Protector (for more details see Type 7825 Online Help and Type 4448 User Manual). To Attach the Windshield To Calibrate Type 4448 1. Switch on Type 4448 and wait for it to start up. 2. Remove windshield (Important: see Windshield) 3. Place the acoustic calibrator over the microphone as shown to the left. Be careful to push the calibrator straight onto Type 4448 without twisting, since this might loosen or over tighten the microphone capsule. 6 4. Turn on the calibrator. Type 4448 automatically recognises calibration tones and enters calibration mode. 5. Press the ‘R’ key to confirm that you wish to calibrate. Type 4448 will take a few seconds to automatically adjust to the required level. Once calibration is completed, a ‘CAL OK’ message will appear. Type 4448 stores the calibration date, time and level then returns to the default screens. Place the tabs into the slots then gently twist the black plastic ring (not the foam) clockwise. NOTE: When attaching or removing the windshield always hold and twist using the black plastic ring at the base of the windshield: Never use the foam. 7 To Mount the Units 1. Select the correct clips for the application (more or less intense physical activity, environment and subject’s clothing requirements). For example, pins provide a stronger bond but penetrate protective materials. 2. Place the instrument on the shoulder ensuring that the microphone points upwards and that the microphone tip is about 10 cm from the ear. For more mounting information, see manual. To Remove or Switch Mounting Clips 1. Locate and remove the screws (see image) and lift off the clips. 2. Place the tabs of the new clips into the holes, gently push the clips into place and insert and tighten the screws. Measurement Control To Start a Measurement 3 sec To Lock and Unlock Keys and Display during Measurement 3 sec Press and hold both keys for 3 seconds; a countdown will be displayed on screen. During a measurement, ► will be displayed in the top left of the screen. The screen will then cycle between the dB level, measurement duration and the memory/battery status. To Stop a Measurement Press and hold both keys for 3 seconds; a countdown will be displayed on screen. 8 English Mount Hold the ‘R’ key down and press the ‘L’ key 3 times. A padlock symbol will appear. The keys are now locked, and dB values will be hidden. To unlock the keys, hold the ‘R’ key down and press the ‘L’ key 3 times. Pre-set Measurement Time When using preset measurement time, the unit can enter locked mode (optional) during measurement. The measurement will stop at the set time. To stop the measurement in advance, unlock Type 4448 as described above. 9 Download Data to PC When Type 4448 is not measuring, the screen will cycle through status information and data from the previous measurement run. The data displayed will depend on the configuration of Type 4448, either ISO or OSHA data. The data shown is displayed to the left. ISO OSHA 10Hrs MEMORY80Hrs 10Hrs MEMORY80Hrs 13:45:03 13:45:03 LAF 112.3 dB LAS 109.3 dB DURATION 07:45:12 DURATION 07:45:12 LAEQ89.9 LCPK101.4 dB LAVG111.4 LZPK119.4 dB PA2Hrs 3.20 OSHA DOSE 4.3 % PROJ DOSE 352.5 % PROJ DOSE 352.5 % 10 To Freeze the Display English Review Measurement Data To Download Data to a PC 1. Ensure the infra-red download adaptor (AO-1492) is connected to the USB port of your PC and Type 4448 is sufficiently charged. 2. Start Type 7825 Protector software on the PC and Type 4448. 3. Hold Type 4448’s infra-red port near to and facing the PC’s infra-red adaptor. 4. Start download sequence within Type 7825 Protector and follow instructions for downloading data. Error Messages If any error messages occur during the procedures described in this field guide, please refer to Troubleshooting in the Type 4448 User Manual. A flashing red LED indicates either low battery or memory. Press the ‘R’ key on any of these screens and the display will freeze for 10 seconds and then resume. 11 Field Specifications BATTERY LIFE 28 hours TIME HISTORY / MEMORY CAPACITY 180 hours with 1 minute logging period PRESET MEASUREMENT TIME 00:00–12:00 in 30-minute steps MEASURING RANGE Linear Operating Range: Peak Measurement Range: OPERATING TEMPERATURE 0 to +40°C HUMIDITY 30% – 95% RH (non-condensing) 12 65.0 – 140.3dB (RMS) 95.0 – 143.3dB (Peak) 1. Inhalt kontrollieren und Symbolerklärung lesen. (Siehe Übersicht) 2. Typ 4448-Gerät(e) voll aufladen. (Siehe Laden) 3. Geräte(e) einschalten. (Siehe Ein- und Ausschalten) 4. Die gewünschten Parameter einstellen. (Siehe Konfiguration beim Start) 5. Gerät(e) kalibrieren. (Siehe Kalibrierung) 6. Gerät an der Person befestigen. Optional: Befestigungsclip wechseln. (Siehe Befestigung) 7. Messungen durchführen. (Siehe Mess-Steuerung) 8. Daten betrachten und übertragen. (Siehe Messdaten betrachten und Datenübertragung zum PC) HINWEIS: Sicherheitshinweise siehe Bedienungshandbuch für Typ 4448. 13 Deutsch Erster Einsatz Laden Symbolerklärung Linke Taste Rechte Taste Statusanzeige Display Windschirm Infrarotsensor Einmal drücken Drücken und halten Mehrmals drücken Typ 4448 aufladen Ladegeräte verbinden Das Gerät auf das mitgelieferte Ladegerät setzen. Volles Aufladen aus dem entladenen Zustand dauert ca. 90 Minuten. Die Ladegeräte mit Kabel AO-1493 verbinden und das Netzteil ZG-0864 an ein Ladegerät mit freiem AC-Eingang anschließen (jeder AC-Eingang ist geeignet). Das Netzteil kann bis zu vier Ladegeräte in Reihe versorgen. Beim Laden: Rotes Blinklicht. Voll geladen: Blaues Dauerlicht. Dafür sorgen, dass Typ 4448 für die gewünschte Messdauer ausreichend geladen ist. Auf dem Display wird die für den derzeitigen Ladezustand verfügbare Messzeit angezeigt. (im Beispiel dreimal) 14 15 Deutsch Übersicht Typ 4448 einschalten Die linke Taste (L) drücken. Typ 4448 durchläuft eine Startsequenz. Die erste Anzeige zeigt Modellnummer und Firmwareversion. Die zweite Anzeige zeigt benutzerdefinierten Text (kann mit Typ 7825 Protector konfiguriert werden). Nach der Anlaufphase geht das Gerät in den Standby-Modus, in dem abwechselnd Uhrzeit/ Datum und (sofern vorhanden) Daten der letzten Messung angezeigt werden. Typ 4448 ausschalten Die ‘L’-Taste 3 Sekunden gedrückt halten. Konfiguration beim Start In den Konfigurationsmodus gehen Beim Start die ‘R’-Taste drücken und halten. Parameter 3 sec 16 Wert ändern KONTRAST SPRACHE PRO. MODUS ANZEIGEMODUS dB ALARME VOREINSTELLUNG AUTO SPEICHER LÖSCHEN ‘L’-Taste drücken, um den Wert des Parameters zu ändern. Parameter wählen Deutsch Ein- und Ausschalten ‘R’-Taste drücken, um den Wert zu bestätigen und zum nächsten Parameter zu gehen. Bei Bestätigung kehrt das Gerät mit der letzten Anzeige in den Standardbetrieb zurück. HINWEIS: Wenn der Speicher gelöscht werden soll, ist dies auf einer zweiten Anzeige zu bestätigen. Mit der ‘L’-Taste ‘Ja’ wählen und dann die ‘R’-Taste drücken, um das Löschen zu bestätigen. 17 Kalibrierung Windschirm Windschirm abnehmen Windschirm aufsetzen Typ 4448 kalibrieren 1. Typ 4448 einschalten und die Anlaufphase abwarten. 2. Windschirm entfernen (Wichtig: siehe Windschirm) 3. Den akustischen Kalibrator auf das Mikrofon setzen (siehe links). Beim Aufsetzen auf Typ 4448 darf der Kalibrator nicht gedreht werden, da andernfalls die Mikrofonkapsel gelockert oder zu fest angezogen werden könnte. 18 Deutsch Den schwarzen Kunststoffring (nicht den Schaumstoff) entgegen dem Uhrzeigersinn drehen und abnehmen. HINWEIS: Standardmäßig ist Typ 4448 auf einen Kalibrierpegel von 94dB eingestellt. Dies kann mit der PC-Software Typ 7825 Protector geändert werden (weitere Einzelheiten siehe Online-Hilfe von Typ 7825 und Bedienungs-handbuch von Typ 4448). 4. Den Kalibrator einschalten. Typ 4448 erkennt automatisch Kalibriertöne und geht in den Kalibriermodus. 5. ‘R’-Taste drücken, um die Kalibrierung zu bestätigen. Nach wenigen Sekunden stellt sich Typ 4448 automatisch auf den gewünschten Pegel ein. Nach der Kalibrierung erscheint die Meldung ‘KAL OK’. Der 4448 speichert Datum/Uhrzeit/Pegel der Kalibrierung und kehrt zur Standardanzeige zurück. Die Vorsprünge in die Aussparungen einpassen und den schwarzen Kunststoffring (nicht den Schaumstoff) im Uhrzeigersinn drehen. HINWEIS: Beim Aufsetzen oder Abnehmen des Windschirms immer den schwarzen Kunststoffring unten am Windschirm festhalten und drehen: Nicht am Schaumstoffteil festhalten oder drehen. 19 Geräte befestigen 1. Die geeigneten Clips für die Anwendung wählen (mehr oder weniger intensive physische Aktivität, Umgebungsbedingungen und Anforderungen an die Kleidung). Beispielsweise ergeben Anstecknadeln eine festere Verbindung, doch sie durchdringen Schutzmaterial. 2. Das Gerät so auf der Schulter anbringen, dass das Mikrofon nach oben zeigt und seine Spitze sich ca. 10 cm vom Ohr befindet. Weitere Informationen zur Befestigung siehe Bedienungsanleitung. Montageclips entfernen oder austauschen 1. Schrauben entfernen (siehe Abb.) und Clips abnehmen. 2. Die Laschen der neuen Clips in die Löcher stecken, die Clips vorsichtig einschieben, die Schrauben einstecken und festziehen. 20 Mess-Steuerung Eine Messung starten 3 sec Tasten und Display während der Messung verriegeln Deutsch Befestigung 3 sec Beide Tasten 3 Sekunden drücken und halten. Auf dem Display erscheint ein Countdown. Während der Messung ist oben links auf dem Display ein ► zu sehen. Die Anzeige wechselt zwischen dem Pegel in dB, der Messdauer und dem Speicherstatus/Batteriezustand. ‘R’-Taste gedrückt halten und 3-mal die ‘L’-Taste drücken. Es erscheint ein Vorhängeschloss-Symbol. Die Tasten sind verriegelt und die dB-Werte nicht zu sehen. Zum Entriegeln die ‘R’-Taste gedrückt halten und 3-mal die ‘L’-Taste drücken. Eine Messung stoppen Vorgewählte Messzeit Beide Tasten 3 Sekunden drücken und halten. Auf dem Display erscheint ein Countdown. Bei vorgewählter Messzeit lässt sich das Gerät bei der Messung verriegeln (optional). Die Messung stoppt, wenn die eingestellte Zeit verstrichen ist. Um die Messung vorher zu stoppen, ist Typ 4448 zu entriegeln, siehe oben. 21 Datenübertragung zum PC Wenn Typ 4448 nicht misst, wechselt die Anzeige zwischen Statusinformation und Daten der vorherigen Messung. Die angezeigten Daten hängen von der Konfiguration des 4448 ab (entweder ISO- oder OSHA-Daten). Welche Daten angezeigt werden, ist links dargestellt. ISO OSHA 10Hrs SPEICHER80Hrs 10Hrs SPEICHER80Hrs 13:45:03 13:45:03 LAF 112.3 dB LAS 109.3 dB MESSZEIT 07:45:12 MESSZEIT 07:45:12 LAEQ89.9 LCPK101.4 dB LAVG111.4 LZPK119.4 dB PA2Hrs 3.20 OSHA DOSE 4.3 % PROJ DOSE 352.5 % PROJ DOSE 352.5 % 22 Anzeige anhalten Daten zum PC übertragen 1. Dafür sorgen, dass der InfrarotAdapter (AO-1492) mit dem USB-Anschluss des PC verbunden und Typ 4448 ausreichend geladen ist. 2. PC-Software Typ 7825 Protector starten und Typ 4448 einschalten. 3. Typ 4448 so halten, dass sein Infrarotport aus geringer Entfernung auf den InfrarotAdapter des PC zeigt. 4. Downloadsequenz in Typ 7825 Protector starten und der Anleitung für die Datenübertragung folgen. Deutsch Messdaten betrachten Fehlermeldungen Die ‘R’-Taste auf einer der Anzeigen drücken. Dann bleibt die Anzeige 10 Sekunden stehen, bevor sie wieder zu wechseln beginnt. Sollten bei den in dieser Kurzanleitung beschriebenen Vorgängen Fehlermeldungen erscheinen, sehen Sie bitte unter Fehlersuche im Bedienungshandbuch von Typ 4448 nach. Eine blinkende rote LED bedeutet entweder schwache Batterie oder fehlenden Speicherplatz. 23 Technische Kurzdaten Batterielebensdauer 28 Stunden ZEITVERLAUF / SPEICHERKAPAZITÄT 180 Stunden mit 1 Minute Abspeicherintervall MESSZEITVORWAHL 00:00–12:00 in 30-Minuten-Schritten MESSBEREICH Linearer Arbeitsbereich: 65,0 – 140,3dB (Effektivwert) Bereich der Spitzenschallpegel: 95,0 – 143,3dB (Spitzenwert) BETRIEBSTEMPERATUR 0 bis +40°C FEUCHTE 30% – 95% RH (ohne Kondensation) 24 1. Revise contenidos y Símbolos de las Teclas. (Ver Información General) 2. Cargue completamente la(s) unidad(es) Dosímetro 4448. (Ver Carga) 3. Encienda la(s) unidad(es). (Ver Encendido y Apagado) 4. Configure la(s) unidad(es) con los parámetros deseados. (Ver Configuración Inicial) 5. Compruebe la(s) unidad(es) “Sólo Laboratorios de Calibración/ Verificación”. (Ver Calibrado) 6. Monte las unidades en el sujeto. Opcional: Cambie las sujeciones de montaje. (Ver Montaje) 7. Realice las medidas. (Ver Control de Medida) 8. Acceda a sus datos y revíselos. (Ver Revisar Datos de Medida y Descarga de Datos a PC) NOTA: Consulta el manual del Dosímetro 4448 para ver la información de seguridad. 25 Espanol Antes de usar su dosímetro por primera vez Carga Símbolos de las Teclas Tecla Izda Tecla Drcha Indicador de Estado Pantalla Pantalla Antiviento Sensor de Infrarojos Pulse una vez Presione y mantenga pulsado Presione varias veces Para cargar el Dosímetro 4448 Para acoplar cargadores Coloque la unidad en el cargador. Con la unidad totalmente descargada, la carga completa tardará aproximadamente 90 minutos. Cargando: Luz roja parpadeante. Cargado: Luz azul constante. Asegúrese de que el Dosímetro 4448 tiene suficiente carga para la duración requerida de la medida mirando en la pantalla, que mostrará el tiempo de funcionamiento disponible de la unidad. Conecte los cargadores usando el cable AO-1493. Después conecte la fuente de alimentación ZG-0864 a un cargador con una entrada de AC libre (cualquier entrada de AC valdrá). La fuente de alimentación puede alimentar hasta cuatro cargadores en cadena. (el ejemplo muestra tres) 26 27 Espanol Información General Para Encender el Dosímetro 4448 Presione la Tecla Izquierda (Izda). El Dosímetro 4488 comenzará la secuencia de encendido. La primera pantalla muestra el número del modelo y la versión del firmware. La segunda pantalla muestra un texto definido por el usuario (puede ser configurado usando el Programa 7825 Protector). Después de encenderse, el instrumento pasa a modo stand-by, mostrando (si es posible), alternativamente la fecha y la hora de la última medida. Para apagar el Dosímetro 4448 Presione y mantenga pulsada la Tecla ‘Izda’ durante 3 segundos. 3 sec 28 Configuración Inicial Para Entrar en el Modo Configuración Para Cambiar un Valor Para seleccionar un Parámetro Espanol Encendido y Apagado Presione y mantega pulsada la Tecla ‘Drcha’ durante el encendido. Parámetros CONTRASTE IDIOMA PRO. MODE VER MODO (ISO/ OSHA) SCROLL LCD dB ALARMA TIEMPO FIJO AUTO BORRAR MEMO Pulse la Tecla ‘Izda’ para cambiar el valor de un parámetro. Pulse la Tecla ‘Drcha’ para confirmar el valor y moverse al siguiente parámetro. Confirmando la pantalla final, la unidad vuelve al modo estándar de funcionamiento. NOTA: Si la memoria debe ser vaciada, una segunda pantalla aparecerá para confirmarlo. Cambie la opción a ‘Yes’ o ‘Si’ presionando la Tecla ‘Izda’. Después presione ‘Drcha’ para confirmar el borrado. 29 Calibrado_ “Sólo Laboratorios de Calibración/ Verificación” Pantalla Antiviento NOTA: Por defecto el Dosímetro 4448 está preparado para un nivel de calibración de 94dB. Puede cambiar este utilizando el Programa para PC 7825 Protector (para más detalles, ver Ayuda Online y Manual de Usuario del Programa 7825 Protector). Si quiere realizar una comprobación, encienda el dosímetro y póngalo a medir, coloque el calibrador y compruebe que el nivel es de 94 ±0.5. (usuarios) Para quitar la Pantalla Antiviento Espanol Gire el anillo de plástico negro (no la espuma) en sentido antihorario, y retire la pantalla. Para poner la Pantalla Antiviento Para Calibrar el Dosímetro 4448 1. Presione el botón de encendido del Dosímetro 4448 y espere a que se complete la secuencia. 2. Quite la Pantalla Antiviento (Importante: ver Pantalla Antiviento) 3. Coloque el calibrador acústico acoplándole el micrófono como se muestra en la imagen. Tenga cuidado de empujar el calibrador fuerte, pero sin girarlo, ya que podría dañar gravemente la cápsula del micrófono. 4. Encienda el calibrador. El Dosímetro 4448 reconocerá automáticamente 30 los tonos de calibración y entrará en el Modo de Calibración. 5. Pulse la Tecla ‘Drcha’ para confirmar que desea calibrar. El Dosímetro 4448 tardará unos segundo en ajustar automáticamente el nivel requerido. Una vez que haya sido completada la calibración, un mensaje de ‘CAL OK’ aparecerá. El Dosímetro 4448 almacena la fecha de calibración, hora y fecha, y nivel. Después, vuelve a la pantalla por defecto. Coloque las guías en las ranuras. Después, suavemente, gire el anillo de plástico negro (no la espuma) en sentido horario NOTA: Cuando esté poniendo o quitando la Pantalla Antiviento, sujete siempre y gire el anillo de plástico negro, en la base de la Pantalla, nunca la espuma. 31 Para montar las unidades 1. Seleccione las sujeciones correctas para el uso (actividad física más o menos intensa, requerimientos del ambiente y de la ropa del sujeto) Por ejemplo, los pins proporcionan un fijado robusto, pero penetran los materiales el protección. 2. Coloque el instrumento en el hombro asegurándose de que el micrófono apunta hacia arriba y de que su punta está situada a aproximadamente a 10 cm del oído. Para más información de Montaje, ver el manual. Para Quitar o Cambiar las Sujeciones de Montaje. 1. Localice y quite los tornillos (ver imagen) y suelte los clips. 2. Coloque las guías de los nuevas clips en los agujeros, empuje suavemente los clips a su sitio e inserte y apriete los tornillos. 32 Control de Medida Para Comenzar una Medida 3 sec 3 sec Para Bloquear y Desbloquear Teclas y Pantalla durante la Medida Espanol Montaje Presione y mantenga ambas teclas durante 3 segundos; una cuenta atrás aparecerá en pantalla. Cuando se esté llevando a cabo una medida, el símbolo ► aparecerá en la esquina superior izquierda de la pantalla. La pantalla mostrará consecutivamente el nivel de dB, la duración de la medida y el estado de la memoria y de la batería. Para Parar una Medida Presione y mantenga ambas teclas durante 3 segundos; una cuenta atrás aparecerá en pantalla. Presione y mantenga la Tecla ‘Drcha’ y pulse la Tecla ‘Izda’ 3 veces. Aparecerá el símbolo de un candado. Las Teclas están ahora bloqueadas, y los valores de dB ocultos Para desbloquear las Teclas, presione y mantenga la Tecla ‘Drcha’ y pulse la Tecla ‘Izda’ 3 veces. Preseleccionar Tiempo de Medida Cuando use un Tiempo de Medida Preseleccionado, podrá entrar en el modo bloqueado (opcional) durante la medida. La medida se detendrá transcurrido el tiempo fijado. Para detener la medida en curso, desbloquee el Dosímetro 4448 como se describe anteriormente. 33 Descarga de Datos a PC Cuando el Dosímetro 4448 no está midiendo, la pantalla mostrará consecutivamente información de estado y datos de la anterior medida. Los datos mostrados dependerán de la configuración del Dosímetro 4448, datos ISO o bien datos OSHA. Estos datos se muestran a la izquierda de la pantalla. ISO OSHA 10Hrs MEMORIA80Hrs 10Hrs MEMORIA80Hrs 13:45:03 13:45:03 LAF 112.3 dB LAS 109.3 dB DURACION 07:45:12 DURACION 07:45:12 LAEQ89.9 LCPK101.4 dB LAVG111.4 LZPK119.4 dB PA2Hrs 3.20 OSHA DOSE 4.3 % PROJ DOSE 352.5 % PROJ DOSE 352.5 % 34 Para congelar la Pantalla Para Descargar los Datos a un PC 1. Asegúrese de que el adaptador de infrarrojos (AO-1492) está conectado al puerto USB del PC y de que el Dosímetro 4448 tiene suficiente batería. 2. Inicie el Programa 7825 Protector en el PC y encienda el Dosímetro 4448. 3. Mantenga el puerto de infrarrojos del Dosímetro 4448 cerca y enfrentado al puerto de infrarrojos del PC. 4. Comience la secuencia de descarga con el Programa 7825 Protector y siga las instrucciones de descarga de datos. Espanol Revisar Datos de Medida Mensajes de Error Pulse la Tecla ‘Drcha’ en cualquiera de estas pantallas y ésta se congelará durante 10 segundos y después continuará con lo que estaba mostrando. Si ocurriera algún error durante los procedimientos descritos, en esta guía de campo, por favor, consulte la sección de Troubleshooting o solución de problemas en el Manual de Usuario del Dosímetro 4448. Un LED rojo parpadeante indica que la batería o la memoria están agotándose. 35 Especificaciones DURACIÓN DE LA BATERÍA 28 horas HISTORIA TEMPORAL / CAPACIDAD DE MEMORIA 180 horas con 1 minuto de tiempo de registro TIEMPO DE MEDIDA PRESELECCIONADO 00:00–12:00 En pasos de 30 minutos RANGO DE MEDIDA Rango de Linealidad: Rango de Medida de Pico: 65.0 – 140.3dB (RMS) 95.0 – 143.3dB (Pico) TEMPERATURA DE FUNCIONAMIENTO 0 a +40°C HUMEDAD 30% – 95% RH (sin condensación) 36 1. Vérifier le contenu et les boutons. (Voir Vue synoptique) 2. Recharger l’appareil. (Voir Recharger la batterie) 3. Mettre l’appareil en marche. (Voir Commutateur Marche/Arrêt) 4. Paramétrer l’appareil. (Voir Configurer au démarrage) 5. Calibrer l’appareil. (Voir Calibrage) 6. Fixer l’appareil sur la personne. Facultatif : Changer les pinces de fixation. (Voir Fixation de l’appareil) 7. Procéder aux mesurages. (Voir Mesurer) 8. Voir les mesures. (Voir Afficher les mesures et Transférer les données sur PC) NOTA : Consulter les consignes de sécurité dans le Manuel de l’Utilisateur du 4448. 37 Francais A la réception Manipulation des boutons Manipulation des boutons Bouton gauche Bouton droit Indicateur d’état Display Windshield Capteur IR Sensor Presser une fois Maintenir enfoncé Presser plusieurs fois Pour recharger le 4448 Pour relier plusieurs chargeurs Placer l’appareil sur le chargeur. La recharge complète d’une batterie épuisée prend environ 90 minutes. Relier les différents chargeurs au moyen du Câble AO-1493 puis connecter l’Alimentation ZG-0864 à une entrée AC disponible sur un quelconque de ces chargeurs. Quatre chargeurs peuvent ainsi être alimentés à la fois. Chargement en cours : LED rouge clignotante Chargement terminé : LED bleue constante S’assurer que le 4448 a suffisamment d’autonomie pour la durée de mesurage souhaitée en vérifiant sur le display la durée disponible affichée. Francais Vue synoptique (ici, trois fois) 38 39 Pour mettre le 4448 en marche Presser le bouton de gauche (L). Le 4448 lance une séquence de démarrage. Le premier affichage montre le numéro du modèle et la version du firmware. Le second affichage montre un texte défini par l’utilisateur (qui peut être configuré via le Logiciel 7825 Protector). L’appareil passe ensuite en mode de veille, affichant alternativement la date et l’heure et (quand elles existent) les données précédemment recueillies. Pour mettre le 4448 à l’arrêt Maintenir le bouton ‘L’ enfoncé pendant 3 secondes. 3 sec 40 Configurer au démarrage Pour passer en mode Configuration Pour changer la valeur Presser le bouton ‘R’ pendant la séquence de démarrage et le maintenir enfoncé. Paramètres CONTRAST LANGUAGE PRO. MODE DISPLAY MODE dB ALARMS PRESET MODE AUTO CLEAR MEMORY Presser le bouton ‘L’ pour changer la valeur du paramètre. Pour choisir le Paramètre Presser le bouton ‘R’ pour confirmer la valeur et passer au paramètre suivant. Après confirmation du dernier paramètre, l’appareil revient en mode de fonctionnement normal. NOTA : Si la mémoire doit être vidée, un second affichage apparaît demandant confirmation. Presser le bouton ‘L’ pour afficher ‘Yes’, puis le bouton ‘R’ pour confirmer l’effacement. 41 Francais Commutateur de marche/arrêt Calibrage Boule antivent Pour déposer la boule antivent NOTA : Par défaut, le 4448 est réglé pour un niveau de calibrage de 94dB. Ce réglage peut être modifié au moyen du Logiciel sur PC 7825 Protector (pour information, consulter l’aide en ligne du 7825 et le Manuel de l’Utilisateur du 4448). Tourner vers la gauche la bague en plastique noir à la base de la boule (pas la partie en mousse) et la soulever. Pour fixer la boule antivent 1. Mettre l’appareil en marche et attendre qu’il ait démarré. 2. Retirer la boule antivent (Important : voir Boule antivent) 3. Placer le calibreur acoustique sur le microphone, comme montré à gauche. Vérifier que le calibreur est bien positionné sur le 4448, sans torsion qui pourrait dévisser ou trop visser la capsule du microphone. 42 4. Mettre le calibreur en marche. Le 4448 reconnaît automatiquement la tonalité de calibrage et passe en mode de calibrage. 5. Appuyer sur le bouton ‘R’ pour confirmer le calibrage. Le 4448 s’ajuste automatiquement sur le niveau requis après quelques secondes. Le message ‘CAL OK’ marque le terme du calibrage. Le 4448 stock heure, date et niveau, puis revient à l’écran par défaut. Placer les ergots dans les fentes puis tourner doucement vers la droite la bague en plastique noir à la base de la boule (pas la partie en mousse). Francais Pour calibrer l’appareil NOTA : Pour ces opérations, bien s’assurer de manœuvrer la bague en plastique noir à la base de la boule, jamais la partie en mousse 43 Pour fixer l’appareil sur la personne 1. Choisir le dispositif de fixation adéquat à l’application (activité physique, environnement, vêtement de travail exigé). Par exemple, une broche assure une bonne fixation, mais troue les tissus protecteurs. 2. Placer l’appareil sur l’épaule en s’assurant que le microphone pointe vers le haut et qu’il est 10 cm environ de l’oreille. Pour un supplément d’information, se reporter au Manuel de l’Utilisateur. Changer les pinces de fixation 1. Localiser et déposer les vis (voir illustration) et enlever les pinces. 2. Placer les ergots des nouvelles pinces dans les trous, positionner délicatement les pinces, puis remettre les vis et serrer celles-ci. Mesurer Pour lancer un mesurage 3 sec 3 sec Maintenir les deux boutons enfoncés pendant 3 secondes ; un compte à rebours s’affiche sur le display. En cours de mesurage, le symbole ► apparaît en haut et à gauche du display. Sont alors affichés en boucle : le niveau en dB, la durée du mesurage, et l’état de la batterie/ mémoire. Pour stopper un mesurage Maintenir les deux boutons enfoncés pendant 3 secondes ; un compte à rebours s’affiche sur le display. 44 Verrouiller/déverrouiller boutons et display pendant le mesurage Maintenir le bouton ‘R’ enfoncé et presser 3 fois le bouton ‘L’. Un cadenas s’affiche sur le display. Les boutons sont maintenant verrouillés et les valeurs dB n’apparaissent pas. Pour déverrouiller, maintenir ‘R’ enfoncé et presser ‘L’ 3 fois. Francais Fixation de l’appareil Durée de mesurage préprogrammée L’appareil peut aussi être verrouillé (optionnel) lors d’un mesurage préprogrammé. Le mesurage s’arrêtera à l’heure prédéfinie. Pour stopper le mesurage avant terme, déverrouiller le 4448 comme décrit ci-dessus. 45 Transférer les données sur PC Quand le 4448 ne mesure pas, le display affiche en boucle les données du mesurage précédent. Celles-ci dépendent de la configuration du 4448 (données ISO ou OSHA). Voir à gauche les données affichées. ISO OSHA 10Hrs MEMOIRE80Hrs 10Hrs MEMOIRE80Hrs 13:45:03 13:45:03 LAF 112.3 dB LAS 109.3 dB DUREE 07:45:12 DUREE 07:45:12 LAEQ89.9 LCPK101.4 dB LAVG111.4 LZPK119.4 dB PA2Hrs 3.20 OSHA DOSE 4.3 % PROJ DOSE 352.5 % PROJ DOSE 352.5 % 46 Pour geler l’affichage Presser le bouton ‘R’ pour interrompre à tout moment l’affichage en boucle pendant 10 secondes. Transfert des données 1. Vérifier que l’adaptateur infrarouge (AO-1492) est relié au port USB du PC et que la batterie du 4448 est suffisamment chargée. 2. Démarrer le Logiciel 7825 Protector sur le PC, ainsi que le 4448. 3. Placer l’interface infrarouge du 4448 face à l’adaptateur infrarouge du PC. 4. Lancer la procédure de transfert à partir du 7825 Protector et suivre les instructions qui apparaissent. Francais Afficher les mesures Messages d’erreur Si un message d’erreur apparaît au cours d’une des procédures décrites dans ce Guide pratique, consulter le chapitre Dépannage du Manuel de l’Utilisateur du 4448. Une LED rouge clignotante indique que la batterie ou la capacité de mémoire est faible. 47 Spécifications AUTONOMIE 28 heures CAPACITÉ MÉMOIRE/ HISTORIQUE 180 heures (enregistrements de 1 minute) DURÉE DE MESURAGE PRÉPROGRAMMABLE 00:00–12:00 par pas de 30 minutes GAMME DE MESURAGE Gamme de fonctionnement linéaire : Gamme de mesurage crête : 65,0 – 140,3dB (Eff) 95,0 – 143,3dB (Crête) TEMPÉRATURES DE FONCTIONNEMENT 0 à +40°C HUMIDITÉ 30% – 95% RH (sans condensation) 48 1. Controllo contenuto e tasti simbolo. (Generalità) 2. Piena carica delle unità 4448. (Carica) 3. Accensione delle unità. (Accensione e spegnimento) 4. Configurazione delle unità sui parametri d’uso desiderati. (Configurzione all’avvio) 5. Calibrazione delle unità. (Calibrazione) 6. Applicazione delle unità sui soggetti. Opzionale: sostituzione delle clip di fissaggio. (Montaggio) 7. Esecuzione della misura. (Controllo misura) 8. Accesso e revisione dei dati. (Revisione dati di misura e Scarico dati a PC) NOTA: per informazioni sulla sicurezza, consultare il Manuale utente del tipo 4448. 49 Italiano Primo uso fuori dalla confezione Carica Tasti simbolo Tasto sinistro Tasto destro Indicatore stato Display Schermo antivento Sensore infrarosso Premere una volta Premere e tenere premuto Premere più volte Per caricare il tipo 4448 Per collegare i caricatori Collocare l’unità nell’apposito caricabatteria. Il caricamento completo richiederà circa 90 minuti. In carica: luce rossa intermittente. Carica terminata: luce blu costante. Accertarsi che il 4448 abbia abbastanza carica per la durata richiesta della misura controllando lo schermo che indicherà il tempo residuo di funzionamento disponibile. Collegare i caricabatteria usando il cavo AO-1493 e collegare l’alimentatore ZG-0864 a un caricatore con un ingresso AC libero (qualsiasi ingresso AC andrà bene). L’alimentatore può alimentare una catena che comprende fino a quattro caricatori. Italiano Generalità (nell’esempio, tre volte) 50 51 Per accendere il tipo 4448 Premere il tasto sinistro (L). Il 4448 eseguirà una sequenza di avviamento. Il primo schermo visualizza il numero di modello e la versione firmware. Il secondo schermo mostra il testo definito dall’utente (che può essere configurato usando il programma Protector 7825). Dopo l’avviamento lo strumento entra in modalità standby, alternando la data e l’ora e (se disponibile) la data dell’ultima esecuzione. Per spegnere il tipo 4448 Mantenere premuto il tasto ‘L’ per 3 secondi. 3 sec 52 Configurazione all’avvio Per immettere la modalità Configurazione Per modificare il valore Premere e mantenere premuto il tasto destro ‘R’ durante l’avviamento. Parametri CONTRASTO LINGUA MODO PRO. MODO DISPLAY ALLARMI dB MODO PRESEL AUTO CANCELLA MEMORIA Premere il tasto ‘L’ per modificare il valore del parametro. Per selezionare il parametro Premere il tasto ‘R’ per confermare il valore e passare al parametro successivo. Confermando lo schermo finale, lo strumento torna al funzionamento standard. Italiano Accensione e spegnimento NOTA: se si richiede la cancellazione della memoria, apparirà un secondo schermo con la richiesta di conferma. Cambiare l’opzione su ‘Sì’, premendo il tasto ‘L’, e premere ‘R’ per confermare. 53 Calibrazione Schermo antivento Per smontare lo schermo antivento NOTA: inizialmente il tipo 4448 è impostato per un livello di calibrazione di 94dB. È possible modificarlo usando il software per PC Protector 7825 (per ulteriori dettagli, si consulti l’Help on-line del 7825 e il manuale utente del 4448). Girare l’anello di plastica nero (non la spugna) in senso antiorario e sollevarlo. Per montare lo schermo antivento 1. Accendere il 4448 e attendere il suo avviamento. 2. Smontare lo schermo antivento (Importante: Schermo antivento) 3. Posizionare il calibratore acustico sul microfono come mostrato a sinistra. Fare attenzione a premere il calibratore senza girare, perchè potrebbe allentare o stringere troppo la capsula del microfono. 54 4. Accendere il calibratore. Il 4448 riconosce automaticamente i toni e entra nella modalità di calibrazione. 5. Premere il tasto ‘R’ per confermare l’esecuzione della calibrazione. Occorreranno pochi secondi allo strumento per correggersi automaticamente al livello richiesto. Una volta completata, apparirà il messaggio ‘CAL OK’. Il 4448 memorizza la data, l’ora ed il livello di calibrazione, ritornando poi allo schermo iniziale. Posizionare le linguette nelle asole e girare cautamente l’anello di plastica nero (non la spugna) in senso orario. Italiano Per calibrare il tipo 4448 NOTA: smontando o montando lo schermo antivento si raccomanda di usare e girare solo l’anello di plastica nero e non la spugna. 55 Per montare le unità 1. Selezionare le clip adatte all’applicazione (movimento fisico più o meno intenso, ambiente e richieste individuali di abbigliamento del soggetto). Per esempio, gli spilli forniscono un aggancio più solido ma penetrano nei materiali protettivi. 2. Posizionare lo strumento sulla spalla accertandosi che il microfono sia orientato verso l’alto e che sia posizionato a circa 10 cm dall’orecchio. Per ulteriori informazioni sul montaggio, si veda il manuale. Per rimuovere o sostituire le clip di montaggio 1. Individuare e rimuovere le viti (vedere l’immagine) e sollevare le clip. 2. Posizionare le linguette delle nuove clip nei fori, premere leggermente in posizione, poi inserire e stringere le viti. 56 Controllo misura Per avviare la misura 3 sec Per bloccare e sbloccare i tasti e il display durante la misura 3 sec Premere e mantenere premuti entrambi i tasti per 3 secondi; il conto alla rovescia sarà indicato nello schermo. Durante una misura, sullo schermo in alto a sinistra appare il segnale ►. Lo schermo visualizzerà poi alternandoli, il livello in dB, la durata della misura e lo stato della memoria/batteria. Per arrestare la misura Premere e mantere premuti entrambi i tasti per 3 secondi; il conto alla rovescia sarà indicato nello schermo. Tenere premuto ‘R’ e premere ‘L’ per 3 volte. Un simbolo a lucchetto appare nello schermo ad indicare che i tasti sono bloccati e i valori in dB verranno nascosti. Per sbloccare i tasti, mantenere premuto il tasto ‘R’ e premere il tasto ‘L’ per 3 volte. Italiano Montaggio Preselezione del tempo di misura Con un tempo di misura preselezionato, durante la misura, l’unità può entrare in modalità bloccata (opzionale). La misura si arresta al tempo impostato. Per arrestare la misura prima, sbloccare lo strumento come sopra descritto. 57 Scarico dati a PC Quando il 4448 non sta misurando, lo schermo visualizza, alternando, informazioni e dati della misura precedentemente eseguita. I dati visualizzati dipendeno dalla configurazione del 4448: dati ISO o OSHA. I dati mostrati sono visualizzati qui a sinistra. ISO OSHA 10Hrs MEMORIA80Hrs 10Hrs MEMORIA80Hrs 13:45:03 13:45:03 LAF 112.3 dB LAS 109.3 dB DURATA 07:45:12 DURATA 07:45:12 LAEQ89.9 LCPK101.4 dB LAVG111.4 LZPK119.4 dB PA2Hrs 3.20 OSHA DOSE 4.3 % PROJ DOSE 352.5 % PROJ DOSE 352.5 % 58 Per congelare il Display Premere il tasto ‘R’ su qualsiasi di queste schermate per congelare il display per circa 10 secondi, per poi riprendere. Per scaricare i dati ad un PC 1. Accertarsi che l’adattatore di scarico a infrarossi (AO-1492) sia collegato alla porta USB del PC e che il 4448 sia sufficientemente in carica. 2. Avviare il software Protector 7825 nel PC e il 4448. 3. Mantenere la porta a infrarosssi del 4448 vicino e orientata verso l’adattatore a infrarossi del PC. 4. Iniziare la sequenza di scarico con il Protector 7825 e seguire le istruzioni per il caricamento dei dati. Messaggi d’errore Se durante le procedure descritte dovesse apparire un messaggio d’errore, si raccomanda di riferirsi alla sezione Individuazione guasti, nel Manuale utente del tipo 4448. Un LED rosso intermittente indica che la batteria è scarica, o lo spazio della memoria è esaurito. Italiano Revisione dati di misura 59 Dati tecnici DURATA BATTERIA 28 ore CRONOLOGIA / CAPACITÀ MEMORIA 180 ore con periodo registrazione di 1 minuto TEMPO DI MISURA PRESELEZIONATO 00:00–12:00 in intervalli di 30 minuti GAMMA DI MISURA Gamma di funzionamento lineare: Gamma di misura del picco: 65.0 – 140.3dB (RMS) 95.0 – 143.3dB (Picco) TEMPERATURA DI FUNZIONAMENTO 0 a +40°C UMIDITÀ 30% – 95% RH (non condensante) 60 Primeiro Uso fora da Caixa Portuguese 1. Verifique o conteúdo e Símbolo da tecla. (Veja Resumo) 2. Carregar totalmente Tipo 4448 unidade (s). (Veja Carga) 3. Ligue o aparelho (s) (Veja Ligar e Desligar) 4. Configurar unidade (s) aos parâmetros de uso desejado. (Veja Configurar a inicialização) 5. Calibrar unidade (s). (Veja Calibrar) 6. Montagem das unidades. Opcional: Alterar os clips (Veja Montegem) 7. Realizar as medições. (Veja Controle de Medição) 8. Acesso e revisão de seus dados. (Veja Revisão dados de medição e Download de dados para o PC) NOTA: Consulte Tipo 4448 - Manual do Usuário para informações de segurança. 61 Carga Símbolo da tecla Tecla esquerda Tecla direita Indicador de Status Display Windshield (protetor de vento e poeira) Sensor Infravermelho Pressione uma vez Pressione e segure Pressione várias vezes Para Carga Tipo 4448 Para Ligar os Carregadores Coloque a unidade sobre o carregador fornecido. O carregamento total do plano levará aproximadamente 90 minutos. Carregando: a luz vermelha piscando. Carregado: luz azul constante. Certifique que o Tipo 4448 tem carga suficiente para duração da medição olhando no display, que irá mostrar o tempo disponível para a corrida para carga atual. Você pode ligar vários carregadores em paralelo, ligue os carregadores usando o cabo AO-1493 em seguida ligar a fonte de alimentação ZG-0864 a um carregador com entrada livre AC. A fonte de alimentação pode conduzir uma corrente para até quatro carregadores. Portuguese Visão Geral (exemplo: mostra três vezes) 62 63 Configuração na inicialização Para ligar Tipo 4448 Pressione a tecla esquerda (L). Tipo de 4448 será executado através de uma seqüência de inicialização. A primeira tela exibe o número do modelo e versão do firmware. A segunda tela mostra o texto definido pelo usuário (pode ser configurado através Software Tipo Protector 7825). Depois de iniciar o instrumento entra em modo stand-by, alternadamente montrando a hora e a data e (se disponível) os dados da última execução. Para desligar o Tipo 4448 Mantenha pressionada a tecla esquerda (L) por 3 segundos. 3 sec 64 Para ativar o modo de configuração Para alterar o valor Pressione e segure a tecla ‘R’ durante o arranque. Parâmetros CONTRASTE LÍNGUA PRO. MODO DISPLAY MODO dB ALARMES PRESET MODO AUTO APAGAR MEMÓRIA Aperte a tecla ‘L’ para alterar o valor do parâmetro. Para selecionar o parâmetro Aperte a tecla ‘R’ para confirmar o valor e passar para o próximo parâmetro. Confirmando a tela final retorno da unidade à operação padrão. NOTA: Se a memória deve ser apagada, uma segunda tela será exibida para confirmação. Altere para opção ‘Yes’ (Sim) pressionando a tecla ‘L’ , em seguida pressione a tecla ‘R’ para confirmação e eliminação. Portuguese Ligar e Desligar 65 Calibração Windshield Para remover o Windshield Rode o anel de plástico preto (não a espuma) anti-horário e retire-a. NOTA: Por padrão Tipo 4448 está configurado para um nível de calibração de 94dB. Você pode mudar isso usando o Software para PC Protector 7825 (para mais detalhes veja Tipo 7825 Ajuda on-line e Tipo 4448 Manual do Usuário). Para fixar (prender) o Windshield 1. Ligue Tipo 4448 e esperar para que inície 2. Remova windshield (Importante: Veja Windshield) 3. Coloque o calibrador acústico sobre o microfone como mostrado à esquerda.Tenha cuidado para pressionar o calibrador em linha reta em Type 4448 sem torcer, pois isso pode afrouxar ou apertar o microfone.Turn on the calibrator. Type 4448 automatically recognises calibration tones and enters calibration mode (see left). 66 4. Aperte a tecla ‘R’ para confirmar que deseja calibrar. Tipo 4448 vai demorar alguns segundos para ajustar automaticamente para o nível exigido. Uma vez que a calibração é concluida, uma mensagem “CAL OK” aparecerá. Tipo 4448 armazena a data de calibração, a hora e o nível, em seguida retorna às telas padrão. Coloque as presilhas nos encaixes, em seguida, gire suavemente o anel de plástico preto (não a espuma) no sentido horário. NOTA: Para colocar ou remover o windshield sempre mantenha a torção usando o anel de plástico preto na base do windshield: NUNCA na espuma. 67 Portuguese Para Calibrar o Tipo 4448 Para montar as unidades 1. Selecione os clips corretos para a aplicação (mais ou menos intensa atividade física, meio ambiente e sujeito às exigências de vestuário). Por exemplo, alfinetes para prender mais forte e penetrar materiais de proteção – Jaleco de couro 2. Coloque o instrumento sobre o ombro para garantir que o microfone fique para cima e que a ponta do microfone é de cerca de 10 centímetros da orelha. Para mais informações de montagem consulte o manual. Para Remover ou Mudar clips de montagem 1. Localize e remova os parafusos (ver imagem) e levante os clips. 2. Coloque as abas dos novos clips nos buracos, empurre os clips no lugar e insira e aperte os parafusos. 68 Controle de Medição Para iniciar uma medição 3 sec 3 sec Pressione e segure as duas teclas por 3 segundos; uma contagem regressiva sera apresentada na tela. Durante a medição, ► será exibido no canto superior esquerdo da tela. A tela irá alternar entre nível dB, duração da medição, e a memória/ status da bateria. Para para uma medição Pressione e segure as duas teclas por 3 segundos; uma contagem regressiva será apresentada na tela. Para bloquear e desbloquear teclas e visor durante a medição Segure a tecla “R“ e pressionar a tecla ‘L’ 3 vezes. O símbolo de cadeadoaparecerá. As teclas são bloqueadas, e os valores dB serão escondidos. Para desbloquear as teclas, segure a tecla “R” e pressionar a tecla ‘L’ 3 vezes. Pré-ajuste do tempo de medição Ao usar o tempo de medição pré-ajuste, a unidade pode entrar no modo bloqueado (opcional) durante a medição. A medida vai parar no prazo estabelecido. Para parar a medição com antecedência, desbloquear Tipo 4448 conforme descrito acima. 69 Portuguese Montar Rever dados de Medição Download Dados para PC Quando o Tipo 4448 não está medindo, a tela irá percorrer as informações de status e os dados da corrida de medição anterior. Os dados apresentados dependerá da configuração do tipo 4448, os dados NR15, ISO ou OSHA. Os dados apresentados é exibido à esquerda. OSHA 10Hrs MEMORIA80Hrs 13:45:03 13:45:03 LAF 112.3 dB LAS 109.3 dB DURACAO 07:45:12 DURACAO 07:45:12 LAEQ89.9 LCPK101.4 dB LAVG111.4 LZPK119.4 dB PA2Hrs 3.20 OSHA DOSE 4.3 % PROJ DOSE 352.5 % PROJ DOSE 352.5 % 70 Para congelar a exibição 1. Verifique se o adaptador de download de infra-vermelhos (AO-1492) é conectadoà porta USB do seu PC e 4448 Tipo tem carga suficiente. 2. Inicie Tipo 7825 Protector software no PC e Tipo 4448. 3. Segure Tipo 4448’s infra-vermelho proximo a porta e de frente para o adaptador infravermelho no PC. 4. Iniciar sequencia de download dentro Tipo 7825 Protector e siga as instruções para fazer o download de dados. Mensagens de erro Aperte a tecla ‘R’ em qualquer uma dessas telas e a tela irá congelar por 10 segundos e depois continuar. Se alguma mensagem de erro ocorrer durante os procedimentos descritos neste guia de campo, consulte “Solucionando problemas no Tipo 4448” no Manual do Usuário. Um LED vermelho piscando indica bateria fraca ou memória. Portuguese ISO 10Hrs MEMORIA80Hrs Para transferir dados para um PC 71 Especificações de Campo DURAÇÃO DA BATERIA 28 horas TEMPO DE MEDIÇÃO / CAPACIDADE DE MEMÓRIA 180 horas com 1 minuto de integração PRESET TEMPO DE MEDIÇÃO 00:00–12:00 em etapas de 30 minutos RANGE DE MEDIÇÃO Range de Operação Linear: Range de Medição Peak 65.0 – 140.3dB (RMS) 95.0 – 143.3dB (Peak) TEMPERATURA DE OPERAÇÃO 0 a +40°C HUMIDADE 72 BR 2212-11 30% – 95% RH (sem condensação) HEADQUARTERS: Brüel & Kjær Sound & Vibration Measurement A/S · DK-2850 Nærum · Denmark Telephone: +45 77 41 20 00 · Fax: +45 45 80 14 05 · www.bksv.com · [email protected] Local representatives and service organisations worldwide