1
E
N
G
L
S
H
Safety Is Your Responsibility (continued from page 5)
Getting Started (continued from page 6)
• Keep exposed skin away from escaping gas when installing
or removing air supply cylinder or if the marker or air supply is
leaking. Compressed air, CO 2 , and nitrogen gasses are
very cold and can cause frostbite under certain conditions.
• Use only .68 caliber paintballs, never load or fire any foreign objects.
• Avoid alcoholic beverages before and during the use of this
marker. Handling markers while under the influence of drugs
or alcohol is a criminal disregard for public safety.
• Avoid shooting an opponent at point blank, 6 feet or less.
• Familiarize yourself with instructions listed on air supply
cylinder or adaptor. Contact the air supply cylinder or adaptor
manufacturer with any questions.
• Always measure your marker’s velocity before playing
paintball and never shoot at velocities in excess of 300 feet
per second (see instructions on page 7).
STEP 3) Hopper Installation
• Barrel Sleeve must be installed (see page 2) and safety in
Safe Mode (see page 4) before filling the hopper.
• Make sure that the feed elbow and hopper are clean and
free of any sharp edges to keep paintballs feeding into the
marker smoothly.
• Install the hopper neck into the feed elbow of your marker
and tighten the hopper down with a 3/16” allen wrench.
NOTE: Do not overtighten or the elbow may break. With the barrel
sleeve installed and safety in Safe Mode, you are now ready to
load your hopper with paintballs. Fill hopper and only remove
barrel sleeve and turn off the safety when ready to shoot.
GETTING STARTED
TM
TM
❏ Eye protection designed for paintball use must be worn by the user
and any person within range.
STEP 1) Prepare Marker for Air Supply Cylinder Installation
• For Models: 98 Custom With E-Trigger or Custom Pro With
E-Trigger - You must first read and follow E-Trigger Operating
Instructions (on pages 8-13) before performing STEP 2.
• For 98 Custom , 98 Custom Response , Custom Pro and
Custom Pro Response go to STEP 2.
TM
TM
TM
TM
TM
TM
STEP 4) Rate of Fire Adjustments and Troubleshooting
• For RESPONSE markers - complete Tuning The Response Trigger
Rate of Fire instructions (on page 13) before performing STEP 5.
• For E-TRIGGER markers - read and follow E-Trigger Operating
Instructions (on pages 8-13); before performing STEP 5.
• For 98 Custom and Custom Pro markers - Go to STEP 5.
TM
TM
TM
STEP 2) Air Supply Cylinder Installation
• Do not pressurize a partially assembled paintball marker.
• First install barrel sleeve (see instructions on page 2).
• Next put trigger safety in Safe Mode (see instructions on page 4).
• Next you need to cock the marker by sliding the bolt handle all
the way back until it locks into place. Always keep marker in the
cocked position when air supply is attached to marker. This will
help prevent an accidental discharge.
• To install the air supply cylinder, lubricate the cylinder valve o-ring with a
little gun oil then insert the cylinder valve end into the air supply adapter
at the back end of the marker grip. Twist the cylinder clockwise into
the marker until it stops. Adjust the butt plate if necessary. Your marker
is ready to fire once you switch to Fire Mode from Safe Mode. If the tank
is full and you do not hear the air supply engage, the pin valve could be
too short or the pin valve seal is damaged.
6
Getting Started (continued on page 7)
TM
TM
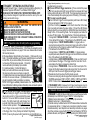
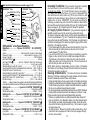
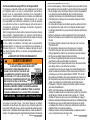
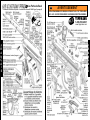
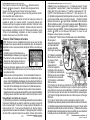
STEP 5) Velocity Adjustment
Each time you play paintball,
Velocity
the velocity of your paintball
Adjustment
marker should be checked
Screw
with a chronograph, an
instrument for measuring
velocity, prior to playing
paintball to verify that the
marker’s velocity is set below
300 feet per second or less if
5/32” Allen Wrench
required by playing field.
To adjust the velocity use the 5/32” allen wrench included with
your marker. The velocity adjustment screw is located on left side
receiver. To adjust the velocity down, turn the screw inward or
. To turn the velocity up, turn the screw out or
clockwise
counterclockwise . Do not remove velocity screw.
before
NOTE: You must turn the velocity screw all the way in
doing any disassembly.
STEP 6) Rear Sight Adjustment
If your paintball is hitting low, slide the rear sight back towards rear
of marker. Do the opposite if paintball is hitting high.
7
E
N
G
L
I
S
H