1
Español................................................................................................................................................ 2
Português...........................................................................................................................................37
English................................................................................................................................................73
Deutsch........................................................................................................................................... 109
IAN 85816
GPS para outdoor SFN 1.5 A1
Índice
Introducción.................................................................................................. 3
Uso destinado............................................................................................... 3
Información sobre marcas..................................................................................................................3
Contenido del paquete.................................................................................. 4
Descripción general....................................................................................... 4
Datos técnicos............................................................................................... 5
GPS......................................................................................................................................................5
Requisitos del sistema..........................................................................................................................5
Instrucciones de seguridad............................................................................ 6
Primeros pasos.............................................................................................. 7
Cargar la batería................................................................................................................................7
Instalar el soporte para bicicleta.......................................................................................................8
Llevar el GPS en el cinturón para brazo......................................................................................... 10
Resumen del menú...................................................................................... 11
Menú "Punto de interés".................................................................................................................. 11
Menú "Plan de ruta"......................................................................................................................... 12
Menú "Invertir ruta".......................................................................................................................... 13
Menú "Configuraciones".................................................................................................................. 14
Funcionamiento........................................................................................... 18
Encender y apagar el GPS.............................................................................................................. 18
Seleccionar el idioma...................................................................................................................... 18
Ajustar el huso horario..................................................................................................................... 18
Pantallas e indicaciones del GPS.................................................................................................... 19
Grabar/recorrer una ruta................................................................................................................ 21
Puntos de interés............................................................................................................................... 22
A casa............................................................................................................................................... 23
Funciones avanzadas.................................................................................. 24
Transferir datos al PC....................................................................................................................... 24
Software para PC "Guider Application"......................................................................................... 24
Resolución de problemas............................................................................. 32
Mantenimiento / limpieza........................................................................... 33
Normativa medioambiental e información sobre el desecho....................... 34
Notas sobre la Conformidad....................................................................... 34
Información sobre la garantía y el servicio posventa................................... 35
2
Español
GPS para outdoor SFN 1.5 A1
Introducción
Gracias por haber adquirido este GPS para exterior SFN 1.5 A1. Con este GPS puede descubrir
nuevas rutas en bicicleta. Este GPS lleva un puerto USB que sirve para cargarlo y para intercambiar
datos con el PC. Además, el GPS es resistente al mal tiempo según la normativa IPX-4.
Uso destinado
El GPS solo está destinado para fines orientativos cuando Usted se encuentre fuera. Cualquier
empleo diferente al mencionado no corresponde a su uso destinado.
El fabricante no asume ninguna responsabilidad si:
• emplea su GPS para otros fines que para los que ha sido diseñado.
• si rompe el GPS a fuerza bruta, o lo pone en funcionamiento mientras esté incompleto o si lo
modifica.
• si conecta dispositivos incapaces de cargar el dispositivo por puerto USB o de transferir datos
al o desde el PC. Consulte la documentación del dispositivo que pretenda conectar.
El GPS solo está destinado al uso privado y no es para uso industrial o comercial. Además,
el GPS no debe ser empleado en climas tropicales. Este GPS cumple todo lo relacionado en
cuanto a la conformidad EC incluyendo la normativa y los estándares pertinentes. Cualquier
modificación del GPS que no haya sido recomendada por el fabricante puede provocar que
estas normativas ya no se cumplan.
Debe respetar y cumplir la legislación y las directivas del país donde emplea el producto.
Tenga en mente que la legislación de tráfico vigente siempre tiene prioridad
sobre cualquier instrucción que le dé la flecha guía de su GPS. No se deje
distraer del tráfico. No maneje el dispositivo mientras esté yendo en bicicleta.
La flecha guía solamente le muestra el camino directo hacia su destino. Dado
que su GPS no contiene mapas y tiene que circular por caminos transitables,
deberá buscar una ruta que corresponda al máximo a la indicación de la
flecha. Si, por ejemplo, la flecha apunta en dirección prohibida de una calle de
sentido único, no debe continuar.
Información sobre marcas
Microsoft®, Windows® y el logotipo de Windows son marcas registradas de Microsoft
Corporation.
USB® es una marca comercial registrada de USB Implementers Forum, Inc.
Español
3
GPS para outdoor SFN 1.5 A1
Contenido del paquete
•
•
•
•
•
•
•
•
•
GPS para outdoor SFN 1.5 A1
Cable USB
8 bridas
Alfombrilla antideslizante de goma
Soporte para manillar
Soporte para GPS
Cinturón para brazo
CD-ROM con controlador y software
Este manual del usuario
Si alguno de los artículos faltara o estuviera dañado, póngase en contacto con nuestra línea
de atención al cliente. Encontrará el número de teléfono correspondiente en el último capítulo
“Información sobre la garantía y el servicio posventa”.
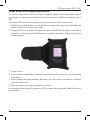
Descripción general
Este Manual del usuario posee una portada desplegable. En la contraportada encontrará una
ilustración enumerada del GPS. El significado de los números es el siguiente:
1
2
3
4
5
Botón de menú / volver
Pantalla
Rieles del soporte para GPS (en ambos lados)
Botón u
Botón de confirmación / puntos de interés / selección del modo operativo
Pulse este botón mientras en pantalla se muestra un menú para confirmar una selección
o entrada.
Pulse este botón con el dispositivo encendido para mostrar el menú de selección de
puntos de interés.*
6
7
8
Mantenga el botón pulsado para mostrar el menú de selección del modo operativo
(grabación de ruta, pausa, detener grabación).*
Puerto USB (detrás de la tapa protectora)
Botón t
Botón de encendido/apagado
Botón de retroiluminación encendida/apagado automático/apagada
* Para que estas opciones funcionen, se deben recibir por lo menos 4 satélites GPS.
4
Español
GPS para outdoor SFN 1.5 A1
Datos técnicos
GPS
Dimensiones (An x Al x P)
Peso
Tensión de entrada
Pantalla
Batería
Autonomía con batería totalmente
cargada
Corriente de carga
Tiempo de carga vía USB con batería
descargada
Receptor/chip de GPS
Memoria
Puerto USB
Temperatura de funcionamiento
Humedad operativa
Grado de protección IPX
52 x 83,3 x 17,3 mm
57 g
5 V a través de cable USB
Retroiluminada, resolución 128 x 128 píxeles
Batería de polímeros de litio, 5 V / 750 mAh
máx. 17 horas con la retroiluminación de pantalla
apagada
máx. 200 mA
hasta 5 horas
GSC3F-7990, precisión hasta 10 m
32 Mb, 25000 puntos de recorrido, hasta 50 rutas con
2500 etapas de ruta en total (50 etapas por ruta)
USB 2.0, compatible con USB 1.1
+5 a +35 °C
< 85 % HR
IPX-4 (resistente a gotas de agua procedentes de
cualquier dirección)
Requisitos del sistema
Para sacar el máximo partido de su GPS, tendrá que emplearlo con el software del CD incluido.
Su PC debe cumplir los requisitos siguientes:
• Sistema operativo: Windows® 7, Windows® Vista o Windows® XP *
• Procesador Pentium III o compatible
• 256 MB de memoria RAM como mínimo
• 1 GB de espacio disponible en el disco duro
• Puerto USB (se recomienda USB 2.0)
• Unidad de CD o DVD
• Conexión a Internet para mostrar los mapas en el software para PC (esto puede suponerle
costes adicionales)
* Infórmese sobre los términos de uso de las marcas empleadas.
Español
5
GPS para outdoor SFN 1.5 A1
Instrucciones de seguridad
Antes de usar este dispositivo por primera vez, lea detenidamente las instrucciones correspondientes
en este manual y siga todas las advertencias, incluso si está acostumbrado a manejar aparatos
electrónicos. Conserve este manual en un lugar seguro para cualquier referencia futura. Si vende
o traspasa el GPS, acompáñelo siempre del presente manual.
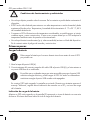
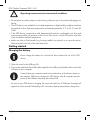
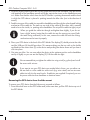
Este símbolo denota información importante para garantizar un manejo seguro
del producto y la seguridad del usuario.
Este símbolo denota más información sobre el tema.
Instrucciones de seguridad generales
• Este GPS no ha sido diseñado para personas (incluyendo a los niños) con capacidad física,
sensorial o mental reducidas y/o que no tengan experiencia en manejar ni conocimientos
sobre este tipo de producto. Por lo tanto, para su propia seguridad, este grupo de personas
debe ser supervisado por una persona con experiencia o recibir información de cómo utilizar
el dispositivo. Es importante supervisar a los niños y a las personas discapacitadas para que
no se expongan a peligros.
• Mantenga el producto, sus accesorios y el material de embalaje fuera del alcance de los
niños pequeños. Peligro de asfixia con las piezas pequeñas. Nótese que también hay peligro
de asfixia si las vías respiratorias se bloquean con los plásticos y bolsas del embalaje.
• Si observa humo, ruidos u olores extraños, desconecte todos los cables inmediatamente. En
estos casos, deje de utilizar el equipo y déjelo comprobar por un técnico autorizado. No
inhale humo procedente de un posible incendio del dispositivo. Si accidentalmente inhala
humo, acuda inmediatamente a un médico. La inhalación de humo puede ser nociva para la
salud.
• Una reparación será necesaria cuando el equipo se haya dañado de cualquier forma,
como defectos en la carcasa del dispositivo, cuando hayan entrado líquidos u objetos en el
dispositivo, si no funciona normalmente o si se ha caído. Para cualquier reparación, póngase
en contacto con la línea de atención al cliente. No intente reparar el producto por su cuenta
para evitar peligros.
• Este dispositivo lleva una batería de polímeros de litio de altas prestaciones. La batería solo
debe ser extraída o sustituida por un servicio técnico autorizado. De lo contrario existe el
peligro de incendio y cortocircuitos.
6
Español
GPS para outdoor SFN 1.5 A1
Condiciones de funcionamiento y ambientales
• No coloque objetos pesados sobre la carcasa. De lo contrario se podría dañar seriamente el
dispositivo.
• El GPS no ha sido diseñado para entornos con altas temperaturas o mucha humedad y debe
mantenerse libre de polvo. Temperatura y humedad de funcionamiento: 5 °C a 35 °C, 85 %
de humedad relativa máx.
• Si expone su GPS a fluctuaciones de temperatura considerables, es posible que en su interior
condense agua y cause cortocircuitos. Si esto ocurre, espere hasta que su GPS adquiera la
temperatura ambiente antes de ponerlo en funcionamiento.
• No coloque fuentes incandescentes (p. ej. velas encendidas) encima o al lado del dispositivo.
De lo contrario existe el peligro de incendio y cortocircuitos.
Primeros pasos
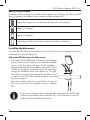
Cargar la batería
Debe cargar la batería por lo menos durante cinco horas antes de usar el GPS
por primera vez.
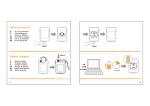
1. Abra la tapa del puerto USB (6).
2. Conecte extremo del conector pequeño del cable USB al puerto USB (6) y el otro extremo a
un puerto USB libre de su ordenador.
Es posible que su ordenador tenga que estar encendido para que el puerto USB
suministre energía eléctrica y pueda cargar el GPS. No todos los ordenadores
suministran energía al puerto USB cuando están apagados.
En cuanto el GPS esté cargando, la pantalla se enciende. Durante unos instantes aparece el
mensaje "Welcome", seguido de una indicación de conexión con el PC y un icono de carga
de la batería.
Indicación de carga de la batería
Mientras su GPS esté cargando, en la pantalla (2) aparecerá un icono de batería con una serie
de barras. El número de barras indica el nivel de carga de la batería:
Español
7
GPS para outdoor SFN 1.5 A1
batería totalmente cargada. Puede desconectar el dispositivo del ordenador.
nivel de batería 2/3.
nivel de batería 1/3.
batería descargada. Se tardará unas 5 horas para cargar completamente la batería.
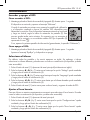
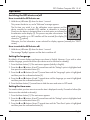
Instalar el soporte para bicicleta
Puede instalar el GPS en el manillar de su bicicleta. De esta forma puede manejarlo con facilidad
y ver bien la pantalla (2).
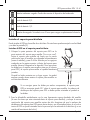
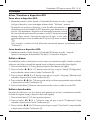
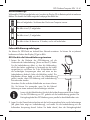
Instalar el GPS en el soporte para bicicleta
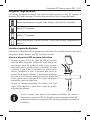
1. Coloque la parte posterior del soporte para GPS en la
parte anterior del soporte para manillar ("cruz con cruz").
Sujete el soporte para manillar de forma que la ranura
semicircular para el manillar que alineada horizontalmente
(como el manillar) y pase 2 de las 8 bridas por los agujeros
cuadrados en las partes superior e inferior del soporte para
manillar (véase el diagrama a la derecha). Tiene que pasar
las bridas por el soporte para manillar para que el soporte
para GPS y el soporte para manillar se queden firmemente
juntados.
Guarde las bridas restantes en un lugar seguro. Las podrá
emplear cuando desee montar el soporte para manillar en
una bicicleta diferente.
Si no consigue pasar las bridas por ambos componentes, el soporte para
GPS se encuentra girado 90° sobre el soporte para manillar. La palanca de
desbloqueo del soporte para GPS se debe quedar orientada en paralelo a
las bridas.
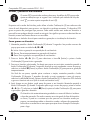
2. Pase la alfombrilla antideslizante con la cara ligeramente rugosa alrededor del manillar
(la cara lisa tiene que estar orientada hacia el soporte para manillar) y coloque la ranura
semicircular del soporte para manillar encima de ella. Asegúrese de que la palanca de
desbloqueo del soporte para GPS apunte hacia abajo y que el portadispositivos en el cual se
inserta el GPS se quede orientado hacia la persona que va montada en la bicicleta (y no en
sentido del movimiento de la bici).
8
Español
GPS para outdoor SFN 1.5 A1
3. Pase las lengüetas de las bridas alrededor del manillar y por el mecanismo de cierre de la
brida que tiene forma de cubo. El lado dentado de la brida (la otra es lisa) debe quedar en
el interior, es decir, orientada hacia el manillar. No apriete la brida todavía.
Si no escuchara un sonido de "rrr" al pasar las bridas y ajustarlas ligeramente,
ha colocado las bridas al revés (con la parte dentada hacia fuera). En este
caso, retire la brida del mecanismo de cierre y reinsértela correctamente.
4. Coloque el GPS en el portadispositivos del soporte para GPS. La pantalla (2) debe quedarse
orientada hacia Usted y el puerto USB (6) hacia abajo. Con ello se garantiza que los dos
rieles del soporte encajen en las ranuras (3) correctas del dispositivo. Presione el dispositivo
suavemente hacia abajo hasta que quede fijado con un clic.
5. Móntese en la bicicleta. Ajuste el dispositivo a la posición óptima en el manillar e inclínelo
ligeramente de forma que pueda leer la pantalla (2) fácilmente. Estire enérgicamente de las
bridas para fijarlas.
Le recomendamos que emplee una herramienta (p.ej. unos alicates) para cerrar
las bridas y que corte la parte sobrante de la lengüeta con unas tijeras.
Si más adelante quiere emplear el GPS con otra bicicleta, puede o bien
usar el cinturón para brazo o cortar las bridas con una herramienta (p.ej. un
cortaalambres) y usar dos bridas nuevas para fijarlo en la otra bicicleta. El
paquete incluye 8 bridas. Si fuera necesario, puede adquirir más bridas en una
ferretería o tienda de electricidad.
Retirar el GPS del soporte para bicicleta
Para retirar el GPS del soporte para bicicleta, proceda como se indica a continuación:
1. Pulse la palanca de desbloqueo del soporte para GPS y, al mismo tiempo, levante el GPS
para extraerlo del soporte para GPS.
Español
9
GPS para outdoor SFN 1.5 A1
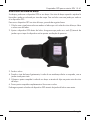
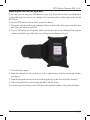
Llevar el GPS en el cinturón para brazo
Si lo desea, puede llevar el GPS en el brazo. El paquete incluye un cinturón ajustable especial
para llevarlo en el brazo encima de la ropa. Está provisto de un bolsillo con ventanilla para el
GPS.
Para llevar el GPS en el cinturón para brazo, proceda como se indica a continuación:
1. El bolsillo con ventanilla lleva un cierre de velcro en ambos lados que se pasa alrededor del
brazo. Abra el cierre de velcro de un lado.
2. Coloque el GPS en el bolsillo. Asegúrese de que la pantalla (2) sea legible a través de la
ventanilla y que la parte suprior del dispositivo se quede orientada en la dirección en que la
bicicleta avanza.
3. Cierre el velcro.
4. Pase el cinturón alrededor de su antebrazo izquierdo o derecho sin ajustarlo y con la ventanilla
hacia arriba.
5. Pase el extremo más largo alrededor del brazo y por el clip que se encuentra en el extremo
más corto del cinturón.
6. Estire del extremo más largo y asegúrelo con el velcro.
A continuación podrá pulsar los botones del GPS a través de la ventanilla o del bolsillo como
de costumbre.
10
Español
GPS para outdoor SFN 1.5 A1
Resumen del menú
A continuación encontrará un resumen de la estructura de menús del GPS y una breve descripción
de cada una de las opciones disponibles. Para abrir el menú, pulse el botón de menú (1). Para
seleccionar una opción del menú, pulse los botones t y u (4 y 7). Pulse el botón de confirmación
(5) para abrir o seleccionar la opción resaltada.
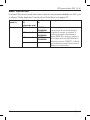
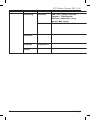
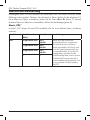
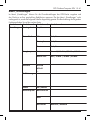
Menú "Punto de interés"
En el menú "Punto de interés" puede seleccionar y administrar un punto de interés previamente
definido.
Nivel de menú Nivel de menú (2)
(1)
(puntos de interés)
Punto de
0 Tipo Fecha
interés
Hora1
1 Tipo Fecha
Hora2
2 Tipo Fecha
Hora3
...
Español
Nivel de
menú (3)
Descripción
DIRECTO /
SECUENCIA
DIRECTO /
SECUENCIA
DIRECTO /
SECUENCIA
...
Seleccione el punto de interés deseado
de la lista de puntos de interés. Puede
distinguir los puntos de interés por el
tipo y la fecha/hora. El tipo de punto de
interés viene representado por el icono
que había seleccionado al crear el punto
de interés. Después de haber efectuado
una selección, pude ir directamente al
punto de interés (DIRECTO) o pasar por
cada punto de interés intermedio hasta
llegar al punto de interés seleccionado
(destino) (SECUENCIA).
11
GPS para outdoor SFN 1.5 A1
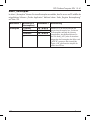
Menú "Plan de ruta"
En el menú "Plan de ruta" puede seleccionar un plan de ruta previamente definido con el PC y con
el software "Guider Application" incluido. Véase "Ficha Plano" en la página 27.
Nivel de
menú (1)
Plan de ruta
12
Nivel de menú
Nivel de menú
(2)
(3)
(planes de ruta)
01 Nombre1
DIRECTO /
SECUENCIA
02 Nombre2
DIRECTO /
SECUENCIA
03 Nombre3
DIRECTO /
SECUENCIA
...
Descripción
Seleccione el plan de ruta deseado de la
lista de planes de ruta. Puede distinguir
los planes de ruta por sus nombres. A
continuación puede ir directamente al
destino (DIRECTO) o pasar por cada una
de las etapas de la ruta (SECUENCIA). Si
selecciona la opción “DIRECTO”, la flecha
guía le indicará el camino directo hacia su
destino por círculo máximo.
Español
GPS para outdoor SFN 1.5 A1
Menú "Invertir ruta"
En el menú "Invertir ruta" puede seleccionar una ruta previamente recorrida (y grabada) para
volver a recorrerla.
Nivel de menú
(1)
Rutas
Nivel de menú
(2)
Fecha Hora1
Fecha Hora2
Fecha Hora3
...
Español
Nivel de menú
(3)
Hacia atrás /
Hacia delante
Hacia atrás /
Hacia delante
Hacia atrás /
Hacia delante
...
Descripción
Seleccione la ruta deseada de la lista
de rutas. Puede distinguir las rutas por
la fecha y hora. Una vez efectuada
la selección, puede decidir si desea
recorrer la ruta en sentido normal ("Hacia
delante") o inverso ("Hacia atrás").
13
GPS para outdoor SFN 1.5 A1
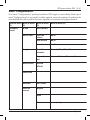
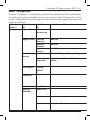
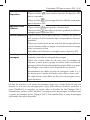
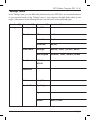
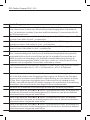
Menú "Configuraciones"
En el menú "Configuraciones" puede personalizar el GPS según sus necesidades. Dado que el
menú "Configuraciones" es muy amplio, la tabla siguiente ocupa dos páginas. Una descripción
más detallada de cada una de las funciones siguientes se encuentra en la página derecha:
Nivel de menú Nivel de menú
(1)
(2)
ConfiguraA casa
ciones
Borrar datos
Energía
Huso horario
Nivel de menú
(3)
Activ./desact.
Nivel de menú (4)
Punto de
interés
Plan de ruta
No/Sí
Invertir ruta
No/Sí
Retroiluminación
Manual / 10 s / 30 s / 60 s
Suspensión
aut.
Desact. / 10 min. / 30 min. / 60 min.
No/Sí
UTC+00
UTC+01
...
Calibración
Unidades
Km / millas
Perfil del
usuario
Mi peso
Edad
Sexo
14
Varón / Mujer
Español
GPS para outdoor SFN 1.5 A1
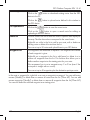
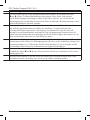
Descripción
Abra este submenú y seleccione la opción "Activ." para ir directamente a casa. Para poder hacerlo, tiene
que haber asignado un punto de interés con el icono de la casa. O seleccione “Desact.” para cancelar.
En cuanto salga del menú con el botón de menú (1), el GPS le indicará el camino directo a su casa.
Abra este submenú y seleccione la opción "Sí" para eliminar todos los puntos de interés guardados en el
GPS. O seleccione “No” para cancelar.
Abra este submenú y seleccione la opción "Sí" para eliminar todos los planes de ruta guardados en el
GPS. O seleccione “No” para cancelar.
Abra este submenú y seleccione la opción "Sí" para eliminar todas las rutas recorridas guardadas en el
GPS. O seleccione “No” para cancelar.
Con esta función puede ampliar la autonomía del GPS a batería. Seleccione la opción "Retroiluminación"
para que al pulsar el botón de encendido/apagado (8) la pantalla se quede encendida de forma
permanente o para que al pulsarlo de nuevo se apague automáticamente tras el tiempo de espera
establecido. Tan pronto como pulse otro botón, la retroiluminación de la pantalla vuelve a encenderse
durante el tiempo establecido. Si selecciona la opción "Suspensión aut.", el GPS se apagará
automáticamente tras el tiempo de espera establecido con el fin de ahorrar batería.
En este menú puede establecer el huso horario de su ubicación para que el dispositivo pueda sincronizar
la hora correctamente. En España, por ejemplo, seleccione "GMT+1" para la hora de invierno y
"GMT+2" para el verano (en Canarias, seleccione una hora menos)
Con esta función puede efectuar una nueva búsqueda de satélites y volver a determinar su posición si
tiene la impresión de que los datos mostrados no son precisos. Gire el dispositivo lentamente primero en
horizontal y luego en vertical, según lo indica la animación en pantalla (2). Este proceso puede tardar
varios minutos. Es necesario que se encuentre al exterior. De lo contrario, no se recibirán satélites GPS. Le
recomendamos que calibre el dispositivo si no lo ha utilizado durante un tiempo prolongado.
Aquí puede establecer las unidades de medida de la distancia. Puede escoger entre kilómetros (km) y
millas terrestres (sm).
Pulse los botones t y u (4 y 7) para editar los dígitos, el botón de menú (1) para seleccionar el dígito
y el botón de confirmación (5) para introducir su peso, de manera que la unidad pueda calcular las
calorías quemadas durante el recorrido.
Pulse los botones t y u (4 y) para editar los dígitos, el botón de menú (1) para seleccionar el dígito y el
botón de confirmación (5) para introducir su edad, de manera que la unidad pueda calcular las calorías
quemadas durante el recorrido.
Pulse los botones t y u (4 y) para editar los dígitos, el botón de menú (1) para seleccionar el dígito y el
botón de confirmación (5) para introducir su sexo, de manera que la unidad pueda calcular las calorías
quemadas durante el recorrido.
Español
15
GPS para outdoor SFN 1.5 A1
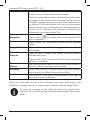
Nivel de menú
(1)
Nivel de menú
(2)
Ajustar info
Nivel de menú
(3)
Seleccionar
info
Despl. autom.
Nivel de menú (4)
Odómetro / Distancia / Velocidad /
Info GPS / Brújula / Transcurridos /
Altímetro / Calorímetro / Veloc.
media / Veloc. máxima
Desact. / 2 s / 4 s / 6 s
Cronómetro
Idioma
Lista de
idiomas
Versión
16
Español
/
GPS para outdoor SFN 1.5 A1
Descripción
Puede emplear esta opción para seleccionar las pantallas informativas seleccionables con los botones
t y u (4 y 7) durante sus recorridos. Si, por ejemplo, no está entrenando y no necesita la indicación de
calorías, seleccione la opción "Calorímetro" y pulse el botón de confirmación (5) para ocultar la marca
que aparece al lado de dicha opción. Entonces, la indicación de calorías ya no aparecerá más.
Con esta opción puede determinar si desea alternar entre las pantallas informativas automática o
manualmente. Seleccione "Desact." para alternar manualmente entre las pantallas informativas. O
establezca un tiempo de espera tras el cual el dispositivo cambia a la pantalla siguiente de forma
automática. Esta opción permite ver la distancia recorrida, la velocidad, la brújula etc. secuencialmente
sin tener que pulsar ningún botón cuando vaya en bicicleta.
Seleccione esta opción para mostrar el cronómetro. Pulse el botón de confirmación (5) para iniciar la
medición del tiempo. Pulse de nuevo el botón de confirmación (5) para detener la medición del tiempo.
La medición temporal tiene una precisión de 1/100 de segundo. Pulse el botón de menú (1) para
resetear el cronómetro. Entonces puede volver a iniciar el cronómetro si lo desea.
Utilice esta opción para definir el idioma deseado de los menús y pantallas del GPS. Pulse los botones
t y u (4 y 7), seleccione el idioma deseado y luego pulse el botón de confirmación (5).
Esta opción le permite mostrar la versión del firmware de su GPS. Va a necesitar estos datos si, p.ej., tiene
que ponerse en contacto con el servicio técnico.
Español
17
GPS para outdoor SFN 1.5 A1
Funcionamiento
Encender y apagar el GPS
Cómo encender el GPS:
1. Mantenga pulsado el botón de encendido/apagado (8) durante aprox. 1 segundo.
El dispositivo se enciende y aparece el mensaje "Welcome".
Cuando lo enciende por primera vez, aparece la pantalla de calibración
Trip Info
y el dispositivo comienza a buscar los satélites GPS disponibles para
determinar la posición. Gire el dispositivo lentamente primero en horizontal
y luego en vertical, según lo indica la animación en pantalla (2). Este
proceso puede tardar varios minutos. Es necesario que se encuentre al
exterior. De lo contrario, no se recibirán satélites GPS [en la pantalla (2)
aparecerá el icono ].
Si no, aparece la primera pantalla de información (generalmente, la pantalla "Odómetro").
Cómo apagar el GPS:
1. Mantenga pulsado el botón de encendido/apagado (8) durante aprox. 1 segundo.
Aparece el mensaje "ByeBye" y el dispositivo se apaga.
Seleccionar el idioma
Por defecto, todas las pantallas y los menús aparecen en inglés. Sin embargo, si desea
seleccionar un idioma diferente, proceda como se indica a continuación (el dispositivo ya debe
estar encendido):
1. Pulse el botón de menú (1). Aparecerá el menú principal (inicialmente en inglés).
2. Pulse los botones t y u (4 y 7) varias veces hasta que la opción "Settings" quede resaltada
y luego pulse el botón de confirmación (5).
3. Pulse los botones t y u (4 y 7) varias veces hasta que la opción "Language" quede resaltada
y luego pulse el botón de confirmación (5).
4. Pulse los botones t y u (4 y 7) varias veces hasta que el idioma deseado quede resaltado
y luego pulse el botón de confirmación (5).
5. Pulse el botón de menú (1) varias veces para ocultar el menú y regresar al modo de GPS.
Ajustar el huso horario
Para que la hora se muestre correctamente es necesario que seleccione el huso horario. Proceda
como se indica a continuación (el dispositivo ya debe estar encendido):
1. Pulse el botón de menú (1). Aparecerá el menú principal.
2. Pulse los botones t y u (4 y 7) varias veces hasta que la opción "Configuraciones" quede
resaltada y luego pulse el botón de confirmación (5).
3. Pulse los botones t y u (4 y 7) varias veces hasta que la opción "Huso horario" quede
resaltada y luego pulse el botón de confirmación (5).
18
Español
GPS para outdoor SFN 1.5 A1
4. Pulse los botones t y u (4 y 7) varias veces hasta que el huso horario deseado quede
resaltado y luego pulse el botón de confirmación (5). En España, por ejemplo, seleccione
"GMT+1" para la hora de invierno y "GMT+2" para el verano (en Canarias, seleccione una
hora menos)
5. Pulse el botón de menú(1) varias veces para ocultar el menú y regresar al modo de GPS.
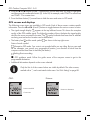
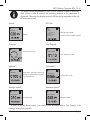
Pantallas e indicaciones del GPS
En el modo de GPS pueden aparecer las pantallas siguientes. Cada pantalla contiene información
específica. Pulse los botones t y u (4 y 7) para alternar secuencialmente entre las diferentes
pantallas.
• Arriba a la izquierda aparece el indicador de intensidad de señal
, que muestra la calidad
de recepción de las señales de los satélites GPS. Cuanto mayor sea el número de barras,
mejor es la calidad de señal y, por lo tanto, la posición se determina con más precisión. El
icono
significa que se reciben menos de 4 satélites y que no es posible determinar la
posición.
• Los iconos del nivel de carga de la batería y de modo aparecen arriba a la derecha.
Estados del icono de modo:
: modo informativo de GPS. La ruta no se graba durante el recorrido. Sin embargo, se
obtienen indicaciones de odómetro, velocidad, posición geográfica, dirección de movimiento
en la brújula y el tiempo recorrido en tiempo real (véase abajo).
parpadeando: grabación de la ruta.
x: modo de guía por GPS. Siga la flecha guía de la brújula para llegar al destino programado.
• La información adicional depende de la pantalla seleccionada.
Por defecto, solo se pueden ver las primeras 6 pantallas siguientes. Las demás
pantallas, marcadas con un *, se pueden activar a través del menú. Véase
"Ajustar info" en la página 16.
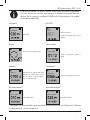
Odómetro:
Distancia:
Info viaje
Info viaje
Distancia
Odómetro
Distancia recorrida
Distancia hasta el destino
Hora actual
Español
19
GPS para outdoor SFN 1.5 A1
Para que la pantalla "Distancia" muestre datos, tiene que tener programada
una ruta. Al recorrer una ruta, aquí aparece la distancia que queda hasta el
destino. De lo contrario, se indicará 0.000 km (o el equivalente en la unidad
de medida establecida).
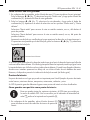
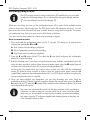
Velocidad:
Info GPS:
Info viaje
Info viaje
Velocidad:
Velocidad
Brújula:
Info GPS
Latitud:
52°52‘00.0“ N
Longitud:
003°03‘03.5‘ E
Núm sat: 10
Latitud y longitud
Número de satélites GPS que se
reciben
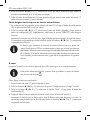
Transcurridos:
Info viaje
Info viaje
Dirección del recorrido arriba
Transcurridos:
Tiempo transcurrido desde la
salida
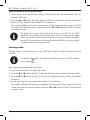
Altímetro*:
Calorímetro*:
Info viaje
Altímetro:
Info viaje
Altitud sobre el nivel del mar (para
altitudes por debajo del nivel del
mar se indica un signo negativo,
p.ej. en el Mar muerto)
Velocidad media*:
Calorímetro:
Calorías quemadas hasta ahora
Velocidad máxima*:
Info viaje
Info viaje
Veloc. media:
Veloc. máxima:
Velocidad media
Velocidad máxima
* Para poder ver estas pantallas, tiene que haberlas activado en la opción "Ajustar info" del menú
"Configuraciones". Véase la página 16.
20
Español
GPS para outdoor SFN 1.5 A1
Grabar/recorrer una ruta
Para que pueda ajustar las opciones siguientes, el GPS tiene que recibir por
lo menos 4 satélites GPS. Esto se reconoce por el indicador de intensidad de
arriba a la izquierda en la pantalla (2),
señal
Mientras vaya en bicicleta, puede grabar la ruta actual en cualquier momento pulsando el botón
de confirmación (5) en cualquiera de las pantallas. El GPS guardará las etapas de ruta que vaya
a pasar. Más adelante podrá acceder a las rutas grabadas y recorrerlas en cualquiera de los
dos sentidos con la flecha guía. Esto significa que nunca más se desviará de su ruta, incluso en
un bosque frondoso o en la oscuridad.
Para controlar la grabación o indicación de la ruta puede utilizar los iconos en pantalla.
Cómo grabar una ruta:
1. Mantenga pulsado el botón de confirmación (5) durante 3 segundos para abrir un menú
emergente con los iconos B, X y x.
B: Iniciar. Inicia la grabación o reproducción de una ruta.
X: Pausa. Detiene la grabación de la ruta temporalmente.
x: Detener. Detiene la grabación o reproducción de la ruta.
2. Pulse los botones t y u (4 y 7), para seleccionar el icono B (Iniciar) y luego pulse el botón
de confirmación (5) para iniciar la grabación.
3. Recorra la ruta seleccionada. Si quiere realizar un descanso en el camino, mantenga pulsado
el botón de confirmación (5) durante tres segundos para volver a mostrar el menú emergente,
seleccione el icono X (Pausa) y pulse el botón de confirmación (5) para detener la grabación
temporalmente.
Al final del descanso, cuando desee reanudar el recorrido, mantenga pulsado el botón de
confirmación (5) durante tres segundos para volver a mostrar el menú emergente, seleccione
el icono B (Iniciar) y pulse el botón de confirmación (5). Su GPS seguirá grabando la ruta
actual (no se creará una ruta nueva).
4. Cuando llegue a su destino, puede detener la grabación de la ruta.. Mantenga pulsado el
botón de confirmación (5) durante tres segundos para mostrar el menú emergente, pulse los
botones t y u (4 y 7), seleccione el icono x (Detener) y pulse el botón de confirmación (5)
para detener la grabación de la ruta y guardarla.
Las rutas se guardan automáticamente con la fecha y hora de la
grabación como nombre de archivo. Para que en un futuro Usted no se
pierda en la lista de rutas y asegurarse de que no vaya a recorrer la ruta
equivocada, le recomendamos que edite las rutas con el software para
PC incluido y las renombre de forma que las pueda identificar claramente.
Ejemplo: estacion-lago.
Español
21
GPS para outdoor SFN 1.5 A1
Cómo recorrer una ruta grabada:
1. En cualquiera de las pantallas, pulse el botón de menú (1) para visualizar el menú principal.
Pulse los botones t y u (4 y 7), seleccione la opción "Invertir ruta" y luego pulse el botón de
confirmación (5). Aparecerá la lista de rutas grabadas.
2. Pulse los botones t y u (4 y 7), seleccione la ruta deseada y luego pulse el botón de
confirmación (5). Aparecerá un menú de selección con las opciones "Hacia atrás" y "Hacia
delante".
Seleccione "Hacia atrás" para recorrer la ruta en sentido contrario, eso es, del destino al
punto de partida.
Seleccione "Hacia delante" para recorrer la ruta en sentido normal, eso es, del punto de
partida al destino.
Aparecerá una brújula con una flecha guía que apunta en la dirección en la que tiene que ir.
Si apareciera otra pantalla que la de la brújula, pulse los botones t y u (4 y 7) y seleccione
la pantalla de la brújula.
Distancia hasta el destino
Si la flecha guía apunta hacia la derecha, tendrá que girar hacia la derecha hasta que la flecha
vuelva a indicar hacia delante. Si la flecha guía apunta hacia la izquierda, tendrá que girar hacia
la izquierda hasta que la flecha vuelva a indicar hacia delante. Cuando haya llegado al destino,
durante unos instantes aparecerá un dibujo de un ciclista al lado de una bandera de meta.
Entonces, el dispositivo pasará a la indicación de brújula normal (sin flecha guía).
Puntos de interés
Un punto de interés es un lugar que puede ser importante para Usted. Ejemplos de puntos de interés
serían bancos, estaciones de tren, aeropuertos, restaurantes, cafeterías y otros.
Su GPS le permite guardar diferentes lugares como puntos de interés e incluso clasificarlos.
Cómo guardar una posición como punto de interés:
Para que pueda ajustar las opciones siguientes, el GPS tiene que recibir por
lo menos 4 satélites GPS. Esto se reconoce por el indicador de intensidad de
señal
arriba a la izquierda en la pantalla (2),
1. En cualquiera de las pantallas, pulse el botón de menú (5)
para visualizar un menú de selección de iconos de puntos de
interés.
22
Español
GPS para outdoor SFN 1.5 A1
2. Pulse los botones t y u (4 y 7) y seleccione el icono que mejor describa el lugar donde se
encuentra actualmente (p.ej. el sol para una playa).
3. Pulse el botón de confirmación (5) para guardar el lugar actual como punto de interés. O
pulse el botón de menú (1) para cancelar.
Cómo dirigirse hacia un punto de interés más adelante:
1. En cualquiera de las pantallas, pulse el botón de menú (1) y luego el botón de confirmación
(5). Se abrirá el menú de puntos de interés.
2. Pulse los botones t y u (4 y 7), seleccione el punto de interés deseado y luego pulse el
botón de confirmación (5). Seguidamente, seleccione la opción "DIRECTO" para dirigirse
hacia él.
Aparecerá la brújula con la flecha guía. Siga la flecha guía para dirigirse al punto de interés.
Si apareciera otra pantalla que la de la brújula, pulse los botones t y u (4 y 7) y seleccione
la pantalla de la brújula.
La flecha guía solamente le muestra el camino directo hacia su punto de
interés. Dado que su GPS no contiene mapas y tiene que circular por caminos
transitables, deberá buscar una ruta que corresponda al máxima a la indicación
de la flecha. Si la flecha indicara hacia la izquierda donde se encuentra una
finca cercada, puede continuar recto y girar hacia la izquierda en el siguiente
desvío.
A casa
La opción "A casa" es una función especial de su GPS que le guia a su casa directamente.
Para poder utilizar esta función, primero tiene que definir un punto de interés
con el icono de la casa
.
Cómo llegar a casa con esta función:
1. Pulse el botón de menú (1) para visualizar el menú.
2. Pulse los botones t y u (4 y 7), seleccione la opción "Configuraciones" y luego "A casa".
3. Pulse los botones t y u (4 y 7), seleccione la opción "Activ." y luego pulse el botón de
confirmación (5).
4. Salga de todos los menús abiertos pulsando varias veces el botón de menú (1).
Aparecerá la brújula con la flecha guía. Siga la flecha guía para dirigirse a su casa. Si
apareciera otra pantalla que la de la brújula, pulse los botones t y u (4 y 7) y seleccione
la pantalla de la brújula.
Español
23
GPS para outdoor SFN 1.5 A1
Funciones avanzadas
Transferir datos al PC
Puede transferir rutas grabadas del GPS al PC y administrarlas con el software para PC
suministrado. Puede analizar las rutas recorridas y diseñar rutas nuevas o crear puntos de interés
sobre el mapa y transferirlos al GPS.
Para poder utilizar el software para PC suministrado en el CD, su ordenador debe cumplir los
requisitos de la sección "Requisitos del sistema" (véase página 5).
Conectar el GPS al PC
1. Abra la tapa del puerto USB (6).
2. Conecte extremo del conector pequeño del cable USB al puerto USB (6) y el otro extremo a
un puerto USB libre de su ordenador.
A continuación se enciende la pantalla del GPS. Durante unos instantes aparecerá el mensaje
"Welcome", seguido de una indicación de conexión con el PC. (Si suministra energía eléctrica
al GPS con un adaptador de alimentación USB, aparecerá un icono de carga de batería.)
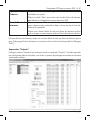
Software para PC "Guider Application"
1. Inserte el CD-ROM incluido en la unidad de CD o DVD de su ordenador.
2. Abra el contenido del CD bajo Windows y haga doble clic en el archivo
"Guider-Targa.exe". Con ello se abre el programa "Guider Application" en la vista de mapa.
Por defecto, el programa se abrirá en inglés. (Según la configuración de seguridad de su
sistema operativo, es posible que aparezca un mensaje que no ha sido posible identificar
el editor del software, preguntándole si realmente desea ejecutarlo. Naturalmente, puede
ejecutar el programa sin riesgo alguno.)
Si no desea ejecutar el programa desde el CD cada vez que lo necesite, puede
copiar el archivo "Guider-Targa.exe" a una carpeta del disco duro de su PC o
incluso al Escritorio. De esta forma le resultará más fácil y rápido iniciarlo en
el futuro.
3. Al ejecutar el programa por primera vez, la interfaz del usuario aparece en inglés. Haga clic
arriba en la ficha "Datos recorrido" y seleccione el idioma deseado de la lista desplegable
"Idioma".
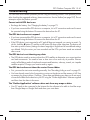
Descargar datos del GPS al programa "Guider application"
Las fichas "Plano", "Punto de interés" y "Recorrido" contienen un campo "Operaciones dispos."
. Abra una de estas fichas y haga clic en el botón
con un botón
descargan los datos pertinentes del GPS.
24
. De esta forma se
Español
GPS para outdoor SFN 1.5 A1
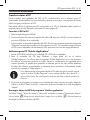
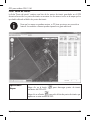
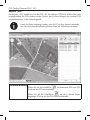
Ficha "Mapa"
Para que los mapas se puedan mostrar, su PC tiene que tener una conexión a
Internet. La conexión a Internet puede suponerle un gasto adicional.
Esta vista es idéntica a la de Google Maps. Consulte la ayuda en línea de Google Maps para
obtener una descripción detallada de las funciones del mapa. Utilice los botones arriba a la
derecha para cambiar entre las vistas de mapa, satélite y relieve.
Español
25
GPS para outdoor SFN 1.5 A1
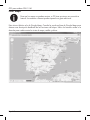
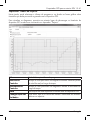
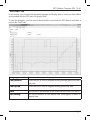
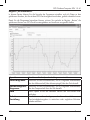
Ficha "Datos recorrido"
En esta ventana puede seleccionar el idioma del programa y mostrar datos en forma de gráficos
de las rutas que ha recorrido y grabado con su GPS.
Para visualizar los diagramas, primero tiene que descargar las rutas del GPS y seleccionar una
ruta en la ficha "Recorrido".
Idioma
Altitud recorrido
Velocidad
recorrido
HRM
Configurar
unidades
26
Aquí puede seleccionar el idioma del programa.
Marque la casilla para mostrar un diagrama de la altitud (por encima
del nivel del mar) sobre el tiempo.
Marque la casilla para mostrar un diagrama de la velocidad sobre
el tiempo.
Esta función no está disponible en la versión actual del GPS.
Aquí puede decidir si desea obtener las indicaciones de la altitud y
velocidad en unidades métricas o inglesas.
Español
GPS para outdoor SFN 1.5 A1
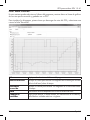
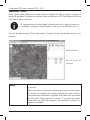
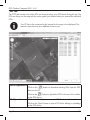
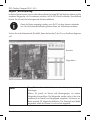
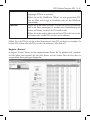
Ficha "Plano"
En esta ventana puede planificar una o varias rutas (máximo 50) sobre el mapa y subir las
diferentes etapas de las rutas al GPS. Después puede montarse en su bicicleta y recorrerlas.
Para que los mapas se puedan mostrar, su PC tiene que tener una conexión a
Internet. La conexión a Internet puede suponerle un gasto adicional.
En la vista de mapa (campo "buscar en el mapa"), busque el lugar donde desee iniciar su ruta.
Lista de rutas
Lista de etapas de la
ruta
Mapa
Haga doble clic en el mapa para definir la salida de la ruta.
Haga clic en desvíos y curvas para añadir etapas de la ruta. Las
etapas aparecen a la derecha en orden numérico con sus respectivas
latitudes y longitudes. Puede definir hasta 50 etapas por ruta. El punto
de partida ya cuenta como etapa, se le asigna el número 0 y aparece
en rojo.
Español
27
GPS para outdoor SFN 1.5 A1
Operaciones
dispos.
Herramientas de
archivo
Lista de rutas
Haga clic en el botón
al PC.
para descargar rutas existentes del GPS
Haga clic en el botón
ventana al GPS.
para subir las rutas definidas en esta
Haga clic en el botón
para guardar la ruta actual.
Haga clic en el botón
para abrir una ruta guardada y poder
editar o subirla al GPS.
Haga clic en un título de la lista para seleccionar la ruta correspondiente
y mostrarla en el mapa. Los títulos que aparecen aquí equivalen a las
rutas guardadas.
Haga clic en un título con el botón derecho del ratón para añadir una
ruta nueva, editar o eliminar una ruta existente o borrar todas las rutas
de la lista.
Puede definir hasta 50 rutas y subirlas al GPS.
Lista de etapas de Las etapas de la ruta vienen enumeradas secuencialmente. Junto a
cada etapa aparecen su latitud y longitud.
la ruta
Con el botón derecho del ratón, haga clic en una etapa de ruta de la
lista para editar (mover) o borrarla o para eliminar todas las etapas
de la lista. Con esta función también puede definir otra etapa de ruta
como punto de salida de la ruta.
Le recomendamos que defina una etapa de ruta cada 2 o 3 km
(incluso si la ruta es recta y sin curvas).
Puede definir hasta 49 etapas más el punto de partida por ruta.
En la lista de rutas o etapas de ruta, con el botón derecho del ratón, haga clic en una ruta o etapa
de ruta para administrarla. Puede añadir rutas, renombrar ("Modificar") o borrarlas o eliminar
todas las rutas de la lista ("Borrar todo"). Puede añadir etapas de ruta, renombrar ("Modificar")
o borrarlas o eliminar todas las etapas de ruta de la lista ("Borrar todo"). También puede definir
la etapa de ruta seleccionada como salida.
28
Español
GPS para outdoor SFN 1.5 A1
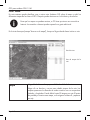
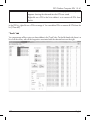
Ficha "Punto de interés"
La ficha "Punto de interés" contiene una lista de los puntos de interés guardados en el GPS
durante el recorrido. Los puntos de interés se muestran con los mismos iconos en el mapa que los
que había utilizado al definir los puntos de interés.
Para que los mapas se puedan mostrar, su PC tiene que tener una conexión a
Internet. La conexión a Internet puede suponerle un gasto adicional.
Operaciones
dispos.
Haga clic en el botón
existentes del GPS al PC.
para descargar puntos de interés
Haga clic en el botón
para subir la lista de puntos de interés que
aparecen en esta ventana al GPS.
Español
29
GPS para outdoor SFN 1.5 A1
Herramientas de
archivo
Haga clic en el botón "Guardar" para guardar la lista de puntos de
interés que aparece en esta ventana.
Haga clic en el botón "Abrir" para abrir una lista de puntos de interés
y poder editar o subirla al GPS.
Lista de puntos de Haga clic en un punto de interés de la lista para seleccionarlo y
mostrarlo en el mapa. Aparece un texto indicando la fecha y hora
interés
cuando se guardó el punto de interés.
Con el botón derecho del ratón, haga clic en un punto de interés de
la lista para borrarlo o para eliminar todos los puntos de interés de
la lista.
En la lista de puntos de interés, haga clic con el botón derecho en un punto de interés para
administrarlo. Puede eliminar puntos de interés individuales o eliminarlos todos de la lista ("Borrar
todo").
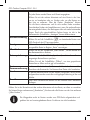
Ficha "Recorrido"
En la ficha "Recorrido" puede administrar todas las rutas que haya recorrido. A la izquierda
aparece una lista de todas las rutas, con las etapas de ruta asociadas a cada una a la derecha.
30
Español
GPS para outdoor SFN 1.5 A1
Lista de rutas
Operaciones
dispos.
Pantalla
Borrar todo
Herramientas de
archivo
Resumen de
recorridos
Rutas
Huso horario
Las rutas vienen enumeradas secuencialmente (Track0, Track1, etc.).
Junto a cada ruta aparecen la fecha y hora.
Con el botón derecho del ratón, haga clic en una ruta de la lista
para editar o borrarla o para eliminar todas las rutas de la lista. Con
la opción "Modificar" puede renombrar la ruta y asignarle un color
diferente. Es muy útil trabajar con colores diferentes cuando tenga
varias rutas que solapen o que recorran muy cerca entre sí. Si les
asigna diferentes colores, le será más fácil distinguirlos en el mapa
(botón "Pantalla").
Haga clic en el botón
para descargar rutas existentes del GPS
al PC.
Haga clic en el botón "Pantalla" para mostrar la ruta actual en la
ficha "Mapa".
Haga clic en el botón "Borrar todo" para borrar todas las rutas de la
vista del mapa.
Haga clic en el botón "Guardar" para guardar la lista de rutas que
aparece en esta ventana.
Haga clic en el botón "Abrir" para abrir una lista de rutas guardada
para poder editarla.
En esta sección se muestran las fechas y horas del inicio y final de
todas las rutas. Estos datos no se pueden editar.
En esta sección se indica el número de puntos de recorrido de la ruta
así como la distancia recorrida en km y millas.
Puede seleccionar el huso horario de su posición geográfica de la
lista desplegable.
En la lista de rutas, con el botón derecho del ratón, haga clic en una ruta para administrarla.
Puede renombrar ("Modificar") rutas o borrarlas o eliminar todas las rutas de la lista ("Borrar
todo").
Las etapas de ruta a la derecha de la ventana han sido grabados por el GPS y
pertenecen a la ruta descargada. No las puede editar.
Español
31
GPS para outdoor SFN 1.5 A1
Resolución de problemas
Los problemas más frecuentes los puede resolver Usted mismo basándose en las secciones
siguientes. Si no consigue resolver el problema con las soluciones sugeridas, póngase en contacto
con nuestra línea de atención al cliente (véase página 35). No intente reparar el producto por su
cuenta.
El GPS no se enciende.
• Recargue la batería. Véase "Cargar la batería" en la página 7.
• Si ha conectado el GPS a un ordenador, éste se encuentra en modo de conexión de PC y no
se deja manejar con los botones. Desconecte el dispositivo del PC.
El GPS no responde.
• Si ha conectado el GPS a un ordenador, éste se encuentra en modo de conexión de PC y no
se deja manejar con los botones. Desconecte el dispositivo del PC.
• Si el GPS no está conectado al PC y todavía no responde, puede resetearlo. Para ello,
mantenga pulsado el botón t (7) y el botón de encendido/apagado (8) al mismo tiempo. El
dispositivo se iniciará con los valores predeterminados de fábrica: el idioma de los menús será
el inglés y todos los ajustes personalizados se borrarán. Solo se conservan las rutas grabadas
y los puntos de interés que ha guardado después de resetear el equipo.
El GPS no indica datos.
• Para que pueda determinar su posición actual en la tierra y captar los movimientos, el GPS
tiene que recibir por lo menos 4 satélites GPS. Para ello es necesario que tenga una vista
despejada a la mayor parte del cielo. Las calles estrechas, los edificios de hormigón y
fábricas, pasadizos, túneles etc. impiden la recepción de los satélites. Cámbiese de lugar y
vuelva a intentarlo.
El GPS no indica las rutas que ha recorrido.
• Para empezar, tendrá que iniciar manualmente la grabación de la ruta. Véase "Grabar/
recorrer una ruta" en la página 21.
• Ya ha guardado muchas etapas de ruta o rutas en el dispositivo y la memoria está llena.
Libere memoria. Vaya al menú / Configuraciones / Borrar datos y elimine algunos datos
que ya no necesite, o transfiéralos al PC con el programa "Guider Application" incluido para
después borrarlos desde el menú.
El programa "Guider Application" no muestra mapas ni datos.
• Su PC tiene que tener una conexión a Internet para que el software pueda mostrar los mapas
de Google Maps o Google Earth y el recorrido de su ruta.
32
Español
GPS para outdoor SFN 1.5 A1
Mantenimiento / limpieza
Desconecte todos los cables del GPS antes de limpiarlo. De lo contrario existe el
riesgo de dañarlo seriamente.
El dispositivo no contiene ninguna pieza que requiera un mantenimiento por parte del usuario.
No abra nunca la carcasa del GPS para evitar peligros. Asegúrese de que los componentes no
se ensucien. Limpie el GPS con un paño limpio y seco. No emplee ningún tipo de disolvente o
líquido que pueda dañar la carcasa de plástico. Si está muy sucio, utilice un paño ligeramente
humedecido.
Español
33
GPS para outdoor SFN 1.5 A1
Normativa medioambiental e información sobre el desecho
Los dispositivos señalizados con este símbolo están sujetos a la Directiva Europea
2002/96/EC. Todo dispositivo eléctrico o electrónico debe ser desechado por
separado de la basura doméstica y en los centros de recogida municipales. Al
respetar las normas de desecho de los aparatos usados, participará activamente en
la protección del medioambiente y de su propia salud. Para más información sobre el
desecho y reciclaje, póngase en contacto con las autoridades pertinentes, los centros
de recogida o el comercio donde adquirió el producto.
No es posible retirar la batería incorporada para su reciclaje.
Recicle también el material de embalaje de forma compatible con el medioambiente. Las cajas
de cartón pueden depositarse en los contenedores de papel correspondientes o en los centros de
recogida públicos para su reciclaje. Los plásticos empleados en el embalaje también se pueden
depositar en los centros de recogida municipales.
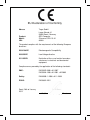
Notas sobre la Conformidad
Este equipo cumple los requisitos básicos y otros requisitos relevantes de la
Directiva CEM 2004/108/EC, de la Directiva de Baja Tensión 2006/95/EC y
de la Directiva RoHS II 2011/65/EU. Encontrará la Declaración de Conformidad
correspondiente al final de este manual del usuario.
34
Español
GPS para outdoor SFN 1.5 A1
Información sobre la garantía y el servicio posventa
Muy estimado cliente, muy estimada cliente:
Este aparato tiene 3 años de garantía a partir de la fecha de compra. Recuerde que,
si detecta desperfectos en este aparato, usted tiene derechos legales respecto al
vendedor del producto. La garantía que se detalla a continuación no limita en modo
alguno esos derechos legales.
Condiciones de garantía
El plazo de garantía empieza a partir de la fecha de compra. Guarde el comprobante
de caja original en un lugar seguro,puesto que lo necesitará para acreditar que hizo
la compra. Si el producto sufre un defecto de material o de fabricación dentro de
este periodo de tres años a partir de la fecha de compra, nos haremos cargo de la
reparación o sustitución gratuitas del producto, de acuerdo con nuestro propio criterio.
Plazo de garantía y reclamaciones legales
La prestación de la garantía no alarga el plazo de garantía. Esto es válido también
para las piezas sustituidas y reparadas. Los daños y desperfectos que ya existían al
adquirir el producto deben notificarse inmediatamente después de quitar el embalaje.
Una vez finalizado el plazo de garantía, todas las reparaciones son de pago.
Volumen de la garantía
El aparato ha sido fabricado en conformidad con las normas de calidad más exigentes
y ha sido revisado minuciosamente antes de entregarse. La prestación de garantía
cubre los defectos de material y de fabricación. Esta garantía no cubre las piezas del
producto que estén expuestas a desgaste habitual, pudiendo ser consideradas piezas
de desgaste, ni tampoco los daños en las piezas frágiles, como interruptores, baterías o
componentes de cristal. La garantía quedará invalidada si el producto resulta dañado,
se utiliza incorrectamente o es manipulado. Para utilizar el producto correctamente
deben respetarse todas las instrucciones contenidas en el manual de instrucciones.
Debe evitarse expresamente cualquier finalidad de uso o manejo que difiera de lo
recomendado o que esté contraindicado en el manual de instrucciones. El producto
está diseñado únicamente para el uso particular, y no para el uso comercial o industrial.
El manejo incorrecto e inadecuado, el uso de la fuerza bruta y las intervenciones no
realizadas por uno de nuestros centros de servicio autorizados invalidarán la garantía.
Español
35
GPS para outdoor SFN 1.5 A1
La reparación o sustitución del producto no dan lugar a ningún plazo de garantía
nuevo.
Procesamiento de la garantía
Para que su solicitud se tramite lo más rápido posible, proceda de la siguiente manera:
-
-
Antes de poner en marcha el producto, lea detenidamente la documentación
adjunta o la ayuda en línea. Si experimenta algún problema y no puede
solucionarlo con ayuda de esas instrucciones, llame a nuestro servicio de
atención al cliente.
Siempre que vaya a realizar una consulta, tenga preparado el comprobante
de caja y la referencia o el número de serie del aparato para poder acreditar
la compra.
Si no fuera posible solucionar el problema por teléfono, y dependiendo de
la causa del mismo, nuestro servicio de atención al cliente le pasará con otro
servicio técnico.
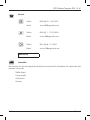
Servicio técnico
Teléfono:
E-Mail:
91 – 45 34 303
[email protected]
IAN: 85816
Fabricante
Tenga presente que los siguientes datos no pertenecen a servicio técnico. En primer
lugar, póngase en contacto con el centro de servicio indicado.
TARGA GmbH
Coesterweg 45
59494 Soest
Alemania
36
Español
Computador GPS para o exterior
Manual do utilizador
com informação relativa a assistência
Português
Computador GPS para o exterior SFN 1.5 A1
Índice
Introdução................................................................................................... 39
Fim a Que Se Destina................................................................................... 39
Informações Relativas às Marcas Comerciais................................................................................ 39
Conteúdo da Embalagem............................................................................ 40
Vista Geral.................................................................................................. 40
Especificações Técnicas................................................................................ 41
Dispositivo GPS................................................................................................................................ 41
Requisitos do sistema....................................................................................................................... 41
Instruções de Segurança.............................................................................. 42
Os Primeiros Passos.................................................................................... 43
Carregar a bateria........................................................................................................................... 43
Instalar o apoio de bicicleta............................................................................................................ 44
Usar o GPS no cinto de braço........................................................................................................ 46
Vista Geral do Menu................................................................................... 47
Menu “Ponto de Interesse”.............................................................................................................. 47
Menu “Planear o Itinerário”............................................................................................................ 48
Menu “Trajecto Inverso”.................................................................................................................. 49
Menu “Configuração”..................................................................................................................... 50
Utilização.................................................................................................... 54
Ativar / Desativar o dispositivo GPS.............................................................................................. 54
Definir o idioma................................................................................................................................ 54
Definir o fuso horário....................................................................................................................... 54
Ecrãs GPS e visualizações.............................................................................................................. 55
Gravar / percorrer um itinerário..................................................................................................... 57
Pontos de Interesse........................................................................................................................... 58
Ir para Casa..................................................................................................................................... 59
Funções Avançadas..................................................................................... 60
Transferir dados para o computador.............................................................................................. 60
Software de computador “Aplicação Guiador”............................................................................ 60
Resolução de Problemas............................................................................. 68
Manutenção / Limpeza................................................................................ 69
Regulamentos Ambientais e Informação de Descarte.................................. 70
Notas Relativas à Conformidade................................................................. 70
Informação Relativa à Garantia e Assistência.............................................. 71
38
Português
Computador GPS para o exterior SFN 1.5 A1
Introdução
Obrigado por ter adquirido este computador GPS para o exterior SFN 1.5 A1. Este dispositivo
GPS permite-lhe embarcar numa viagem de descoberta em duas rodas. Este dispositivo GPS tem
um porto USB que pode usar para carregar o dispositivo e trocar dados com o seu computador.
O dispositivo GPS também é à prova de água, de acordo com o padrão IPX-4.
Fim a Que Se Destina
Este dispositivo GPS destina-se exclusivamente a efeitos de orientação enquanto passeia fora de
casa. Este dispositivo não se destina a um fim diferente do acima mencionado.
O fabricante não se responsabiliza se:
• o dispositivo GPS não for utilizado de acordo com o fim a que se destina;
• o dispositivo GPS estiver danificado, ou for utilizado se estiver incompleto ou tiver sido
modificado;
• estiverem ligados ao dispositivo GPS outros dispositivos que não possam ser utilizados para
o carregar através do porto USB ou transferir dados para ou de um computador. Consulte a
documentação do dispositivo que deseja ligar para ter a certeza.
O dispositivo GPS só pode ser utilizado para uso privado, não para uso industrial ou comercial.
Note também que o dispositivo GPS não deve ser utilizado em climas tropicais. O dispositivo GPS
adere a todas as normas e padrões relativos à conformidade CE. Modificações ao dispositivo
GPS não recomendadas pelo fabricante podem fazer com que o dispositivo deixe de estar em
conformidade com estes padrões.
Respeite os regulamentos e leis do país onde utilizar o GPS.
Tenha em conta que o Código da Estrada tem sempre prioridade sobre as setas
guia visualizadas no dispositivo GPS. Nunca permita que o dispositivo GPS o
distraia enquanto está na estrada. Não utilize o dispositivo enquanto estiver a
andar de bicicleta ou a cavalo.
A seta guia mostra apenas o trajeto direto para o seu destino. Uma vez que
o dispositivo GPS não contém qualquer mapa informativo, e você precisa
de utilizar itinerários transitáveis, tem de encontrar um itinerário tão próximo
quanto possível da direção de orientação. Se, por exemplo, a seta apontar
numa direção errada, para uma rua de sentido único, não pode prosseguir.
Informações Relativas às Marcas Comerciais
Microsoft®, Windows®, e o logótipo do Windows são marcas comerciais registadas da
Microsoft Corporation.
USB® é uma marca comercial registada da USB Implementers Forum, Inc.
Português
39
Computador GPS para o exterior SFN 1.5 A1
Conteúdo da Embalagem
•
•
•
•
•
•
•
•
•
Computador GPS para o exterior SFN 1.5 A1
Cabo USB
8 braçadeiras de plástico
Tapete de borracha antideslizante
Apoio de guiador
Apoio de GPS
Cinto de braço
CD-ROM com controlador e software
Este Manual do Utilizador
Se faltarem itens ou se estes estiverem danificados, contacte a nossa linha de apoio ao cliente.
O número de telefone relevante encontra-se no último capítulo, “Informação Relativa à Garantia
e Assistência”.
Vista Geral
Estas instruções de utilização têm uma capa desdobrável. No interior da capa, encontra-se um
diagrama numerado do dispositivo GPS. O significado desses números é o seguinte:
1
2
3
4
5
Botão Menu / Voltar
Ecrã
Ranhuras para o apoio de GPS (em ambos os lados)
Botão u
Botão Confirmação / Ponto de Interesse / Seleção de modo
Enquanto um menu está visível, prima este botão para confirmar uma seleção ou
introdução de dados.
Prima este botão para mostrar o menu de seleção de Ponto de Interesse enquanto o
dispositivo estiver a funcionar.*
6
7
8
Mantenha o botão premido para mostrar um menu de seleção de modo (gravar trajeto,
pausar, parar de gravar).*
Porto USB (por trás da tampa protetora)
Botão t
Botão Ativado / Desativado
Botão de luz de fundo ligada / desligada automaticamente / desligada
* Necessitam de ser recebidos pelo menos 4 sinais de satélite de GPS para estas opções
funcionarem.
40
Português
Computador GPS para o exterior SFN 1.5 A1
Especificações Técnicas
Dispositivo GPS
Dimensões (L x A x P)
Peso
Tensão de entrada
Ecrã
Bateria
Tempo de utilização com carga
completa
Corrente de carregamento
Tempo de carga a partir de
descarregada através do USB
Recetor/chip GPS
Memória
Porto USB
Temperatura de funcionamento
Humidade de funcionamento
Grau de proteção IPX
52 x 83,3 x 17,3 mm
57 g
5 V via cabo USB
Retroiluminado, resolução de 128 x 128 píxeis
Bateria de polímero de lítio, 5 V, 750 mAh
Máximo de 17 horas com a luz de fundo do ecrã
desligada
Máx. 200 mA
Até 5 horas
GSC3F-7990, precisão até 10 m
32 Mb, 25.000 pontos de trajeto, até 50 itinerários,
com um total de 2.500 pontos de passagem (50
pontos de passagem por itinerário)
USB 2.0, compatível com USB 1.1
+5 °C a +35 °C
< 85% HR
IPX-4 (à prova de salpicos de qualquer direção)
Requisitos do sistema
Para utilizar o dispositivo GPS da melhor forma possível, deve utilizá-lo com o software de
computador fornecido no CD. O seu computador tem de possuir os seguintes requisitos mínimos:
• Sistema Operativo: Windows® 7, Windows® Vista ou Windows® XP *
• Processador Pentium III ou compatível
• Mínimo de 256 MB de RAM
• 1 GB de espaço disponível no disco duro
• Porto USB (USB 2.0 recomendado)
• Unidade de CDs ou DVDs
• Ligação à Internet para visualização de mapas no software do computador (isto pode fazê-lo
incorrer em custos adicionais)
* Informe-se sobre as condições de utilização das marcas comerciais relevantes utilizadas.
Português
41
Computador GPS para o exterior SFN 1.5 A1
Instruções de Segurança
Antes de utilizar este dispositivo pela primeira vez, leia as notas que se seguem, neste manual, e
preste atenção a todos os avisos, mesmo se estiver habituado/a a lidar com dispositivos eletrónicos.
Guarde estas instruções de utilização num local seguro para futura referência. Se vender ou ceder
o dispositivo GPS a alguém, assegure-se que o acompanha destas instruções de utilização.
Este símbolo identifica informação importante para utilizar o dispositivo com
segurança e para a segurança do utilizador.
Este símbolo identifica informação adicional sobre o tópico em questão.
Instruções de segurança gerais
• Este dispositivo GPS não se destina a ser utilizado por pessoas (incluindo crianças) com
diminuição de faculdades físicas, sensoriais ou mentais, e/ou que não tenham experiência
em, ou saibam como, utilizar este dispositivo: para sua própria segurança, elas devem ser
supervisionadas por uma pessoa competente ou devem ser instruídas sobre como utilizar o
dispositivo. Crianças ou pessoas com deficiências devem ser supervisionadas para assegurar
que não se exponham a qualquer perigo.
• Mantenha o dispositivo, os seus acessórios e material de embalagem fora do alcance de
crianças pequenas. Os componentes mais pequenos podem constituir perigo de asfixia. Note
também que existe risco de asfixia se as vias respiratórias forem bloqueadas pelas películas
de plástico do material de embalamento.
• Se observar fumo, ou ruídos ou cheiros estranhos, desligue imediatamente todos os cabos.
Se tal acontecer, o dispositivo não deve ser utilizado mais e deve ser inspecionado por um
perito. Nunca inale fumo proveniente dum potencial incêndio no dispositivo. Se inalar fumo
inadvertidamente, procure assistência médica. Inalar fumo pode ser prejudicial para a sua
saúde.
• Este dispositivo necessita de ser reparado se ele for de algum modo danificado, por exemplo,
se a proteção do dispositivo está danificada, se entrou líquido no dispositivo, se caíram
objetos no dispositivo, se o dispositivo não funciona normalmente ou se ele caiu. Contacte a
linha de apoio ao cliente para reparações. Não tente reparar o dispositivo você mesmo para
evitar qualquer perigo.
• Este dispositivo utiliza uma bateria de polímero de lítio de topo de gama. A bateria
recarregável apenas deve ser removida ou substituída num centro de assistência autorizado.
Caso não o faça, há o risco de incêndio ou curto-circuito.
42
Português
Computador GPS para o exterior SFN 1.5 A1
Ambiente de utilização / condições ambientais
• Não coloque objetos pesados em cima do dispositivo, ou corre o risco de o danificar
seriamente.
• O dispositivo GPS não deve ser utilizado em condições de temperatura ou humidade elevadas
e deve ser mantido livre de pó. Temperatura e humidade de utilização: de 5 °C a 35 °C;
máximo de 85% de HR.
• Se o dispositivo GPS for exposto a grandes flutuações de temperatura, pode ocorrer
condensação que provoca humidade que, por sua vez, pode levar a um curto-circuito. Se
tais flutuações de temperatura ocorrerem, utilize o dispositivo GPS apenas depois de ele ter
atingido a temperatura ambiente.
• Assegure-se que não são colocadas fontes de chama ou outros itens que possam causar um
incêndio (por exemplo, velas acesas) em cima ou perto do dispositivo. Caso não o faça, há o
risco de incêndio ou curto-circuito.
Os Primeiros Passos
Carregar a bateria
Carregue a bateria durante pelo menos 5 horas antes de utilizar o dispositivo
pela primeira vez.
1. Abra a cobertura do porto USB (6).
2. Ligue a extremidade pequena do cabo USB fornecido ao porto USB (6) e a outra extremidade
ao porto USB do seu computador.
Pode ter de ligar o computador para o porto USB do computador ter energia e
assim poder carregar o dispositivo GPS. Nem todos os computadores fornecem
energia ao porto USB quando desligados.
Assim que o seu dispositivo GPS ficar carregado, o ecrã liga-se. Uma mensagem de boasvindas (“Welcome”) aparece durante alguns segundos, seguida por uma imagem de ligação
ao computador com um ícone de carga de bateria.
Português
43
Computador GPS para o exterior SFN 1.5 A1
Imagem de carga de bateria
Um símbolo de bateria consistindo numa série de barras aparece no ecrã (2) enquanto o
dispositivo GPS está a carregar. O número de barras indica o nível de carga da bateria.
Bateria completamente carregada. Pode desligar o dispositivo do computador.
Bateria 2/3 carregada.
Bateria 1/3 carregada.
Bateria descarregada. Demora cerca de 5 horas para carregar completamente a
bateria.
Instalar o apoio de bicicleta
Pode ajustar o dispositivo GPS ao guiador da sua bicicleta. Isto permite-lhe utilizar o dispositivo
em qualquer altura e manter o ecrã (2) ao alcance da vista.
Ajustar o dispositivo GPS ao apoio de bicicleta
1. Coloque a parte de trás do apoio de GPS na parte da
frente do apoio do guiador (a fazer uma cruz). Assegure-se
que segura o apoio do guiador de modo a que a inserção
semicircular para o guiador esteja na horizontal, tal como
o guiador, e guie 2 das 8 braçadeiras de plástico pelos
buracos quadrados no topo e em baixo pelo apoio do
guiador (ver diagrama à direita). As braçadeiras de plástico
precisam de ser introduzidas através do apoio do guiador de
modo a garantir que o apoio de GPS e o apoio do guiador
estejam fixos juntos de modo firme.
Guarde as restantes braçadeiras de plástico num local
seguro. Pode utilizá-las se quiser fixar o apoio de guiador
numa bicicleta diferente.
Se não conseguir fazer passar as braçadeiras de plástico por ambos os
componentes, o apoio de GPS é colocado no apoio de guiador rodado 90 °.
A alavanca de destravar, no apoio de GPS, deve estar paralela às braçadeiras
de plástico.
44
Português
Computador GPS para o exterior SFN 1.5 A1
2. Envolva o lado ligeiramente nervurado do tapete de borracha antideslizante à volta do
guiador (com o lado macio virado para o apoio do guiador) e ajuste a inserção semicircular
ao apoio de guiador. Assegure-se que a alavanca de destravar no apoio de GPS está a
apontar para baixo, e que a cavidade na qual o dispositivo GPS está colocado está a
apontar na direção do ciclista (não na direção da deslocação!).
3. Introduza as linguetas das braçadeiras de plástico à volta do guiador e pelo mecanismo de
fecho de forma cúbica da braçadeira. Os dentes num dos lados da braçadeira de plástico (o
outro lado é liso) devem estar no interior, ou seja, a apontar para o guiador. Não aperte para
já as braçadeiras de plástico.
Quando introduzir e apertar ligeiramente as braçadeiras, se não ouvir um
barulho ligeiramente tremente, as braçadeiras de plástico estão colocadas ao
contrário (com os dentes para fora). Neste caso, remova as braçadeiras de
plástico do mecanismo de fecho e volte a inseri-las corretamente.
4. Coloque o dispositivo GPS na cavidade do apoio de GPS. O ecrã (2) deve estar virado para
o ciclista e o porto USB (6) virado para baixo. Isto implica assegurar-se que as duas ranhuras
do apoio estão introduzidas corretamente nas fendas (3) do dispositivo e que, ao empurrar o
dispositivo para baixo, ouve um clique ao ficar no sítio.
5. Suba para a bicicleta. Pode agora ajustar o dispositivo para uma posição ótima no guiador
e incliná-lo ligeiramente de modo a que possa ver o ecrã (2). Aperte bem as braçadeiras de
plástico.
Recomendamos que aperte as braçadeiras de plástico utilizando uma ferramenta
(por exemplo, alicates) e corte o excesso com uma tesoura.
Se, no futuro, pretender utilizar o dispositivo GPS noutra bicicleta, pode ou
utilizar o cinto de braço ou cortar as braçadeiras de plástico com uma ferramenta
(por exemplo, um alicate para cortar arame) e utilizar duas novas braçadeiras
de plástico para ajustá-lo à nova bicicleta. São fornecidas 8 braçadeiras de
plástico. Se necessário, pode comprar mais braçadeiras de plástico em lojas de
eletricidade ou de ferramentas.
Remover o dispositivo GPS do apoio de bicicleta
Para remover o dispositivo GPS do apoio de bicicleta, proceda da seguinte forma:
1. Pressione a alavanca de destrancar do apoio de GPS e, ao mesmo tempo, puxe pelo
dispositivo GPS para fora do apoio.
Português
45
Computador GPS para o exterior SFN 1.5 A1
Usar o GPS no cinto de braço
Se desejar, pode usar o dispositivo GPS no seu braço. Um cinto de braço especial e ajustável é
fornecido e pode ser colocado por cima da roupa. Tem um bolso com uma janela por onde se
vê o dispositivo GPS.
Para usar o dispositivo GPS no cinto de braço, proceda da seguinte forma:
1. O bolso com a janela tem velcro em ambos os lados que vai à volta do cinto de braço. Abra
o velcro num dos lados.
2. Ajuste o dispositivo GPS dentro do bolso. Assegure-se que pode ver o ecrã (2) através da
janela e que o topo do dispositivo está a apontar na direção do percurso.
3. Feche o velcro.
4. Prenda o cinto de braço ligeiramente, à volta do seu antebraço direito ou esquerdo, com a
janela virada para cima.
5. Coloque a ponta comprida à volta do seu braço e através do clipe na ponta curta do cinto
de braço.
6. Puxe a ponta comprida completamente e fixe-a com o velcro.
Pode agora premir os botões do dispositivo GPS através da janela do bolso como antes.
46
Português
Computador GPS para o exterior SFN 1.5 A1
Vista Geral do Menu
Em baixo encontra-se uma vista geral da estrutura do menu do dispositivo GPS e uma breve
explicação de cada uma das opções. Para abrir o menu, prima o botão Menu (1). Para selecionar
uma opção no menu, prima os botões t e u (4 e 7). Prima o botão Confirmação (5) para abrir
ou selecionar a opção realçada.
Menu “Ponto de Interesse”
No menu “Ponto de Interesse”, pode escolher um Ponto de Interesse que tenha definido
anteriormente e geri-lo.
Nível do
menu (1)
Ponto de
Interesse
Português
Nível do menu
Nível do
(2) (Pontos de
menu (3)
Interesse)
0 Tipo Data Hora1 DIRECTO /
SEQUÊNCIA
1 Tipo Data Hora2 DIRECTO /
SEQUÊNCIA
2 Tipo Data Hora3 DIRECTO /
SEQUÊNCIA
...
...
Descrição
Selecione o Ponto de Interesse que
deseja da lista de Pontos de Interesse.
Pode diferenciar os Ponto de Interesse
com base no tipo e na data / hora. O
tipo do Ponto de Interesse é representado
pelo símbolo que selecionou quando
configurou o Ponto de Interesse.
Após ter feito a sua seleção, pode ir
diretamente para o Ponto de Interesse
(DIRECTO) ou ir à vez para cada um
dos Pontos de Interesse até alcançar o
Ponto de Interesse selecionado (destino)
(SEQUÊNCIA).
47
Computador GPS para o exterior SFN 1.5 A1
Menu “Planear o Itinerário”
O menu "Planear o Itinerário” permite-lhe selecionar um plano de itinerário que tenha definido
anteriormente no computador utilizando o software “Aplicação Guiador” fornecido. Consulte a
secção Separador “Plano” na página 63.
Nível do
menu (1)
Planear o
Itinerário
Nível do menu
(2) (Planos de
itinerário)
01 Nome1
02 Nome2
03 Nome3
...
48
Nível do menu Descrição
(3)
DIRECTO /
SEQUÊNCIA
DIRECTO /
SEQUÊNCIA
DIRECTO /
SEQUÊNCIA
Selecione o plano de itinerário que deseja
da lista de planos de itinerário. Pode
diferenciar os planos de itinerário com
base nos seus nomes. De seguida pode
ir diretamente para o destino (DIRECTO)
ou ir à vez para cada um dos pontos de
passagem (SEQUÊNCIA). Se selecionar a
opção “DIRECTO”, a seta guia mostra-lhe
o itinerário direto para o seu destino em
linha reta.
Português
Computador GPS para o exterior SFN 1.5 A1
Menu “Trajecto Inverso”
No menu “Trajecto Inverso”, pode selecionar um itinerário que tenha percorrido (e gravado)
anteriormente de modo a voltar a percorrê-lo.
Nível do menu
(1)
Itinerários
Nível do menu
(2)
Data Hora1
Data Hora2
Data Hora3
...
Português
Nível do menu
(3)
Para Trás /
Para a Frente
Para Trás /
Para a Frente
Para Trás /
Para a Frente
...
Descrição
Selecione o itinerário que deseja a partir
da lista de itinerários. Pode diferenciar
os itinerários com base na data e na
hora. Após ter feito a sua seleção, pode
escolher entre percorrer o itinerário na
direção normal (“Para a Frente”) ou na
direção inversa (“Para Trás”).
49
Computador GPS para o exterior SFN 1.5 A1
Menu “Configuração”
No menu ”Configuração”, pode definir as preferências do seu dispositivo GPS e personalizá-lo
de acordo com as suas necessidades pessoais. Uma vez que o menu “Configuração” é muito
extenso, a tabela abaixo ocupa duas páginas. A descrição das funções seguintes encontra-se na
página do lado direito.
Nível do
menu (1)
Configuração
Nível do menu
(2)
Ir para Casa
Nível do menu
(3)
Activado /
Desactivado
Nível do menu (4)
Apagar Dados
Ponto de
Interesse
Planear o
Itinerário
Trajecto
Inverso
Luz de Fundo
Não/Sim
Auto
Suspender
Desactivado / 10 Min. / 30 Min. /
60 Min.
Modo de
Energia
Fuso Horário
Não/Sim
Não/Sim
Manual / 10 Seg. / 30 Seg. / 60 Seg.
UTC+00
UTC+01
...
Calibração
Unidade
Perfil do
Utilizador
km / Milha
O Meu Peso
Idade
Sexo
50
Masculino / Feminino
Português
.
Computador GPS para o exterior SFN 1.5 A1
Descrição
Abra este submenu e selecione a opção “Activado” para ser conduzido diretamente para casa. Para
fazer isto, tem de ter atribuído o símbolo duma casa a um Ponto de Interesse. Pode também selecionar
“Desactivado” para cancelar. Após sair do menu premindo o botão Menu (1), o dispositivo GPS mostralhe o caminho para casa.
Abra este submenu e selecione a opção “Sim” para apagar todos os Pontos de Interesse guardados no
dispositivo GPS. Pode também selecionar “Não” para cancelar.
Abra este submenu e selecione a opção “Sim” para apagar todos os planos de itinerário guardados no
dispositivo GPS. Pode também selecionar “Não” para cancelar.
Abra este submenu e selecione a opção “Sim” para apagar todos os itinerários de trajeto inverso
guardados no dispositivo GPS. Pode também selecionar “Não” para cancelar.
Pode utilizar esta função para aumentar a automonia da bateria do dispositivo GPS. Selecione a
opção “Luz de Fundo” e prima o botão Ativado / Desativado (8) para ter o ecrã permanentemente
retroiluminado, ou prima o botão novamente para o ecrã se desligar automaticamente após o tempo
definido. Assim que premir outro botão, a luz de fundo do ecrã liga-se outra vez pelo tempo definido. Se
selecionar a opção “Suspender Automaticamente”, o dispositivo GPS desliga-se automaticamente após o
tempo definido para poupar a bateria.
Neste menu, pode definir o fuso horário do local onde se encontra de modo a poder sincronizar
corretamente a hora. Em Portugal, por exemplo, selecione “GMT” para a hora de inverno e “GMT+1”
para a hora de verão.
Esta função permite-lhe levar a cabo uma nova pesquisa e descoberta de local por satélite se tiver a
sensação que os dados mostrados não estão corretos. Gire lentamente o dispositivo num movimento
horizontal e vertical tal como indicado pela animação presente no ecrã (2). Este processo pode demorar
alguns minutos. Necessita estar fora de casa ou não serão recebidos os sinais de satélite de GPS.
Recomendamos que faça a calibração do dispositivo se esteve muito tempo sem o utilizar.
Pode definir aqui a unidade de medida para distâncias. Pode escolher entre quilómetros (km) e milhas (sm).
Utilize os botões t e u (4 e 7) para editar os dígitos, o botão Menu (1) para selecionar o dígito e o
botão Confirmação (5) para introduzir o seu peso de modo a que o aparelho possa calcular as calorias
que queima enquanto anda de bicicleta.
Utilize os botões t e u (4 e 7) para editar os dígitos, o botão Menu (1) para selecionar o dígito e o
botão Confirmação (5) para introduzir a sua idade de modo a que o aparelho possa calcular as calorias
que queima enquanto anda de bicicleta.
Utilize os botões t e u (4 e 7) para editar os dígitos, o botão Menu (1) para selecionar o dígito e o
botão Confirmação (5) para introduzir o seu sexo de modo a que o aparelho possa calcular as calorias
que queima enquanto anda de bicicleta.
Português
51
Computador GPS para o exterior SFN 1.5 A1
Nível do menu
(1)
Nível do menu
(2)
Definição da
Informação
Nível do menu
(3)
Selecionar
Informação
Deslocamento
Automático
Nível do menu (4)
Odómetro / Distância / Velocidade
/ Informação do GPS / Bússola /
Tempo Decorrido / Altímetro /
Calorímetro / Velocidade Média /
Velocidade Máxima
Desactivado / 2 Seg. / 4 Seg. /
6 Seg.
Cronómetro
Idioma
Lista de
Idiomas
Versão
52
Português
Computador GPS para o exterior SFN 1.5 A1
Descrição
Pode utilizar esta opção para selecionar os ecrãs de informação que pode percorrer utilizando os
botões t e u (4 e 7) enquanto está a andar de bicicleta. Se, por exemplo, não está em treino e
não necessita de mostrar as calorias, selecione a opção “Calorímetro” e prima o botão Confirmação
(5) para esconder o marcador perto desta opção. O mostrador de calorias não está mais disponível
enquanto está a andar de bicicleta.
Utilize esta opção para selecionar se quer percorrer os ecrãs de informação automática ou
manualmente. Selecione “Desactivado” para percorrer os ecrãs de informação manualmente. Ou defina
o tempo de atraso após o qual o dispositivo muda automaticamente para o ecrã seguinte. Esta opção
significa que pode ver a distância percorrida, a velocidade, a bússola, etc. em sequência enquanto
anda de bicicleta sem ter de premir qualquer botão.
Selecione esta opção para mostrar o cronómetro. Prima o botão Confirmação (5) para começar a
medir o tempo. Prima novamente o botão Confirmação (5) para parar de medir o tempo. A precisão
da medição do tempo é de 1/100 segundos. Prima o botão Menu (1) para repor o cronómetro. Pode
reiniciar novamente o cronómetro se desejar.
Utilize esta opção para definir o idioma do menu e do ecrã do dispositivo GPS. Prima os botões t e u
(4 e 7), escolha o idioma que pretende, e prima o botão Confirmação (5).
Esta opção permite-lhe mostrar a versão de firmware do dispositivo GPS. Esta informação é necessária
se, por exemplo, necessitar de contactar a linha de apoio ao cliente.
Português
53
Computador GPS para o exterior SFN 1.5 A1
Utilização
Ativar / Desativar o dispositivo GPS
Como ativar o dispositivo GPS:
1. Mantenha premido o botão Ativado / Desativado (8) durante cerca de 1 segundo.
Isto liga o dispositivo, e uma mensagem de boas-vindas, “Welcome”, aparece.
Da primeira vez que liga o dispositivo, o ecrã de calibração aparece e o
Informação da
Viagem
dispositivo procura por satélites de GPS disponíveis para determinar a sua
posição. Gire lentamente o dispositivo num movimento horizontal e vertical
tal como indicado pela animação presente no ecrã (2). Este processo pode
demorar alguns minutos. Necessita de estar fora de casa, ou não serão
recebidos quaisquer sinais de satélites de GPS [o ecrã (2) mostra o símbolo
].
Caso contrário, o primeiro ecrã de informação selecionado aparece (normalmente o ecrã
“Odómetro”).
Como desativar o dispositivo GPS:
1. Mantenha premido o botão Ativado / Desativado (8) durante cerca de 1 segundo.
Aparece a mensagem de despedida (“Bye Bye”) e o dispositivo desliga-se.
Definir o idioma
Por predefinição, todas as informações no ecrã e menus são mostradas em Inglês. Contudo, se desejar
selecionar outro idioma, proceda da seguinte forma (o dispositivo necessita de já estar ligado):
1. Prima o botão Menu (1). O menu principal aparece (inicialmente em Inglês).
2. Prima os botões t e u (4 e 7) diversas vezes até que a opção "Settings" [Configuração]
esteja realçada e depois prima o botão Confirmação (5).
3. Prima os botões t e u (4 e 7) diversas vezes até que a opção “Language” [Idioma] esteja
realçada e depois prima o botão Confirmação (5).
4. Prima os botões t e u (4 e 7) diversas vezes até que o idioma que pretende esteja realçado
e depois prima o botão Confirmação (5).
5. Prima o botão Menu (1) diversas vezes para esconder o menu e voltar ao modo GPS.
Definir o fuso horário
Necessita de selecionar o seu fuso horário para garantir que a hora é corretamente mostrada.
Proceda da seguinte forma (o dispositivo deve estar ligado):
1. Prima o botão Menu (1). O menu principal aparece.
2. Prima os botões t e u (4 e 7) diversas vezes até que a opção "Configuração" esteja
realçada e depois prima o botão Confirmação (5).
3. Prima os botões t e u (4 e 7) diversas vezes até que a opção “Fuso Horário” esteja realçada
e depois prima o botão Confirmação (5).
54
Português
Computador GPS para o exterior SFN 1.5 A1
4. Prima os botões t e u (4 e 7) diversas vezes até que o fuso horário que pretende esteja
realçado e depois prima o botão Confirmação (5). Em Portugal, por exemplo, selecione
“GMT” para a hora de inverno e “GMT+1” para a hora de verão.
5. Prima o botão Menu (1) diversas vezes para esconder o menu e voltar ao modo GPS.
Ecrãs GPS e visualizações
As seguintes vistas de ecrã estão disponíveis no modo GPS. Cada um destes ecrãs contém
informação específica. Prima os botões t e u (4 e 7) para percorrer entre os vários ecrãs em
série.
• O símbolo de força do sinal
aparece no canto superior esquerdo. Isto mostra a qualidade
de receção do sinal de satélite de GPS. Quanto maior o número de barras, maior a qualidade
indica que menos de 4
do sinal e portanto mais correta é a localização. O símbolo
satélites estão a ser recebidos e não pode ser determinada a localização.
• Os símbolos de nível de bateria e de modo aparecem no canto superior direito.
Estado do símbolo de modo:
: Modo informativo de GPS. O seu itinerário não é gravado enquanto anda de bicicleta.
Mas pode ler um a um o odómetro, a sua velocidade, a sua localização geográfica, a sua
direção de viagem a partir da bússola e o tempo de viagem em tempo real (ver em baixo).
a piscar: A gravar itinerário.
x: Modo de orientação GPS. Siga a seta guia a partir do ecrã da bússola para ir até ao
destino programado.
• Dependendo do ecrã selecionado, há informação adicional.
Apenas os primeiros 6 ecrãs em baixo são visíveis por predefinição. Os
outros ecrãs, marcados com um *, podem ser ativados através do menu. Ver
“Definição da Informação” na página 52.
Odómetro:
Distância:
Informação da
Viagem
Informação da
Viagem
Distância
Odómetro
Distância percorrida
Distância até ao destino
Hora atual
Português
55
Computador GPS para o exterior SFN 1.5 A1
Necessita de ter programado um itinerário para que o ecrã “Distância” mostre
algum dado. Quando um itinerário é introduzido, a distância que falta até ao
destino é mostrada. Caso contrário, o ecrã mostra 0.000Km (ou o equivalente
na unidade de medida definida).
Velocidade:
Informação do GPS:
Informação da
Viagem
Informação da
Viagem
Velocidade:
Velocidade
Bússola:
Informação do GPS
Latitude:
52°52’00,0” N
Longitude:
003°03’03,5“ E
Número Sat: 10
Latitude e longitude
Número de satélites de GPS
recebidos
Tempo Decorrido:
Informação da
Viagem
Informação da
Viagem
Direção da viagem
Tempo Decorrido:
Tempo decorrido desde o início
Altímetro*:
Calorímetro*:
Informação da
Viagem
Altímetro:
Informação da
Viagem
altitude acima do nível do mar
(um sinal de menos aparece para
altitudes abaixo do nível do mar,
por exemplo, o Mar Morto)
Velocidade Média*:
Calorímetro:
Calorias queimadas
momento
até
ao
Velocidade Máxima*:
Informação da
Viagem
Informação da
Viagem
Velocidade Média:
Velocidade Máxima:
Velocidade média
Velocidade máxima
* Para ver estes ecrãs, necessita de os ter ativado em “Definição da Informação” no menu
“Configuração”. Consulte a página 52.
56
Português
Computador GPS para o exterior SFN 1.5 A1
Gravar / percorrer um itinerário
O recetor GPS necessita de receber pelo menos 4 satélites de GPS para poder
ajustar as definições que se seguem. Isto é indicado pelo símbolo de força do
no canto superior esquerdo do ecrã (2).
sinal
Enquanto está a andar de bicicleta, pode utilizar o botão Confirmação (5) em cada uma das
vistas de ecrã disponíveis para gravar o seu itinerário a qualquer momento. O dispositivo GPS
grava os pontos de passagem que percorre. Pode então aceder mais tarde aos itinerários e
percorrê-los em qualquer direção usando a seta guia. Isto significa que nunca se desviará do seu
itinerário, mesmo em floresta densa ou na escuridão.
Pode utilizar os símbolos de ecrã para controlar a gravação ou visualização do itinerário.
Como gravar um itinerário:
1. Mantenha premido o botão Confirmação (5) durante 3 segundos. Isto produz um menu de
pop-up que mostra os símbolos B, X e x.
B: Iniciar. Inicia a gravação ou reprodução de um itinerário.
X: Pausar. Pausa temporariamente a gravação do itinerário.
x: Parar. Para a gravação ou reprodução de um itinerário.
2. Prima os botões t e u (4 e 7) para selecionar o ícone B (Iniciar) e prima o botão
Confirmação (5) para iniciar a gravação.
3. Percorra o itinerário selecionado. Se deseja uma pausa no seu trajeto, mantenha premido o
botão Confirmação (5) durante 3 segundos de modo a surgir novamente o menu de pop-up,
selecione o símbolo X (Pausar) e prima o botão Confirmação (5) para pausar a gravação
temporariamente.
No final da sua pausa, quando quiser continuar o trajeto, mantenha premido o botão
Confirmação (5) durante 3 segundos de modo a surgir novamente o menu de pop-up,
selecione o símbolo B (Iniciar) e prima o botão Confirmação (5). O dispositivo GPS continua
a gravar o itinerário em curso (não é criado um itinerário novo).
4. Após chegar ao seu destino, pode parar de gravar o seu itinerário. Mantenha premido o
botão Confirmação (5) durante 3 segundos para surgir o menu de pop-up, prima os botões
t e u (4 e 7), selecione o símbolo x (Parar) e prima o botão Confirmação (5) para parar
a gravação e guardar o itinerário.
Os itinerários são automaticamente guardados e o nome do ficheiro é a data e
a hora da gravação. De modo a manter uma vista geral da lista de itinerários
no futuro, e para ter a certeza que não percorre um itinerário errado por
engano, recomendamos editar os itinerários usando o software de computador
fornecido e os mudar-lhes o nome para que sejam claros. Exemplo: Da estação
para o lago.
Português
57
Computador GPS para o exterior SFN 1.5 A1
Como percorrer um itinerário gravado:
1. Em qualquer vista de ecrã, prima o botão Menu (1) para mostrar o menu principal. Prima
os botões t e u (4 e 7), selecione a opção “Trajecto Inverso” e depois prima o botão
Confirmação (5). Isto mostra uma lista de itinerários gravados.
2. Prima os botões t e u (4 e 7), selecione o itinerário que pretende e depois prima o botão
Confirmação (5). Isto faz surgir um menu de seleção com as opções “Para Trás” e “Para a
Frente”.
Selecione “Para Trás” para percorrer o itinerário no sentido inverso, isto é, do ponto de
destino para o ponto de partida.
Selecione “Para a Frente” para percorrer o itinerário no sentido original, isto é, do ponto de
partida para o ponto de destino.
Isto faz surgir uma bússola com uma seta guia apontando na direção a ir. Se aparecer outro
ecrã que não o da bússola, prima os botões t e u (4 e 7) e selecione o ecrã da bússola.
Distância até ao destino
Se a seta guia aponta para a direita, necessita de virar à direita até que ela aponte novamente
para a frente. Se a seta guia aponta para a esquerda, necessita de virar à esquerda até que ela
aponte novamente para a frente. Uma vez chegado ao seu destino, uma imagem de um ciclista
perto de uma bandeira aos quadrados pisca durante alguns segundos. O dispositivo volta então
ao ecrã normal da bússola (sem quaisquer indicações que o guiem num itinerário).
Pontos de Interesse
Um ’Ponto de Interesse’ é um local que pode ser importante. Os Ponto de Interesse podem ser
bancos, estações ferroviárias, aeroportos, atrações turísticas, restaurantes, cafés e outros serviços
ou instalações.
O dispositivo GPS permite-lhe guardar vários locais como Ponto de Interesse e classificá-los.
Como guardar o seu local como um Ponto de Interesse:
O recetor GPS necessita de receber pelo menos 4 satélites de GPS para poder
ajustar as definições seguintes. Isto é indicado pelo símbolo de força do sinal
no canto superior esquerdo do ecrã (2).
1. Em qualquer vista de ecrã, prima o botão Confirmação (5) para fazer aparecer um menu de
seleção de símbolos de Pontos de Interesse.
58
Português
Computador GPS para o exterior SFN 1.5 A1
2. Prima os botões t e u (4 e 7) e selecione o símbolo que
melhor descreve o local atual (por exemplo, o sol para uma
praia).
3. Prima o botão Confirmação (5) para guardar o local atual
como um Ponto de Interesse. Ou prima o botão Menu (1)
para cancelar.
Como ir para um Ponto de Interesse mais tarde:
1. Em qualquer vista de ecrã, prima o botão Menu (1) seguido do botão Confirmação (5). Isto
abre o menu Ponto de Interesse.
2. Prima os botões t e u (4 e 7), escolha o Ponto de Interesse que deseja, e prima o botão
Confirmação (5). Depois selecione a opção “DIRECTO” para ser conduzido ao Ponto de
Interesse.
Aparece o ecrã da bússola com uma seta guia. Siga a seta guia para chegar ao Ponto de
Interesse. Se aparecer outro ecrã que não o da bússola, prima os botões t e u (4 e 7) e
selecione o ecrã da bússola.
A seta guia mostra apenas o trajeto direto para o seu Ponto de Interesse. Uma vez
que o dispositivo GPS não contém qualquer mapa informativo, e você precisa de
utilizar itinerários transitáveis, tem de encontrar um itinerário tão próximo quanto
possível da direção de orientação. Se a seta aponta para a esquerda para um
campo vedado, pode ir em frente e depois virar na próxima esquerda.
Ir para Casa
“Ir para Casa” é uma função especial do seu dispositivo GPS que o pode levar diretamente para
casa a qualquer momento.
Para utilizar Ir para Casa, necessita definir primeiro a sua casa como um Ponto
de Interesse com o símbolo
.
Como fazer com que Ir para Casa o leve para casa:
1. Prima o botão Menu (1) para fazer aparecer o menu.
2. Prima os botões t e u (4 e 7), selecione a opção “Configuração” e depois “Ir para Casa”.
3. Prima os botões t e u (4 e 7), selecione a opção “Activado” e depois prima o botão
Confirmação (5).
4. Saia de todos os menus abertos premindo o botão Menu (1) diversas vezes.
Aparece o ecrã da bússola com uma seta guia. Siga a seta guia para ir para casa. Se
aparecer outro ecrã que não o da bússola, prima os botões t e u (4 e 7) e selecione o ecrã
da bússola.
Português
59
Computador GPS para o exterior SFN 1.5 A1
Funções Avançadas
Transferir dados para o computador
Pode transferir itinerários gravados do dispositivo GPS para um computador e geri-los utilizando
o software de computador fornecido. Pode analisar os itinerários que percorreu e elaborar novos
itinerários ou Pontos de Interesse no mapa e transferi-los para o dispositivo GPS.
Para utilizar o software de computador fornecido em CD, o seu computador deve cumprir os
requisitos apresentados na secção “Requisitos do Sistema” (ver página 41).
Ligar o dispositivo GPS a um computador
1. Abra a cobertura do porto USB (6).
2. Ligue a extremidade pequena do cabo USB fornecido ao porto USB (6) e a outra extremidade
ao porto USB do seu computador.
O ecrã do dispositivo GPS liga-se. Uma mensagem de boas-vindas (“Welcome”) aparece
por alguns segundos, seguida por uma imagem de ligação ao computador. (Quando liga o
dispositivo com um adaptador de energia USB, aparece um indicador de carga de bateria.)
Software de computador “Aplicação Guiador”
1. Introduza o CD-ROM fornecido na unidade de CDs ou DVDs do seu computador.
2. Abra o conteúdo do CD no Windows e faça duplo clique sobre o ficheiro
“GuiderTarga.exe”. Isto abre o programa “Aplicação Guiador” na vista de mapa. O
programa está em Inglês por predefinição. (Dependendo das definições de segurança do
seu sistema operativo, pode aparecer uma mensagem a dizer que o fabricante do software
não pôde ser identificado e a perguntar se realmente pretende correr o programa. Claro, não
há risco em executar este programa.)
Para não ter de iniciar o programa a partir do CD cada vez que o quizer
utilizar, pode fazer uma cópia do ficheiro “Guider-Targa.exe” para uma
pasta no disco duro local do seu computador ou mesmo para o Ambiente de
Trabalho. Isto torna-o rápido e fácil de iniciar no futuro.
3. Quando corre o programa pela primeira vez, a interface de utilizador aparece em Inglês.
Clique no separador “Track data” [Dados do trajecto] no topo e selecione o idioma que
pretende para a interface de utilizador do programa a partir da lista pendente “Language”
[Idioma].
Descarregar dados do dispositivo GPS para a Aplicação Guiador
Nos separadores “Plano”, “Ponto de Interesse” e “Trajecto” existe uma caixa “Operações do
. Abra um desses separadores e clique no botão
Dispositivo” com um botão
descarrega os dados importantes do dispositivo GPS.
60
. Isto
Português
Computador GPS para o exterior SFN 1.5 A1
Separador “Mapa”
O computador tem de estar ligado à Internet para que os mapas possam ser
visualizados. A ligação à Internet pode incorrer em custos adicionais para si.
Esta vista é a mesma que a dos Google Maps. Veja a ajuda online dos Google Maps para
uma descrição detalhada das funções de mapa. Utilize os botões no canto superior direito para
mudar a vista entre Mapa, Satélite e Terreno.
Português
61
Computador GPS para o exterior SFN 1.5 A1
Separador “Dados do trajecto”
Nesta janela, pode selecionar o idioma do programa e ver dados na forma gráfica sobre
itinerários que tenha percorrido e gravado com o dispositivo GPS.
Para visualizar os diagramas, necessita em primeiro lugar de descarregar os itinerários do
dispositivo GPS e selecionar um itinerário no separador “Trajecto”.
Idioma
Altitude do
Caminho
Velocidade do
Caminho
HRM
Configuração das
Unidades
62
Pode definir aqui o idioma do programa.
Marque a caixa para exibir um diagrama a mostrar a altitude (acima
do nível do mar) ao longo do tempo.
Marque a caixa para exibir um diagrama a mostrar a velocidade ao
longo do tempo.
Esta função não está disponível na versão atual do dispositivo GPS.
Pode definir aqui ter os valores de altitude e velocidade em unidades
métricas ou imperiais.
Português
Computador GPS para o exterior SFN 1.5 A1
Separador “Plano”
Nesta janela, pode planear um ou mais itinerários (máximo de 50) no mapa e carregar os
pontos de passagem individuais que deseja utilizar no dispositivo GPS. Pode depois subir para
a bicicleta e seguir o itinerário.
O computador tem de estar ligado à Internet para que os mapas possam ser
visualizados. A ligação à Internet pode incorrer em custos adicionais para si.
Na vista de mapa (campo “Procura de mapa”), pesquise o local onde deseja começar o seu
itinerário.
Lista de itinerários
Lista de pontos de
passagem
Mapa
Faça duplo clique no mapa para determinar o ponto de partida para
o itinerário.
Clique nas voltas e curvas para adicionar mais pontos de passagem.
Os pontos de passagem são listados à direita em ordem numérica
com informação da latitude e longitude. Pode definir até um máximo
de 50 pontos de passagem por itinerário. O seu ponto de partida
conta como um ponto de passagem, é-lhe atribuido o número 0 e
aparece a vermelho.
Português
63
Computador GPS para o exterior SFN 1.5 A1
Operações do
Dispositivo
Clique no botão
para o computador.
para transferir itinerários do dispositivo GPS
Clique no botão
para carregar itinerários definidos nesta janela
para o dispositivo GPS.
Operações com
Ficheiros
Clique no botão
para guardar o itinerário atual.
Clique no botão
para abrir um itinerário guardado, e editá-lo ou
carregá-lo para o dispositivo GPS:
Lista de itinerários Clique num título da lista para selecionar o itinerário em questão e
vê-lo no mapa. Os títulos mostrados aqui correspondem aos itinerários
guardados.
Clique com o botão direito do rato num título da lista para adicionar
um novo itinerário, editar ou apagar um itinerário existente ou apagar
todos os itinerários da lista.
Pode definir até 50 itinerários e carregá-los para o dispositivo GPS.
Lista de pontos de Os pontos de passagem estão numerados em sequência. É dada a
longitude e a latitude de cada ponto de passagem.
passagem
Clique com o botão direito do rato num ponto de passagem da
lista para o editar (mover), apagar ou remover todos os pontos de
passagem da lista. Esta função também lhe permite definir outro ponto
de passagem como sendo o ponto de partida do seu itinerário.
Recomendamos que defina um ponto de passagem a cada 2 ou 3
km (mesmo que o caminho do itinerário seja a direito e sem curvas).
Por cada itinerário pode definir até 49 pontos de passagem mais o
ponto de destino.
Na lista de itinerários ou de pontos de passagem, clique com o botão direito do rato num
itinerário ou num ponto de passagem para o gerir. Pode adicionar itinerários, mudar-lhes o
nome (“Modificar”) ou apagá-los, ou remover todos os itinerários da lista (“Apagar Tudo”).
Pode adicionar, mudar o nome (“Modificar”) ou apagar pontos de passagem, ou remover todos
os pontos de passagem da lista (“Apagar Tudo”). Pode também definir o ponto de passagem
selecionado como ponto de partida.
64
Português
Computador GPS para o exterior SFN 1.5 A1
Separador “Ponto de Interesse”
O separador “Ponto de Interesse” contém uma lista dos Pontos de Interesse que guardou no seu
dispositivo GPS durante a viagem. Os Pontos de Interesse são mostrados no mapa com o mesmo
símbolo que lhes atribuiu quando introduziu os Pontos de Interesse individuais.
O computador tem de estar ligado à Internet para que os mapas possam ser
visualizados. A ligação à Internet pode incorrer em custos adicionais para si.
Operações do
Dispositivo
Clique no botão
para transferir Pontos de Interesse do dispositivo
GPS para o computador.
Clique no botão
para carregar a lista de Pontos de Interesse
mostrada nesta janela para o dispositivo GPS.
Português
65
Computador GPS para o exterior SFN 1.5 A1
Operações com
Ficheiros
Clique no botão “Guardar” para guardar a lista de Pontos de Interesse
mostrada nesta janela.
Clique no botão “Abrir” para abrir uma lista de Pontos de Interesse
para edição ou carregamento para o dispositivo GPS.
Lista de Pontos de Clique num Ponto de Interesse da lista para o selecionar e ver no
mapa. Aparece texto mostrando a data e a hora em que o Ponto de
Interesse
Interesse foi guardado.
Clique com o botão direito do rato num Ponto de Interesse da lista
para o apagar ou para remover todos os Pontos de Interesse da lista.
Na lista de Pontos de Interesse, clique com o botão direito do rato num Ponto de Interesse para o
gerir. Pode apagar Pontos de Interesse ou remover todos os Pontos de Interesse da lista ("Apagar
Tudo").
Separador “Trajecto”
Pode gerir todos os itinerários que tenha percorrido no separador “Trajecto”. No lado esquerdo,
tem uma lista de todos os itinerários, com todos os pontos de passagem associados ao itinerário
selecionado à direita.
66
Português
Computador GPS para o exterior SFN 1.5 A1
Lista de itinerários
Operações do
Dispositivo
Ver
Apagar Tudo
Operações com
Ficheiros
Resumos do
Trajecto
Itinerários
Fuso Horário
Os itinerários estão numerados em sequência (Track0, Track1, etc.).
A data e a hora de cada itinerário são apresentadas.
Clique com o botão direito do rato num itinerário da lista para o editar
ou apagar, ou para remover todos os itinerários da lista. A opção
“Modificar” permite-lhe mudar o nome do itinerário e atribuir-lhe uma
cor diferente. É útil utilizar múltiplas cores uma vez descarregados
diversos itinerários que se sobreponham ou estão localizados perto
uns dos outros. As diferentes cores ajudam-no a distingui‑los mais
facilmente na vista de mapa (botão “Ver”).
Clique no botão
para transferir itinerários do dispositivo GPS
para o computador.
Clique no botão “Ver” para mostrar o itinerário atual no separador
“Mapa”.
Clique no botão “Apagar Tudo” para apagar todos os itinerários da
vista de mapa.
Clique no botão “Guardar” para guardar a lista de itinerários
mostrada nesta janela.
Clique no botão “Abrir” para abrir uma lista de itinerários guardados
para fazer a sua edição.
Esta secção mostra-lhe a data e a hora de início e de fim de todos os
itinerários. Não é possível editar esta informação.
Nesta secção, pode ver o número de pontos do trajeto gravados
para o itinerário e a distância coberta em km e milhas.
Pode selecionar o fuso horário correspondente ao local onde se
encontra a partir da lista pendente.
Clique com o botão direito do rato na lista de itinerários para a gerir. Pode mudar o nome
(“Modificar”) ou apagar itinerários, ou remover todos os itinerários da lista (“Apagar Tudo”).
Os pontos de passagem no lado direito da janela foram gravados pelo
dispositivo GPS e são uma parte fixa do itinerário descarregado. Não os pode
editar.
Português
67
Computador GPS para o exterior SFN 1.5 A1
Resolução de Problemas
Pode resolver a maior parte dos problemas mais comuns você mesmo utilizando as secções
seguintes. Se o problema persistir depois de tentar as soluções sugeridas, contacte o nosso
serviço telefónico de apoio ao cliente (consulte a página 71). Não tente reparar o dispositivo você
mesmo.
Não consegue ativar o dispositivo GPS.
• Recarregue a bateria. Ver “Carregar a bateria” na página 43.
• Se ligou o dispositivo GPS a um computador, está no modo de ligação a computador e o
dispositivo não pode ser operado utilizando os botões. Desligue o dispositivo do computador.
O dispositivo GPS não responde.
• Se ligou o dispositivo GPS a um computador, está no modo de ligação a computador e o
dispositivo não pode ser operado utilizando os botões. Desligue o dispositivo do computador.
• Se o dispositivo GPS não está ligado a um computador e, mesmo assim, não responder, pode
tentar reiniciá-lo. Para fazer isto, mantenha premidos os botões t (7) e Ativado / Desativado
(8) ao mesmo tempo. O dispositivo será iniciado com as suas definições de fábrica: o idioma
de menu é Inglês e todas definições do utilizador são apagadas. Apenas os itinerários que
tenha gravado e os Pontos de Interesse que tenha guardado são mantidos após um reinício.
O dispositivo GPS não mostra quaisquer dados.
• O dispositivo GPS necessita de receber pelo menos quatro sinais de satélite de GPS para
determinar a sua posição atual e seguir movimentos. Necessita de ter uma vista clara de
tanto céu quanto possível. Estradas estreitas, edifícios altos feitos de betão armado e fábricas,
metropolitanos, túneis, etc. impedem a receção de satélite. Altere a sua localização e tente de
novo.
O dispositivo GPS não mostra os itinerários que percorri.
• Em primeiro lugar, necessita de começar a gravar manualmente um itinerário. Ver “Gravar /
percorrer um itinerário” na página 57.
• Já tem guardados muitos pontos de passagem ou itinerários no dispositivo e a memória está
cheia. Liberte memória indo a Menu / Configuração / Apagar Dados, e apague quaisquer
dados que não precise, ou transfira os dados do dispositivo para o seu computador usando
o software “Aplicação Guiador” fornecido e depois apague os dados através do menu.
O software “Aplicação Guiador” não mostra quaisquer mapas ou dados.
• O seu computador necessita de estar ligado à Internet para que o software possa carregar os
mapas dos Google Maps ou Google Earth e mostrar os seus dados de itinerário.
68
Português
Computador GPS para o exterior SFN 1.5 A1
Manutenção / Limpeza
Desligue todos os cabos do dispositivo GPS antes de o limpar, caso contrário
corre o risco de danificar seriamente o dispositivo GPS.
O dispositivo não contém componentes que necessitem de manutenção por parte do utilizador.
Nunca abra o recipiente do dispositivo GPS, evitando assim potenciais situações perigosas.
Assegure-se que os componentes não se sujam. Para limpar o dispositivo GPS, utilize um pano
macio e seco. Nunca utilize solventes ou produtos de limpeza que possam danificar o recipiente
de plástico. Para zonas mais sujas, utilize um pano ligeiramente humedecido.
Português
69
Computador GPS para o exterior SFN 1.5 A1
Regulamentos Ambientais e Informação de Descarte
Os dispositivos marcados com este símbolo estão sujeitos à Diretiva Europeia
2002/96/CE. O descarte de todos os dispositivos elétricos e eletrónicos deve ser
efetuado separadamente do lixo doméstico, em centros de descarte oficiais. O
devido descarte de dispositivos antigos evita danos ao ambiente e à sua saúde. Para
mais informação sobre como se descartar devidamente do dispositivo, contacte as
agências governamentais locais, centros de reciclagem, ou a loja onde adquiriu o
dispositivo.
A bateria recarregável integrada não pode ser removida para descarte.
Descarte-se de todo o material de embalamento duma forma que respeite o ambiente. As
caixas podem ser recicladas com outro papel ou entregues em pontos de recolha públicos. As
películas e plásticos incluídos na embalagem original podem ser recolhidos pela sua empresa de
eliminação de resíduos local duma forma que respeite o ambiente.
Notas Relativas à Conformidade
Este dispositivo está em conformidade com os requisitos básicos e outros requisitos
relevantes da Diretiva de Compatibilidade Eletromagnética 2004/108/CE, da
Diretiva de Baixa Voltagem 2006/95/CE e da Diretiva RoHS II 2011/65/UE.
A respetiva Declaração de Conformidade encontra-se no fim deste Manual do
Utilizador.
70
Português
Computador GPS para o exterior SFN 1.5 A1
Informação Relativa à Garantia e Assistência
Estimado(a) cliente,
Com este aparelho, usufrui de 3 anos de garantia a partir da data de compra. Em caso de
defeitos neste produto, estão-lhe garantidos os direitos legais do consumidor. Estes direitos legais
não são limitados pela garantia de seguida apresentada.
Condições da garantia
O prazo da garantia tem início na data da compra. Guarde o recibo original, pois será necessário
como comprovativo de compra. Se no prazo de três anos da data de compra se verificarem
falhas de material ou de fabrico, o produto será reparado ou substituído, à nossa discrição, sem
custos para o comprador.
Período da garantia e reclamação devido a defeitos
O período da garantia não é prolongado pela prestação da garantia. Isto aplica-se também
a peças substituídas e reparadas. Eventuais danos e defeitos já existentes aquando da compra
deverão ser comunicados logo após o desembalamento. As reparações que ocorram após o fim
do período da garantia estão sujeitas a pagamento.
Âmbito da garantia
O aparelho foi fabricado segundo as normas de qualidade mais rígidas e devidamente
verificado antes de ser expedido. A prestação da garantia é válida para falhas de material ou
de fabrico. Esta garantia não abrange peças do produto que estão sujeitas a desgaste normal
e que, por isso, poderão ser consideradas peças de desgaste, nem a danos em peças frágeis
como, por exemplo, interruptores, baterias ou artigos de vidro. Esta garantia expira se o produto
for danificado, incorrectamente utilizado ou se não for submetido a manutenção adequada.
Para uma utilização correcta do produto, devem ser seguidas, de forma precisa, todas as
indicações constantes do manual de instruções. Utilizações e manuseamentos expressamente
desaconselhados e proibidos no manual de instruções devem ser evitados sem excepções. O
produto destina-se exclusivamente a utilização privada e não comercial. O manuseamento
abusivo e incorrecto, o exercício de violência e intervenções não realizadas pelas nossas filiais
de assistência técnica autorizadas resultam na anulação da garantia.
Português
71
Computador GPS para o exterior SFN 1.5 A1
Processo de activação da garantia
De forma a assegurar um processamento rápido do seu pedido, siga as seguintes indicações:
-
Antes de utilizar o produto, leia atentamente a documentação fornecida ou a
ajuda online. Caso ocorra algum problema que não possa ser resolvido com estas
informações, contacte a nossa linha de apoio ao cliente.
-
Para qualquer pedido, tenha a postos o recibo e o número de referência ou, se
disponível, o número de série, como comprovativo de compra.
-
Caso não seja possível conseguir uma solução por via telefónica, a nossa linha de
apoio ao cliente fará o encaminhamento para um serviço de assistência técnica
complementar, consoante a causa do erro.
Serviço de assistência técnica
Telefone:
E-Mail:
21 – 415 90 76
[email protected]
IAN: 85816
Fabricante
Tenha em atenção que o seguinte endereço não é o endereço do serviço de assistência técnica.
Contacte, antes de mais, o ponto de assistência técnica acima mencionado.
TARGA GmbH
Coesterweg 45
59494 Soest
Germany
72
Português
Outdoor Handheld GPS Unit
User manual and service information
English
GPS Outdoor Computer SFN 1.5 A1
Contents
Introduction................................................................................................. 75
Intended Use............................................................................................... 75
Trademark information..................................................................................................................... 75
Package contents........................................................................................ 76
Overview.................................................................................................... 76
Technical specifications................................................................................ 77
GPS device....................................................................................................................................... 77
System requirements......................................................................................................................... 77
Safety instructions....................................................................................... 78
Getting started............................................................................................ 79
Charging the battery........................................................................................................................ 79
Installing the bike mount.................................................................................................................. 80
Wearing the GPS on the arm belt................................................................................................... 82
Overview of menu navigation..................................................................... 83
“POI” Menu...................................................................................................................................... 83
“Route Plan” Menu.......................................................................................................................... 84
“Track Back” Menu.......................................................................................................................... 85
"Settings" menu................................................................................................................................. 86
Operation................................................................................................... 90
Switching the GPS device on/off.................................................................................................... 90
Setting the language........................................................................................................................ 90
Setting the time zone........................................................................................................................ 90
GPS screens and displays............................................................................................................... 91
Recording/riding a route................................................................................................................. 93
POIs................................................................................................................................................... 94
Homing mode................................................................................................................................... 95
Advanced Functions..................................................................................... 96
Transferring data to the PC.............................................................................................................. 96
"Guider Application" PC software................................................................................................... 96
Troubleshooting........................................................................................ 104
Maintenance / cleaning............................................................................. 105
Environmental regulations and disposal information................................. 106
Conformity Notes...................................................................................... 106
Warranty and Service Information............................................................ 107
74
English
GPS Outdoor Computer SFN 1.5 A1
Introduction
Thank you for purchasing the SFN 1.5 A1 GPS Outdoor Computer. This GPS device allows you
to go on a voyage of discovery on two wheels. This GPS device has a USB port which you can
use to charge the device and exchange data with your PC. The GPS device is also weatherproof
to the IPX-4 standard.
Intended Use
The GPS device is intended solely for orientation purposes while out and about. Any use other
than that mentioned above does not correspond to the intended use.
The manufacturer accepts no liability if:
• the GPS device is not used in accordance with the intended use;
• the GPS device is damaged or operated when incomplete or modified;
• devices are connected which cannot charge the device via the USB port or transfer data to or
from a PC. Check the documentation for the device you wish to connect to make sure.
The GPS device may only be used for private purposes, not industrial or commercial ones.
Furthermore, the GPS device may not be used in tropical climates. The GPS device fulfils all
relevant norms and standards relating to CE conformity. Any modifications to the GPS device
other than recommended changes by the manufacturer may result in these standards no longer
being met.
Observe the regulations and laws in the country of use.
Please always bear in mind that the Road Traffic Act always has priority over the
guide arrow on your GPS device. Never let it distract you on the road. Do not
operate the device while riding.
The guide arrow merely shows the direct route to your destination. As your GPS
device does not contain any map information and you need to use passable
routes, you need to find a route which comes as close as possible to the guide
direction. If, for example, the arrow points the wrong way up a one-way street,
you may not proceed.
Trademark information
Microsoft®, Windows® and the Windows Logo are registered trademarks of Microsoft
Corporation.
USB® is a registered trademark of USB Implementers Forum, Inc.
English
75
GPS Outdoor Computer SFN 1.5 A1
Package contents
•
•
•
•
•
•
•
•
•
GPS Outdoor Computer SFN 1.5 A1
USB cable
8 cable ties
Rubber non-slip mat
Handlebar mount
GPS holder
Arm belt
CD-ROM with driver and software
This User’s Manual
If any items are missing or damaged, please phone our hotline. You will find the phone number in
the last chapter, “Warranty and Service Information”.
Overview
These operating instructions have a fold-out cover. On the inside of the cover is a numbered
diagram of the GPS device. The meanings of the numbers are as follows:
1
2
3
4
5
Menu / Back button
Display
Rails for GPS holder (on both sides)
u button
Confirmation / POI / Mode selection button
While a menu is displayed, press this button to confirm a selection or input.
Press this button to show the POI selection menu while the device is running.*
6
7
8
Hold the button down to display a mode selection menu (record route, pause, stop
recording).*
USB port (behind protective cover)
t button
On/Off button
Backlight on/auto off/off button
* At least 4 GPS satellite signals need to be received for these options to work.
76
English
GPS Outdoor Computer SFN 1.5 A1
Technical specifications
GPS device
Dimensions (W x H x D)
Weight
Input voltage
Display
Battery
Run time when fully charged
Charging current
Charge time from empty via USB
GPS receiver/chip
Memory
USB port
Operating temperature
Operating humidity
IPX degree of protection
52 x 83.3 x 17.3 mm
57 g
5 V via USB cable
Backlit, 128 x 128 pixel resolution
Li-polymer battery, 5 V, 750 mAh
Max. 17 hours with display backlight switched off
Max. 200 mA
up to 5 hours
GSC3F-7990, accuracy up to 10 m
32 Mb, 25000 trackpoints, up to 50 routes with 2500
waypoints total (50 waypoints per route)
USB 2.0, compatible to USB 1.1
+5 to +35 °C
< 85 % RH
IPX-4 (splashproof from any direction)
System requirements
To obtain optimum use from your GPS device, you need to use it with the PC software supplied on
CD. Your PC needs to meet the following requirements:
• Operating system: Windows® 7, Windows® Vista or Windows® XP *
• Pentium III or compatible processor
• Minimum 256 MB RAM
• 1 GB of available hard disk space
• USB port (USB 2.0 recommended)
• CD or DVD drive
• Internet connection for map display in the PC software (this may incur extra costs to you)
* Please find out about the terms of use of the relevant trademarks used.
English
77
GPS Outdoor Computer SFN 1.5 A1
Safety instructions
Before you use this device for the first time, please read the following notes in this manual and
heed all warnings, even if you are familiar with handling electronic devices. Keep these operating
instructions in a safe place for future reference. If you sell the GPS device or give it away, pass on
the operating instructions at the same time.
This symbol denotes important information for the safe operation of the product
and user safety.
This symbol denotes further information on the topic.
General safety instructions
• This GPS device is not destined for use by persons (including children) with reduced physical,
sensorial or mental capabilities and/or who have no experience in, or knowledge of, using
this appliance: for their own safety they should be supervised by a competent person or given
instructions on how to use the appliance. Children and persons with disabilities should be
supervised to ensure that they do not expose themselves to any danger.
• Keep the product, its accessories and packaging material away from toddlers. Small parts can
represent choking hazards. Please also note that there is a risk of suffocation if airways are
blocked by the packaging films.
• If you notice smoke or unusual noises or smells, disconnect all cables immediately. If this
occurs, the device should no longer be used and should be inspected by an expert. Never
inhale smoke from a possible device fire. If you do inadvertently inhale smoke, seek medical
attention. Smoke inhalation can be damaging to your health.
• Repairs are required if this device is damaged in any way, for example, if the device housing is
damaged, if liquid has permeated into on the product, if objects have fallen into the product,
if the product does not work normally or if the product has been dropped. Contact the service
hotline for repairs. Do not attempt to repair the product yourself to avoid any danger.
• This device uses a high-end Lithium-Polymer battery. The rechargeable battery may only be
removed or replaced by an authorised service centre. Otherwise there is the risk of fire and
short-circuit.
78
English
GPS Outdoor Computer SFN 1.5 A1
Operating environment/environmental conditions
• Do not place any heavy objects on the housing, otherwise you risk seriously damaging your
device.
• The GPS device is not suitable for use in high-temperature or high-humidity conditions and must
be kept free of dust. Operating temperature and operating humidity: 5 ºC to 35 ºC, max. 85
% RH.
• If the GPS device is exposed to wide temperature fluctuations condensation can form and
cause moisture which can produce a short circuit. If this occurs, use the GPS device only after
it has reached the ambient temperature.
• Make sure that no fire hazards (e.g. burning candles) are placed on or near the device.
Otherwise there is the risk of fire and short-circuit.
Getting started
Charging the battery
Please charge the battery for at least five hours before first use of the GPS
device.
1. Open the cover for the USB port (6).
2. Connect the small end of the USB cable supplied to the USB port (6) and the other end to the
USB port on your computer.
It may be that your computer needs to be switched on so that there is power to
the computer USB port to charge your GPS device. Not all computers provide
power to the USB port when they are switched off.
As soon as your GPS device is charging, the screen will switch on. A "Welcome" message will
appear for a few seconds, followed by a PC connection display with a battery charge icon.
English
79
GPS Outdoor Computer SFN 1.5 A1
Battery charge display
A battery symbol consisting of a number of bars appears on the display (2) while your GPS
device is charging. The number of bars indicates the battery charge level:
battery fully charged. You can disconnect the device from the computer.
battery 2/3 charged.
battery 1/3 charged.
battery empty. It takes about 5 hours to charge the battery completely.
Installing the bike mount
You can fit the GPS device to the handlebar of your bike. This allows you to operate it at any time
and keep your eye on the display (2).
Fitting the GPS device in the bike mount
1. Place the back of the GPS holder on the front of the handlebar
mount ("cross to cross"). Make sure you hold the handlebar
mount so that the semicircular insert for the handlebar is
aligned horizontally, like the handlebar, and guide 2 of the
8 cable ties through the square holes at the top and bottom
through the handlebar mount (see diagram on the right).
The cable ties need to be fed through the handlebar mount
to make sure the GPS holder and the handlebar mount are
firmly fixed together.
Keep the remaining cable ties in a safe place. You can use
them if you want to fix the handlebar mount to a different
bike.
If you cannot feed the cable ties through both components, the GPS holder
is fitted to the handlebar mount rotated by 90°. The unlock lever on the GPS
holder should be parallel to the cable ties.
80
English
GPS Outdoor Computer SFN 1.5 A1
2. Wrap the slightly ribbed side of the non-slip rubber mat around the handlebar (with the smooth
side pointing at the handlebar mount) and fit the semicircular insert on the handlebar mount
to it. Make sure that the unlock lever on the GPS holder is pointing downwards and the bowl
in which the GPS device is placed is pointing towards the bike rider (not in the direction of
travel!).
3. Feed the tongues of the cable ties around the handlebar and through the cube-shaped locking
mechanism of the cable tie. The teeth on one side of the cable tie (the other side is smooth)
need to be on the inside, i.e. pointing at the handlebar. Do not pull the cable ties tight just yet.
When you guide the cable ties through and tighten them slightly, if you do not
hear a slight 'tearing' noise then the cable ties are the wrong way round (with
the teeth facing outwards). In this case, remove the cable tie from the closing
mechanism and re-insert it properly.
4. Place your GPS device in the bowl of the GPS holder. The display (2) should point at the rider
and the USB port (6) should face down. This means making sure the two rails on the holder
are fitted into the correct slots (3) on the device and pushing the device down until you hear it
click into place.
5. Get onto your bike. You can now adjust the device to the optimum position on the handlebar
and tip it slightly so you can see the display (2). Pull the cable ties tight.
We recommend that you tighten the cable ties using a tool (e.g. pliers) and cut off
the excess with scissors.
If you want to use your GPS device on another bike in future, you can either use
the arm belt or cut the cable ties with a tools (e.g. wire cutters) and use two new
cable ties to fit it to the new bicycle. 8 cable ties are supplied. If required, you can
buy more cable ties from hardware or electrical stores.
Removing the GPS device from the bike mount
To remove your GPS device from the bike mount, proceed as follows:
1. Press the unlock lever on the GPS holder and, at the same time, pull the GPS device up out of
the GPS holder.
English
81
GPS Outdoor Computer SFN 1.5 A1
Wearing the GPS on the arm belt
If you wish, you can wear your GPS device on your arm. A special arm belt is provided which
is adjustable and can be worn over clothing. It has a pocket with a see-through window for the
GPS device.
To wear the GPS device in the arm belt, proceed as follows:
1. The pocket with the see-through window has Velcro on both sides which goes around the arm
belt. Open the Velcro on one side.
2. Fit your GPS device into the pocket. Make sure that you can see the display (2) through the
window and that the top of the device is pointing into the direction of travel.
3. Close the Velcro again.
4. Strap the arm belt loosely around your left or right forearm with the see-through window
pointing up.
5. Feed the long end around your arm and through the clip at the short end of the arm belt.
6. Pull the long end all the way through and affix it with the Velcro.
You can then press the buttons on the GPS device through the window or the pocket as before.
82
English
GPS Outdoor Computer SFN 1.5 A1
Overview of menu navigation
Below is an overview of the menu structure of the GPS device and a brief explanation of the
individual options. To open the menu, press the Menu button (1). To select an option in the menu,
press the t and u button (4 and 7). Press the confirmation button (5) to open or select the
highlighted option.
“POI” Menu
In the "POI" menu, you can select a POI you have previously defined and manage it.
Menu level (1) Menu level (2)
Description
POI
Select the POI you want from the POI list.
You can differentiate the POIs based on
the type and the date/time. The POI type
is represented by the symbol that you
selected when you set the POI. Once you
have made your selection, you can go
directly to the POI (DIRECT) or go to each
of the POIs in turn until you reach the
selected POI (destination) (SEQUENCE).
English
Menu level
(3)
(POIs)
0 Type Date Time1 DIRECT /
SEQUENCE
1 Type Date Time2 DIRECT /
SEQUENCE
2 Type Date Time3 DIRECT /
SEQUENCE
...
...
83
GPS Outdoor Computer SFN 1.5 A1
“Route Plan” Menu
The "Route Plan" menu allows you to select a route plan you have previously defined on the PC
using the "Guider Application" software provided. See "Plan tab" on page 99.
Menu level (1) Menu level (2)
(Route plans)
Route plan
01 Name1
02 Name2
03 Name3
...
84
Menu level (3) Description
DIRECT /
SEQUENCE
DIRECT /
SEQUENCE
DIRECT /
SEQUENCE
Select the route plan you want from the
route plan list. You can differentiate the
route plans based on their names. Next
you can go directly to the destination
(DIRECT) or go to each of the waypoints
in turn (SEQUENCE). If you select option
“DIRECT“, the guide arrow shows you the
direct route to your destination as the crow
flies.
English
GPS Outdoor Computer SFN 1.5 A1
“Track Back” Menu
In the "Track Back" menu, you can select a route you have previously ridden (and recorded) in
order to retrace it.
Menu level (1)
Routes
Menu level (2)
Date Time1
Date Time2
Date Time3
...
English
Menu level (3)
Backward /
Forward
Backward /
Forward
Backward /
Forward
...
Description
Select the route you want from the route
list. You can differentiate the routes based
on the date and the time. Once you have
made your selection, you can decide
whether to ride the route in the normal
direction ("Forward") or in the reverse
direction ("Backward").
85
GPS Outdoor Computer SFN 1.5 A1
"Settings" menu
In the "Settings" menu, you can define the preferences for your GPS device to customise the device
to your personal needs. As the "Settings" menu is very extensive, the table below takes up two
pages. A description of the following functions can be found on the right-hand page:
Menu level (1) Menu level (2)
Settings
Homing mode
Clear Data
Power Mode
Time Zone
Menu level (3)
On / Off
Menu level (4)
POI
No/Yes
Route Plan
No/Yes
Track Back
No/Yes
Backlight
Manual / 10 Sec. / 30 Sec. / 60 Sec.
Auto Suspend
Disabled / 10 Min / 30 Min / 60 Min
UTC+00
UTC+01
...
Calibration
Unit
Km / Mile
User Profile
My Weight
Age
Gender
86
Male / Female
English
GPS Outdoor Computer SFN 1.5 A1
Description
Open this sub-menu and select the "On" option to be taken straight home. To do this, you need to have
assigned the house symbol to a POI. Or select "Off" to cancel. Once you exit the menu by pressing the
Menu button (1), the GPS device will show you the way home.
Open this sub-menu and select the "Yes" option to clear all the POIs stored on the GPS device. Or select
"No" to cancel.
Open this sub-menu and select the "Yes" option to clear all the route plans stored on the GPS device. Or
select "No" to cancel.
Open this sub-menu and select the "Yes" option to clear all the track back routes stored on the GPS device.
Or select "No" to cancel.
You can use this function to extend the battery runtime of your GPS device. Select the "Backlight" option
and press the On/Off button (8) to have the screen permanently back-lit, or press the button again to get it
to switch off automatically after the time set. As soon as you press another button, the screen back-lighting
switches on again for the time set. If you select the "Auto Suspend" option, the GPS device automatically
powers off after the set time to save the battery.
In this menu, you can set the time zone for your location so you can synchronise the time correctly. In the
UK, for example, select "GMT" for winter time and "GMT+1" for summer time.
This function allows you to carry out a new satellite search and location find if you get the impression
that the data shown is inaccurate. Slowly turn the device in horizontal then in vertical motion as indicated
by the animation on the display (2). This process may take a few minutes. You need to be outside or no
GPS satellites will be received. We recommend that you calibrate the device if you have not used it for an
extended period.
You can set the unit of measurement for the distances here. You can choose between kilometres (km) and
miles (sm).
Use the t and u buttons (4 and 7) to edit the digits, the menu button (1) to select the digit and the
confirmation button (5) to enter your weight so that the unit can calculate the calories you are burning
when riding.
Use the t and u buttons (4 and 7) to edit the digits, the menu button (1) to select the digit and the
confirmation button (5) to enter your age so that the unit can calculate the calories you are burning when
riding.
Use the t and u buttons (4 and 7) to edit the digits, the menu button (1) to select the digit and the
confirmation button (5) to enter your gender so that the unit can calculate the calories you are burning
when riding.
English
87
GPS Outdoor Computer SFN 1.5 A1
Menu level (1)
Menu level (2)
Info Setting
Menu level (3)
Info Select
Auto Scroll
Menu level (4)
ODO / Dist / Speed / GPS Info /
Compass / Time Elapsed /
Altimeter / Calorimeter / Avg.
Speed / Max. Speed
Disabled/ 2 Sec. / 4 Sec. / 6 Sec.
Stopwatch
Language
Language list
Version
88
English
GPS Outdoor Computer SFN 1.5 A1
Description
You can use this option to select the information screens that you can toggle through using the t and u
buttons (4 and 7) while you are riding. If, for example, you are not in training and do not need the calorie
display, select the "Calorimeter" option and press the confirmation button (5) to hide the tick next to this
option. The calorie display is no longer available while you are riding.
Using this option, you can select whether to scroll between the information screens automatically or
manually. Select "Disabled" to switch between the information screens manually. Or set a delay time
after which the device automatically switches to the next screen. This option means that you can see the
distance covered, the speed, the compass, etc. in sequence while you are riding without having to press a
single button.
Select this option to show the stopwatch. Press the confirmation button (5) to start time measurement. Press
the confirmation button (5) again to stop time measurement. Time measurement is accurate to 1/100
second. Press the Menu button (1) to reset the stopwatch. You can then start the stopwatch again if you
want.
Use this option to define the menu and screen language for the GPS device. Press the t and u buttons (4
and 7), select the language you want and then press the confirmation button (5).
This option allows you to display the firmware version on the GPS device. This information is required if, for
example, you need to contact the hotline.
English
89
GPS Outdoor Computer SFN 1.5 A1
Operation
Switching the GPS device on/off
How to switch the GPS device on:
1. Hold the on/off button (8) down for about 1 second.
This powers the device on, and a "Welcome" message appears.
Trip Info
The first time you switch it on, the calibration screen appears and the
device searches for available GPS satellites to determine its location.
Slowly turn the device in horizontal then in vertical motion as indicated by
the animation on the display (2). This process may take a few minutes. You
need to be outside or no GPS satellites will be received [the display (2)
shows the
symbol].
Otherwise, the first information screen selected for display appears (normally the "ODO"
screen).
How to switch the GPS device off:
1. Hold the on/off button (8) down for about 1 second.
The message "ByeBye" appears and the device switches off.
Setting the language
By default, all screen displays and menus are shown in English. However, if you wish to select
another language, proceed as follows (the device must be switched on already):
1. Press the Menu button (1). The main menu appears (initially in English).
2. Press the t and u buttons (4 and 7) several times until the "Settings" option is highlighted and
then press the confirmation button (5).
3. Press the t and u buttons (4 and 7) several times until the "Language" option is highlighted
and then press the confirmation button (5).
4. Press the t and u buttons (4 and 7) several times until the language you want is highlighted
and then press the confirmation button (5).
5. Press the Menu button (1) several times to hide the menu and return to GPS mode.
Setting the time zone
You need to select your time zone to ensure the time is displayed correctly. Proceed as follows (the
device must be switched on already):
1. Press the Menu button (1). The main menu appears.
2. Press the t and u buttons (4 and 7) several times until the "Settings" option is highlighted and
then press the confirmation button (5).
3. Press the t and u buttons (4 and 7) several times until the "Time Zone" option is highlighted
and then press the confirmation button (5).
90
English
GPS Outdoor Computer SFN 1.5 A1
4. Press the t and u buttons (4 and 7) several times until the time zone you want is highlighted
and then press the confirmation button (5). In the UK, for example, select "GMT" for winter time
and "GMT+1" for summer time.
5. Press the Menu button (1) several times to hide the menu and return to GPS mode.
GPS screens and displays
The following screen views are available in GPS mode. Each of these screens contains specific
information. Press the t and u (4 and 7) buttons to toggle between the various screens in series.
• The signal strength display
appears in the top left-hand corner. This shows the reception
quality of the GPS satellite signal. The higher the number of bars, the better the signal quality
and thus the more accurate the location. The
symbol indicates that fewer than 4 satellites
are being received and no location can be determined.
• The battery level and the mode symbol are shown in the top-right corner.
Status of mode symbol:
: Informative GPS mode. Your route is not recorded while you are riding. But you can read
off the odometer, your speed, your geographical location, your direction of travel from the
compass and the travel time in real time (see below).
flashing: Route recording.
x: GPS guidance mode. Follow the guide arrow of the compass screen to get to the
programmed destination.
• Additional information depends on the screen selected.
Only the first 6 of the screens below are visible by default. The other screens,
marked with a *, can be activated via the menu. See "Info Setting" on page 88.
ODO:
Distance:
Trip Info
Trip Info
Distance
ODO
Distance travelled
Distance to destination
Current time
English
91
GPS Outdoor Computer SFN 1.5 A1
You need to have programmed a route for the "Distance" screen to show any
data. When a route is entered, the remaining distance to the destination is
displayed. Otherwise, the display shows 0.000 km (or the equivalent in the unit
of measurement set).
Speed:
GPS Info:
Trip Info
Trip Info
Speed:
Speed
Compass:
GPS Info
Latitude:
52°52‘00.0“ N
Longitude:
003°03‘03.5‘ E
Sat Num.: 10
Latitude and longitude
Number of GPS satellites received
Time Elapsed:
Trip Info
Trip Info
Direction of travel up
Time Elapsed:
Time elapsed since start
Altimeter*:
Calorimeter*:
Trip Info
Altimeter:
Trip Info
height above sea level (a minus sign
appears for heights below sea level,
e.g. the Dead Sea)
Average Speed*:
Calorimeter::
Calories burnt so far
Maximum Speed*:
Trip Info
Trip Info
Avg. Speed:
Max. Speed:
Average speed
Maximum speed
* In order to display these screens, you need to have activated them in "Info Setting" in the
"Settings" menu. See page 88.
92
English
GPS Outdoor Computer SFN 1.5 A1
Recording/riding a route
The GPS receiver needs to receive at least four GPS satellites for you to be able
to adjust the following settings. This is indicated by the signal strength indicator
in the top left-hand corner of the display (2).
While you are riding, you can use the confirmation button (5) in each of the available screen
views to record your route at any time. The GPS device saves the waypoints you pass. You can
then access the routes later and ride them in either direction using the arrow guide. This means
you need never stray from your route, even in thick forest or darkness.
You can use the screen symbols to control route recording or display.
How to record a route:
1. Press and hold the confirmation button (5) for 3 seconds. This brings up a pop-up menu
showing the symbols B, X and x.
B: Start. Starts route recording or playback.
X: Pause. Temporarily pauses route recording.
x: Stop. Stops route recording or playback.
2. Press the t and u button (4 and 7) to select the B icon (start) and press the confirmation
button (5) to start recording.
3. Ride the selected route. If you fancy a break along the way, hold the confirmation button (5)
down for three seconds in order to show the pop-up menu again, select the X symbol (pause)
and press the confirmation button (5) to pause recording temporarily.
At the end of your break when you want to carry on with your ride, hold the confirmation
button (5) down for three seconds in order to show the pop-up menu again, select the B
symbol (start) and press the confirmation button (5). Your GPS device continues recording the
current route (no new route is created).
4. Once you have reached your destination, you can stop recording your route. Hold the
confirmation button (5) down for three seconds to display the pop-up menu, press the t and
u buttons (4 and 7), select the x symbol (Stop) and press the confirmation button (5) to stop
recording and save the route.
The routes are automatically saved with the date and time of the recording as
a filename. In order to keep an overview of the list of routes in the future and
make sure you do not ride the wrong route by accident, we recommend editing
the routes using the PC software supplied and renaming them so that they are
clear. Example: Station to lake.
English
93
GPS Outdoor Computer SFN 1.5 A1
How to ride a recorded route:
1. In any screen view, press the Menu button (1) to display the main menu. Press the t and u
buttons (4 and 7), select the "Track Back" option and then press the confirmation button (5).
This displays a list of recorded routes.
2. Press the t and u buttons (4 and 7), select the route you want and then press the confirmation
button (5). This brings up a selection menu with "Backward" and "Forward" options.
Select "Backward" to ride the route backwards, i.e. from the destination to the starting point.
Select "Forward" to ride the route forwards, i.e. from the start to the destination point.
This brings up a compass with a guide arrow pointing in the direction to go. If a screen other
than the compass appears, press the t and u buttons (4 and 7) and select the compass
screen.
Distance to destination
If the guide arrow points right, you need to turn right until it is pointing forwards again. If the guide
arrow points left, you need to turn left until it is pointing forwards again. Once you have reached
your destination, a picture of a bike rider next to a chequered flag flashes for a few seconds. The
device then switches back to a normal compass display (with no route guidance).
POIs
POI means 'point of interest', i.e. a place that could be important. POIs can be banks, railway
stations, airports or sights, restaurants, cafés and other facilities.
Your GPS device allows you to save various locations as POIs and even to classify them.
How to save your location as a POI:
The GPS receiver needs to receive at least four GPS satellites for you to be able
to adjust the following settings. This is indicated by the signal strength indicator
in the top left-hand corner of the display (2).
1. In any screen view, press the confirmation button (5) to bring
up a selection menu of POI symbols.
2. Press the t and u buttons (4 and 7) and select the symbol
which best describes the current location (e.g. the sun for a
beach).
3. Press the confirmation button (5) to save the current location as a POI. Or press the Menu
button (1) to cancel.
94
English
GPS Outdoor Computer SFN 1.5 A1
How to ride to a POI at a later date:
1. In any screen view, press the Menu button (1) followed by the confirmation button (5). This
opens the POI menu.
2. Press the t and u buttons (4 and 7), select the POI you want and then press the confirmation
button (5). Then select the option "DIRECT" to be taken to it.
The compass display with a guide arrow appears. Follow the guide arrow to get to the POI.
If a screen other than the compass appears, press the t and u buttons (4 and 7) and select
the compass screen.
The guide arrow merely shows the direct route to your POI. As your GPS
device does not contain any map information and you need to use passable
routes, you need to find a route which comes as close as possible to the guide
direction. If the arrow points left through a fenced-off field, you can go straight
on and take the next turning on the left.
Homing mode
"Homing mode" is a special function on your GPS device which can take you directly home at
any time.
To use the homing mode, you need to first define your home as a POI with the
house symbol
.
How to get homing mode to take you home:
1. Press the Menu button (1) to display the menu.
2. Press the t and u buttons (4 and 7), select the "Settings" option and then "Homing mode".
3. Press the t and u buttons (4 and 7), select the "On" option and then press the confirmation
button (5).
4. Exit all open menus by pressing the Menu button (1) several times.
The compass display with a guide arrow appears. Follow the guide arrow to get to home. If a
screen other than the compass appears, press the t and u buttons (4 and 7) and select the
compass screen.
English
95
GPS Outdoor Computer SFN 1.5 A1
Advanced Functions
Transferring data to the PC
You can transfer recorded routes from your GPS device to your PC and manage them using the
PC software supplied. You can analyse the routes you have ridden and design new routes or POIs
on the map and transfer them to your GPS device.
To use the PC software supplied on CD, your PC must meet the requirements set out in the "System
requirements" section (see page 77).
Connecting the GPS device to your PC
1. Open the cover for the USB port (6).
2. Connect the small end of the USB cable supplied to the USB port (6) and the other end to the
USB port on your computer.
The screen of the GPS device then switches on. A "Welcome" message will appear for a few
seconds, followed by a PC connection display. (When powering the device with a USB power
adapter, a battery charge indicator appears.)
"Guider Application" PC software
1. Insert the CD-ROM supplied into the CD or DVD drive of your computer.
2. Open the content of the CD in Windows and double click on the file
"Guider-Targa.exe". This opens up the "Guider Application" program in the map view. The
program is in English by default. (Depending on the security settings of your operating system,
you may get a message that the publisher of the software could not be identified and asking
whether you really want to run the program. Of course, there is no risk in running this program.)
If you do not wish to start the program from CD every time, you can copy the
file "Guider-Targa.exe" to a folder on the local hard drive of your PC or even the
Desktop. This makes it quick and easy to start in the future.
3. When running the program for the first time, the user interface appears in English. Click on the
"Track data" tab at the top and select the language you want for the program's user interface
from the "Language" pull-down list.
Downloading data from GPS device to Guider application
In the "Plan", "POI" and "Track" tabs, there is a "Device Operations" box with a
one of these tabs and click on the
device.
96
button. Open
button. This downloads the relevant data from the GPS
English
GPS Outdoor Computer SFN 1.5 A1
"Map" tab
Your PC has to be connected to the Internet for the maps to be displayed. The
Internet connection may incur additional costs to you.
This view is the same as Google Maps. See the Google Maps online help for a detailed
description of the map functions. Use the buttons in the top right-hand corner to switch between
map, satellite and terrain views.
English
97
GPS Outdoor Computer SFN 1.5 A1
"Track data" tab
In this window, you can select the program language and display data on routes you have ridden
and recorded with the GPS device in graphic form.
To view the diagrams, you first need to download the routes from the GPS device and select a
route in the "Track" tab.
Language
Path Altitude
Path Speed
HRM
Unit Setting
98
You can set the program language here.
Check the box to show a diagram showing altitude (above sea level)
over time.
Check the box to show a diagram showing speed over time.
This function is not available in the current version of the GPS device.
You can set whether to have altitude and speed figures in metric or
imperial here.
English
GPS Outdoor Computer SFN 1.5 A1
"Plan" tab
In this window, you can plan one or more routes (maximum 50) on the map and upload the
individual waypoints you wish to use onto your GPS device. You can then get on your bike and
trace the route.
Your PC has to be connected to the Internet for the maps to be displayed. The
Internet connection may incur additional costs to you.
In the map view ("Search map" field), search for the place you wish to start your route.
Route list
Waypoint list
Map
Double-click on the map to define the starting point for the route.
Click on bends and turnings to add more waypoints. The waypoints
are listed on the right in numerical order with latitude and longitude
information. You can set a maximum of 50 waypoints per route. Your
starting point counts as a waypoint, is assigned number 0 and shown
in red.
English
99
GPS Outdoor Computer SFN 1.5 A1
Device Operations
File Operations
Route list
Click on the
device to the PC.
button to download existing routes from the GPS
Click on the
the GPS device.
button to upload routes defined in this window to
Click on the
button to save the current route.
Click on the
button to open a saved route for editing or
uploading to the GPS device.
Click on a title in the list to select the route in question and display on
the map. The titles shown here correspond to the saved routes.
Right-click on a title in the list to add a new route, edit or delete an
existing route or delete all routes from the list.
Waypoint list
You can set up to 50 routes and upload them to your GPS device.
The waypoints are numbered in sequence. The longitude and latitude
of each waypoint is given.
Right-click on a waypoint in the list to edit (move) or delete it or to
remove all waypoints from the list. This function also allows you to
define another waypoint as the starting point for your route.
We recommend you to set a waypoint every 2 or 3 km (even if the
route path is straight with no curves).
You can set up to 49 waypoints plus the destination point per route.
In the route or waypoint list, right-click on a route or waypoint to manage it. You can add routes,
rename ("Modify") or delete them or remove all routes from the list ("Clear All"). You can add
rename waypoints ("Modify") or delete them or remove all waypoints from the list ("Clear All").
You can also define the selected waypoint as a starting point.
100
English
GPS Outdoor Computer SFN 1.5 A1
"POI" tab
The "POI" tab contains a list of the POIs you have saved on your GPS device during the trip. The
POIs are shown on the map with the same symbol you defined when you entered the individual
POIs.
Your PC has to be connected to the Internet for the maps to be displayed. The
Internet connection may incur additional costs to you.
Device Operations
File Operations
Click on the
device to the PC.
button to download existing POIs from the GPS
Click on the
button to upload the POI list shown in this window
to the GPS device.
Click on the "Save" button to save the POI list shown in this window.
Click on the "Open" button to open a POI list for editing or uploading
to the GPS device.
English
101
GPS Outdoor Computer SFN 1.5 A1
POI list
Click on a POI in the list to select it and display on the map. Text
appears showing the date and time the POI was saved.
Right-click on a POI in the list to delete it or to remove all POIs from
the list.
In the POI list, right-click on a POI to manage it. You can delete POIs or remove all POIs from the
list ("Clear All").
"Track" tab
You can manage all the routes you have ridden in the "Track" tab. On the left hand side, there is a
list of all the routes, with all the waypoints associated with the selected route on the right.
102
English
GPS Outdoor Computer SFN 1.5 A1
Route list
The routes are numbered in sequence (Track0, Track1, etc.) The date
and time of each route is given.
Device Operations
Right-click on a route in the list to edit or delete it or to remove all routes
from the list. The "Modify" option allows you to rename the route and
assign it a different colour. It is helpful to use multiple colours when
you have downloaded several routes that overlap or are located close
each other. The different colours help you distinguish them easier in
map view ("Display" button).
Clear All
Click on the
button to download existing routes from the GPS
device to the PC.
Click on the "Display" button to display the current route in the "Map"
tab.
Click on the "Clear All" button to delete all routes from the map view.
File Operations
Click on the "Save" button to save the route list shown in this window.
Display
Track Summaries
Routes
Time Zone
Click on the "Open" button to open a saved route list for editing.
This section shows you the date and time of the start and finish of all
routes. You cannot edit this information.
In this section, you can see the number of trackpoints recorded for the
route and the distance covered in km and miles.
You can select the time zone of your location from the pull-down list.
Right-click on a route in the route list to manage it. You can rename ("Modify") or delete routes or
remove all routes from the list ("Clear All").
The waypoints on the right-hand side of the window have been recorded by the
GPS device and are a fixed part of the downloaded route. You cannot edit them.
English
103
GPS Outdoor Computer SFN 1.5 A1
Troubleshooting
You can solve most common problems yourself using the following sections. If the problem persists
after checking the suggested solutions, please contact our Service Hotline (see page 107). Do not
attempt to repair the product yourself.
Cannot switch GPS device on.
• Recharge the battery. See "Charging the battery" on page 79.
• If you have connected the GPS device to a computer, it is in PC connection mode and it cannot
be operated using the buttons. Disconnect the device from the PC.
The GPS device does not respond.
• If you have connected the GPS device to a computer, it is in PC connection mode and it cannot
be operated using the buttons. Disconnect the device from the PC.
• If the GPS device is not connected to a PC and still does not respond, you can try to reset it. To
do this, hold the t button (7) and the on/off button (8) down at the same time. The device will
then start up with its factory settings: the menu language is English and all user-defined settings
are deleted. Only the routes you have recorded and the POIs you have saved are retained
after a reset.
The GPS device is not showing any data.
• The GPS device needs to receive at least four GPS satellites to determine your current position
and track movements. You need to have a clear view of as much sky as possible. Narrow
roads, tall buildings made of reinforced concrete and factories, subways, tunnels, etc. impede
satellite reception. Change your location and try again.
The GPS device does not show the routes I have ridden.
• First, you need to start route recording manually. See "Recording/riding a route" on page 93.
• You have already saved a lot of waypoints or routes on the device and the memory is full. Free
up memory by going to Menu / Settings / Clear data and deleting any data you do not need,
or transfer the data on the device to your PC using the "Guider Application" software supplied
and then clear the data via the menu.
The "Guider Application" software does not show any maps or data.
• Your PC needs to be connected to the Internet for the software to be able to load the maps
from Google Maps or Google Earth and show your route data.
104
English
GPS Outdoor Computer SFN 1.5 A1
Maintenance / cleaning
Disconnect all cables from the GPS device before cleaning it, otherwise you risk
seriously damaging your GPS device.
The device does not contain any parts that require user maintenance. Never open the housing of
the GPS device in order to avoid any danger. Make sure that the components do not get dirty. To
clean the GPS device, use a dry cloth. Never use any solvents or cleaners that may damage the
plastic housing. For more stubborn dirt, use a slightly damp cloth.
English
105
GPS Outdoor Computer SFN 1.5 A1
Environmental regulations and disposal information
Devices marked with this symbol are subject to European Directive 2002/96/EC.
All electrical and electronic devices must be disposed of separately from household
waste at official disposal centres. Proper disposal of old devices prevents damage to
the environment or your health. For further information about proper disposal, contact
your local council, recycling centre or the shop where you bought the device.
The built-in rechargeable battery cannot be removed for disposal.
Dispose of all packaging in an environmentally-friendly manner. Boxes can be recycled with waste
paper collections or handed in to public collection points. Films and plastics included in the original
packaging can be disposed of via your local waste disposal company in an environmentallyfriendly way.
Conformity Notes
This device complies with the basic and other relevant requirements of the EMC
Directive 2004/108/EC, the Low-voltage Directive 2006/95/EC and the RoHS II
Directive 2011/65/EU. The corresponding Declaration of Conformity can be found
at the end of this User Manual.
106
English
GPS Outdoor Computer SFN 1.5 A1
Warranty and Service Information
Dear Customer,
This device is sold with three years warranty from the date of purchase. In the event of product
defects, you have legal rights towards the seller. These statutory rights are not restricted by our
warranty as described below.
Warranty conditions
The warranty period commences upon the date of purchase. Please keep the original receipt in
a safe place as it is required as proof of purchase. If any material or manufacturing faults occur
within three years of purchase of this product, we will repair or replace the product free of charge
as we deem appropriate.
Warranty period and legal warranty rights
The warranty period is not extended in the event of a warranty claim. This also applies to
replaced and repaired parts. Any damage or defects discovered upon purchase must be reported
immediately when the product has been unpacked. Any repairs required after the warranty period
will be subject to charge.
Scope of warranty
The device was carefully manufactured in compliance with stringent quality guidelines and
subjected to thorough testing before it left the works. The warranty applies to material and
manufacturing faults. This warranty does not cover product components which are subject to
normal wear and which can therefore be regarded as wearing parts, or damage to fragile
components such as switches, rechargeable batteries or components made of glass. This warranty
is void if the product is damaged, incorrectly used or serviced. To ensure correct use of the
product, always comply fully with all instructions contained in the user manual. The warnings and
recommendations in the user manual regarding correct and incorrect use and handling of the
product must always be observed and complied with. The product is solely designed for private
use and is not suitable for commercial applications. The warranty is rendered void in the event
of incorrect handling and misuse, if it is subjected to force, and also if any person other than our
authorised service technicians interfere with the device. No new warranty period commences if
the product is repaired or replaced.
English
107
GPS Outdoor Computer SFN 1.5 A1
Submitting warranty claims
To ensure speedy handling of your complaint, please note the following:
-
Before using your product for the first time, please read the enclosed documentation or
online help carefully. Should any problems arise which cannot be solved in this way,
please call our hotline.
-
Always have your receipt, the product article number as well as the serial number (if
available) to hand as proof of purchase.
-
If it is not possible to solve the problem on the phone, our hotline support staff will
initiate further servicing procedures depending on the fault.
Service
Phone:
E-Mail:
0207 – 3650744
[email protected]
Phone:
E-Mail:
01 – 2421583
[email protected]
Phone:
E-Mail:
800 – 62175
[email protected]
Phone:
E-Mail:
800 – 92496
[email protected]
IAN: 85816
Manufacturer
Please note that the following address is not a service address. First contact the service point
stated above.
TARGA GmbH
Coesterweg 45
59494 Soest
Germany
108
English
GPS-Outdoor-Computer
Bedienungsanleitung und Serviceinformationen
Deutsch
GPS Outdoor-Computer SFN 1.5 A1
Inhalt
Einleitung.................................................................................................. 111
Bestimmungsgemäße Verwendung........................................................... 111
Hinweise zu Warenzeichen...........................................................................................................111
Lieferumfang............................................................................................. 112
Übersicht................................................................................................... 112
Technische Daten....................................................................................... 113
GPS-Gerät.......................................................................................................................................113
Systemvoraussetzungen.................................................................................................................113
Sicherheitshinweise................................................................................... 114
Inbetriebnahme......................................................................................... 115
Akku aufladen................................................................................................................................115
Fahrrad-Halterung anbringen........................................................................................................116
GPS im Armgürtel tragen...............................................................................................................118
Übersicht der Menüführung....................................................................... 119
Menü „POI“....................................................................................................................................119
Menü „Routenplan“.......................................................................................................................120
Menü „Zurückverfolgen“...............................................................................................................121
Menü „Einstellungen“....................................................................................................................122
Bedienung................................................................................................. 126
GPS-Gerät ein-/ausschalten..........................................................................................................126
Sprache einstellen..........................................................................................................................126
Zeitzone einstellen..........................................................................................................................126
GPS-Bildschirme und Anzeigen.....................................................................................................127
Route aufzeichnen/fahren.............................................................................................................129
POIs.................................................................................................................................................130
Homing-Modus...............................................................................................................................131
Erweiterte Funktionen............................................................................... 132
Daten mit PC austauschen.............................................................................................................132
PC-Programm „Guider Application“.............................................................................................132
Problemlösung.......................................................................................... 140
Wartung / Reinigung................................................................................. 141
Umwelthinweise und Entsorgungsangaben............................................... 142
Konformitätsvermerke.............................................................................. 142
Hinweise zu Garantie und Serviceabwicklung........................................... 143
110
Deutsch
GPS Outdoor-Computer SFN 1.5 A1
Einleitung
Vielen Dank für den Kauf des GPS Outdoor-Computers SFN 1.5 A1. Mit diesem GPS-Gerät
können Sie z.B. als Radler auf Entdeckungsreise gehen. Dieses GPS-Gerät verfügt über einen
USB-Anschluss, über den Sie es aufladen und Daten mit Ihrem PC austauschen können. Das GPSGerät ist zudem wetterfest nach IPX-4-Standard.
Bestimmungsgemäße Verwendung
Das GPS-Gerät wird bestimmungsgemäß verwendet, wenn es ausschließlich zur Orientierung
unterwegs verwendet wird. Eine andere Verwendung ist nicht bestimmungsgemäß.
Der Hersteller übernimmt keine Haftung, wenn:
• das GPS-Gerät nicht bestimmungsgemäß verwendet wird.
• das GPS-Gerät beschädigt, unvollständig oder umgebaut in Betrieb genommen wird.
• Geräte angeschlossen werden, die nicht in der Lage sind, das Gerät über den USB-Anschluss
aufzuladen bzw. Daten zum oder vom PC zu übertragen. Vergewissern Sie sich mithilfe der
Dokumentation des anzuschließenden Gerätes.
Das GPS-Gerät darf nur zu privaten, nicht aber zu industriellen oder kommerziellen Zwecken
verwendet werden. Außerdem darf das GPS-Gerät nicht in tropischen Klimaregionen genutzt
werden. Das GPS-Gerät erfüllt alle im Zusammenhang mit der CE Konformität relevanten Normen
und Standards. Bei einer nicht mit dem Hersteller abgestimmten Änderung des GPS-Geräts ist die
Einhaltung dieser Normen nicht mehr gewährleistet.
Bitte beachten Sie die Vorschriften und Gesetze des Einsatzlandes.
Beachten Sie bitte unbedingt, dass die Straßenverkehrsordnung Vorrang vor
dem Leitpfeil des GPS-Geräts hat. Lassen Sie sich im Straßenverkehr nicht
ablenken. Bedienen Sie das Gerät nicht während der Fahrt.
Der Leitpfeil zeigt lediglich die Richtung an, in der Sie Ihr Ziel auf direktem Wege
erreichen würden. Da Ihr GPS-Gerät kein Kartenmaterial besitzt und Sie ja auf
begeh- bzw. befahrbare Wege angewiesen sind, müssen Sie sich einen Weg
suchen, der der Leitrichtung am nächsten kommt. Leitet Sie der Pfeil z.B. in eine
Einbahnstraße entgegen der Fahrtrichtung, dürfen Sie keinesfalls weiterfahren.
Hinweise zu Warenzeichen
Microsoft®, Windows® und das Windows-Logo sind eingetragene Warenzeichen von Microsoft
Corporation.
USB® ist ein eingetragenes Warenzeichen von USB Implementers Forum, Inc.
Deutsch
111
GPS Outdoor-Computer SFN 1.5 A1
Lieferumfang
•
•
•
•
•
•
•
•
•
GPS Outdoor-Computer SFN 1.5 A1
USB-Kabel
8 Kabelbinder
Gummi-Antirutschpolster
Lenkerhalterung
GPS-Halterung
Armgürtel
CD-ROM-Disk mit Treiber und Software
Diese Bedienungsanleitung
Wenn Teile fehlen oder beschädigt sind, rufen Sie die Hotline an. Die Telefonnummer finden Sie
im letzten Kapitel „Hinweise zu Garantie und Serviceabwicklung“.
Übersicht
Diese Bedienungsanleitung ist mit einem ausklappbaren Umschlag versehen. In der Innenseite
des Umschlags ist das GPS-Gerät mit einer Bezifferung abgebildet. Die Ziffern haben folgende
Bedeutung:
1
2
3
4
5
Menütaste / Zurück-Taste
Display
Schienen für GPS-Halterung (an beiden Seiten)
Taste u
Bestätigungstaste / POI / Betriebsartenauswahl
Drücken Sie diese Taste bei angezeigtem Menü, um eine Auswahl oder Eingabe zu
bestätigen.
Drücken Sie diese Taste während des Betriebs, um das POI-Auswahlmenü einzublenden.*
6
7
8
Halten Sie diese Taste gedrückt, um ein Auswahlmenü für die Betriebsart (Route
aufzeichnen, Pause, Aufzeichnung beenden) anzuzeigen.*
USB-Anschluss (hinter Schutzkappe)
Taste t
Taste Ein/Aus
Taste Bildschirmbeleuchtung ein/automatisch aus/aus
* Damit diese Optionen funktionieren, müssen mindestens 4 GPS-Satelliten empfangen werden.
112
Deutsch
GPS Outdoor-Computer SFN 1.5 A1
Technische Daten
GPS-Gerät
Abmessungen (B x H x T)
Gewicht
Eingangsspannung
Display
Akku
Laufzeit bei vollem Akku
Ladestrom
Ladezeit über USB bei leerem Akku
GPS-Empfänger/Chip
Speicher
USB-Schnittstelle
Betriebstemperatur
Luftfeuchtigkeit (Betrieb)
IPX-Schutzklasse
52 x 83,3 x 17,3 mm
57 g
5 V über USB-Kabel
Hintergrundbeleuchtet, Auflösung 128 x 128 Pixel
Li-Polymer-Akku, 5 V, 750 mAh
Max. 17 Stunden bei ausgeschalteter DisplayHintergrundbeleuchtung
Max. 200 mA
Bis zu 5 Stunden
GSC3F-7990, Genauigkeit bis zu 10 m
32 Mb, 25000 Trackpunkte, bis zu 50 Routen mit
insgesamt 2500 Wegpunkten (50 Wegpunkte pro
Route)
USB 2.0, kompatibel zu USB 1.1
+5 bis +35 °C
< 85 % RL
IPX-4 (einfallendes Spritzwasser aus beliebiger
Richtung)
Systemvoraussetzungen
Um Ihr GPS-Gerät optimal nutzen zu können, müssen Sie es mit der auf CD vorhandenen PCSoftware verwenden. Ihr PC muss dazu folgende Voraussetzungen erfüllen:
• Betriebssystem Windows® XP, Windows® Vista oder Windows® 7 *
• Pentium III oder kompatibler Prozessor
• Mindestens 256 MB RAM
• 1 GB freier Speicherplatz auf der Festplatte
• USB-Anschluss (USB 2.0 empfohlen)
• CD- bzw. DVD-Laufwerk
• Internet-Verbindung zur Kartendarstellung in der PC-Software (dadurch können Ihnen weitere
Kosten entstehen)
* Bitte erkundigen Sie sich über die Nutzungsbedingungen der jeweils verwendeten Warenzeichen.
Deutsch
113
GPS Outdoor-Computer SFN 1.5 A1
Sicherheitshinweise
Vor der ersten Verwendung des Gerätes lesen Sie bitte die folgenden Anweisungen genau
durch und beachten Sie alle Warnhinweise, selbst wenn Ihnen der Umgang mit elektronischen
Geräten vertraut ist. Bewahren Sie diese Bedienungsanleitung sorgfältig als zukünftige Referenz
auf. Wenn Sie das GPS-Gerät verkaufen oder weitergeben, händigen Sie unbedingt auch diese
Bedienungsanleitung aus.
Dieses Symbol kennzeichnet wichtige Hinweise für den sicheren Betrieb des
Gerätes und zum Schutz des Anwenders.
Dieses Symbol kennzeichnet weitere informative Hinweise zum Thema.
Allgemeine Sicherheitshinweise
• Dieses GPS-Gerät ist nicht dafür bestimmt, durch Personen (einschließlich Kinder) mit
eingeschränkten physischen, sensorischen oder geistigen Fähigkeiten oder mangels Erfahrung
und/oder mangels Wissen benutzt zu werden, es sei denn, sie werden durch eine für ihre
Sicherheit zuständige Person beaufsichtigt oder erhielten von ihr Anweisungen, wie das Gerät
zu benutzen ist. Kinder und Personen mit Einschränkungen sollten beaufsichtigt werden, um
sicherzustellen, dass sie sich keinen unnötigen Gefahren aussetzen.
• Halten Sie Kleinkinder vom Produkt, dem Zubehör und dem Verpackungsmaterial fern. Kleinteile
können bei Verschlucken lebensgefährlich sein. Beachten Sie auch, dass Erstickungsgefahr
besteht, wenn Atemwege durch Verpackungsfolie abgedeckt werden.
• Falls Sie Rauchentwicklung, ungewöhnliche Geräusche oder Gerüche feststellen, trennen Sie
sofort alle Kabelverbindungen. In diesen Fällen darf das Gerät nicht weiter verwendet werden,
bevor eine Überprüfung durch einen Fachmann durchgeführt wurde. Atmen Sie keinesfalls
Rauch aus einem möglichen Gerätebrand ein. Sollten Sie dennoch Rauch eingeatmet haben,
suchen Sie einen Arzt auf. Das Einatmen von Rauch kann gesundheitsschädlich sein.
• Reparaturarbeiten sind erforderlich, wenn das Gerät beschädigt wurde, z.B. wenn das
Gerätegehäuse beschädigt ist, Flüssigkeit oder Gegenstände ins Innere des Gerätes gelangt
sind oder wenn es nicht einwandfrei funktioniert oder heruntergefallen ist. Wenden Sie sich für
Reparaturen an die Hotline. Führen Sie keine eigenhändigen Reparaturarbeiten durch, um sich
keinen unnötigen Gefahren auszusetzen!
• Dieses Gerät arbeitet mit einem hochwertigen Lithium-Polymer-Akku. Nur zulässige ServiceZentren dürfen den Akku entfernen oder auswechseln. Anderenfalls besteht Brand- und
Kurzschlussgefahr.
114
Deutsch
GPS Outdoor-Computer SFN 1.5 A1
Betriebsumgebung/Umweltbedingungen
• Stellen Sie keine schweren Gegenstände auf das Gerät. Anderenfalls kann es beschädigt
werden.
• Das GPS-Gerät ist nicht für den Betrieb in Umgebungen mit hoher Temperatur oder
Luftfeuchtigkeit oder übermäßigem Staubaufkommen ausgelegt. Betriebstemperatur und
Betriebsluftfeuchtigkeit: 5 °C bis 35 °C, max. 85 % rel. Feuchte.
• Wenn das GPS-Gerät großen Temperaturschwankungen ausgesetzt wird, kann es durch
Kondensation zu Feuchtigkeitsbildung kommen, die einen elektrischen Kurzschluss verursachen
kann. Warten Sie in dem Fall so lange mit der Inbetriebnahme, bis das GPS-Gerät die
Umgebungstemperatur angenommen hat.
• Achten Sie darauf, dass keine offenen Brandquellen (z.B. brennende Kerzen) auf oder neben
dem Gerät stehen. Anderenfalls besteht Brand- und Kurzschlussgefahr.
Inbetriebnahme
Akku aufladen
Laden Sie den Akku vor der Inbetriebnahme des GPS-Geräts mindestens 5
Stunden lang auf.
1. Öffnen Sie die Abdeckung des USB-Anschlusses (6).
2. Verbinden Sie den kleineren Stecker des mitgelieferten USB-Kabels mit dem USB-Anschluss (6)
und das andere Ende mit dem USB-Port Ihres Computers.
Damit am USB-Port des Computers Strom zum Aufladen Ihres GPS-Geräts
anliegt, kann es sein, dass Ihr Computer dazu eingeschaltet sein muss. Nicht
alle Computer liefern Strom am USB-Port, während sie ausgeschaltet sind.
Sobald Ihr GPS-Gerät geladen wird, schaltet sich sein Bildschirm ein, es erscheint einige
Sekunden lang die Nachricht „Welcome“ und daraufhin eine PC-Verbindungsanzeige mit
einem Akku-Ladesymbol.
Deutsch
115
GPS Outdoor-Computer SFN 1.5 A1
Akku-Ladeanzeige
Während Ihr GPS-Gerät aufgeladen wird, erscheint im Display (2) ein Batteriesymbol mit mehreren
Balken. Die Anzahl der Balken zeigt den Ladepegel des Akkus an:
Akku voll aufgeladen. Sie können das Gerät vom Computer trennen.
Der Akku ist zu 2/3 aufgeladen.
Der Akku ist zu 1/3 aufgeladen.
Der Akku ist leer. Es dauert ca. 5 Stunden, um ihn voll aufzuladen.
Fahrrad-Halterung anbringen
Sie können Ihr GPS-Gerät am Lenkrad Ihres Fahrrads montieren. So können Sie es jederzeit
bedienen und haben das Display (2) gut im Blick.
GPS-Gerät in die Fahrrad-Halterung einsetzen
1. Setzen Sie die Rückseite der GPS-Halterung auf die
Vorderseite der Lenkerhalterung („Kreuz auf Kreuz“). Halten
Sie die Lenkerhalterung dabei so, dass die Halbrundung,
die für den Lenker vorgesehen ist, horizontal wie der Lenker
ausgerichtet ist, und führen Sie 2 der 8 Kabelbinder durch
die rechteckigen Aussparungen oben und unten an der
Lenkerhalterung hindurch (siehe die Abbildung rechts). Die
Kabelbinder müssen dabei mit durch die Lenkerhalterung
geführt werden, damit GPS-Halterung und Lenkerhalterung
fest verbunden werden.
Verwahren Sie die restlichen Kabelbinder an einem sicheren
Ort. Sie können Sie verwenden, wenn Sie die FahrradHalterung an einem anderen Fahrrad befestigen möchten.
Lassen sich die Kabelbinder nicht durch die beiden Komponenten führen, haben
Sie die GPS-Halterung um 90° gedreht auf die Lenkerhalterung gesetzt. Der
Entriegelungshebel der GPS-Halterung muss parallel zu den Kabelbindern sein.
2. Legen Sie das Gummi-Antirutschpolster mit der leicht angerauhten Seite um die Lenkerstange
(die glatte Seite zeigt zur Lenkerhalterung), und setzen Sie die Lenkerhalterung mit der
halbrunden Aussparung darauf. Achten Sie dabei darauf, dass der Entriegelungshebel
116
Deutsch
GPS Outdoor-Computer SFN 1.5 A1
der GPS-Halterung nach unten und die Schale, in die das GPS-Gerät eingesetzt wird, zum
Radfahrer (nicht in Fahrtrichtung!) zeigt.
3. Führen Sie die Zungen der Kabelbinder um die Lenkerstange herum und durch den
würfelförmigen Schließmechanismus des Kabelbinders. Die Zähne auf der einen Seite des
Kabelbinders (die andere ist glatt) müssen innen liegen, d.h. zur Lenkerstange zeigen. Ziehen
Sie die Kabelbinder noch nicht ganz fest.
Falls beim Durchführen und leichten Festziehen der Kabelbinder kein „Ritsch“Geräusch zu hören ist, haben Sie die Kabelbinder falsch herum (mit den Zähnen
nach außen) eingesetzt. Ziehen Sie den Kabelbinder in diesem Fall aus dem
Schließmechanismus, und fädeln Sie ihn korrekt ein.
4. Setzen Sie Ihr GPS-Gerät in die Schale der GPS-Halterung ein. Das Display (2) muss dabei
zum Radfahrer und der USB-Anschluss (6) nach unten zeigen. Dazu müssen die beiden
Schienen (3) an der Halterung in die entsprechenden Aussparungen am Gerät und das Gerät
nach unten geschoben werden, bis es hörbar einrastet.
5. Setzen Sie sich auf Ihr Fahrrad. Jetzt können Sie das Gerät noch auf der Lenkerstange an
die optimale Position schieben und leicht kippen, sodass Sie das Display (2) optimal sehen
können. Danach ziehen Sie die Kabelbinder kräftig fest.
Wir empfehlen Ihnen, die Kabelbinder mit einem Werkzeug (z.B. einer
Kombizange) gut festzuziehen und die überstehenden langen Zungen mit einer
Schere abzuschneiden.
Falls Sie Ihr GPS-Gerät zukünftig mit einem anderen Fahrrad verwenden
möchten, können Sie entweder den Armgürtel verwenden, oder Sie müssen die
Kabelbinder mit einem Werkzeug (z.B. einem Seitenschneider) abschneiden und
mit zwei weiteren Kabelbindern am neuen Fahrrad befestigen. Im Lieferumfang
sind 8 Kabelbinder enthalten. Bei Bedarf können Sie auch passende Kabelbinder
preiswert im Baumarkt oder Elektrohandel erwerben.
GPS-Gerät aus der Fahrrad-Halterung nehmen
Um Ihr GPS-Gerät aus der Fahrrad-Halterung zu nehmen, gehen Sie folgendermaßen vor:
1. Drücken Sie den Entriegelungshebel unten an der GPS-Halterung, und ziehen Sie gleichzeitig
das GPS-Gerät nach oben aus der GPS-Halterung heraus.
Deutsch
117
GPS Outdoor-Computer SFN 1.5 A1
GPS im Armgürtel tragen
Bei Bedarf können Sie Ihr GPS-Gerät auch am Arm tragen. Dazu wird ein spezieller Armgürtel
mitgeliefert, der verstellbar ist, und auch über der Kleidung passend getragen werden kann. Er
besitzt eine Tasche mit Sichtfenster für das GPS-Gerät.
Um das GPS-Gerät im Armgürtel zu tragen, gehen Sie folgendermaßen vor:
1. Die Tasche mit Sichtfenster besitzt beidseitig je einen Klettverschluss, der um den Armgürtel
gelegt ist. Öffnen Sie den Klettverschluss auf einer der beiden Seiten.
2. Schieben Sie Ihr GPS-Gerät in die Tasche hinein. Achten Sie dabei darauf, dass das Display
(2) durch das Sichtfenster zu sehen ist und dass die Geräteoberseite in Fahrtrichtung zeigt.
3. Schließen Sie den Klettverschluss wieder.
4. Legen Sie den Armgürtel mit der Tasche mit Sichtfenster nach oben lose auf Ihren linken oder
rechten Unterarm.
5. Führen Sie das lange Ende um Ihren Arm herum und durch die Schnalle am kurzen Ende des
Armgürtels.
6. Ziehen Sie das lange Ende ganz hindurch, und befestigen Sie es mit dem Klettverschluss.
Anschließend können Sie die Tasten des GPS-Geräts durch das Sichtfenster bzw. die Tasche bei
Bedarf nach wie vor bedienen.
118
Deutsch
GPS Outdoor-Computer SFN 1.5 A1
Übersicht der Menüführung
Nachfolgend finden Sie eine Übersicht der Menüstruktur des GPS-Geräts und einer kurzen
Erklärung zu den einzelnen Optionen. Um das Menü zu öffnen, drücken Sie die Menütaste (1).
Um im Menü eine Option zu markieren, drücken Sie die Tasten t bzw. u (4 bzw. 7). Um eine
markierte Option zu öffnen bzw. auszuwählen, drücken Sie die Bestätigungstaste (5).
Menü „POI“
Im Menü „POI“ können Sie einen POI auswählen, den Sie zuvor definiert haben, und diesen
ansteuern.
Menüebene 1
Menüebene 2
POI
(POIs)
0 Typ Datum Zeit1
1 Typ Datum Zeit2
2 Typ Datum Zeit3
...
Deutsch
Menüebene 3 Beschreibung
A-D /
A-B-C-D
A-D /
A-B-C-D
A-D /
A-B-C-D
...
Wählen Sie in der POI-Liste den
gewünschten POI aus. Sie können die
POIs anhand des Typs und Datum/
Uhrzeit unterscheiden. Der POI-Typ wird
durch das Symbol gekennzeichnet, das
Sie ausgewählt haben, als Sie den POI
festgelegt hatten. Nachdem Sie Ihre
Auswahl bestätigt haben, können Sie den
POI direkt (A-D) ansteuern oder alle in
der Liste enthaltenen POIs der Reihe nach
bis zum gewählten POI (Ziel) anfahren
(A-B-C-D).
119
GPS Outdoor-Computer SFN 1.5 A1
Menü „Routenplan“
Im Menü „Routenplan“ können Sie einen Routenplan auswählen, den Sie zuvor am PC mithilfe der
mitgelieferten Software „Guider Application“ definiert haben. Siehe „Register Routenplanung“
auf Seite 135.
Menüebene 1
Routenplan
120
Menüebene 2
(Routenpläne)
01 Name1
02 Name2
03 Name3
...
Menüebene 3
Beschreibung
A-D / A-B-C-D
A-D / A-B-C-D
A-D / A-B-C-D
Wählen Sie in der Routenplanliste den
gewünschten Routenplan aus. Sie können
die Routenpläne anhand des Namens
unterscheiden. Anschließend können Sie
das Ziel direkt („A-D“) oder die einzelnen
Wegpunkte des Routenplans der Reihe nach
(„A-B-C-D“) ansteuern. Bei Auswahl der
Option „A-D“ gibt Ihnen der Leitpfeil die
Luftlinie zum Ziel an.
Deutsch
GPS Outdoor-Computer SFN 1.5 A1
Menü „Zurückverfolgen“
Im Menü „Zurückverfolgen“ können Sie eine Route auswählen, die Sie zuvor gefahren sind (und
aufgezeichnet haben), um sie erneut abzufahren.
Menüebene 1
Routen
Deutsch
Menüebene 2
Datum Zeit1
Datum Zeit2
Datum Zeit3
...
Menüebene 3
Zurück / Vor
Zurück / Vor
Zurück / Vor
...
Beschreibung
Wählen Sie in der Routenliste die
gewünschte Route aus. Sie können die
Routen anhand des Datums und der
Uhrzeit unterscheiden. Nachdem Sie Ihre
Auswahl bestätigt haben, können Sie
auswählen, ob Sie die Route in normaler
(„Vor“) oder umgekehrter Richtung
(„Zurück“) fahren möchten.
121
GPS Outdoor-Computer SFN 1.5 A1
Menü „Einstellungen“
Im Menü „Einstellungen“ können Sie die Grundeinstellungen des GPS-Geräts vorgeben und
das Gerät so an Ihre persönlichen Bedürfnisse anpassen. Da das Menü „Einstellungen“ recht
umfangreich ist, wurde die folgende Tabelle doppelseitig gesetzt. Die Beschreibung der folgenden
Funktionen finden Sie auf der rechten Seite:
Menüebene 1
Einstellungen
Menüebene 2
Menüebene 3
Homing-Modus An / Aus
Menüebene 4
Daten löschen
POI
Nein/Ja
Routenplan
Nein/Ja
Routen
Nein/Ja
Licht
Manuell / 10 Sek. / 30 Sek. / 60 Sek.
Autom. Aus
Aus / 10 Min. / 30 Min. / 60 Min.
Energieopt.
Zeitzone
UTC+00
UTC+01
...
Kalibrierung
Einheit
Benutzerprofil
Km / Meilen
Mein Gewicht
Alter
Geschlecht
122
Männlich / Weiblich
Deutsch
.
GPS Outdoor-Computer SFN 1.5 A1
Beschreibung
Öffnen Sie dieses Untermenü, und wählen Sie die Option „An“, um sich direkt nach Hause führen zu
lassen. Hierzu müssen Sie bereits einen POI mit dem Haussymbol festgelegt haben. Oder wählen Sie
„Aus“, um abzubrechen. Nachdem Sie das Menü mithilfe der Menütaste (1) verlassen haben, führt Sie
das GPS-Gerät nach Hause.
Öffnen Sie dieses Untermenü, und wählen Sie die Option „Ja“, um alle im GPS-Gerät gespeicherten POIs
zu löschen. Oder wählen Sie „Nein“, um abzubrechen.
Öffnen Sie dieses Untermenü, und wählen Sie die Option „Ja“, um alle im GPS-Gerät gespeicherten
Routenpläne zu löschen. Oder wählen Sie „Nein“, um abzubrechen.
Öffnen Sie dieses Untermenü, und wählen Sie die Option „Ja“, um alle im GPS-Gerät gespeicherten
Routen zu löschen. Oder wählen Sie „Nein“, um abzubrechen.
Über diese Funktion können Sie die Akku-Laufzeit Ihres GPS-Geräts verlängern. Wählen Sie die Option
„Licht“, damit beim Betätigen der Taste Ein/Aus (8) die Bildschirm-Hintergrundbeleuchtung dauerhaft
eingeschaltet bleibt bzw. durch erneutes Drücken nach der hier eingestellten Zeit ausgeschaltet wird.
Sobald Sie wieder eine Taste betätigen, wird die Bildschirm-Hintergrundbeleuchtung erneut für die
eingestellte Wartezeit eingeschaltet. Wählen Sie die Option „Autom. Aus“, damit sich das GPS-Gerät
automatisch nach der eingestellten Zeit ausschaltet, um den Akku zu schonen.
In diesem Menü stellen Sie die Zeitzone Ihres Standortes ein, damit die Uhr richtig synchronisiert werden
kann. In Deutschland wählen Sie z.B. „UTC+1“ für Winterzeit bzw. „UTC+2“ für Sommerzeit.
Über diese Funktion können Sie eine erneute Satellitensuche und Positionsbestimmung durchführen lassen,
falls Sie den Eindruck haben, dass die angezeigten Daten ungenau sind. Drehen Sie das Gerät dabei
langsam zuerst in horizontaler und anschließend in vertikaler Richtung, wie es die Animation im Display
(2) zeigt. Dieser Vorgang kann einige Minuten dauern. Dabei müssen Sie sich unbedingt im Freien
aufhalten, anderenfalls werden keine GPS-Satelliten empfangen. Wir empfehlen Ihnen, eine Kalibrierung
durchzuführen, wenn Sie das Gerät über einen längeren Zeitraum nicht benutzt haben.
Hier können Sie die Maßeinheit für die Entfernungen (Kilometer [km] und Meilen [sm]) einstellen.
Geben Sie hier mithilfe der Tasten t bzw. u (4 bzw. 7) zum Bearbeiten der Ziffern, der Menütaste zum
Auswählen der Zeichenstelle und der Bestätigungstaste (5) Ihr Gewicht ein, damit die beim Radfahren
verbrauchten Kalorien richtig ermittelt werden können.
Geben Sie hier mithilfe der Tasten t bzw. u (4 bzw. 7) zum Bearbeiten der Ziffern, der Menütaste
zum Auswählen der Zeichenstelle und der Bestätigungstaste (5) Ihr Alter ein, damit die beim Radfahren
verbrauchten Kalorien richtig ermittelt werden können.
Geben Sie hier mithilfe der Tasten t bzw. u (4 bzw. 7) zum Bearbeiten der Ziffern, der Menütaste zum
Auswählen der Zeichenstelle und der Bestätigungstaste (5) Ihr Geschlecht ein, damit die beim Radfahren
verbrauchten Kalorien richtig ermittelt werden können.
Deutsch
123
GPS Outdoor-Computer SFN 1.5 A1
Menüebene 1
Menüebene 2
Info einstellen
Menüebene 3
Menüebene 4
Info auswählen Wegmesser / Entfernung / Tempo /
GPS Info / Kompass / Zeit /
Höhenmesser / Kalorien / Ø Tempo /
Max. Tempo
Auto Scroll
Deaktiviert / 2 Sek. / 4 Sek. / 6 Sek.
Stoppuhr
Sprache
Sprachenliste
Version
124
Deutsch
/
GPS Outdoor-Computer SFN 1.5 A1
Beschreibung
Über diese Option können Sie die Informationsbildschirme auswählen, die Sie mithilfe der Tasten
t bzw. u (4 bzw. 7) während des Radfahrens sehen möchten. Wenn Sie z.B. nicht trainieren
und die Kalorienanzeige nicht benötigen, wählen Sie die Option „Kalorien“ aus, und drücken die
Bestätigungstaste (5), um das Häkchen neben dieser Option auszublenden. Die Kalorienanzeige ist dann
während des Radfahrens nicht mehr verfügbar.
Über diese Option können Sie auswählen, ob zwischen den Informationsbildschirmen automatisch
oder manuell umgeschaltet werden soll. Wählen Sie „Deaktiviert“, um manuell zwischen den
Informationsbildschirmen umzuschalten. Oder legen Sie eine Wartezeit fest, nach der das Gerät
automatisch zum nächsten Bildschirm umschalten soll. Über die letztgenannten Optionen können Sie
während der Fahrt abwechselnd die zurückgelegte Strecke, die Geschwindigkeit, den Kompass usw. der
Reihe nach betrachten, ohne dazu eine Taste drücken zu müssen.
Wählen Sie diese Option, um die Stoppuhr einzublenden. Drücken Sie die Bestätigungstaste (5), um die
Zeitmessung zu starten. Drücken Sie die Bestätigungstaste (5) erneut, um die Zeitmessung zu stoppen. Die
Zeitmessung erfolgt bis zu 1/100 Sekunde. Drücken Sie die Menütaste (1), um die Stoppuhr auf Null
zurückzusetzen. Danach können Sie bei Bedarf eine neue Zeitmessung durchführen.
Über diese Option können Sie die Sprache der Menüs und Bildschirme des GPS-Geräts festlegen. Wählen
Sie mithilfe der Tasten t bzw. u (4 bzw. 7) die gewünschte Sprache aus, und quittieren Sie sie mit der
Bestätigungstaste (5).
Über diese Option können Sie sich die Version der Firmware des GPS-Geräts anzeigen lassen. Diese
Informationen werden z.B. benötigt, wenn Sie sich mit der Hotline in Verbindung setzen.
Deutsch
125
GPS Outdoor-Computer SFN 1.5 A1
Bedienung
GPS-Gerät ein-/ausschalten
So schalten Sie das GPS-Gerät ein:
1. Halten Sie die Taste Ein/Aus (8) ca. 1 Sekunde lang gedrückt.
Daraufhin schaltet sich das Gerät ein, und die Nachricht „Welcome“ erscheint.
Trip Info
Beim ersten Einschalten erscheint der Kalibrierungsbildschirm, und das Gerät
sucht nach verfügbaren GPS-Satelliten und bestimmt Ihren Standort. Drehen
Sie das Gerät dabei langsam zuerst in horizontaler und anschließend
in vertikaler Richtung, wie es die Animation im Display (2) zeigt. Dieser
Vorgang kann einige Minuten dauern. Dabei müssen Sie sich unbedingt im
Freien aufhalten, anderenfalls werden keine GPS-Satelliten empfangen [am
Display (2) bleibt das Symbol
eingeblendet].
Ansonsten erscheint der erste, zur Anzeige ausgewählte Informationsbildschirm (i.d.R. der
Bildschirm „Wegmesser“).
So schalten Sie das GPS-Gerät aus:
1. Halten Sie die Taste Ein/Aus (8) ca. 1 Sekunde lang gedrückt.
Daraufhin erscheint die Nachricht „ByeBye“, und das Gerät schaltet sich aus.
Sprache einstellen
Standardmäßig erscheinen alle Bildschirmanzeigen und Menüs in englischer Sprache. Wenn Sie
eine andere Sprache auswählen möchten, gehen Sie folgendermaßen vor (hierzu muss das Gerät
eingeschaltet sein):
1. Drücken Sie die Menütaste (1). Daraufhin erscheint das Hauptmenü (zunächst in englischer Sprache).
2. Drücken Sie mehrmals die Tasten t bzw. u (4 bzw. 7), bis die Option „Settings“
hervorgehoben ist, und betätigen Sie die Bestätigungstaste (5).
3. Drücken Sie mehrmals die Tasten t bzw. u (4 bzw. 7), bis die Option „Language“
hervorgehoben ist, und betätigen Sie die Bestätigungstaste (5).
4. Drücken Sie mehrmals die Tasten t bzw. u (4 bzw. 7), bis die gewünschte Sprache
hervorgehoben ist, und betätigen Sie die Bestätigungstaste (5).
5. Drücken Sie mehrmals die Menütaste (1), um das Menü auszublenden und zum GPS-Betrieb
zurückzukehren.
Zeitzone einstellen
Damit die Uhrzeit korrekt angezeigt wird, müssen Sie die Zeitzone Ihres Standortes auswählen.
Dazu gehen Sie folgendermaßen vor (hierzu muss das Gerät eingeschaltet sein):
1. Drücken Sie die Menütaste (1). Daraufhin erscheint das Hauptmenü.
2. Drücken Sie mehrmals die Tasten t bzw. u (4 bzw. 7), bis die Option „Einstellungen“
hervorgehoben ist, und betätigen Sie die Bestätigungstaste (5).
126
Deutsch
GPS Outdoor-Computer SFN 1.5 A1
3. Drücken Sie mehrmals die Tasten t bzw. u (4 bzw. 7), bis die Option „Zeitzone“
hervorgehoben ist, und betätigen Sie die Bestätigungstaste (5).
4. Drücken Sie mehrmals die Tasten t bzw. u (4 bzw. 7), bis die gewünschte Zeitzone
hervorgehoben ist, und betätigen Sie die Bestätigungstaste (5). In Deutschland wählen Sie
z.B. „UTC+1“ für Winterzeit bzw. „UTC+2“ für Sommerzeit.
5. Drücken Sie mehrmals die Menütaste (1), um das Menü auszublenden und zum GPS-Betrieb
zurückzukehren.
GPS-Bildschirme und Anzeigen
Während des GPS-Betriebs stehen Ihnen verschiedene Bildschirmansichten zur Verfügung. Jeder
dieser Bildschirme enthält spezifische Informationen. Mit den Tasten t bzw. u (4 bzw. 7) können
Sie zwischen den verschiedenen Bildschirmen zyklisch umschalten.
• Oben links erscheint die Signalpegelanzeige
. Hier wird die Empfangsqualität der GPSSatelliten angezeigt. Je mehr Balken vorhanden sind, desto besser ist die Signalqualität bzw.
desto höher die Genauigkeit der Positionsbestimmung. Das Symbol
bedeutet, dass weniger
als 4 Satelliten empfangen werden und die Positionsbestimmung derzeit nicht möglich ist.
• Oben rechts werden der Pegel des Akkus und das Betriebsartensymbol eingeblendet.
Zustand des Betriebsartensymbols:
: Informativer GPS-Modus. Während Sie fahren, wird keine Route aufgezeichnet. Sie können
jedoch die Strecke, das Tempo, Ihren geografischen Standort, die Fahrtrichtung am Kompass
und die Fahrzeit in Echtzeit ablesen (siehe unten).
blinkt: Routenaufzeichnung.
x: GPS-Leitmodus. Folgen Sie dem Leitpfeil des Kompassbildschirms, um das einprogrammierte
Ziel zu erreichen.
• Die weiteren Informationen sind vom gewählten Bildschirm abhängig.
Standardmäßig sind nur die ersten 6 der folgenden Bildschirme sichtbar. Die
weiteren, mit * gekennzeichneten Bildschirme können über das Menü aktiviert
werden. Siehe „Info einstellen“ auf Seite 124.
Wegmesser:
Entfernung:
Trip Info
Trip Info
Entfernung:
Wegmesser
Zurückgelegte Strecke
Entfernung zum Ziel
Aktuelle Uhrzeit
Deutsch
127
GPS Outdoor-Computer SFN 1.5 A1
Damit der Bildschirm „Entfernung“ Daten anzeigt, müssen Sie eine Route
programmiert haben. Nur dann wird die verbleibende Entfernung zum Ziel
angezeigt. Anderenfalls erscheint die Anzeige 0.000 Km (oder die äquivalente,
eingestellte Maßeinheit).
Tempo:
GPS Info:
Trip Info
Trip Info
Tempo:
Geschwindigkeit
Kompass:
GPS Info:
Breitengrad:
52°52‘00.0“ N
Längengrad:
003°03‘03.5‘ E
Anz. Sat.: 10
Breiten- und Längengrad
Anzahl der empfangenen GPSSatelliten
Zeit:
Trip Info
Trip Info
Fahrtrichtung oben
Zeit:
Verstrichene Zeit seit dem Start
Höhenmesser*:
Kalorien*:
Trip Info
Höhenmesser:
Trip Info
Höhe über Nullniveau (ein
Minuszeichen erscheint bei Höhen
unter dem Meeresspiegel, z.B. am
Toten Meer)
Ø Tempo*:
Kalorien:
Bisher auf der Strecke verbrannte
Kalorien
Max. Tempo*:
Trip Info
Trip Info
Ø Tempo:
Max. Tempo:
Durchschnittsgeschwindigkeit
Maximale Geschwindigkeit
* Damit diese Bildschirme angezeigt werden, müssen Sie sie im Menü „Einstellungen“ unter „Info
einstellen“ aktiviert haben. Siehe Seite 124.
128
Deutsch
GPS Outdoor-Computer SFN 1.5 A1
Route aufzeichnen/fahren
Die folgenden Einstellungen sind nur möglich, wenn das GPS-Gerät
mindestens 4 GPS-Satelliten empfängt. Dies erkennen Sie daran, dass die
anzeigt.
Signalpegelanzeige oben links im Display (2) das Symbol
Während Sie mit Ihrem Fahrrad unterwegs sind, können Sie mithilfe der Bestätigungstaste (5) in
jeder der verfügbaren Bildschirmansichten zu einem beliebigen Zeitpunkt Routen aufzeichnen.
Das GPS-Gerät speichert dabei die Wegpunkte, die Sie gefahren sind. Sie können die Routen bei
Bedarf später wieder abrufen und erneut mit der Leithilfe in beide Richtungen fahren. So kommen
Sie selbst im dichten Wald bzw. bei Dunkelheit nie vom Weg ab.
Die Routenaufzeichnung bzw. –Wiedergabe steuern Sie über Bildschirmsymbole.
So zeichnen Sie eine Route auf:
1. Halten Sie die Bestätigungstaste (5) drei Sekunden lang gedrückt. Daraufhin wird ein PopupMenü mit den Symbolen B, X und x eingeblendet.
B: Start. Startet eine Routenaufzeichnung bzw. –Wiedergabe.
X: Pause. Hält die Routenaufzeichnung vorübergehend an.
x: Stopp. Beendet die Routenaufzeichnung bzw. –Wiedergabe.
2. Drücken Sie die Tasten t bzw. u (4 bzw. 7), wählen Sie das Symbol B (Start), und drücken
Sie die Bestätigungstaste (5), um die Aufzeichnung zu starten.
3. Fahren Sie die gewünschte Route ab. Wenn Sie zwischendurch eine Pause einlegen möchten,
halten Sie die Bestätigungstaste (5) drei Sekunden lang gedrückt, um das Popup-Menü erneut
einzublenden, wählen Sie das Symbol X (Pause), und drücken Sie die Bestätigungstaste (5),
um die Aufzeichnung vorübergehend anzuhalten.
Wenn Sie Ihre Pause beenden und die Fahrt fortsetzen möchten, halten Sie die Bestätigungstaste
(5) drei Sekunden lang gedrückt, um das Popup-Menü einzublenden, wählen Sie das Symbol
B (Start), und drücken Sie die Bestätigungstaste (5). Ihr GPS-Gerät fährt mit der Aufzeichnung
der aktuellen Route fort (es wird keine neue Route erstellt).
4. Sind Sie an Ihrem Ziel angekommen, können Sie die Aufzeichnung der Route beenden. Halten
Sie die Bestätigungstaste (5) drei Sekunden lang gedrückt, um das Popup-Menü einzublenden,
drücken Sie die Tasten t bzw. u (4 bzw. 7), wählen Sie das Symbol x (Stopp), und drücken
Sie die Bestätigungstaste (5), um die Aufzeichnung zu beenden und die Route zu speichern.
Die Routen werden automatisch mit dem Datum und der Uhrzeit ihrer
Aufzeichnung als Dateinamen gespeichert. Um später in der Routenliste nicht
den Überblick zu verlieren und versehentlich eine falsche Route zu fahren,
empfehlen wir Ihnen, Ihre Routen mit der mitgelieferten PC-Software zu
bearbeiten und so umzubenennen, dass Sie eindeutig sind. Beispiel: BahnhofBadesee.
Deutsch
129
GPS Outdoor-Computer SFN 1.5 A1
So fahren Sie eine gespeicherte Route:
1. Drücken Sie in einer beliebigen Bildschirmansicht die Menütaste (1), um das Hauptmenü
anzuzeigen. Drücken Sie die Tasten t bzw. u (4 bzw. 7), wählen Sie die Option
„Zurückverfolgen“, und drücken Sie die Bestätigungstaste (5). Daraufhin wird eine Liste der
aufgezeichneten Routen angezeigt.
2. Drücken Sie die Tasten t bzw. u (4 bzw. 7), wählen Sie die gewünschte Route aus, und
drücken Sie die Bestätigungstaste (5). Daraufhin erscheint ein Auswahlmenü mit den Optionen
„Zurück“ und „Vor“.
Wählen Sie „Zurück“, um die Route rückwärts, d.h. vom Ziel- zum Startpunkt zu fahren.
Wählen Sie „Vor“, um die Route vorwärts, d.h. vom Start- zum Zielpunkt zu fahren.
Daraufhin erscheint der Kompass mit einem Leitpfeil, der die zu fahrende Richtung weist. Falls
ein anderer als der Kompassbildschirm erscheint, drücken Sie die Tasten t bzw. u (4 bzw. 7)
und wählen den Kompassbildschirm aus.
Entfernung zum Ziel
Dreht sich der Leitpfeil nach rechts, müssen Sie nach rechts abbiegen, bis er wieder geradeaus
zeigt. Dreht sich der Leitpfeil nach links, müssen Sie nach links abbiegen, bis er wieder geradeaus
zeigt. Wenn Sie an Ihrem Ziel angekommen sind, blinkt einige Sekunden lang die Zielfahne mit
einem Radfahrer daneben. Danach schaltet das Gerät wieder auf die normale Kompassanzeige
(ohne Wegführung) um.
POIs
POI bedeutet „Point of Interest“, also ein Ort, der wichtig sein könnte. POIs können Banken, Bahnhöfe,
Flughäfen, aber auch Sehenswürdigkeiten, Restaurants, Cafés und andere Einrichtungen sein.
Ihr GPS-Gerät ermöglicht es Ihnen, beliebige Standorte als POIs zu speichern und sogar zu
klassifizieren.
So speichern Sie Ihren Standort als POI:
Die folgenden Einstellungen sind nur möglich, wenn das GPS-Gerät
mindestens 4 GPS-Satelliten empfängt. Dies erkennen Sie daran, dass die
Signalpegelanzeige oben links im Display (2) das Symbol
anzeigt.
1. Drücken Sie in einer beliebigen Bildschirmansicht die
Bestätigungstaste (5), um ein Auswahlmenü mit POI-Symbolen
anzuzeigen.
2. Drücken Sie die Tasten t bzw. u (4 bzw. 7), und wählen
130
Deutsch
GPS Outdoor-Computer SFN 1.5 A1
Sie das Symbol, das den aktuellen Standort am besten beschreibt (z.B. die Sonne für den
Badestrand).
3. Drücken Sie die Bestätigungstaste (5), um den aktuellen Standort als POI abzuspeichern.
Oder drücken Sie die Menütaste (1), um abzubrechen.
So steuern Sie einen POI zu einem späteren Zeitpunkt an:
1. Drücken Sie in einer beliebigen Bildschirmansicht die Menütaste (1) gefolgt von der
Bestätigungstaste (5). Dadurch wird das POI-Menü geöffnet.
2. Drücken Sie die Tasten t bzw. u (4 bzw. 7), wählen Sie den gewünschten POI aus, und
drücken Sie die Bestätigungstaste (5). Wählen Sie anschließend die Option „A-D“, um sich zu
ihm führen zu lassen.
Daraufhin erscheint die Kompassanzeige mit dem Leitpfeil. Folgen Sie dem Leitpfeil, um den
POI zu erreichen. Falls ein anderer als der Kompassbildschirm erscheint, drücken Sie die
Tasten t bzw. u (4 bzw. 7) und wählen den Kompassbildschirm aus.
Der Leitpfeil zeigt lediglich die Richtung an, in der Sie den POI auf direktem
Wege erreichen würden. Da Ihr GPS-Gerät kein Kartenmaterial besitzt und
Sie ja auf begeh- bzw. befahrbare Wege angewiesen sind, müssen Sie sich
einen Weg suchen, der der Leitrichtung am nächsten kommt. Leitet Sie der Pfeil
links voraus, befindet sich hier aber eine eingezäunte Wiese, können Sie zuerst
geradeaus fahren und an der nächsten Abzweigung nach links abbiegen.
Homing-Modus
Der „Homing-Modus“ ist eine spezielle Funktion Ihres GPS-Geräts, dank derer Sie jederzeit direkt
nach Hause finden können.
Damit Sie den Homing-Modus verwenden können, müssen Sie zuvor bei sich
Zuhause den POI mit dem Haussymbol
festgelegt haben.
So lassen Sie sich vom Homing-Modus nach Hause leiten:
1. Drücken Sie die Menütaste (1), um das Menü anzuzeigen.
2. Drücken Sie die Tasten t bzw. u (4 bzw. 7), wählen und öffnen Sie die Option „Einstellungen“
und anschließend die Option „Homing-Modus“.
3. Drücken Sie die Tasten t bzw. u (4 bzw. 7), wählen Sie die Option „An“, und drücken Sie
die Bestätigungstaste (5).
4. Verlassen Sie alle geöffneten Menüs durch mehrfaches Betätigen der Menütaste (1).
Daraufhin erscheint die Kompassanzeige mit dem Leitpfeil. Folgen Sie dem Leitpfeil, um nach
Hause zu gelangen. Falls ein anderer als der Kompassbildschirm erscheint, drücken Sie die
Tasten t bzw. u (4 bzw. 7) und wählen den Kompassbildschirm aus.
Deutsch
131
GPS Outdoor-Computer SFN 1.5 A1
Erweiterte Funktionen
Daten mit PC austauschen
Sie können aufgezeichnete Routen von Ihrem GPS-Gerät auf den PC überspielen und dort über
die mitgelieferte PC-Software verwalten. Sie können gefahrene Strecken analysieren und neue
Routen oder POIs auf der Karte entwerfen und auf Ihr GPS-Gerät überspielen.
Damit Sie die auf CD mitgelieferte PC-Software verwenden können, muss Ihr PC die Anforderungen
des Abschnitts „Systemvoraussetzungen“ (siehe Seite 113) erfüllen.
GPS-Gerät mit PC verbinden
1. Öffnen Sie die Abdeckung des USB-Anschlusses (6).
2. Verbinden Sie den kleineren Stecker des mitgelieferten USB-Kabels mit dem USB-Anschluss (6)
und das andere Ende mit dem USB-Port Ihres Computers.
Daraufhin schaltet sich der Bildschirm des GPS-Geräts ein, es erscheint einige Sekunden lang
die Nachricht „Welcome“ und daraufhin eine PC-Verbindungsanzeige. (Wenn Sie das Gerät
mit einem USB-Netzteil speisen erscheint eine Akku-Ladeanzeige.)
PC-Programm „Guider Application“
1. Legen Sie die mitgelieferte CD-ROM in das CD- bzw. DVD-Laufwerk Ihres Computers ein.
2. Öffnen Sie in Windows den Inhalt der CD, und doppelklicken Sie auf die Datei
„Guider-Targa.exe“. Daraufhin öffnet sich das Programm „Guider Application“ in der
Kartenansicht. Zunächst erscheint das Programm auf Englisch. (Je nach Sicherheitseinstellungen
Ihres Betriebssystems kann es sein, dass zuerst eine Nachricht erscheint, dass der Herausgeber
der Software nicht identifiziert werden konnte und ob Sie das Programm wirklich ausführen
möchten. Sie können das Programm natürlich problemlos ausführen lassen.)
Um das Programm nicht jedesmal von CD starten zu müssen, können Sie die
Datei „Guider-Targa.exe“ auch in einen Ordner auf die lokale Festplatte Ihres
PCs oder sogar auf den Desktop kopieren. So können Sie es zukünftig schnell
und einfach starten.
3. Beim ersten Start erscheint die Benutzeroberfläche auf Englisch. Klicken Sie oben auf die
Registerkarte „Track data“ (Streckendaten), und wählen Sie in der Pulldown-Liste „Language“
(Sprache) die gewünschte Sprache für die Benutzeroberfläche des Programms aus.
Daten vom GPS-Gerät in Guider Applikation herunterladen
In den Registern „Routenplanung“, „POI“ und „Routen“ gibt es ein Feld „Geräteverbindung“ mit
. Öffnen Sie eines dieser Register, und klicken Sie auf die Schaltfläche
der Schaltfläche
Daraufhin werden die betreffenden Daten vom GPS-Gerät heruntergeladen.
132
.
Deutsch
GPS Outdoor-Computer SFN 1.5 A1
Register „Karte“
Damit die Karten angezeigt werden, muss Ihr PC mit dem Internet verbunden
sein. Durch die Internet-Verbindung können Ihnen evtl. Mehrkosten entstehen.
Diese Ansicht entspricht der von Google Maps. Zur detaillierten Bedienung der Kartenfunktionen,
siehe die Hilfe zu Google Maps im Internet. Mit den Schaltflächen rechts oben können Sie
zwischen der Straßenkarten-, der Satelliten- und der Geländeansicht umschalten.
Deutsch
133
GPS Outdoor-Computer SFN 1.5 A1
Register „Streckendaten“
In diesem Fenster können Sie die Sprache des Programms einstellen und sich Daten zu den
gefahrenen Strecken, die Sie mit dem GPS-Gerät aufgezeichnet haben, grafisch darstellen lassen.
Damit Sie die Diagramme betrachten können, müssen Sie zunächst im Register „Routen“ die
gefahrenen Routen vom GPS-Gerät heruntergeladen und eine Route ausgewählt haben.
Sprache
Höhendiagramm
Geschwindigkeits
diagramm
HRM
EinheitenEinstellung
134
Hier können Sie die Sprache des Programms einstellen.
Aktivieren Sie das Kontrollkästchen, um ein Diagramm einzublenden,
das den Höhenverlauf (über Meeresspiegel) über der Zeit darstellt.
Aktivieren Sie das Kontrollkästchen, um ein Diagramm einzublenden,
das den Tempoverlauf über der Zeit darstellt.
Diese Option ist bei der aktuellen Version des GPS-Geräts nicht
verfügbar.
Hier können Sie festlegen, ob Sie die Höhen- und
Geschwindigkeitsangaben in metrischen oder englischen Einheiten
erhalten möchten.
Deutsch
GPS Outdoor-Computer SFN 1.5 A1
Register „Routenplanung“
In diesem Fenster können Sie eine oder mehrere Routen (maximal 50) auf der Karte planen und die
einzelnen Wegpunkte, die Sie ansteuern möchten, auf Ihr GPS-Gerät hochladen. Anschließend
können Sie sich aufs Rad schwingen und die Route abfahren.
Damit die Karten angezeigt werden, muss Ihr PC mit dem Internet verbunden
sein. Durch die Internet-Verbindung können Ihnen evtl. Mehrkosten entstehen.
Suchen Sie in der Kartenansicht (Suchfeld „Karte durchsuchen“) den Ort, wo Ihre Route beginnen
soll.
Routenliste
Wegpunktliste
Karte
Doppelklicken Sie auf die Karte, um den Startpunkt der Route
festzulegen.
Klicken Sie jeweils an Kurven und Abzweigungen, um weitere
Wegpunkte hinzuzufügen. Die Wegpunkte werden rechts in der Liste
nummerisch mit Breiten- und Längengrad aufgelistet. Sie können pro
Route maximal 50 Wegpunkte definieren. Der Startpunkt wird dabei
mitgezählt, erhält die Nummer 0 und wird rot dargestellt.
Deutsch
135
GPS Outdoor-Computer SFN 1.5 A1
Geräteverbindung
Klicken Sie auf die Schaltfläche
, um bestehende Routen vom
GPS-Gerät auf den PC herunterzuladen.
Klicken Sie auf die Schaltfläche
, um die in diesem Fenster
definierten Routen auf das GPS-Gerät hochzuladen.
Datei
Routenliste
Klicken Sie auf die Schaltfläche
Route zu speichern.
, um die aktuell definierte
, um eine gespeicherte
Klicken Sie auf die Schaltfläche
Route zu öffnen und sie ggf. zu bearbeiten oder auf das GPS-Gerät
hochzuladen.
Klicken Sie mit der Maus auf einen Titel in der Liste, um die betreffende
Route auszuwählen und in der Karte anzuzeigen. Die hier angezeigten
Titel entsprechen den gespeicherten Routen.
Klicken Sie mit der rechten Maustaste auf einen Titel in der Liste, um
eine neue Route hinzuzufügen, eine bestehende Route zu bearbeiten
oder zu löschen oder um alle Routen aus der Liste zu entfernen.
Wegpunktliste
Sie können maximal 50 Routen festlegen und auf Ihr GPS-Gerät
hochladen.
Die Wegpunkte werden der Reihe nach nummeriert. Zu jedem
Wegpunkt werden Breiten- und Längengrad angegeben.
Klicken Sie mit der rechten Maustaste auf einen Wegpunkt in der Liste,
um ihn zu bearbeiten (zu verschieben) oder zu löschen oder um alle
Wegpunkte aus der Liste zu entfernen. Über diese Funktion können Sie
auch einen anderen Wegpunkt als Startpunkt Ihrer Route festlegen.
Wir empfehlen Ihnen, alle 2-3 km einen Wegpunkt zu setzen (auch bei
geradlinigem Streckenverlauf).
Sie können pro Route maximal 49 Wegpunkte plus den Zielpunkt
definieren.
Klicken Sie in der Routen- oder Wegpunktliste mit der rechten Maustaste auf eine Route bzw. einen
Wegpunkt, um diese zu verwalten. Sie können Routen hinzufügen, umbenennen („Bearbeiten“),
löschen oder alle Routen aus der Liste entfernen („Alles löschen“). Sie können Wegpunkte
umbenennen („Bearbeiten“), löschen, alle Wegpunkte aus der Liste entfernen („Alles löschen“)
oder den markierten Wegpunkt als Startposition festlegen.
136
Deutsch
GPS Outdoor-Computer SFN 1.5 A1
Register „POI“
Das Register „POI“ enthält eine Liste der POIs, die Sie mit Ihrem GPS-Gerät während der Fahrt
angelegt haben. Die POIs werden mit dem Symbol, das Sie beim Anlegen der einzelnen POIs
vorgegeben haben, in der Karte dargestellt.
Damit die Karten angezeigt werden, muss Ihr PC mit dem Internet verbunden
sein. Durch die Internet-Verbindung können Ihnen evtl. Mehrkosten entstehen.
Geräteverbindung
Klicken Sie auf die Schaltfläche
, um bestehende POIs vom GPSGerät auf den PC herunterzuladen.
Klicken Sie auf die Schaltfläche
, um die in diesem Fenster
angezeigte POI-Liste auf das GPS-Gerät hochzuladen.
Deutsch
137
GPS Outdoor-Computer SFN 1.5 A1
Datei
POI-Liste
Klicken Sie auf die Schaltfläche „Speichern“, um die in diesem Fenster
angezeigte POI-Liste zu speichern.
Klicken Sie auf die Schaltfläche „Öffnen“, um eine gespeicherte POIListe zu öffnen und sie ggf. zu bearbeiten oder auf das GPS-Gerät
hochzuladen.
Klicken Sie mit der Maus auf einen POI in der Liste, um ihn auszuwählen
und in der Karte anzuzeigen. Es erscheint eine Texteinblendung mit
Datum und Uhrzeit, zu denen der POI erstellt wurde.
Klicken Sie mit der rechten Maustaste auf einen POI in der Liste, um ihn
zu löschen oder um alle POIs aus der Liste zu entfernen.
Klicken Sie in der POI-Liste mit der rechten Maustaste auf einen POI, um diesen zu verwalten. Sie
können POIs löschen oder alle POIs aus der Liste entfernen („Alles löschen“).
Register „Routen“
Im Register „Routen“ können Sie die aufgezeichneten Routen, die Sie gefahren sind, verwalten.
Auf der linken Seite erscheint die Liste aller Routen, auf der rechten Seite die Liste aller zur
ausgewählten Route gehörigen Wegpunkte.
138
Deutsch
GPS Outdoor-Computer SFN 1.5 A1
Routenliste
Geräteverbindung
Anzeigen
Alles löschen
Datenspeicherung
Die Routen werden der Reihe nach nummeriert Track0, Track1 usw).
Zu jeder Route werden Datum und Uhrzeit angegeben.
Klicken Sie mit der rechten Maustaste auf eine Route in der Liste,
um sie zu bearbeiten oder zu löschen oder um alle Routen aus
der Liste zu entfernen. Über die Option „Bearbeiten“ können
Sie die Route umbenennen und ihr eine andere Farbe zuordnen.
Verschiedene Farben sind empfehlenswert, wenn Sie mehrere Routen
heruntergeladen haben, die überlappen oder sehr nahe beieinander
liegen. Durch die unterschiedlichen Farben lassen sie sich in der
Kartenansicht (Schaltfläche „Anzeigen“) besser differenzieren.
Klicken Sie auf die Schaltfläche
, um bestehende Routen vom
GPS-Gerät auf den PC herunterzuladen.
Klicken Sie auf die Schaltfläche „Anzeigen“, um die aktuell
ausgewählte Route im Register „Karte“ anzuzeigen.
Klicken Sie auf die Schaltfläche „Alles löschen“, um alle Routen aus
der Kartenansicht zu löschen.
Klicken Sie auf die Schaltfläche „Speichern“, um die in diesem Fenster
angezeigte Routenliste zu speichern.
Klicken Sie auf die Schaltfläche „Öffnen“, um eine gespeicherte
Routenliste zu öffnen und sie ggf. zu bearbeiten.
RoutenIn diesem Abschnitt sehen Sie Datum und Uhrzeit des Starts und des
Zusammenfassung Erreichens des Routenziels. Sie können diese Daten nicht bearbeiten.
Strecke
In diesem Abschnitt sehen Sie die Anzahl Trackpunkte, die zur Route
aufgezeichnet wurden sowie die zurückgelegte Entfernung in Km und
Meilen.
Time Zone
Über diese Pulldown-Liste können Sie die Zeitzone Ihres Standortes
festlegen.
Klicken Sie in der Routenliste mit der rechten Maustaste auf eine Route, um diese zu verwalten.
Sie können Routen umbenennen („Bearbeiten“), löschen oder alle Routen aus der Liste entfernen
(„Alles löschen“).
Die Wegpunkte rechts im Fenster wurden vom GPS-Gerät aufgezeichnet und
gehören fest zur heruntergeladenen Route. Sie können sie nicht bearbeiten.
Deutsch
139
GPS Outdoor-Computer SFN 1.5 A1
Problemlösung
Die meisten Probleme können Sie selbst anhand der folgenden Abschnitte lösen. Falls das Problem
nach Durcharbeiten dieser Ansätze fortbesteht, wenden Sie sich an unsere Hotline (siehe Seite 143.
Führen Sie keine eigenhändigen Reparaturarbeiten durch!
GPS-Gerät lässt sich nicht einschalten.
• Laden Sie den Akku auf. Siehe „Akku aufladen“ auf Seite 115.
• Wenn Sie das GPS-Gerät mit einem Computer verbunden haben, befindet es sich im PCVerbindungsmodus, und es lässt sich nicht über die Tasten bedienen. Trennen Sie das Gerät
vom PC.
Das GPS-Gerät reagiert nicht.
• Wenn Sie das GPS-Gerät mit einem Computer verbunden haben, befindet es sich im PCVerbindungsmodus, und es lässt sich nicht über die Tasten bedienen. Trennen Sie das Gerät
vom PC.
• Falls das GPS-Gerät nicht mit dem PC verbunden ist und trotzdem nicht reagiert, versuchen
Sie, es zurückzusetzen. Dazu halten Sie die Taste t (7) und die Taste Ein/Aus (8) gleichzeitig
gedrückt. Anschließend startet das Gerät im Ausgangszustand: die Menüsprache ist Englisch,
und alle benutzerdefinierten Einstellungen wurden gelöscht. Nur Ihre aufgezeichneten Routen
und gespeicherten POIs bleiben nach dem Zurücksetzen erhalten.
Das GPS-Gerät zeigt keine Daten an.
• Das GPS-Gerät muss mindestens vier GPS-Satelliten empfangen, damit es Ihre gegenwärtige
Position und die Bewegung bestimmen kann. Dazu muss freie Sicht auf einen möglichst großen
Himmelsabschnitt bestehen. Enge Straßen, hohe Gebäude aus Stahlbeton oder Hallen sowie
Unterführungen, Tunnel usw. verhindern den Satellitenempfang. Bewegen Sie sich an einen
anderen Ort, und versuchen Sie es erneut.
Das GPS-Gerät zeichnet keine gefahrene Routen auf.
• Sie müssen die Routenaufzeichnung zunächst manuell starten. Siehe „Route aufzeichnen/
fahren“ auf Seite 129.
• Sie haben schon sehr viele Wegpunkte bzw. Routen im Gerät abgelegt, und der Speicher ist
voll. Geben Sie Speicherplatz frei, indem Sie über das Menü / Einstellungen / Daten löschen
nicht benötigte Daten entfernen, oder überspielen Sie die auf dem Gerät gespeicherten Daten
mithilfe der Software „Guider Application“ auf den PC, und löschen Sie danach alle Daten
über das Menü.
Die Software „Guider Application“ zeigt keine Karte bzw. keine Daten an.
• Ihr PC muss mit dem Internet verbunden sein, damit sich die Software die Karten von Google
Maps bzw. Google Earth laden und Ihre Streckendaten darstellen kann.
140
Deutsch
GPS Outdoor-Computer SFN 1.5 A1
Wartung / Reinigung
Trennen Sie alle Kabelverbindungen vom GPS-Gerät, bevor Sie es reinigen.
Andernfalls kann das GPS-Gerät beschädigt werden.
Das GPS-Gerät beinhaltet keine zu wartenden Teile. Öffnen Sie niemals das Gehäuse des
GPS-Geräts, um Gefährdungen zu vermeiden. Achten Sie darauf, dass die Komponenten nicht
verunreinigt werden. Verwenden Sie zur Reinigung des GPS-Geräts ein weiches, trockenes Tuch
und keinesfalls Lösungsmittel oder Reiniger, die Kunststoff angreifen. Verwenden Sie bei stärkerer
Verschmutzung nur ein leicht angefeuchtetes Tuch.
Deutsch
141
GPS Outdoor-Computer SFN 1.5 A1
Umwelthinweise und Entsorgungsangaben
Die mit diesem Symbol gekennzeichneten Geräte unterliegen der europäischen
Richtlinie 2002/96/EC. Alle Elektro- und Elektronik-Altgeräte müssen getrennt
vom Hausmüll über dafür staatlich vorgesehene Stellen entsorgt werden. Mit der
ordnungsgemäßen Entsorgung des alten Gerätes vermeiden Sie Umweltschäden und
eine Gefährdung der persönlichen Gesundheit. Weitere Informationen zur Entsorgung
des alten Gerätes erhalten Sie bei der Stadtverwaltung, beim Entsorgungsamt oder in
dem Geschäft, in dem Sie das Produkt erworben haben.
Der eingebaute Akku ist für die Entsorgung nicht entnehmbar.
Führen Sie auch die Verpackung einer umweltgerechten Entsorgung zu. Kartonagen können
bei Altpapiersammlungen oder an öffentlichen Sammelplätzen zur Wiederverwertung
abgegeben werden. Folien und Kunststoffe des Lieferumfangs werden über Ihr örtliches
Entsorgungsunternehmen eingesammelt und umweltgerecht entsorgt.
Konformitätsvermerke
Dieses Gerät entspricht hinsichtlich Übereinstimmung mit den grundlegenden
Anforderungen und den anderen relevanten Vorschriften der EMV-Richtlinie
2004/108/EC und der Richtlinie für Niederspannungsgeräte 2006/95/EC sowie
der RoHS II Richtlinie 2011/65/EU. Die dazugehörige Konformitätserklärung finden
Sie am Ende dieser Bedienungsanleitung.
142
Deutsch
GPS Outdoor-Computer SFN 1.5 A1
Hinweise zu Garantie und Serviceabwicklung
Sehr geehrte Kundin, sehr geehrter Kunde,
Sie erhalten auf dieses Gerät 3 Jahre Garantie ab Kaufdatum. Im Falle von Mängeln dieses Produkts stehen
Ihnen gegen den Verkäufer des Produkts gesetzliche Rechte zu. Diese gesetzlichen Rechte werden durch
unsere im Folgenden dargestellte Garantie nicht eingeschränkt.
Garantiebedingungen
Die Garantiefrist beginnt mit dem Kaufdatum. Bitte bewahren Sie den Original-Kassenbon gut auf. Diese
Unterlage wird als Nachweis für den Kauf benötigt. Tritt innerhalb von drei Jahren ab dem Kaufdatum dieses
Produkts ein Material- oder Fabrikationsfehler auf, wird das Produkt von uns – nach unserer Wahl – für Sie
kostenlos repariert oder ersetzt.
Garantiezeit und gesetzliche Mängelansprüche
Die Garantiezeit wird durch die Gewährleistung nicht verlängert. Dies gilt auch für ersetzte und reparierte
Teile. Eventuell schon beim Kauf vorhandene Schäden und Mängel müssen sofort nach dem Auspacken
gemeldet werden. Nach Ablauf der Garantiezeit anfallende Reparaturen sind kostenpflichtig.
Garantieumfang
Das Gerät wurde nach strengen Qualitätsrichtlinien sorgfältig produziert und vor Anlieferung gewissenhaft
geprüft. Die Garantieleistung gilt für Material- oder Fabrikationsfehler. Diese Garantie erstreckt sich nicht
auf Produktteile, die normaler Abnutzung ausgesetzt sind und daher als Verschleißteile angesehen werden
können oder für Beschädigungen an zerbrechlichen Teilen, z. B. Schalter, Akkus oder die aus Glas gefertigt
sind. Diese Garantie verfällt, wenn das Produkt beschädigt, nicht sachgemäß benutzt oder gewartet wurde.
Für eine sachgemäße Benutzung des Produkts sind alle in der Bedienungsanleitung aufgeführten Anweisungen
genau einzuhalten. Verwendungszwecke und Handlungen, von denen in der Bedienungsanleitung
abgeraten oder vor denen gewarnt wird, sind unbedingt zu vermeiden. Das Produkt ist lediglich für den
privaten und nicht für den gewerblichen Gebrauch bestimmt. Bei missbräuchlicher und unsachgemäßer
Behandlung, Gewaltanwendung und bei Eingriffen, die nicht von unserer autorisierten Service-Niederlassung
vorgenommen wurden, erlischt die Garantie. Mit Reparatur oder Austausch des Produkts beginnt kein neuer
Garantiezeitraum.
Abwicklung im Garantiefall
Um eine schnelle Bearbeitung Ihres Anliegens zu gewährleisten, folgen Sie bitte den folgenden Hinweisen:
-
Bitte lesen Sie vor Inbetriebnahme Ihres Produktes sorgfältig die beigefügte Dokumentation bzw.
Onlinehilfe. Sollte es einmal zu einem Problem kommen, welches auf diese Weise nicht gelöst
werden kann, wenden Sie sich bitte an unsere Hotline.
-
Bitte halten Sie für alle Anfragen den Kassenbon und die Artikelnummer bzw. wenn vorhanden die
Seriennummer als Nachweis für den Kauf bereit.
-
Für den Fall, dass eine telefonische Lösung nicht möglich ist, wird durch unsere Hotline in Abhängigkeit der Fehlerursache ein weiterführender Service veranlasst.
Deutsch
143
GPS Outdoor-Computer SFN 1.5 A1
Service
Telefon:
0049 (0) 211 - 547 69 93
E-Mail:
[email protected]
Telefon:
0043 (0) 1 - 79 57 60 09
E-Mail:
[email protected]
Telefon:
0041 (0) 44 - 511 82 91
E-Mail:
[email protected]
IAN: 85816
Hersteller
Bitte beachten Sie, dass die folgende Anschrift keine Serviceanschrift ist. Kontaktieren Sie zunächst die oben
benannte Servicestelle.
TARGA GmbH
Coesterweg 45
59494 Soest
Germany
144
Deutsch
EU-Declaration of Conformity
Adress:
Product:
Model:
IAN:
Targa GmbH
Lange Wende 41
59494 Soest, Germany
GPS Computer
Silvercrest SFN 1.5 A1
85816
The product complies with the requirements of the following European
directives:
2004/108/EC
Electromagnetic Compatibility
2006/95/EC
Low Voltage directive
2011/65/EU
Restriction of the use of certain hazardous
substances in electrical and electronical
equipment
Compliance was proved by the application of the following standards:
EMC:
EN 55022:2006 +A1:2007
EN 55024:1998 +A1:2001 +A2:2003
Safety:
EN 60950-1 :2006 +A11 :2009
ROHS:
EN 50851:2012
Soest, 28th of January
2012
Matthias Klauke, Managing Director