1
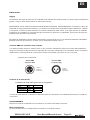
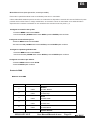
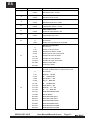
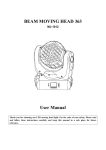
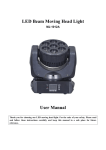
SIDIUS LED 368 Z
Rev. 13.07.01
User Manual / Instrucciones de Usuario
EN
CAUTION !
Keep this device away from rain and moisture
Unplug mains lead before opening the housing
For your own safety, please read this user manual carefully before you initially start-up
Every person involved with installation. operation and maintenance of this fixture has to
- be qualified
- follow the instruction of this manual
- consider this manual to be part of the total product
- Keep this manual for the entire service life of the product
- pass this manual to every future owner or use of the product
INTRODUCTION
Thank you for choosing our fixture, if you follow up the instruction given in this manual we be sure that
you will enjoy this product for a long period of time
SAFETY INSTRUCTION
CAUTION!
Be careful with your operations, With a dangerous voltage you can suffer a dangerous electric
shock when touching the wires.
This device has left our premises in absolutely perfect condition .In order to maintain this condition and
to ensure a safe operation, it is absolutely necessary for the user to follow the safety instruction and
warning notes written in this user manual.
Important: Damages caused by the disregard of this user manual are not subject o warranty, the dealer
will not accept liability for any resulting defects of problem. If the device had been exposed to drastic
temperature fluctuation (e.g. after transportation),do not switch it on immediately. The arising
condensation water might damage your device. Leave the device switched off until it had reached room
temperature. Please make sure that there are no obvious transport damages, should you notice any
damages on the AC connection cable or on the casing, do not take the device into operation and
immediately consult your local dealer.
The device falls under protection-class. The power plug must only be plugged into a protection class I
outlet. The voltage and frequency must exactly be the same as stated on the device. Wrong voltages or
power outlets can lead to the destruction of the device and mortal electrical shock.Always plug in the
power plug last. The power plug must always be inserted without force .Make sure that the plug is tightly
connected with the outlet.
Never let the power-cord come into contact with other cables! Handle the power-cord and all
SIDIUS LED 368 Z
User Manual/Manual de uso
Page 1
EN
connections with the mains with particular caution! Never touch them with wet hands .as this could lead
to mortal electrical shock. Never modify, bend, strain mechanically, put pressure on, pull or heat up the
power cord. Never operate next to sources of heat or cold. Disregard can lead to power cord damages,
fire or mortal electrical shock. The cable insert or the female part in the device must never be strained.
There must always be sufficient cable to the device. Otherwise, the cable may be damaged which may
lead to mortal electrical shock. Make sure that the power-cord is never crimped or damaged by sharp
edges. Check the device and the power-cord from time to time.If extension cords are used, make sure
that the core diameter is sufficient for the required power consumption of the device. All warnings
concerning the power cords are also valid for possible extension cords.
OPERATING DETERMINATIONS
This device is designed for permanent operation. Consistent operation breaks will ensure that the
device will serve you for a long time without defects. Do not shake the device. Avoid brute force when
installing or operation the device. Never lift the fixture by holding it at the projector-head. As the
mechanics may be damaged. When choosing the installation-spot, please make sure that the device is
not exposed to extreme heat, moisture or dust. There should not be any cable lying around. Please
make sure that the fixture can not be touched or bumped. Your endanger your own and the safety of
others.
The housing must never touch surrounding surfaces or objects. Make sure that the area below the
installation place is blocked when rigging, dragging or servicing the fixture. For overhead use (mounting
height>100cm), always fix the fixture with an appropriate safety-rope. Fix the safety-rope at the correct
fixation points only. The safety-rope must never be fixed at the transport handles. Only operate the
fixture after having check that the housing is firmly closed and all screw are tightly fastened.
0
The maximum ambient temperature Ta=45 C must never be exceeded. Operate the device only after
having become familiarized with its functions. Do not permit operation by persons not qualified for
operating the device. Most damages are the result of unprofessional operation. Please use the original
packaging if the device is to be transported. Please consider that unauthorized modifications on the
device are forbidden due to safety reasons! Never remove the serial barcode from the device as this
would make the guarantee void. If this device will be operated in any way different to the one described
in this manual, the product may suffer damages and the guarantee becomes void. Furthermore, any
other operation may lead to dangers like short-circuit, burns, electric shock, crash etc.
DESCRIPTION OF THE DEVICE
Features
> 11 channel DMX-512 .
> Pan :630°/tilt:270°.
> 36 pcs 8W RGBW QUAD LED
> Variable electronic strobe.
> Variable electronic dimmer(0-100%).
> LED display menu with invert.
> Reset to factory settings option.
> Zoom angle from 18º to 55º
> Pan/Tilt invert option
> Fan cooled
SIDIUS LED 368 Z
User Manual/Manual de uso
Page 2
EN
INSTALLATION
Rigging
The installation of the projector has to be built and constructed in a way that it can hold 10 times the
weight for 1 hour without any harming deformation.
IMPORTANT!OVERHEAD RIGGING REQUIRES EXTENSIVE EXPERIENCE, including calculating
working load limits, installation material being used, and periodic safety inspection of all installation
material and the projector. If you lack these qualifications, do not attempt the installation yourself, but
instead use a professional structural rigger. Improper installation can result in bodily injury and or
damage to property. The projector had to be installed out of the reach of people
DANGER OF FIRE! When installing the device, make sure there is no highly-inflammable
material(decoration articles, etc.)within a distance of min.0.5m.
DMX 512 connection/ connection between fixture
The wires must not come into contact with each other, otherwise the fixture will not work at all or
properly. Please note the starting address depends upon which controller is being used. Only use a
DMX cable and 3-pin XLR-plugs and connectors in order to connect the controller with the fixture or one
fixture to another
Connection with the mains.
The earth has to be connected. The device must only be connected with an electric installation carried
out in compliance with IEC standards.
OPERATION
After you connected the effect to the mains, The fixture starts running
Stand Alone operation
In the stand alone mode, the fixture can be use without controller
SIDIUS LED 368 Z
User Manual/Manual de uso
Page 3
EN
Master/slave-operation
The master/slave-operation enables that several devices can be synchronized and controlled by one
master-device
DMX controlled operation
You can control the projectors individually via your DMX-controller
Addressing
The control board allows you to assign the DMX starting address,
Note;it’s necessary to insert the XLR termination plug (with 120ohm) in the last device in the link in order
to ensure proper transmission on the DMX data link.
C ONT R O L B O AR D
The control board offer several features :you can simple set the starting address, run the
pre-programmed program or make a reset
The main menu is accessed by pressing the Mode/Esc button, Browse through the submenu by pressing
Up or Down .Press the Enter-button in order to select the desired menu. You can change the selection
by pressing Up or Down, Confirm every selection by pressing the Enter-button. You can leave every
mode by pressing the Mode/Esc-button .The functions provided are described in the following setting.
M EN U M AP
DMX Address (DMX address 001-512)
Mode (DMX mode 15 ch, Auto mode1~8,sound mode)
TEST mode (X,Y,Red,Green,Blue,White)
Setting (ID code0-25,X reverse,Y reverse,Fade delay,dmx signal,endcode,temperature
Protection,Temperature,fans seepd,screen protection,screen reverse, factory reset, rest motor,
System info (running time, total running time, software version, run mode, address, temperature
SIDIUS LED 368 Z
User Manual/Manual de uso
Page 4
EN
Master/slave mode(auto-running、sound control)
.This mode will allow you to link up 32 units together without a controller.
.Use standard DMX cables to daisy chain your units together via the DMX connector on the rear of
the units.Proper performance it may be necessary to use a terminator at the last fixture.
.
Set the desired master-mode- “Automatic program mode” or”sound controlled mode”, for the
master-device, send the DMX address 1 for all slave-devices. Please refer to the instruction under
control board.
To set the pan to reverse
.Press the MENU until it shows RPOF.
.Use the UP/DOWN buttons show RPON, press ENTER to confirm.
To set the tilt to reverse
.Press the MENU until it shows RTOF
.Use the UP/DOWN buttons show RTON, press ENTER to confirm.
o set the LED readout to 180°,rotating
.Press the MENU until it shows RDOF.
.Use the UP/DOWN buttons show RDON, press ENTER to confirm.
Resume reverse Windows default
.Press the MENU until it shows DFON.
press ENTER to confirm。
D M X - pr oto c ol
Channel
1
2
3
4
5
6
SIDIUS LED 368 Z
Value
Function
Dimmer
0-255
0~100% dimmer
Red
0-255
0-100% Red
Green
0-255
0-100% Green
Blue
0-255
0-100% Blue
White
0-255
0-100% White
Customs dimmer
User Manual/Manual de uso
Page 5
EN
0-255
7
8
9
10
11
12
Pan
0-255
Pan movement 0~540
Tilt
0-255
Tilt movement 0~270
Pan Fine
0-255
Pan fine movement 0~540
Tilt Fine
0-255
Tilt fine movement 0~270
Pan Tilt speed
0-255
Pan & Tilt speed adjustment
Zoom
0-255
From 18 degree to 55 degree zoom
Strobe
13
0
No function
1-255
Strobe with increasing speed
Built in effect
0
14
Switch off ID effect
1-25
Fade delay open
26-50
Fade delay close
51-90
Select built color on
91-130
Color change in pulse
131-170
Color change
171-210
Color change in fade
211-250
Built in mode 1
251-255
Sound mode
Build in Color
Running this channel need channel 14 at 91-210
0
15
SIDIUS LED 368 Z
No function
1-20
R255 G↑ B0 W0
21-40
R↓ G255 B0 W0
41-60
R0 G255 B↑ W0
61-80
R0 G↓ B255 W0
81-100
R↑ G0 B255 W0
101-120
R255 G0 B↓ W0
121-140
R255 G↑ B↑ W0
141-160
R↓ G↓ B255 W0
161-170
R255 G255 B255 W255
171-200
R0 G0 B0 W0
201-205
R242 G204 B5 W227
206-210
R242 G215 B5 W227
211-215
R255 G255 B50 W255
216-220
R255 G255 B90 W255
221-215
R255 G255 B118 W255
226-230
R255 G255 B132 W255
User Manual/Manual de uso
Page 6
EN
231-235
R255 G255 B151 W255
236-240
R255 G255 B171 W255
241-245
R255 G255 B185 W255
246-250
R255 G255 B197 W255
251-255
R255 G255 B234 W255
ID effect
16
0-9
10-19
No function
ID 1 to ID25 per each 10 DMX value
TECHNICIAL SPECIFICATIONS
Model
SIDIUS LED 368 Z
Voltage
110V- 250V / 50-60Hz
Power consumption:
380W
LED
36x8pcs RGBW QUAD
Gross Weight
6.5Kgs
Dimensions
450 (H) x 300 (W) x 270(L) mm
SIDIUS LED 368 Z
User Manual/Manual de uso
Page 7
ES
PRECAUCION !
Mantenga este dispositivo lejos de la lluvia o la humedad
Desconecte el cable de alimerntación antes de abrir el recinto
Por su propia seguridad, por favor, lea cuidadosamente este manual antes de ponerlo en marcha
Toda persona implicada en la instalación, operación y mantenimiento de este aparato tiene que
- estar calificado
- seguir las instrucciones de este manual
- considerar este manual como parte del producto total
- Guarde este manual para toda la vida útil del producto
- Pasar el manual a cada futuro propietario o usuario del producto
INTRODUCCION
Gracias por elegir nuestro dispositivo, si sigue las instrucciones dadas en este manual, podemos estar
seguros de que podrá disfrutar de este producto durante un largo período de tiempo
INSTRUCCIONES DE SEGURIDAD
PRECAUCION!
Sea cuidadoso con sus operaciones, con un voltaje peligroso puede sufrir una peligrosa eléctrica
al tocar el cableado.
Este aparato ha salido de nuestras instalaciones en absolutamente perfectas condiciones. Para mantener esta
condición y para garantizar un funcionamiento seguro, es absolutamente necesario para el usuario seguir las
instrucciones de seguridad y notas de advertencia escritas en este manual del usuario.
Importante: Los daños causados ?
por no seguir este manual del usuario no están sujetos a garantía, el distribuidor no
aceptará responsabilidad alguna por los defectos causados por este problema. Si el dispositivo ha estado expuesto a
una drástica fluctuación de temperatura (pe tras el transporte), no lo enchufe inmediatamente. El surgimiento de
agua de condensación puede dañar el aparato. Deje el aparato desconectado hasta que alcance la temperatura
ambiente.
Por favor, asegúrese de que no hay daños obvios debidos al transporte, si encontrara cualquier dañ en el cable de
conexión de AC o en el chasis, no ponga en funcionamiento el dispositivo y consulte inmediatamente con su
distribuidor local.
El aparato sólo se debe conectar a una toma mural de protección clase I. La tensión y la frecuencia debe ser
exactamente los mismos que los que aparecen en el dispositivo. Voltajes o tomas de corriente incorrectos pueden
llevar a estropear el dispositivo o provocar una descarga eléctrica mortal. Siempre conecte el enchufe al final. El
cable de alimentación debe insertarse sin forzarlo. Asegúrese de que el enchufe esté firmemente conectadao en
la base mural
Nunca deje que el cable de alimentación entre en contacto con otros cables!
SIDIUS LED 368 Z
User Manual/Manual de uso
Page 8
ES
Maneje el cable y todas las conexiones de red con mucha precaución! Nunca los toque con las manos mojadas, ya
que podría dar lugar una descarga eléctrica mortal. Nunca modifique, doble, presione, tire o caliente el cable de
alimentación. Nunca opere cerca de fuentes de calor o de frío. En no hacerlo, puede conducir a daños en el cable
de alimentación, incendio o una descarga eléctrica mortal. Asegúrese de que el cable no es pinzado, pisado o
dañado por bordes afilados. Compruebe el dispositivo y el cable de alimentación periódicamente. Asegúrese que
el diamétro de los cables internos es el adecuado a los requerimientos de voltaje.Todos los avisos relativos al cable
de alimentación también son válidos para posibles extensiones.
INSTRUCCIONES DE MANEJO
Este dispositivo está diseñado para un funcionamiento permanente. El dejarlo sin funcionar durante algun periodo
de tiempo puede garantizar que el dispositivo le servirá durante mucho tiempo y sin defectos. No agite el aparato.
Evite usar excesiva fuerza durante la instalación o el funcionamiento del dispositivo. No levante nunca el aparato
tomándolo por la cabeza del proyector. El mecanismo podría dañarse. Al elegir el lugar de instalación, asegúrese
de que el dispositivo no está expuesto al calor extremo, el polvo o la humedad. No debe haber ningún cable liado
alrededor. Asegúrese que la unidad no está al alcance de la gente para que no pueda manipularlo o volcarlo.
La unidad nunca debe tomar con objetos o superficies en los alrededores. Asegúrese de que el área por debajo de la
lugar de instalación no se convierte en un área de paso.
Fije siempre el aparato con un cable de seguridad adecuado. Fije este cable de seguridad en los agujeros colocados
a tal efecto. NUNCA utilice para ello las asas de transporte. Empiece a utilizar la unidad después de asegurarse que
el dispositivo está firmemente sujeto.
La máxima temperatura ambiente Ta =45º C,nunca debe ser superada. Utilice el dispositivo sólo después de
familiarizarse con sus funciones. No permita el manejo a personas que no conocen el uso del dispositivo. La mayoría
de los daños son causados ?
por manejo inadecuado de inexpertos. Utilice el embalaje original si el dispositivo debe
ser transportado. Por favor, tenga en cuenta que las modificaciones no autorizadas del dispositivo están prohibidas
por razones de seguridad! Nunca quite el código de barras de serie del dispositivo, ya que haría que la pérdida de
la garantía.
Si este dispositivo seutiliza de un modo diferente a la des
crita en este manual, el producto puede sufrir daños y la garantía expira. Por otra parte, cualquier uso diferente
del indicado puede causar peligros como cortocircuito, quemaduras, descargas eléctricas, caída, etc
DESCRIPCION DEL DISPOSITIVO
Características
> 16 canalesDMX -512 .
> Pan :630°/tilt:270°.
> 36 LEDs de 8W c.u. RGBW QUAD
> Angulo de zoom de 18º a 55º
> Strobo electrónico variable
> Dimmer electrónico variable (0-100%)
> Pantalla LED con menu y función de inversión
> Opción reset de valores para defecto
> Opción de inversión de sentido Pan/Tilt
> Refrigeración por ventilador
SIDIUS LED 368 Z
User Manual/Manual de uso
Page 9
ES
INSTALACION
Rigging
La instalación del proyector tiene que ser realizada de tal manera que pueda soportar 10 veces el peso del dispositivo
durante 1 hora sin sufrir deformaciones ni daños permanentes.
IMPORTANTE! ESTE TIPO DE INSTALACION REQUIRE EXTENSOS CONOCIMIENTOS, incluyendo el cálculo de
capacidad de carga, material de instalación, y la inspección periódica de la seguridad de toda la instalación, material
y el proyector. Si carece de estos requisitos, no intente la instalación usted mismo, en su lugar, llame a un instalador
profesional. Una instalación incorrecta puede provocar daños en personas o propiedades. El proyector tiene que ser
instalado fuera del alcance de personas
PELIGRO DE INCENDIO! Cuando instale el dispositivo, asegúrese de que no hay elementos altamente inflamables
alrededor (artículos de decoración, cortinas, etc) a una distancia inferior a 0.5 m.
Conexión DMX 512 / Conexión entre unidades
Los cables no deben entrar en contacto entre sí, de lo contrario el dispositivo podría no funcionar adecuadamente.
Tenga en cuenta que la dirección de inicio depende de lo que haya configurado en el controlador. Utilice únicamente
cables DMX y conectores XLR de 3 pines para conectar el controlador y proyector en uno y otro lado.
Ocupación de la conexión XLR
Entrada DMX
Conector XLR
Salida DMX
Conector XLR
1: Masa
2: Señal (-)
3: Señal (+)
1: Masa
2: Señal (-)
3: Señal (+)
Conexión de la alimentación
La función de cada cable y su color es la siguiente:
Cable
Marrón
Azul
Amarillo/Verde
Pin
Fase
Neutro
Tierra
Internacional
L
N
La toma de tierra debe ser conectada. El dispositivo debe ser conectada a una instalación eléctrica que cumpla las
normas IEC
FUNCIONAMIENTO
Despues de conectar el dispositivo a la red eléctrica, la unidad comenzará a funcionar.
Modo Stand Alone
En el modo Stand Alone, la unidad puede ser usada sin controlador externo
SIDIUS LED 368 Z
User Manual/Manual de uso
Page 10
ES
Modo Master/slave
El modo Master/Slave que permite varios dispositivos pueden ser sincronizados y controlados por un dispositivo
Master.
Control DMX
Usted puede controlar los proyectores individualmente mediante su controlador DMX
Direccionamiento
El panel de control le permite asignar la dirección de inicio DMX,
Nota; es aconsejable insertar el conector XLR (con una resistencia de 120 ohmios entre los pines 2 y 3) en el último
dispositivo de la cadena para asegurar la correcta transmisión en el enlace de datos DMX.
PANEL DE CONTROL
El panel de control ofrece varias características: puede establecer la dirección de inicio, ejecutar los programas
preprogramados o realizar un reset.
Al menú principal se accede pulsando el botón MODE / ESC , navegue por el submenú pulsando las teclas Up y
Down. Presione la tecla Enter para seleccionar el menú deseado. Puede cambiar la selección pulsando Up o
Down, confirmar cada selección pulsando la tecla Enter. Para salir de cada modo seleccionado pulse la tecla Esc.
Las funciones proporcionadas se describen en el siguiente ajuste.
MAPA DE MENU
El dispositivo tiene dos modos de funcionamiento, puede ser operado en modo Stand Alone o controlado por DMX.
M EN U M AP
DMX Address (Direcionamiento de canal DMX 001-512)
Mode (Modo DMX 15 canales, Modo Auto 1-8, Modo Audio)
TEST mode (X,Y,Rojo, verde, Azul, Blanco)
Setting (ICódigo ID 0-25, reverse X, reverse Y, Fade delay, señales DMX, endcode, protección de temperatura
PTemperatura, velocidad del ventilador, protector de pantalla, rotación de pantalla, reset, reset motor
System info Tiempo de funcionamiento, tiempo total, version software, mode de ejecución, dirección, temperatura
Nota: El código de direccionamiento por defecto es A001, los ejes pan y tilt vienen por defecto con una
rotación positiva. La pantalla LED viene con una posición de lectura normal.
SIDIUS LED 368 Z
User Manual/Manual de uso
Page 11
ES
Modo Master/slave (auto-ejecución, control por audio)
Este modo le permitirá enlazar hasta 32 unidades juntas sin un controlador.
Utilice cables DMX estándar para la conexión en cadena de los dispositivos a través del conector DMX en la parte
posterior de la unidad. Para un mejopr rendimiento, es necesario colocar un terminador en la salida del último
dispositivo de la cadena consistente en una resistencia de 120 ohms entre los pines 2 y 3.
Configurar la inversión del eje Pan
.Pressione MENU hasta mostrar RPOF.
.Use las teclas UP y DOWN hasta mostrar RPON, presione ENTER para confirmar.
Configurar la inversión del eje Tilt
.Pressione MENU hasta mostrar RTOF.
.Use las teclas UP y DOWN hasta mostrar RTON, presione ENTER para confirmar.
Configurar la pantalla girándola 180º
.Pressione MENU hasta mostrar RDOF.
.Use las teclas UP y DOWN hasta mostrar RDON, presione ENTER para confirmar.
Configurar los valores por defecto
.Pressione MENU hasta mostrar DFON.
.Presione ENTER para confirmar.
Protocolo DM X
Modo de canal DMX
Canal
1
2
3
4
5
6
SIDIUS LED 368 Z
Valor
Función
Dimmer
0-255
0~100% dimmer
Rojo
0-255
0-100% Rojo
Verde
0-255
0-100% Verde
Azul
0-255
0-100% Azul
Blanco
0-255
0-100% Blanco
Custom dimmer
User Manual/Manual de uso
Page 12
ES
0-255
7
8
9
10
11
12
Pan
0-255
Movimiento Pan 0~630
Tilt
Movimiento Tilt 0~ 270
0-255
Pan Fino
0-255
Movimiento Pan fino 0~630
0-255
Tilt Fino
Movimiento Tilt fino 0~270
Velocidad Pan/Tilt
0-255
Ajuste de velociad Pan y Tilt
Zoom
0-255
Zoom desde 18º a 55 º
Strobo
13
0
Sin función
1-255
14
Strobo con incremento de velocidad
0
Efectos incorporados
Sin función
1-25
Activa el relé de control
26-50
desactiva el relé de control
51-90
Selecciona el color incorporado
91-130
Cambio de color en pulsos
131-170
Cambio de color aleatorio
171-210
Cambio de color con fundido
211-250
Modo incorporado 1
251-255
Control por audio
Color incorporado
El canal 14 debe tener un valor entre 91-210
0
15
SIDIUS LED 368 Z
Sin función
1-20
R255 G↑ B0 W0
21-40
R↓ G255 B0 W0
41-60
R0 G255 B↑ W0
61-80
R0 G↓ B255 W0
81-100
R↑ G0 B255 W0
101-120
R255 G0 B↓ W0
121-140
R255 G↑ B↑ W0
141-160
R↓ G↓ B255 W0
161-170
R255 G255 B255 W255
171-200
R0 G0 B0 W0
201-205
R242 G204 B5 W227
206-210
R242 G215 B5 W227
211-215
R255 G255 B50 W255
216-220
R255 G255 B90 W255
221-215
R255 G255 B118 W255
226-230
R255 G255 B132 W255
User Manual/Manual de uso
Page 13
ES
231-235
R255 G255 B151 W255
236-240
R255 G255 B171 W255
241-245
R255 G255 B185 W255
246-250
R255 G255 B197 W255
251-255
R255 G255 B234 W255
Efecto ID
16
0-9
10-19
Sin función
ID 1 a ID25 por cada 10 valores de DMX
ESPECIFICACIONES TECNICAS
Modelo
SIDIUS LED 368 Z
Alimentación
110V- 250V / 50-60Hz
Consumo
380W
LED
36 LEDs de 8W c.u. RGBW QUAD
Peso
6.5Kgs
Dimensiones
450(Al) x 300(An) x 270(L) mm
SIDIUS LED 368 Z
User Manual/Manual de uso
Page 14
EQUIPSON, S.A.
Avda. El Saler, 14 - Pol. Ind. L´Alteró,46460 - Silla (Valencia) Spain
Tel. +34 96 121 63 01 Fax + 34 96 120 02 42
www.equipson.es [email protected]