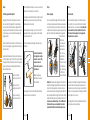
1
®
ABS AVALANCHE AIRBAG SYSTEM
Gebrauchsanleitung · Instruction for use · Mode d‘emploi · Istruzioni per l’uso
photo: Hansi Heckmair, rider: Roman Rohrmoser
TEN PRINCIPLES OF AVALANCHE SAFETY
6
7
DE
Die eigene Verschüttung zu verhindern gilt als oberste Maxime der Lawinenexperten. Die Vorteile des ABS® TwinBag
Systems beruhen auf 10 Prinzipien. Das Selbst-Rettungs-System ABS
1 ® hat seine Wirksamkeit eindrucksvoll bewiesen:
Bei mittlerweile 262 dokumentierten Unglücksfällen mit ausgelöstem ABS® System haben 97% der Personen überlebt:*
EN
According to avalanche experts, the top priority in an avalanche is to avoid being buried. The benefits of the ABS® TwinBag
System are based on 10 principles. The self-rescue system ABS® has impressively demonstrated its efficiency – in meanwhile 262 recorded accidents with activated ABS® system, 97% of people have survived:*
FR
La règle suprême des experts en avalanches est d‘empêcher l’ensevelissement des personnes. Les avantages du système
2 ABS® a prouvé son efficacité de façon impressioABS® TwinBag reposent sur 10 principes. Le système d’auto-sauvetage
nante. En effet, sur les 262 accidents aujourd’hui documentés lors desquels le système ABS® a été déclenché, 97% des
3
personnes ont survécu :*
IT
Impedire di restare sepolti è la massima più importante per gli esperti di valanghe. I vantaggi del sistema ABS® TwinBag si
basano su 10 principi. L’efficacia del sistema di autosalvataggio ABS® è dimostrata in maniera straordinaria dal fatto che in
262 incidenti finora documentati il 97% delle persone colpite sono sopravvissute grazie all’attivazione del sistema ABS®:*
7
8
4
*Source: SLF, known and documented accidents with ABS avalanche airbags, August 2010.
5
PRINCIPLE 01
PRINCIPLE 07
PRINCIPLE 10
PNEUMATIC
PULL
VARIO –
INDIVIDUAL
& SAFE
EASY PACK
AND USE
PRINCIPLE 02
PRINCIPLE 05
PRINCIPLE 08
GERMAN
ENGINEERING
SEE AND FLEE
MAXIMUM
VISIBILITY
HIGHEST
SURVIVAL RATE
13
9
PRINCIPLE 04
12
PRINCIPLE 03
DOUBLE SAFETY
14
PRINCIPLE 06
DYNAMIC15
LIFT
PRINCIPLE 09
LIGHTWEIGHT
10
11
DEUTSCH
Seite
ENGLISH
Page
01 - 18
19 - 36
FRANÇAIS
Page
37 - 54
ITALIANO
Pagina
55 - 72
Inhaltsverzeichnis
6
7
1. Willkommen . . . . . . . . . . . . . . . . . . . . . . . . . . . . . . . . . 2
1
7
2. Warnhinweise und funktionsgemäßer Gebrauch . . . . . . 3
3. Gerätebeschreibung und Lieferumfang . . . . . . . . . . . . .4
2
4. Inbetriebnahme
4.1. Erste Inbetriebnahme und
Trainingsauslösung . . . . . . . . . . . . . . . . . . . . 4 – 10
4.2. Bei jeder Tour bzw. Einsatz . . . . . . . . . . . . . . . . . 10
4.3. Am Ende der Tour . . . . . . . . . . . . . . . . . . . . . . . . 10
3
8
4
5
13
12
9
15
11
9. Lagerung und Reinigung . . . . . . . . . . . . . . . . . . 14 – 15
10. Transport . . . . . . . . . . . . . . . . . . . . . . . . . . . . . . . . . 15
11. Lebensdauer . . . . . . . . . . . . . . . . . . . . . . . . . . . . . . . 15
5. Gebrauch im Lawinenfall
5.1. Auslösung . . . . . . . . . . . . . . . . . . . . . . . . . . . . . . 11
5.2. Verhalten in der Lawine . . . . . . . . . . . . . . . . . . . 11
5.3. Nach dem Lawinenabgang . . . . . . . . . . . . . . . . . 11
5.4. Fragebogen zur Erfassung von Lawinenunfällen . 11
14
10
8. Gerätekomponenten
8.1. Airbags . . . . . . . . . . . . . . . . . . . . . . . . . . . . . . . . 13
8.2. Füll- und Ablasseinheit . . . . . . . . . . . . . . . . . . . . 13
8.3. Anstecheinheit . . . . . . . . . . . . . . . . . . . . . . . . . . 13
8.4. Auslösegriff . . . . . . . . . . . . . . . . . . . . . . . . . . . . . 14
8.5. Patrone . . . . . . . . . . . . . . . . . . . . . . . . . . . . . . . . 14
8.6. Tragesysteme . . . . . . . . . . . . . . . . . . . . . . . . . . . 14
6. ABS Funktions- und Wirkungsweise
. . . . . . . . . 11 – 12
12. Ergänzende Informationen
12.1. Fehlerdiagnose . . . . . . . . . . . . . . . . . . . . . 16 – 17
12.2. Garantie . . . . . . . . . . . . . . . . . . . . . . . . . . . . . . 17
12.3. Technische Daten . . . . . . . . . . . . . . . . . . . . . . . 17
12.4. Zulassungen / Konformität . . . . . . . . . . . . . . . . 18
12.5. Servicecenter . . . . . . . . . . . . . . . . . . . . . . . . . . 18
7. Wartung
7.1. Selbstüberprüfung . . . . . . . . . . . . . . . . . . . . . . . 12
7.2. Überprüfung nach Lawineneinsatz . . . . . . . 12 – 13
7.3. Kundendienst . . . . . . . . . . . . . . . . . . . . . . . . . . . 13
Deutsch
DEUTSCH
Seite
ENGLISH
Page
01 - 18
19 - 36
FRANÇAIS
Page
37 - 54
ITALIANO
Pagina
55 - 72
1
1. Willkommen
Herzlichen Glückwunsch zum Kauf des ABS-LawinenairbagSystems.
Dieses Handbuch vermittelt Ihnen die Funktionsweise und die
Anwendung des ABS-Lawinenairbag-Systems. Es richtet sich an
alle Schneesportler, die sich abseits des gesicherten Skiraumes
bewegen.
Lesen Sie diese Gebrauchsanleitung vor dem Einsatz des Gerätes sorgfältig durch. Widmen Sie dem Punkt Warnhinweise Ihre
besondere Aufmerksamkeit und halten Sie sich strikt an diese
Information. Legen Sie diese Gebrauchsanleitung zum Nachschlagen an gut zugänglicher Stelle ab und liefern Sie diese Anleitung mit, falls Sie das Gerät weitergeben.
2
Abschnitte der Anleitung die mit diesem Symbol
gekennzeichnet sind, weisen auf Risiken hin, die bei
Nichtbeachtung zu schweren Folgen führen können.
Das ABS-Lawinenairbag-System ist eine Notfallausrüstung,
die unter bestimmten Voraussetzungen eine Totalverschüttung
verhindern kann. Den Lawinen- oder Schneebrettabgang selbst
kann es nicht verhindern. Jede Lawine bedeutet unabhängig
von jeglicher Ausrüstung absolute Lebensgefahr. Gehen Sie
deshalb auch mit einem ABS-Lawinenairbag kein höheres
Risiko ein.
Für die Funktionsfähigkeit des ABS-Lawinenairbags benötigen
Sie eine Auslöseeinheit (Patrone + Griff). Jedes ABS-System
wird vor der Auslieferung getestet. Die Extremsituation eines
Lawinenabgangs erfordert einen eingeübten Umgang mit dem
ABS-System. Eine Trainingsauslösung zu Ihrer persönlichen
Schulung wird von ABS daher dringend empfohlen.
Lesen Sie zuerst die Gebrauchsanleitung und nehmen Sie dann
die Trainingsauslösung vor. Füllen Sie das Garantieformular
online aus unter http://abs-airbag.de/de/service/garantiekarte/
Ihr Garantieanspruch verlängert sich dadurch auf 4 Jahre.
Docken Sie den Auslösegriff nie an das ABS-System, wenn Sie
keine volle Patrone eingeschraubt haben!
Wechseln Sie nach Auslösung immer den Auslösegriff und die
Patrone! Nur wenn beide Teile gewechselt werden ist das
System wieder einsatzbereit. Bei Nichtgebrauch Auslösegriff
immer abdocken!
Verwenden Sie das ABS-Lawinenairbag-System immer in Kombination mit Lawinen-Verschütteten-Suchgerät (LVS), Schaufel und
Sonde.
Das ABS-System ist Made in Germany
Deutsch
2. Warnhinweise und funktionsgemäßer Gebrauch
Der ABS-Lawinenairbag kann keine Lawine verhindern.
Jede Lawine bedeutet immer absolute Lebensgefahr, ob mit
oder ohne ABS-Lawinenairbag.
Der ABS-Lawinenairbag darf in keiner Weise Ihre Risikobereitschaft erhöhen.
Die Funktion und Wirkungsweise des ABS-Systems beschränkt
sich ausschließlich darauf, die Totalverschüttung des Lawinenopfers zu verhindern. Es kann Situationen geben, wo dies
nicht oder nur eingeschränkt möglich ist.
Das ABS-System muss aktiv ausgelöst werden. Dies zu trainieren ist notwendig, um im Ernstfall richtig zu reagieren.
Machen Sie daher zu Ihrer eigenen Sicherheit 1x pro Saison
eine Trainingsauslösung.
Das ABS-System erfordert einen sorgfältigen Umgang und
vor jedem Einsatz eine exakte Überprüfung der Funktionsbereitschaft.
Auslösegriff und Patrone sind wieder befüllbar.
Den Auslösegriff nur Andocken, wenn eine volle Patrone eingesetzt ist. Bei Auslösung ohne Patrone oder mit leerer Patrone wird das System beschädigt, ist nicht mehr funktionsfähig
und muss zur Überprüfung.
Wenn am Griffstift die rote Banderole deutlich sichtbar ist,
ist der Griff nicht geladen und damit nicht funktionsfähig!
Verwenden Sie keine beschädigten Griffe, sonst besteht beim
Auslösen Berstgefahr!
Versuchen Sie nicht, den Griffstift außerhalb der Einschubhülse am Rucksackträger herauszuziehen – Verletzungsgefahr!
Den Griffstift unbedingt vor Verschmutzung schützen. Ist
Schmutz eingedrungen, nicht selbst reinigen, sondern zum
Austausch an das für Sie zuständige Servicecenter einsenden.
Achten Sie auf das Verfalldatum des Auslösegriffs.
Verwenden Sie ausschließlich ABS-Originalpatronen,
Füllungen und Zubehör bzw. Ersatzteile.
Die Patrone muss sich leicht bis zum Anschlag eindrehen
lassen. Sind während des Eindrehens deutliche Widerstände
zu überwinden oder lässt sich die Patrone nur schwer bis
zum Anschlag eindrehen, so darf diese Patrone nicht verwendet werden!
Die gefüllte Patrone keinesfalls auf eine heiße Unterlage
(Ofen, Autorückfenster usw.) legen, auch nicht werfen oder
mechanisch belasten. Explosionsgefahr! Max. Temperatur 50°C.
Achten Sie darauf, dass von der Bepackung der Rucksäcke
keine Zerstörungsgefahr für die Airbags ausgeht und dass
sich die Airbags ungehindert entfalten können. Dies gilt insbesondere für angedockte Teile wie Eispickel, Stöcke, Skier etc.
Falten Sie die Airbags gemäß der Gebrauchsanweisung. Eine
unsachgemäße Faltung behindert die Ausfaltung der Airbags,
kann zu Funktionsstörungen und Beschädigung des Rucksacks führen!
Bewahren Sie Griff und Patrone immer außerhalb der Reichweite von Kindern auf.
Achten Sie bei jeder Trainingsauslösung darauf, dass Sie
keine anderen Personen gefährden.
Um ungewollte Auslösungen auszuschließen empfehlen wir
den Auslösegriff insbesondere dann abzunehmen, wenn Sie
sich selbst oder andere durch eine ungewollte Auslösung
gefährden könnten, wie z.B. im Sessellift, in Seilbahnen,
im Helikopter, in Bus, Bahn etc.
Deutsch
3
3. Gerätebeschreibung und Lieferumfang
Bitte Bildseite ausklappen
1) Anstecheinheit
2) Airbags
3) Airbagtasche
4) Füll- und Ablasseinheit
5) Ablassventil
4. Inbetriebnahme
Schritt 2
Schritt 3
4.1 Erste Inbetriebnahme und Trainingsauslösung
Patrone einschrauben
Tragesystem anlegen
Für das ABS-Lawinenairbag-System sind die kompromisslose
Funktionsbereitschaft und die persönliche Handhabungsfähigkeit des Benutzers entscheidend. Die Handhabung ist unkompliziert, muss aber sorgfältig in den vorgeschriebenen Schritten
durchgeführt werden:
Überprüfen Sie vor dem Einschrauben die Anstecheinheit innen
auf Sauberkeit. Die Anstechnadel muss in der Mitte sichtbar
sein. Volle Patrone dann bis zum Anschlag fest einschrauben.
Es darf keine Umdrehung mehr möglich sein.
Rucksack anziehen. Schulterträger an Ihre Körpergroße anpassen. Hüft- Brust- und Schrittgurt unbedingt immer schließen und
an Ihre Körpergröße anpassen. Denn nur wenn das Tragesystem
im Ernstfall am Körper bleibt, ist das ABS-System von Nutzen!
Überzeugen Sie sich vor
jedem Gebrauch des Airbags,
ob die Patrone fest eingeschraubt ist.
Schritt 1
4
6) Schutzklappe
7) Einschubhülse für Auslösegriff
8) Griffplatte
9) Brustgurt
10) Hüftgurt
11) Schrittgurt
Patronenfüllung kontrollieren
Gurte so anpassen, dass das Hauptgewicht des Rucksacks auf
der Hüfte liegt und die Schultern möglichst entlastet werden.
Das Gurtgerüst entspricht den
TÜV-Anforderungen für extreme Beanspruchung. Die Zugfestigkeit für alle tragenden
Gurte beträgt 3.000 N.
Patronenfüllung ohne Patronenkappe vor jedem Einsatz durch
Wiegen kontrollieren. Die Gewichtsangabe finden Sie seitlich
an der Flasche. Toleranzgrenze +/- 5 Gramm. Tauschen Sie die
Patrone bei Ihrem Händler kostenfrei aus, wenn das Gewicht von
der Toleranzgrenze abweicht.
12) Patrone
13) Patronenkappe
479,8 gr
08/12
14) Auslösegriff
15) Griffstift
Deutsch
Eine vollständig gefüllte
Patrone ist absolut Voraussetzung für das Funktionieren
des ABS-Lawinenairbags.
Tipp! Den Rucksack anziehen,
bevor Sie den Auslösegriff
andocken. So vermeiden Sie
eine ungewollte Auslösung.
Die Patrone muss sich leicht bis zum Anschlag eindrehen lassen.
Achten Sie darauf, dass die Patrone nicht verkantet eingesetzt
wird. Sind während des Eindrehens deutliche Widerstände zu
überwinden oder lässt sich die Patrone nur schwer bis zum
Anschlag eindrehen, so darf diese Patrone nicht verwendet
werden! Sie erhalten kostenlos Ersatz bei Ihrem Händler.
Deutsch
5
Schritt 4
Verfalljahr wird auf der farbigen Kappe angezeigt. Ablaufmonat
ist Mai des jeweiligen Jahres
Auslösegriff kontrollieren
Der Auslösegriff ist mit einer kleinen Druckkapsel geladen, die
0,19 Gramm Explosivstoff enthält. Er kann nur einmal verwendet
werden. Durch Ziehen am angedockten Auslösegriff zerplatzt die
Druckkapsel. Der dabei entstehende Druck sticht die Patrone an
und die Airbags werden gefüllt.
Die Funktionssicherheit der Druckkapsel ist zeitlich begrenzt.
Deshalb empfehlen wir unbenutzte, geladene Auslösegriffe nicht
länger als drei Wintersaisonen zu verwenden.
6
Unbenutzte Auslösegriffe mit abgelaufenem Verfallsdatum
können kostenpflichtig umgetauscht werden.
Der Griffstift muss fest sitzen und es darf keine rote Banderole
sichtbar sein. Wenn am Stift die rote Banderole deutlich sichtbar
ist, ist der Griff nicht geladen und damit nicht funktionsfähig!
Verwenden Sie keine beschädigten Griffe, sonst besteht beim
Auslösen Berstgefahr!
Versuchen Sie nicht, den
Stift außerhalb der Einschubhülse herauszuziehen –
Verletzungsgefahr!
Die maximale Funktionsdauer wird durch den Metallstift an der
seitlichen Öffnung des Auslösegriffs angezeigt. Ab Winter 2010
wird die seitliche Öffnung des Auslösegriffs durch eine rote
Kappe bedeckt. Auf dieser ist das Verfalljahr angezeigt. Verfallmonat ist jeweils Mai des angezeigten Jahres. Folgende Verfallszeiten bitte unbedingt beachten:
Schützen Sie den Griff vor
Verschmutzung! Bewahren Sie
den Griff immer außerhalb der
Reichweite von Kindern auf!
goldfarbige Metallstifte
Verfalldatum Mai 2013
schwarze Metallstifte
Verfalldatum Mai 2012
Für den Fernauslösegriff (Wireless Activation) beachten Sie bitte
die separate Gebrauchsanweisung.
silberfarbige Metallstifte
Verfalldatum Mai 2010
Schritt 5
Schritt 6
Auslösegriff andocken
Klettbandsicherung
Zum Andocken des Auslösegriffs den Stift gerade an die Einschubhülse ansetzen und Griff hochschieben. Klappen Sie mit
der anderen Hand die Schutzklappe hoch und üben den Gegendruck aus. Die Einschubhülse schnappt automatisch zurück.
Das Klettband dient zur Sicherung des Auslösegriffs, um ungewollte Auslösungen zu vermeiden. Vor dem Verlassen des gesicherten Geländes das rote Klettband unbedingt lösen und
hinter dem Auslösegriff anbringen, damit eine ungehinderte
Auslösung möglich ist.
Nur dann ist der Griff
einsatzbereit fixiert.
Lässt sich der Griff
nicht andocken siehe
Punkt 12.1. Ist der
Griff nicht richtig angedockt und durch die
zurück geschnappte
Einschubhülse arretiert,ist keine funktionsfähige Auslösung
möglich.
Achtung! Den Griff nur andocken, wenn eine volle Patrone eingeschraubt ist. Bei Auslösung ohne Patrone oder mit leerer
Patrone wird das System beschädigt, der Kolben muss ausgetauscht werden. Bei Rückfragen wenden Sie sich bitte an das
in Ihrem Land zuständige Servicecenter.
Wenn Sie alle Schritte bis hier ausgeführt haben, ist Ihr ABS
System funktionsbereit, wir empfehlen Ihnen jedoch zuerst die
Gebrauchsanleitung fertig zu lesen, bevor sie eine Trainingsauslösung durchführen.
Deutsch
7
Ein fest geschlossenes Klettband verhindert in der Regel eine
Auslösung. Um ungewollte Auslösungen komplett auszuschließen empfehlen wir den Auslösegriff abzunehmen. Dies gilt insbesondere dann, wenn Sie sich selbst oder andere durch eine
ungewollte Auslösung gefährden könnten, wie z.B. im Sessellift,
in Seilbahnen, im Helikopter, in Bus, Bahn etc.
Für den Fernauslösegriff (Wireless Activation) beachten Sie bitte
die separate Gebrauchsanweisung.
Deutsch
Schritt 7
Schritt 8
Höhenverstellung des Auslösegriffs
Auslösegriff abnehmen
Prüfen Sie bei angelegtem Rucksack, ob der Auslösegriff für Sie
griffgünstig liegt, in den meisten Fällen wird dies der Fall sein,
wenn nicht ist die Halterung des Auslösegriffs höhenverstellbar.
Die richtige Position des Auslösegriffs ist zwischen Brust und
Schulter.
Notwendige Auslösekraft beträgt ca. 8 kg (80 N). Die Airbags
blasen sich selbständig innerhalb von 2-3 Sekunden auf.
Falten der Airbags
Achtung! Zischgeräusche
nach dem Aufblasen kommen vom Ablassventil, das
automatisch für Druckausgleich sorgt. Der Füllgrad
der Airbags kann je nach
Außentemperatur und Höhe
variieren.
Zum Abnehmen des Auslösegriffs das Klettband lösen und die
Einschubhülse nach oben schieben. Der Auslösegriff springt
heraus, ohne dass daran gezogen werden muss. Nicht am geladenen Auslösegriff ziehen,
das System löst sonst aus!
Lässt sich der geladene Griff
nicht abnehmen siehe Punkt
12.1.
Bei Nichtgebrauch Auslösegriff immer abdocken und in
der dafür vorgesehenen Grifftasche am Hüftgurt verstauen.
8
Schritt 9
Achten Sie darauf, dass der Auslösegriff nicht durch Kleidungsteile verdeckt ist und ohne Behinderung erreicht werden kann.
Der Auslösegriff kann auf Wunsch für Linkshänder durch den
Fachhandel auch rechts montiert werden, dazu ist eine Linkshänder-Griffplatte nötig.
Trainingsauslösung
Wir wollen, dass Sie sich mit dem ABS-System 100% vertraut
machen. Daher empfehlen wir Ihnen dringend eine Trainingsauslösung durchzuführen, um die Funktionsweise des ABS-Systems
möglichst praxisnah auszuprobieren.
Bitte achten Sie darauf, dass bei Trainingsauslösungen des Airbags ausreichender Abstand zu Personen und Gegenständen
gegeben ist (ca. 1m), um keine Beeinträchtigungen zu verursachen. Auslösen durch kräftigen, ruckartigen Zug am Auslösegriff.
Deutsch
Achtung! Eine unsachgemäße
Faltung behindert die Ausfaltung der Airbags. Dies kann
zu Funktionsstörungen und
Beschädigung des Rucksacks
führen!
1
Falten Sie daher die Airbags
nach der folgenden Faltanweisung.
Schritt 10
Luftablassen der Airbags
Zur Höhenverstellung Klettverschluss öffnen und ausfädeln,
Griffplatte auf die entsprechende Kunststofföse aufstecken,
Klettverschluss wieder einfädeln und schließen.
Schritt 11
Hängen Sie zunächst die Netzabdeckung über der Füll- und
Ablasseinheit aus.
Klappen Sie nun die rote
Abdeckkappe hoch und
drücken Sie das Ablassventil
im Zentrum der schwarzen
Füll- und Ablasseinheit. Üben
Sie gleichzeitig Gegendruck
auf den Airbag aus, bis dieser
vollständig entleert ist.
Netzabdeckung jetzt wieder
schließen.
1. Legen Sie die Airbags mit
der Füll- und Ablasseinheit
nach unten auf den Boden.
Die glatte Airbagseite zeigt
nach oben.
9
2
2. Falten Sie den oberen Teil
des Airbags auf die Höhe der
Airbagtasche.
3. Falten Sie nun den unteren
Teil des Airbags. Die Airbagbreite muss der Breite der
Airbagtasche entsprechen.
3
Deutsch
4. Schlagen Sie nun den Airbag drei Mal zum Rucksack
hin handbreit ein, damit dieser
sich frei entfalten kann.
4
10
5. Schieben Sie nun die Airbags in die dafür vorgesehenen
Seitentaschen. Die Füll- und
Ablasseinheit muss nach der
Faltung sichtbar oben auf dem
Airbagmaterial liegen.
Schritt 12
5. Gebrauch im Lawinenfall
5.3 Nach dem Lawinenabgang
Patrone und Auslösegriff austauschen.
5.1 Auslösung
Nach einer Auslösung müssen immer die Patrone und der Auslösegriff ausgetauscht werden. Gehen Sie wie in Schritt 1, 2 und
4, 5 beschrieben vor. Dann ist das ABS-System ist wieder voll
funktionsfähig.
Lösen Sie kompromisslos den ABS-Lawinenairbag aus, sobald
Sie eine Lawinensituation erkannt haben. Lösen Sie besser einmal zu viel als einmal zu wenig aus.
Bringen Sie sich an eine sichere Stelle. Versuchen Sie anderen
Personen zu helfen, wenn Sie dazu in der Lage sind. Entleeren
Sie die Airbags erst, wenn absolut keine Gefahr von Lawinen
besteht und setzen Sie wenn möglich eine neue Patrone und
einen neuen Auslösegriff ein. Falls Sie sich nach wie vor in
lawinengefährlichem Gebiet befinden, lassen Sie die Airbags
aufgeblasen.
Führen Sie jetzt die Trainingsauslösung durch und füllen Sie
das Online-Formular zur Garantieverlängerung im Internet
(http://abs-airbag.de/de/service/garantiekarte/) aus.
4.2 Bei jeder Tour bzw. Einsatz
5
6. Die Klettverschlüsse der
Airbagtaschen zum Schließen
fest anpressen.
Führen Sie die Schritte 1 – 6 der Inbetriebnahme durch:
1 Patronenfüllung kontrollieren
2 Patrone einschrauben
3 Tragesystem anlegen
4 Auslösegriff kontrollieren
5 Auslösegriff andocken
6 Klettbandsicherung
4.3 Am Ende der Tour
Führen Sie den Schritt 8 Auslösegriff abnehmen der Inbetriebnahme durch. Die Patrone kann eingeschraubt bleiben.
Zur Auslösung kräftig und ruckartig am Auslösegriff ziehen und
versuchen zu fliehen. Die Airbags blasen sich selbständig auf,
unabhängig ob Sie fahren, gestürzt sind, auf dem Airbag liegen
oder bereits von den Schneemassen erfasst sind. Die aufgeblasenen Airbags behindern Sie nicht bei eventuell noch möglichen
Flucht- oder Ausweichmanövern, die Sie immer versuchen sollten.
5.2 Verhalten in der Lawine
Wenn Sie ausgelöst haben, konzentrieren Sie sich ausschließlich
auf Ihre Sturzbahn. Durch die seitliche Anbringung der Airbags
können sie ungehindert Ihre Arme einsetzen. Kämpfen Sie mit
Schwimmbewegungen, drücken Sie Hindernisse weg, versuchen
Sie sich zu stabilisieren und Ihren Kopf zu schützen. Die Form
der Airbags bietet zusätzlich Schutz für Ihren Kopf, ohne Sie in
der Bewegung oder Sicht einzuschränken. Versuchen Sie, sich
durch Drehen von den Skiern zu lösen. Verwenden Sie vor allem
keine Stockschlaufen und keine Fangriemen! Wenn möglich halten Sie den Mund geschlossen.
Versuchen Sie beim Auslaufen der Lawine Ihren Oberkörper und
vor allem Ihre Arme an die Oberfläche zu bringen und sich dann
so schnell wie möglich aus den Schneemassen zu befreien.
6
Deutsch
5.4 Fragebogen zur Erfassung von Lawinenunfällen
Bitte melden Sie jeden Praxiseinsatz mit dem ABS-Lawinenairbag. Die Erkenntnisse aus Praxiseinsätzen sind für die Weiterentwicklung sehr wichtig. Fordern Sie für Ihre Angaben den
Fragebogen direkt bei uns an oder laden Sie ihn sich von unserer
Website (http://abs-airbag.de/lawine/fragebogen-lawinenunfall/)
herunter. Senden Sie dazu den ausgefüllten und unterschriebenen Fragebogen an das in Ihrem Land zuständige Lawineninstitut, an das eidgenössische Institut für Schnee- und Lawinenforschung in Davos (SLF) oder an Ihr ABS Servicecenter.
6. ABS Funktions- und Wirkungsweise
Sie haben mit dem ABS-Lawinenairbag-System ein Gerät erworben, bei dem langjährige Erfahrung in der Lawinenforschung,
Bergung und Statistik für die Funktion und Wirkungsweise
zugrunde gelegt wurden. Zentrale Bedeutung hat dabei die Tatsache, dass die überwiegende Zahl aller Lawinenopfer (Alpinskifahrer und Snowboarder) noch leben, wenn die Lawine zum
Stillstand kommt. Nur – die meisten sind verschüttet, können
sich nicht selbst befreien, sind für Helfer häufig nicht sichtbar.
Deutsch
11
System ist bei Beachtung nachstehend
kontrolle weitgehend wartungsfrei.
n Airbags wenigstens einmal jährlich.
ine jährliche Probeauslösung am besten
ngefährlichem Gelände können Sie realirainieren.
blassventil in der schwarzen Füll- und
n Sie den roten Knopf mehrmals.
ndig zurückschnellen.
mäßig den Zustand der Rucksackträger,
aschen, die Klettverschlüsse.
e Anstecheinheit, in die Sie die Patrone
erschmutzt ist.
immer leicht in die Einschubhülse
gentlich einen Tropfen ABS-Öl in die
das Entfernen des Griffes Probleme
be ABS-Öl liegt bei und kann bei ABS
or jedem Gebrauch des ABS-Lawinene Patrone fest eingeschraubt ist.
awineneinsatz
nn an die Belastungsgrenze des
mal sind Beschädigungen visuell nicht
n deshalb den ABS-Rucksack und die
eine prophylaktische Überprüfung an
enter einzusenden.
12
Spätestens hier beginnt der Wettlauf gegen den Tod, den Ganzverschüttete mit verschlossenen Atemwegen nach wenigen
Minuten endgültig verloren haben.
7. Wartung
Haupthindernis für eine erfolgreiche Bergung ist die durchschnittliche Verschüttungstiefe von einem Meter und mehr.
Häufig dauert schon das reine Ausgraben aus solchen Verschüttungstiefen länger als dem Verschütteten zum Überleben bleibt.
Zentrale Aufgabe ist deshalb die Verschüttung zu verhindern.
Das ABS-Lawinenairbag-System ist bei Beachtung nachstehend
beschriebener Zustandskontrolle weitgehend wartungsfrei.
• Entfalten Sie die beiden Airbags wenigstens einmal jährlich.
Wir empfehlen auch eine jährliche Probeauslösung am besten
zu Saisonbeginn. In ungefährlichem Gelände können Sie realistisch die Auslösung trainieren.
• Überprüfen Sie das Ablassventil in der schwarzen Füll- und
Ablasseinheit. Drücken Sie den roten Knopf mehrmals.
Er muss jeweils vollständig zurückschnellen.
•∑Kontrollieren Sie regelmäßig den Zustand der Rucksackträger,
Schnallen, die Airbagtaschen, die Klettverschlüsse.
• Überprüfen Sie, ob die Anstecheinheit, in die Sie die Patrone
einschrauben, nicht verschmutzt ist.
•∑Der Auslösegriff sollte immer leicht in die Einschubhülse
gehen. Geben Sie gelegentlich einen Tropfen ABS-Öl in die
Einschubhülse, wenn das Entfernen des Griffes Probleme
bereitet. Eine Probetube ABS-Öl liegt bei und kann bei ABS
nachbestellt werden.
•∑Überzeugen Sie sich vor jedem Gebrauch des ABS-Lawinenairbags, ob die gefüllte Patrone fest eingeschraubt ist.
Mit einem Zug
am Auslösegriff
schafft der ABSLawinenairbag
dafür in Sekundenschnelle die physikalischen Voraussetzungen.
Die fließenden Schneemassen spülen großvolumige Körper
an die Oberfläche. Haben diese Körper ein geringeres Volumengewicht als der sie umgebende Schnee, so bleiben sie an der
Oberfläche. Das zusätzliche Volumen der Airbags von insgesamt
170 Litern sorgt dafür, dass Sie im Fluss der Schneemassen an
der Schneeoberfläche bleiben. Dazu tragen auch die Form und
Anbringung der Airbags bei. Eine große Oberfläche, verbunden
mit flexibler, körpernaher Fixierung setzt die Fliesskräfte optimal
in Auftrieb um. Das ABS-Lawinenairbag-System hat bereits
hunderte Schneesportler vor einer Verschüttung bewahrt, und
nicht wenige verdanken ihm ihr Leben.
7.1 Selbstüberprüfung
Bitte senden Sie den ausgefüllten Fragebogen zur Erfassung von
Lawinenunfällen an uns oder direkt an das Schweizer Lawineninstitut (siehe Punkt 5.4).
8. Gerätekomponenten
Sollten Sie keine Möglichkeit haben Ihr ABS-System sofort
einzuschicken überprüfen Sie:
– Airbags visuell auf Abrieb
– Befestigungsschlaufen der Airbags auf Anriss
– Schulterträger, Bauch- und Brustgurte und Nähte auf Anriss
– alle Schnallen (Einstellschnallen an Schulterträgern, Bauchund Brustgurtschnalle sowie Schrittgurt) auf Anriss und
Verformung
Jeder der beiden Airbags hat in gefülltem Zustand ein Volumen
von 85 lt. Sie werden gleichzeitig gefüllt, haben aber separate
Verschlussventile. Wird einer der Airbags beschädigt, hält der
andere ausreichend lange seine Füllung. Der Innendruck beträgt
ca. 0,1 Bar.
Senden Sie das ABS Lawinenairbag System in jedem Fall an das
in Ihrem Land zuständige Servicecenter zur Überprüfung.
Deutsch
8.2 Füll- und Ablasseinheit
Dieses Kombiteil ist direkt an den beiden Airbags angebracht.
Im Zentrum der schwarzen Füll- und Ablasseinheit befindet sich
auch der Druckknopf des Ablassventils. Er ist durch eine rote
Kunststoffabdeckung vor ungewolltem Druck geschützt.
7.3 Kundendienst
Nach jeweils 3 Saisonen wird ein Generalservice durch die Herstellerfirma empfohlen. Der ABS-Lawinenairbag inklusive Patrone
und Auslösegriff ist dazu an das in Ihrem Land zuständige Servicecenter zu senden. Der ABS Kundendienst ist kostenpflichtig.
Der Kundendienst beinhaltet eine wesentlich umfangreichere
Überprüfung aller ABS-Systemteile als die Trainingsauslösung
oder die Selbstüberprüfung.
7.2 Überprüfung nach Lawineneinsatz
Jeder Lawineneinsatz kann an die Belastungsgrenze des
Materials gehen. Manchmal sind Beschädigungen visuell nicht
erkennbar. Wir empfehlen deshalb den ABS-Rucksack und die
leere Auslöseeinheit für eine prophylaktische Überprüfung an
Ihr zuständiges Servicecenter einzusenden.
8.1 Airbags
Die für den ABS Kundendienst zuständigen Firmen in den
jeweiligen Ländern finden Sie auf unserer Internetseite
www.abs-airbag.com unter http://abs-airbag.de/de/meta/kontakt/
Die Netzabdeckung über der Füll- und Ablasseinheit verhindert
das Eindringen von Schnee während der Füllung der Airbags.
Beschädigte Netze können jederzeit ersetzt werden.
8.3 Anstecheinheit
Die Anstecheinheit, in die die Patrone eingeschraubt wird ist
in einer Tasche oben im Rucksack untergebracht. Achten Sie
unbedingt darauf, dass sie nicht verschmutzt und keine Gegenstände eindringen können. Deshalb immer die Abdeckung
schließen. Eine eingeschraubte Patrone kann jederzeit wieder
aus der Anstecheinheit ausgeschraubt werden. Die Patrone wird
erst durch das Ziehen des angedockten Griffs geöffnet. Grundsätzlich empfehlen wir, dass die Patrone immer eingeschraubt ist.
Deutsch
13
8.4 Auslösegriff
Der Auslösegriff beinhaltet eine Druckkapsel. Durch Ankoppeln
des Griffs an die Einschubhülse am Tragegurt des Rucksacks
und durch Ziehen am Auslösegriff wird die Kapsel gezündet. Der
Explosionsdruck strömt durch den Druckschlauch zur Anstecheinheit. Dort wird die gefüllte Patrone von der Nadel angestochen,
deren Inhalt durch Druckschläuche zu den beiden Airbags
gelangt und dort in Kombination mit der Füll- und Ablasseinheit
die Airbags füllt. Fülldauer ca. 2 – 3 Sekunden!
Zur Fernauslösung (Wireless Activation) beachten Sie bitte die
separate Gebrauchsanweisung.
8.5 Patrone
14
Die Patronen enthalten ausschließlich ungefährliches, nicht
brennbares Gas, wie es in der Umluft enthalten ist. Innendruck
300 bar (Carbonpatrone 340 bar). Das Anstechen der Patrone
darf nur in der Anstecheinheit des ABS-Systems erfolgen. Jede
Manipulation am Verschluss oder an der Patrone kann zur Explosion führen. Höchste Verletzungs- und Lebensgefahr, auch für
umstehende Dritte!
Die Patrone ist für einen Temperaturbereich von -40°C bis +50°C
ausgelegt. Entleerte Patronen können ausschließlich durch ABS
wieder befüllt werden. Der Umtausch gegen eine volle Patrone
ist nur direkt beim ABS Händler möglich. Vermeiden Sie mechanische Belastungen wie z.B. Herunterfallen der Patrone.
Die Patronen entsprechen je nach Ausführung folgenden
Richtlinien:
– Stahlpatrone Europa: EG Richtlinie
– Stahlpatrone Nordamerika: DOC und TC zertifiziert
– Carbonpatrone: EG Richtlinie
8.6 Tragesysteme
Die autorisierten Tragesysteme sind durch das ABS-Logo
gekennzeichnet. Das Gurtgerüst entspricht den TÜV-Anforderungen für extreme Beanspruchung. Die Zugfestigkeit für alle
tragenden Gurte beträgt 3.000 N. Um zu gewährleisten, dass
das ABS-Lawinenairbag-System in einer Lawine mit dem Körper
des Trägers verbunden bleibt, ist das feste Schließen des Hüftgurtes, des Brustgurtes und des Schrittgurtes unerlässlich.
Andernfalls ist nicht auszuschließen, dass das ABS-Lawinenairbag-System in einer Lawine vom Körper gerissen wird.
Bei Verschmutzung des Airbag- oder Rucksackmaterials nur
Seifenwasser verwenden, keinesfalls aggressive Reinigungsmittel
wie z.B. Laugen und OxyCleaner. Vermeiden Sie Wasser oder
Flüssigkeit an der Füll- und Ablasseinheit am Airbag.
Ausführliche, aktuelle Informationen finden Sie immer unter
http://abs-airbag.de/de/service/abs-im-flugzeug/
Achtung: nach der Reinigung muss das System vollkommen
trocken sein bevor es eingesetzt wird – Vereisungsgefahr.
Bei Einhaltung der empfohlenen Wartungsintervalle von 3 Saisonen durch die Herstellerfirma ist die Lebensdauer maßgeblich
vom Grad der Nutzung abhängig und betrifft meist nur den
Packsack. Bei einer vorschriftsmäßigen Nutzung und durchschnittlich 50 Einsatztagen pro Saison kann für das ABS-System
(nicht den Rucksack) von einer 10-jährigen Nutzung ausgegangen werden. Wichtig ist die empfohlene Selbstkontrolle durch die
jährliche Trainingsauslösung.
10. Transport
Die Mitnahme von ABS-Lawinenrucksäcken in Flugzeugen ist
grundsätzlich erlaubt. Dies ist in dem Handbuch der IATA (International Air Transport Association) in den Gefahrengutvorschriften unter Tabelle 2.3A geregelt. Voraussetzung ist aber, dass Sie
den ABS-Lawinenairbag 14 Tage vor Abflug bei Ihrer Fluggesellschaft anmelden und gleich in Ihre Buchung eintragen lassen.
Pro ABS-Rucksack ist eine Auslöseeinheit erlaubt, wobei der
Auslösegriff nicht angedockt sein darf.
9. Lagerung und Reinigung
Überprüfen Sie vor jedem Einsatz, ob die gefüllte Patrone fest
eingeschraubt ist und vor allem auch deren Gewicht wie in
Schritt 1 und 2 der Inbetriebnahme beschrieben. Ansonsten
können Sie die Patrone eingeschraubt lassen.
Versehen Sie die Patrone außerhalb des Gerätes immer mit der
Schutzkappe. Es wird empfohlen, den Auslösgriff nach jedem
Einsatz abzunehmen. Lagern Sie den ABS-Lawinenairbag an
einem trockenen, vor Nagetieren sicheren Ort und außerhalb
der Reichweite von Kindern.
Fordern Sie unbedingt den Auszug aus dem IATA Handbuch
bei dem in Ihrem Land zuständigen Servicecenter an oder laden
Sie ihn sich von unserer Internetseite herunter (http://abs-airbag.de/de/service/abs-im-flugzeug/) um diesen am Schalter
vorweisen zu können. Wir empfehlen Ihnen auch dringend,
den Auszug aus dem IATA Handbuch zusammen mit Patrone,
Auslösegriff und Rucksack ins Check-In Gepäck zu legen.
11. Lebensdauer
Bei Verschleiß des Tragesystems/Base Unit ist der Umbau des
ABS-Lawinenairbag-System in ein neues Tragesystem/Base Unit
oder in den Freeride Rucksack möglich. Den Umbau nimmt die
Herstellerfirma vor. Bitte kontaktieren Sie das in Ihrem Land
zuständige Servicecenter für nähere Informationen. Wenn Schäden am Tragesystem, an den Verschlüssen oder Schäden an den
Airbags festgestellt werden, muss ein Austausch erfolgen.
Bitte beachten Sie für Reisen in die USA die aktuellen Hinweise unter http://abs-airbag.de/de/service/abs-im-flugzeug/
Zum Transport der Patrone außerhalb des ABS-Rucksackes
versehen Sie die Patrone immer mit der Patronenkappe.
Deutsch
Deutsch
15
16
12. Ergänzende Informationen
Fehlerbeschreibung
Fehlerdiagnose
Fehlerbeschreibung
Fehlerdiagnose
12.2 Garantie
12.1 Fehlerdiagnose
Auslösegriff lässt sich
nicht andocken
– Wenn Sie im Gelände sind
und kein ABS-Öl zur Hand
haben, schieben Sie zum
Andocken zunächst die
Einschubhülse nach oben,
docken den Griff an und
schieben die Einschubhülse
dann wieder nach unten.
Die Airbags kommen
nur schwer aus den
Seitentaschen und blasen
sich nicht vollständig auf
Um den gesetzlichen Garantieanspruch auf das ABS-System
von 2 auf 4 Jahre zu verlängern, füllen Sie bitte die Garantiekarte
online spätestens 30 Tage nach dem Kauf vollständig aus (unter
http://abs-airbag.de/de/service/garantiekarte/). Voraussetzung ist,
dass Sie die Trainingsauslösung entsprechend der Schritte 1 – 12
der Gebrauchsanweisung erfolgreich durchgeführt haben und
jährlich eine Trainingsauslösung durchführen werden.
Der geladene Auslösegriff
lässt sich nicht abnehmen
– Lassen Sie unbedingt die
volle Patrone eingeschraubt.
– Die Einschubhülse mit Gefühl
nach oben schieben, den
Griff von links nach rechts
bewegen und vorsichtig ver
suchen, nach unten zu
ziehen.
– Geben Sie zusätzlich einen
Tropfen ABS-Öl auf den Griffstift, und drehen Sie den Griff,
um den Mechanismus besser
zu ölen.
– Führt dies nicht zum Erfolg
senden Sie den Rucksack an
das in Ihrem Land zuständige
Servicecenter zur Überprüfung.
– Waren die Airbags richtig
gefaltet?
– Hat das Gewicht der Patrone
mit dem Füllgewicht übereingestimmt?
– Wenn Sie beides mit Ja
beantworten können, senden
Sie den Airbag zur Überprüfung.
– Sind Sie sich unsicher in
einem der beiden Punkte,
nehmen Sie eine Probeauslösung vor.
– Besteht das Problem weiter
hin senden Sie das ABSSystem zum Service.
Fehlerbeschreibung
Fehlerdiagnose
Ich habe den Auslösegriff
ohne Patrone oder mit
leerer Patrone gezogen
– Durch den ungedämpften
Explosionsdruck wird das
System beschädigt, ist nicht
mehr funktionsfähig und
muss repariert werden.
– Bei Rückfragen wenden
Sie sich bitte an das für Sie
zuständige Servicecenter.
Auslösegriff lässt sich
nicht andocken
– Einen Tropfen ABS-Öl innen
in die Einschubhülse geben.
Einschubhülse hochschieben,
Griff mehrmals an- und
abdocken bis Einschubhülse
wieder gangbar ist.
– Falls dies nicht zum Erfolg
führt, muss das System zur
Überprüfung.
– Auf keinen Fall versuchen,
den Griff mit Gewalt
anzudocken.
Deutsch
Nach dem Aufblasen der
Airbags sind Zischgeräusche
deutlich hörbar
– Zischgeräusche kommen
vom Ablassventil, das für
Druckausgleich sorgt.
– Nach einigen Minuten soll
der Druckabfall nicht deutlich
sichtbar sein.
– Ist der Druckabfall deutlich
sichtbar, muss das System
repariert werden. Geben Sie
das ABS-System zum Service.
12.3 Technische Daten
Airbagvolumen:
Systemgewicht:
Airbagmaterial:
Auslösung:
Füllvorgang:
2 x 85 Liter Airbags
ca. 1200g
Polyamid 6.6.
Pyrotechnische Zündung im Auslösegriff
In ca. 1 Sekunde werden rund 90 Liter
Gas-Luft-Gemisch in die beiden Airbags
gedrückt. In weiteren 1,5 Sekunden die
restlichen ca. 80 Liter (abhängig von der
Außentemperatur und Höhe).
Patronen:
Bestehen aus hochfesten Materialien,
ausgelegt für Drücke über 300 bar. Sie
entsprechen je nach Ausführung den
Richtlinien der EG bzw. DOC / TC für
Nordamerika. Die Patrone ist ausschließlich bei ABS wieder befüllbar.
Tragesystem:
Entspricht den TÜV-Anforderungen für
extreme Beanspruchung. Die Zugfestigkeit
für alle tragenden Gurte beträgt 3.000 N.
Betriebstemperatur: von -40°C bis +50°C
Deutsch
17
12.4 Zulassung / Konformität
12.5 Servicecenter
Table of Contents
Hersteller: ABS Peter Aschauer GmbH
Herstellerland: Deutschland
Die für den ABS Kundendienst zuständigen Firmen in den
jeweiligen Ländern finden Sie auf unserer Internetseite
unter http://abs-airbag.de/de/meta/kontakt/
1. Welcome . . . . . . . . . . . . . . . . . . . . . . . . . . . . . . . . . . . 20
2. Warning Notices and Appropriate Use . . . . . . . . . . . . 21
Typ: ABS-Lawinenairbag-System
18
Für die Beschaffenheit der für das ABS-Lawinenairbag-System
verwendeten Materialien und für die Art der Verarbeitung wurden
Richtwerte aus vergleichbaren Anforderungsbereichen zugrunde
gelegt. Diese Werte bilden das Anforderungsprofil der von der
TÜV Süd Product Service GmbH vorgenommenen Material- und
Funktionsprüfung im Rahmen der GS-Zeichen-Prüfung (Geprüfte
Sicherheit), nach den PSA Richtlinien 89/686 EWG und den
CE-Richtlinien. Trotzdem können gerade in Lawinen Kräfte und
Umstände auftreten, die diese Werte übersteigen. Wir weisen
deshalb ausdrücklich daraufhin, dass das ABS-LawinenairbagSystem in seiner Gesamtheit und in Einzelbereichen (Airbagmaterial, Befestigungsmaterial, Rucksack etc.) nicht allen möglichen, in Verbindung mit Lawinen auftretenden Belastungen
standhalten kann.
3. Unit Description and Parts . . . . . . . . . . . . . . . . . . . . .22
4. Operation
4.1. Initial Operation and practice activation . . . 22 – 28
4.2. During each tour or operation of the system . . . . 28
4.3. At the end of each tour . . . . . . . . . . . . . . . . . . . . 28
5. Handling during Avalanche Incident
5.1. Activation . . . . . . . . . . . . . . . . . . . . . . . . . . . . . . 29
5.2. Handling yourself during the avalanche . . . . . . . 29
5.3. After the avalanche . . . . . . . . . . . . . . . . . . . . . . . 29
5.4. Questionnaire for statistical analysis . . . . . . . . . 29
TÜV Süd Product Service GmbH, Ridlerstr. 65,
D-80339 München, Prüfstellennummer 0123.
6. How it Works . . . . . . . . . . . . . . . . . . . . . . . . . . . 29 – 30
8. Components
8.1. Airbags . . . . . . . . . . . . . . . . . . . . . . . . . . . . . . . . 31
8.2. Suction and release valve . . . . . . . . . . . . . . . . . . 31
8.3. Puncture unit . . . . . . . . . . . . . . . . . . . . . . . . . . . 31
8.4. Activation handle . . . . . . . . . . . . . . . . . . . . . . . . 32
8.5. Cartridge . . . . . . . . . . . . . . . . . . . . . . . . . . . . . . 32
8.6. Carrying system . . . . . . . . . . . . . . . . . . . . . . . . . 32
9. Storage and Cleaning . . . . . . . . . . . . . . . . . . . . . 32 – 33
10. Transport . . . . . . . . . . . . . . . . . . . . . . . . . . . . . . . . . 33
11. Working Life . . . . . . . . . . . . . . . . . . . . . . . . . . . . . . . 33
12. Additional Information
12.1. Troubleshooting . . . . . . . . . . . . . . . . . . . . 34 – 35
12.2. Warranty . . . . . . . . . . . . . . . . . . . . . . . . . . . . . . 35
12.3. Technical data . . . . . . . . . . . . . . . . . . . . . 35 – 36
12.4. Permits / Conformance . . . . . . . . . . . . . . . . . . . 36
12.5. Service Centers . . . . . . . . . . . . . . . . . . . . . . . . 36
7. Maintenance
7.1. Self-check . . . . . . . . . . . . . . . . . . . . . . . . . . . . . 30
7.2. Post-avalanche check . . . . . . . . . . . . . . . . . 30 – 31
7.3. Customer service . . . . . . . . . . . . . . . . . . . . . . . . 31
Die ABS Peter Aschauer GmbH ist ein nach ISO 9001:2000
zertifizierter Betrieb.
Das ABS-System ist Made in Germany
Deutsch
English
19
1. Welcome
Congratulations on your purchase of the ABS Avalanche Airbag
System.
This manual provides you with information about the function
and use of the ABS Avalanche Airbag System. It applies to every
out of bounds snow sport enthusiast.
Please read this manual carefully before you use this equipment.
Pay special attention to the warning notices and strictly adhere to
the information within. In order to be able to easily consult this
user manual we suggest that you keep it in a convenient location.
Make sure you include it if you choose to pass this equipment
on.
20
Sections in the manual that are marked with this
symbol identify risks which, if not observed will lead
to serious consequences.
The ABS Avalanche Airbag System is an emergency equipment,
which under certain conditions can prevent a total burial if
activated. It cannot prevent the release of an avalanche. An
element of deadly risk remains even if the user doesn’t get
buried. Every avalanche is absolutely life threatening regardless of any equipment. Therefore the ABS Avalanche Airbag
System should not encourage you to take greater risks.
For the functioning of the ABS Avalanche Airbag you need an
activation unit (cartridge + handle). Each ABS system is tested
prior to delivery. The extreme situation of an avalanche requires
a practiced approach to the ABS system. ABS therefore highly
recommends that the triggering of the airbag is practiced as part
of your personal training.
Please read the user manual before you practice your first activation by pulling the activation handle. Complete the warranty
form online under www.abs-airbag.com (under Service/Warranty
Card). Your warranty claim will then be extended to 4 years.
• Do not attach the activation handle to the ABS-System
unless you have attached a full cartridge first.
• Always change the activation handle and cartridge after
an activation of the system!
• Only when both parts have been changed is the system
ready to use again.
• Remove the activation handle when airbag is not in use.
Always use the ABS Avalanche Airbag System in combination
with an avalanche transceiver, shovel and probe.
The ABS-System is Made in Germany.
English
2. Warning notices and appropriate use
The ABS Avalanche Airbag cannot prevent an avalanche.
Every avalanche is always absolutely life threatening, with or
without an ABS Avalanche Airbag.
The ABS Avalanche Airbag should not in any way increase
your willingness to take risks.
The function and action of the ABS-System is limited solely to
preventing the total burial of an avalanche victim. However,
there may be situations when this is only partially or not at all
possible.
The ABS-System has to be activated. It is important to
practice this in order to be able to react properly in case of
emergency. For your own safety you should practice the
activation once a season.
The ABS-System requires careful handling and proper
inspection before each use.
Activation handle and cartridge are refillable.
Only attach the activation handle if a full cartridge has been
attached. Activation without a cartridge or with an empty
one will damage the system and render it non-functional. It
will have to be sent to your respective service center for
inspection.
If the red line is clearly visible the activation handle is not
charged and therefore not functioning!
Do not use damaged handles as there is a danger that they
could burst while releasing!
Do not try to pull the pin outside the brass quick coupler
located at the backpack strap. You will risk injury.
It is essential that the pin is protected from dirt. Should the pin
have come in contact with dirt, do not clean it yourself. Send it
to your respective service center for an exchange instead.
Pay attention to the expiration date of the release handle.
Only use original ABS cartridges, refills, parts or spares.
Do not alter, change or perform any repair on the system.
Only an authorized ABS Service Center should perform any
work or repair on the system. Any unauthorized work will void
you warranty as well as make the system inoperable.
The cartridge should screw in easily right to the back stop.
If you experience any resistance or if it is really hard to turn
the cartridge right up to the back stop, then this cartridge
cannot be used!
The full cartridge cannot be exposed to heat (stove, sun etc.).
Do not throw or stress the cartridge. Risk of explosion! Max.
temperature is 50ºC (+122 F).
When packing the airbags make sure that nothing can damage
the airbags and that the airbags are able to open up freely.
This applies especially to attachable parts like ice picks,
poles, skis, etc.
Fold the airbags according to the instructions. Improper folding
inhibits the opening of the airbags, can lead to malfunctioning
and damage the backpack.
Keep children away from the ABS System.
Be careful not to endanger other people when practicing the
activation of the airbag.
In order to avoid an unwanted or inadvertent activation
where other people could be harmed by such an accidental
activation, it is recommended that you remove the handle,
especially on chairlifts, in gondolas, in or around a helicopter,
the bus, train, automobile, etc.
English
21
3. Unit description and Parts
Please unfold picture page
1) Puncture unit
2) Airbags
3) Airbags compartment
4) Suction and release unit
5) Release valve
4. Initial Operation
Step 2
Step 3
4.1 Initial operation and practice release
Attaching the cartridge
Attaching straps and belts
The uncompromising functioning and the personal handling by
the user of the ABS Avalanche Airbag System are critical. The
handling is straightforward but must be done with care and
according to the steps outlined below:
Check if the puncturing unit is clean before attaching the cartridge.
The piercing pin must be visible in the middle. Screw in the full
cartridge right up to the back stop and tight enough that there is
no possibility of another turn.
Put the backpack on and adjust shoulder straps to fit your body.
Always fasten waist belt, chest and leg straps and fit them according to your body. The ABS-System will only be of use to you if the
backpack stays on your body during an emergency!
Step 1
22
6) Plastic flap
7) Brass quick coupler
8) Handle plate
9) Chest strap
10) Waist belt
11) Leg strap
Check that the cartridge is
screwed in tightly before each
use of the airbag to avoid
leakage and malfunctions.
Checking the cartridge weight
Most of the weight of the pack should be resting on your hips
rather than being carried by your shoulders.
The carrying system meets
the high European standards
(TÜV guidelines) for extreme
operational demands. The
tensile strength for all weight
bearing straps equals 3000 N
(674lbs).
Check the weight of the cartridge without the cartridge cap before
each use. The weight is listed on the side of the cartridge. Tolerance limit +/- 5 grams (0.18 oz). Your retail shop will exchange
any cartridge with a weight that differs more than the tolerance
limit at no charge.
12) Cartridge
13) Cartridge cap
479,8 gr
08/12
14) Activation handle
15) Pin
English
A completely full cartridge is
an absolute prerequisite for
the proper functioning of the
ABS Avalanche Airbag.
Tip! Put on your backpack
before you attach the activation
handle. This way you avoid
an unwanted or inadvertent
activation.
It should be easy to screw in the cartridge right up to the back
stop. Make sure that the cartridge doesn’t get screwed in on an
angle. If you experience any resistance or if it is really hard to
turn the cartridge right up to the back stop, then this cartridge
cannot be used! Your retail shop will exchange the cartridge at
no charge.
English
23
Step 4
Expiration year is shown on the colored cap. The expiry month is
always May in the year indicated.
Checking the activation handle
Step 5
Step 6
Attaching activation handle
Velcro closure
In order to attach the activation handle, align the pin with the
brass coupler and push the handle in. With the other hand flip
up the plastic flap, thus administering counter pressure.
The brass coupler will automatically snap back.
The Velcro closure secures the activation handle in order to avoid
unwanted activations. Before you leave a patrolled area, the
red Velcro closure must be completely loosened and attached
behind the activation handle to facilitate an unhindered activation. A tightly fastened Velcro usually prohibits an activation.
Unused, expired release handles can be exchanged for a fee.
The activation handle is charged with a small pressurized capsule,
which contains 0.19 grams of explosives. It can therefore only
be used once. By pulling the attached activation handle the
pressurized capsule explodes. The resulting pressure punctures
the cartridge and the airbags are filled.
The pressurized capsule functions for a limited time only. We
therefore do not recommend the use of unused cartridges after
3 winter seasons.
24
The pin has to be firmly fixed and the red line should not be
visible. If the red line is visible on the pin, the handle has not
been charged and therefore will not function properly!
Do not use damaged handles as this might cause it to burst
during the activation function.
Do not try to pull the pin
outside of the brass quick
coupler – there is a risk
of injury!
The metal pin on the side opening of the release handle indicates
the maximum operating time. Starting in winter 2010 the side
opening of the activation handle will have a red cap. The cap
indicates the replacement year. The replacement month is
always May in the year indicated. Please observe the following
expiry dates:
Protect the handle from contamination! Always store the
handle away from children!
gold-colored metal pins
Expiry date May 2013
black metal pins
Expiry Date May 2012
For the wireless activation handle please consult the special
instruction manual.
Only then is the handle
attached properly and
ready to use. If the
handle will not attach
refer to point 12.1.
If the handle is not
attached properly and
is stuck due to the
coupler snapping back
into place, a proper
activation will be
impossible.
Attention! Only attach the handle if a full cartridge has been
screwed in. When activating without a cartridge or with an empty
one, the system will be damaged and the pin must be exchanged.
Please direct all inquires to your respective Service center.
If you followed all the steps up to this point your ABS-System
is now operational. However, we recommend that you finish
studying the instruction manual before you conduct your practice
activation.
silver-colored metal pins
Expiry Date May 2010
English
25
In order to completely eliminate unwanted activations we
recommend that you remove the activation handle. Particularly
in situations when you could endanger yourself and other people
such as on chairlifts, in gondolas, in or around a helicopter, the
bus, train, automobile, etc.
For the wireless activation handle please consult the special
instruction manual.
English
Step 7
Step 8
Height adjustment of the activation handle
Remove activation handle
Check when wearing the backpack if the activation handle is
positioned in a way that works for you. Usually that is the case,
if not, the handle attachment can be adjusted to the appropriate
height. The proper position of the activation handle should be
between chest and shoulder.
The required activation force equals approx. 8 kg (17.64 lb; 80 N).
The airbags will inflate within 2-3 seconds.
Folding airbags
Attention! Background noise
after inflation is caused by
the release valve, which
automatically equalizes the
pressure. The inflation of the
airbags varies according to
the outside temperature and
elevation.
In order to remove the handle, undo the Velcro closure and push
the coupler upwards. The activation handle will pop out without
you pulling on it. Do not pull
the charged activation handle,
the system will be activated! If
you are not able to remove the
activation handle refer to
point 12.1.
Remove the handle when
ABS backpack is not in use
and store it in the pocket
located at the hip strap.
26
Step 10
Deflate airbags
In order to adjust the height open and undo the Velcro closure,
attach the handle plate to the appropriate plastic grommet and
fasten the Velcro closure.
Make sure that the activation handle is not obstructed by
clothing and that it can be easily reached.
A retail shop will be able to attach the activation handle on the
right hand strap if so desired by left-handed clients. A special
handle plate is therefore needed.
Step 11
Step 9
First open the net cover over the suction and release valve.
Practice activation
Now fold up the red cover and
press the release valve in the
center of the black suction
and release valve. At the same
time, compress the airbag
until it is completely empty.
Now close the net cover again.
We want you to feel 100% comfortable with the ABS-System.
We therefore strongly recommend that you practice the triggering
as part of your training so that the functional principle can be
demonstrated as realistically as possible.
Attention! Improper folding
will result in poor opening of
the airbags. This can lead to
malfunction and damage to
the backpack!
1. Lie the airbags down with
the suction and release valve
facing the ground. The smooth
side of the airbag should be
facing up.
2. Fold the upper part of the
airbag to the level of the airbag
compartment.
27
2
3. Now fold the bottom part of
the airbag. The airbag width
must correspond to the width
of the airbag compartment.
Please ensure that during the practice activation the distance to
people and objects is approximately 1 m (3.28 feet) in order to
avoid adverse affects. Activate the handle with a strong, rapid pull.
English
1
Therefore please fold the airbags according to the following
instructions.
3
English
4. Now fold the airbag three
times towards the backpack
ensuring that each fold is
approx. a hand's breadth wide
so that the airbag can easily
unfold.
4
5. Now push the airbags in the
designated compartments. The
suction and release valve must
be clearly visible on top of the
airbag material.
Step 12
5. Handling during avalanche incident
5.3 After the avalanche
Replace cartridge and activation handle
5.1 Activation
After every activation the cartridge and the activation handle
must be replaced. Proceed according to step 1, 2 and 4, 5.
The ABS-System is then once again operational.
Activate the ABS Avalanche Airbag without hesitation as soon as
you become aware of an avalanche. It is better to activate once
too often than not at all.
Find a safe place. Try to help other victims if possible. Only deflate
the airbags when there is absolute certainty that there is no
longer any danger of avalanches and attach another cartridge
and activation handle immediately if possible. In case you are still
in an avalanche prone area, leave the airbags inflated.
Proceed now with the practice activation and complete the online
form in order to extend the warranty (www.abs-airbag.com under
ABS-System).
In order to activate pull hard and fast on the activation handle
and try to escape. The airbags are self inflating, independent of
whether you are skiing, are falling, are lying on top of the airbag
or are already captured by the moving snow. The inflated airbags
will not compromise your possible escape or avoidance of rocks
etc., which you should always try to do.
4.2 During each tour or operation of the system
28
5
Follow steps 1 – 6 of the Initial Operation
1 Checking cartridge weight
2 Attaching cartridge
3 Attaching straps and belts
4 Checking activation handle
5 Attaching activation handle
6 Velcro closure
4.3 At the end of the tour
6. Fasten the Velcro closures
of the airbag compartments
tightly.
Follow step 8 Removing activation handle of the Initial Operation.
The cartridge can remain attached.
5.2 Handling yourself during the avalanche
Once you have activated, only concentrate on your fall line. The
way that the airbags are attached on the sides of the pack allows
you to freely move your arms. Fight by swimming and pushing
away obstacles. Try to steady yourself and protect your head.
The shape of the airbags will help to protect your head without
compromising your movements and ability to see. Try to twist out
of your ski bindings. Never put your hands through the pole
straps and never use safety straps with your bindings. If possible
keep your mouth closed.
When the avalanche is coming to a halt, try to keep your upper
body and arms above the snow and free yourself from the
avalanche as soon as possible.
6
English
5.4 Questionnaire for statistical analysis
Please report each activation you had to perform with your ABS
Avalanche Airbag. The findings from actual activations are very
important for the further development of the system. You can
request the Questionnaire directly from us or download it from
our website (under Avalanche/Questionnaire Avalanche Accidents). Complete and sign the form and send it to the competent
avalanche center in your country, to the Federal Institute for
Snow and Avalanche Research in Davos (SLF) or to your ABS
service center.
6. How it works
With the ABS Avalanche Airbag you have purchased a device
based on many years of experience in avalanche research, rescue
and statistics. Led by the one outstanding fact, that a predominant number of all avalanche victims (skiers and snowboarders) are still alive when the avalanche comes to a halt. However,
most of them are buried, are unable to free themselves and are
often not visible to the rescuer. And this is where the race with
death begins and is lost by those victims, who are totally buried
and have blocked airways.
English
29
The main obstacle for a successful rescue is when the burial
depth is one meter or more. Often the time it takes to shovel
these victims out of such snow depths exceeds their survival
time. Therefore it is absolutely vital to prevent a burial as good
as possible. One pull of the activation handle and within seconds
the ABS Avalanche Airbag provides the physical prerequisites
for this to happen.
30
The moving snow
flushes large volume
objects to the surface. If these objects
have a smaller
dimensional weight
then the surrounding snow, they will
stay at the surface.
The additional airbag volume of 170 liters helps that you will stay
on top of the moving snow. The weight, shape as well as the
attachment of the airbags, also contribute to this. A large surface
area combined with a flexible attachment that fits close to the
body convert the flow force into buoyancy. The ABS Avalanche
Airbag System has already prevented hundreds of snow enthusiasts from being buried.
7. Maintenance
7.1 Self check
• The ABS Avalanche Airbag is virtually maintenance free if the
following points are observed.
• Unfold both airbags at least once a year. We also recommend
a yearly practice activation, preferably at the beginning of the
season. The activation can easily be practiced on a safe site.
• Check the release valve in the black suction and release unit.
Push the red button several times. It has to completely click
back into place each time.
• Inspect the condition of the backpack straps, buckles, airbag
compartments and Velcro closures on a regular basis.
• Check whether the puncturing unit which holds the cartridge
is free of dirt
• The activation handle should easily fit into the coupler. You
can add a drop of ABS oil to the coupler if you have problems
removing the handle. A sample tube of ABS oil is included and
can be ordered from ABS.
• Make sure that the full cartridge is screwed in tightly each time
before using the ABS Avalanche Airbag.
7.2 Post-avalanche check
Every use can negatively affect the material. Often the damage
is not visible with the naked eye. We therefore recommend
sending the ABS-backpack and empty cartridge to your service
centre for a prophylactic inspection. Please send the filled out
questionnaire to be used for statistical analysis of avalanche
accidents to us or the Swiss avalanche institute (see item 5.4).
English
If you are unable to send the ABS Avalanche Airbag in right away
we recommend to check the following:
– check the airbags visually for punctures
– check the airbag fastening straps for tears
– check the shoulder, waist and chest straps as well as the
seems for tears
– check all buckles (adjustment buckles at the shoulder straps,
waist and chest strap)
– check buckles as well as leg straps for tears and deformation
In any case send the ABS Avalanche Airbag System to your
respective service center for inspection.
7.3 Customer service
After three seasons the manufacturer recommends a general
inspection. The ABS Avalanche Airbag including cartridge and
activation handle has to be sent to your respective service
center. The ABS customer service will charge for this inspection.
The customer service includes a much more extensive inspection
of all ABS parts than the practice activation or self check.
8. Components
8.1 Airbags
Each of the two airbags has a volume of 85 liters when inflated.
They are inflated simultaneously but have separate closure and
suction valves. If one of the airbags is damaged the other one will
remain inflated for a sufficient amount of time. The inner pressure
equals approx. 0.1 bar.
8.2 Suction and release valve
This combination part is attached directly to the airbag. The
button for the release valve is located in the middle of the black
suction and release unit. It is protected from unwanted pressure
by a red plastic cover.
The net cover over the suction and release valve prevents snow
entering the airbag when it is being filled. Damaged nets can be
replaced at any time.
8.3 Puncture unit
The appropriate ABS customer service for each of the countries
is listed on our web page www.abs-airbag.com under Contact.
The puncture unit into which the cartridge is screwed into is
housed in a compartment at the top of the backpack. Make
absolutely sure that it stays clean and that no objects can damage
it. Therefore always close the cover. A screwed in cartridge can
be unscrewed from the puncture unit at any time. Only the pull
on the attached handle will activate the cartridge. We generally
recommend to always leaving the cartridge attached.
English
31
8.4 Activation handle
8.6 Carrying system
The activation handle is equipped with a blank cartridge. By
attaching the handle to the coupler at the shoulder strap of the
backpack and then pulling the activation handle, the blank
cartridge will ignite. The explosion pressure travels through the
tube to the puncture unit. There a cartridge containing nitrogen
will be pierced with the pin and the nitrogen is forced through the
pressure tubes to the two airbags where in combination with the
suction and release valve the airbags get inflated. Inflation time is
approx. 2 – 3 seconds!
The authorized carrying systems are identified by the ABS logo.
The various straps and belts comply with the TÜV requirements
for extreme operational demands. The tensile strength for all
weight bearing straps equals 3000N (674lbs). In order to ensure
that the ABS Avalanche Airbag System stays on the person’s
body during an avalanche, it is imperative that the waist belt,
chest strap and leg straps are properly fastened. The greatest
chance that the ABS Avalanche Airbag to remain on your body
during an Avalanche is if waist belt, chest strap and leg straps
are properly fastened.
8.5 Cartridge
Attention: after cleaning make sure that the system is completely
dry before use – or you risk freezing the components which will
not operate as intended.
10. Transport
Generally you are allowed to take your airbag on the airplane.
The guidelines are outlined in the IATA (International Air Transport Association) reference guide under dangerous goods Table
2.3A. However, you have to register the ABS-Airbag with your
airline 14 days before your departure. One activation unit is
allowed for each ABS backpack, and the activation handle must
not be installed.
9. Storage and cleaning
32
The cartridges contain only harmless gas, the same as in our air.
The inside pressure is 300 bar (Carbon cartridge 340 bar). The
piercing of the cartridge should only occur within the puncture
unit of the ABS-system. Any manipulation at the closure or at the
cartridge can trigger an explosion which may result in a high risk
of injury and or death, including bystanders.
Each cartridge is designed for temperatures from -40ºC to +50ºC
(-40F to +122 F). Empty cartridges can only be filled by ABS.
The exchange can only be done at an ABS retail shop. Avoid
impacts such as dropping the cartridge.
Depending on the model, the cartridges comply with the
following guidelines:
– Steel cartridge Europe: EG guidelines
– Steel cartridge North America: DOC and TC certified
– Carbon cartridge: EG guidelines
Make sure before each use that the full cartridge is screwed in
tightly and check the weight as described in steps 1 and 2 of the
Initial Operation. Otherwise you can leave the cartridge attached.
Always make sure that the protective cap is on the cartridge
when the cartridge is not attached to the airbag. It is recommended to remove the handle after each use. The ABS Avalanche
Airbag should be stored in a dry, rodent free area and away from
children.
Use only soapy water to clean the airbag or the backpack. Do not
use harsh cleaning agents like bleach or OxiCleaner. Do not wash
in a washing machine. Protect the suction and release valve from
water and other liquids.
We strongly recommend that you request the IATA guidelines
from your respective service center or that you download them
yourself from our website in order to be able to show them at the
ticket counter. We also recommend that you put the copy of the
IATA guidelines along with your cartridge, activation handle and
backpack in your carry-on luggage. If you are traveling within the
USA you need to comply with FAA rules.
11. Working Life
By adhering to the manufacturer recommended maintenance
schedule of 3 seasons, the working life mainly depends on the
degree of usage and mostly refers to the backpack. When using
the system according to the instructions and on an average of
50 days per season, the ABS-System (not the backpack) can be
expected to function for 10 years. It is important to perform the
suggested practice activation by activating the ABS System once
year.
If the backpack/carrying system shows signs of wear and tear it
is possible to transfer the ABS Avalanche Airbag into a new backpack/carrying system or into the Freeride pack. The transfer will
be carried out by the manufacturer. Please contact your respective
service center for more details. If there is any damage to the
carrying system, the buckles or the airbag itself is damaged, by
a puncture for example, the system must be exchanged.
When travelling to the United States please pay attention to
the latest advice on www.abs-airbag.com (under Service/ABS
in planes).
When you transport the cartridge outside the airbag the protective
cap must be on the cartridge.
Detailed and updated information on the transport of ABS packs
can be found here: www.abs-airbag.com (under Service/ABS
in planes)
English
English
33
12. Additional information
Malfunction
Troubleshooting
Malfunction
Troubleshooting
12.1 Troubleshooting
The charged activation
handle does not come off
– You must leave the full
cartridge in place.
– Gently push the coupler
upwards, wiggle the handle
from side to side and carefully
try pulling it down.
– In addition apply a drop of
ABS oil to the handle and
turn it to increase lubrication.
– If this doesn’t work the system
has to be sent in for service.
After inflating the
airbags there is a definite
background noise
– This noise is due to the
release valve equalizing the
pressure.
– After a few minutes the
pressure drop should not be
clearly visible any more.
– If the pressure drop is still
clearly visible, the system
needs to be repaired. Send
the ABS-System in for service.
– Were the airbags folded
properly?
– Did the weight of the cartridge
match the filled weight?
– If you answered both with yes
you have to send the airbag in
for service.
– If you are unsure about either
one of these points, perform a
practice activation.
– If the problem persists send
the ABS-System in for service.
12.2 Warranty
Malfunction
Troubleshooting
I pulled the activation
handle without the cartridge
being installed
– the undamped explosion
pressure will damage the
puncture unit and render it
unsafe and unusable. It must
be checked and replaced.
– Direct all queries to your
respective service center.
Activation handle does
not attach
34
– Put a drop of ABS oil into
the coupler. Push up coupler,
attach and remove handle
several times until the coupler
is functioning properly.
– If this doesn’t work the
system has to be sent to your
respective service center.
– Do not try to attach the
handle with force.
– If you are out in the field and
you have no ABS oil with you,
push the coupler up, attach
the handle and then push the
coupler down.
The airbags are difficult
to remove from the
compartments and are
hard to inflate
English
To extend your warranty of the ABS-System from 2 years to
4 years please complete the warranty card on-line no later than
30 days after your purchase under www.abs-airbag.com (under
Service/Warranty Card). (The ABS-System does not include the
backpack). It is required to successfully perform the practice
activation according to steps 1 – 12 of the instructions for use
and to continue self-testing the unit year after year.
ABS AIRBAGS warrants that the product will meet the specifications stated in the instructions and ABS AIRBAGS agrees to replace the product free of charge if the product does not conform to
the specifications. Notice for replacement must be given within
60 days of the discovery of the defect. In consideration of the
above promises by ABS AIRBAGS, the buyer agrees to and
accepts the following conditions:
• That this warranty is in lieu of all other warranties, expressed
or implied;
• That all warranties of merchantability or of fitness for a
particular purpose are hereby excluded and/or waived;
• That the buyer's sole remedy shall be to obtain replacement
of the product free of charge from ABS AIRBAGS; and
That this remedy is in lieu of all other remedies or claims for
damages, consequential or otherwise, which the buyer may have
against ABS AIRBAGS.
ABS AIRBAGS shall have no liability for Any loss or injury caused, in whole or in part, by its actions, omissions, or negligence,
or for contingencies beyond its control;
The warranty extends only to you, the original purchaser. It is
not transferable to anyone who subsequently purchases the
ABS AIRBAGS from you.
12.3 Technical data
Volume of airbag:
Weight of system:
Release:
Filling procedure:
English
2 x 85 liter airbags
Approx. 1200g
Pyrotechnical ignition in the activation
handle
Within approx. 1 second 90 liters
(23,8 US gallon) of a gas-air mix
is forced into the two airbags while
the remaining approx. 80 liters
(21,1 US gallon) will take 1.5 seconds
(depending on outside temperature
and elevation).
35
Cartridges:
Carrying system:
Operating temperature:
Are made from highly durable materials with an allowable pressure of more
than 300 bar (4400 psi).
Depending on the model, the cartridges comply with the guidelines of the
EG or DOC / TC for North America.
Complies with the TÜV requirements
for extreme operational demands. The
tensile strength for all weight bearing
straps equals 3000 N (674lbf).
From -40ºC to +50 ºC (-40F to +122F)
12.4 Permits and conformance
TÜV Süd Product Service GmbH, Ridlerstr. 65,
D-80339 München, Prüfstellennummer 0123.
1. Bienvenue . . . . . . . . . . . . . . . . . . . . . . . . . . . . . . . . . . 38
Die ABS Peter Aschauer GmbH is a certified company according
to ISO 9001:2000 standards.
2. Avertissements et précautions d’utilisation . . . . . . . . . 39
The ABS System is Made in Germany.
3. Présentation des éléments de l’ABS . . . . . . . . . . . . . .40
8. Description des composants de l’ABS
8.1. Airbags . . . . . . . . . . . . . . . . . . . . . . . . . . . . . . . . 49
8.2. Valve Venturi de remplissage et de purge . . . . . . 49
8.3. Unité de perçage . . . . . . . . . . . . . . . . . . . . . . . . 49
8.4. Poignée de déclenchement . . . . . . . . . . . . . . . . . 50
8.5. Bouteille de remplissage . . . . . . . . . . . . . . . . . . 50
8.6. Système de portage . . . . . . . . . . . . . . . . . . . . . . 50
12.5 Service centers
The ABS customer service centers for the different countries are
listed under Contact on our website www.abs-airbag.com
Manufacturer: ABS Peter Aschauer GmbH
Country of origin: Germany
36
Table des matières
4. Utilisation courante
4.1. Prise en main . . . . . . . . . . . . . . . . . . . . . . . 40 – 46
4.2. A chaque sortie . . . . . . . . . . . . . . . . . . . . . . . . . . 46
4.3. A la fin de la sortie . . . . . . . . . . . . . . . . . . . . . . . 46
5. Utilisation en cas d’avalanche
5.1. Déclenchement . . . . . . . . . . . . . . . . . . . . . . . . . 47
5.2. Comportement dans l’avalanche . . . . . . . . . . . . . 47
5.3. Après l’arrêt de l’avalanche . . . . . . . . . . . . . . . . 47
5.4. Questionnaire de témoignage . . . . . . . . . . . . . . . 47
Type: ABS Avalanche Airbag System
The nature of the materials and the kind of workmanship used
for the development of the ABS Avalanche Airbag System are
based on the standard values of comparable usage requirements. These standard values form the requirement profile for
the material and operating tests conducted by TÜV Süd Product
Service GmbH within the Federal Consumer Product Safety Act,
according to PPE directive 89/686 EWG as well as the CE guidelines. Yet during an avalanche incident there could be forces
and circumstances, which will exceed these standard values.
We would therefore explicitly point out that the ABS Avalanche
Airbag System in its entirety and in parts (airbag material,
attachments, backpack, etc.) cannot withstand all possible
demands which will arise during an avalanche incident.
6. Fonctions et efficacité de l’ABS
. . . . . . . . . . . . 47 – 48
9. Maintenance, stockage et nettoyage . . . . . . . . . . 50 – 51
10. Transport . . . . . . . . . . . . . . . . . . . . . . . . . . . . . . . . . 51
11. Durée de vie . . . . . . . . . . . . . . . . . . . . . . . . . . . . . . . 51
12. Informations supplémentaires
12.1. Guide de dépannage . . . . . . . . . . . . . . . . 52 – 53
12.2. Garantie . . . . . . . . . . . . . . . . . . . . . . . . . . . . . . 53
12.3. Données techniques . . . . . . . . . . . . . . . . . . . . . 53
12.4. Homologation / conformité . . . . . . . . . . . . . . . . 53
12.5. Service clientèle . . . . . . . . . . . . . . . . . . . . . . . . 54
7. Entretien
7.1. Vérification personnelle . . . . . . . . . . . . . . . . . . . 48
7.2. Vérification après utilisation en avalanche . 48 – 49
7.3. Service après vente . . . . . . . . . . . . . . . . . . . . . . . 49
English
Français
37
1. Bienvenue
Félicitations pour l’achat de votre ABS – Avalanche Airbag
System.
Ce manuel vous fournit le mode de fonctionnement et d’utilisation
de l’ABS. Il s’adresse à tous les pratiquants de sports de neige
qui évoluent en dehors des pistes balisées.
Il est important de bien lire ce manuel avant l’utilisation de ce
produit. Prêtez attention aux précautions d’utilisation et respectez
ces informations. Rangez ce manuel dans un endroit où il vous
sera facile d’accéder afin de le relire. Si vous prêtez votre ABS à
une autre personne, fournissez-lui le manuel.
38
Les points du manuel qui sont précédés de ce
symbole indiquent la présence d’un risque. Le
non-respect de l’indication peut entraîner de
lourdes conséquences.
L’ABS est un équipement de sécurité qui, sous certaines
conditions, évite l’ensevelissement total sous la neige à celui
qui le porte. Cet équipement n’empêche pas le déclenchement
d’une avalanche. Toute avalanche implique l’existence d’un
danger de mort, indépendamment de l’équipement utilisé.
L’utilisation de l’ABS ne doit en aucun cas augmenter votre
prise de risques.
Pour que le système ABS Avalanche Airbag soit fonctionnel, vous
avez besoin d’une unité de déclenchement (bouteille + poignée).
Chaque système ABS est testé avant sa livraison. La situation
extrême que représente une avalanche requiert une parfaite
maîtrise du système ABS. Il est donc vivement recommandé de
tester une fois le système de déclenchement de l’ABS.
Tout d’abord, lisez ce manuel d’utilisation et effectuez le
déclenchement de prise en main en suivant les instructions.
Veuillez remplir le formulaire de garantie en ligne (http://absairbag.de/fr/services/carte-de-garantie/). Votre garantie sera
ainsi prolongée à 4 ans.
Ne branchez jamais la poignée de déclenchement si la bouteille de remplissage n’est pas correctement vissée et remplie.
Changez la bouteille et la poignée après chaque déclenchement! Le système n’est de nouveau opérationnel que si les
deux composants (bouteille et poignée) ont été changés. En
zone sécurisée, enlevez toujours la poignée.
En plus de l’ABS, il est conseillé de vous munir d’un Appareil
de Recherche de Victimes en Avalanche (ARVA), d’une pelle et
d’une sonde.
Le système ABS est de fabrication allemande.
Français
2. Avertissements et précautions d’utilisation
L’ABS ne peut pas empêcher l'avalanche.
Toute avalanche implique l’existence d’un danger de mort
avec ou sans ABS.
L'utilisation d’un ABS ne doit en aucun cas augmenter votre
prise de risque.
L’ABS tente de s'opposer à l'ensevelissement d’une victime
d’avalanche. Cependant, il existe des situations d’avalanche
pour lesquelles l’efficacité de l’ABS peut être limitée ou
entravée.
L'ABS doit être déclenché activement par l'utilisateur. Un
entraînement régulier est nécessaire pour pouvoir réagir
correctement en cas d’urgence. Faîtes donc pour votre propre
sécurité un déclenchement d’exercice une fois par saison.
L'ABS demande un entretien et un stockage soigné. Le bon
état du système ABS est à vérifier avant chaque sortie.
La bouteille et la poignée de déclenchement ne fonctionnent
qu’une seule fois. Elles doivent être renvoyées chez votre
revendeur pour être rechargées.
Ne branchez jamais la poignée de déclenchement si la bouteille de remplissage n’est pas correctement vissée et remplie.
Si vous déclenchez la poignée sans avoir vissé la bouteille,
vous endommagez le système. L’ABS n’est alors plus en état
de fonctionner correctement et doit être révisé.
Si vous apercevez une bague rouge sur la tige de la poignée
de déclenchement, la poignée n’est plus chargée et ne fonctionne plus!
N’utilisez pas de poignée endommagée, il existerait un risque
d’éclatement!
Ne tentez jamais de déclencher la poignée hors du système
avec les mains, les dents, une pince ou tout autre ustensile.
Vous risqueriez de graves blessures.
Protégez la tige de la saleté. Si toutefois la tige est salie, ne
tentez pas de la nettoyer vous-même, mais renvoyez-la à
votre revendeur pour un échange standard.
Contrôlez la date de validité de la poignée.
Utilisez exclusivement des composants ABS originaux (bouteille de remplissage et poignée de déclenchement, ou autres
pièces de rechange).
Si en vissant la bouteille, vous sentez des résistances ou si
elle se laisse visser difficilement jusqu'à la butée, il ne faut
pas l'utiliser.
N’exposez jamais la bouteille à une source de chaleur (poêle,
plage arrière de voiture, etc.). Ne la jetez pas et ne la soumettez pas à des charges mécaniques (marteau, pinces, etc.).
Une utilisation non appropriée peut entraîner l'eclatement de
celle-ci et mettre votre vie en danger. La température maximale d’utilisation est de 50°C.
Veillez à ce qu’aucun élément sur le sac à dos ne puisse
gêner la sortie des airbags ou les abîmer lors de leur sortie.
Cela vaut en particulier pour le matériel attaché sur le sac
comme un piolet, des bâtons, des skis etc.
Les airbags doivent être pliés comme indiqué dans le manuel.
Un mauvais pliage peut gêner le gonflage des airbags, provoquer des problèmes de fonctionnement ou dégrader le sac.
Conservez la poignée et la bouteille hors de portée des enfants.
Lorsque vous effectuez un déclenchement de prise en main
ou d’exercice, veillez à ne blesser personne.
Nous conseillons de débrancher la poignée dans les situations
où un déclenchement involontaire provoqué par vous-même,
une autre personne ou un objet quelconque, est susceptible
de se produire, comme par exemple sur le télésiège, dans le
téléférique, l’hélicoptère, le bus, la rue, etc.
Français
39
3. Présentation des éléments
Ouvrez le plan du système en première page
1) Unité de perçage (avec le piston)
2) Airbags
3) Poche airbag
4) Valve Venturi de remplissage et de purge
5) Bouton de purge
4. Utilisation courante
Etape 2
Etape 3
4.1 Prise en Main
Visser la bouteille
Ajuster le système de portage
Comme pour de nombreux appareils techniques, le bon fonctionnement de l’ABS dépend du bon état du système et de la
capacité personnelle de l'utilisateur. La manipulation n'est pas
compliquée mais il faut respecter scrupuleusement l'ordre des
opérations ci-décrites :
Vérifiez que l’unité de perçage est propre et que l’aiguille du
piston est visible au milieu. Vissez la bouteille et serrez bien
jusqu'à la butée. Aucun autre tour ne peut être possible.
Mettez le sac à dos. Fermez les sangles ventrale, pectorale et
soucutale et ajustez l’ensemble ainsi que les bretelles à votre
taille. Le système ABS sera utile en cas d’avalanche uniquement
si le sac à dos reste solidaire de la personne et n’est pas arraché.
Il est donc indispensable de verrouiller les 3 points d’attache
(ventrale, pectorale et soucutale).
Etape 1
40
6) Cache de protection de la prise rapide
7) Prise rapide pour la poignée de déclenchement
8) Patte de fixation de la poignée de déclenchement
9) Sangle pectorale
10) Sangle ventrale
11) Sangle soucutale
12) Bouteille de remplissage
13) Bouchon de sécurité
Vérifiez le serrage de la
bouteille avant toute
utilisation de l’ABS.
Le réglage doit être fait de manière à faire supporter le poids du
sac par les hanches.
Contrôler le remplissage de la bouteille
Contrôlez le remplissage de la bouteille avant chaque sortie, en
la pesant sans le bouchon de sécurité. Le poids est indiqué sur
une étiquette adhésive sur le côté de la bouteille. Le seuil de
tolérance est de +/- 5 grammes.
479,8 gr
08/12
14) Poignée
15) Tige de la poignée
En cas de différence supérieure à 5 grammes, vous pouvez
échanger gratuitement la
bouteille auprès de votre
revendeur.
L’harnachement répond aux
normes TÜV, conçues pour
des contraintes à l’arrachement extrêmes, allant jusqu’à
3000 N.
Conseil ! Mettez le sac à dos
avant de brancher la poignée
de déclenchement. Vous
éviterez un déclenchement
involontaire.
Veillez à ne pas visser la bouteille de travers. Si en vissant
vous sentez des résistances ou si la bouteille se laisse visser
difficilement jusqu'à la butée, il ne faut pas l'utiliser. Si la
bouteille est défectueuse, votre revendeur vous l’échangera
gratuitement.
Une bouteille complètement
remplie est indispensable
au bon fonctionnement de
l’ABS.
Français
Français
41
Etape 4
L’année d’expiration est indiquée sur le cache en couleur. Valide
jusqu'en mai de l'année indiquée sur ce capuchon
Contrôler la poignée de déclenchement
La poignée de déclenchement est chargée avec une balle à
blanc, qui contient 0,19 g d'explosif. Elle ne peut fonctionner
qu'une seule fois. Suite à une traction sur la poignée branchée
au système, la balle à blanc explose. Cela provoque une surpression dans le tuyau, qui perce la bouteille de remplissage et les
airbags se gonflent.
La durée de validité de la balle à blanc est limitée. Nous conseillons donc de ne pas garder une poignée de déclenchement plus
de 3 saisons d'hiver.
42
Si votre poignée n'a pas été déclenchée et que la date de validité
est dépassée, vous pouvez en acheter une autre en échange
standard auprès de votre revendeur.
L’année d’expiration est indiquée sur le cache en couleur. Si la
bague rouge est visible sur la tige, la poignée n’est plus chargée
et ne peut plus fonctionner!
N’utilisez pas de poignée endommagée. Il existerait un risque
d’éclatement.
Ne tentez jamais de déclencher la poignée hors du système avec les mains, les dents,
une pince ou tout autre
ustensile. Vous risqueriez de
graves blessures.
La date de validité maximale est visible au verrou métallique sur
le côté de la poignée. À partir de l’hiver 2010, l’ouverture latérale
de la poignée de déclenchement sera recouverte d’un capuchon
rouge sur lequel figurera l'année d'expiration. Respectez les
dates de validité suivantes :
tige de couleur dorée
valide jusqu'en mai 2013
Protégez la poignée de la
saleté. Conservez-la hors de
portée des enfants.
tige de couleur noire
valide jusqu'en mai 2012
tige de couleur argente
valide jusqu'en mai 2010
Pour la poignée de déclenchement à distance (Wireless Activation), reportez-vous au manuel spécifique.
Français
Etape 5
Etape 6
Brancher la poignée
Velcro de sécurité
Avec une main, présentez la poignée de déclenchement exactement dans l’axe de la prise rapide et introduisez-la en la poussant
vers le haut. En même temps, avec l’autre main, relevez le cache
de protection et exercez la pression opposée. La bague de verrouillage doit se remettre en place automatiquement. La poignée de
déclenchement est
prête à l’emploi.
Si vous ne parvenez
pas à brancher la
poignée, allez à la
section 12.1. Si la
poignée n’est pas
convenablement
branchée et si elle n’est
pas verrouillée par la
bague, il n’est pas possible d’effectuer un
déclenchement correct.
Le velcro situé derrière la poignée, s’il est ramené par-dessus
celle-ci et serré, limite le risque de déclenchement intempestif
du système (exemple : lors d’une bousculade). Avant de quitter
une zone sécurisée, il est donc impératif d’enlever le velcro
et de le passer derrière la poignée, afin de ne pas gêner le
déclenchement en cas de besoin.
Attention ! Ne branchez jamais la poignée de déclenchement si la
bouteille de remplissage n’est pas correctement vissée et remplie.
Si vous déclenchez la poignée avec une bouteille vide ou sans
avoir vissé de bouteille, vous endommagez le système. L’ABS n’est
alors plus en état de fonctionner correctement et le piston doit être
changé. Contactez alors votre service clientèle (voir section 12.5).
Lorsque vous avez effectué les étapes 1 à 5, votre ABS est prêt
à fonctionner. Mais nous vous conseillons de lire la suite du
manuel avant d’effectuer le déclenchement de prise en main.
Nous conseillons de débrancher la poignée dans les situations
où un déclenchement involontaire provoqué par vous-même,
une autre personne ou un objet quelconque, est susceptible de
se produire, comme par exemple sur le télésiège, dans le téléférique, l’hélicoptère, le bus, la rue, etc.
43
Pour la poignée de déclenchement à distance (Wireless Activation), reportez-vous au manuel spécifique.
Français
Etape 7
Etape 8
Réglage en hauteur de la poignée de déclenchement
Débrancher la poignée
Une fois le sac mis sur le dos, vérifiez si la poignée se trouve à
une hauteur vous permettant de l’attraper facilement. La bonne
position de la poignée se trouve entre la poitrine et l’épaule. Pour
régler la hauteur, ouvrez le velcro de la patte de fixation, sortez-le
du passant de la bretelle, déplacez la patte de fixation vers un
autre passant, enfilez le velcro dans le nouveau passant et
refermez-le. Si le Velcro n’est pas enfilé dans le passant, la
patte n’est pas verrouillée.
Une force d’environ 8 kg (80 N) est nécessaire pour déclencher le
système. Les airbags se gonflent instantanément (2 à 3 secondes).
Pliage des airbags
Le degré de remplissage des
airbags peut varier légèrement selon la température
extérieure et l’altitude. Cependant, il ne doit pas y avoir de
perte de volume perceptible
dans les premières minutes.
Pour débrancher la poignée, poussez la bague de verrouillage
vers le haut. La poignée tombe automatiquement. Ne tirez pas
sur la poignée. Si celle-ci est
chargée, cela pourrait provoquer le déclenchement. Si
une poignée chargée ne sort
pas automatiquement, allez
à la section 12.1.
En zone sécurisée, enlevez
toujours la poignée et rangezla dans la poche de la ceinture
ventrale.
44
Etape 9
Etape 10
Mettre ensuite en place le filet de protection sur la valve de
remplissage et de purge.
Déclenchement
Pour avoir 100 % confiance dans le système ABS et afin d'apprendre le fonctionnement dans des conditions aussi proches
que possible de la réalité, il est fortement recommendé de tester
une fois le déclenchement de l'ABS.
Vous pouvez ainsi vous familiariser avec le déclenchement du
système ABS. Afin d’éviter tout dommage, veillez à ce qu’une
distance suffisante (environ 1 mètre) soit maintenue entre vous
et des objets ou des personnes, lorsque vous effectuez le déclenchement de prise en main. Tirez vigoureusement sur la poignée.
Français
Attention ! Un mauvais
pliage peut gêner le gonflage
des airbags, provoquer des
disfonctionnements ou
endommager le sac.
1
Pliez les airbags en suivant les
instructions ci-dessous.
Dégonflage des airbags
Veillez à ce que la poignée de déclenchement ne soit pas
recouverte par des parties de vêtement et puisse être atteinte
sans entrave.
Pour les gauchers, la poignée de déclenchement peut être
installée sur la bretelle droite. Cependant, une patte de fixation
inversée est nécessaire. Pour cela, contactez votre service
clientèle (voir section 12.5).
Etape 11
Soulevez ensuite le cache de
protection rouge et appuyez sur
le bouton de purge qui se situe
au centre de la valve de remplissage et de purge de couleur
noire. Dans le même temps,
exercez une pression sur
l’airbag, jusqu’à ce que celui-ci
soit totalement dégonflé. Rattachez le filet de protection.
1. Disposez les airbags à plat
de manière à ce que la valve
de remplissage et de purge soit
face au sol. La face lisse de
l’airbag doit être orientée vers
le haut.
2. Repliez la partie supérieure
de l’airbag à la hauteur de la
poche airbag.
45
2
3. Repliez ensuite la partie
inférieure de l’airbag. La
largeur de l’airbag doit être
égale à celle de la poche
airbag.
3
Français
4. Repliez l’airbag en 3 en
direction du sac à dos de sorte
que l’airbag puisse se déployer
librement. (La taille de chaque
pli doit correspondre environ à
la largeur d’une main.)
4
5. Rangez l’airbag dans la
poche airbag latérale. La valve
Venturi doit être visible sur
l’airbag.
Etape 12
5. Utilisation en cas d’avalanche
5.3 Après l’arrêt de l’avalanche
Changer la bouteille et la poignée de déclenchement.
5.1 Déclenchement
La bouteille et la poignée doivent être changées après chaque
déclenchement. Répétez les étapes 1, 2, 4 et 5. Votre ABS est
de nouveau prêt à l’emploi.
Déclenchez sans hésitation dès que vous êtes confronté à une
avalanche, quelle que soit sa taille. Gardez en mémoire que
mieux vaut déclencher l’ABS une fois de trop qu’une fois trop
peu.
Placez-vous en lieu sûr. Essayez d’aider d’autres personnes si
vous en avez la possibilité. Si un danger d’avalanche persiste à
l’endroit où vous vous trouvez, gardez les ballons gonflés. Ne
quittez votre ABS et ne videz les airbags que si vous êtes hors
de portée d’une avalanche.
Maintenant que vous avez effectué le déclenchement de prise
en main, vous pouvez remplir le formulaire de prolongation
de garantie en ligne à l'adresse http://abs-airbag.de/fr/services/
carte-de-garantie/
4.2 A chaque sortie
46
5
6. Fermez le velcro de la
poche airbag de bas en
haut en exerçant une pression
suffisante. Répétez les
différentes phases pour l’autre
airbag.
Effectuez les étapes 1 – 6 de la section prise en main:
1 Contrôler le remplissage de la bouteille
2 Visser et serrer la bouteille
3 Ajuster le système de portage
4 Contrôler la poignée de déclenchement
5 Brancher la poignée
6 Velcro de sécurité
4.3 A la fin de la sortie
Effectuez l’étape 8 (Débrancher la poignée) de la section prise
en main. La bouteille peut rester vissée en permanence.
6
Français
5.4 Questionnaire de témoignage
Pour déclencher, tirez vigoureusement sur la poignée et puis
essayez de vous échapper de l’avalanche. Les airbags se gonflent automatiquement, que vous soyez debout ou couché
(même sur l’airbag), déjà pris dans l’avalanche ou non. Les airbags gonflés ne vous entraveront nullement dans vos tentatives
de fuite.
5.2 Comportement dans l’avalanche
Une fois l’ABS déclenché, concentrez-vous sur votre chute. En
règle générale, les airbags vous empêchent de plonger profondément dans la masse neigeuse, ce qui vous permet d'utiliser pleinement vos mains. Battez-vous en effectuant des mouvements
de natation, repoussez tout obstacle, essayez de vous stabiliser
et de vous protéger la tête. La forme des airbags vous procure
une protection supplémentaire de la tête sans gêner votre vue et
vos mouvements. Essayez de vous débarrasser des skis par des
mouvements de torsion. Il est conseillé de ne pas utiliser les
dragonnes des bâtons et les liches de sécurité des skis. Gardez
la bouche fermée. Dans la phase finale de l’avalanche, essayez
d’avoir le haut du corps et surtout les bras à la surface, pour
pouvoir sortir le plus vite possible de la masse neigeuse.
Nous vous serions gré de nous informer si vous avez eu connaissance d’une utilisation d’un ABS en avalanche. Les compte-rendus des utilisations de l’ABS en avalanche sont essentiels pour
des développements futurs du système. Vous pouvez vous procurer le questionnaire de témoignage sur le site Internet d’ABS
(http://abs-airbag.de/fr/avalanche/questionnaire-accidentsavalanche/). Renvoyez le questionnaire rempli et signé à l’organisme de surveillance des avalanches compétent dans votre
région, à votre centre S.A.V. ou à L’Institut Fédéral pour l’Étude
de la Neige et des Avalanches à Davos (SLF) .
6. Fonctions et efficacité de l’ABS
L’ABS est un appareil dont le fonctionnement repose sur de
longues années d’expérience dans l’étude des avalanches, le
sauvetage et les statistiques d’efficacité. L’idée à la base du
système est le fait que de nombreuses victimes d’avalanche sont
encore vivantes lorsque l’avalanche s’arrête. Mais la plupart de
ces victimes sont ensevelies, ne peuvent pas se dégager et ne
sont pas visibles pour les personnes participant aux recherches.
A partir de ce moment commence une course contre la mort car
une personne totalement ensevelie avec les voies respiratoires
Français
47
bouchées meurt après quelques minutes. Pour une profondeur
d’ensevelissement de 1 mètre, le temps pour creuser et dégager
la victime est souvent plus long que le temps moyen de survie
sous la neige. L’objectif principal est donc d’éviter l’ensevelissement total de la victime. Une avalanche coulante agit comme
une matière granuleuse en mouvement composée de particules
dissociées de tailles différentes.
48
Les substances granuleuses en mouvement ont tendance à se
dissocier, de telle
sorte que les particules les plus volumineuses se retrouvent plutôt à la
surface, alors que
les plus petites sont
plutôt localisées
dans les couches
inférieures du flux.
L’ABS se base sur ce phénomène de triage, appelé la « ségrégation inverse ». Une simple action sur la poignée de déclenchement permet, en quelques secondes, d’ajouter un volume idéal
de 170L au volume corporel, ramenant la personne à la surface.
La forme des airbags et leur mode de fixation contribuent aussi à
ce phénomène. Des airbags d’un grand volume, souples et fixés
proches du corps transforment les forces descendantes en forces ascendantes. L’ABS a déjà empêché l’ensevelissement pour
des centaines de pratiquants de sports de neige, et beaucoup
d’entre eux lui doivent la vie.
7. Entretien
7.1 Vérification personnelle
Le système airbags ABS nécessite peu d’entretien. Vérifiez
toutefois régulièrement les points suivants :
• Dépliez les airbags une fois par an. Nous vous conseillons
aussi de faire un déclenchement d’exercice au début de chaque saison. Afin de bénéficier de conditions plus réalistes,
vous pouvez effectuer ce déclenchement dans la neige, mais
en zone sécurisée.
• Vérifiez la valve Venturi en poussant plusieurs fois sur le
bouton de purge rouge. Celui-ci doit revenir à sa position
initiale sans difficulté.
• Contrôlez régulièrement l’état des bretelles, des sangles, des
poches airbags et des zips.
• Vérifiez qu’il n’y ait pas de saleté dans l’unité de perçage où
vous vissez la bouteille.
• La poignée de déclenchement doit toujours rentrer facilement
dans la prise rapide. Dans le cas contraire, versez une goutte
d’huile ABS dans la prise rapide. Vous pouvez également
effectuer cette opération à titre préventif. Un tube d’huile ABS
est fourni avec le sac. Vous pouvez en recommander en vous
adressant à votre service clientèle ABS (voir section 12.5).
• Vérifiez avant l’usage de votre ABS que la bouteille soit bien
vissée jusqu’à la butée.
Dès lors, nous vous conseillons de renvoyer le sac et son unité
de déclenchement à votre service clientèle ABS pour une
vérification approfondie. Merci de joindre le questionnaire de
témoignage rempli (voir section 5.4) ou de l'envoyer au SLF à
Davos.
Exceptionnellement, si vous n'avez pas la possibilité de renvoyer
votre ABS immédiatement, vérifiez:
– visuellement si des trous ou des traces d’abrasion sont
presents sur l’airbag
– la présence éventuelle de déchirures au niveau des boucles
d’attache des airbags
– la présence éventuelle de déchirures au niveau des coutures
des sangles ventrale et pectorale et des bretelles
– la présence éventuelle de fissures ou de déformations sur
toutes les boucles (boucles de réglage des bretelles, boucles
des sangles ventrale, pectorale et soucutale).
Si vous constatez des problèmes ou si vous avez des doutes, ne
l'utilisez plus. Dans tous les cas, vous devrez le renvoyer à votre
service clientèle (voir section 12.5) pour vérification.
7.3 Service après vente
7.2 Vérification après utilisation en avalanche
Après 3 saisons, une révision générale de la part du fabricant est
conseillée. L’ABS accompagné de son unité de déclenchement
(bouteille et poignée) peut être ramené chez le distributeur ou
votre revendeur. Ce service à la clientèle est payant.
Dans toute utilisation du système en avalanche, le matériel peut
avoir été soumis des forces à la limite de sa résistance. Il arrive
que les dégâts ne soient pas visibles.
Vous trouverez les coordonnées des sociétés responsables du
service clientèle de chaque pays respectif sur la page Internet
http://abs-airbag.de/fr/meta/contact/
Français
8. Composants et description du produit
8.1 Airbags
Chacun des deux airbags a un volume de 85 litres à l’état gonflé.
Ils se remplissent en même temps mais ont une valve de fermeture séparée. Si un des deux airbags est endommagé, l’autre
maintient suffisamment longtemps le mélange gazeux qu’il contient. La pression intérieure à la fin du gonflage est d’environ 0,1 bar.
8.2 Valve Venturi de remplissage et de purge
Cette pièce est directement fixée sur l’airbag. Au milieu de la
valve Venturi se trouve le bouton de purge rouge. Un capuchon
en plastique rouge le protège des pressions extérieures. Le filet
de protection recouvrant la valve de remplissage et de purge
empêche la pénétration de la neige lors du gonflage de l’airbag.
Les filets endommagés peuvent être remplacés à tout moment.
8.3 Unité de perçage
L’unité de perçage, dans laquelle la bouteille est vissée, se situe
dans une poche dans le haut du sac. Veillez à la propreté de
cette poche et évitez d’y laisser des objets quelconques. Nous
conseillons de garder la bouteille vissée et la poche fermée en
permanence.
Une bouteille de remplissage peut être vissée ou dévissée à tout
moment. La bouteille ne peut s'ouvrir que par une traction sur la
poignée de déclenchement branchée.
Français
49
8.4 Poignée de déclenchement
La poignée de déclenchement contient une balle à blanc. En
branchant la poignée dans la prise rapide qui se situe sur la
bretelle du sac et en l’actionnant, vous libérez la balle. La pression de l’explosion passe par le tuyau pressurisé jusqu’à l’unité de
perçage. L’aiguille du piston perce la bouteille. Le gaz contenu
dans la bouteille s’échappe et passe par les tuyaux pneumatiques qui mènent aux airbags. Les airbags se gonflent avec le gaz
provenant de la bouteille et avec de l’air extérieur aspiré par la
valve Venturi. La durée du gonflage est d’environ 2 – 3 secondes.
Il est conseillé d’enlever la poignée de déclenchement avant de
prendre une remontée mécanique.
Pour la poignée de déclenchement à distance (Wireless Activation), reportez-vous au manuel spécifique.
50
8.5 Bouteille de remplissage
La bouteille est remplie avec un gaz inoffensif et ininflammable,
identique à celui contenu dans l'air. La pression interne est de
300 bars pour les bouteilles en acier et de 340 bars pour les
bouteille en carbone. La bouteille ne peut être percée que dans
l'unité de perçage ABS. En dehors, toute manipulation du goulot
ou de la bouteille elle-même pourrait provoquer une explosion. Il
existerait un danger de blessure ou de mort, aussi pour autrui.
Les températures acceptables pour son utilisation vont de -40° C
à +50°C. Les bouteilles vides ne peuvent être remplies que par
ABS. Les échanges standards de bouteille ne sont possibles
que chez un revendeur ABS. Evitez de l’exposer à des charges
mécaniques (marteau, pince, chute, etc.).
N'opérez pas sur la bouteille de manipulations non prévues
par ce manuel.
Les bouteilles répondent aux normes suivantes :
– bouteilles en acier Europe : directive EG
– bouteilles en acier Amérique du Nord : certifié DOC et TC
– bouteilles en carbone : directive EG
8.6 Système de portage
Les systèmes de portage autorisés à recevoir le système ABS sont
reconnaissables à la présence du logo ABS. L’harnachement
est conforme aux normes TÜV, conçues pour des contraintes à
l’arrachement extrêmes, allant jusqu’à 3000 N. Pour que le
système de portage de l’ABS reste solidaire de son utilisateur en
cas d’avalanche, il est indispensable de verrouiller les 3 points
d’attaches (ventrale, pectorale et soucutale). Dans le cas
contraire, la perte du sac peut être envisageable.
9. Maintenance, stockage et nettoyage
Contrôlez après chaque utilisation si la bouteille est correctement
vissée et si son poids est conforme à celui indiqué sur l’étiquette
adhésive (voir étapes 1 et 2 de la prise en main). Nous conseillons de laisser la bouteille vissée en permanence, sauf pour la
vérification de son poids.
La bouteille non montée sur le système doit toujours être munie
de son bouchon de sécurité. L’ABS doit être stocké dans un
endroit sec et à l’abri des rongeurs. Veillez également à le tenir
hors de portée des enfants.
Français
Si le sac ABS ou les airbags sont sales, n’utilisez que de l’eau
savonneuse pour les nettoyer. N’utilisez en aucun cas des produits de nettoyage agressifs, comme par exemple de l’acide ou
des détergents. Evitez de mettre la valve Venturi en contact avec
l’eau ou un autre liquide.
Attention: après le rinçage, laissez sécher complètement le
système avant de le réutiliser afin qu’il ne gèle pas au contact
du froid.
10. Transport
Le transport de l’ABS en avion est autorisé. Selon l'IATA (International Air Transport Association), le transport de la bouteille et de
la poignée de déclenchement dans les avions est soumis à une
réglementation, fait l’objet d’une déclaration préalable, 14 jours
avant l’enregistrement, et d'une inscription dans la réservation.
Une norme a été adoptée sous la dénomination " Avalanche
Rescue Back packs " (référence: IATA-DGR. Tab. 2.3.A.).Vous
n’avez le droit d’emporter qu'une unité de déclenchement par
sac à dos ABS, et la poignée ne doit pas être branchée.
Pour tout transport du sac ABS muni de sa bouteille, veillez à
ce que la poignée de déclenchement soit débranchée.
Des conseils et des informations courant sur le transport des
bouteilles ABS sont à l’adresse suivante : http://abs-airbag.de/
fr/services/ abs-en-avion/
11. Durée de vie
La durée de vie de l’ABS dépend de l’intensité et de la qualité de
son utilisation. La plupart du temps, le système de portage s’use
plus vite que le système ABS proprement dit. Le système ABS
peut être récupéré et remonté dans un nouveau sac ABS. Cette
opération ne peut être effectuée que par le fabricant.
Si des dégâts sont constatés sur le systéme de portage ou les
airbags, contactez votre service clientèle. Nous recommandons
une révision complète de votre ABS tous les 3 ans, effectuée
par le fabricant. Utilisé convenablement, à un rythme de 50 jours
par saison, le système ABS (pas le sac) peut durer 10 ans. Un
déclenchement contrôle du système tous les ans est conseillé.
Munissez-vous de l’extrait de la réglementation IATA concernant
le transport des matières dangereuses en avion pour effectuer
l’enregistrement (sac, bouteille et poignée). Il est disponible en
téléchargement sur le site Internet d’ABS (http://abs-airbag.de/fr/
services/abs-en-avion/).
Quand vous voyagez aux États Unis, retrouvez les derniers
conseils sur http://abs-airbag.de/fr/services/abs-en-avion/
Français
51
12. Informations supplémentaires
Description du problème
Dépannage
Description du problème
Dépannage
12.3 Données techniques
12.1 Guide de dépannage
Je ne peux pas
débrancher la poignée
de déclenchement
chargée.
– N’enlevez pas la bouteille et
ne tirez pas sur la poignée.
– Relevez la bague de verrouillage sans forcer sur la butée
et faites de légers mouvements latéraux avec la poignée.
– Si la poignée ne sort toujours
pas, appliquez une goutte
d’huile ABS sur la tige de
la poignée et orientez la tige
vers le bas pour faire pénétrer
l’huile. Faites tournez la
poignée sur elle-même.
Lubrifiez comme au point 2.
– Si le problème persiste, contactez votre service clientèle
(voir section 12.5).
Les airbags sortent
difficilement des poches
et ne se gonflent pas
complètement
– Si vous n’êtes pas certain des
deux premiers points, effectuez un déclenchement de contrôle. Si le problème persiste
renvoyez le sac au service
clientèle pour vérification.
Après le gonflage des
airbags, un sifflement
persiste.
– Ce sifflement peut être dû à
un équilibrage de pression
entre les deux ballons qui ne
doit plus être perceptible
après quelques minutes. Il ne
doit pas y avoir de perte de
volume substantielle.
– Si il y a une perte de volume
visible dans les premières
minutes, l’airbag doit être
vérifié par votre service
clientèle (voir section 12.5).
2 x 85 litres
1200g
Polyamide 6.6
Déclenchement pyrotechnique
dans la poignée
Mode de remplissage: Dans la première seconde, environ 90
litres d’un mélange air-azote entrent dans
les airbags. Les 80 litres restants entrent
dans les airbags dans la seconde et demi
qui suit (ce volume complémentaire varie
faiblement suivant la température et
l’altitude).
Bouteille:
Les bouteilles sont faites de matériaux
de haute qualité, et sont conçues pour
résister à une pression interne supérieure
à 300 bars. Elles répondent à la directive
EG pour l'Europe et aux réglementations
DOC / TC pour l'Amérique du Nord. La
bouteille est rechargeable exclusivement
chez ABS.
Système de portage: Répond aux normes TÜV, conçu pour
résister à des arrachements jusqu’à
3000N.
Températures de
de -40°C à +50°C
fonctionnement:
Description du problème
Dépannage
J’ai déclenché la poignée
sans bouteille ou avec
une bouteille vide.
– L’impulsion a endommagé le
mécanisme de perçage, qui
n’est plus fonctionnel et doit
être réparé.
– Contactez votre service
clientèle (voir section 12.5).
Je ne peux pas brancher
la poignée de
déclenchement.
52
– N’utilisez jamais la force pour
mettre la poignée.
– Si vous avez votre tube d’huile
ABS, versez une goutte dans
l’orifice de la prise rapide.
Relevez la bague de verrouillage. Branchez et débranchez
la poignée plusieurs fois.
– Si le problème persiste,
contactez votre service
clientèle (voir section 12.5).
– Si vous êtes en montagne sans
huile à disposition, maintenez
la bague de verrouillage relevée, poussez la poignée dans
la prise rapide et verrouillez en
rabaissant la bague. Au retour,
effectuez la manoeuvre de
lubrification.
Les airbags sortent
difficilement des poches
et ne se gonflent pas
complètement
Français
– Les airbags étaient-ils bien
pliés ?
– La bouteille était-elle bien
remplie et avait-elle le bon
poids ?
– Si c’était le cas, renvoyez le
sac à votre service clientèle
pour vérification (voir section
12.5).
12.2 Garantie
Pour prolonger la garantie juridique de 2 à 4 ans, remplissez
entièrement dans les 30 jours après l'achat, le formulaire en
ligne à l'adresse http://abs-airbag.de/fr/services/carte-de-garantie/. Vous devez avoir effectué le déclenchement de prise en
main conformément aux étapes 1 – 12 décrites dans le manuel
d'utilisation.
Volume des airbags:
Poids du système:
Matériau de l’airbag:
Déclenchement:
Français
53
12.4 Homologation / Conformité
12.5 Service clientèle
Indice
Fabricant : ABS Peter Aschauer GmbH
Pays de fabrication : Allemagne
Les coordonnées des services clientèle respectifs pour chaque
pays se trouvent sur le site internet http://abs-airbag.de/fr/meta/
contact/
1. Benvenuti
2. Segnalazioni di pericolo ed utilizzo corretto . . . . . . . . 57
Type : ABS-Avalanche Airbag System
54
. . . . . . . . . . . . . . . . . . . . . . . . . . . . . . . . . 56
En ce qui concerne les matériaux utilisés et la méthode de fabrication de l’ABS – Avalanche Airbag System, des directives ont
été mises en place, sur base d’exigences de produits similaires.
Ces données constituent le cahier des charges qui a été rédigé
par le TÜV-Sud Produktservice GmbH, pour les tests effectués
sur les matériaux et le fonctionnement dans le cadre des GS-Zeichen-Prüfung (Test sécurité), d’après les directives PSA 89/686
EWG et les directives CE. Malgré tout, il peut y avoir dans les
avalanches des forces et des situations qui dépassent ces exigences. Pour cette raison, nous vous faisons remarquer que
le système ABS dans son ensemble et chaque élément individuel
(matériau de l’airbag, matériau d’harnachement, sac à dos, etc.)
ne peuvent pas résister à toutes les forces potentielles dans une
avalanche.
3. Descrizione dell'apparecchio e volume di fornitura . . .58
TÜV-Süd Produktservice GmbH, Ridlerstr. 65,
D-80339 München, Prüfstellennummer 0123.
4. Messa in opera
4.1. Prima messa in opera e prove d'esercizio . . 58 – 64
4.2. Prima di ogni escursione e/o uso . . . . . . . . . . . . 64
4.3. Al termine dell'escursione . . . . . . . . . . . . . . . . . . 64
9. Stoccaggio e pulizia . . . . . . . . . . . . . . . . . . . . . . . . . . 68
5. Uso in caso di valanghe
5.1. Sgancio . . . . . . . . . . . . . . . . . . . . . . . . . . . . . . . 65
5.2. Comportamento in valanga . . . . . . . . . . . . . . . . . 65
5.3. A valanga terminata . . . . . . . . . . . . . . . . . . . . . . 65
5.4. Questionario per il rilevamento
di incidenti in valanga . . . . . . . . . . . . . . . . . . . . 65
11. Durata d'impiego . . . . . . . . . . . . . . . . . . . . . . . . . . . 69
6. ABS Funzione e modo d'azione . . . . . . . . . . . . . 65 – 66
La société ABS Peter Aschauer GmbH a obtenu la certification
ISO 9001:2000.
8. Componenti dell'apparecchio
8.1. Airbags . . . . . . . . . . . . . . . . . . . . . . . . . . . . . . . . 67
8.2. Unità di riempimento e scarico . . . . . . . . . . . . . . 67
8.3. Unità d'innesto . . . . . . . . . . . . . . . . . . . . . . . . . . 67
8.4. Maniglia di sgancio . . . . . . . . . . . . . . . . . . . . . . . 68
8.5. Cartucce . . . . . . . . . . . . . . . . . . . . . . . . . . . . . . 68
8.6. Sistema d'imbragatura . . . . . . . . . . . . . . . . . . . . 68
10. Trasporto . . . . . . . . . . . . . . . . . . . . . . . . . . . . . . . . . 69
12. Informazioni supplementari
12.1. Diagnostica e rimozione dell'errore . . . . . . 70 – 71
12.2. Garanzia . . . . . . . . . . . . . . . . . . . . . . . . . . . . . . 71
12.3. Dati tecnici . . . . . . . . . . . . . . . . . . . . . . . . . . . . 71
12.4. Immatricolazione / Conformità . . . . . . . . . . . . . 72
12.5. Centri di assistenza . . . . . . . . . . . . . . . . . . . . . 72
7. Manutenzione
7.1. Autoverifica . . . . . . . . . . . . . . . . . . . . . . . . . . . . 66
7.2. Controllo dopo l'uso pratico in valanga . . . . 66 – 67
7.3. Servizio assistenza clienti . . . . . . . . . . . . . . . . . . 67
Le système ABS est de fabrication allemande.
Français
Italiano
55
1. Benvenuti
Ci congratuliamo con voi per aver acquistato un sistema airbag
da valanga ABS.
In questo manuale si illustrano il funzionamento e l’utilizzo del
sistema airbag da valanga ABS, ideato soprattutto per tutti quegli
sciatori che praticano sci fuoripista.
Leggete attentamente le istruzioni per l’uso prima di utilizzare
l’apparecchio. Leggete anche attentamente e attenetevi a quanto
contenuto nel capitolo Segnalazioni di pericolo. Riponete le
istruzioni per l’uso in modo che siano sempre a portata di mano
e consegnatele ad un eventuale ulteriore usufruitore dell’apparecchio.
56
Se alcuni passaggi delle istruzioni per l’uso sono
contrassegnati da questo simbolo, significa che si
possono correre pericoli anche mortali se non ci si
attiene a quanto indicato.
Il sistema airbag da valanga ABS è un equipaggiamento di salvataggio che, soddisfatti determinati presupposti, può evitare che la
persona venga seppellita completamente. Il sistema non può
però evitare che una valanga o dei lastroni di neve vi investano.
Indipendentemente dal tipo di equipaggiamento, la caduta di
una valanga rappresenta sempre un pericolo mortale. Vi invitiamo pertanto ad evitate qualsiasi rischio eccessivo anche se siete
equipaggiati con l'airbag da valanga ABS.
Per la funzionalità dell’airbag da valanga ABS è necessaria
un’unità di sgancio (cartuccia e maniglia). Ogni sistema ABS
viene testato prima della consegna. La situazione estrema
rappresentata da una valanga richiede particolare dimestichezza
con il sistema ABS. Un azionamento di prova per l’addestramento personale è pertanto vivamente raccomandato da ABS.
Prima dell’utilizzo leggete attentamente le istruzioni per l’uso
ed eseguite poi uno sgancio di prova. Compilate il modulo di
garanzia online (http://abs-airbag.de/it/assistenza/certificato-digaranzia/). Il Vs. diritto alla garanzia si prolunga così ai 4 anni.
Non attaccate mai la maniglia di sgancio al sistema ABS prima
di aver inserito la cartuccia carica! Dopo ogni uso degli airbag
sostituire sempre la maniglia e la cartuccia! Il sistema è di
nuovo pronto per l’uso solo dopo che si sono sostituiti entrambi
questi dispositivi. In caso di non impiego togliere sempre la
maniglia di sgancio!
Utilizzate il sistema airbag da valanga ABS sempre e solo in
combinazione con l’apparecchio di ricerca sepolti in valanga
(A.R.VA), la pala e la sonda.
Il sistema ABS è “made in Germany”.
Italiano
2. Segnalazioni di pericolo e di funzionamento corretto
L’airbag da valanga ABS non evita la caduta di valanghe!
La caduta di qualsiasi valanga significa sempre un pericolo
mortale, indipendentemente dall’uso o meno dell’airbag da
valanga ABS.
Non dovete assolutamente aumentare i rischi a cui andare
incontro solo perché siete equipaggiati con l’airbag da valanga
ABS.
Il sistema ABS è stato progettato solo per evitare che lo sciatore venga completamente sotterrato delle valanghe. Si possono
però presentare situazioni che non permettono, o che permettono solo parzialmente, questa funzione di salvataggio.
Il sistema ABS deve venire sganciato attivamente. È pertanto
necessario esercitare l'azionamento degli airbag, in modo
da poter reagire prontamente in caso di pericolo reale. Per
la sicurezza personale si consiglia pertanto di controllare
l’innesco del sistema prima di ogni inizio stagione.
Il sistema ABS deve essere utilizzato con cura e ne deve
essere verificata con attenzione la funzionalità prima di ogni
impiego.
La maniglia di sgancio e la cartuccia sono ricaricabili.
Agganciate la maniglia solo dopo aver inserito una cartuccia
carica. Se provate ad azionare il sistema senza aver prima
inserito la cartuccia o quando la cartuccia è scarica, lo danneggiate, ne pregiudicate il funzionamento e siete poi costretti
a farlo riparare.
Se è chiaramente visibile la fascetta rossa applicata sul perno
della maniglia, significa che la maniglia non è in posizione di
carica e non è quindi in grado di funzionare!
Non utilizzate mai maniglie danneggiate, perché il sistema
potrebbe scoppiare al suo azionamento!
Non cercate di staccare il perno della maniglia dalla bussola
di innesto collocata sul portazaino, perché vi potreste ferire!
Fare attenzione alla data di scadenza della maniglia di sgancio.
Evitate assolutamente che il perno della maniglia si sporchi.
In presenza di sporco non cercate di pulirlo, provvedete
invece alla sua sostituzione.
Utilizzare esclusivamente cartucce, cariche, accessori e pezzi
di ricambio originali ABS.
Inserire la cartuccia avvitandola completamente. Se la cartuccia dovesse però fare resistenza o se non si lascia avvitare fino
in fondo, evitarne l’utilizzo!
Quando la cartuccia è carica non deve essere appoggiata su
una base calda (forni, vetro posteriore dell’auto, ecc.), non
lanciarla per aria e non sottoporla a sforzi meccanici, perché
potrebbe esplodere! Temperatura max. sopportata: 50°C.
Porre attenzione affinchè gli airbags possano venire aperti
agevolmente, e che il contenuto degli zaini, o oggetti ad essi
agganciati non danneggino gli airbags stessi. Ciò vale soprattutto per picconi, bastoni, sci ecc.
Ripiegate gli airbag come descritto nelle istruzioni per l’uso.
Se non li ripiegate a regola d’arte possono ostacolarvi nei
movimenti, potrebbero non funzionare correttamente oppure
danneggiare lo zaino!
Custodite sempre la maniglia e la cartuccia fuori dalla portata
dei bambini.
Fate attenzione a non mettere in pericolo altre persone
quando vi esercitate nell’azionamento degli airbag.
Raccomandiamo di togliere la maniglia di sgancio in luoghi
dove uno sgancio involontario potrebbe recare danni alla
vostra o all'altrui persona, ad esempio in seggiovia, cabinovia,
elicottero, autobus, treno ecc.
Italiano
57
3. Descrizione apparecchio e volume di fornitura
Aprite per favore la pagina con le foto
1) Unità d'innesto
2) Airbag
3) Tasche dell' airbag
4) Unità di riempimento e di scarico
5) Valvola di scarico
4. Messa in opera
Punto 2
Punto 3
4.1 Prima messa in opera e sgancio di prova
Avvitate la cartuccia
Indossare l'airbag
L'attitudine personale dell'utente e la massima attenzione usata
nella messa in opera sono decisivi per il funzionamento dell'airbag da valanga ABS. La messa in opera stessa non è complicata,
deve però essere eseguita con cura seguendo i passi sottodescritti:
Prima dell'avvitamento della cartuccia controllate che l'unità
d'innesto / perno sia internamente pulita. Il perno deve essere
visibile nella sua parte centrale. Avvitate quindi fortemente la
cartuccia carica fino all'arresto. Non deve essere possibile un
ulteriore giro d'avvitamento.
Indossate lo zaino. Regolate sullo spallaccio i nastri con fibbia in
base alla propria altezza. Chiudete sempre molto bene le cinture
collocate su petto, fianchi e sottogambe e regolarle in base alla
propria altezza.
Punto 1
58
6) Cappuccio protettivo
7) Bussola di innesto per maniglia di sgancio
8) Sede della maniglia
9) Cintura pettorale
10) Cintura a vita
11) Cintura inguinale
Controllate il grado di riempimento della cartuccia
Assicuratevi prima di ogni
uso dell'airbag che la
cartuccia sia ben avvitata.
Per alleggerire le spalle, adattare le cinture in modo tale che il
maggior peso dello zaino sia posto sui fianchi.
Le cinture sono conformi ai
severi requisiti richiesti dal
TÜV tedesco per condizioni
estreme. La resistenza a trazione per tutte le cinture è di
3.000 N.
Controllate il peso del contenuto della cartuccia – senza cappuccio protettivo – prima di ogni uso. I dati relativi al peso sono indicati sul fondo della cartuccia stessa. Valore di tolleranza +/- 5
grammi. Fatevi cambiare gratuitamente la cartuccia dal Vs.
rivenditore se il peso devia dallo scarto di tolleranza.
12) Cartuccia
13) Cappuccio protettivo
479,8 gr
08/12
14) Perno della maniglia
15) Punta del perno
Una cartuccia perfettamente
piena è premessa assoluta
per il funzionamento
dell'ABS.
Il sistema ABS è d'aiuto in una
situazione d'emergenza solo se
le cinture di salvataggio aderiscono bene al corpo!
La stessa deve lasciarsi avvitare facilmente fino all'arresto. Fate
attenzione che essa non venga inserita di sbieco. Se durante
l'avvitamento si notano particolari resistenze o se la cartuccia
si lascia avvitare con difficoltà, non va usata! Il Vs. rivenditore
provvederà al ricambio gratis.
Raccomandazione: Indossate lo zaino prima di fissare la maniglia di sgancio. Si evita così un'involontario disinnesto.
Italiano
Italiano
59
Punto 4
L’anno di scadenza è indicato sul cappuccio colorato. Il mese di
scadenza è maggio del relativo anno.
Controllate la maniglia di sgancio
La maniglia di sgancio è dotata di una piccola capsula
pressurizzata che contiene 0,19 grammi di materiale esplosivo e
può essere attivata solo una volta. Tirando la maniglia di sgancio,
la capsula esplode. La pressione che di conseguenza si forma
fora la cartuccia e gonfia gli airbags.
La sicurezza del funzionamento della capsula pressurizzata è
limitata nel tempo. Perciò raccomandiamo di non tenere per più
di tre stagioni invernali maniglie di sgancio cariche ed inutilizzate.
60
Le maniglie di sgancio inutilizzate e scadute possono venire
sostituite a proprie spese.
Il perno della maniglia deve essere ben fisso e la fascetta
rossa non deve essere visibile.Se essa è visibile, significa che
la maniglia non è carica e quindi non è funzionante!
Non usate maniglie difettose, pericolo di scoppio!
Non tentate di estrarre
il perno dalla bussola
d'innesto – pericolo di
lesioni!
La durata di funzione massima viene segnalata dal perno di
metallo che si trova nell'apertura laterale della maniglia di sgancio. A partire dall’inverno 2010, l’apertura laterale della maniglia
di sgancio sarà coperta da un cappuccio rosso. Sul cappuccio
è indicato l’anno di scadenza. Il mese di scadenza è sempre
maggio dell’anno indicato. Vanno assolutamente rispettate le
seguenti date di scadenza:
Proteggete la maniglia da
sporcizia. Tenete la maniglia
lontano dalla portata dei
bambini.
perni di metallo di colore dorato
Data di scadenza maggio 2013
perni di metallo di colore nero
Data di scadenza maggio 2012
Per la maniglia di sgancio telecomandata (Wireless Activation)
osservare le istruzioni d’uso separate.
perni di metallo di colore argento
Data di scadenza maggio 2010
Punto 5
Punto 6
Fissate la maniglia di sgancio
Nastro con chiusura a strappo – dispositivo di sicurezza
Per fissare la maniglia di sgancio inserite il perno per diritto nella
bussola d'innesto e spingetelo verso l'alto. Sollevate con l'altra
mano il cappuccio protettivo ed esercitate contropressione.
La bussola d'innesto si chiude automaticamente con uno scatto
all'indietro. Solo allora
la maniglia è fissata e
pronta all'uso. Se la
maniglia non si lascia
fissare, vedere al punto
12.1. Se la maniglia
non è fissata in modo
giusto ed è bloccata
dalla bussola d'innesto
scattata all'indiestro,
non è possibile uno
sgancio regolamentare.
Il nastro con chiusura a strappo serve come sicurezza della
maniglia di sgancio, per evitare sganciamenti involontari. Prima
di abbandonare la zona di sicurezza è assolutamente necessario slegare il nastro rosso con chiusura a strappo e collocarlo
dietro alla maniglia di sgancio, per non impedirne lo sgancio.
Attenzione! Fissate la maniglia solo a cartuccia completamente
piena. Lo sgancio senza cartuccia o a cartuccia vuota provoca il
danneggiamento del sistema, il pistone deve essere in questo
caso sostituito. Per ulteriori informazioni rivolgetevi al ns.servizio
Hotline Tel: +49 - (0)89 - 898 78 90.
Di regola, un nastro a strappo ben fissato impedisce lo sgancio.
Per evitare del tutto sganci involontari, raccomandiamo di
togliere la maniglia di sgancio. Ciò vale soprattutto in luoghi dove
uno sgancio involontario potrebbe recare danni alla vostra o
all'altrui persona, ad esempio in seggiovia, cabinovia, elicottero,
autobus, treno ecc.
Se tutti i passi qui elencati finora sono stati eseguiti a regola
d'arte, il sistema ABS è funzionante, consigliamo comunque
di leggere attentamente e fino in fondo le istruzioni per l'uso
prima di eseguire uno sgancio di prova.
Italiano
61
Per la maniglia di sgancio telecomandata (Wireless Activation)
osservare le istruzioni d’uso separate.
Italiano
Punto 7
Punto 8
Regolare l'altezza della maniglia di sgancio
Togliere la maniglia
Controllate, a zaino indossato, che la maniglia di sgancio sia a
comoda portata di mano; nella maggior parte dei casi lo sarà,
altrimenti regolate l'altezza del supporto. La posizione giusta della
maniglia di sgancio è tra il petto e le spalle.
La forza necessaria è di ca. 8 Kg. (80 N). Gli airbags si gonfiano
da soli in 2-3 secondi.
Piegatura degli Airbags
Attenzione! Il sibilo che si
sente viene dalla valvola di
sarico, che compensa la
pressione. Il grado di
riempimento degli airbags
può variare a seconda della
temperatura esterna e
dell'altitudine.
Per togliere la maniglia aprite il nastro e spingete verso l'alto la
bussola d'innesto. Il perno fuoriesce, senza che sia necessario
tirare.Non tirate la maniglia
carica, altrimenti il sistema si
sgancia! Se la maniglia carica
non si lascia togliere, vedere
al punto 12.1.
In caso di non impiego togliere sempre la maniglia di
sgancio e riporla nell’apposito
scomparto della cintura a vita.
62
Punto 10
Sgonfiare gli Airbags
Punto 9
Per regolarla aprire la cerniera e sfilarla, inserire la maniglia
nell'apposito occhiello di plastica, reinfilare il nastro e chiudere.
Controllate che la maniglia non venga ostacolata da indumenti
e che sia facilmente accessibile.
A richiesta, è possibile la fornitura ed il montaggio della maniglia
anche a destra, per persone mancine.
Staccate innanzitutto la rete di protezione sull’unità di scarico e
riempimento.
Sgancio di prova
Onde avere il 100% di dimestichezze con il sistema ABS consigliamo pertanto vivamente di effettuare un azionamento di prova,
per testare le modalità di funzionamento del sistema ABS nel
contesto più prossimo alla realtà.
Durante lo sgancio di prova dell'airbag, fate attenzione a che vi
sia una distanza di sicurezza tra voi e altre persone od oggetti di
ca. 1 mt., per non provocare danni. Lo sgancio si ottiene con un
forte strappo alla maniglia.
Italiano
Punto 11
Sollevate ora il cappuccio
rosso ed esercitate pressione
sulla valvola di scarico disposta al centro dell’unità di
scarico e riempimento nera.
Esercitate allo stesso tempo
una contropressione sull’airbag, fino a svuotarlo completamente. Richiudete quindi la
rete di protezione.
Attenzione! Una piegatura
impropria degli airbags ne
ostacola il funzionamento e
può condurre a danni dello
zaino!
1
Seguite pertanto le seguenti
istruzioni di piega.
1. Poggiate gli Airbag a terra,
con l’unità di scarico e riempimento rivolta verso il basso. Il
lato liscio dell’airbag è rivolto
verso l’alto.
2. Piegate la parte superiore
dell’airbag, all’altezza della
relativa tasca.
63
2
3. Piegate ora la parte inferiore
dell’airbag. La larghezza
dell’airbag deve corrispondere
a quella della tasca dell’airbag.
3
Italiano
4. Avvolgete ora l’airbag verso
lo zaino effettuando tre risvolti
dell’ampiezza di un palmo,
in modo da consentire all’
airbag di potersi nuovamente
dispiegare.
4
64
5. Spingete ora gli airbags
verso le tasche laterali qui
previste. L'unità di carico e
scarico, dopo la piegatura,
deve essere ben visibile,
sopra, come da foto.
Punto 12
5. Utilizzo in caso di valanga
5.3 A valanga terminata
Sostituzione della cartuccia e della maniglia di sgancio.
5.1 Sgancio
Dopo uno sgancio, la cartuccia e la maniglia devono essere
sempre sostituite. Seguite qui i punti 1, 2, 4 e 5 come descritto.
Il sistema ABS è nuovamente pronto all'uso.
Attivate senza indugi l’airbag da valanga ABS non appena riconoscete una situazione di valanga. Meglio attivarlo una volta di
troppo che una in meno.
Portatevi in un posto sicuro. Cercate di aiutare altre persone se
ne siete in grado. Svuotate gli airbag solo se non sussiste più
nessun pericolo di valanga. Se continuate a trovarvi in zone a
rischio di valanga, lasciate gonfiati gli airbag o impiegate immediatamente una cartuccia e una maniglia di sgancio nuove.
Per prolungare la garanzia, eseguire uno sgancio di prova e compilare il formulario online sul sito internet (http://abs-airbag.de/it/
assistenza/certificato-di-garanzia/).
Per attivarlo tirate con forza e bruscamente la maniglia di sgancio
e cercate di scappare. I cuscini d’aria si gonfiano automaticamente e indipendentemente da quello che state facendo (sciando, siete caduti, giacete sull’airbag o siete già stati travolti dalla
massa di neve). I cuscini d’aria non vi ostacolano in eventuali
ancora possibili tentativi di fuga o di eludere la valanga, che
dovete in qualsiasi caso tentare.
4.2 Prima di ogni escursione o di ogni impiego
5
6. Per chiudere le tasche degli
airbags premete bene i nastri
con chiusura a strappo.
Eseguite i passaggi da 1 a 6 descritti
al capitolo Messa in funzione:
1 Controllate la carica della cartuccia
2 Fissate la cartuccia
3 Indossate il sistema di trasporto
4 Controllate la maniglia di sgancio
5 Agganciate la maniglia
6 Fissate il nastro con chiusura a strappo
4.3 Al termine dell'escursione
Eseguite il punto 8 della messa in funzione „togliere la maniglia“.
La cartuccia può rimanere avvitata.
5.2 Comportamento in valanga
Dopo che avete azionato il sistema airbag concentratevi solo sulla
vostra traiettoia di caduta. Poiché gli airbag sono montati lateralmente potete muovere liberamente le braccia. Lottate facendo
movimenti natatori, spostate ostacoli, cercate di stabilizzarvi e di
proteggervi la testa. La forma del cuscino d’aria offre inoltre protezione per la vostra testa senza limitarvi nei movimenti o nella
visuale. Tentate, girandovi, di liberarvi degli sci. Non usate assolutamente i lacci dei bastoni da sci e nessun cinturino di sicurezza! Se possibile tenete la bocca chiusa.
Quando la valanga si è fermata cercate di portare il vostro
busto e le vostre braccia verso la superficie e di liberarvi prima
possibile dalle masse di neve.
6
Italiano
5.4 Questionario per il rilevamento di incidenti da valanga
Vi saremmo grati se poteste comunicarci ogni qualsiasi impiego
pratico degli airbag da valanga ABS. Le conoscenze provenienti
da impieghi pratici sono molto importanti per ulteriori sviluppi.
Richiedete il questionario per i vostri dati direttamente presso di
noi o scaricatelo dal nostro sito Internet (http://abs-airbag.de/it/
valanga/questionario-degli-incidenti-da-valanga/). Chi sia stato
coinvolto in una valanga ed abbia usato il sistema, avrà diritto al
rimborso gratis della cartuccia e della maniglia. Inviate il questionario compilato e firmato al centro di assistenza competente nel
vostro paese o all’istituto federale elvetico per lo studio della neve
e delle valanghe (SLF).
6. ABS Funzionamento e modo d'azione
Anni di esperienza nello studio delle valanghe, ricupero e statistica per il funzionamento ed il modo d'azione stanno alla base
dell'acquisto dell'ABS airbag da valanga. D'importanza centrale
è il fatto che la maggior parte di tutte le vittime da valanga, siano
essi sciatori o snowboarder, sono ancora vivi nel momento in cui
la valanga si placa. Per lo più essi sono seppelliti, non possono
liberarsi da soli, e spesso i soccorritori non sono in vista. E' il
momento in cui inizia la gara con la morte, ed in pochi minuti si
Italiano
65
perde per sempre chi è rimasto completamente sepolto con gli
organi di respirazione bloccati. L'ostacolo maggiore per un soccorso di successo è la profondità media di sepoltura di un metro
e più. Spesso la semplice operazione di scavo da simili profondità dura più a lungo di quanto non resti da vivere alla persona
sepolta. Il compito centrale resta quindi quello di evitare che si
rimanga sepolti.
66
Con un semplice strappo alla maniglia di sgancio, l'airbag da
valanga ABS ne crea le premesse in secondi. Le masse di neve
in corsa trasportano in superficie i corpi voluminosi. Se tali corpi
hanno un peso
specifico inferiore
alla neve circostante,
essi restano in
superficie. Non
possono più risprofondare nella massa
nevosa. Se sono più
pesanti, risprofondano immediatamente.
Il volume supplementare degli airbags di 170 litri complessivi fa
in modo che si rimanga sulla superficie della massa nevosa. Qui
contribuiscono anche la forma ed il montaggio degli airbags. Una
grossa superficie, unita ad un fissaggio flessibile ed anatomico
traducono ottimamente le forze di scorrimento. Il sistema airbag
da valanga ABS ha preservato già centinaia di appassionati di
sport invernali da un seppellimento e non pochi gli devono la
vita.
7. Manutenzione
7.1 Autoverifica
Anche se l'airbag da valanga ABS non richiede praticamente
alcuna manutenzione, dovresti periodicamente effettuare i
seguenti controlli:
• Almeno una volta l’anno spiegare entrambi gli airbag. Si
consiglia anche di verificarne il corretto funzionamento
all’inizio della stagione sciistica. Esercitate l’azionamento di
prova in ambienti dove non corriate il pericolo di ferire i pre
senti o di danneggiare il sistema.
• Controllate la valvola di scarico nell’unità di riempimento e
scarico nera. Premere più volte il pulsante rosso ed assicurasi
che torni indietro velocemente ogni volta.
• Controllate regolarmente lo stato del portazaino, delle fibbie,
delle tasche per gli airbag e delle chiusure a strappo.
• Controllate che l’unità nella quale viene inserita la cartuccia
non sia sporca.
• La maniglia di sgancio deve sempre lasciarsi inserire facilmente
nella bussola. Se la maniglia non si lascia estrarre facilmente,
lubrificare leggermente la bussola con olio al silicone ABS. Un
campione di olio ABS viene fornito con il sistema e può poi
essere ordinato presso la ABS.
• Prima di ogni utilizzo degli airbag da valanga ABS verificare
sempre che la cartuccia sia carica e ben inserita.
7.2 Controllo dopo l'uso pratico in valanga
Ogni impiego in valanga può portare il materiale al proprio
limite di sforzo. A volte i danni non sono visibili ad occhio nudo.
Raccomandiamo pertanto di inviare al Vs. Centro di assistenza
Italiano
lo zaino ABS e la cartuccia di sgancio vuota per un controllo
profilattico. Vi preghiamo di inviare il questionario compilato o a
noi o all’Istituto Svizzero delle Valanghe per il rilevamento degli
incidenti da valanga (v. Punto 5.4).
Eseguendo l’autoverifica raccomandiamo di attenersi a quanto
segue:
Controllate quindi
– se gli airbag presentano segni di usura ad occhio nudo,
– se gli occhielli di fissaggio degli airbag si sono rotti,
– se gli spallacci, la cintura a vita, quella pettorale e le cuciture
si sono rotte,
– se le fibbie (sugli spallacci, sulla cintura a vita e pettorale,
e su quella inguinale) si sono rotte o deformate.
7.3 Servizio assistenza
Si consiglia di far controllare il sistema dalla ditta produttrice
dopo 3 stagioni. Consegnate a tale scopo gli airbag da valanga
ABS insieme alla cartuccia e alla maniglia di sgancio al vostro
rivenditore. Il servizio assistenza ABS non è gratuito. Si tratta
però di un controllo generale del sistema ABS in tutte le sue
parti, molto più ampio dell'autoverifica o dello sgancio di prova.
Sul ns. sito internet http://abs-airbag.de/it/meta/contatto/
troverete i nominativi delle ditte autorizzate all’assistenza clienti
ABS, suddivisi per Paesi.
8. Componenti dell'apparecchio
8.1 Airbag
I due airbag pieni hanno un volume di 85 l ciascuno. Vengono
riempiti contemporaneamente anche se hanno due diverse valvole di chiusura. Se uno dei due airbag si dovesse danneggiare,
l’altro mantiene la sua carica abbastanza a lungo. La pressione
interna è pari a 0,1 bar circa.
8.2 Unità di riempimento e scarico
Questo elemento combinato è montato direttamente su entrambi
gli airbag. Al centro di questa unità si trova il pulsante della valvola di scarico, protetto da azionamenti involontari da un tappo di
plastica. La rete di protezione sull’unità di scarico e riempimento
impedisce che la neve penetri durante la fase di riempimento
dell’airbag. Le reti danneggiate possono essere sostituite in
qualsiasi momento.
8.3 Unità d'innesto
L'unità d'innesto, nella quale viene avvitata la cartuccia, si trova
in una tasca superiore dello zaino. Assicurarsi sempre che non
sia sporca e che non vi entrino oggetti di varia natura. Se non è
inserita la cartuccia, chiuderla sempre con la sua copertura.
Una cartuccia avvitata può venire svitata dall’unità d’innesto in
qualsiasi momento lo si voglia. La cartuccia infatti viene aperta
solo nel momento in cui si tira la maniglia di sgancio. Si consiglia
comunque di lasciarci sempre inserita la cartuccia.
Italiano
67
68
8.4 Maniglia di sgancio
8.6 Imbragatura
10. Trasporto
11. Durata
La maniglia di sgancio è dotata di una capsula pressurizzata. La
capsula si aziona tirando la maniglia di sgancio precedentemente
inserita nella bussola sulla cintura di trasporto dello zaino. La
pressione creata dall’esplosione fluisce nel tubo verso l'unità
d'innesto nella quale la cartuccia, caricata con azoto, viene forata
dall’ago. Il contenuto della cartuccia scorre quindi attraverso tubi
pressurizzati fino agli airbag e li riempe in combinazione con
l’unità di riempimento e scarico. Il processo di riempimento non
dura più di 2 – 3 secondi!
I sistemi d'imbragatura autorizzati sono contrassegnati dal marchio ABS. L’insieme delle cinture è conforme ai requisiti TÜV per
sollecitazioni estreme. La resistenza allo strappo per tutte le cinture di trasporto corrisponde a 3.000 N. Per essere sicuri che il
sistema airbag da valanga ABS rimanga ben attaccato al corpo
durante una valanga, è indispensabile chiudere bene la cintura
a vita, quella pettorale e quella inguinale.
Generalmente il trasporto degli zaini da valanga ABS in aereo
è permesso ed è regolato dal manuale IATA (International Air
Transport Association) al punto 2.3. A condizione che comunichiate e facciate registrare l’airbag da valanga ABS alla Vs.
Compagnia aerea almeno 14 gg. prima della partenza. Per ogni
zaino ABS sono consentite al massimo uno unità di sgancio e la
maniglia di sgancio non deve essere agganciata.
Se si rispettano gli intervalli di manutenzione di 3 stagioni
consigliati dal produttore, la durata dell’apparecchio dipende da
quanto viene utilizzato ed interessa generalmente solo il sacco.
Rispettando le norme relative all‘uso e calcolando una media di
50 giorni d’impiego a stagione, si può contare su un impiego di
ca. 10 anni per il sistema ABS (non per lo zaino).
9. Stoccaggio e pulizia
8.5 Cartucce
Controllate prima di ogni utilizzo che la cartuccia sia carica, ben
inserita nel sistema e, soprattutto, verificatene il peso come descritto ai paragrafi 1 e 2 delle istruzioni per l’uso. Altrimenti potete
lasciare la cartuccia inserita.
Richiedete presso di noi l’estratto dal manuale IATA o scaricatelo
dal nostro sito Internet per poterlo presentare allo sportello. Si
raccomanda vivamente di porre nel bagaglio check-in, insieme
alla cartuccia, alla maniglia di sgancio e allo zaino, un estratto del
manuale IATA.
Le cartucce contengono esclusivamente un gas innocuo, non
infiammabile, come quello presente nell’aria. Pressione interna
300 bar (cartucce in fibra di carbonio 340 bar). La cartuccia va
forata solo nell‘apposita unità d’innesto del sistema ABS. Ogni
manipolazione alla chiusura o alla cartuccia può condurre ad una
esplosione. Attenzione! Pericolo di vita o di ferite gravi, anche a
terzi che si trovino nelle vicinanze!
La cartuccia è dimensionata per temperature comprese tra i 40°C e i +50°C. Le cartucce scariche possono essere ricaricate
solo da ABS. Si possono sostituire le cartucce scariche solo direttamente presso i rivenditori ABS. Evitare sollecitazioni meccaniche (p.e. che la cartuccia cada per terra).
Le cartucce, a seconda del modello, soddisfano le seguenti norme:
– cartuccia d’acciaio Europa: norme CE
– cartuccia d’acciaio America del Nord: certificate DOC e TC
– cartucce in fibra di carbonio: norme CE
Proteggete sempre la cartuccia con il suo cappuccio tutte le volte
che la si estrae dall'apparecchio. Si consiglia anche di togliere la
maniglia di sgancio dopo ogni impiego. Conservate l’airbag da
valanga ABS in un luogo asciutto, protetto da animali roditori e
fuori dalla portata dei bambini.
Per pulire il materiale dell'airbag e dello zaino utilizzate comune
acqua e sapone, non utilizzate assolutamente detergenti aggressivi come p.e. lisciva e OxyCleaner. Evitate che acqua o liquidi
vari entrino in contatto con l’unità di riempimento e scarico
dell’airbag.
E´ importante peró eseguire l’autocontrollo annuale con uno
sgancio di prova consigliato. Se il sistema d'imbragatura/Base
Unit si dovesse usurare, potete montare il sistema airbag da
valanga ABS su uno nuovo o su uno zaino Freeride. La ditta produttrice si occuperà del montaggio sul nuovo zaino. Se vengono
rilevati danni al sistema d’imbragatura, alle chiusure o agli airbags, si deve provvedere alla sostituzione.
Informazioni aggiornate per viaggi negli Stati Uniti sotto
http://abs-airbag.de/it/assistenza/abs-in-aereo/
69
Proteggere sempre la cartuccia con il cappuccio se non è inserita
nello zaino ABS. Usare l’imballaggio originale ABS sia per la
cartuccia che per la maniglia di sgancio.
Informazioni complete ed aggiornate sotto http://abs-airbag.de/it/
assistenza/abs-in-aereo/
Attenzione! Assicurarsi che il sistema si sia asciugato completamente dopo averlo pulito e prima di un nuovo utilizzo, perché i
residui liquidi si potrebbero altrimenti ghiacciare.
Italiano
Italiano
70
12. Informazioni supplementari
Diagnostica
Rimozione dell'errore
Diagnostica
Rimozione dell'errore
12.3 Dati tecnici
12.1 Diagnostica
La maniglia di sgancio non
si lascia sganciare
– Se siete all'aperto e non
avete olio ABS a disposizione,
spingete per prima cosa la
bussola verso l'alto, agganciate la maniglia e rispingete la
bussola verso il basso.
– Lasciate assolutamente
avvitata la cartuccia carica.
Spingete la bussola con
delicatezza verso l'alto,
muovete la maniglia da sinistra a destra e tentate, con
cautela, di tirare verso il basso.
Gli airbags non si gonfiano
appieno e si lasciano
asportare con difficoltà dalle
tasche laterali
– Se avete risposto sì ad
entrambe le domande,
portate gli airbags al controllo.
– Se vi sentite insicuri su uno
dei due punti sopra descritti,
fate uno sgancio di prova.
– Se il problema continua a
sussistere, consegnate l'ABS
per un controllo.
Volume airbag
Peso sistema
Materiale airbag
Innesco I
Diagnostica
Rimozione dell'errore
Ho tirato la maniglia di
sgancio senza cartuccia
o a cartuccia vuota:
– La pressione dovuta alla deto
nazione non smorzata rovina
il sistema che non è più
funzionante e deve essere
riparato. Per ulteriori
domande rivolgersi al ns.
Servizio Hotline
Tel: +49 - (0)89 - 898 78 90.
La maniglia di sgancio non
si lascia sganciare
– Porre una goccia di olio ABS
dentro alla bussola d'innesto.
Alzare la bussola d'innesto,
inserirvi una goccia di olio
ABS, agganciare e sganciare
più volte la maniglia fino a
rendere scorrevole la bussola.
– Se ciò non porta all'effetto
desiderato, il sistema va
portato al controllo.
– Non tentate assolutamente di
agganciare la maniglia con
violenza.
La maniglia carica non
si lascia togliere
Gli airbags non si gonfiano
appieno e si lasciano
asportare con difficoltà dalle
tasche laterali
Italiano
– Bagnate inoltre il perno della
maniglia con una goccia di
olio ABS, e girate la maniglia
per lubrificare meglio il
meccanismo.
– Se ciò non porta all'effetto
desiderato, portate lo zaino al
controllo.
– Gli airbags erano piegati in
modo corretto?
– Il peso della cartuccia era
conforme al peso di
riempimento?
Dopo il gonfiaggio degli
airbags, si sentono chiari
rumori di sibilo.
– I sibili vengono dalla valvola
di scarico, che provvede alla
compensazione della pressione.
– Dopo pochi minuti, la caduta
di pressione non deve essere
chiaramente visibile.
– Se lo è, il sistema deve essere
riparato.
– Portate il sistema ABS alla
riparazione.
Riempimento
Cartucce
Sistema di trasporto
12.2 Garanzia
Per prolungare a 4 anni il diritto di garanzia, che per legge varrebbe 2 anni, Vi preghiamo di compilare la cartolina di garanzia
online, in ogni sua parte, al più tardi 30 gg. dopo l’acquisto
(http://abs-airbag.de/it/assistenza/certificato-di-garanzia/).
A condizione che abbiate eseguito con successo lo sgancio di
prova annuale seguendo gli punto 1 – 12 delle istruzioni per l’uso
e che eseguiate annualmente uno sgancio di prova.
Temperatura impiego
Italiano
2x85 litri
1200g circa
Poliammide 6.6
Innesco ad aria compressa con capsu
la pressurizzata nella
maniglia di sgancio.
In circa 1. sec. Vengono pompati circa
90 litri di una miscela di aria e gas in
entrambi gli airbag. Nei seguenti 1,5
secondi i rimanenti 80 litri (a seconda
della temperatura esterna e dell'
altitudine).
Le cartucce sono fatte di materiali
estremamente resistenti, che possono
sopportare pressioni sopra i 300 bar.
A seconda del modello, soddisfano le
norme CE e DOC / TC per l’America
del Nord. La cartuc cia può essere
ricaricata solo presso la
È conforme con i requisiti del TÜV per
sollecitazioni estreme. La resistenza
allo strappo di tutte le cinture portanti
è di 3.000 N.
da -40°C a +50°C
71
12.4 Omologazione / Conformità
12.5 Centri assistenza
Produttore: ABS Peter Aschauer GmbH
Paese di produzione: Germania
Le ditte responsabili del servizio assistenza ABS nei singoli stati
sono elencate sul nostro sito Internet http://abs-airbag.de/it/meta/
contatto/
Tipo: sistema airbag da valanga ABS
72
Per la qualità dei materiali utilizzati per il sistema airbag da valanga ABS e per il tipo di lavorazione ci si è basati sui valori standard
di settori di sforzo paragonabili. Su questi valori si basa la TÜVSüd Produktservice GmbH per eseguire il controllo del materiale
e del funzionamento del sistema, al fine di assegnare la certificazione GS (sicurezza controllata), in conformità con le norme PSA
89/686 CEE e le norme CE. Nonostante i severi controlli, le valanghe possono creare forze e situazioni che superano tali valori
standard. Ci teniamo pertanto a precisare che il sistema airbag
da valanga ABS come unità e nelle sue singole parti (materiale
airbag, materiale di fissaggio, zaino, ecc.) non può sopportare
tutti i possibili sforzi provocati dalla caduta di una valanga.
TÜV-Süd Produktservice GmbH, Ridlerstr. 65,
D-80339 München, Ufficio di collaudo 0123.
ABS Peter Aschauer GmbH è un’azienda certificata secondo
ISO 9001:2000.
DEUTSCH
Seite
01 - 18
Il sistema ABS è “made in Germany”.
ENGLISH
Page
19 - 36
FRANÇAIS
Page
37 - 54
ITALIANO
Pagina
55 - 72
Italiano
Headquarters:
ABS Peter Aschauer GmbH
Stefanusstr. 6a · D-82166 Gräfelfing
Germany
Tel: +49 (0)89 89 87 89 - 0
Fax: +49 (0)89 89 87 89 - 60
E-Mail: [email protected]
–
North America:
ABS Avalanche Rescue Devices Inc.
5352-273A Street · V4W 1S3 Langley, BC
Canada
WWW.ABS-AIRBAG.COM
07/12
Tel: +1 604 626 - 0229
Fax: +1 604 626 - 4711
E-Mail: [email protected]