1
WSL-Institut für Schnee- und Lawinenforschung SLF
WSL Institut pour l'étude de la neige et des avalanches SLF
WSL Istituto per lo studio della neve e delle valanghe SLF
WSL Institute for Snow and Avalanche Research SLF
Manual
SnowMicroPen 3
February 2013
Version 1, Revision 4
WSL Institute for Snow and Avalanche Research SLF
Flüelastrasse11, 7260 Davos Dorf, Switzerland
1
Manual SMP3
Table of Contents
Introduction............................................................................................................................................. 4
Technical Properties ................................................................................................................................ 4
Operating the SnowMicroPen 3 .............................................................................................................. 5
Setting up the instrument ................................................................................................................... 5
Setting up the controller ..................................................................................................................... 5
Measurement preparation .................................................................................................................. 5
Measuring............................................................................................................................................ 7
Controller................................................................................................................................................. 7
Improvements of SMP3 controller ...................................................................................................... 7
Controller body.................................................................................................................................... 8
SD-card ................................................................................................................................................ 9
Configuration file ............................................................................................................................... 10
Buttons and Display........................................................................................................................... 11
Menu structure and navigation schematically .................................................................................. 12
Menus on the display ........................................................................................................................ 13
Battery and power supply ................................................................................................................. 16
Transferring data and evaluation .......................................................................................................... 17
Transferring data ............................................................................................................................... 17
Evaluation Software .......................................................................................................................... 17
Transportation and Package.................................................................................................................. 18
Maintenance ......................................................................................................................................... 19
Cleaning ............................................................................................................................................. 19
Drying ................................................................................................................................................ 19
Replacing the battery ........................................................................................................................ 19
Software upgrade .............................................................................................................................. 19
Special hints........................................................................................................................................... 19
Initialization of the SD-card fails ....................................................................................................... 19
Control of tip temperature ................................................................................................................ 19
Check list................................................................................................................................................ 20
Before the measurement .................................................................................................................. 20
After the measurement ..................................................................................................................... 20
Features no more possible on SMP3..................................................................................................... 20
2
Manual SMP3
Still existing bugs in controller software v2.9 ....................................................................................... 20
Support .................................................................................................................................................. 20
Appendix A Firmware Upgrade of SnowMicroPen 3............................................................................. 22
A1.
Improvements with new Software Upgrade ............................................................................. 22
A2.
How to do the Software Upgrade ............................................................................................. 22
2.1
Needed components ............................................................................................................. 22
2.2
Installation of PICkit Software on PC ..................................................................................... 22
2.3
Preparation of the SnowMicroPen3 Controller..................................................................... 24
Doing the Software Upgrade on the SnowMicroPen Controller....................................................... 25
2.4
A3.
A New Config File is necessary .............................................................................................. 27
Questions................................................................................................................................... 27
3
Manual SMP3
Introduction
The SnowMicroPen is the first instrument capable of measuring the bonding force between snow
grains, with both high spatial resolution and high speed.
The new controller of SMP3 is designed for field measurements. The intended purpose is to measure
snow penetration resistance. The controller is solely protected against splash water. It should not be
exposed to continuous rain or submersed into water or any other liquid.
Although the controller is specified for temperatures below 0°C, some lower temperature limits have
to be respected:
Operating temperature with display
above -20°C
Operating temperature without display (only data logging)
above -30°C
Below -20 °C the display will not be damaged, but will cease to function properly.
Measured data can be downloaded from the SD-card directly to a PC. The file system on the SD-card
is a standard FAT-32 system.
The GPS is an standard add-on of the SMP.
This short manual will help you to perform successful measurements. Please read it carefully.
Technical Properties
A short list of the most important technical properties of the SMP:
Velocity of drive rod:
20 mm/s
Sampling rate of the force:
242 S/mm
Maximal allowed force with sensor type 9207:
-50 N .. 50 N
Maximal allowed force with sensor type 9203:
-500 N .. 500 N
Internal clock (for date and time):
Initialized by GPS
4
Manual SMP3
Operating the SnowMicroPen 3
Setting up the instrument
It takes about five minutes to set up the instrument on snow:
Make sure that the coaxial cable is always shorted with the cap before connecting! Handle
the sensor cables with care! (Don’t bend them!)
1.
2.
3.
4.
5.
Take the motor unit and the drive rod out of the box.
Fix the stripping brush on the white plastic tube on the bottom of the motor unit.
Insert the two standing poles into the mounting holes on the motor unit.
Connect the cable of the force sensor (coming out of the drive rod) to the controller.
Connect the cable from the motor unit to the controller.
In case the measuring tip was removed for drying:
6.
7.
8.
9.
Use "Drive Engine -> Forward" (see chapter "Menus on the display").
Screw in the measuring tip with the O-ring carefully into the force sensor by hand.
Look for a proper positioning of the O-ring.
Use "Drive Engine -> Back" to return the drive rod to the initial position.
A white plastic tube at the bottom of the motor unit always covers the force sensor. Do not move the
drive rod out manually.
Only for SMP with demountable drive rod:
When tightening the rods together, make sure there is no gap between the rods by twisting them
against each other. Under no circumstances may there be any gap! When not tight enough, the gear
wheel and the rods will become damaged, which requires expensive repairs!
Setting up the controller
For detailed information about the handling of the controller, please see the chapter "Controller".
1. Insert an SD-card with an appropriate configuration file into the controller (see chapter
"Configuration file").
2. Switch the controller "ON" (a check of the controller and the SD-card is automatically done).
3. Now the SMP is ready to measure.
Measurement preparation
Before measuring, the instrument must be adapted to the outside temperature for at least one hour.
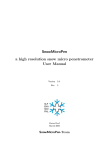
On slopes use the adjustable poles to make sure the drive rod is oriented perpendicular to the snow
surface. The instrument may NOT be operated in horizontal or upside-down position. The geared
rods may become damaged, which requires expensive repairs. Figure1 shows an appropriate setup of
the SnowMicroPen before starting a measurement.
5
Manual SMP3
Figure1 The SnowMicroPen must be positioned perpendicular to the slope.
If the measuring length is correct then the SnowMicroPen is ready to start measuring. To change the
measuring length, see chapter "Menus on the display" Figure13. You can navigate through the menus
by using the round two black, the green and red button on the controller beside the display.
The only "safe" mode of operation on a slope is perpendicular to the slope!
NOTE: Vertical (at plumb) measurements on a slope are not permitted and will lead to signal with
spurious (false) values and possibly to a complete destruction of the force sensor. This is caused by
bending of the tip on the layer transitions and their consequent forces.
Be very careful while measuring close to hard surfaces (rocks, scree or frozen soil, soil). The force
sensor may be damaged due to bending of the tip much easier than when the force is normal. The
guidelines given below are especially for the 50 N sensor, the standard sensor for the SMP used in
seasonal snow.
Specific recommendations for different ground surfaces
Scree or rock fields:
Measurements to the ground on scree slopes / boulder fields can cause a destruction of the sensor,
because the bending forces on the tip may get very high when the tip hits the rock.
- Minimize the risk of damage by sounding the actual depth with a calibrated avalanche probe before
measuring.
- Set the maximal force to a lower value than usual (25 N).
Solid rock
Measurements to the ground on solid rock can cause a destruction of the sensor, because during
braking very high transient forces can occur.
6
Manual SMP3
- The maximal force in such conditions, if the measurement can not be stopped before, should be set
to 25 N.
- The tip itself may get damaged and blunt, always check if still OK.
Soil and frozen soil
Measurements into mineral or organic soils are no problem if there is little or no skeleton
(embedded stones). However, often clay, silt or fine organic material easily sticks on the tip,
especially in the groove (O-ring). Clean the tip of the SMP with a soft brush before penetrating into
ground. If you are unsure about the type of the soil, reduce the maximal force to 25 N.
Measuring
The SnowMicroPen has to be held in the position by the measuring person.
The measuring process is started with the green button. Before the drive rod starts, a message "W-fTime" (controller waits for a GPS signal to get a timestamp). When the timestamp is available the
red LED starts blinking and the measurement starts. If there is no GPS signal, the "W-f-Time" process
can be interrupted by pressing the green button a second time and the measurement will start
immediately.
If no exceptions occur, the drive rod of the SnowMicroPen is being driven into the snow pack until
the user-defined length is reached. When the drive rod stops, a plot showing the penetration force
against measured depth is displayed on the controller. The dataset is written as a "*.pnt"-file on the
SD-card and the drive rod is driven back to the initial start position afterwards.
EXCEPTIONS
•
•
The user stops a running measurement with the red button on the controller
The penetration force becomes larger than the overload that is defined in the configuration
file
If an exception occurs, the drive rod stops immediately and does not continue to the user-defined
length. Although the measurement is aborted, the data already taken is displayed and are written to
a "*.pnt"-file with the corrected header information. Then the drive rod is driven back to the initial
start position as normal.
SD-Fail, Data ok: if there was an error between the controller and the SD card between the
measurement, "SD-Fail, Data ok" is displayed. All the data until the rod stopped are saved in the file.
Controller
Improvements of SMP3 controller
The new controller of the SnowMicroPen3 provides the following advantages:
•
•
•
The controller can be operated with gloves.
You can use the round four buttons on the left to navigate through the menu structure.
The battery is located inside the controller.
7
Manual SMP3
•
The data storage is performed by a SD-card and a standard FAT-filesystem.
Controller body
Figure2 The new controller of the SnowMicroPen 3.
On the left side of the controller (Figure2) there are the operating buttons, on the right side the main
switch. The red and green LED shows the operating status of the controller.
The controller is not fully protected against moisture. Do not use the controller without
additional protection (e.g. plastic bag) when it is raining. Cover the controller during snowfall when it
is not being used for measuring. Remove the snow and water droplets from the device before
heating it up.
When the force sensor is not connected, always put on the short circuit connector, otherwise
the amplifier can be destroyed! Without the short circuit connector, it is possible that the charge
amplifier may charge itself. A charge caused by electrostatic effects is equivalent to an overload
during a measurement and can make it impossible to measure, because the "simulated" overload
stops it immediately.
8
Manual SMP3
When opening the SnowMicroPen controller, wear an anti-static wrist wrap to prevent
electrostatic discharges to the electronics.
SD-card
Control parameters and measured data are stored on the SD-card (rated to -40°C). Multiple SD-cards
can be used and/or prepared. A configuration file (figure4) with the name “config.txt” AND the
backup file "config_original.txt" must be written on the SD-card before being used.
The SD-card must be inserted that the labeled side points upwards. It is technically not possible to
insert the card the wrong way.
For the normal use of the SD-card, we recommend to use the SD-card with the write lock ON - you
can still write on it using the controller, but the PC can not write or delete any files accidentally.
Make sure that the SD-card has a data rate of at least 30 MB/s (class 10). We recommend to
use the provided SD-cards. The maximal size of the SD-card is 4 GB (restriction on the file system on
the microcontroller).
Make sure that the only files stored on the SD-card are "config.txt", the “config_orginal.txt”
file and the "*.pnt" files. It is not allowed to store other files on the SD-card.
9
Manual SMP3
If the SD-card needs a reformatting, it is important to chose the allocation unit size equal to 32 KB as
shown in the figure 3. Otherwise the "real-time" data writing during a measurement often fails.
figure 3 Parameter to reformat the SD-card.
Configuration file
The configuration file has the following structure:
figure4 Example of a configuration file that must be stored on the SD-card.
10
Manual SMP3
The user should only change the following parameters:
•
•
•
•
Default measure length in mm: It is not allowed to set a higher value in [mm] than the drive
rod can be driven (parameter "max length in mm"). It is recommended to define the
appropriate measure length for a campaign on the configuration file. Otherwise the measure
length has to be changed manually before each measurement directly on the controller - that
is possible as well.
Filename: The parameter filename is a four-letter word. The automatic numbering and
labeling of the *.pnt- files starts with the filename (e.g. S27M_002.pnt).
Offset: the parameter offset [N] can be set unequal to 0 N if the average zero signal (e.g.
measured in air) from the force sensor is not equal to 0 N. The offset does not affect the
overload value. The offset correction of the penetration force takes place after the
measurement.
GPS: 0=OFF, 1=ON. The GPS should be ON (=1). With the GPS signal a timestamp is added to
the measurement file.
If the parameters are set incorrectly on the configuration file, force sensor, electrical or
mechanical components of the controller or SnowMicroPen can be destroyed!!
Buttons and Display
The controller has one main switch and four button (see Figure2):
Main switch, green, with protection cap: 1=ON, 0=OFF
Green round button is used to enter a menu, start a measurement or confirm a setting.
Red round button is used to exit a menu (step back), abort a measurement.
Lower black round button is used to go down in a menu structure or decrease a value.
Upper black round button is used to go up in a menu structure or increase a value.
The buttons and the display are used to control the SnowMicroPen. If menu options are shown on
the display, the one with the white letters and the black background is active.
If there is a complete failure of the SnowMicroPen, the green main switch must be used as
emergency stop!
11
Manual SMP3
Menu structure and navigation schematically
The main operation is shown in the flow chart (Figure5). All operations are done using the four round
buttons. “Green” is used to select the highlighted item or to continue with the next number in a
selection, “Red” to skip a screen or to cancel an operation. The black buttons are used to select other
operations, to move up and down to select a number, or to drive the motor up and down.
Figure5 Flowchart of the menu structure.
Additional information to the flow chart in Figure 5: before the measurement starts, the message
"W-f-Time" is displayed. W-f-Time means, that the controller waits for a GPS signal to extract the
time (UTC) and add a timestamp to the measurement file. If there is no GPS signal at all or the user
does not like to wait, the green button can pressed a second time (press as long as the red LED
flushes up) and the measurement will start immediately.
12
Manual SMP3
Menus on the display
Using the main switch (green switch) turns on the controller. An initializing screen appears for a few
seconds. In the case that the SD-card is not inserted or unreadable, the following screen appears:
Figure6 Display if the initializing of the SD-card fails.
Otherwise the instrument is immediately ready to measure (Figure7). If you enter the measure menu
the display changes to Figure11:
Figure7 Display if the initializing of the controller is successful.
If the green button is pressed, the “Measure Process” is started (Figure7). If “Settings” is selected,
the selection shown in figure 8 ("Drive Engine" or "Parameter") appears.
figure 8 Display shows the selection to enter either "Drive Engine" or "Parameter".
If "Parameter" is selected the values of the configuration file are shown (Figure9). The values can not
be changed. The screen is exited using the red button.
13
Manual SMP3
Figure9 Display shows settings from configuration file on the SD-card.
If "Drive Engine" is selected from figure 8, the display shown in figure 10 appears and the user can
drive the SMP manually. As long as the lower black round button is pressed, the drive rod of the SMP
moves forward. If the upper black round button is pressed the drive rod moves back directly to its
initial position.
figure 10 Display to drive the SMP manually.
If the user enters "Measure" from Figure7, Figure11 appears.
Figure11 Display to start a measurement with the default length of 500 mm, change the default length (depth) or
settings of the GPS (optional - not included in standard version of SnowMicroPen).
If the green button is pressed for the first time (Figure11), a measurement will be initialzied (here
with the default depth of 500 mm given in the configuration file).
14
Manual SMP3
figure 12 Display of initializing the measurement after pressing the green button for the first time. The display shows the
message "W-f-Time", means wait for time of the GPS signal. This W-f-Time process can be jumped over by pressing the
green button for a second time.
The measurement will start either the controller got the GPS signal for the timestamp or the user
pressed the green button a second time. The red, blinking LED indicates that the device is measuring.
The measured data is visualized and then stored automatically (Figure13).
Figure13 Display visualization of the measured penetration force.
To exit the display showing the measured data (Figure13), press the red button.
To change the measured depth, "Depth" is selected (Figure14).
Figure14 Display to change the default measure length [mm].
The appearing screen should look like this:
15
Manual SMP3
Figure15 Display in the menu for changing the measure length [mm].
The values can be changed using the black and green buttons. The decimal to be changed is
highlighted.
Figure16 Display, the decimal to be changed is highlighted.
Battery and power supply
The controller (Figure2) includes a 3.5 Ah 14 V Lithium-Polymer battery. The battery is either charged
from the outside with the suitable power supply, or an additional battery can be connected. The
device of the controller must not be opened for recharging the battery. The battery should be fully
charged before use, using only the provided charger.
The battery can only be recharged if the battery temperature is higher than 5°C. If the
temperature is below about 5°C, the charger indicates "Battery recharged"(green LED) although NO
recharge occurs.
16
Manual SMP3
Transferring data and evaluation
Transferring data
Data transfer is done by removing the SD-card from the slot (slightly push on the card) and
downloading it to a PC using a standard SD-card reader. No specific download software is necessary.
The card will appear as a normal drive, and the binary files with the ending ".pnt" can be copied.
There is no need to delete the files; actually this way there is always a backup (up to 6000 files of 1.2
m length can be stored on a 4 GB card). We recommend not to delete the files - this way all files are
consecutively numbered up to 9999.
Do not delete the configuration file "config.txt" or "config_original.txt" (which is recommended to be
in protected mode, such that it can not be deleted accidentally).
During one measuring campaign we suggest not to delete any data files on the SD-card
because the numbering of a new file on the controller depends on the total amount of files on the
SD-card. If the SD-card contains no *.pnt-files but the "config.txt" and the "config_original.txt", the
numbering starts with 0000.
Evaluation Software
The files can be viewed and printed with the program PeneWin.exe. PeneWin also has the capability
of exporting the data to a file type compatible to Excel.
17
Manual SMP3
Transportation and Package
The SnowMicroPen is transported in a box with the following specifications:
Dimensions:
31 x 22 x 175 cm
Weight:
18 kg
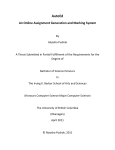
Figure16 shows the complete content of the box with components of the SnowMicroPen.
Figure17 Box for transportation of SnowMicroPen 3 containing all components.
List of components:
•
•
•
•
•
•
•
•
•
•
SnowMicroPen 3, motor unit and drive rod
Controller
Measuring tip
Stripping snowbrush
SD-card reader and USB cable
PicKit for upgrading controller firmware, cable and CD
Charging device and cable
Standing poles
Spare parts
CD containing user manual, PeneWin software, original configuration file and software
upgrade manual (CD stuck to the inside of the cover plate of the box)
The tip of the SnowMicroPen must be completely covered by the white tube during
transportation. If the tip is not covered, unexpected forces can destroy the force sensor.
The cable of the SnowMicroPen must be disconnected from the controller during
transportation and ALWAYS shortened with the attached cable cap.
18
Manual SMP3
Maintenance
Cleaning
The surface of the screen can be cleaned with a soft cloth (as any plastic screen).
Drying
The components should be dried after each usage.
Water condensing inside the front part of the penetration shaft may cause a drift of the force signal.
Therefore, the penetration shaft containing the force sensor has to dry out well after measurements.
Replacing the battery
A new battery must be ordered at SLF.
Software upgrade
The user can do a software upgrade. The procedure is described in the Appendix A1. To upgrade the
software, the controller must be opened and connected to a special cable with the PicKit tool to the
computer. For more information please see Appendix A1.
Special hints
Initialization of the SD-card fails
If the initialization of the SD-card fails every time the controller is switched on, a reformatting of the
SD-card should be performed.
After formatting the SD-card, the original configuration file must be restored, see also chapter "SDcard".
Control of tip temperature
The temperature of the sensor must be below 0°C and close to the snow temperature. If the sensor is
not close to the snow temperature, the force signal will show a drift (continuous change over the
measured length) of up to 2 N.
In spring it may occur that the temperature of the SnowMicroPen tip is above 0°C. This means that
snow crystals in contact to the tip may melt. This may influence the measurement, i.e. when water
enters the force sensor unit and refreezes blocking the sensor tip. Spray the tip with some alcohol or
anti-freeze (as used to unfreeze key holes).
19
Manual SMP3
Check list
Before the measurement
•
•
•
•
•
Check if the O-ring of the sensor tip is placed correctly.
Is the SD-card inserted into the controller unit? Is there enough free memory for the
measurements?
Is the battery recharged?
Don´t forget: controller unit, motor unit and the two fixing poles.
Adapt the instrument to the outside temperature for at least one hour !
After the measurement
•
•
•
•
•
Read out the data from SD-card afterwards.
After measurements in wet conditions let the SnowMicroPen dry out well (all the electronics
and also the penetration shaft containing the force sensor).
Clean everything and store it somewhere warm and dry.
Pull out the penetration shaft using Settings -> Drive Engine ->Forward (approx. 10cm).
Remove measuring tip VERY carefully.
Recharge the battery.
Features no more possible on SMP3
There were features provided by SMP2 those are not available on SMP3 anymore.
- Date and time are only written into the file header, if the real time clock was initialized at least one
time with internal GPS. Otherwise the date and time are fixed to 2000-01-01 00:00
- The numbering of the files cannot be set through the controller; always the total amount of files on
the SD-card is counted to number a new file.
Still existing bugs in controller software v3.12
There are still some small bugs in the controller software v3.12. However, if the user knows about
the bugs, the SMP3 can be used.
•
•
•
After entering the "Settings -> Parameter" menu a followed measurement is executed with
the default measuring length (configuration file) and NOT with the measuring length that the
user entered on the controller although the entered length is shown on the display of the
controller. So, not to fall prey to this bug, switch ON / OFF the controller after entering the
"Parameter" menu and enter the measuring length again.
The first value of the graph (Figure13) is random value and not correct on the display, but
correct in the *.pnt file.
If the user wants a consecutively numbering of the files, the old *.pnt files should not be
deleted on the SD-card.
Support
For support please write to [email protected] or call +41 81 417 0111 .
20
Manual SMP3
21
WSL-Institut für Schnee- und Lawinenforschung SLF
WSL Institut pour l'étude de la neige et des avalanches SLF
WSL Istituto per lo studio della neve e delle valanghe SLF
WSL Institute for Snow and Avalanche Research SLF
Appendix A
Firmware Upgrade of SnowMicroPen 3
A1.
•
Improvements with new Software Upgrade
Few programs are perfect - therefore we give the user of the SMP3 to possibility to upgrade
it quite easily.
A2. How to do the Software Upgrade
2.1 Needed components
The components you need for the software upgrade are listed below:
•
•
•
•
•
•
Computer with available USB port and CD-ROM drive (Windows XP, Vista or 7)
PICkit 2 containing PICkit Starter Kit Software, USB Interface Cable, HI-TECH PICC Lite
Compiler (delivered with all SnowMicroPen3-controllers)
Extension cable from PICkit2 to SnowMicroPen controller
SnowMicroPen3 controller
Screw driver
"main.hex" file of latest software version
2.2 Installation of PICkit Software on PC
The installation of the PICkit Starter Kit software on the computer is quite easy. Follow the steps in
the list below (please keep your PC connected to the internet and make sure you have Administrator
permissions):
•
•
Insert the CD into the CD-ROM drive
Autostart (you may be asked to download a more recent version of PICkit from Microchip do so)
22
Manual SMP3
•
Choose “Programmer Only” on the left side of the user interface
•
Choose “Install PICkit TM 2 Programmer Application”
•
Installation as usual …
23
Manual SMP3
2.3 Preparation of the SnowMicroPen3 Controller
1. Loosen the four
screws of the SMP
controller cover
2. Extension cable from PIC
compiler with white cable
on the side of the white
arrow at the PICkit 2
3. Five-pin plug on the
left side of the SD-card.
White wire on the right
side of the plug
•
•
Then connect the PIC compiler with the USB cable to the computer
Switch on the SnowMicroPen controller
24
Manual SMP3
Doing the Software Upgrade on the SnowMicroPen Controller
•
•
Start the installed PICkit program
The following window appears
2. Continue by importing Hex File "main.hex"
(Software Upgrade for SnowMicroPen controller)
1. This message should
appear
3. Write imported Hex File
to controller
•
•
•
•
4. Verify the writing in the
end
If the verifying process was successful, the software upgrade was successful as well, if
not, repeat the write process (at most two times)
Disconnect the PICkit
Switch off SnowMicroPen controller
Reassemble the SnowMicroPen controller with the screws
25
Manual SMP3
If the PIC Device is not found (different message than in 1. on picture above), please try
the following action:
•
Also Device Familiy must be “PIC18F_J” in case that the connection cannot be properly
opened.
26
Manual SMP3
2.4 A New Config File is necessary
•
•
The new software upgrade on the SnowMicroPen controller may also needs a slightly
different config file.
Please load the "config.txt" and the "config_original.txt" to the SD-card.
IMPORTANT: check the correct working of the SnowMicroPen3 by connecting the motor
and sensor, do a few test measurements, and check the results on the computer. If you want
your measurement files to be consecutively numbered, keep all "*.pnt"-files on the SD-card.
A3. Questions
If you have trouble to accomplish the new software upgrade, please contact [email protected] .
27