1
2
•
•
•
•
•
•
Det. A
•
•
•
•
•
•
•
•
•
•
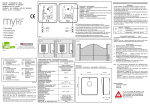
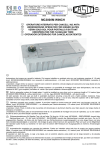
Sollevare e togliere il coperchio.
Inserire l’antenna nell’apposito foro facendo attenzione che sullo stelo sia
posizionato il tappino e la guarnizione come da dettaglio A (Fig. 2).
Assicurarsi che lo stelo sia inserito a fondo nel morsetto corrispondente.
Avvitare la vite.
Inserire il cavo di alimentazione nell’apposito passacavo, avendo in precedenza
forato con una matita, dettaglio B (Fig. 2).
Uplift and remove the cover.
Plug the aerial in the proper hole, paying attention that the cap and the washer
are as shown in detail A (drawing 2).
Make sure that the aerial is deeply plugged into the corresponding terminal and
then fix it with a screw.
Pierce the rubber fairlead with a pencil or a tool as shown in detail B (drawing
2) and then insert the power supply cable.
Soulevez le couvercle par le bas.
Introduisez l'antenne par le trou du haut, assurez vous que le petit joint est
bien en place. (Fig. A 2)
Placer l'antenne dans le connecteur sur la borne de gauche comme le montre
le schéma, serrez sans exagération.
Avec un objet pointu percez la membrane au bas du boîtier et insérez le câble
d'alimentation.(Fig. B 2)
Levantar y quitar la tapa
Introducir la antena en el agujero ponendo atención en que haya la pequeña
tapa y la guarnición como en detalle A , (dibujo 2)
Controlar que la antena sea introducida en el agujero del borne correspondiente
y fijar con un tornillo.
Introducir el cable en la pasteca, después de agujerearla con un lápiz, detalle B
, (dibujo 2)
Det. B
•
•
•
•
Den Deckel hochziehen und wegnehmen.
Die Antenne an den dazu bestimmtes Loch einstecken. Sich versichern dass
beide den Plastikpfropfen und die Dichtung am Schraft sind, laut anliegendem
Muster A Fig. 2.
Sich versichern dass der Schraft richtig in der korrespondierenden Klemme
eingesteckt ist. Verschrauben.
Das Speisekabel an den dazu bestimmten Kabeldurchgang einstecken. Zuvor
bei einem Bleistift durchlöchern, laut anliegendem Muster B Fig.2 .
3
Dopo aver eseguito i collegamenti vedi Fig. 1 e provveduto alla memorizzazione dei
telecomandi vedi “AUTOAPPRENDIMENTO CODICI” chiudere il coperchio e fissarlo
con le due viti in dotazione (Fig. 3).
Once the receiver is completely connected (see drawing 1) and the transmitters'
codes are correctly stored (see paragraph “SELF LEARNING STORAGE OF CODES”)
close the cover and fix it with the provided screws.
Une fois les branchements réalisés (Fig. 1) et seulement quand vous aurez
programmé les télécommandes (Programmation), refermez le couvercle avec les 2 vis
fournies.(Fig. 3)
Después de efectuar las conexiones (ver dibujo 1) y memorizar los mandos (ver
parágrafo MEMORISACION AUTOMATICA CODIGOS) cerrar la tapa y fijarla con los
dos tornillos provisto en dotación.
Nach der Anschlüsse Fig. 1 und dem Memorieren der Handsendern, Abschnitt
„SELBLERNEN DER KODEN“ , den Deckel schließen und befestigen bei der zwei
vermachtenen Schrauben (Fig. 3).