1
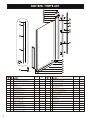
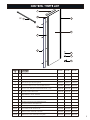
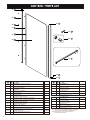
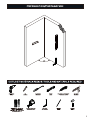
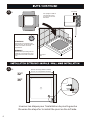
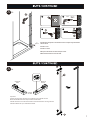
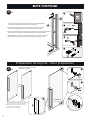
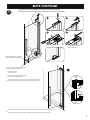
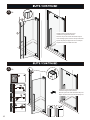
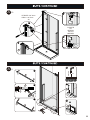
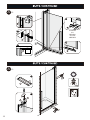
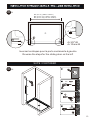
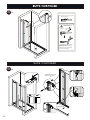
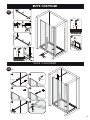
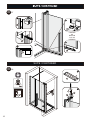
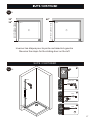
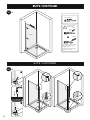
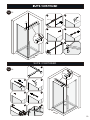
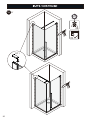
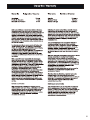
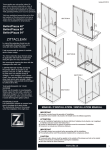
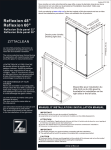
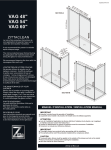
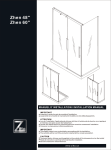
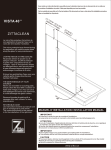
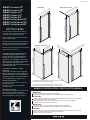
Update:20150625
)
)
m mm )
3m 95 m
0 4 11 6 m
~1 m~ 149
m m ~
8m 40 m
98 1 m
) ( ") (1441
"
1 7 1
~4 4 ) (
9" "~ 9"
(3 3/4"~5
4
(4 3/4
6
(5
SECTION A
AMALY screen 32"
AMALY screen 36"
AMALY inline 10"
AMALY inline 16"
AMALY inline 24"
AMALY side panel 32"
AMALY side panel 36"
AMALY side panel 42"
SECTION A et/and B
Le micro film protecteur formé lors de
son application,fera perler l'eau sur le
verre afin d'en faciliter l'entretien.
78 3/4"(2000mm)
80"(2030mm)
78 3/4"(2000mm)
ZITTACLEAN
80"(2030mm)
)
m
m )
78 m
~7 m
m 879
m ~
48 m
(7 m
") 49
/4 ) (8
3
"
30 1/2
"~
/2 34
9 1/2"~
2
(
31
(3
II est recommandé de passer la raclette
après chaque usage.
(
38 29"
m ~3
( m 0
40 33"~76")
m ~3 2m
m 4" m
~8 )
)
64
m
m
)
80"(2030mm)
78 3/4"(2000mm)
(8
m
)
)
)
m m
m 2m
2 011 6 )
0
m
~1 ~
m m 3m
m 2m 17
90 3 1
( 9 ) ( 11 m ~
)
4" " 3m
1/ 3/4 44
40 45 (1
"~ 2"~ 3")
9
5
/
3
" ( 4 1 "~
42" (4 3/4
6
48" (5
60
80"(2030mm)
(7
We recommend cleaning the door with the
squeegee after each use.
L'ENTRETIEN DE VOTRE DOUCHE
Ne jamais utiliser de poudre ou de
tampon à récurer .Il suffit de nettoyer
la porte avec une solution d'eau et
vinaigre, 1 once vinaigre pour 5 onces
d’eau.Vous pouvez utiliser un détergent
doux mais aucun produit à base
d'ammoniaque cela pourraitendommager
la surface de la vitre.
32
36" (2
9
42" (3 "~3
" ( 3"~ 0"
39 3 ) (
"~ 4") 73
39 (8 8m
3/ 40 m~
4" m
) ( m~762
98 8 m
8m 64 m
m mm)
~1 )
01
2m
)
2"
1/ )
3 0 5 m m)
~
"
"
/4 77 1/2 )
m
9 1 m~ 4
(2 5m "~377m
4 /4 8
7
1
( 3 m~
3
( 7m
4
(8
SECTION A et/and C
78 3/4"(2000mm)
The micro protective layer formed during
its application will make the water bead
along the glass for easy maintenance.
THE MAINTENANCE OF YOUR
SHOWER
Never use of powder or scouring pads.
Simply clean the door with a solution of
water and vinegar,1 to 5.You can use a
mild detergent but never use ammoniac,
it could dammage the glass surface.
PORTE REVERSIBLE
La porte doit être du même côté que le
panneau de retour.
The door must be the same side as
the side pannel.
REVERSIBLE DOOR
Les instructions montrés au manuel sont
pour le montage de la porte droite.
The instructions shown in the manual
is for the installation of the right door.
2 possibilité d'installation de la poignée en haut ou en bas
2 choices install the handle up or down
Les pivots doivent toujours être installer du coté du mur
The pivots must always be installed on the side of the wall
MANUEL D’INSTALLATION / INSTALLATION MANUAL
IMPORTANT
Inspecter le produit avant de procéder à l'installation.
La garantie sera invalide si le produit a été installé avec des défauts apparents.
ATTENTION
Lors de l’installation.l'application de silicone doit être à l'extérieur de la douche, car si appliqué
à l'intérieur,cela peut causer des fuites d'eau !
Veuiller lire attentivement ce manuel d’instruction avant de commencer l’installation.
Conserver ce manuel pour référence ultérieure.
IMPORTANT
Thoroughly inspect your product before proceeding with the installation.
The warranty will be void if the productis installed with a conspicuous defect.
CAUTION
To prevent leaks, silicone must be applied on the outside of the shower and not on the inside!
Read all instructions carefully before starting the installation.
Save this manual for future reference.
1
2
3
4
5
8
6
21
7
9
22
10
11
12
23
13
24
14
25
15
26
16
17
18
27
19
20
2.5mm / 4.0mm
32"/42"/48"
Code
2
1
1
2
1
3
1
4
8
5
1
6
1
7
1
8
1
9
1
10
1
11
8
12
4
13
4
14
1
15
1
Vis 8 x 1
Screw 8 x 1
Couvert d'extrusion mural chrome kit
Channel cap extrusion chrome kit
Couvert du pivot
Pivot cap
Vis en V 8 x 1
Flat screw 8 x 1
kit pivot bas et haut
Pivot kit top and bottom
Joint d'étanchéité verticale
Vertical gasket
Porte de pivot clair
Clear pivot door
Extrusion du pivot Amaly
Pivot channel Amaly
Extrusion murale Chrome Amaly
Chrome Wall Channel Amaly
Cap de l'extrusion murale Amaly
Wall channel cap Amaly
Cheville murale
Wall anchor
Vis 8 X 1 1/2 '' tête plate
Flat head screw 8 X 1 1/2 ''
Vis auto perçante 8 x 1/2"
Self tapping screw 8 x 1/2"
Joint anti éclaboussure petit
Backsplash gasket small
Support a pivot bas et haut
Pivot support top and bottom
36"/60"
Code
32"/42"/48"
Code
PV001899 PV001899
16
1
PQ015202 PQ015202
17
1
PQ015302 PQ015302
18
1
PV001899 PV001899
19
1
PQ015402 PQ015402
20
1
PJ005310
PJ005310
21
1
PG008120 PG008220
22
1
PA002602 PA002602
23
4
PA002702 PA002702
24
5
PA002802 PA002802
25
1
PV000199 PV000199
26
1
PV000799 PV000799
27
1
PV001399 PV001399
PJ005410
PJ005410
PQ015502 PQ015502
Ancrage chrome d'anti éclaboussure avec cap
Chrome bracket for backsplash with cap
Anti éclaboussure chrome
Chrome back splash
Joint anti éclaboussure long
Backsplash gasket long
Aimant A 78 3/4" 2000mm
Magnet A 78 3/4" 2000mm
Poignée chrome
Chrome handle
Extrusion avec aimant Amaly
Channel with magnet Amaly
Extrusion mural d'aimant chrome
Chrome wall chanel for magnet
Vis 1 5 /8 '' tete plate
1 5/8 '' flat head screw
Cheville murale
Wall anchor
Vis en V 8 x 1
Flat screw 8 x 1
Ancrage chrome d'anti éclaboussure avec cap
Chrome bracket for backsplash with cap
Kit de clé Allan
Allan key kit
36"/60"
Code
PQ015602 PQ015602
PQ015702 PQ015802
PJ005510
PJ005610
PJ003110
PJ003110
PP000902 PP000902
PA002902 PA002902
PA003002 PA003002
PV000299 PV000299
PV000199 PV000199
PV001899 PV001899
PQ015602 PQ015602
PT000299 PT000299
1
2
6
SP 10
3
7
4
5
8
9
10
10"Code
16"Code
24"Code
1A
1
Barre transversale / cross-bar
PQ015902 PQ016002 PQ016102
1A
1
Attache barre à barre / Bar to bar attachment
PQ016202 PQ016202 PQ016202
1A
1
Attache sur la vitre / Attached on the glass
PQ016302 PQ016302 PQ016302
2
1
Joint de serrage / Squeeze gasket
PJ005710
3
1
Extrusion murale Chrome / Chrome Wall Channel
PA000002 PA000002 PA000002
4
5
Vis 8 X 1 1/2 '' tête plate / Flat head screw 8 X 1 1/2 ''
PV000799 PV000799 PV000799
5
6
Cheville murale / Wall anchor
PV000199 PV000199 PV000199
6
1
Aimant B 8mm 78 3/4" 2000mm
Magnet B 8mm 78 3/4" 2000mm
PJ005610
7
1
Panneau fixe / Fix panel
PG008320 PG008420 PG008520
8
1
Vis en V 8 x 1 / Flat screw 8 x 1
PV001899 PV001899 PV001899
9
1
Ancrage chrome pour anti éclaboussure kit
Chrome bracket for back splash kit
PQ016402 PQ016402 PQ016402
10
1
Outil pour joint de serrage / Squeeze gasket tool
PT000399 PT000399 PT000399
SP10A
1
Barre d'attache 36 / brace bar 36
PQ016502 PQ016502 PQ016502
SP10A
1
Attache au mur / Attaches to the wall
PQ016602 PQ016602 PQ016602
SP10A
1
Attache sur la vitre / Attached on the glass
PQ016302 PQ016302 PQ016302
PJ005710
PJ005610
PJ005710
PJ005610
3
SP 1
SP 2
SP 7
SP 3
SP 4
9
SP 10
SP 5
9
SP 11
SP 6
SP 12
SP 8
SP 9
Code
4
SP1
1
SP2
1
SP3
5
SP4
4
SP5
1
SP6A
1
SP6B
1
SP6B
1
SP7
1
SP8
1
SP9
1
SP10
1
SP11
1
Couvert d'extrusion mural Chrome
Channel cap extrusion
Extrusion murale Chrome
Chrome Wall Channel
Cheville murale
Wall anchor
Vis 8 X 1 1/2 '' tête plate
Flat head screw 8 X 1 1/2 ''
Joint de serrage
Squeeze gasket
Panneau de retour clair de retour 8 mm 32''
Clear Return panel 8 mm 32''
Panneau de retour clair de retour 8 mm 36''
Clear Return panel 8 mm 36''
Panneau de retour clair de retour 8 mm 42''
Clear Return panel 8 mm 42''
aimant B 90 8mm 2000mm
Magnet B 90 8mm 2000mm
Vis 8 X 1 5 /8 '' tête en V
Flat head screw 8 X 1 5/8 ''
Ancrage chrome 90 pour anti éclaboussure KIT
90 Chrome bracket for back splash KIT
Outil pour joint de serrage
Squeeze gasket tool
Support de nivellement pour vitre
Leveling support glass
Code
PQ000102
SP12A
1
PA000002
SP12A
1
PV000199
SP12A
1
PV000799
SP12A
1
PJ005710
SP12A
1
SP12B
1
SP12B
1
SP12B
1
SP12B
1
SP12B
1
PG008620
PG008720
PG008820
PJ005210
PV000699
PQ016702
PT000399
PT000199
12A
Barre d'attache 36
Brace bar 36
Attache au mur
Attaches to the wall
Attache sur la vitre
Attached on the glass
Cheville murale
Wall anchor
Vis 8 X 1 1/2 '' tête plate
Flat head screw 8 X 1 1/2 ''
Barre d'attache 42
brace bar 42
Attache au mur
Attaches to the wall
Attache sur la vitre
Attached on the glass
Attache au mur
Attaches to the wall
Vis 8 X 1 1/2 '' tête plate
Flat head screw 8 X 1 1/2 ''
PQ016502
PQ016602
PQ016302
PV000199
PV000799
PQ016802
PQ016602
PQ016302
Seulement pour installation 32x32 et 36x36 coin
Only for 32x32 and 36x36 installation corner
12B Seulement avec panneau de retour 42
Only with side panel 42
PV000199
PV000799
5
A
20~30mm
01
Pour protéger le FINI de
votre base de douche.
To protect your shower
base finish.
24 H
ATTENTION !
Attendre 24h avant d'installer votre
porte de douche, afin de permettre au
mortier et à la finition de sécher
complètement.
WARNING !
Wait 24h before proceeding with the
installa-tion of the shower door. This
will ensure that the finish and mortar
is dry.
A
02
Céramiques
Tiles
(29 1/2"~30 3/4") (748mm~778mm)
(33 1/2"~34 1/2") (849mm~879mm)
32"
36"
1"
23mm
9
2
Inverser les étapes pour l'installation du pivot à gauche
Reverse the steps for to install the pivot on the left side.
6
A
03
9
1
2
1/4"
4X
3
1"
23mm
9
4
11
Installation temporaire du montant mural / temporary installation
wall channel
Installer 2 vis
Install 2 screws
Marquer le montant mural de chaque cotés
Mark the wall channel on both side
4
A
04
8
GAUCHE
LEFT
DROITE
RIGHT
PENTE
SLOPE
Important
Choisir l'ancrage avec la pente vers l'intérieur pour installer en bas
Select the bracket with the slope inward to settle down
Installer le bouton d'ouverture ascendant / descendant dans I'ancrage du bas
Install the button lift up in the bottom bracket
4
7
A
1
05
1
Insérer le montant du pivot 8 à l'intérieur du montant mural 9
Insert the pivot channel 8 within the wall channe 9
2
1/4"
Insérer le support à pivot (ne pas visser) et marquer les trous
2
Insert the pivot support (do not screw) and mark the holes
3
Enlever le montant du pivot 8 et le montant mural 9 pour percer les trous
Remove the pivot channel 8 and wall channel 9 to drill the holes
4
Réinstaller le montant mural no9 et insérer le montant du pivot no8
reinstall the wall channel no9 and insert the pivot channel no8
3X
3
11
4
11
Préparation de la porte /Doorpreparation
A
06
Installation en bas ou en haut
Install top or bottom
1
2
OU
OR
3
8
1
Enlever les caps et les vis sur les deuy pivots
Remove the caps and the screws on the two pivots
2
Choisir le positionnement de la poignée no 20
Choose the positioning of the handle no 20
3
Installer les pivots et la poignée
Install the pivots and the handle
Pivot ascendant
ou descendant
Pivot lift-up
20
A
07
Étape difficile de l'installation recommandons 2 personnes
Difficult step of the installation,we strongly recommend 2 persons
1
2
3
4
4
Visser temporairement
Screw temporarily
Placer un bloc de 1"(25mm)
Placer a block of 1"(25mm)
1"
25
m
m
Enlever l'ancrage du pivot de haut
Remove upper bracket pivot
1
5
Insérer la porte
Insert the door
Visser l'ancrage du pivot du haut
2 Screw upper bracket pivot
5/16"
8mm
Visser le support du pivot au mur et sur l'ancrage du pivot
3 Screw the pivot bracket to the wall and anchor the pivot
5/16"
8mm
Devisser un peu les pivots pour ajuster la porte à 5/16"(8mm) du montant du pivot
5
Unscrew slightly pivots to adjust the door 5/16"(8mm) of the amount of pivot
9
A
08
19
21
Installer les 2 aimants No19 et 21
Install the 2 magnets No19et 22
Devisser un peu les vis de la bracket du pivot
Unscrew slightly the screws of the pivot bracket
Ajuster la porte par rapport au mur et marquer
Adjust the door to the wall and mark
A
09
22
1
21
2
1/4"
Intaller le montant d'almant No22
Intall the magnet channel No22
24
22
23
10
3
4
Ajuster la porte et visser la bracket du pivot
Adjust the door and screw the bracket pivot
A
10
1
PERCER 1/8" 3mm
DRILL 1/8" 3mm
4X
3
COUPER
AU
BESOIN
CUT AS
NEEDED
2
4
10
4
11
26
1
3mm
A
1/8"
17
16
2
7
5
25
4
26
17
16
17
3
6
26
17
4
16
11
A
12
3
6
4
COUPER
AU
BESOIN
CUT AS
NEEDED
6
5
6
A
13
24 H
1
3
2
1
2
3
12
B
01
42" (39"~41") (988mm~1043mm)
48" (44 3/4"~47") (1140mm~1195mm)
60" (56 3/4"~59") (1441mm~1496mm)
A
3
A+3/8"=B
A+10mm=B
B
Inverser les étapes pour la porte coulissante à gauche
Reverse the steps for the sliding door on the left
SUITE / CONTINUED
B
1
02
3
2
1/4"
3
5
4
3
4
13
B
03
6
Minimum 3/8"(10mm)
3
Commencez par le bas
Start at the bottom
7
2
interieur
Inside
3
10
7
Insérer partiellement le joint de serrage.
ajuster et serrer seulement à la fin de
l’installation de la porte.
Partially insert gasket. adjust & tighten
at the end of door installation.
SUITE / CONTINUED
B
04
1
PERCER 1/8" 3mm
DRILL 1/8" 3mm
4X
3
2
4
10
14
1
9
B
17
05
16
6
2
16
17
9
3mm
7
1/8"
17
3
7
9
17
4
16
5
3mm
4
8
1/8"
9
SUITE / CONTINUED
B
06
1
2
50 "
mm
2
SP 10
6mm
3
4
5
6
15
B
07
3
6
4
COUPER
AU
BESOIN
CUT AS
NEEDED
6
5
6
SUITE / CONTINUED
B
08
1
24 H
3
2
1
2
3
16
01
42"
(39"~39 3/4") (988mm~1012mm)
32"
36"
(29"~30") (738mm~762mm)
(33"~34") (840mm~864mm)
C
SP 2
SP 2
Inverser les étapes pour la porte coulissante à gauche
Reverse the steps for the sliding door on the left
SUITE / CONTINUED
C
1
02
SP 2
2
6mm 1/4"
3
SP 3
4
33mm
SP 4
SP 2
4X
17
C
03
Minimum 3/8"(10mm)
SP 2
Commencez par le bas
Start at the bottom
SP 5
interieur
Inside
SP 2
SP 6
SP 10
SP 6
Insérer partiellement le joint de serrage.
ajuster et serrer seulement à la fin de
l’installation de la porte.
Partially insert gasket. adjust & tighten
at the end of door installation.
SUITE / CONTINUED
C
04
1
SP 7
SP 7
SP 9
3mm
2
1/8"
SP 9
3
SP 8
18
SP 9
C
05
1
2
SP 12
50
6mm
mm
3
4
5
6
32"
36"
32"
SUITE / CONTINUED
C
1
06
32"
2
6mm
3
4
5
6
7
32"
36"
42"
19
C
07
24 H
SP 1
20
21
347B Charles-Marchands Repentigny J5Z 4N8
Québec Canada
Tel: 1-855-492-4242
Fax: 1-866-735-6885
[email protected]
www.zitta.ca