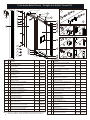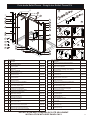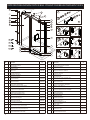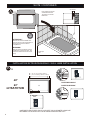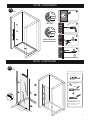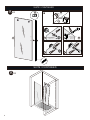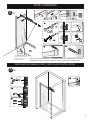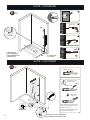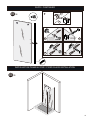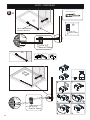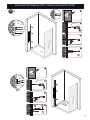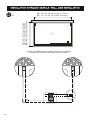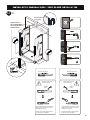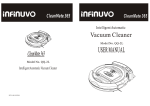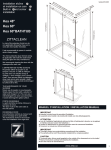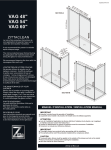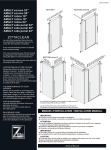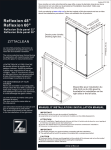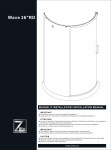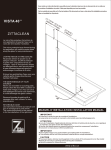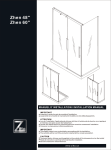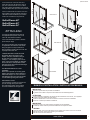
1
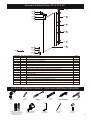
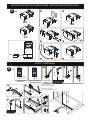
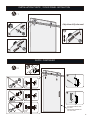
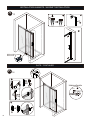
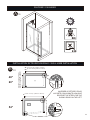
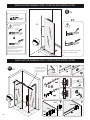
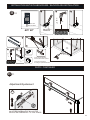
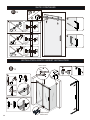
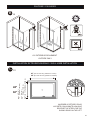
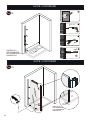
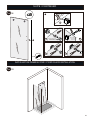
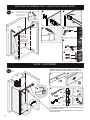
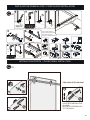
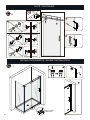
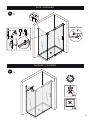
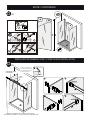
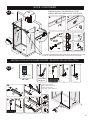
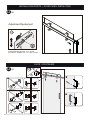
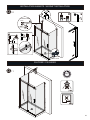
Visit our website at www.zitta.ca for the
last update of this document and see a
video about the installation procedure.
Video not available for all products.
78 3/4''
2000mm
Update:20150519
Vous rendre sur notre site internt le
www.zitta.ca pour la dernière mise à
jour de ce document et voir un vidéo
sur la procédure d’installation du produit.
Vidé,pasdisponible pour tous les produits.
SECTION A
63''
1600mm
Bellini/Piazza 48"
Bellini/Piazza 60"
Bellini/Piazza 54"
ZITTACLEAN
Le micro film protecteur formé lors de
son application,fera perler l'eau sur le
verre afin d'en faciliter l'entretien.
II est recommandé de passer la raclette
après chaque usage.
SECTION B
The micro protective layer formed during
its application will make the water bead
along the glass for easy maintenance.
We recommend cleaning the door with the
squeegee after each use.
L'ENTRETIEN DE VOTRE DOUCHE
Ne jamais utiliser de poudre ou de
tampon à récurer .Il suffit de nettoyer
la porte avec une solution d'eau et
vinaigre, 1 once vinaigre pour 5 onces
d’eau. Vous pouvez utiliser un détergent
doux mais aucun autre produit à base
d’ammoniaque cela pourrait endommager
la surface de la vitre.
SECTION C
THE MAINTENANCE OF YOUR
SHOWER
Never use of powder or scouring pads.
Simply clean the door with a solution of
water and vinegar,1 to 5.You can use a
mild detergent but never use ammoniac,
it could dammage the glass surface.
REVERSIBLE DOOR
Les instructions montrés au manuel sont
pour le montage de la porte droite.
The instructions shown in the manual
is for the installation of the right door.
SECTION D
MANUEL D’INSTALLATION / INSTALLATION MANUAL
IMPORTANT
Inspecter le produit avant de procéder à l'installation.
La garantie sera invalide si le produit a été installé avec des défauts apparents.
ATTENTION
Lors de l’installation.l'application de silicone doit être à l'extérieur de la douche, car si appliqué
à l'intérieur,cela peut causer des fuites d'eau !
Veuiller lire attentivement ce manuel d’instruction avant de commencer l’installation.
Conserver ce manuel pour référence ultérieure.
IMPORTANT
Thoroughly inspect your product before proceeding with the installation.
The warranty will be void if the productis installed with a conspicuous defect.
CAUTION
To prevent leaks, silicone must be applied on the outside of the shower and not on the inside!
Read all instructions carefully before starting the installation.
Save this manual for future reference.
www.zitta.ca
1
Porte droite Bellini/Piazza - Straight door Bellini/ Piazza R14
⑥
24
8
8A
⑦
10
①
30
11
2
29
3
4
9
12
5
13
8B
10A
6A
14
15
6B
10B
11A
16
27
17
20
21
31
28
22
18
23
19
Numéro Qté
Qty
NO
7B
11B
25
26
7A
Description
Description
48"
60"
Numéro Qté
Qty
NO
12A 30A
12B 30B
Description
Description
9A
9B
48"
60"
1
1
Extrusion murale Chrome
Chrome Wall Channel
PA000002 PA000002
12B/30B
1
Ancrage chrome mural pour bar Piazza
Chrome Wall bracket for bar Piazza
2
1
Joint de serrage
Squeeze gasket
PJ000110 PJ000110
13
1
Aimant A 78 3/4" 2000mm
Magnet A 78 3/4" 2000mm
PJ003110 PJ003110
PJ003210 PJ003210
PQ009602 PQ009602
3
8
Cheville murale
Wall anchor
PV000199 PV000199
14
1
Aimant B collant 78 3/4" 2000mm
Magnet B adhesive 78 3/4" 2000mm
4
6
Vis 1 5/8" tete plate
1 5/8" flat head screw
PV000299 PV000299
15
1
Porte clair 8 mm
Clear Door 8 mm
PG001620 PG001820
5
1
Panneau fixe clair
Clear fixe panel
PG001520 PG001720
16
1
Poigné chrome 12''
Chrome handle 12''
PP000702 PP000702
6A
1
Cap pour bar Bellini
Cap for bar Bellini
PQ008802 PQ008802
17
1
Kit de joint pour porte et panneau fixe
Gasket kit for door and fix panel
PJ001120 PJ001120
6B
1
Cap pour bar Piazza
Cap for bar Piazza
PQ008902 PQ008902
18
1
Cap pour trou de vis
Screw cover for hole
PQ006402 PQ006402
7A
1
Amortisseur chrome de roulette Bellini
Chrome Roller bumper Bellini
PQ009002 PQ009002
19
1
Ancrage chrome d'anti éclaboussure mural
Chrome mural bracket for backsplash
PQ009702 PQ009702
7B
1
Amortisseur chrome de roulette Piazza
Chrome Roller bumper Piazza
PQ009102 PQ009102
20
4
8A
2
Ecrou de barre pour panneau fixe Bellini
Fix panel screw for glass Bellini
PQ002102 PQ002102
21
1
8B
2
Ecrou de barre pour panneau fixe Piazza
Fix panel screw for glass Piazza
PQ009202 PQ009202
22
1
Anti éclaboussure chrome
Chrome back splash
PQ009802 PQ009902
9A
1
Bar de roulement Bellini chrome
Bellini Chrome rolling bar
PQ006002 PQ002702
23
1
Joint anti éclaboussure
Back splash gasket
PJ003310 PJ003410
9B
1
Bar de roulement Piazza chrome
Piazza Chrome rolling bar
PQ009302 PQ009402
24
1
Couvert d'extrusion mural Chrome
Channel cap extrusion
PQ000102 PQ000102
1
Outil pour joint de serrage
Squeeze gasket tool
PT000399 PT000399
PT000199 PT000199
Vis 8 X 1 5 /8 '' tête en V
PV000699 PV000699
Flat head screw 8 X 1 5/8 ''
Ancrage chrome d'anti éclaboussure de panneau fixe
PQ010002 PQ010002
Chrome Fix panel bracket for backsplash
2
Kit de roulette chrome Bellini
Bellini chrome roller kit
10B
2
Kit de roulette chrome Piazza
Piazza chrome roller kit
PR000502 PR000502
26
1
Support d'installation pour vitre
Glass Wedge spacer
11A
2
Kit anti jump Bellini chrome pour panneau fixe
Bellini Chrome anti jump kit for fix panel
PQ002302 PQ002302
27
1
Kit de clé Allan
Allan key kit
PT000299 PT000299
11B
2
Kit anti jump Piazza chrome pour panneau fixe
Piazza Chrome anti jump kit for fix panel
PQ009502 PQ009502
28
2
Clé d'ajustement de roulette
Roller wrench tool
PT000499 PT000499
1
Ancrage chrome mural pour bar Bellini
Chrome Wall bracket for bar Bellini
PJ003510 PJ003510
10A
PR000202 PR000202
25
PQ001902 PQ001902
29
1
Joint 90 degré pour joindre 2 vitres
90 degrees gasket to joined 2 glasses
NOTE: ITEM 29-30 INSTALLATION FERMETURE SUR MUR OU MUR PLAT
ITEM 29-30 INSTALLATION CLOSING ON WALL OR FLAT WALL
31
1
Support de décalage pour anti-éclaboussure
PQ012902 PQ012902
Offset backsplash bracket
12A/30A
2
Porte droite Bellini/Piazza - Straight door Bellini/ Piazza R14
8
①
⑥
⑦
8A
10
11
2
9
3
4
8B
12
13
5
10A
14
6A
15
29
30
16
25
17
6B
10B
11A
7A
26
27
28
7B
11B
20
21
22
12A
18
23
9A
19
12B
Numéro Qté
Qty
NO
Description
Description
54"
Numéro Qté
Qty
NO
Description
Description
9B
54"
1
1
Extrusion murale Chrome
Chrome Wall Channel
PA001802
12B
1
Ancrage en angle chrome mural pour bar Piazza
Angle chrome wall bracket for bar Piazza
2
1
Joint de serrage
Squeeze gasket
PJ000110
13
1
Aimant A 78 3/4" 2000mm
Magnet A 78 3/4" 2000mm
PJ003110
PJ003810
PQ010402
3
6
Cheville murale
Wall anchor
PV000199
14
1
Aimant B collant avec angle 78 3/4" 2000mm
Magnet B adhesive with angle 78 3/4" 2000mm
4
4
Vis 8 X 1 1/2 '' tête plate
Flat head screw 8 X 1 1/2 ''
PV000799
15
1
Porte clair 8 mm
Clear Door 8 mm
PG005920
5
1
Panneau fixe Kea clair
Kea Clear Fixe panel
PG005820
16
1
Poigné chrome 12''
Chrome handle 12''
PP000702
6A
1
Cap pour bar Bellini
Cap for bar Bellini
PQ008802
17
1
Kit de joint pour porte et panneau fixe
Gasket kit for door and fix panel
PJ001120
6B
1
Cap pour bar Piazza
Cap for bar Piazza
PQ008902
18
1
Cap pour trou de vis
Screw cover for hole
PQ006402
7A
1
Amortisseur chrome de roulette Bellini
Chrome Roller bumper Bellini
PQ009002
19
1
Ancrage chrome en angle pour anti éclaboussure
Angle chrome bracket for back splash
PQ010502
7B
1
Amortisseur chrome de roulette Piazza
Chrome Roller bumper Piazza
PQ009102
20
2
8A
2
Ecrou de barre pour panneau fixe Bellini
Fix panel screw for glass Bellini
PQ002102
21
1
Vis 8 X 1 5 /8 '' tête en V
Flat head screw 8 X 1 5/8 ''
Ancrage chrome d'anti éclaboussure de panneau fixe
Chrome Fix panel bracket for backsplash
PV000699
PQ010002
1
Anti éclaboussure chrome
Chrome back splash
PQ010602
PJ003910
2
Ecrou de barre pour panneau fixe Piazza
Fix panel screw for glass Piazza
9A
1
Bar de roulement Bellini chrome
Bellini Chrome rolling bar
PQ010102
23
1
Joint anti éclaboussure
Back splash gasket
9B
1
Bar de roulement Piazza chrome
Piazza Chrome rolling bar
PQ010202
25
1
Outil pour joint de serrage
Squeeze gasket tool
PT000399
1
Support d'installation pour vitre
Glass Wedge spacer
PT000199
PT000299
8B
PQ009202
22
2
Kit de roulette chrome Bellini
Bellini chrome roller kit
10B
2
Kit de roulette chrome Piazza
Piazza chrome roller kit
PR000502
27
1
Kit de clé Allan
Allan key kit
11A
2
Kit anti jump Bellini chrome pour panneau fixe
Bellini Chrome anti jump kit for fix panel
PQ002302
28
2
Clé d'ajustement de roulette
Roller wrench tool
PT000499
11B
2
Kit anti jump Piazza chrome pour panneau fixe
Piazza Chrome anti jump kit for fix panel
PQ009502
29/30
4
Cache vis chrome
Chrome Screw cap
PQ002902
1
Ancrage en angle chrome mural pour bar Bellini
Angle chrome Wall bracket for bar Bellini
PQ010302
10A
12A
PR000202
26
INSTALLATION AVEC PANNEAU DE COTÉ SEULEMENT.
INSTALLATION WITH SIDE PANEL ONLY.
3
PORTE DROITE BELLINI/PIAZZA PORTE DE BAIN - STRAIGHT DOOR BELLINI/ PIAZZA BATH TUB R14
⑥
24
8
⑦
8A
10
①
11
2
3
4
9
12
5
13
8B
14
10A
6A
15
6B
10B
16
11A
25
7A
26
20
21
31
28
17
9A
12A
22
18
19
23
12B
Numéro Qté
Qty
NO
7B
11B
27
Description
Description
60"
Numéro Qté
Qty
NO
9B
Description
Description
60"
1
1
Extrusion murale Chrome
Chrome Wall Channel
PA001202
12B
1
Ancrage chrome mural pour bar Piazza
Chrome Wall bracket for bar Piazza
PQ009602
2
1
Joint de serrage
Squeeze gasket
PJ001710
13
1
Aimant A 63" 1600mm
Magnet A 63" 1600mm
PJ003610
3
6
Cheville murale
Wall anchor
PV000199
14
1
Aimant B collant 63" 1600mm
Magnet B adhesive 63" 1600mm
PJ003710
PG004220
4
4
Vis 1 5/8" tete plate
1 5/8" flat head screw
PV000299
15
1
Porte clair 28'' 8 mm
Clear Door 28'' 8 mm
5
1
Panneau fixe kea clair 30''
Kea Clear Fixe panel 30''
PG004120
16
1
Poigné chrome 12''
Chrome handle 12''
PP000702
1
Cap pour bar Bellini
Cap for bar Bellini
PQ008802
17
1
Kit de joint pour porte et panneau fixe
Gasket kit for door and fix panel
PJ001920
6B
1
Cap pour bar Piazza
Cap for bar Piazza
PQ008902
18
1
Cap pour trou de vis
Screw cover for hole
PQ006402
7A
1
Amortisseur chrome de roulette Bellini
Chrome Roller bumper Bellini
PQ009002
19
1
Ancrage chrome d'anti éclaboussure mural
Chrome mural bracket for backsplash
PQ009702
7B
1
Amortisseur chrome de roulette Piazza
Chrome Roller bumper Piazza
PQ009102
20
4
8A
2
Ecrou de barre pour panneau fixe Bellini
Fix panel screw for glass Bellini
PQ002102
21
1
8B
2
Ecrou de barre pour panneau fixe Piazza
Fix panel screw for glass Piazza
PQ009202
22
1
Anti éclaboussure chrome
Chrome back splash
PQ009902
1
Bar de roulement Bellini chrome
Bellini Chrome rolling bar
1
Joint anti éclaboussure
Back splash gasket
PJ003410
9B
1
Bar de roulement Piazza chrome
Piazza Chrome rolling bar
PQ009402
24
1
Couvert d'extrusion mural Chrome
Channel cap extrusion
PQ000102
10A
2
Kit de roulette chrome Bellini
Bellini chrome roller kit
PR000202
25
1
Outil pour joint de serrage
Squeeze gasket tool
PT000399
2
Kit de roulette chrome Piazza
Piazza chrome roller kit
1
Support d'installation pour vitre
Glass Wedge spacer
PT000199
11A
2
Kit anti jump Bellini chrome pour panneau fixe
Bellini Chrome anti jump kit for fix panel
PQ002302
27
1
Kit de clé Allan
Allan key kit
PT000299
11B
2
Kit anti jump Piazza chrome pour panneau fixe
Piazza Chrome anti jump kit for fix panel
PQ009502
28
2
Clé d'ajustement de roulette
Roller wrench tool
PT000499
1
Support de décalage pour anti-éclaboussure
Offset backsplash bracket
PQ012902
6A
9A
10B
12A
4
1
Ancrage chrome mural pour bar Bellini
Chrome Wall bracket for bar Bellini
PQ002702
PR000502
PQ001902
23
26
31
Vis 8 X 1 5 /8 '' tête en V
Flat head screw 8 X 1 5/8 ''
Ancrage chrome d'anti éclaboussure de panneau fixe
Chrome Fix panel bracket for backsplash
PV000699
PQ010002
Panneau Fix Bellini/ Piazza 32'' & 36'' & 42"
SP 1
SP 7
SP 8
SP 9
SP 2
SP 10
SP 3
SP 4
SP 5
SP 6
SP 11
SP 12
SP 14
SP 13
Numéro / NO Qté / Qty
1
1
2
1
3
1
4
4
5
4
6A
1
6B
1
6C
1
7
2
8
2
9
2
10
1
11
1
1
12
13
1
14
1
Description / Description
Couvert d'extrusion mural Chrome / Channel cap extrusion
Extrusion murale Chrome / Chrome Wall Channel
Joint de serrage / Squeeze gasket
Cheville murale / Wall anchor
Vis 1 5 /8 '' tete plate / 1 5/8 '' flat head screw
Panneau clair de retour 10 mm 32''/ Clear Return panel 10 mm 32''
Panneau clair de retour 10 mm 36"/ Clear Return panel 10 mm 36''
Panneau clair de retour 10 mm 42''/ Clear Return panel 10 mm 42''
Vis mécanique M5 x 20/Machine screw M5 x 20
Joint de vitre/gasket
Entretoise/Sleeve
Cap pour vitre chrome M5/Chrome cap for glass M5
Cap pour trou de vis/Screw cover for hole
Vis 8 X 1 5 /8 '' tête en V/ Flat head screw 8 X 1 5/8 ''
Ancrage chrome 90 pour anti éclaboussure/90 Chrome bracket for back splash
Support d'installation pour vitre/Glass Wedge spacer
Code
PQ000102
PA000002
PJ000110
PV000199
PV000299
PG006020
PG006120
PG006220
PV001199
PJ004010
PQ010799
PQ010802
PQ006402
PV000699
PQ010902
PT000199
OUTILS ET MATÉRIAUX REQUIS / TOOLS AND MATERIALS REQUIRED
PERCEUSE
DRILL
FORETS: 1/8", 3/16" ET 1/4"
*FORET À MAÇONNERIE
DRILL BITS: 1/8", 3/16" ET 1/4"
*MASONRY DRILL BIT
VIS
SCREWS
RUBAN À MESURER
MEASURING TAPE
NIVEAU
LEVEL
TOURNEVIS
SCREWDR
ÉQUERRE
SET SQUARE
COUTEAU DE PRECISION
PRECISION KNIFE
CRAYON
PENCIL
SILICONE
SILICONE
MAILLET
MALLET
5
SUITE / CONTINUED
20~30mm
A
Pour protéger le FINI de
votre base de douche.
To protect your shower
base finish.
01
24 H
ATTENTION !
Attendre 24h avant d'installer votre
porte de douche, afin de permettre au
mortier et à la finition de sécher
complètement.
WARNING !
Wait 24h before proceeding with the
installa-tion of the shower door. This
will ensure that the finish and mortar
is dry.
Céramiques
Tiles
INSTALLATION EXTRUSION MURALE / WALL JAMB INSTALLATION
A
02
48"
60"
(45 1/4"~47") (1150mm~1192mm)
(57 7/16"~59 5/8") (1489mm~1514mm)
1
1/4" to 3/4"
6mm to 19mm
1/4" to 3/4"
6mm to 19mm
48"
PORTE DE BAIN 60"
60"
BATHTUB DOOR60"
60"BATHTUB
GAUCHE
LEFT
INVERSER LES ETAPES POUR LA PORTE COULISSANTE A GAUCHE.
REVERSE THE STEPS FOR THE SLIDING DOOR ONTHE LEFT.
6
1/4"
6mm
SUITE / CONTINUED
A
03
1
1/4" to 3/4"
6mm to 19mm
48"/ 60"
2
6mm 1/4"
1/4"
6mm
3
3
PORTE DE BAIN 60"
BATHTUB DOOR60"
4
4
4X
SUITE / CONTINUED
A
04
Minimum 3/8"(10mm)
Commencez par le bas
Start at the bottom
interieur
Inside
5
26
Insérer partiellement le joint de serrage.
ajuster et serrer seulement à la fin de
l’installation de la porte.
Partially insert gasket. adjust & tighten
at the end of door installation.
7
SUITE / CONTINUED
A 05
13
10A
2
OR
10B
2X
15
NE PAS INSTALLER
LE CAP DO NOT
INSTALL CAP
NE PAS INSTALLER
LE CAP DO NOT
INSTALL CAP
1
2X
SUITE / CONTINUED
A 06
8
2X
2X
SUITE / CONTINUED
3
A
07
12
9
1
2
4
5
8A
OR
8B
6
7
m
0~ 2 5 m
Couper le rail d'aluminium
selon les dimensions requises
Cut aluminium rail according
to required dimensions
INSTALLATION TEMPORAIRE POUR MARQUER L'EMPLACEMENT DE L'ANCRAGE
TEMPORARY INSTALLATION TO IDENTIFY THE LOCATION OF THE BRACKET
INSTALLATION PANNEAU FIXE / FIXED GLASS INSTALLATION
A
1
08
6mm 1/4"
4
2
3
9
INSTALLATION ANTI-ECLABOUSSURE / BACKSPLASH INSTALLATION
A
1
09
2
RH
RH
LH
8mm
3
4
5
6
10mm
LH
SUITE / CONTINUED
10
48"/ 60"
5
PORTE DE BAIN 60"
BATHTUB DOOR60"
ENLEVER
REMOVE
Couper seuil d'aluminium
selon les dimensions requises
Cut aluminum threshold
according to required dimensions
23
19
22
0~ 25
mm
OR
3mm
21
8 18
7
1/8"
1/4"
6mm
6
OR
4
20
1/4" to 3/4"
6mm to 19mm
Y
21
X
31
1/8"
Y-5mm
X
10
3
2
3mm
A
1
19
31
INSTALLATION PORTE / DOOR PANEL INSTALLTION
A
11
Adjustment/Ajustement
28
2X
2X
2X
SUITE / CONTINUED
A
11A
12
11B
2
1
16
interieur
Inside
VERSION 1
3
interieur
Inside
VERSION 2
interieur
Inside
AJUSTER PARRALLÈLE
AU MUR
ADJUSTED PARRALLEL
TO THE WALL
11
INSTALLATION AIMANTS / MAGNET INSTALLATION
A
13
2
1
14
3
REPLACER
REPLACE
SUITE / CONTINUED
A
14
24
3
1
7A
OR
7B
Intérieur/Inside
4
8mm
17
10mm
2
OR
6A
12
6B
SILICONE / CAULKING
A
15
24 H
INSTALLATION EXTRUSION MURALE / WALL JAMB INSTALLATION
48"
60"
01
42'' (40~41'') (1016~1041mm)
32'' (30''~31'') (762mm~787mm)
36'' (34 ″~35″)(863mm~ 886mm)
B
48" (45 1/4"~46 3/4") (1150mm~1187mm)
60" (57 7/16"~59 5/8") (1459mm~1514mm)
sp
=
INVERSER LES ÉTAPES POUR
LA PORTE COULISSANTE A GAUCHE
REVERSE THE STEPS FOR THE
SLIDING DOOR ON THE LEFT
54" (51 3/8"~52 1/4")~(1305mm~1327mm)
36 " (34 ″~35″) (863mm~ 886mm)
54"
=
13
SUITE / CONTINUED
1
B 02
2
6mm 1/4"
sp ②
BASE
3
sp4
4
5 8"
60 4" 46"
" 52 -1
58 "-1 16
"-1 32 8m
47 1m m
3m m
m
DIMENSION
RECOMMANDÉ
RECOMMENDED
DIMENSION
sp5
EXTERIEUR
OUTSIDE
4
4X
SUITE / CONTINUED
B 03
Minimum 3/8"(10mm)
Commencez par le bas
Start at the bottom
sp6
sp3
Interieur inside
Porte intérieur
Inside door
Insérer partiellement le joint de serrage.
ajuster et serrer seulement à la fin de
l’installation de la porte.
Sp13
14
Partially insert gasket. adjust & tighten
at the end of door installation.
1/2 13mm
DIMENSION RECOMMANDÉ
RECOMMENDED DIMENSION
SUITE / CONTINUED
B 04
10A
2
OR
10B
2X
NE PAS INSTALLER
LE CAP DO NOT
INSTALL CAP
NE PAS INSTALLER
LE CAP DO NOT
INSTALL CAP
2X
1
2X
2X
INSTALLATION PANNEAU FIXE / FIXED GLASS INSTALLATION
B 05
15
SUITE / CONTINUED
B 06
Minimum 3/8"(10mm)
15
NE PAS INSTALLER
DO NOT INSTALL
1/4"to 3/4"
6mm to 19mm
1/4"to 3/4"
6mm to 19mm
RH
8mm
10mm
LH
1
2
RH
3
4
5
6
1/4"to 3/4"
6mm to 19mm
16
LH
INSTALLATION PANNEAU FIXE / FIXED GLASS INSTALLATION
B 07
1
2
6mm 1/4"
1/4"to 3/4"
6mm to19mm
3
4
4X
1
2
6mm 1/4"
54"
3
29
30 4
4X
17
INSTALLATION PANNEAU FIXE / FIXED GLASS INSTALLATION
B
08
Minimum 3/8"(10mm)
54"
Commencez par le bas
Start at the bottom
SP
interieur
Inside
Insérer partiellement le joint de serrage.
ajuster et serrer seulement à la fin de
l’installation de la porte.
Ajuster porte et serrer joint de serrage.
Partially insert gasket. adjust & tighten
at the end of door installation.
Adjust door and tighten gasket.
INSTALLATION PANNEAU FIXE / FIXED GLASS INSTALLATION
B
1
09
2
Couper le rail d'aluminium
selon les dimensions requises
Cut aluminium rail according
to required dimensions
m
0~ 2 5 m
3
OR
Sp14
Sp9
4
Sp8
Sp7
18
Sp10
5
INSTALLATION ANTI-ECLABOUSSURE / BACKSPLASH INSTALLATION
1
2
3mm
B 10
3
1/8"
1/4" to 3/4"
6mm to 19mm
ENLEVER
REMOVE
48"/ 60"
4
5
7
6
Sp11
3mm
Sp12
0~ 25
1/8"
mm
Couper seuil d'aluminium
selon les dimensions requises
Cut aluminum threshold
according to required dimensions
Sp13
SUITE / CONTINUED
B 11
Adjustment/Ajustement
2X
25
25
AJUSTER PARRALLÈLE À LA VITRE
ADJUSTED PARRALLEL TO THE GLASS
19
SUITE / CONTINUED
B
11A
12
11B
2
1
interieur
Inside
VERSION 1
3
interieur
Inside
VERSION 2
interieur
Inside
INSTALLATION JOINTS / GASKET INSTALLATION
interieur inside
B 13
4
8mm
Sp1
3
1
10mm
7A
OR
7B
2
OR
6A
6B
REPLACER
REPLACE
20
SILICONE / CAULKING
B 14
24 H
À Ľ EXTERIEUR SEULEMENT
OUTSIDE ONLY
INSTALLATION EXTRUSION MURALE / WALL JAMB INSTALLATION
01
60"
36 " (34 ″~35″) (863mm~ 886mm)
48"
(1016mm~1041mm)
(30″~31″)
32 "
(762mm~787mm)
48" (45 1/4"~46 1/4") (1150mm~1177mm)
60" (57 7/16"~58 1/4") (1459mm~1479mm)
42 " (40″~41″)
C
=
=
INVERSER LES ÉTAPES POUR
LA PORTE COULISSANTE A GAUCHE
REVERSE THE STEPS FOR THE
SLIDING DOOR ON THE LEFT
21
SUITE / CONTINUED
1
C 02
2
6mm 1/4"
3
sp4
DIMENSION
RECOMMANDÉ
RECOMMENDED
DIMENSION
U
mm
68 3mm RIE
1
E
1
7
6"- -14 EXT
" 4 58" IDE
8
4 0" S
6 UT
O
R
sp5
4X
SUITE / CONTINUED
C 03
1/2"
13mm
DIMENSION
RECOMMANDÉ
RECOMMENDED
DIMENSION
22
4
SUITE / CONTINUED
C 04
10A
2
OR
10B
1
2X
2X
NE PAS INSTALLER
LE CAP DO NOT
INSTALL CAP
NE PAS INSTALLER
LE CAP DO NOT
INSTALL CAP
2X
2X
INSTALLATION PANNEAU FIXE / FIXED GLASS INSTALLATION
C 05
23
INSTALLATION PANNEAU FIXE / FIXED GLASS INSTALLATION
C 06
Couper le rail d'aluminium
selon les dimensions requises
1
2
3
4
5
B
Cut aluminium rail according
to required dimensions
m
0~ 2 5 m
TROU
HOLE
WALLSIDE
INSÉRER LA
BARRE AU
FOND DE
L'ANCRAGE
INSERT THE
BAR AT THE
BOTTOM OF
THE BRACKET
6mm 1/4"
6
A
7
A
SUITE / CONTINUED
B
C 07
INSÈRER AVANT DE POSER LA VITRE
INSERT BERORE INSTALLING THE GLASS
2
1
3
4
5
OR
AJUSTER LA BARRE POUR ENLIGNER AVEC LES
TROUS DE LA VITRE
LINE UP THE BAR TO ADJUST WITH THE HOLES
OF THE GLASS
24
INSTALLATION PANNEAU FIXE / FIXED GLASS INSTALLATION
3
2
4
20
3mm
C 08
1
1/8"
ENLEVER
REMOVE
5
31
6
OR
Couper seuil d'aluminium
selon les dimensions requises
23
Cut aluminum threshold
according to required dimensions
19
22
0~ 25
mm
21
OR
8 18
3mm
7
LH
RH
8mm
10mm
21
Y
31
X
1
2
4
5
RH
3
1/8"
Y-5mm
19
X
6
LH
INSTALLATION PORTE / DOOR PANEL INSTALLTION
C 09
Adjustment/Ajustement
28
2X
2X
2X
AJUSTER PARRALLÈLE
AU MUR
ADJUSTED PARRALLEL
TO THE WALL
25
SUITE / CONTINUED
11A
C 10
11B
2
1
16
interieur
Inside
VERSION 1
3
interieur
Inside
VERSION 2
interieur
Inside
INSTALLATION AIMANTS / MAGNET INSTALLATION
C 11
2
1
14
3
REPLACER
REPLACE
26
SUITE / CONTINUED
C 12
24
2
Intérieur/Inside
1
3
7A
OR
8mm
7B
17
10mm
SILICONE / CAULKING
C 13
24 H
27
C 01
D
32" (30"~31")(762~787mm)
36" (34"~35")(867~886mm)
42" (40"~41")(1016~1041mm)
48" (45 1/4"~46 1/4")(1150~1177mm)
60" (57 1/4"~58 1/4")(1454~1479mm)
Inverser les étapes pour la porte coulissante a gauche
Reverse the steps for the sliding door on the left
28
C 02
D
EXTERIEUR
OUTSIDE
DIMENSION
RECOMMANDÉ
RECOMMENDED
DIMENSION
4
40 8" (
"
4
(5 6~1
8~ 1
14 68m
73
mm m)
)
1/4"
Sp10
Sp10
1/2"
12mm
Minimum 3/8"(10mm)
Commencez par le bas
Start at the bottom
interieur
Inside
Minimum 3/8"(10mm)
Commencez par le bas
Start at the bottom
interieur
Inside
Insérer partiellement le joint de serrage.
ajuster et serrer seulement à la fin de
l’installation de la porte.
Insérer partiellement le joint de serrage.
ajuster et serrer seulement à la fin de
l’installation de la porte.
Partially insert gasket. adjust & tighten
at the end of door installation.
Partially insert gasket. adjust & tighten
at the end of door installation.
29
SUITE FIXE
/ CONTINUED
INSTALLATION PANNEAU
/ FIXED GLASS INSTALLATION
C 04
D
10A
OR
10B
1
2X
NE PAS INSTALLER
LE CAP DO NOT
INSTALL CAP
NE PAS INSTALLER
LE CAP DO NOT
INSTALL CAP
2X
2X
2X
INSTALLATION PANNEAU FIXE / FIXED GLASS INSTALLATION
C 05
D
Couper le rail d'aluminium
selon les dimensions requises
PANNEAU FIXE
FIX PANEL
1
B
Cut aluminium rail according
to required dimensions
m
0~ 2 5 m
TROU
HOLE
30
INSÉRER LA BARRE AU FOND DE L'ANCRAGE
INSERT THE BAR AT THE BOTTOM OF THE BRACKET
2
3
4
5
SUITE / CONTINUED
C 06
D
INSÉRER AVANT DE POSER LA VITRE
INSERT BEFORE INSTALLING THE GLASS
3
2
1
4
5
OR
AJUSTER LA BARRE POUR ENLIGNER AVEC LES TROUS DE LA VITRE
LINE UP THE BAR TO ADJUST WITH THE HOLES OF THE GLASS
INSTALLATION ANTI-ECLABOUSSURE / BACKSPLASH INSTALLATION
1
3
2
C 07
D
4
3mm
20
1/8"
1/4" to 3/4"
6mm to 19mm
ENLEVER
REMOVE
48"/ 60"
5
6
OR
31
Couper seuil d'aluminium
selon les dimensions requises
Cut aluminum threshold
according to required dimensions
23
8
19
22
0~ 25
mm
OR
3mm
21
8 18
7
Y
21
X
31
1/8"
Y-5mm
X
19
31
INSTALLATION PORTE / DOOR PANEL INSTALLTION
D 08
Adjustment/Ajustement
2X
25
25
AJUSTER PARRALLÈLE À LA VITRE
ADJUSTED PARRALLEL TO THE GLASS
SUITE / CONTINUED
D 09
11A
11B
2
1
16
interieur
Inside
VERSION 1
3
interieur
Inside
VERSION 2
interieur
Inside
32
INSTALLATION AIMANTS / MAGNET INSTALLATION
D 10
Sp1
3
4
5
interieur inside
1
8mm
10mm
2
7A
OR
7B
REPLACER
REPLACE
SILICONE / CAULKING
D 11
24 H
33
Garantie / Warranty
Garantie
Baignoire / Douche
Acrylique
Porte de Douche
Roulette et Penture
10 ans
5 ans
à Vie
Suite aux conditions et aux termes décrits ci-dessous,
Zitta garantit que le produit vendu est conforme
à ses
spécifications et qu'au moment de la vente, le produit est
exempt de tout vice et/ou défaut de fabrication. Cette
garantie n'est applicable que pour le premier acheteurutilisateur et ce pour la premi è re année à partir de la date
d'achat. Cette garantie ne peut
ê tre transférée à une
tierce personne. Cette garantie exclue tout frais relié au
déplacement, frais d'installation et/ou désinstallation et
aux frais de transport.
La présente garantie ne couvre pas les défauts ou bris
résultant d'Acte de Dieu, d'accident, de catastrophe,
d'abus, de négligence, d'une installation non conforme,
de l'ajout ou de la suppression de pi è ce ou
équipement,d'une mauvaise utilisation, de variation de
température intense, d'exposition aux produits
chimiques et a des abrasifs de tout genre ou de tache
provoquée par différent type d'eau tel une eau ferreuse
ou alcaline.
34
Warranty
Bathtub / Shower
Acrylic
Shower Door
Roller & Hinge
10 years
5 years
Lifetime
Following the terms and conditions described below,
Zitta warrants the product to be free from defects in
workmanship from the date of purchase. This warranty
applies to the initial date of purchase from an authorized
dealer for the owner/end-user only. This warranty cannot
be transferred to a third party. This warranty excludes
any expenses related to shipping, handling and/or
installation fees.
The present warranty does not cover the defects or
breaking resulting from any Act of God, accident,
catastrophe, abuse, negligence, improper installation,
addition or removal of parts or equipment, of misuse,
intensive variation of temperature, exposures to
chemicals and/or abrasives of any kind, stains caused
by different types of water such as ferrous or alkaline
water.
Zitta cannot be held responsible for the direct or indirect
damage caused by or resulting from fortuitous
occurrences, from the expenses of sundries, labor,
wastes of time, material or any other cost related to the
application or the replacement of the product or one of
its components. In the eventuality that a manufacturing
defect appears, the owner/enduser must have followed
the instructions of installation described in the
installation manual, have in his
possession the proof of purchase as well as a proof of
installation by a professional recognized by the
construction industry.
Zitta ne peut être tenu responsable des dommages
directs ou indirect causés ou résultant de cas fortuits,
des frais de main d'oeuvre, frais divers, perte de temps,
matériaux ou autres coûts relatifs
à l'application ou au
remplacement du produit ou à l'une de ses composantes.
Dans l'éventualité ou un défaut de fabrlcation se
manifeste, l'acheteur utilisateur devra avoir suivi les
instructions d'installation inscrites au manuel
d'instruction, devra présenter une preuve d'achat ainsi
qu'une preuve d'installation par un professionnel
reconnupar l'industrie de la construction. Zitta pourra a
son enti è re discrétion, réparer ou remplacer le produit
sur une base au prorata du prix alors en vigueur. Zitta se
réserve le droit de faire inspecter, sur le site, la
défectuosité par un représentant de son choix. Aucun
retour ne sera accepté sans l'autorisation au préalable
de Zitta.
Zitta will, at its own discretion, repair or replace the
product based on the selling price at the time of
purchase. Zitta reserves the right to inspect, on site, the
defect by a representative of its choice. Any return of
goods will not be accepted without the written
authorization from Zitta.
Entretien et prévention
Maintenance and prevention
Zitta recommande l'entretien des surfaces avec un
chiffon humide et du savon doux. L'utilisation de produits
abrasifs, grattoir, brosse ou tout autres objets pouvant
endommager la surface du prodult est a proscrire et
annulera la présente garantie. Vous réferer
à la section
《Nettoyage》 pour des directives spéclfiques
d'entretien du fabricant.
Zitta recommends the use of a wet cloth and soft soap
for the maintenance of surfaces. The use of gritting
scraper, brushes or any other scouring object which can
damage the surface of the product is to be proscrlbed
and will cancel the present warranty. Refer to the
“Cleaning" section of the owner's manual for the
manufacturer recommendations.
1556 Nationale Terrebonne J6W 6M1
Québec Canada
Tel: (450) 492-4242
1-855-492-4242
Fax: 1-866-735-6885
[email protected]
www.zitta.ca