1
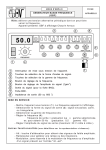
CK-TRAK-L
Tracker LCD Keypad
Clavier tracker avec écran LCD
Range: Online Access Control / Gamme: Contrôle d’Accès centralisé
INSTALLATION MANUAL
MANUEL D’INSTALLATION
Group Company
IN
INSTALLATION
NS
N
ST
TA
TALL
TAL
AL
ALL
A
LLATIO
ATIO
TI N MA
MAN
MANUAL
ANUAL
NU
NU
CK-TRAK-L
Tracker LCD keypad
The Tracker LCD Keypad serves as a display unit for your Tracker Time and Attendance
Software. The keypad’s buttons do not perform any actions other than while in programming mode. When an access card is presented to a reader (door) assigned to
the Tracker, the keypad will display the card number as well as a confirmation of a
valid punch in or punch out.When used with Anti-passback applications, the keypad
will also display an error if the card user has already punched in or out.
INSTALLATION INSTRUCTIONS:
1. Set the required DIP switch settings as detailed in the figure below.
Tracker LCD Keypad
(CK-TRAK-L)
CK-TRAK-L
DIP Switches
(1 to 4)
Low/High E-Bus Bias: Select the bias of the tracker by
setting DIP switches 1 and 3 either ON or OFF (default
= OFF) depending on the E-bus network configuration.
If the tracker is at the Start Point of the network, set
the High/Low bias jumpers to A+ = low and B- = low.
Otherwise, set the bias jumpers to A+ = high and B- = high.
ON
1234
Not Used
OFF = EOL Termination Off
ON = EOL Termination ON
OFF = B- High E-bus Bias
ON = B- Low E-bus Bias
OFF = A+ High E-bus Bias
ON = A+ Low E-bus Bias
EOL termination: Set the tracker’s
EOL jumpers by setting DIP switch 2 ON
or OFF depending on the configuration. If the tracker is
at the start Point or the End Point of the network, set
the EOL jumpers to ON. Otherwise, set the EOL to OFF.
2. Connect the Tracker LCD keypad to the CT-V900-A controller’s E-bus terminals as shown
in the figure below. The Tracker keypad’s “PGM”, “Z1”, and “Z2” terminals are not used.
The keypad can be connected up to 4000ft. (1220m) from the CT-V900-A controller.
3. After connecting the Tracker LCD keypad to the E-bus, the screen will display “Position
Tracker” and the time and date to indicate that communication has been established.
If “Communication Failure” appears on the LCD screen, reset the CT-V900-A controller
to reestablish communication.
AC
AC
BAT+
BAT+24V
+12V
GND
OUT5
OUT6
A2+
B2GND
+12VDC
GRN
YEL
BLK
RED
tracker LCD Keypad
(CK-TRAK-L)
CT-V900-A
Controller
A2+
B2GND
TMP
TMP
GND
A+
To other E-bus
expansion modules
SPECIFICATIONS:
BPower input: 9-16 VDC, 80mA maximum
LCD:
Super Twisted Nematic display (STN), wide viewing angle, 2 lines of 16 characters
2
www.cdvi.com
www.cdvigroup.com
INSTALL
INSTALLATION
LATION MANUAL
AL
CK-TRAK-L
Tracker LCD keypad
PROGRAMMING GUIDE
To enter the programming mode:
1. Press and hold the [CLEAR] button for approximately four seconds.
2. Enter the [INSTALLER CODE] (default = 000000).
3. Enter the 3-digit section number to be accessed, or use the [s] and [t] buttons to scroll
the sections and press [ENTER] when the desired section appears on the screen.
Press the [CLEAR] button at any time during the programming process to revert
to the previous step or to cancel.
Sections:
[000] = Information
This section displays the LCD Tracker
version number and release date.
[001] = Language Selection
This section allows you to choose
the language in which the LCD
keypad will communicate while
in programming mode.
1. Use the [s] and [t] buttons
to toggle between the available
languages.
2. Press [ENTER] when the desired
language appears on the screen.
Tracker LCD Keypad Lights and Buttons
«AC LIGHT»
Orange:
ON = AC power
OFF = Power
Failure
«STATUS LIGHT»
Green:
ON = System is communicating
OFF = Communication Failure
ACTION BUTTONS
ARROW BUTTONS
[002] = E-bus Address
This section allows you to assign a Tracker keypad to a specific door.
The controller supports eight doors and each door is assigned to an address between
one and eight in Centaur. Please note that only one door can be assigned per keypad.
1. Use the [s] and [t] buttons to scroll between door addresses 1 and 8.
2. Press [ENTER] when the door address you want to assign to the keypad appears
on the screen.
You must power down by unplugging the keypad from the controller, then power up
for this setting to take effect.
[003] = Contrast
This section allows you to adjust the contrast between the text and the background
on the LCD screen.
1. Use the [s] and [t] buttons to scroll the contrast settings between 0 and 4,
where 4 is the highest contrast.
2.
Press [ENTER] when the number corresponding to the desired contrast appears
on the screen.
www.cdvi.com
www.cdvigroup.com
3
IN
INSTALLATION
NS
N
ST
TA
TALL
TAL
AL
ALL
A
LLATIO
ATIO
TI N MA
MAN
MANUAL
ANUAL
NU
NU
CK-TRAK-L
Tracker LCD keypad
[004] = Backlight
This section allows you to adjust the brightness of the keypad buttons and screen.
1. Use the [s] and [t] buttons to scroll the backlight settings between 0 and 7,
where 7 is the brightest.
2. Press [ENTER] when the number corresponding to the desired brightness appears
on the screen.
[005] = Installer Code
This section allows you to modify the Installer code.
1. Enter a 6-digit code to replace the existing one.
2. Press [ENTER].
Reset to default settings:
This feature allows you to reset all settings, including the Installer code, to their
default values.
1. Power down by unplugging the keypad from the controller.
2. Press and hold buttons [1] and [3] while powering up the keypad.
When performed correctly, the LCD Tracker will beep as it resets to the default
settings.
4
www.cdvi.com
www.cdvigroup.com
MANUEL
L D’INSTALLATI
D’INSTALLATION
TIO
ON
CK-TRAK-L
Clavier tracker avec écran LCD
Le clavier Tracker à ACL sert d’unité d’affichage pour votre logiciel de Temps
et Présence Tracker. Les touches du clavier n’exécutent aucune autre fonction à part
celles liées à la programmation. Lorsqu’une carte d’accès est présentée à un lecteur
assigné au Tracker, le clavier affiche le numéro de la carte ainsi qu’une confirmation
du pointage d’arrivée ou du pointage de départ valide. Lorsque utilisé avec des applications d’antiretour, le clavier affiche également un message d’erreur si le détenteur de carte a déjà utilisé sa carte pour pointer son arrivée ou son départ.
INSTRUCTIONS POUR L’INSTALLATION :
1. Réglez les propriétés de l’interrupteur DIP tel qu’illustré à la figure ci-dessous.
E-bus à basse/haute impétence : Sélectionnez l’impédence du tracker en réglant les interrupteurs DIP 1 et 3
à ON ou à OFF (OFF = par défaut) selon la configuration
du réseau E-bus. Si le Tracker est au début du réseau,
réglez les cavaliers d’impédence à A+ = basse
et B- = basse. Sinon, réglez les cavaliers d’impédence
à A+ = haute et B- = haute.
Clavier Tracker à ACL
(CK-TRAK-L)
CK-TRAK-L
interrupteurs DIP
(1 to 4)
ON
1234
Non utilisé
OFF = Terminaison sans RFL
ON = Terminaison avec RFL
OFF = B- E-bus à haute impétence
ON = B- E-bus à basse impétence
OFF = A+ E-bus à haute impétence
ON = A+ E-bus à basse impétence
Terminaison RFL : réglez les cavaliers RFL du Tracker en
réglant l’interrupteur DIP 2 à ON ou à OFF selon la
configuration. Si le Tracker est au début ou à la fin du
réseau, réglez les cavaliers RFL à ON. Sinon, réglez les
RFL à OFF.
2. Branchez le clavier Tracker à ACL sur les bornes du E-bus du contrôleur CT-V900-A
tel qu’indiqué à la figure ci-dessous. Les bornes «PGM», «Z1», et «Z2» du clavier Tracker
ne sont pas utilisées. Le clavier peut être installé jusqu’à une distance de 4000 pieds
(1220 m) du contrôleur CT-V900-A.
3. Une fois que le clavier Tracker à ACL est branché au E-bus, l’écran du clavier affichera
«Position Tracker» ainsi que l’heure et la date, ce qui vous indiquera que la communication
a été établie. Si le message «Problème de communication» s’affiche à l’écran ACL,
réinitialisez le contrôle CT-V900-A pour qu’il rétablisse la communication.
AC
AC
BAT+
BAT+24V
+12V
GND
OUT5
OUT6
A2+
B2GND
+12VDC
GRN
YEL
BLK
RED
Clavier Tracker à ACL
(CK-TRAK-L)
Contrôleur
CT-V900-A
A2+
B2GND
TMP
TMP
SPÉCIFICATIONS :
GND
A+
Vers les autres modules
d'extension du E-bus
BTension d’entrée : 9 à16 Vdc, 80 mA maximum.
ACL : Affichage nématique super torsadé (NST), grand angle de visionnement, 2 lignes
de 16 caractères.
www.cdvi.com
www.cdvigroup.com
5
MA
MAN
M
MANUEL
ANU
AN
UEL
UE
E
EL
L D’INSTAL
D’IN
D
D’INSTALLATION
’INSTAL
ALLATI
AL
LLATI
LAT
LAT
AT ON
CK-TRAK-L
Clavier tracker avec écran LCD
POUR ENTRER EN MODE PROGRAMMATION :
1. Appuyez et maintenez la touche [CLEAR] pendant environ quatre secondes.
2. Entrez le [CODE D’INSTALLATEUR] (000000 = par défaut).
3. Entrez le numéro à trois chiffres du secteur à atteindre ou utilisez les touches [s] et [t]
pour faire défiler les sections et appuyez sur la touche [ENTER] lorsque la section
désirée apparaît à l’écran.
À n’importe quel moment lors de la programmation, vous pouvez appuyer
sur la touche [EFFAC.] pour revenir à l’écran précédent ou pour annuler l’opération.
APPLICATIONS :
[000] = Information
Cette application affiche la version
et la date de fabrication du Tracker
à ACL.
[001] = Choix de langue
Cette application vous permet
de choisir la langue dans laquelle
le clavier à ACL communiquera
en mode programmation.
Touches et voyants
du clavier Tracker à ACL
«Voyant CA» Orange :
ON = Courant CA
OFF = Panne de courant
«Voyant d’état» Vert:
ON = Système en communication
OFF = Problème de communication
1. Utilisez les touches [s] et [t]
pour faire défiler les langues
disponibles.
Flèches
Touches de commande
2. Appuyez sur la touche [ENTER]
de défilement
lorsque la langue désirée
apparaît à l’écran.
[002] = Adresse E-bus
Cette application vous permet d’assigner un clavier Tracker à une porte spécifique.
Jusqu’à huit portes peuvent être branchées au contrôleur et chacune obtient
une adresse entre un et huit dans Centaur. Veuillez noter que seulement une porte
peut être assignée par clavier.
1. Utilisez les touches [s] et [t] pour faire défiler les adresses des portes de 1 à 8.
2. Appuyez sur la touche [ENTER] lorsque l’adresse de la porte que vous désirez
assigner au clavier apparaît à l’écran.
Vous devez débrancher le clavier du contrôleur, puis le rebrancher
pour que les changements soient appliqués.
[003] = Contraste
Cette application vous permet d’ajuster le contraste entre le texte et l’arrière-plan
de l’écran ACL.
1. Utilisez les touches [s] et [t] pour faire défiler les options (0 à 4) de contraste,
où 4 est le nombre qui présente le contraste le plus intense.
2. Appuyez sur la touche [ENTER] lorsque le chiffre correspondant au contraste
désiré apparaît à l’écran.
6
www.cdvi.com
www.cdvigroup.com
MANUEL
L D’INSTALLATI
D’INSTALLATION
TIO
ON
CK-TRAK-L
Clavier tracker avec écran LCD
[004] = Luminosité
Cette application vous permet d’ajuster la luminosité des touches du clavier
et de l’écran.
1. Utilisez les touches [s] et [t] pour faire défiler les options (0 à 7) de luminosité,
où 7 est le nombre qui présente le plus de luminosité.
2. Appuyez sur la touche [ENTREE] lorsque le chiffre correspondant à la luminosité
désirée apparaît à l’écran.
[005] = Code d’installateur
Cette application vous permet de modifier le code d’installateur.
1. Entrez un code à 6 chiffres pour remplacer celui déjà existant.
2. Appuyez sur la touche [ENTREE].
RETOUR AUX PARAMETRES PAR DÉFAUT :
Cette manipulation vous permet de réinitialiser tous les paramêtres, y compris
le code d’installateur, en valeurs par défaut.
1. Éteignez le clavier en le débranchant du contrôleur.
2. Appuyez et maintenez les touches [1] et [3] lorsque vous remettez le clavier
sous tension. Si l’opération est bien effectuée, le Tracker à ACL émettra un «bip»
lors de la réinitialisation des paramêtres par défaut.
www.cdvi.com
www.cdvigroup.com
7
Reference : G0301FR0259V02
Extranet : EXE-CDVI_IM CK-TRAK-L CMYK A4 FR-EN 01
Toutes les indications mentionnées sur le présent document (photos, dessins, caractéristiques et côtes) sont susceptibles
de modifications sans notification préalable.
All the specifications on this document (photos, drawing, features and dimensions) could be changed without prior notice.
Manufacturing Access Control since 1985
CDVI (Headquarters/Siège social)
FRANCE
Phone: +33 (0)1 48 91 01 02
Fax: +33 (0)1 48 91 21 21
CDVI
SWITZERLAND
Phone: +41 (0)21 882 18 41
Fax: +41 (0)21 882 18 42
CDVI
ITALIA
Phone: +39 0331 97 38 08
Fax: +39 0331 97 39 70
CDVI
UK
Phone: +44 (0)1628 531300
Fax: +44 (0)1628 531003
CDVI
AMERICAS
Phone: +1 (450) 682 7945
Fax: +1 (450) 682 9590
CDVI
CHINA
Phone: +86 (0)10 87664065
Fax: +86 (0)10 87664165
CDVI
MAROC
Phone: +212 (0)22 48 09 40
Fax: +212 (0)22 48 34 69
DIGIT
FRANCE
Phone: +33 (0)1 41 71 06 85
Fax: +33 (0)1 41 71 06 86
CDVI
BENELUX
Phone: +32 (0)5 662 02 50
Fax: +32 (0)5 662 02 55
CDVI
IBÉRICA
Phone: +34 936 916 551
Fax: +34 935 801 278
CDVI
SWEDEN
Phone: +46 (0)31 760 19 30
Fax: +46 (0)31 748 09 30
TECHNO EM
FRANCE
Phone: +33 (0)4 42 96 58 73
Fax: +33 (0)4 42 96 45 77
www.cdvigroup.com