1
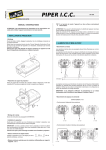
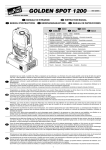
®
POINT MH
Le operazioni di collegamento alla rete di distribuzione dell’energia
elettrica devono essere effettuate da un installatore elettrico qualificato.
Prima di iniziare qualsiasi operazione di manutenzione o pulizia sul
proiettore togliere la tensione dalla rete di alimentazione.
Connection to the electricity mains must be carried out by a qualified
electrical installer.
Before starting any maintenance work or cleaning the projector, cut
off power from the mains supply.
Les opérations de branchement au réseau de distribution de l'énergie
électrique doivent être effectuées par un installateur électricien qualifié.
Avant toute opération d'entretien ou de nettoyage sur le projecteur,
couper la tension du réseau.
Der Anschluss an das Stromnetz muss von einem kompetenten
Elektroinstallateur ausgeführt werden.
Vor Beginn von Wartungs- oder Reinigungsarbeiten am Projektor
stets die Stromversorgung abschalten.
El conexionado a la red de distribución de la energía eléctrica debe ser
efectuado por un instalador electricista cualificado.
Antes de comenzar cualquier operación de mantenimiento o limpieza,
desconecte el aparato de la alimentación eléctrica.
12V 50W
MANUALE DI INSTALLAZIONE
I
GB
INSTALLATION MANUAL
F
MANUEL D'INSTALLATION
D
INSTALLATIONHANDBUCH
E
MANUAL DE INSTALACIÓN
Leggere attentamente in tutte le sue parti il presente manuale di installazione e
conservarlo accuratamente per riferimenti futuri. La conoscenza delle informazioni ed il
rispetto delle prescrizioni contenute in questa pubblicazione sono essenziali per
garantire la correttezza e la sicurezza delle operazioni di installazione, uso e
manutenzione dell’apparecchio. CLAY PAKY S.p.A. declina ogni responsabilità per danni
all’apparecchio o ad altre cose o persone, derivanti da installazione, uso e manutenzione
effettuate non in conformità con quanto riportato sul presente manuale di installazione,
che deve sempre accompagnare l’apparecchio. CLAY PAKY S.p.A. si riserva la facoltà di
modificare, in qualunque momento e senza preavviso, le caratteristiche menzionate nel
presente manuale di installazione.
È obbligatorio effettuare il collegamento ad un impianto di alimentazione
dotato di un’efficiente messa a terra (apparecchio di Classe I secondo
la norma EN 60598-1).
Connection must be made to a power supply system fitted with efficient
earthing (Class I appliance according to standard EN 60598-1).
Il est obligatoire d’effectuer le branchement à une installation
d’alimentation équipée d’une mise à la terre efficace (appareil de
Classe I, conformément à la norme EN 60598-1).
Es ist Pflicht, das Gerät an eine Stromversorgungsanlage
anzuschließen, die mit einer leistungsfähigen Erdung ausgestattet ist
(Gerät der Klasse I gemäß Richtlinie EN 60598-1).
Es obligatorio efectuar la conexión a una instalación eléctrica dotada
de eficiente puesta a tierra (aparato de Clase I según la norma EN
60598-1).
Carefully read this instruction manual in its entirety and keep it safe for future reference.
It is essential to know the information and comply with the instructions given in this manual
to ensure the fitting is installed, used and serviced correctly and safely. CLAY PAKY S.p.A.
disclaims all liability for damage to the fitting or to other property or persons deriving from
installation, use and maintenance that have not been carried out in conformity with this
installation manual, which must always accompany the fitting. CLAY PAKY S.p.A. reserves
the right to modify the characteristics stated in this installation manual at any time and
without prior notice.
Lire attentivement et entièrement le présent manuel d'installation, et le conserver
soigneusement pour toutes références futures. La connaissance des informations et le
respect des prescriptions contenues dans la présente publication sont essentiels afin de
garantir la correction et la sécurité des opérations d'installation, d'utilisation et d'entretien
de l'appareil. CLAY PAKY S.p.A. décline toute responsabilité en cas de dommages
causés à l'appareil, à des personnes ou à des choses par une installation, une utilisation
ou un entretien n'ayant pas été réalisés conformément aux indications fournies dans le
présent manuel d'installation, qui doit toujours accompagner l'appareil. CLAY PAKY
S.p.A. se réserve la faculté de modifier, à tout moment et sans préavis, les
caractéristiques mentionnées dans le présent manuel d'installation.
Lesen Sie diese Installationhandbuch bitte vollständig durch und bewahren Sie sie für
späteres Nachschlagen sorgfältig auf. Die Kenntnis der darin enthaltenen Informationen
und die strikte Befolgung der Anweisungen ist die Voraussetzung für eine korrekte und
sichere Installation, Benutzung und Wartung des Geräts. Die Firma CLAY PAKY S.p.A.
lehnt jede Haftung für Schäden an dem Gerät bzw. sonstige Sach- und
Personenschäden ab, die durch eine nicht mit den Anweisungen dieser
Installationhandbuch konforme Installation, Benutzung und Wartung verursacht werden.
Die Installationhandbuch muss immer bei dem Gerät bleiben. Die Firma CLAY PAKY
S.p.A. behält sich das Recht vor, die in der vorliegenden Installationhandbuch
enthaltenen Daten jederzeit und ohne vorherige Benachrichtigung zu ändern.
Lea atentamente todo el manual de instalación y guárdelo para futuras consultas. Las
informaciones e indicaciones que figuran en esta publicación son esenciales para
efectuar de modo correcto y seguro las operaciones de instalación, uso y mantenimiento
del aparato. CLAY PAKY S.p.A. declina toda responsabilidad ante daños sufridos por el
proyector, por personas u objetos, que puedan atribuirse a operaciones de instalación,
uso o mantenimiento no conformes a lo indicado en este manual, el cual debe guardarse
siempre junto con el aparato. CLAY PAKY S.p.A. se reserva el derecho de modificar, en
cualquier momento y sin aviso previo, las características mencionadas en el presente
manual de instalación.
0,3
0,2 m
Distanza minima degli oggetti illuminati / Minimum distance of
illuminated objects / Distance minimum des objets éclairés /
Mindestabstand zu beleuchteten Objekten / Distancia mínima de
los objetos iluminados
Distanza minima dei materiali infiammabili / Minimum distance from
flammable materials / Distance minimum des matériaux
inflammables / Mindestabstand zu entzündbaren Materialien /
Distancia mínima de materiales inflamables
È consentito il montaggio su superfici normalmente infiammabili / It
is permissible to mount the fitting on normally flammable surfaces /
Il est permis de monter l'appareil sur des surfaces normalement
inflammables / Die Montage des Geräts auf normal entzündbaren
Oberflächen ist zulässig / El aparato puede montarse sobre
superficies normalmente inflamables.
ta 35°C
Massima temperatura ambiente / Maximum ambient temperature /
Température ambiante maximale / Max. Raumtemperatur /
Temperatura ambiente máxima
tc 145°C
Temperatura massima della superficie esterna / Maximum
temperature of the external surface / Température maximale de la
surface externe / Max. Temperatur der Außenfläche / Temperatura
máxima de la superficie exterior
IP20
Grado di protezione IP20 / IP20 protection rating / Degré de
protection IP20 / Schutzklasse IP20 / Grado de protección IP20
12V - 50W
Lampada alogena costruita con tecnologia a bassa pressione. /
Halogen lamp made with low pressure technology. / Lampe halogène
et réalisée avec la technologie à basse pression. / Ausschließlich mit
Niederdrucktechnik hergestellte Halogenlamp. / Lámpara halógena
fabricada con tecnología a baja presión.
LVD 73/23
EMC 89/336
INSTALLAZIONE
INSTALLING
INSTALLATION
INSTALLATION
INSTALACIÓN
C71104
C71102
Il proiettore può essere installato a pavimento in appoggio sugli appositi gommini, su truss,
a soffitto o a parete. Per l’installazione a parete o a soffitto, utilizzare 4 viti ø 5 mm complete di
dado e rondella elastica. Per l’installazione su truss è inoltre disponibile a richiesta la piastra
cod. C71102 mentre per l’installazione a parete è disponibile la piastra cod. C71104.
The projector can be positioned at loor level standing on the special rubber, on truss, on
ceiling or on the wall. For wall or ceiling installation, use 4 screws of ø 5 mm with nut and
spring washer. A plate code C71102 can also be supplied, on request, for truss mounting
whereas the C71104 code plate is available on request for ceiling installation.
Le projecteur peut être monté au sol en appui sur des éléments en caoutchouc antichoc,
sur truss, au plafond ou au mur. Pour l’installation au mur ou plafond utiliser 4 vis ø 5 mm
munies d’un écrou et d’une rondelle élastique. En outre, la plaque code C71102 pour
l’installation sur truss est disponible sur demande tandis que pour l’installation au mur,
la plaque code C71104 est disponible sur demande.
Der Projektor kann direkt auf dem Fußboden auf den hierzu vorgesehenen stoßfesten
Gummifüßen, auf Traversen, an der Decke oder an der Wand installiert werden. Für Wandoder Deckeninstallation, dazu 4 Schrauben ø 5 mm mit Mutter und Federring benutzen. Für
die Installation auf Rohrträgern ist auf Anfrage außerdem die Platte Art. Nr. C71102
während die Platte Art. Nr. C71104 ist zur Installation an die Wand auf Anfrage erhältlich.
El proyector puede instalarse en el suelo apoyado en los tacos de goma, en el truss, al techo
o a la pared. Para la instalación a la pared o al techo, utilice 4 tornillos ø 5 mm con tuercas y
arandelas elásticas. Para el montaje en el truss está disponible la placa optional cód. C71102
en cambio, para la instalación en pared, está disponible por encargo la placa cód. C71104.
SOSTITUZIONE DEL CAVO DI ALIMENTAZIONE (SE NECESSARIO)
REPLACING THE POWER CORD (IF NECESSARY)
REMPLACEMENT DU CÂBLE D'ALIMENTATION (SI NÉCESSAIRE)
ERSATZ DES VERSORGUNGSKABELS (WENN NÖTIG)
CAMBIAR EL CABLE DE ALIMENTACIÓN (SI ES NECESARIO)
COLLEGAMENTO ALLA LINEA DI ALIMENTAZIONE
CONNECTING TO THE MAINS SUPPLY
BRANCHEMENT À LA LIGNE D’ALIMENTATION
ANSCHLUSS AN DIE VERSORGUNGSLEITUNG
CONEXIÓN A LA LÍNEA DE ALIMENTACIÓN
Rimozione delle due coperture.
Removing the two covers.
Dépose des deux protections.
Demontage der zwei Abdeckungen.
Desmontaje de las dos tapas.
2
100 VA
1
3
Inserimento frontale.
Front inserting.
Mise en place depuis le devant.
Einsetzen von der Vorderseite.
Introducción frontal.
Inserimento dalla piastra di fondo.
Inserting from the base plate.
Connexion de la plaque de fond.
Einsetzen von der Grundplatte aus.
Introducción de la placa de fondo.
Alimentazione
Mains
Alimentation
Netz
Alimentacion
100 VA
100 VA
L
N
COLLEGAMENTO ALLA LINEA DEL SEGNALE DI CONTROLLO (DMX)
CONNECTING TO THE CONTROL SIGNAL LINE (DMX)
BRANCHEMENT À LA LIGNE DU SIGNAL DE CONTRÔLE (DMX)
ANSCHLUSS AN DIE LEITUNG DER STEUERSIGNALE (DMX)
CONEXIÓN A LA LÍNEA DE SEÑAL DE CONTROL (DMX)
A
DMX 512
DMX 512
SCREEN
1
2
3
SIGNAL
SIGNAL
B
D+ D– GND
D+ D– GND
120Ω
DMX
5mm
30mm
L = Live
= Earth/Ground
N = Neutral
C
DMX 512
1
2
4
3
2
1
4
3
1 - Screen
2 - Signal –
3 - Signal +
4 - Screen
Fig. A-B - Utilizzare un cavo conforme alle specifiche EIA RS-485: bipolare intrecciato,
schermato, 120Ω di impedenza caratteristica, 22-24 AWG, bassa capacità.
Le terminazioni devono essere effettuate con connettori maschio/femmina tipo XLR a 3
pin. È necessario inserire sull’ultimo apparecchio uno spinotto terminale con una
resistenza da 120Ω (minimo 1/4 W) tra i terminali 2 e 3 (Fig. A) oppure tra i terminali D+ e
D– (Fig. B).
Importante: I fili non devono fare contatto tra di loro o con l’involucro metallico dei
connettori. L’involucro stesso deve essere collegato alla calza di schermo ed al piedino 1
dei connettori.
Fig. C - Utilizzare cavetto piatto a 4 poli di tipo telefonico terminante con apposito
connettore a 4 poli. È necessario inserire sull’ultimo apparecchio uno spinotto terminale
con una resistenza da 120Ω (minimo 1/4 W) tra i terminali 2 e 3.
Fig. A-B - Use a cable conforming to specifications EIA RS-485: 2-pole twisted, shielded,
120Ω characteristic impedance, 22-24 AWG, low capacity. The end connections must be
made using XLR type 3-pin male/female connectors. A terminating plug must be inserted
into the last projector with a resistance of 120Ω (minimum 1/4W) between terminals
2 and 3 (Fig. A) or between D+ and D– terminals (Fig. B).
Important: The wires must not make contact with each other or with the metal casing of
the connectors. The casing itself must be connected to the shield braid and to pin 1 of
the connectors.
Fig. C - Use a 4-pole flat telephone cable ending with the 4-pole connector. A terminating
plug must be inserted into the last projector with a resistance of 120Ω (minimum 1/4W)
between terminals 2 and 3.
Fig. A-B - Utiliser un câble conforme aux spécifications EIA RS-485: bipolaire tressé,
blindé, 120Ω d’impédance caractéristique, 22-24 AWG, basse capacité. Les
terminaisons doivent être réalisées avec des connecteurs mâle/femelle du type XLR à 3
broches. Il faut introduire sur le dernier appareil une fiche terminale ayant une résistance
de 120Ω (minimum 1/4 W) entre les bornes 2 et 3 (Fig. A) ou entre les contacts D+ et
D– (Fig. B).
Important: S'assurer que les fils n'entrent pas en contact entre eux ou avec l'enveloppe
métallique des connecteurs. Relier l'enveloppe de la fiche/prise à la gaine de blindage et
au contact 1 des connecteurs.
Fig. C - Utiliser un câble plat à 4 fils de type téléphonique se terminant avec un
connecteur à 4 broches prévu à cet effet. Il faut introduire sur le dernier appareil une
fiche terminale ayant une résistance de120Ω (minimum 1/4 W) entre les bornes 2 et 3.
SOSTITUZIONE FUSIBILI
REPLACING FUSES
REMPLACEMENT FUSIBLES
AUSWECHSELN DER SICHERUNGEN
CAMBIO DE LOS FUSIBLES
2
2 AT
5x20 mm fuse
1
3
6,3 AT
5x20 mm fuse
SOSTITUZIONE FILTRI COLORE
CHANGING COLOUR FILTERS
REPLACEMENT DES FILTRES COULEUR
AUSTAUSCH DER FARBFILTER
SUSTITUCIÓN DE LOS FILTROS DE COLOR
Abb. A-B - Ein Kabel mit der Kennzeichnung EIA RS-485 verwenden: verdrilltes,
abgeschirmtes Zweileiterkabel, 120Ω charakteristische Impedanz, 22-24 AWG, niedrige
Kapazitä. Die Kabelabschlüsse müssen mit Steckverbindern (Steckern/Buchsen) Typ
XLR 3 pin erfolgen. Muss in das letzte Gerät der Reihe ein Endstecker mit einem
Widerstand 120Ω (mindestens 1/4 W) zwischen die Kontakte 2 und 3 eingesetzt werden
(Abb. A) oder zwischen den Klemmen D+ und D– (Abb. B).
Wichtig: Die Leiter dürfen weder untereinander, noch mit dem Metallgehäuse der
Steckverbinder Kontakt haben. Das Gehäuse muss mit dem Schirmgeflecht und dem
Kontakt 1 der Verbinder verbunden werden.
Abb. C - Ein flaches Vierpoltelephonkabel verwenden, dass mit einem entsprechenden 4Pole Verbinder endet. Muss in das letzte Gerät der Reihe ein Endstecker mit einem
Widerstand 120Ω (mindestens 1/4 W) zwischen die Kontakte 2 und 3 eingesetzt werden.
1
2
Fig. A-B - Utilice un cable conforme a las normas EIA RS-485: bipolar trenzado y
apantallado, 120Ω de impedancia característica, 22-24 AWG, baja capacidad. Las
uniones deben efectuarse con conectores macho-hembra tipo XLR de 3 pin. Es
necesario montar en el último aparato una clavija terminal con una resistencia de 120Ω
(mínimo 1/4 W) entre los terminales 2 y 3 (Fig. A) o entre los terminales D+ y D– (Fig. B).
Importante: los cables no deben hacer contacto entre sí ni con la funda metálica de los
conectores. La funda debe conectarse a la trenza de blindaje y al pin 1 de los
conectores.
Fig. C - Utilizar cable plano de 4 polos de tipo telefónico terminado con el
correspondiente conector de 4 polos . Es necesario montar en el último aparato una
clavija terminal con una resistencia de 120Ω (mínimo 1/4 W) entre los terminales 2 y 3.
3
4
Accensione proiettore: Dopo aver eseguito tutte le operazioni indicate
precedentemente, alimentare l’apparecchio verificando che abbia inizio la procedura di
azzeramento.
5
Switching on the projector: After having carried out all the operations described
above, switch on the appliance to check that the resetting has begun.
Allumage projecteur: Après avoir effectué toutes les opérations indiquées
précédemment, mettez l'appareil sous tension en vous assurant que la procédure de
mise à zéro a commencé.
Einschalten des Projektors: Nach Abschluss der zuvor angezeigten Operationen das
Gerät speisen und prüfen, ob der Ablauf der Nullstellung begonnen hat.
Encendido del proyector: Después de haber llevado a cabo todas las operaciones
indicadas anteriormente, alimente el aparato comprobando que se inicie el
procedimiento de puesta a cero.
Per rimuovere lo sporco dal vetro di
protezione della lampada (●) e dai filtri
colore (❍) usare un panno morbido
inumidito di un qualsiasi liquido
detergente per la pulizia del vetro. Non
usare solventi o alcool.
To remove dirt from the protective
glass of the lamp (●) and colour filters
(❍), use a soft cloth dipped in any
window-cleaning liquid. Do not use
solvents or alcohol.
Pour enlever la saleté s’étant
déposée sur le verre de protection de la
1
source lumineuse (●) et des filtres
couleur (❍), utiliser un chiffon souple
imbibé
d’un
liquide
nettoyant
quelconque pour le nettoyage du verre.
2
Ne pas utiliser de solvants ou d’alcool.
Zum Entfernen des Schmutzes vom
Schutzglas der Lampe (●) und von den
Farbfiltern (❍ ) zu entfernen, ein
weiches, mit einem beliebigen
Glasreiniger befeuchteten Tuch reinigen. Keine Lösungsmittel oder Alkohol verwenden.
Para eliminar la suciedad del cristal protector de la lámpara (●) y de los filtros de
colores (❍), usar un paño suave humedecido con detergente líquido para vidrios. No
utilizar disolventes ni alcohol.
PULIZIA PERIODICA
ROUTINE CLEANING
NETTOYAGE PÉRIODIQUE
REGELMÄßIGE REINIGUNG
LIMPIEZA PERIÓDICA
SOSTITUZIONE LAMPADA
LAMP CHANGE
REMPLACEMENT LAMPE
LAMPENWECHSEL
CAMBIO LÁMPARA
3
1
6
2
4
DATI TECNICI
TECHNICAL INFORMATION
DONNEES TECHNIQUES
TECHNISCHE DATEN
DATOS TÉCNICOS
I
L’ELETTRONICA NON FUNZIONA
PROIEZIONE DIFETTOSA
ANOMALIE
LUMINOSITÀ RIDOTTA
POSSIBILI CAUSE
250
(9.8")
250
(9.8")
100VA
Alogena dicroica Decostar 51 IRC
- 12V, 50W con attacco GU 5,3
- Temperatura colore 3.100 K
- Durata nominale 4.000 h
Halogen dichroic lamp
Decostar 51 IRC
- 12V, 50W with cap GU 5.3
- Colour temperature 3,100 K
- Nominal lifetime 4,000 h
Lampe halogène dichroïque
Decostar 51 IRC
- 12V, 50W, culot GU 5,3
- Température de couleur 3.100 K
- Durée de vie 4.000 h
Dichroitische Halogenlampe
Decostar 51 IRC
- Spannung 12V, 50W, sockel GU 5,3
- Farbtemperatur 3.100 K
- Lebensdauer 4.000 h
Lámpara halógena dicroica
Decostar 51 IRC
- 12V, 50W, casquillo GU 5,3
- Temperatura color 3.100 K
- Duración nominal 4.000 h
Apertura angolare / Beam angle
Ouverture angulaire / Winkelöffnung
Abertura angular
10° (standard)
24° ( only on request)
38° ( only on request)
60° ( only on request)
Motori
Motors
Moteurs
Motoren
Motores
IL PROIETTORE NON SI ACCENDE
Intensità luminosa / Light intensity
Intensité lumineuse / Leuchtintensität
Intensidad luminosa
15.000 cd
5.700 cd
2.850 cd
1.430 cd
3 motori passo-passo, funzionanti a micropassi, totalmente controllati da
microprocessore.
3 stepper motors, operating with microsteps, totally microprocessor
controlled.
3 moteurs pas-à-pas, fonctionnant par micropas, totalement contrôlés par
microprocesseur.
3 Mikro-Schrittmotoren, vollständig mikroprozessorgesteuert.
3 motores de micropasos totalmente controlados por microprocesador.
Canali
Channels
Canaux
Kanäle
Canales
4 o 6 canali di controllo
4 or 6 control channels
4 ou 6 canaux de contrôle
4 oder 6 Kontrollkanäle
4 ó 6 canales de control
Ingressi / Inputs / Entrées
Eingänge / Entradas
DMX 512
Corpo mobile
Movable body
Corps mobile
Beweglicher Kopfs
Cuerpo móvil
Movimento tramite due motori a micropassi, controllati da microprocessore.
Movement by means two stepper motors, controlled by microprocessor.
Mouvement fourni par deux moteurs à micropas commandés par micro-processeur.
Bewegung durch zwei mikroprozes-sorgesteuerte Mikro-Schrittmotoren.
Movimiento mediante dos motores de micropasos controlados por microprocesador.
Lampada esaurita o difettosa.
Cavo di trasmissione dei segnali
guasto o scollegato.
Codifica errata.
Difetto nei circuiti elettronici.
Deposito di polveri o grasso.
Trasformatore guasto
Velocità max / Maximum speeds
Vitesses max / Höchstgeschwindigkeit
Velocidades máximas
Risoluzione / Resolution
Résolution / Auflösung
Resolución
- PAN = 360°
- TILT = 208°
- PAN = 2.3 sec (360°)
- TILT = 1.5 sec (208°)
- PAN = 1.40°
- PAN FINE = 0.005°
- TILT = 0.81°
- TILT FINE = 0.003°
Dispositivi di sicurezza
Dispositivi di sicurezza
Dispositifs de sécurité
Sicherheitsvorrichtungen
Dispositivos de seguridad
2 fusibili di protezione
2 line fuses
2 fusibles de protection
2 Sicherungen
2 fusibles protectores.
Raffreddamento
Cooling
Refroidissement
Kühlung
Enfriamiento
A convezione
By convection
Par convection
Konvektionskühlung
Por convección.
Corpo
Body
Corps
Gehäuse
Cuerpo
In plastica pressofusa ed alluminio
In die-cast plastic and aluminium
En plastique moulé sous pression ou aluminium
Aus Pressdruck-Kunststoff und Aluminium
En plástico moldeado a presión y aluminio
Posizione di lavoro
Working position
Position de travail
Einbauposition
Posición de trabajo
Funzionamento in qualsiasi posizione.
Functioning in any position.
Fonctionne dans toutes les positions.
Beliebig.
Funciona en cualquier posición.
CONTROLLI E RIMEDI
Verificare la presenza della tensione sulla presa
di alimentazione e/o la conducibilità dei fusibili.
Sostituire lampada (vedi istruzioni).
Sostituire cavi.
Verificare codifica (vedi istruzioni).
Interpellare tecnico autorizzato.
Procedere alla pulizia (vedi istruzioni).
Interpellare tecnico autorizzato.
THE PROJECTOR WILL NOT SWITCH ON
GB
ELECTRONICS NON-OPERATIONAL
DEFECTIVE PROJECTION
PROBLEMS
REDUCED LUMINOSITY
CHECKS AND REMEDIES
POSSIBLE CAUSES
No mains supply.
Lamp exhausted or defective.
Signal transmission cable faulty or
disconnected.
Incorrect addressing.
Fault in the electronic circuits.
Dust or grease deposited.
Transformer has failed
Check the power supply voltage and/or
that fuses are intact.
Replace the lamp. (See instructions).
Replace the cables.
Check the addressing (see instructions)
Call an authorized technician.
Clean (see instructions).
Call an authorized technician.
LE PROJECTEUR NE S'ALLUME PAS
L'ELECTRONIQUE NE FONCTIONNE PAS
PROJECTION DEFECTUEUSE
F
ANOMALIES
REDUCTION DE LA LUMINOSITE
CONTROLES ET REMEDES
CAUSES POSSIBLES
Absence de courant.
Lampe déchargée ou défectueuse.
Câble de transmiss. des signaux en
panne ou déconnecté.
Codification erronée.
Problèmes sur les circuits électroniques.
Dépôt de poussière ou de graisse.
Transformateur en panne
Escursione / Travel
Excursion / Aktionsradius
Excursión
Peso / Weights / Poids / Gewichte / Peso
Mancanza di alimentazione di rete.
Vérifier la présence de la tension d’alimentation
et/ou la conductibilité des fusibles.
Remplacer la lampe (voir instructions).
Remplacer les câbles.
Voir instructions de codification des projecteurs.
Faire appel à un technicien autorisé.
Nettoyer (voir instructions).
Faire appel à un technicien autorisé.
DER PROJEKTOR SCHALTET SICH NICHT EIN
ELEKTRONIK FUNKTIONIERT NICHT
FEHLERHAFTE PROJEKTION
D
STÖRUNGEN
VERRINGERTE LEUCHTKRAFT
KONTROLLEN UND ABHILFE
MÖGLICHE URSACHE
Keine Stromversorgung.
Lampe erschöpft oder defekt.
Übertragungskabel der Signale
defekt oder nicht verbunden.
Fehlerhafte Codierung.
Defekt in den Elektronikschaltungen.
Ablagerungen von Staub oder Fett.
Transformator defekt
Das Vorhandensein der Versorgungsspannung
und/oder die Leitfähigkeit der Sicherungen überprüfen.
Lampe ersetzen (siehe Anweisungen).
Kabel ersetzen.
Codierung überprüfen (siehe Anweisungen).
Einen autorisierten Techniker anfordern.
Reinigen (siehe Anweisungen).
Einen autorisierten Techniker anfordern.
EL PROYECTOR NO SE ENCIENDE
EL SISTEMA ELECTRÓNICO NO FUNCIONA
PROYECCIÓN DEFECTUOSA
E
Cod. 099479
Lampada
Lamp
Lampe
Lampe
Lámpara
235
(9.25")
50/60Hz
50/60Hz
50/60Hz
50/60Hz
ANOMALIAS
POCA LUMINOSIDAD
~ 4,8 kg (3 Ibs 15 ozs)
CAUSES POSSIBLES
Falta de alimentación de la red.
Lámpara agotada o defectuosa.
Cable de transmisión de las señales
averiado o desconectado.
Codificación errónea.
Fallo de los circuitos electrónicos.
Acumulación de polvo o grasa.
Transformador averiado
CONTROLES ET REMEDES
Compruebe la presencia de la tensión de alimentación y/o conductividad de los fusibles.
Sustituya la lámpara según las instrucciones.
Sustituya el cable.
studio
Potenza
Power
Puissance
Leistungs
Potencia
230V
240V
100V
120V
Controle la codificación según las instrucciones.
Consulte a un técnico autorizado.
Limpie según las instrucciones.
Consulte a un técnico autorizado.
Rev. 2 10/04
Alimentazioni disponibili
Power supplies available
Alimentations disponibles
Vorhandene Netzversorgung
Alimentaciones disponibles
CAUSA E SOLUZIONE DEI PROBLEMI
CAUSE AND SOLUTION OF PROBLEMS
CAUSE ET SOLUTION DES PROBLEMES
URSACHEN UND ABHILFE BEI BETRIEBSSTÖRUNGEN
CAUSAS Y SOLUCIONES DE PROBLEMAS
CLAY PAKY SPA - Via Pastrengo, 3/b - 24068 Seriate (BG) - Italy - Tel. +39-035 -65 4311 (10 linee) - Fax +39-035-301876 - Internet: www.claypaky.it