1
PRECAUTIONS on power supply and speaker
connections:
VORSICHTSMASSREGELN beim Anschließen der
Stromversorgung und Lautsprecher:
PRECAUTIONS sur l’alimentation et la
connexion des enceintes:
• DO NOT connect the speaker leads of the power cord to
the car battery; otherwise, the unit will be seriously
damaged.
• Connect the black lead (ground), yellow lead (to car battery,
constant 12V), and red lead (to an accessory terminal) correctly.
• BEFORE connecting the speaker leads of the power cord to
the speakers, check the speaker wiring in your car.
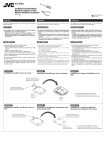
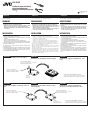
– If the speaker wiring in your car is as illustrated in Fig. 1
and Fig. 2 below, DO NOT connect the unit using that original
speaker wiring. If you do, the unit will be seriously damaged.
Redo the speaker wiring so that you can connect the unit to
the speakers as illustrated in Fig. 3.
– If the speaker wiring in your car is as illustrated in Fig. 3,
you can connect the unit using the original speaker wiring in
your car.
– If you are not sure of the speaker wiring of your car, consult
your car dealer.
• Die Lautsprecherleitungen des Netzkabels NICHT an der
Autobatterie anschließen, da sonst das Gerät schwer
beschädigt wird.
• Die schwarze Leitung (Erdung), die gelbe Leitung (zur
Autobatterie, konstant 12 V) und die rote Leitung (zur
Zubehöranschlußklemme) richtig anschließen.
• VOR dem Anschließen der Lautsprecherleitungen des
Netzkabels an die Lautsprecher, die Lautsprecherverdrahtung
in Ihrem Auto überprüfen.
– Ist die Lautsprecherverdrahtung wie unten in “Fig. 1” und
“Fig.2” abgebildet, das Gerät NICHT mit der
Originalverdrahtung der Lautsprecher anschließen, da sonst
das Gerät schwer beschädigt wird.
Die Lautsprecherverdrahtung erneuern, so daß Sie das Gerät
an den Lautsprechern wie in “Fig. 3” abgebildet anschließen
können.
– Ist die Lautsprecherverdrahtung in Ihrem Auto wie in “Fig.
3” abgebildet, können Sie das Gerät mit der
Originalverdrahtung der Lautsprecher in Ihrem Auto
anschließen.
– Sind Sie sich über die Lautsprecherverdrahtung in Ihrem Auto
nicht sicher, wenden Sie sich an Ihren Autohändler.
• NE CONNECTEZ PAS les fils d’enceintes du cordon
d’alimentation à la batterie; sinon, l’appareil serait
sérieusement endommagé.
• Connectez correctement le fil noir (a la masse), le fil jaune (a
la batterie de la voiture,12V constant) et le fil rouge (à la prise
accessoire).
• AVANT de connecter les fils d’enceintes du cordon
d’alimentation aux enceintes, vérifiez le câblage des enceintes
de votre voiture.
– Si le câblage des enceintes de votre voiture est réalisé
comme montré sur la Fig. 1 ou Fig. 2 ci-dessous, NE
CONNECTEZ PAS l’appareil en utilisant ce câblage original
d’enceintes. Si vous le faites, l’appareil sera sérieusement
endommagé.
Recommencez le câblage des enceintes de façon que vous
puissiez connecter l’appareil aux enceintes comme montré
sur la Fig. 3.
– Si le câblage des enceintes de votre voiture est comme
montré sur la Fig. 3, vous pouvez connecter l’appareil en
utilisant ce câblage original d’enceintes pour votre voiture.
– Si vous n’êtes pas sûrs du câblage d’enceintes de votre
voiture, consulter le concessionnaire de votre voiture.
+
L -
+
R -
+
+
L -
-
+
+
R -
+
-
Fig. 1
+
L -
-
+
+
R -
-
Typical Connections
+
-
Fig. 3
Fig. 2
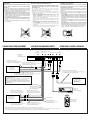
CONNECTING OTHER EQUIPMENT
+
-
ANSCHLIESSEN ANDERER GERÄTE
CONNEXION D’AUTRES APPAREILS
Typische Anschlüsse
Connexions typiques
LINE IN
POWER/
SPEAKER REMOTE
L
R
SPEAKER OUTPUT
INPUT OUT
VCR
DISPLAY CHANGER REMOTE
Amplifier unit
Verstärker
Appareil amplificateur
Red lead of the power cord
Roter Leiter des Stromanschlußkabels
Fil rouge du cordon d’alimentation
AV cord (provided with KV-V10)
AV-Kabel (gehört zum Lieferumfang des KV-V10)
Cordon A/V (fourni avec le KV-V10)
L
R
JVC KV-V10
JVC KV-V10
JVC KV-V10
DIN cord (provided with CD changer)
DIN-Kabel (gehört zum Lieferumfang des CD-Wechslers)
Cordon DIN (fourni avec le changeur CD)
Remote control data cord (provided with KV-V10)
Fernbedienungsdatenkabel (gehört zum Lieferumfang des KV-V10)
Cordon de télécommande (fourni avec le KV-V10)
• For details about VCR connection, see the instructions
supplied with KV-V10.
• Einzelheiten über den Anschluß eines Videorecorders
finden Sie in der Bedienungsanleitung des KV-V10.
• Pour plus d’informations à propos de la connexion du
magnétoscope, référez-vous aux instructions fournies
avec le KV-V10.
JVC CD changer
(ex: CH-X200)
JVC-CD-Wechsler
(Beispiel: CH-X200)
Changeur CD JVC
(ex: CH-X200)
White/Weiß/Blanc
White with black stripe
Weiß mit schwarzem Streifen
Blanc à bandes noires
VCR / CD-CH CONTROL
SEL
Speaker output (Left channel)
Lautsprecherausgang (linker Kanal)
Sortie d’enceinte (canal gauche)
Speaker input (Left channel)
Lautsprechereingang (linker Kanal)
Entrée d’enceinte (canal gauche)
Your car receiver*
Autoreceiver*
Votre autoradio*
Speaker output (Right channel)
Lautsprecherausgang (rechter Kanal)
Sortie d’enceinte (canal droit)
/ I / ATT
FUNC 7/RND/RPT 3/DISC+
KV-RA2
Display unit
Display
Appareil d’affichage
Gray/Grau/ Gris
Speaker input (Right channel)
Lautsprechereingang (rechter Kanal)
Entrée d’enceinte (canal droit)
Gray with black stripe
Grau mit schwarzem Streifen
Gris à bandes noires
* When your car receiver has 4 channels for speaker output, use the 2 front channels or rear channels.
* Wenn Ihr Autoreceiver vier Lautsprecherausgänge besitzt, verwenden Sie die beiden Frontkanäle oder die beiden Kanäle für die hinteren Lautsprecher.
* Si votre autoradio a 4 canaux pour les sorties d’enceinte, utilisez les deux canaux avant ou les deux canaux arrière.
Remote controller
Fernbedienung
Télécommande