1
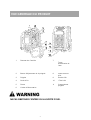
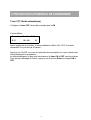
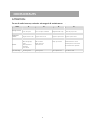
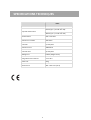
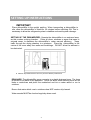
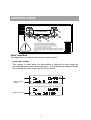
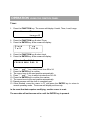
FD65
Déshumidificateur d’air mobile professionnel
FR - Manuel d’installation & d’utilisation Page 1
UK - Installation and user manual
Page 17
1
INFORMATIONS GENERALES
Emballage
S'il vous plaît, NE PAS jeter l'emballage jusqu'à ce que vous ayez vérifié que
l'appareil est bien opérationnel.
Après avoir enlevé l'emballage, s'assurer que le contenu est intact et complet.
Dans le cas improbable de pièces manquantes; contacter votre revendeur.
NE PAS laisser les enfants sans surveillance devant l’emballage car il est une
source potentielle de danger. L'élimination de tous les emballages doit être
effectuées de façon responsable et en toute sécurité et conformément aux
réglementations des autorités locales.
TOUJOURS recycler les matériaux d'emballage si possible.
Lors de l'utilisation de tout produit électrique, des précautions de sécurité
élémentaires doivent toujours être suivies.
S'IL VOUS PLAÎT, LIRE LES INSTRUCTIONS ATTENTIVEMENT
ET COMPLETEMENT AVANT L'UTILISATION DU PRODUIT.
2
INSTRUCTIONS IMPORTANTES
AVERTISSEMENT – Pour réduire les risques d’incendie, de choc électrique
ou blessures aux personnes ou biens :
1. Toujours faire fonctionner le produit à partir d'une source d'alimentation de la
même tension, fréquence et taux indiqués sur la plaque d'identification du produit.
2. Une étroite surveillance est nécessaire lorsque tout produit est utilisé par ou près
des enfants, des personnes âgées ou des infirmes. Ne pas laisser les enfants
utiliser l'appareil comme un jouet.
3. Ne pas utiliser un produit avec un cordon d'alimentation ou une prise
endommagée, après dysfonctionnement, tombé ou endommagé de quelque
façon. Retourner le produit complet à l'endroit de l'achat d'inspection, de réparation
ou de remplacement.
4. Pour réduire le risque de choc électrique, n'exposer en aucun cas l'appareil ou
câble souple à l'humidité de toute genre.
5. Éteindre et débrancher l’appareil de la prise de courant lorsqu'il n'est pas utilisé,
avant assemblage ou nettoyage.
6. Ne pas placer des objets sur le produit ou faisant obstacles aux entrées et sorties
d’ouvertures, ou de faire fonctionner à proximité des murs ou rideaux, etc…
7. L'utilisation d'outils ou accessoires non recommandés ou vendus par le
distributeur, peut causer des dommages physiques et matériels.
8. Ne pas tenter de démonter l'appareil.
9. Ne pas faire fonctionner l'appareil sur une surface métallique.
10. Ne pas utiliser l'appareil dans des conditions artificiellement chaud, humide ou
dans un environnement dangereux.
11. Ne pas nettoyer l'appareil avec un solvant organique.
12.Cet appareil n'est pas destiné à être utilisé par des personnes (enfants compris)
dont les capacités physiques, sensorielles ou mentales, ou le manque d'expérience
et de connaissances,à moins qu'ils aient été,désignés pour surveiller ou instruis
concernant l'utilisation de l'appareil par une personne responsable de leur sécurité.
13. Les enfants ne doivent pas être laissés sans surveillance avec l'appareil.
14. Ce manuel est une partie intégrante de l'appareil et doit être, stocké dans le
coffre, accompagner l’appareil en cas de transfert de propriété par un ingénieur de
maintenance.
LIRE ET SAUVEGARDER CES INFORMATIONS
3
VUE GENERALE DU PRODUIT
1
Panne au de C ont r ôl e
7
2
Bout on d’ Aj ust em ent de l a poi gnée
8
3
Poi gnée
9
4
Sor ti e d’ Ai r
10
5
R oues
11
6
C or don d’ Ali m ent at i on
T uyau
d' év acuati on de
l' eau
Gr ille d’ Ent r ée
d’ Air
Ent r ée d’ Ai r
Fi lt r e à Ai r
C om par ti m ent
poi gnée
NE PAS OBSTRUER L'ENTREE OU LA SORTIE D'AIR.
4
INSTRUCTIONS DE REGLAGE
•
IMPORTANT
Placer le déshumidificateur à la position verticale. Lorsque vous transportez un
déshumidificateur, reposez le pendant 30 minutes avant de la rallumer. Cela est
nécessaire pour permettre au système de réfrigération de sa stabiliser et d’éviter
d’endommager le système.
INSTALLATION DU DESHUMIDIFICATEUR: Faire fonctionner le déshumidificateur
dans un espace clos. Fermer toutes les portes, fenêtre ou zones en contact avec
l’extérieur, afin de maximiser l’efficacité du déshumidificateur. Éviter de générer du
trafic à travers la pièce à déshumidifier. Placer le déshumidificateur au centre de la
pièce loin des murs et du mobilier. NE PAS entraver le flux d’air.
Ill ustration de positionnement correct pour la meilleure performance
VIDANGE: La pompe du déshumidificateur se connecte à un tuyau de
vidange en plastique. Le tuyau est stocké au dos de l’appareil. Dérouler le
tuyau entièrement en assurant qu’il n’y a pas de pincement et de nœuds.
Et placer l'extrémité de ce tuyau dans un lavabo ou une vidange, ou bien à
l'extérieur.
5
PANNEAU DE COMMANDE
LCD DISPLAY
M
OK
Compteurs horaires
Deux compteurs numériques d'heures sont intégrés dans le déshumidificateur.
• Compteur d’heures de cycle
Le compteur est remis à zéro lorsque le déshumidificateur est allumé et indique le
temps cumulé de travail de chaque cycle. Il est automatiquement affiché pendant le
mode de fonctionnement et compte à partir de 00 :00 jusqu’à 99 :60.
Indication du
mode
Humi di té ambiante
Compteur
d’heures d’emploi du
cycle
Horloge temps
réel
6
PANNEAU DE COMMANDE
• Compteur total d’heures (réinitialisation non-manuel)
Ce compteur enregistre l’heure et ne peut être réinitialisé.
Il est affiché en mode veille à compter de 0000 à 9999 heures.
BOUTONS DE FONCTIONS
A.
B.
C.
I.
II.
III.
ON/OFF: Appuyer une fois sur l’appareil ON ou OFF.
PURGE: Appuyer sur la touché P pour vider l’eau contenu dans le
bac à eau. Durant le fonctionnement normal, la pompe purge automatiquement
lorsque le réservoir est plein. Utiliser la fonction P avant de déplacer la machine
pour éviter de renverser de l’eau. La pompe se stoppe automatiquement après
40 secondes de fonctionnement.
et
Appuyer sur
et
pour régler l’humidité relative entre 26% et
90%. Lorsque l’humidité ambiante est inférieure à 26% “CO” sera affiché.
et
et
Ajuster le temps voulu.
Défiler les fonctions du menu.
D.
: Le panneau affichera ’HUMID’ - ‘TIMER’ - ‘LOAD’ ‘LANGUAGE’. Appuyer sur ENTER pour sélectionner le sous-menu.
Après une minute, l’appareil revient au menu normal.
E.
: Appuyer sur ENTER pour confirmer votre choix de menu.
6
7
UTILISATION DU PANNEAU DE COMMANDE
Utilis ation générale:
I. Appuyer sur la touche ON/OFF pour alimenter le déshumidificateur. L’appareil
fonctionnera automatiquement.
II. Après utilisation, appuyer sur ON / OFF pour couper l’alimentation. La pompe à
eau se met en marche automatiquement pendant 40 secondes pour évacuer l’eau de
condensation résiduelle dans le déshumidificateur.
Attention:
NE PAS mettre l'appareil hors tension en le débranchant à la prise secteur.
Pour éviter les fuites d’eau; NE PAS déplacer le déshumidificateur pour au moins
trois minutes après avoir mis l’appareil hors tension.
Réglage de L’humidité relative
Le réglage usine est continu. L’humidité peut être réglé de la manière suivante:
1. Appuyer sur la touche FONCTION. L’écran affiche: Humid, Timer, Load, Langu R.
H um id
Time r
Langu
2. Appuyer sur FONCTION de nouveau, et sélectionner “Humid”.
3. appuyer sur “ENTER” et l’écran affiche:
H um id
0 0 %
Set tin g
R
4. Appuyer sur “?” et“? ”, pour sélectionner l’humidité relative entre 26% et 90%
5. Appuyer sur ENTER pour sélectionner la valeur désirée.
6. Appuyer sur FUNCTION et sélectionner “R” puis ENTER ou attendre 10 seconde
pour revenir en arrière automatiquement. Si vous souhaitez revenir au RH,
choisissez un nombre inférieur à 26% et appuyer sur ENTER.
8
UTILISATION DU PANNEAU DE COMMANDE
Timer:
1. Appuyez sur la touche FUNCTION. L'écran affiche: Humid, Timer, Load,
Language
H um id
Time r
Langu
2.
3.
Appuyez sur la touche de fonction et sélectionner Timer
Appuyer sur la touche entrée et l'écran affiche:
Clo ck
T off
4.
5.
T
T I/ O R
Appuyer sur la touche de fonction et sélectionner clock.
Appuyer sur la touche entrée et l'écran affiche:
Clo ck
Y2000
M00
T 0 0:0 0
D00
R
6. Appuyer sur “?” et“?”, sélectionner heures de 00 à 24
7. Appuyer sur ENTER.
8. Le curseur se change à la position suivante automatiquement..
9. Appuyer sur “?” et“?” pour sélectionner les minutes de 0 à 59.
10. Appuyer sur ENTER.
11. Le curseur se change à la position suivante automatiquement.
12. Répéter le processus jusqu'à ce que l'horloge soit complètement définie.
13. Une fois terminé, amenez le curseur sur ‘R’ et Appuyer sur ENTER pour revenir au
mode de fonctionnement normal.
Dans le cas où les données supposent d'être modifiées, utilisez le curseur
pour réinitialiser.
Les nouvelles données seront pas actives jusqu'à ce que la touche Entrée
soir enfoncée.
8
9
UTILISATION DU PANNEAU DE COMMANDE
Timer ON (Démarrage automatique)
Assurez vous que l'horloge soit réglée avant le réglage du minuteur (timer) .
1.
Appuyer sur la touche FUNCTION et l'écran affiche:
H um id
Tim er
Langu
2.
3.
4.
5.
Appuyer sur la touche FUNCTION de nouveau et sélectionner Timer
Appuyer sur la touche ENTER et l'écran affiche:
Clo ck
T on
T off
T I /O
Appuyer sur la touche FUNCTION de nouveau et sélectionner T.
Appuyer sur la touche ENTER et l'écran affiche:
T im e r
On
0 0: 0 0
Off
R
6. Appuyer “? ” et“? ”pour sélectionner de 00 à 24.
7. Appuyer ENTER pour confirmer le numéro.
8. Appuyer FUNCTION sélectionner position minute
9. Appuyer “? ” et“? ”sélectionner de 00 à 59.
10. Appuyer “ENTER” pour confirmer ce nombre.
11. Appuyer FUNCTION , Off’ est affiché.
12. Appuyer ENTER et ‘On’ est activé.
13. Après confirmation, Appuyer FUCTION et déplacer le curseur sur “R” et Appuyer sur
ENTER. L'écran retournera à la normale.
Pour annuler l'affichage de l'heure déplacer le curseur à la position ON et
appuyez sur ENTER, il revient à OFF.
10
UTILISATION DU PANNEAU DE COMMANDE
Timer OF F (Arrêt automatique)
Configurer le timer OFF de la même manière que le ON
L’écran affiche:
On
Off
00 : 00
00 : 00
Off
R
Après réglage de la minuterie, le déshumidificateur affiche ON / OFF à la durée
demandée. Le cycle est de 24 heures.
Appuyez sur 'On/Off", au cours de l'opération de temporisation le cycle n’annule pas
automatiquement le programme.
Le déshumidificateur ne peut pas fonctionner si le timer ON et OFF sont les mêmes.
Pour annuler l'affichage de l'heure, appuyez sur la touche Enter et changer ON et
OFF.
10
11
MAINTENANCE DU FILTRE A AIR
Assurer que le déshumidificateur est hors tension (que la prise soit débranchée) avant
d’effectuer l’entretien.
La performance de travail du déshumidificateur sera considérablement réduite si les
filtres sont obstrués, même partiellement .
Filtre d’air
Soulever vers le haut
Pour nettoyer ou
renouveler
I. retirer le filtre comme illustré dans le schéma ci-dessus.
II. Evacuer les débris du filtre.
III. Utiliser de l’eau tiède et un détergent doux, laver le filtre et laisser sécher.
IV. Une fois sec, réinstaller le filtre dans le déshumidificateur.
12
MAINTENANCE DE LA BATTERIE
I. Retirez les vis des quatre coins du panneau de commande.
II. Une fois les vis retirées, soulever délicatement le panneau de commande
pour accéder à la carte électronique.
III. Sur cette carte, il y a une pile CR2032. Retirer la batterie et la remplacer
par la nouvelle.
IV. Remonter le panneau de commande.
V. Remonter les quatre vis.
Batterie (CR2032)
13
PANNES
PROBLEME
D éshu m idif ica t eur ne f onc t ionne pa s
D éshu m idif ica t eur c ollec t e peu d’ea u
D éshu m idif ica t eur f onc tionn e m a is la pièc e n’est
pa s désh um idif iée
CAUSE
SOLUTION
Pa s d’a lim ent a t ion à l’ a ppa r eil
Br a nc her la f ic he à la pr ise d’alim ent a t ion
Com m ut a t eur no n a llum é
Allum é le
E 4 er r or af fic hé
Vér if ier le débit de v ida ng e
Insu f f isa nc e du t em ps d e t r av a il
Pr ev oir plus d e t em p s de t r a v a il
L e f iltr e est bloqué
N et t oy er le f ilt r e
Tem pér a t ur e a m bia nt e ba sse
Aug m ent er la t em pér a t ur e a m bia nt e
T uy a u bloq ué
Vér if ier le t uy a u
Les por t es et f enêt r es s ont ouv er t es
Fermer les et étancher a pièce
ATTENTIION:
Un dépannage ne doit être effectué que par du personnel qualifié.
14
CODES DEFAUTS
ATTENTION:
En cas de code inconnu, contacter votre agent de maintenance
CODE
Me s s a g e d ’ e r r e u r
Affi ch a g e d e
Le c t u r e
Ra i s o n s
Zone d’af f ic ha g e
E1
E2
E3
.
E4
E r r eur du c a pt eur
E r r eur du c a pt eur d’hum i dit é
Réf r ig ér a nt f a ible ou pa s
Pa nne de p om pe à ea u
Clig not e t out es les 30s
Clig not e t out es les 30s
Clig not e en per m a nenc e
Clig not e en per m a nenc e
M o de de dég iv r a g e
t em ps.
D éshu m idif ica t eur
F onc tionn e
c orr ec t em ent
50% R. H aff ic he
M o de c ont inue en
f onc t ionne m ent
Couper puis r a llum er
D éshu m idif ica t eur s’ét eint
a ut om a t ique m ent . L a f a ut e doit
êt r e r ec t if iée av a nt l’opér a t ion
E n ha ut à g a uc he
E n ba s à g a uc he
Coin su pér ieur dr oit
Coin inf ér ieur dr oit
15
SPECIFICATIONS TECHNIQUES
FD6 5
65 litres/jour (30°C & 80% HR)
Ca pacité d’E xtra ction
38 litres/jour (27°C & 60% HR)
Alimenta tion
230 V olts 5 0 Hz
Puissa nce nominale
75 0 Watts
Intensité
3,3 A mpères
Puissa nce ma x
10 80 Wa tts
Intensité ma x
4,6 A mpères
Réfrigéra nt
R4 10 A (56 0g ra mmes)
Plag e de fonctionnement
1°C à 38°C
Poids n et
37k g
Dimensions
48 5 x 510 x 81 0 (m m)
16
INDUSTRIAL DEHUMIDIFIER
FD65
INSTRUCTION MANUAL
SAVE THESE INSTRUCTIONS FOR FUTURE REFERENCE
17
GENERAL INFORMATION
Pac kagi ng
Please DO NOT dispose of any pac kaging until you have checked the
applianc e is operational.
After removing the packag ing ensure the contents are intact and complete.
In the unlikely event of missing part s; contact your retailer.
DO NOT leave children unatt ended with any of the packaging since it is a
potential source of danger. Disposal of all packa ging must be carried out
responsibly & safely and in accordance with your local authorit y regulations.
ALWAYS recycle the packaging material wher e possible.
When using any electrically powered product, basic safety precautions
should always be followed.
PLEASE READ THE INSTRUCTIONS CAREFULLY AND IN FULL BEFORE
USING THE PRODUCT.
1
18
IMPORTANT INSTRUCTIONS
WARNING - to reduce the risk of fire, electrical shock or injury to persons or
property:
Important Safety Instructions
1.
2.
3.
4.
5.
6.
7.
8.
9.
10.
11.
12.
13.
14.
15.
Always operate the product from a power source of the same voltage,
frequency and rating as indicated on the product identification plate.
Close supervision is necessary when any product is used by or near children
the elderly or the infirm. Do not allow children to use the appliance as a toy.
Do not operate any product with a damaged power cord or plug, after the
product malfunctions, dropped or damaged in any way. Return the complete
product to the place of purchase for inspection, repair or replacement.
To reduce the risk of electric shock, do not expose the unit or flexible cord to
moisture of any kind.
Switch off and unplug from the power socket when not in use, before
assembling or before cleaning.
Do not place objects on the product or allow objects to obstruct the inlet or
outlet openings, or operate in close proximity to walls or curtains, etc.
The use of attachments or accessories not recommended or sold by the
product distributor may cause injury to persons or damage to property.
This product is intended for normal light commercial use only.
Do not attempt to dismantle the appliance.
Do not operate the appliance on a metal surface.
Do not use the appliance in artificially hot or humid conditions or allow to be
used in a hazardous environment.
Do not clean the appliance with organic solvent.
This appliance is not intended for use by persons (including children) with
reduced physical, sensory or mental capabilities, or lack of experience and
knowledge unless they have been given supervision or instruction concerning
use of the appliance by a person responsible for their safety.
Children should not be left unsupervised with the appliance .
This instruction manual is an integral part of the appliance and should be
stored for safe keeping and must always accompany the appliance in the
event of ownership transfer or for reference to by a service engineer.
READ AND SAVE THESE INSTRUCTIONS
2
19
PRODUCT IDENTIFICATION
1
2
3
4
5
6
C ontr ol Pan el
H andl e Adjust m ent Bu tt on
H andl e
Ai r Outl et
Wheel s
Pow er C or d
7
8
9
10
11
Wat er Pi pe
Ai r I nl et Gr il le
Ai r I nl et
Ai r Fi lt er
Bucket H andl e
DO NOT OBSTRUCT THE AIR INLET OR OUTLET.
20
SETTING UP INSTRUCTIONS
IMPORTANT
Place dehumidifier in the upright position. When transporting a dehumidifier to
site, allow the dehumidifier to stand for 30 minutes before switching ON. This is
necessary to allow the refrigerant system to stabilise and avoid system damage .
SETTING UP THE DEHUMIDIFIER: Operate the dehumidifier in an enclosed area,
as this creates a drying chamber. Close all doors, windows or areas that open to
external areas, to maximize the dehumidifier’s water removal efficiency. Keep
traffic through the drying chamber to a minimum. Place the dehumidifier in the
centre of the room away from walls and furnishings. DO NOT allow the airflows to
be obstructed.
Ill ustration de positionnement correct e pour la meilleure performance
DRAINAGE: The dehumidifier pump connects to a plastic drainage hose. The hose
is stored on the back of the appliance. Uncoil the entire hose ensuring there are no
kinks or restrictions and place the unattached end into a water vessel or run to
outdoors.
Ensure that water which runs to outdoors does NOT create a slip hazard.
Water vessels MUST be checked regu larly where used.
21
CONTROL PANEL
LCD DISPLAY
OK
M
Hour counters
Two digital hour counters are built-into the control system.
• Cycle hour counter
This counter is reset when the dehumidifier is switched on and shows the
accumulated working time of each job cycle. It is automatically displayed during
the running mode and counts from 00:00 up to 99:60.
Cycle jo b ho ur
counter
Real Ti me Cl ock
22
CONTROL PANEL
• Total hours counter (non-manual reset)
This hour counter records the running time and cannot be reset.
It is displayed during standby mode, counting from 0000 up to 9999 hours.
FUNCTION KEYS
A.
B.
C.
ON/OFF: Press once to turn the unit ON or OFF.
PURGE: Press the PURGE key to empty water from the pump reservoir.
During normal operation the pump purges automatically when the reservoir is full.
Use ‘PURGE’ before moving the machine to avoid water spillage. The pump will
close automatically after forty seconds continuous operation.
and
I.
Press
and
key to set or adjust humidity in the range between 26% and
90%. When the environmental humidity is below 26% “CO” will be displayed.
II.
and
key is used to adjust set time.
III.
and
key used to switch menu functions.
D.
E.
: Press the function key, the panel displays ’HUMID’ - ‘TIMER’ - ‘LOAD’ ‘LANGUAGE’. Press ENTER to select sub menu. Repress ENTER key and after
one minute the appliance will return to normal menu.
: Press the ENTER key to confirm menu selection.
6
23
OPERATION USING THE CONTROL PANEL
Operation in general us e:
I. Press the ON/OFF key to power the dehumidifier ON. The unit will operate
automatically to set conditions.
II. After use, press ON/OFF key to turn the power OFF. The water pump will turn on
automatically for 40 seconds to drain the residual condensate water in the
dehumidifier.
Attention:
DO NOT switch the power OFF by disconnecting at the mains socket outlet.
To avoid water spillage; DO NOT move the dehumidifier for at least three minutes
after turning the power OFF.
Humidity s etting
The factory setting is continuous. The humidity can be set in the following manner:
1. Press the FUNCTION key. The screen will display: Humid, Timer, Load, Langu R.
H um id
T im e r
Langu R
2. Press the FUNCTION key again, and select “Humid”.
3. Press “ENTER” and the screen will display:
H um id
0 0 %
Set ting
R
4. Press “?” and“?” key, to select Relative Humidity between 26% and 90%
5. Press ENTER key to select desired setting.
6. Press FUNCTION key to select “R” and press the ENTER key or wait 10 seconds
to turn back automatically. If you need return to acquiescent RH setting, choose a
number below 26% then press ENTER.
7
24
OPERATION USING THE CONTROL PANEL
Timer:
1. Press the FUNCTION key. The screen will display: Humid, Timer, Load, Langu
H um id
T im e r
Langu R
2. Press the FUNCTION key & select Timer
3. Press the ENTER key & the screen will display:
Clo ck
T off
T on
T I/ O R
4. Press the FUNCTION key & select clock.
5. Press the ENTER key & the screen will display:
Clo ck T
0 0:0 0
Y20000 M00 D00
R
6. Press “?” and“?” key, select hours from 00 to 24.
7. Press the ENTER key to confirm.
8. The cursor turns to the next position automatically.
9. Press “?” and“?” key to select minutes from 0 to 59.
10. Press the ENTER key to confirm the number.
11. The cursor turns to the next position automatically.
12. Repeat process until the clock is completely set.
13. Once finished, move the cursor to ‘R’ and press the ENTER key to return to
normal operating mode. The screen will display set time only.
In the event that data requires modifying; use the cursor to reset.
The new data will not become active until the ENTER key is pressed.
8
25
OPERATION USING THE CONTROL PANEL
Timer ON s etting
Ensure the clock is correct before setting the timer.
1. Press the FUNCTION key & the screen displays:
H um id
T im e r
Langu R
2. Press the FUNCTION key again & select Timer
3. Press the ENTER key & the screen displays:
Clo ck
T on
T off
T I /O
R
4. Press the FUNCTION key again & select T on.
5. Press the ENTER key & the screen will display:
T im e r
On
0 0: 0 0
Off
R
6. Press “?” and“?” keys to select from 00 to 24.
7. Press the ENTER key to confirm this number.
8. Press the FUNCTION key again & select minute position
9. Press “?” and“?” key & select from 00 to 59.
10. Press “ENTER” key to confirm this number.
11. Press the FUNCTION key again & ‘Off’ is displayed.
12. Press the ENTER key & ‘On’ is activated.
13. After setting is completed press the FUCTION key again & move the cursor to “R”
and press the ENTER key. The display will return to normal.
To cancel the time display move the cursor to the ‘On’ position and press
enter, turning it to Off. This function only performs once.
9
26
OPERATION USING THE CONTROL PANEL
Timer OF F s etting
Set the timer OFF in the same manner as timer ON
Cycle timer s etting
The screen displays:
On
Off
00 : 00
00 : 00
Off
R
After setting the cycle timer the dehumidifier will turn ON/OFF at the selected times.
The cycle is 24 hours.
Pressing ‘On/Off’ during the Cycle timer operation will not automatically cancel
the program.
The dehumidifier will not function if the timer ON and timer OFF times are the
same.
To cancel the time display, press the ENTER key to change OFF to ON.
Language Option
The language option is not available for this model
27
Maintenance CLEANING THE AIR FILTER
Ensure the dehumidifier is turned OFF and the 13 Amp plug is removed from
the power socket before maintenance is carried out.
The working perfo rmance of the dehumidifier will be greatly reduced if the
filters become blocked.
Air Filter
Lift upwards to remove
for cleaning or renewal
I.
II.
III.
IV.
Remove the filter as shown in the diagram above.
Vacuum any debris from the filter using the vacuum hose and nozzle attachment.
Using luke-warm water and a mild detergent wash the filter and allow to dry.
Once dry, re-install the filter into the dehumidifier.
11
28
Maintenance REPLACING THE BATTERY
I.
II.
III.
IV.
V.
Remove the screws in the four corners of the control panel.
Once the screws are removed, carefully lift the control panel to access the PCB.
On the PCB is a CR2032 battery. Remove the battery and replace with new.
Refit the control panel onto the PCB.
Refit the four screws.
Battery (CR2032)
12
29
TROUBLE SHOOTING
PRO BLEM
D ehum i d if ier d o e s not ope r a t e
CAUSE
SOLUTION
N o Pow er t o a pp lia nc e
Co n n e c t plug t o p o w er so cket
S w it c h not t u r n e d on
S w it c h on
E 4 er r or is disp la y e d
Chec k dr a ina g e f low
Insu f f ic ient w or k ing t im e
Allo w m or e wor king t im e
F ilt er is bloc k e d
Cle a n f ilt er
L ow a m b ient t e m p er a t ur e
I nc r ea s e a m bient t em per a t ur e
Co n d e n sa t e ho se is bloc k e d
Chec k ho se f or r es t r ic t ions
D oor s a nd w i n do w s a r e open
S ea l r oo m f r om ext er n a l a r ea s
D ehum i d if ier c o llec t s litt le w a t er
D ehum i d if ie r is o p er a t ing but
r oom is not dr y in g
WARNING:
DO NOT attempt to rectify faults using unqualifie d personnel.
30
TROUBLE SHOOTING FAULT CODES
WARNING:
In the event of a fault code, contact your service agent.
CODE
E r ro r
Me s s a g e
D i s p la y
Rea di ng
Rea s on
E1
E2
E3
E4
Wa t er pum p f a u lt or bloc ka g e
Coil sen s or er r or
H um id ity sen sor er r or
L ow or n o r ef r ig er a nt
F la shes e v er y 30 sec ' s
F la shes e v er y 30 sec ' s
F la shes c on t inu a lly
F la shes c on t inu a lly
T im ed d ef r ost m o de.
T he d eh um id if ier is
w or king c or r e c t ly.
50% R. H disp la y e d
Cont i n u o us m o d e in o p er a t i o n
T ur n p o wer O F F.
T hen t ur n O N a g a in.
D ehum i d if ier w ill t ur n O F F
a ut om a t ic a lly. T he f a ult m ust
be r ec t if ie d be f o r e o pe r a t io n
ca n c o m m en c e.
D ispla y Ar ea
T op lef t c or n er
Bot t om left c or ne r
T op r ig ht c or n er
14
31
Bot t om r ig ht c or n er
SPECIFICATION
MO DE L
65 litres/da y (30°C RH80% )
Extra ction ca pa city
38litres/da y (27°C RH60% )
Power S upply
230 vol ts 50 Hz
Ra ted Power
750 watts
Ra ted Current
3.3A mps
Ma x Power
10 80wa tts
Ma x Current
4.6A mps
Refrig er a nt
R4 10 a (5 60g ra ms)
Opera ting Ra nge
1°C ~ 38°C
Net Weight
37kg
Dimensions
48 5 x 510 x 81 0 (m m)
32