1
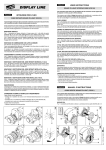
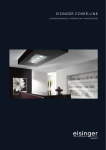
ENGLISH
®
ITALIANO
DISPLAY LINE
OPERATING INSTRUCTIONS
ADJUSTABLE OSCILLATING MIRROR (C52130)
This instructions sheet must be read together with the instructions manual supplied with
the projector to be fitted with this accessory.
ISTRUZIONI PER L’USO
This accessory can be fitted on Display Line projectors equipped with electrified rails, in
conjunction with the lens holder mounting (supplied as standard with the projector) and with a
lens. It can be mounted on its own or in combination with other accessories.
SPECCHIO OSCILLANTE REGOLABILE (C52130)
Il presente foglio di istruzioni deve essere letto unitamente al manuale di istruzioni fornito
con il proiettore sul quale si intende montare questo accessorio.
INDEPENDENT INSTALLATION
Questo accessorio può essere montato sui proiettori Display Line provvisti di guide elettrificate,
in abbinamento con il supporto portaobiettivo (fornito di serie con il proiettore) e con un obiettivo.
Può essere montato singolarmente o in combinazione con altri accessori.
The accessory must be fixed to the lens holder support as follows:
Fig. 1 - Loosen the two knobs (A) so that they are not projecting inside collar (B).
Fig. 2 - Make sure that the switch (C) is on «O», then fit the accessory onto the lens holder
mounting. Tighten knobs (A) without using excessive force.
MONTAGGIO SINGOLO
INSTALLATION IN COMBINATION WITH OTHER ACCESSORIES
L’accessorio deve essere fissato sul supporto portaobiettivo procedendo come segue:
Fig. 1 - Allentare i due volantini (A) in modo che essi non sporgano all’interno del collare (B).
Fig. 2 - Assicurarsi che l’interruttore (C) sia in posizione di spento «O», quindi infilare
l’accessorio sul supporto portaobiettivo e avvitare senza forzare i volantini (A).
Refer to the operating instructions of the other accessories. In general, make sure that the
moving parts of the various accessories cannot come into contact with each other.
MONTAGGIO IN COMBINAZIONE CON ALTRI ACCESSORI
ADJUSTING THE MIRROR
Fare riferimento alle istruzioni per l’uso degli altri accessori. Come norma generale fare
attenzione, nel montaggio, a non far entrare in contatto fra loro le parti in movimento dei diversi
accessori.
Fig. 3 - To adjust the direction of the light beam, loosen the two knobs (A), turn the accessory
on the lens holder mounting and then tighten the two knobs (A) without using excessive force.
Fig. 4 - The mirror movement angle can be adjusted by means of screw (D).
Fig. 5 - The mirror orientation can be adjusted by means of knob (E).
Fig. 6 - The image projected by the mirror will be the reverse of the slide or gobo image
(if mounted). To restore the correct image, invert the position of the slide or gobo (F).
OPERATION
The accessory works automatically when switch (C) is set to «I».
FUNZIONAMENTO
L’accessorio funziona in maniera automatica, per avviarlo posizionare su «I» l’interruttore (C).
ORIENTAMENTO DELLO SPECCHIO
MAINTENANCE
Fig. 3 - Per orientare il fascio luminoso nella direzione desiderata, allentare i due volantini (A),
ruotare l’accessorio sul supporto portaobiettivo, quindi avvitare senza forzare i due volantini (A).
Fig. 4 - L’angolo di escursione del movimento dello specchio può essere regolato agendo sulla
vite (D).
Fig. 5 - L’orientamento dello specchio si regola agendo sul volantino (E).
Fig. 6 - L’immagine proiettata dallo specchio sarà al contrario dell’immagine della diapositiva o
del gobo eventualmente montato. Per riportare l’immagine nella giusta vista, ribaltare la
diapositiva o il gobo (F).
This accessory requires no routine maintenance and, in the event of malfunctioning, it must be
passed over to an authorized technician. Periodically clean the mirror with an anti-static cloth or
a soft cloth moistened with a non-corrosive product for cleaning glass.
BASIC TROUBLESHOOTING
Mirror movement problems:
• Make sure that the projector is on and the switch (C) of the accessory is on «I».
• Check if there is contact between the collar containing the two conductor strips for securing
the accessory and the lens holder mounting.
MANUTENZIONE
• Check electrical continuity between fixing clips on the lens holder mounting and projector’s
electrified guides.
L’accessorio non richiede alcuna manutenzione ordinaria e in caso di malfunzionamento deve
essere affidato a un tecnico autorizzato. La pulizia periodica dello specchio va effettuata con un
panno antistatico oppure con un panno morbido e un detersivo per vetro non corrosivo.
• Make sure that, as the mirror rotates, it does not collide with the lens unit projecting from its
mounting.
CORREZIONE DI SEMPLICI ANOMALIE DI FUNZIONAMENTO
Rings are seen on the projection:
Lo specchio non gira regolarmente:
• Verificare che il proiettore sia acceso e che l’interruttore (C) dell’accessorio sia in posizione «I».
• Perform routine cleaning.
• Verificare che ci sia contatto tra il collare contenente le due strisce conduttrici di fissaggio
dell’accessorio e il supporto portaobiettivo.
FRANÇAIS
• Verificare che ci sia contatto fra le mollette di fissaggio del supporto portaobiettivo e le guide
elettrificate del proiettore.
MIROIR OSCILLANT REGLABLE (C52130)
• Accertarsi che durante la rotazione, lo specchio non venga a contatto con l’obiettivo sporgente
dal suo supporto.
Lire la présente fiche d'instructions en même temps que le manuel d'instructions fourni
avec le projecteur sur lequel l'accessoire doit être monté.
Si notano aloni sulla proiezione:
• Effettuare l’operazione di pulizia periodica.
1
INSTRUCTIONS D'UTILISATION
Cet accessoire peut être monté sur les projecteurs Display Line équipés de guides électrifiés,
en association avec le support d'objectif (fourni de série avec le projecteur) et avec un objectif.
Il peut être monté seul ou en combinaison avec d'autres accessoires.
2
A
3
A
A
A
A
C
B
5
4
6
003 PIV
F
VIP 300
F
D
Rev. 1 11/00 Cod. 099536
studio
E
MONTAGE SEUL
L’accessoire doit être fixé sur le support de l’objectif en procédant de la façon suivante
Fig. 1 - Desserrez les deux molettes (A) pour qu’elles ne dépassent pas a l’intérieur de la
collerette (B).
Fig. 2 - S’assurer que l’interrupteur (C) est en position éteinte «O», puis introduire l’accessoire
dans le support d’objectif et visser les molettes (A) sans forcer.
• Prüfen, ob zwischen den Federn zur Befestigung des Halters des Objektivträgers und den
elektrifizierten Führungsstäben des Projektors Kontakt besteht.
• Sich vergewissern, dass der Spiegel während der Drehung nicht mit dem Objektiv, das über
den Halter herausragt, in Berührung kommt.
Ränder an der Projektion:
• Regelmäßige Reinigung der Optiken, Gobos und Farbfilter.
MONTAGE AVEC D’AUTRES ACCESSOIRES
Se reporter aux instructions pour l'utilisation des autres accessoires. Comme règle générale de
montage, vous devez éviter tout contact entre les parties en mouvement des différents
accessoires.
ESPAÑOL
INSTRUCCIONES DE USO
ESPEJO OSCILATORIO REGULABLE (C52130)
FONCTIONNEMENT
L’accessoire fonctionne en automatique; pour le mettre en fonction, positionner sur «I»
l’interrupteur (C).
ORIENTATION DU MIROIR
Fig. 3 - Pour orienter le faisceau lumineux dans la direction désirée, desserrer les deux molettes
(A), tourner l’accessoire sur le support d’objectif, puis visser les deux molettes (A) sans forcer.
Fig. 4 - L’angle de course du mouvement du miroir peut être réglé en agissant sur la vis (D).
Fig. 5 - L’orientation du miroir peut être réglée en agissant sur la molette (E).
Fig. 6 - L’image projetée par le miroir est renversée par rapport à l’image de la diapositive ou du
gobo éventuellement montés. Pour obtenir l’image correcte, retourner la diapositive ou le gobo (F).
ENTRETIEN
L'accessoire ne nécessite aucun entretien ordinaire, et en cas de mauvais fonctionnement,
il doit être confié à un technicien agréé. Le nettoyage périodique du miroir s’effectue avec un
chiffon antistatique ou un chiffon doux imbibé de produit non corrosif spécial vitres.
INTERVENTION EN CAS DE PETITS PROBLÈMES DE FONCTIONNEMENT
La presente hoja de instrucciones debe leerse junto con el manual de instrucciones del
proyector en el cual se montará este accesorio.
Este accesorio puede montarse en proyectores Display Line provistos de guías electrificadas,
junto con el portaobjetivo (que se suministra de serie con el proyector) y un objetivo.
Es posible montarlo sólo o en combinación con otros accesorios.
MONTAJE INDIVIDUAL
Fijar el accesorio al soporte portaobjetivo de la siguiente manera:
Fig. 1 - Aflojar las dos manecillas (A) hasta que queden fuera del perímetro del collar (B).
Fig. 2 - Compruebe que el interruptor (C) esté en posición apagado «O», luego introduzca el
accesorio en el soporte portaobjetivo y enrosque sin forzar las manecillas (A).
MONTAJE EN COMBINACIÓN CON OTROS ACCESORIOS
Consulte las instrucciones de uso de los demás accesorios. Como regla general, durante el
montaje, cuidar que las partes móviles de los diversos accesorios no se toquen entre sí.
Le miroir ne tourne pas régulièrement:
• S'assurer que le projecteur est allumé et que l'interrupteur (C) de l'accessoire est sur la
position «I».
FUNCIONAMIENTO
• Vérifier qu’il y a un contact entre le collier contenant les deux bandes conductrices de fixation
de l’accessoire et le support d’objectif.
ORIENTACIÓN DEL ESPEJO
• Vérifier qu’il y a un contact entre les ressorts de fixation du support d’objectif et les guides
électrifiés du projecteur.
• S’assurer que, pendant la rotation, le miroir n’entre pas en contact avec l’objectif en saillie sur
son support.
En cas de halos sur la projection:
• Nettoyez.
El accesorio funciona en modo automático, para activarlo ponga el interruptor (C) en la posición «I».
Fig. 3 - Para orientar el haz luminoso en la dirección deseada, afloje las dos manecillas (A), gire
el accesorio en el soporte portaobjetivo y enrosque sin forzar las dos manecillas (A).
Fig. 4 - El ángulo de desplazamiento del movimiento del espejo se puede regular interviniendo
en el tornillo (D).
Fig. 5 - La orientación de espejo se regula interviniendo en la manecilla (E).
Fig. 6 - La imagen proyectada por el espejo estará invertida respecto a la de la diapositiva o del
gobo que se haya montado. Para visualizar correctamente la imagen, de vuelta la diapositiva o
el gobo (F).
MANTENIMIENTO
DEUTSCH
BEDIENUNGSANLEITUNG
MOTORISCHER SCHWENSKSPIEGEL (C52130)
Diese Bedienungsanleitung sollte parallel mit dem Bedienungshandbuch des Projektors,
mit dem dieses Zubehörteil benutzt werden soll, gelesen werden.
El accesorio no requiere ningún mantenimiento ordinario y ante cualquier desperfecto, acuda a
un técnico autorizado. Limpiar periódicamente el espejo con un paño antiestático, o con una tela
suave humedecida en un liquido lavacristales que no sea corrosivo.
SOLUCION DE ANOMALÍAS SIMPLES
El espejo no gira correctamente:
• Compruebe que el proyector esté encendido y que el interruptor (C) del accesorio se
encuentre en la posición «I».
Dieses Zubehörteil kann an Display Line-Projektoren mit elektrifizierten Führungsstäben, in
Kombination mit dem (serienmäßig mit dem Projektor mitgelieferten) Objektivhalter und mit
einem Objektiv montiert werden. Es kann einzeln oder in Kombination mit anderen
Zubehörteilen montiert werden.
• Compruebe que haya contacto entre el collar que contiene las dos tiras conductoras de
fijación del accesorio y el soporte portaobjetivo.
EINZELMONTAGE
• Compruebe que haya contacto entre los clips de fijación del soporte portaobjetivo y las guías
electrificadas del proyector.
Das Modul folgendermaßen am Objektivhalter befestigen:
Abb. 1 - Die beiden Handschrauben (A) so lockern, daß sie nicht ins Innere des Halterings (B) ragen.
Abb. 2 - Sich vergewissern, dass sich der Schalter (C) in der Stellung «O» - ausgeschaltet befindet, dann das Zubehörteil auf den Halter des Objektivträgers setzen und die
Handschrauben (A) ohne Kraftaufwand festziehen.
• Cerciorarse de que, durante la rotación, el espejo no toque el objetivo que sobresale del
soporte.
La proyección tiene halos:
• Efectúe la operación de limpieza periódica.
MONTAGE IN KOMBINATION MIT WEITEREN EFFEKTEN
Auf die Bedienungsanleitungen der anderen Zubehörteile Bezug nehmen. Als allgemeine
Richtlinie gilt, während der Montage darauf zu achten, daß die beweglichen Teile der
verschiedenen Effektmodule nicht miteinander in Berührung kommen.
9
13
BETRIEB
14
Das Zubehörteil funktioniert automatisch; um es einzuschalten, den Schalter (C) auf «I» stellen.
AUSRICHTUNG DES ABLENKSPIEGELS
Abb. 3 - Um den Lichtstrahl in die gewünschte Richtung zu lenken, die beiden Handschrauben
(A) lösen, das Zubehörteil auf dem Halter des Objektivträgers drehen und dann die beiden
Handschrauben (A) ohne Kraftaufwand festziehen.
Abb. 4 - Der Schwenkwinkel des Spiegels kann durch Verstellen der Schraube (D) reguliert werden.
Abb. 5 - Die Ausrichtung des Spiegels reguliert man durch Verstellen der Handschraube (E).
Abb. 6 - Das vom Spiegel projizierte Bild wird im Vergleich zum Bild des Diapositivs oder des
eventuell montierten Gobos seitenverkehrt sein. Um das Bild richtig wiederzugeben, ist das
Diapositiv oder der Gobo (F) umzukehren.
WARTUNG
Das Zubehörteil bedarf keinerlei ordentlichen Wartung, und im Falle einer Betriebsstörung muss
es von einem autorisierten Techniker repariert werden. Für die regelmäßige Reinigung des
Ablenkspiegels ein antistatisches Tuch oder ein weiches, mit einem milden Glasreinigungsmittel
getränktes Tuch verwenden.
BEHEBUNG EINFACHER BETRIEBSSTÖRUNGEN
Der Spiegel dreht sich nicht regulär:
• Prüfen, ob der Projektor eingeschaltet ist und ob der Schalter (C) des Zubehörteils auf der
Position «I» steht.
• Prüfen, ob zwischen dem Stellring, der die zwei leitfähigen Streifen zur Befestigung des
Zubehörteils enthält, und dem Halter des Objektivträgers Kontakt besteht.
7
12
1
6
22
21
5
10
15
11
22
23
24
25
26
19
27
28
18
29
4
16
17
3
2
CLAY PAKY SPA - Via Pascoli,1 - 24066 Pedrengo ( Bergamo) Italy
Tel. +39-035 -65 4311 (10 linee) - Fax +39-035 -66 59 76 - Internet: www.claypaky.it