1
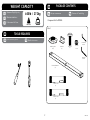
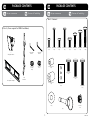
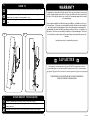
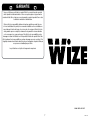
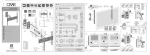
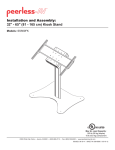
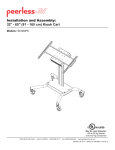
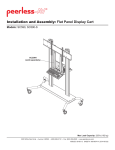
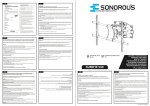
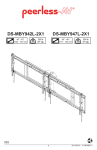
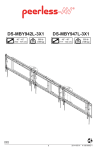
ВНИМА НИЕ !
DSM63
Ceiling Mounted Quad Display System
For 37”-65” TVs / Weight Capacity: 600 lb
Instruction Manual
ВНИМАНИЕ! ТРАВМА И ПОВРЕЖДЕНИЕ ОБОРУДОВАНИЯ МОЖЕТ ПРОИЗОЙТИ ОТ
НЕПРАВИЛЬНОЙ УСТАНОВКИ ИЛИ СБОРКИ. ОЗНАКОМЬТЕСЬ СО СЛЕДУЮЩИМИ
ПРЕДУПРЕЖДЕНИЯМИ ПЕРЕД НАЧАЛОМ.
info@wize. ru
www.wize-av.com
Инструкция
Manuel D’instructions
Компоненты, входящие в этот продукт, предназначен для установки на стенах из цельного
дерева, бетона или бетонных блоков. Для стен из других материалов, таких как кирпич,
пожалуйста, проконсультируйтесь с вашим инсталлятором и / или специалистом поставщика.
НЕ ПРЕВЫШАЙТЕ МАКСИМАЛЬНЫЙВЕС, УКАЗАННЫЙ В ИНСТРУКЦИИ
!
WA R NI N G!
AV ERTISSE MEN T
!
AVERTISSEMENT! SI CE PRODUIT N’EST PAS CORRECTEMENT INSTALLÉ OU ASSEMBLÉ, IL
RISQUE DE CAUSER DES BLESSURES RAVES, VOIRE MORTELLES, AINSI QUE DES DOMMAGES MATÉRIELS IMPORTANTS. AVANT DE COMMENCER, LISEZ LES AVERTISSEMENTS
SUIVANTS.
WARNING! SEVERE PERSONAL INJURY AND PROPERTY DAMAGE CAN RESULT FROM
IMPROPER INSTALLATION OR ASSEMBLY. READ THE FOLLOWING WARNINGS BEFORE
BEGINNING.
N’utilisez pas ce produit à une fin non spécifiée expressément par Crimson AV. Une installation
incorrecte peut entraîner des préjudices corporels ou des dommages matériels. Si vous ne comprenez pas ces instructions ou si vous avez des doutes quant à la sécurité de l’installation, veuillez
contacter le service clientèle de Crimson AV ou un installateur qualifié. Crimson AV n’est pas responsable des dommages ou des préjudices causés par un montage, un assemblage ou une
Do not use this product for any purpose not explicitly specified by Crimson AV. Improper installation may cause property damage or personal injury. If you do not understand these directions, or
have doubts about the safety of the installation, contact Crimson AV Customer Service or call a
qualified contractor. Crimson AV is not liable for damage or injury caused by incorrect mounting,
assembly, or use.
utilisation incorrects.
The hardware provided with this product, is exclusively intended for installation on walls made of
solid wood, concrete, concrete block or solid wood columns with a maximum of 16 mm of drywall.
For walls made of other materials, for example hollow bricks, please consult your installer and/
or specialist supplier.
Le matériel fourni avec ce produit, est exclusivement destiné à être installé sur des murs en bois
massif, en béton, blocs de béton ou des colonnes en bois massif avec un maximum de 16 mm de
plaques de plâtre. Pour les murs faits d’autres matériaux, comme la brique creuse, s’il vous plaît
consulter votre installateur et / ou fournisseur spécialisé.
DO NOT EXCEED THE MAXIMUM WEIGHT CAPACITY FOR THIS PRODUCT
NE DÉPASSEZ JAMAIS LA CAPACITÉ DE CHARGE MAXIMALE DE CE PRODUIT.
1
DSM63-0001
W E IGHT CA PACI TY
Maximum Weight Capacity
Максимальный вес
Poids maximal de l’écran
PAC K AG E C O N T E N T S
6 00lb / 27 2kg
Входит в комплект
!
Contenu de l’emballage
Component List for DSM63:
CAUT I O N!
Box 1
TOOL S R EQUIRE D
Необходимые Инструменты
Outils nécessaires
2.5mm Allen
Wrench
Retaining collar
D (5)
L Brackets
(2)
M8 x 16mm
(8)
Set screws
DD (10)
4mm Allen
Wrench
Horizontal Extrusion
(2)
6” Static Column
(2)
8” Static Column
(2)
2
DSM63-001
PA CKAG E CONT E N TS
Входит в комплект
PAC K AG E C O N T E N T S
Contenu de l’emballage
Входит в комплект
Contenu de l’emballage
Box 4 Continued
Box 4 (4 boxes required for DSM63 installation)
M4 x 12mm
F (4)
C
Ceiling Mount Box
2.5mm Allen
Wrench
4mm Allen
Wrench
Set screws
(Security)
DD (4)
Set screws
EE (4)
M4 x 30mm
G(4)
M5 x 12mm
H (4)
M5 x 30mm
I (4)
M6 x 12mm
J (4)
M6 x 20mm
K (4)
M6 x 25mm
L (4)
M6 x 30mm
M(4)
M4 / M5 Spacer
R (4)
M8 x 16mm
N (4)
Z
Mount plate adapter
E (2)
Brackets
M8 x 25mm
O (4)
M6 / M8 Spacer
S (4)
M8 Washer
U (12)
3
Multiwasher
V (4)
Locking Pin
Y (1)
M8 x 40mm
P (4)
Lock Nut
T (4)
DSM63-0001
1a-2
I N S TAL L ATION INS TRU CTION S
Инструкция
1a-1
Attach 2nd horizontal extrusion to bottom of “L” brackets with screws M8x16mm. Note:
Make sure that larger openings face up.
Instructions d’installation
Прикрепите 2-ю деталь крепелния с помощью винтов M8x16mm .
Oтмечать: Убедитесь, что большие отверстия сверху.
A S S E M B LY IN S TA LLATION
Fixez extrusion horizontale en bas de crochets avec vis M8x16mm. Note: Assurezvous que les grandes ouvertures vers le haut.
Attach “L” brackets to side of horizontal extrusion with screws M8x16mm. Note: Make
sure that larger openings face up.
Прикрепите скобки (L)с помощью винтов M8x16mm.
Убедитесь, что большие отверстия сверху.
ASSEM B LY INSTALLATIO N
Oтмечать :
1a-2
Fixez “L” les supports à l’extrusion horizontale avec vis M8x16mm. Note: Assurezvous que les grandes ouvertures vers le haut.
1 a- 1
4
DSM63-001
2
ASSEM B LE CEILING M O UNT
3
A S S E M B LY IN S TA L LATION
Attach mount plate to ceiling box. Thread ceiling box onto column. Secure with set
screws.
Прикрепите пластину для потолочного кронштейна. Присоедините потолочный
кронштейн к штанге . Крепится с помощью установочных винтов.
Fixez la plaque de montage au boîtier de plafond. Fixer la boîte de plafond sur la
colonne. Fixez avec des vis.
Slide horizontal extrusions (A) onto end of extension pipe followed by retaining collar (D).
Соедините детали как указано на рисунке.
Faites glisser l’assemblage (A) sur l’extrémité du tuyau d’extension suivie conservant collier (D).
2
3-1
T
C
Z
3-2
OR
O
OU
5
(EE)
(DD)
DSM63-0001
4
5
A S S E M B LY IN S TA LLATION
ASSEM B LY INSTALLATIO N
Rotate to desired position and lock down wtih pre-installed set screws with supplied wrench.
Slide extension pipe through opening in horizontal extrusion and attach retaining collar.
Вставьте штанги
гайкой.
Установите
винты,
Вставьте
штангичерез
черезотверстия
отверстияииприкрепите
прикрепитебольшой
большой
гайкой.
Установите
винты,
чтобы предотвратить ослабление гайки.
Поверните сборку в нужное положение и затяните предустановленными винтами
с помощью прилагаемого ключа.
Faites glisser tuyau par extrusion horizontale et fixez collier de retenue.
Tournez à la position désirée et sécurisés avec camions vis pré-installées avec la clé fournie.
4
5
6
DSM63-001
4
AT TA C H M O U N T B R AC K ET S
4-2
ATTACH M O UNT B RACKETS
Align mount bracket (E) to holes on back of TV. Fasten using supplied hardware with
a screwdriver. Hand tools only.
If screws (F-M) are needed use multi-washer (V).
Совместите адаптер (E) с отверстиями на задней части телевизора. Используйте отвертку,
чтобы закрепить винтами из комплекта. Используйте только ручные инструменты.
Si les vis (F-M) sont nécessaires, puis utilisez multi-rondelle (V).
Если винты (F-M) необходимы, используйте шайбы (V).
Aligner le support de montage (E) dans les trous à l’arrière du téléviseur. Fixer à l’aide de matériel fourni avec un tournevis. Outils à main seulement..
4-3
ATTACH M O UNT B RACKETS
Use spacers (R / S) between TV and mount if needed.
Используйте прокладки (R / S) между кронштейном и телевизором, если это
необходимо.
Utiliser des entretoises (R / S) entre le téléviseur et le support métallique si nécessaire.
4-3
4- 1
Spacer
R or S
4- 2
Screws
(N-P)
DO NOT USE
Multi-washer
4-4
Screws
(F-M)
!
Multi-washer
(V)
4-4
ATTACH M O UNT B RACKETS
If screws bottom out use washers (not included) to eliminate slack.
Если винт дойдет до нижнего предела, используйте шайбы (не включены) для
устранения провисания.
Si les vis touché le fond, puis utiliser des rondelles (non inclus) afin d’éliminer mou.
7
DSM63-0001
5
HANG TV
WAR R AN TY
Hook top of bracket over the top of mount then lower down and tilt toward ceiling
box.
Навесьте верхнюю часть кронштейна на верхнюю часть настенного крепления,
потяните вниз и поверните по направлению к стене.
Congratulations on the purchase of this Wize product! The product you now have in your possession
is made of durable materials and is based on a design, every detail of which has been meticulously
thought-out. That is why Wize products are covered by a 10-year warranty against defects in materials or manufacturing.
Accrocher le haut du support sur le support, puis plus bas et l’inclinaison vers la boîte de
plafond..
5
Wize disclaims any liability for modifications, improper installations, or installations over the specified weight range. To the maximum extent permitted by law, Wize disclaims any other warranties,
expressed or implied, including warranties of fitness for a particular purpose and warranties of
merchantability. Wize will not be liable for any damages arising out of the use of, or inability to use,
Wize products. Wize bears no responsibility for incidental or consequential damages. This includes,
but is not limited to, any labor charges for the repair of Wize products performed by anyone other
than Wize.
6
Specifications are subject to change without prior notice.
ГА РА НТИЯ
Благодарим вас за покупку данного продукта Wize! Этот продукт изготовлен из
прочных материалов и основан на дизайне, каждая деталь которого была тщательно
продумана. Продукты Wize обеспечены 10-летней гарантией от дефектов в производстве.
ТЕХНИЧЕСКИЕ ХАРАКТЕРИСТИКИ МОГУТ БЫТЬ ИЗМЕНЕНЫ БЕЗ
ПРЕДВАРИТЕЛЬНОГО УВЕДОМЛЕНИЯ.
6
S ECU RE B RA CKET TO C E I L I N G B OX
Using a screwdriver tighten securing screws to lock monitor in place.
Используйте отвертку, чтобы затянуть крепежные винты и зафиксировать
монитор на месте.
En utilisant un tournevis serrer les vis de fixation pour verrouiller suivre en place.
8
DSM63-001
G A R A N TI E
Nous vous félicitons pour l’achat de ce produit Wize! Vous venez d’acquérir un produit
réalisé à partir de matériaux durables et d’une conception ingénieuse jusque dans les
moindres détails. Wize est ainsi en mesure de garantir ses produits pendant 10 ans contre
les défauts de matériaux et de fabrication.
Wize rejette toute responsabilité relativement à quelque problème pouvant être associé à une modification d’un produit, à une mauvaise installation ou à une installation ne
respectant pas les limites de charge. Sous réserve des lois en vigueur, Wize réfute toute
autre garantie expresse ou implicite, notamment toute garantie de commercialisation
ou de convenance à un usage quelconque. Wize réfute toute responsabilité pour des
dommages résultant de l’utilisation ou de l’impossibilité d’utiliser des produits Wize. Wize
réfute également toute responsabilité pour quelque dommage accessoire ou indirect. Ceci
s’applique notamment aux frais de main d’oeuvre pour la réparation de produits Wize par
une personne ne travaillant pas pour Wize.
Les spécifications sont sujettes à changement sans préavis.
www.wize-av.com
9
DSM63-0001