1
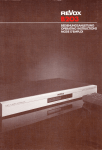
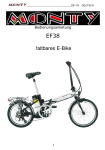
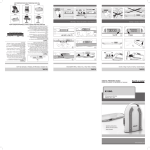
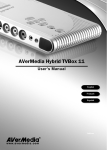
DIGITAL THERMOMETER
PRECAUTION
ENGLISH
When handled properly, this unit is engineered to give you years of satisfactory
service. Here are a few product care instructions:
MODEL: SA880SSWR
USER'S MANUAL
ON/FAST
OFF/AUTO OFF
TEMP START MAX
TIMER STOP
MIN
1.
Thermomater has 4 digits display for temperature with °C or °F indicator.
1.
2.
Termperature
measuring range
: -55°C to 145.8°C
(67°F to +299.8°F)
Do not immerse the unit in water. If the unit comes in contact with water,
dry it immediately with a soft lint-free cloth.
2.
Accuracy
: +/- 1°C (at 0 to 60°C)
+/- 1.5°C (full range)
Do not clean the unit with alcohol containing detergent, abrasive or corrosive materials. Abrasive cleaning agents may scratch the plastic parts and
corrode the electronic circuit.
Resclution
: 0.1°C (from -49°C to 105°C)
0.2°C (from -55°C to -49°C and 105°C to 129°C)
0.3°C (from 129°C to 140°C)
0.4°C (from 140°C to 148.8°C)
3.
Do not subject the unit to excessive: force, shock, dust, temperature, or
humidity. Such treatment may result in malfunction, a shorter electronic life
span, damaged batteries, or distorted parts.
4.
Do not tamper with the unit's internal components. Doing so will terminate
the unit's warranty and may cause damage. The unit contains no user-serviceable parts.
5.
Only use new batteries as specified in this instruction manual. Do not mix
new and old batteries as the old batteries may leak.
6.
Read this instruction manual thoroughly before operating the unit.
3.
Selection of Fast or Slow temperature sensing speed. (1 sec. sampling cycle
or 10 sec. sampling cycle.)
4.
High limit temperature and low limit temperature setting function.
5.
Temperature alarm beep sound when temperature display reaches high limit
or low limit of temperature.
6.
Full segment on test by prossing High Alarm, Low Alarm, Advance and
Alarm ON/OFF together.
HI
LO
…C
7.
Fast advance alarm setting function. (5°C or 5°F step up)
HOUR
MIN
…F
8.
Alarm enable/disable function.
QUARTZ
CAUTION
- The content of this manual is subject to change without further notice.
- Due to printing limitation, the displays shown in this manual may differ
from the actual display.
TEMPERATURE MEASUREMENT
1.
Normal sampling rate is 10 sec.
2.
Slide 1/10 switch for fast sampling setting 1 or 10 sec.
3.
Pull out the steelprobe and stick it into the material or liquld of which the
temperature is to be messured. Corresponding temperature will show on
display.
- The contents of this manual may not be reproduced without the permission of the manufacturer.
FRENCH
SELECTION OF °C OR °F
Fig. 1 / Abb. 1
1.
Slide °C/°F switch to °C position, temperature wil show in °C range on
display.
2.
Slide °C/°F switch to °F position, temperature will show in °F range on
display.
Fig. 2 / Abb. 2
SETTING OF HIGH LIMIT TEMPERATURE
THERMOMETER ANALOGIQUE
1.
Ce thermomètre a un affichage à 4 chiffrea pour la température et lindicateur
°C ou °F.
2.
Amplitude de mesure
de la température
: -55°C à 148.8°C
(-67°F à +299.8°F)
1.
Slide SET/LOCK switch to SET position.
2.
Press HI button, “HI” will show on display, The corresponding indicator
“HI” will flash.
Précisior
: +/- 1°C (de 0 à 60°C)
+/- 1.5°C pour les autres amplitudes
3.
Press ADV, Button select dealred high limit temperature. Selection range is
from -55°C to 148°C (-67°F to +299°F). Press and hold ADV. button own
fast advance the setting (for 5°C or 5°F step up).
Flésolution
4.
After high limit temperature setting, press HI button once to return current
temperature and “HI” indicator will show on display.
: 0.1°C (de -49°C à 105°C)
0.2°C (de -55°C à 49°C at de 105°C à 129°C)
0.3°C (de 129°C à 140°C)
0.4°C (de 140°C à 148.8°C)
5.
After setting, dlide SET/ LOCK switch to LOCK position.
6.
When temperature shown on display matches with the high limit
temperature setting, temperature alarm wil sound for 1 minute with flashing
“DISPLAY” indeator. Temperature alarm can be stopped by pressing HI,
LO, ADV., RESET HI/LO button. If you do not want to open slide cover to
stop alarm, simply slide the
switch to position.
SETTING OF LOW LIMIT TEMPERATURE
1.
Slide SET/LOCK switch to SET position.
2.
press LO button, “LO” will show on display, the corresponding “LO”
indieator will flash.
3.
Press adv. button to select dealred low limit temperature. Selecting range is
from -55°C to 148°C (-57°F to +299°F). Press and hold “ADV.” button can
fest advance the setting for 5°C or 5°F stop up.
4.
After low limit temperature setting, press LO button to return the current
temperature and the LO indicator will show on display.
5.
After setting, slide SET/LOCK switch to LOCK position.
6.
When temperature shown on display matches with the low limit
temperature setting, temperature alarm will aound for 1 minute with
flashing “DISPLAY”. Temperature alarm can be stopped by pressing HI,
switch to
LO, ADV., RESET HI/LO button. (or simply slide the
position.)
DISABLE TEMPERATURE ALARM SETTING
3.
Sélection du temps de prise de température (cycle de mesure toutes les
secondes ou toutes les 10 secondes).
4.
Fonction de réglage de la température maximale at minimale.
5.
La sonnerie d’alarme se déclenche quand la température atteint la limite
pré-réglée maxl ou mini.
6.
Tous les segments de l’écran s’allument quand vous appuyez aur High alarm,
Low alarm, Advance et Alarm ON/OFF en möme temps.
7.
Fonctior de réglage accétéré de la sonnerie (unités de 5°C ou °F)
8.
Fonctior marche/arrét de la sonnerie.
MESURE DE LA TEMPÉRATURE
1.
L’intervalie de prise de température est de 10 secondes.
2.
Placez le commutateur 1/10 pour unintervalle rapide de 1 seconde ou 10
secondes.
3.
Sortez la sonde métallique et mettez-la en contact avoc le matérial ou le
liquide dont vous désirez mesurer la température. La température
correspondante apparait alors sur l’écran.
SÉLECTION °F OU °C
1.
Placez le commutateur °C/°F aur la position °C at la température apparait en °C.
2.
Placez le commutateur °C/°F aur la position °F at la température apparait en °F.
RÉGLAGE DE LA TEMPÉRATURE MAXIMALE
1.
Placez le commutateur SET/LOCK (réglege/verroultlé) aur la position SET
(réglage).
2.
Appuyez sur HI, I’ indication “HL..” (haute) apparait sur l’écran. L’Indicateur
“HI” correspondant clignote.
3.
Appuyez sur ADV. (avance) pour régler la température désirée, Vous pouvez
choiair un chiffre de -55°C à 148°C (-67°F à + 299°F). Appuyez et mainterez
le bouton d’avance pour un réglage accéléré (par unité de 5°C ou 5°F).
4.
Après avoir régié la température maximale, appuyez sur HI à nouveau pour
revenir à la température amoiante et l’indicateur “HI” reste sur l’écran.
REPLACEMENT OF BATTERY (FIG. 2)
5.
Après le régiage, placez le commutatour SET/LOCK sur la position LOCK.
Flip out the bettary cover at back side of unit. Removed exhausted battery and put a new 1.
5V UM-4 (AAA) size battery into battery compertment. Make sure positive (+) and negative (-) polarftyie matching with the indication inside the battery compartment. Close the
battey cover.
6.
Quand la température affichée attaint la température pré-réglée, la sonneria
d’alarme sonno pondart 1 minute alors que “DISPLAY” clignote sur l’écran.
Vous pouvez arrétor cette sonnerie en appuyant sur HI, LO, ADV., RESET
sur la position )
HI/LO (ou simplement en glissant l’interruptour
HOW TO SAVE BATTERY POWER (FIG.1)
RÉGLAGE DE LA TEMPÉRATURE MINIMALE
When not is use, make sure probing time slide switch 1/10 is set on 10 sec. position. This
reduces battery consumption about 10 times.
1.
Placze le bouton du commutateur SET/LOCK sur la position SE.
2.
Appuyez sur LO (basse). L’indication “LO...” apparait sur l’écran.
L’Indicateur “LO” clignote.
WARRANTY WILL CEASE TO BE EFFECTIVE IF
CABLE IS CUT OR SHORTENED
3.
Appuyez sur ADV. pour régler la température minimale désirée. Vous pouvez
choiair un chiffre de -55°C à 148°C (-67°F à + 299°F). Appuyez et maintenez
ADV, pur un réglage accéléré (par unité de 5°C ou °F)
4.
Après avoir regié la température minimale, appuyez sur LO pour revenir à
l’affichage de la température ambiante. L’indication LO reste sur l’écran.
1.
2.
Enable High or low Alarm Setting; Press the HI or LOW button once to
toggle to the alarm setting mode than press the adv. button for HIGH or
LOW alarm setting, press the HI or LOW button once to return to the
current temperature display.
Disable High or Low Alarm Setting; Slide SET/LOCK switch to set position.
Press the HI or LOW button once to toggie to the alarm setting mode, press
RESET HI/LOW switch to reset the HI or LOW alarm setting than press
the HI or LOW button once to return to the current temperature display.
5.
Une fois votre réglage effectué, placaz la bouton du commutateur SET/
LOCK sur la position “LOCK”.
6.
Loraque la température ambiante atteint le température minimale préréglés,
la thermomètre sonne pendant 1 minute at l’indication “DISPLAY” clignote.
Vous pouvez arròter catte sonnerie en appuyant sur HI, LO, ADV., RESET
la
HI/LO (ou simplement en glissant le bouton du commutatour sur
position ).
EINSPAREN VON STROM (ABB.1)
DEUTSCH
DIGITALTHERMOMETERS
1.
Des Thermomater hart aine 4 etellige Temperaturanzeige in °C order °F.
2.
Temperaturmeßbereich : -55°C bis 148.5°C (-67°F bis +299.8°F)
ANNULATIION DES PRÉ-RÉGLAGES DE LA
SONNERIE.
Geneulgkeit
: +/-1°C (von 0 bis 60°C)
+/-1.5°C (votler Meßbereich)
1.
Autôsung
: 0.1°C (von -49°C bis 105°C
0.2°C (von -55°C bis -49°C und 105°C bis 129°C)
0.3°C (von 129°C bis 140°C)
0.4°C (von 140°C bis 148.8°C)
Pour activer les régiages mini ou maxi de la sonnerie:
Appuyez aur HI ou sur LOW une fois pour active le mode de réglage des
températures puis appuyez sur “ADV” pour régler la température mini ou
maxi. Appuryez sur “HI” ou “LOW” pour revenir à l’affichage de la
température ambiante.
2.
Pour annuler les pré-réglages maxi ou mini de la sonnerie. Gitasez la bouton
du commutateur SET/LOCK aur la position SET. Appuyez sur “HI” ou sur
“LOW” une fois pour annuler le mode de réglage de la sonnerie. Appuyez
sur RESET HI/LOW (annulation maxi/mini) pour annuier les pré-réglages
de sonnerie et appuyez sur “HI” ou sur “LOW” une fois pour revenir à
l’affichage de la température ambiante.
CHANGEMENT DE PILE ( FLG. 2)
Dócachaz le couvercle du comperthment à päe au doe de l’apperal. Otez la pila uaagée et
inserraz une plle neuve 1,5V de type UM-4 (AAA).
Assurez-vous que lea polarltéa (+) at (-) correapondert blan aux indications à l’ntérteur de
l’apperal. Redermaz le couvercle.
3.
Einstellen der Meßgeechwindlgkelt - achnell oder langearn (1 Sek. Abatand
oder 10 Sek. Abstand fûr Probemeesungen).
4.
Einstellen der Hóchat-und Thefethemperaturfuniction.
5.
Wenn die Temperaturanzalge die Hóchat-oder Thefethemperaturgrenze
erreicht hat, ertönt ain Alarmalgnel.
6.
Durch gleihzoitiges Drücken von Hight Alarm, Low Alarm, Advance und
Alarm ON/OFF wind sin ganzer Abechnitt getestat.
7.
Einstellen des Alarms im Schneilvorlauf (in 5°C oder 5°F Schritten)
8.
Ein-und Ausstellen der Alarmfunktion.
TEMPERATURMESSUNGEN
LA GARNATIE S’ÉTEINO EN CAS
DE COUPER OU RACCOURCIR LE CÁBLE
PRECAUTIONS
Ne pas immerger l’appareil.
2.
Ne pas nettoyer l’appareil à l’aide de produits abrasifs ou corrosifs. Ces
produits peuvent rayer les parties en plastique et attaquer les circuits
électroniques.
3.
Ne pas exposer l’appareil aux chocs excessifs, ni aux excès de force,
poussière, chaleur, froid ou humidité qui pourraient résulter en un mauvais
fonctionnement, le raccourcissement de la vie de l’appareil,
l’endommagement des piles et la déformation des composants.
4.
Ne pas toucher les composants internes de l’appareil. Ceci rendra nul la
garantie et peut causer des dommages. L’appareil ne contient aucun
composant pouvant être réparé par l’utilisateur.
5.
Utiliser uniquement des piles neuves du type préconisé dans le manuel
d’utilisation. Ne pas mélanger piles neuves et piles usées afin d’éviter les
fuites. 6. Lire soigneusement le manuel d’instructions avant de faire
fonctionner l’appareil.
1.
Tauchen Sie das Gerät nicht in Wasser.
2.
Reinigen Sie das Gerät niemals mit scheuernden oder scharfen Reinigern.
Diese könnten die Plastikteile beschädigen, und die elektronischen
Schaltkreise korrodieren.
3.
Setzen Sie das Gerät nicht irgendwelcher Gewalteinwirkung,
Erschütterungen, Staub, extremen Temperaturen oder Feuchtigkeit aus, da
dadurch Funktionsstörungen, kürzere Lebensdauer und Batterieschäden
sowie Gehäuseverformungen verursacht werden können.
4.
Nehmen Sie keine Änderungen an den inneren Komponenten des Gerätes
vor. Dadurch erlischt die Garantie für das Gerät und es können andere
Schäden verursacht werden. Im Inneren des Gerätes befinden sich keine
Teile, die vom Benutzer selbst gewartet werden müssen.
5.
Verwenden Sie nur neue Batterien des in der Bedienungsan-leitung
angegebenen Typs. Mischen Sie niemals alte und neue Batterien, da alte
Batterien auslaufen können.
Durch den 1-10 Seiterachalter töast sich des Messintervall von 1 Sek. auf 10
Sek. umstellen und umgekahrt.
VORSICHT
3.
Ziehen Sie die Stahlaonda aus der Halterung hereus und stacken Sie diese in
des zu messende Material oder die zu messenda Flüssigk sit. Auf der Anzelge
aracharit die entaprechande Temperatur.
- Aufgrund von Einschränkungen der Druckmöglichkeiten kann die
Darstellung der Anzeige in dieser Bedienungsanleitung von der
tatsächlichen Anzeige abweichen.
EINSTELLEN VON °C ODER °F
1.
Wenn Siie den °C/°F Schaller auf die °C Position stellen, wird die
Temperathur in °C angezeigt.
2.
Wenn Sie den °C/°F Schaller auf die °F Position stellen, wind die Temperathur
in °F angezeigt.
- Der Inhalt dieser Bedienungsanleitung darf nicht ohne die Zustimmung
des Herstellers vervielfältigt werden.
- Änderungen vorbehalten
EINSTELLEN DER HÖCHSTTEMPERATUR
1.
Stellen Sie den SET/LOCK Scheller auf die SET Position.
2.
Wenn Sie die HI (hoch) taste drücken, erachaint auf der Anzelge “HI—”
und des arriaprechende “HI” Symbol lauchiat auf.
3.
Stellen Sie mit Hille der ADV (vorwtrte) Teste die gewünechia
Höchattemperatur sin. Der Meßbereich relcht von -56°C bis 148·C (-67°F
bis +299°F). Wenn Sie die ADV Tasle hanunterdrücken und festhaltun,
können Sie die Temperatur im Schneilvorlauf einstellen (in 5°C oder 5°F
Schritten).
4.
Wenn Sie die Höchatterperaur singestelt haban, drücken Sie einmal die HI
Taste und des Gerát lahet zur gegenwärtigen Anzelge zurück. Des “HI”
Symbol bleibt auf der Anzeige sichtbar.
5.
Schieban Sie Nach dem Einstellen, den SET/LOCK Schalter auf die LOCK
Position.
6.
Wenn Die Temperatur der Anzelge mit der singestellen Höchstemperatur
übersinllmmt, artönt Mruis lang din Alarm und des “DISPLAY” Symbol
lauchtet auf. Sie könnan den Alarm durch Drücken der HI, LO, ADV.,
RESET HI/LO Tanten abstation. Wenn Sie den Deckel nicht öffnen
Schellen
möcháan, um den Alarm abzustellen, können Sie einfach den
auf die Position stellen.
ATTENTION
- Le contenu de ce livret ne peut être reproduit sans l’autorisation du fabricant.
Dieses Gerät wird Ihnen bei schonender Behandlung viele Jahre nützlich sein.
Beachten Sie dennoch die wenigen nachfolgenden Vorsichtsmaßnahmen:
Des normale Messintervall für Probemessungen betrágt 10 Sekunden.
- Le contenu de ce livret est susceptible de modifications sans avis préalable.
- En raison des restrictions imposées par l’impression, les affichages figurant
dans ce livret peuvent différer de ceux du produit.
VORSICHTSMASSNAHMEN
2.
Ce produit a été conçu pour assurer un bon fonctionnement pendant plusieurs
années à condition d’en prendre soin. Certaines précautions s’imposent:
1.
BEL ABGESCHNITTERM ODER WERTüRDERN
KABEL ERFFECHT DER GARANDERNAPRUCH.
1.
COMMENT ÉCONOMISER LA PILE ( FLG.1)
Lorsque vous n’uttleaz pes volre thermomèire, essurez-vous de placer le boulon du
commutatur 1/10 sur la position 10 sec. Cecl réduit votre concommation d’énergle par 10.
Achten Sie dereauf, deß der Zeìtechwlter der Sonde [1/10] auf der 10 Sek.
Position simht, wenn des Garát nicht benutzt wird. Der Batterllanverbrauch wird
dedurch um des 10 fache verringart.
EINSTELLEN DER TIEFSTTEMPERATUR
1.
Stellen Sie den SET/LOCK Scheller auf die SET Position.
2.
Wenn Sie die LO (Wef) Taste drücken, erachaint auf der Anzelge “LO—”
und des arriaprechende “LO” Signal lauchiat auf.
3.
Stellen Sie mit Hille der ADV Taste die gewünechia Tiefsttemperatur sin.
Der Meßbereich relcht von -55°C bis 145°C (-67°F bis +299°F). Wenn Sie
die “ADV Taste hanunterdrücken und festhaltun, können Sie Die Temperatur
im Schneilvorlauf einstellen (5°C oder 5°F Schritten).
4.
Wenn Sie die Tiefsttemperatur singestelt haban, drücken Sie einmal die LO
Taste und des Gerát lahet zur gegenwärtigen Temperaturanzeige zurük. Des
LO Symbol bleibt auf der Anzeige sichtbar.
5.
Stellen Sie nach dem Einstellen den SET/LOCK Schetter auf die LOCK
Position.
6.
Wenn die Temperatur des Anzelge mit der singestellen Tiefsttemperatur
übersinllmmt, artönt eine Minute lang ein Alarm und des “DISPLAY” Symbol lauchtet auf. Sie Könnan den Alarm durch Drücken der HI, LO, ADV.,
Schetter auf die
RESET HI/LO Tasten abstation. (oder sinfach den
Position achiaben).
ABSTELLEN DES TEMPERATURALARMS
1.
Einstellen des Alarms für Hüchat-oder Tiefsttemperaturen; Drücken Sie
ainmal die HI oder LOW taste, um den Alammcdus einzunchalten und stellen
Sie dwnn mit Hille der ADV Taste den Alarm für Höchat-oder
Tiefsttemperaturen ein. Wenn Sie ainmal die HI oder LOW Taste drücken,
kehren Sie zur gegenwärtigen Temperaturanzeige zurück.
2.
Abstellen des Alarme für Höchat-oder Tiefsttemperaturen; Stellen Sie den
SET/LOCK Schalter auf die SET Position. Drücken Sie ainmal die HI oder
LOW Taste, um den Alarmmodus einzunchalten, Drücken Sie die RESET/
HI/LOW taste, umdie HI oder LOW Alarmeirstallungen neu einzugeben
und drücken Sie dann einmal die HI oder LOW Taste, um zur geogenwärtigen
Temperaturanzeige zurückzuketwen.
AUSWECHSELN DER BATTERIE (ABB. 2)
Öffnen Sie des suf der Rückseite des Gerätes befindllche Batterlantach. Nahmen
Sie die lears Batterie horous und legen Sie sine neue 1.5V UM-4 (AAA) Batterie
in des Batterlantach sin. Achten Sie darauf, deß die Batterie den Hinwelean lm
lnnern des Batterlantaches entaprachand eingalegt wird (+ und - Pol). Verachießen
Sie des Batterlantach.
086-001206-43