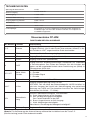
1
L8542381
02/2013 rev 4
CP.J3M
UNIONE NAZIONALE COSTRUTTORI
AUTOMATISMI PER CANCELLI, PORTE
SERRANDE ED AFFINI
CP.J3M
F2:1.25AT (230V)
F2:2.5AT (115V)
N L
230Vac
50Hz
0
20
20
24
28
35
LAMP
24Vac/15Wmax
24Vac
1A max
17 16 15 14
JP4
21 20 19 18
F1
2AF
SERVICE LIGHT
24Vac/10W
P.P
JP7
PGM
JP1
S1
CL
ENCODER
4 3 2 1
ON
DL1
AMPC
6
7
8
COM
STOP
PHOT
2
5
SHIELD
ANT
ANT
2
P.P.
1
AMPO
TCA
M
Collegamento scheda JM.CB (opzionale) / Connection to the JM.CB Card (optional)
Anschluss Karte JM.CB (option) / Branchement fiche JM.CB (optionnel)
Conexión tarjeta JM.CB (opcional) / Połączenie karty JM.CB (opcjonalna)
F2:1.25AT (230V)
F2:2.5AT (115V)
N L
230Vac
50Hz
0
20
20
24
28
35
24Vdc
(-) (+)
17 16 15 14
JP4
21 20 19 18
2 4 trs
0 trs
0 sc
PGM
VM tr s
2 4 sc
VM sc
P.P
S1
CL
4 3 2 1
ON
DL2 DL1
DL1
TCA
F10A
2
5
6
7
8
+
1
12V
-
JM.CB
AMPO
F1
AMPC
12V
3
Dichiarazione CE di Conformità
Dichiarazione in accordo alle Direttive 2004/108/CE(EMC); 2006/95/CE(LVD)
Fabbricante:
Automatismi Benincà SpA
Indirizzo:
Via Capitello, 45 - 36066 Sandrigo (VI) - Italia
Dichiara che il prodotto:
Centrale di comando per 1 motore:
CP.J3M
è conforme alle condizioni delle seguenti Direttive CE:
• DIRETTIVA 2004/108/CE DEL PARLAMENTO EUROPEO E DEL CONSIGLIO del 15 dicembre 2004 concernente il ravvicinamento delle legislazioni degli Stati membri relative alla compatibilità elettromagnetica e che abroga
la direttiva 89/336/CEE, secondo le seguenti norme armonizzate:
EN 61000-6-2:2005, EN 61000-6-3:2007.
• DIRETTIVA 2006/95/CE DEL PARLAMENTO EUROPEO E DEL CONSIGLIO del 12 dicembre 2006 concernente il ravvicinamento delle legislazioni degli Stati membri relative al materiale elettrico destinato ad essere adoperato
entro taluni limiti di tensione, secondo le seguenti norme armonizzate:
EN 60335-1:2002 + A1:2004 + A11:2004 + A12:2006 + A2:2006 + A13:2008; EN 60335-1-103:2003.
se applicabile:
• DIRETTIVA 1999/5/CE DEL PARLAMENTO EUROPEO E DEL CONSIGLIO del 9 marzo 1999 riguardante
le apparecchiature radio e le apparecchiature terminali di telecomunicazione e il reciproco riconoscimento della loro
conformità, secondo le seguenti norme armonizzate:
ETSI EN 301 489-3 V1.4.1 (2002) + ETSI EN 301 489-1 V1.4.1 (2002) + ETSI EN 300 220-3 V1.1.1 (2000) + EN
60950-1 (2001)
Benincà Luigi, Responsabile legale.
Sandrigo, 02/11/2010.
AVVERTENZE
Questo manuale è destinato esclusivamente a personale
qualificato per l’installazione e la manutenzione di aperture
automatiche.
Nessuna informazione qui presente è di interesse o di utilità
per l’utente finale.
Conservare questo manuale per futuri utilizzi.
L’installatore deve fornire tutte le informazioni relative
al funzionamento automatico, manuale e di emergenza
dell’automazione, e consegnare all’utilizzatore dell’impianto
le istruzioni d’uso.
Prevedere sulla rete di alimentazione un interruttore/sezionatore onnipolare con distanza
d’apertura dei contatti uguale o superiore a 3 mm.
Verificare che a monte dell’impianto elettrico vi sia un interruttore differenziale e una protezione di sovracorrente adeguati.
Alcune tipologie di installazione richiedono il collegamento
dell’anta ad un impianto di messa a terra rispondente alle
vigenti norme di sicurezza.
•
4
L’installazione elettrica e la logica di funzionamento devono
essere in accordo con le normative vigenti.
I conduttori alimentati con tensioni diverse, devono essere
fisicamente separati, oppure devono essere adeguatamente
isolati con isolamento supplementare di almeno 1 mm.
I conduttori devono essere vincolati da un fissaggio supplementare in prossimità dei morsetti.
Durante gli interventi di installazione, manutenzione e riparazione, togliere l’alimentazione prima di accedere alle
parti elettriche.
Ricontrollare tutti i collegamenti fatti prima di dare tensione.
Gli ingressi N.C. non utilizzati devono essere ponticellati.
Le descrizioni e le illustrazioni presenti in questo manuale
non sono impegnative. Lasciando inalterate le caratteristiche
essenziali del prodotto il fabbricante si riserva il diritto di
apportare qualsiasi modifica di carattere tecnico, costruttivo
o commerciale senza impegnarsi ad aggiornare la presente
pubblicazione.
DATI TECNICI
Alimentazione centrale di comando
24 Vdc
Alimentazione di rete
230 Vac 50/60 Hz
Uscita Motore
1 motore 24Vdc
Potenza massima motore
120 W
Uscita alimentazione accessori
24Vdc 1 A max.
Grado di protezione
IP54
Temp. funzionamento
-20°C / +70°C
Ricevitore radio
La centrale è dotata di un modulo radio incorporato per la ricezione di telecomandi sia a codice fisso che a codice variabile con frequenza di 433.92MHz.
Centrali di comando CP.J3M
FUNZIONI INGRESSI/USCITE
N° Morsetti Funzione
Descrizione
(1-2)
Antenna
Predisposizione collegamento antenna scheda radioricevente incorporata
(1-segnale/2-schermo).
Solo per utilizzo dell’antenna esterna, in questo caso tagliare il tagliare il
filo saldato su “ANT”.
5
COM
Comune per tutti gli ingressi di comando.
6
Passo-Passo
Ingresso pulsante passo-passo (contatto N.O.)
7
STOP
Ingresso pulsante STOP (contatto N.C.)
8
PHOT
Ingresso collegamento dispositivi di sicurezza, contatto N.C.
(ad es. fotocellule)
In fase di chiusura: l’apertura del contatto provoca l’arresto del motore e
l’inversione istantanea della direzione di marcia dello stesso (apre).
In fase di apertura: non attivo.
JP1/JP7
Motore 24Vdc
Encoder
Connettore ad innesto per collegamento al motore 24Vdc + Encoder
A: + Encoder
B: S Segnale Encoder
C: - Encoder
14-15
Lampeggiante
Collegamento lampeggiante 24Vac 15W max.
24 Vac
Uscita alimentazione accessori 24Vac/1A max.
ATTENZIONE: Nel caso di installazione della scheda caricabatteria
JM.CB, l’uscita (in assenza di alimentazione di rete) presenta una
tensione 24Vdc - polarizzata. Verificare il corretto collegamento dei
dispositivi (16:+24Vdc - 17:-24Vdc).
JP4
Secondario
Collegamento avvolgimento secondario trasformatore.
18 Grigio: Collegato all’uscita 0V
19 Rosso: Velocità rallentamento.
Collegare il Faston all’uscita 20V.
20 Marrone: Collegato all’uscita 24V
21 Bianco :Velocità marcia motore.
Vedi paragrafo “Regolazione velocità motore”
J3
Ricevitore Radio Ricevente radio incorporata
16-17
Nota: Per il comando dell’automazione durante la fase di installazione è possibile utilizzare il pulsante P.P.
presente sulla centrale.
5
TCA AMPO
AMPC
Funzione dei Trimmer
Permette di regolare il tempo di chiusura automatica se attivata dal Dip-Switch N°1.
La regolazione varia da un minimo di 1s ad un massimo di 90s
Regola la sensibilità del sensore amperometrico di rilevamento ostacolo in fase di apertura.
Regola la sensibilità del sensore amperometrico di rilevamento ostacolo in fase di chiusura.
Ruotare i trimmer in senso orario (+) per aumentare la coppia, ruotare in senso antiorario (-)
per diminuire la coppia.
La regolazione dei trimmer AMP-O e AMP-C deve essere effettuata nel rispetto delle
normative vigenti.
In caso rilevamento ostacolo:
In fase di apertura ferma il movimento.
In fase di chiusura ferma e riapre l’anta per circa 3s.
Funzione Dip-Switch
DIP 1 “TCA”
Abilita o disabilita la chiusura automatica.
Off: chiusura automatica disabilitata
On: chiusura automatica abilitata
DIP 2 “COND.”
Abilita o disabilita la funzione condominiale.
Off: Funzione condominiale disabilitata.
On: Funzione condominiale abilitata. L’impulso P.P. o del trasmettitore non ha
effetto durante la fase di apertura e durante la fase TCA (se attivata).
DIP 3 Non utilizzato
DIP 4 “Radio”
Abilita o disabilita i trasmettitori a codice programmabile
On: Ricevitore radio abilitato esclusivamente ai trasmettitori a codice variabile
(rolling-code).
Off: Ricevitore abilitato a trasmettitori codice variabile (rolling-code) e
programmabile (autoapprendimento e dip/switch) .
Regolazione della velocità motore
ATTENZIONE! Questa regolazione influisce sul grado di sicurezza dell’automazione.
Verificare che la forza applicata sull’anta sia conforme con quanto previsto dalle normative vigenti.
Ogni modifica della velocità richiede una nuova taratura del sensore amperometrico.
Sul trasformatore sono presenti due faston:
Il faston F1 (bianco) regola la velocità di apertura e chiusura della porta e può essere posizionato su tre
valori di tensione:
• 20V: (bassa velocità)
• 28V: (media velocità)
• 35V: (alta velocità)
Il faston F2 (rosso) non deve essere spostato dalla posizione 20V.
Configurazione ricevitore incorporato
La centrale è dotata di un modulo radio incorporato per la ricezione di telecomandi sia a codice fisso che a
codice variabile (vedi funzioni dip-switch 4), con frequenza di 433.92MHz.
Per utilizzare un telecomando è prima necessario apprenderlo, la procedura di memorizzazione è illustrata
di seguito, il dispositivo è in grado di memorizzare fino a 64 codici diversi.
Memorizzazione di un nuovo trasmettitore con attivazione funzione P.P.
- Premere 1 volta il pulsante PGM per 1s, il LED DL1 inizia a lampeggiare con 1s di pausa.
- Premere entro 10s il pulsante del trasmettitore che si desidera memorizzare con funzione P.P., dopo la
memorizzazione il ricevitore esce automaticamente dalla fase di programmazione.
Per uscire dalla programmazione, senza memorizzare il trasmettitore, attendere 10s.
Apprendimento remoto di un trasmettitore (solo rolling-code)
Se si dispone di un trasmettitore già memorizzato è possibile memorizzarne altri senza accedere alla
centrale. La memorizzazione remota deve essere eseguita con anta in totale apertura, indipendentemente
dal settaggio del TCA. Procedere come segue:
1 Premere il tasto nascosto del trasmettitore già memorizzato, la luce di cortesia si spegne.
6
2 Premere entro 10s il tasto del trasmettitore già memorizzato di cui si vuole copiare la funzione. La luce di
cortesia ed il LED DL1 si accendono.
3 Premere entro 10 s il tasto nascosto del nuovo trasmettitore a cui si vuole associare la funzione. La luce
di cortesia ed il LED DL1 iniziano a lampeggiare (1 lampeggio/s).
4 Premere entro 10 s il tasto del nuovo trasmettitore a cui si vuole associare la funzione scelta nel punto 2.
La luce di cortesia ed il LED DL1 si accendono per 1s.
5 Il nuovo trasmettitore è memorizzato, la ricevente esce dalla fase di programmazione.
Es: sul pulsante 1 del TX “A” è memorizzata la funzione P.P. che si vuole attribuire al tasto 2 del nuovo
TX “B”; premere in sequenza:
tasto nascosto del TX A >> pulsante 1 del TX A >> tasto nascosto del TX B >>pulsante 2 del TX B
Cancellazione di tutti i trasmettitori dalla memoria
- Mantenere premuto il pulsante PGM per 15s, il LED DL1 e la luce di cortesia iniziano a lampeggiare
velocemente e si spengono a cancellazione avvenuta.
- Rilasciare il pulsante PGM, la memoria è stata cancellata
NOTA:
Per motivi di sicurezza, non è possibile memorizzare trasmettitori durante le fasi apertura/chiusura del
motore. Se entrando nella procedura di memorizzazione dei trasmettitori il LED DL1 emette un lampeggio
lungo e si spegne, significa che la memoria della ricevente è piena e non è possibile memorizzare altri
trasmettitori o che il trasmettitore utilizzato non è compatibile.
Memorizzazione delle posizioni di apertura e chiusura
Dopo aver effettuato il collegamento elettrico della centrale e dei dispositivi di sicurezza, comando e
segnalazione è necessario memorizzare le posizioni di apertura e chiusura della porta.
Posizionare innanzitutto i fermi meccanici di apertura e chiusura:
- sbloccare manualmente l’anta e portarla in posizione di completa chiusura, posizionare il fermo meccanico
di chiusura in battuta sul carrello di traino e bloccarlo.
- portare l’anta in posizionare di completa apertura, posizionare il fermo meccanico di apertura in battuta
sul carrello di traino e bloccarlo.
Fate riferimento al manuale istruzioni fornito con l’operatore per ulteriori informazioni.
Si può procedere ora con la memorizzazione delle posizioni di apertura e chiusura:
-con la porta ferma premere per circa 5 secondi i tasti PGM+CL, sino all’accensione del LED DL1
-la centrale è ora pronta alla memorizzazione della posizione di chiusura
-premere e mantenere premuto il tasto CL fino a portare il carrello di traino in battuta sul fermo meccanico
di CHIUSURA, rilasciare il tasto CL e premere per 1s il tasto PGM, il led si spegne e si riaccende, la
posizione è così memorizzata dalla centrale
-premere e mantenere premuto il tasto PP fino a portare il carrello di traino in battuta sul fermo meccanico
di APERTURA, rilasciare il tasto PP e premere per 1s il tasto PGM, il led si spegne, la posizione è così
memorizzata dalla centrale
Tensionamento della cinghia
Per evitare che la cinghia rimanga in tensione una volta raggiunto il fermo meccanico di chiusura, viene
comandata una breve inversione in direzione di apertura.
Questa inversione, se necessario, può essere regolata (o esclusa), seguendo questa procedura:
- Premere 1 volta il pulsante PGM per 1s, la luce di cortesia ed il LED DL1 iniziano a lampeggiare con 1s di
pausa.
- Premere nuovamente e mantenere premuto per PGM fino alla accensione della luce di cortesia e del LED
DL1.
- Rilasciare PGM, il LED DL1 inizia ad effettuare un certo numero di lampeggi (da 1 a 4) seguito da una
pausa.
- Con il pulsante P.P. è possibile modificare il numero di lampeggi, scegliere il valore tra i seguenti:
1 LAMPEGGIO con pausa:
inversione disabilitata
2 LAMPEGGI con pausa:
inversione minima
3 LAMPEGGI con pausa:
inversione media (impostazione di default)
4 LAMPEGGI con pausa:
inversione massima
- Confermare la sceta con la pressione del pulsante PGM o attendere 10 s.
Effettuare alcune manovre di prova per verificare il corretto funzionamento.
7
Autodiagnosi della centrale
Durante il funzionamento normale lo stato della centrale viene visualizzato nella seguente modalità:
-LED DL1 spento: motore in movimento o motore fermo senza allarme
-2 flash del LED DL1 intervallati di 1 sec: ingresso di stop occupato
-3 flash del LED DL1 intervallati di 1 sec: ingresso di fotocellula occupata per più di 5 s
-4 flash del LED DL1 e della luce di cortesia* intervallati di 1 sec: intervento sensore amperometrico.
-5 flash del LED DL1 e della luce di cortesia* intervallati di 1 sec: l’encoder non funziona correttamente.
-7 flash del LED DL1 e della luce di cortesia* intervallati di 1 sec: ingresso P.P. impegnato per più di 5
sec.
* La luce di cortesia segnala l’anomalia per circa 30s, dopodichè si spegne. Il led DL1 contiuna a segnalare
la condizione di allarme fino alla sua soluzione.
Interruzione dell’alimentazione di rete
Quando l’interruzione dell’alimentazione avviene nelle posizioni di completa apertura o chiusura, la centrale
al ripristino dell’alimentazione ritorna al normale funzionamento.
Se la mancanza rete avviene durante la corsa e al ritorno rete la porta parte dalla posizione intermedia,
durante l’apertura si avrà l’arresto per intervento del sensore amperometrico non appena il carrello di traino
arriva in battuta sul fermo meccanico.
Con la manovra successiva viene ripristinato il normale funzionamento dell’automazione.
8
CE Declaration of Conformity
Declaration in accordance with Directives 2004/108/CE (EMC); 2006/95/CE (LVD)
The Manufacturer:
AUTOMATISMI BENINCÀ SPA
Address:
Via Capitello, 45 - 36066 Sandrigo (VI) - Italy
Declares that the product:
Control box for 1 motor
CP.J3M
conforms with the requirements of the following EU Directives:
DIRECTIVE 2004/108/CE OF THE EUROPEAN PARLIAMENT AND COUNCIL, 15 December
2004, in relation to the harmonisation of the legislation of member states regarding electromagnetic
compatibility, in abrogation of Directive 89/336/CEE, per the following harmonised standards:
EN 61000-6-2:2005, EN 61000-6-3:2007.
DIRECTIVE 2006/95/CE OF THE EUROPEAN PARLIAMENT AND COUNCIL, 12 December
2006, in relation to the harmonisation of the legislation of member states regarding electrical material
intended to be used within certain voltage ranges, per the following harmonised standards:
EN 60335-1:2002 + A1:2004 + A11:2004 + A12:2006 + A2:2006 + A13:2008; EN 60335-1-103:2003.
as applicable:
DIRECTIVE 1999/5/CE OF THE EUROPEAN PARLIAMENT AND COUNCIL, 9 March 1999 in
relation to radio equipment and telecommunications terminals and the mutual recognition of their
conformity, per the following harmonised standards:
ETSI EN 301 489-3 V1.4.1 (2002) + ETSI EN 301 489-1 V1.4.1 (2002) + ETSI EN 300 220-3 V1.1.1
(2000) + EN 60950-1 (2001)
Benincà Luigi, Legal representative.
Sandrigo, 08/07/2008.
WARNINGS
This manual has been especially written to be use by qualified fitters.
None of the information provide in this manual can be considered as being of interest for the end users.
Preserve this manual for future needs.
The technician has to furnish all the information related to the
step by step function, the manual and the emergency function
of the operator, and to deliver the manual to the final user.
•
Foresee on the supply net an onnipolar switch or
selector with distance of the contacts equal or
superior to 3 mms.
Verify that of the electrical system there is an awry differential
interrupter and overcurrent protection.
Some typologies of installation require the connection of the
shutter to be link at a conductive mass of the ground according to the regulations in force.
The electrical installation and the operating logic must comply
with the regulations in force.
The leads fed with different voltages must be physically
separate, or they must be suitably insulated with additional
insulation of at least 1 mm.
The leads must be secured with an additional fixture near
the terminals.
During installation, maintenance and repair, interrupt the
power supply before opening the lid to access the electrical parts
Check all the connections again before switching on the
power.
The unused N.C. inputs must be bridged.
The descriptions and the present illustrations in this manual
are not binding. Leaving the essential characteristics of the
product unchanged, the manufacturer reserves himself the
right to bring any change of technical, constructive or commercial character without undertaking himself to update the
present publication.
9
TECHNICAL DATA
Contol unit supply
24 Vdc
Power supply
230 Vac 50/60 Hz
Output supply
1 motor 24Vdc
Power maximum motor
120 W
Output supply accessories
24Vdc 1 A max.
Protection level
IP54
Operating temp.
-20°C / +70°C
Radio receiver
The control unit is fitted with a built-in radio module for receiving remote
controls both with fixed codes and variable codes with a frequency of
433.92MHz.
Control units CP.J3M
INPUT/OUTPUT FUNCTIONS
Terminals
Function
Description
(1-2)
Antenna
Optional antenna connection to built-in radio receiver board (1signal/2-screen).
If external antenna connected cut wire welded to “ANT”.
5
COM
Common for all control inputs.
6
Step by Step
Step by step button input (N.O. contact)
7
STOP
STOP button input (N.C. contact)
8
PHOT
Input for safety devices, N.C. contact (e.g. photocells)
In close cycle: if the contact opens, the motor will stop and will instantly reverse direction (opening).
In open cycle: disabled.
JP1/JP7
24VDC Motor
Encoder
IExtractable connector with connection to 24VDC + Encoder
A: + Encoder
B: S Encoder signal
C: - Encoder
14-15
Blinker
Blinker connection, 24Vac/15W max.
24 Vac
Accessory power supply 24Vac/1A max.
IMPORTANT: If the battery charger board JM.CB is installed, the
output (without mains power connected) has a 24Vdc polarised
voltage. Make sure the devices are correctly connected.
(i.e. 16:+24Vdc - 17:-24Vdc).
JP4
Secondary
Secondary circuit of the transformer.
18 Grey: 0V output
19 Red: Slowdown speed.
Connect the Faston to the 20V output
20 Brown: 24V output
21 White: Motor speed.
See section “Motor speed adjustment ”
J3
Radio Receiver
Built-in radio receiver
16-17
N.B.: To control the automation during installation, the Step by Step button on the control unit can be
used.
10
Trimmer functions
TCA AMP-O
AMP-C
Adjustment of the automatic close time if enabled by Dip-Switch 1.
Adjustment ranges from 1 sec to max 90 sec
Adjustment of the amperometric sensor obstacle detection sensitivity during the open
cycle.
Adjustment of the amperometric sensor obstacle detection sensitivity during the close
cycle.
Turn the trimmers clockwise (+) to increase the torque, turn them anticlockwise (-) to reduce
the torque.
Adjustment of trimmers AMP-O and AMP-C must comply with statutory regulations.
If an obstacle is detected:
When opening, the gate is stopped.
When closing, the gate stops and opens for about 3 sec.
Dip-Switch functions
DIP 1 “TCA”
Enables or disables automatic closing.
Off: automatic closing disabled
On: automatic closing enabled
DIP 2 “COND.”
Enables or disables the high traffic function.
Off: High traffic function disabled.
On: High traffic function enabled. The P.P. (Step-by-step) or transmitter signal is
ignored during the open cycle and the TCA cycle (if enabled).
DIP 3
Not used.
DIP 4 “Radio”
Enables or disables transmitters with programmable codes
On: Radio receiver enabled exclusively for rolling-code transmitters.
Off: Receiver enabled for both rolling-code and programmable transmitters
(self-learn and dip-switch) .
Motor speed adjustment
CAUTION! This adjustment strongly affects the safety of the gate automation.
Make sure that the gate thrust complies with statutory regulations.
If the gate speed is changed the amperometric sensor must be calibrated accordingly.
Two faston terminals are provided on the transformer:
Faston F1 (white) regulates the door opening and closing speed and can be preset on three voltage
values:
• 20V: (low speed)
• 28V: (medium speed)
• 35V: (high speed)
Faston F2 (red) must not be moved from 20V position.
Configuration with built-in receiver
The control unit is fitted with a built-in radio module for receiving remote controls both with fixed codes
and variable codes (see dip-switch 4 functions), with a frequency of 433.92MHz.
For a transmitter to be used, the module first has to self-learn its code. The memorise procedure is
illustrated below, the module can memorise up to 64 different codes.
How to memorize a new transmitter code with activation through a P.P. (Step-by-Step) function
-
Press the PGM key once for 1 sec, the DL1 LED starts flashing with 1sec intervals.
-
Within 10 seconds, press the transmitter key to be stored in memory through the P.P. function. After
storage, the receiver automatically exits the programming mode.
To exit the programming mode without storing the transmitter code into memory, wait for 10 seconds.
Remote learning of a transmitter code (rolling-code only)
If a transmitter code is already memorised, other codes can be stored without accessing the control unit.
The remote storage must be carried out with totally open door, regardless of the TCA setting.
11
Proceed as follows:
1 Press the hidden key of the already memorized transmitter, the courtesy light switches off.
2 Within 10 sec., press the key of the already memorized transmitter, the function of which is to be
copied. The courtesy light and the DL1 LED switch up.
3 Within 10 seconds, press the hidden key of the new transmitter, the function of which is to be matched.
The courtesy light and the DL 1 LED start flashing (1 flashing/sec).
4 Within 10 seconds, press the key of the transmitter to which the function, selected at point 2, is to be
matched. The courtesy light and the DL1 LED switch up for 1 sec.
5
The new transmitter is stored in memory, the receiver exits the programming mode.
Example: the P.P. function, which is to be matched to key 2 of the new “B” TX, is stored on key 1 of
“A” TX. Press in sequence:
hidden key of A TX >> key 1 of A TX >> hidden key of B TX >>key 2 of B TX
Cancelling all transmitters from the memory
- Keep the PGM key pressed for 15 sec, the DL1 LED and the courtesy light start flashing rapidly and
switch off at completion of cancellation.
- Release the PGM key and the memory is now erased.
N.B.:
For safety reasons, transmitters cannot be memorised during the open/close cycles of the motor.
When entering the memorise transmitter procedure, if the Power LED gives a prolonged blink and then
goes out, this signals that the receiver memory is full and no other transmitters can be memorised or that
the transmitter is not compatible.
Storage in memory of the opening and closing positions
After carrying out the electric connections of the control unit and the safety, control and indication devices,
the door opening and closing positions must be memorized.
First of all place the opening and closing mechanical stoppers in the correct position:
- manually release the door and completely close it. Place the closing mechanical stopper in the closed
position on the driving carrier and fix it.
- completely open the door. Place the opening mechanical stopper in the open position on the driving
carrier and fix it.
For further information, please refer to the Manual for use supplied with the operator.
Now the opening and closing positions can be stored in memory:
-with door stopped, press keys PGM+CL for about 5 seconds until the LED DL1 switches on
-the control unit is now ready to store the closing position in memory
-press and keep the CL key pressed until the carrier reaches the CLOSING mechanical stopper. Release
the CL key and press the PGM key for 1 second. The LED switches on and off and the position is therefore
stored in the control unit memory.
-press and keep the PP key pressed until the carrier reaches the OPENING mechanical stopper. Release
the PP key and press the PGM key for 1 second. The LED switches off and the position is therefore stored
in the control unit memory.
Tensioning of the belt
Once the closing mechanical stopper is reached, a brief opening reversion command is given to avert that
the belt remains tensioned.
This reversion movement can be adjusted (or excluded), if required, as follows:
- Press the PGM key once for 1 sec, the courtesy light and the DL1 LED starts flashing with 1sec intervals.
- Press the PGM key again and keep it pressed until the courtesy light and the DL1 LED switch on.
-Release the PGM key and the DL1 LED starts flashing (from 1 to 4 flashes), followed by an interval.
- The number of flashes can be modified by pressing the P.P. key, select the value amongst the following:
1 FLASH with interval:
disabled reversion
2 FLASHES with interval:
minimum reversion
3 FLASHES with interval:
medium reversion (default presetting)
4 FLASHES with interval:
maximum reversion
- Confirm the selection by pressing the PGM key, or wait for 10 seconds.
Carry out some trial operations to check the correct operation of the system.
12
Self-diagnosis of the control unit
In normal operating mode, the status of the control unit is displayed as follows:
-LED DL1 off: motor moving or motor stopped without alarm
-3 flashes of LED DL1 with 1 sec interflash interval: photocell input engaged for more than 5 sec
-4 flashes of LED DL1 and the courtesy light*, with 1 sec. interval: the amperometric sensor triggers.
-5 flashes of DL1 LED, and the courtesy light*, with 1 sec. interval: the encoder does not work correctly.
-7 flashes of LED DL1 and the courtesy light*, with 1 sec. interval: P.P. input is engaged for more than 5
sec.
* The courtesy light indicates its malfunction for around 30 sec. Then, it will switch off.
The LED DL1 continues to indicate the alarm condition until the fault is solved.
Power failure
When a power failure occurs, either in the completely open or in the completely closed positions, at reset of
power the control unit returns to normal operating mode. If a power failure occurs when the door is moving
open or closed, the door relay starts from the intermediate position. During opening, the door will stop
thanks to the activation of the amperometric sensor as soon as the driving carrier reaches the mechanical
stopper.
The normal operating mode of the system will be reset in the following operation.
13
CE-Konformitätserklärung
Erklärung im Einklang mit den Richtlinien 2004/108/CE(EMC); 2006/95/CE(LVD)
Hersteller:
Automatismi Benincà SpA
Anschrift:
Via Capitello, 45 - 36066 Sandrigo (VI) - Italien
Erklärt, dass das Produkt:
Steuerung für 1 Motor:
CP.J3M
die Bedingungen der folgenden CE-Richtlinien erfüllt:
RICHTLINIE 2004/108/CE DES EUROPÄISCHEN PARLAMENTS UND EUROPARATS vom 15.Dezember
2004 in Bezug auf die Annäherung der Rechtsprechungen der Mitgliedsstaaten über die elektromagnetische Kompatibilität, welche die Richtlinie 89/336/CEE laut den folgenden harmonisierten Normen:
EN 61000-6-2:2005, EN 61000-6-3:2007.
RICHTLINIE 2006/95/CE DES EUROPÄISCHEN PARLAMENTS UND EUROPARATS vom 12. Dezember
2006 in Bezug auf die Annäherung der Rechtsprechungen der Mitgliedsstaaten über elektrische Betriebsmittel zur
Verwendung innerhalb bestimmter Spannungsgrenzen laut den folgenden harmonisierten Normen:
EN 60335-1:2002 + A1:2004 + A11:2004 + A12:2006 + A2:2006 + A13:2008; EN 60335-1-103:2003.
falls anwendbar:
RICHTILINIE 1999/5/CE DES EUROPÄISCHEN PARLAMENTS UND EUROPARATS vom 9.März 1999 in
Bezug auf Funkapparate und Telekommunikations-Endgeräte und die gegenseitige Anerkennung ihrer Konformität
entsprechend den folgenden harmonisierten Normen:
ETSI EN 301 489-3 V1.4.1 (2002) + ETSI EN 301 489-1 V1.4.1 (2002) + ETSI EN 300 220-3 V1.1.1
(2000) + EN 60950-1 (2001)
Benincà Luigi, Leiter der
Rechtsabteilung. Sandrigo, den
08.07.2008.
HINWEISE
geltenden Vorschriften entsprechen.
Dieses Handbuch ist ausschließlich qualifiziertem Personal für
die Installation und Wartung von automatischen Öffnungsvorrichtungen bestimmt.
Die Leiter die mit unterschiedlichen Spannungen gespeist
werden, müssen physisch getrennt oder sachgerecht mit
einer zusätzlichen Isolierung von mindestens 1 mm isoliert
werden.
Es enthält keine Informationen die für den Endbenutzer interessant oder nützlich sein könnten.
Bewahren Sie dieses Handbuch für Nachschlagzwecke auf.
Der Installateur hat dem Benutzer alle Informationen über den
automatischen, manuellen und Not-Betrieb der Automatik
zusammen mit der Bedienungsanleitung zu liefern.
•
Das Stromnetz muss mit einem allpoligen Schalter
bzw. Trennschalter ausgestattet sein, dessen
Kontakte einen Öffnungsabstand gleich oder
größer als 3 aufweisen.
Kontrollieren ob der elektrischen Anlage ein geeigneter Differentialschalter und ein Überspannungsschutzschalter vorgeschaltet sind.
Einige Installationstypologien verlangen den Anschluss des
Flügels an eine Erdungsanlage laut den geltenden Sicherheitsnormen.
Die elektrische Installation und die Betriebslogik müssen den
14
Die Leiter müssen in der Nähe der Klemmen zusätzlich
befestigt werden.
Während der Installation, der Wartung und der Reparatur, die
Anlage stromlos machen bevor an den elektrischen Teilen
gearbeitet wird.
Alle Anschlüsse nochmals prüfen, bevor die Zentrale mit
Strom versorgt wird.
Die nicht verwendeten N.C. Eingänge müssen überbrückt
werden.
Die in diesem Handbuch enthaltenen Beschreibungen und
Abbildungen sind nicht verbindlich. Ausgenommen der
Haupteigenschaften des Produkts, behält sich der Hersteller
das Recht vor eventuelle technische, konstruktive oder kommerzielle Änderungen vorzunehmen ohne dass er vorliegende
Veröffentlichung auf den letzten Stand bringen muss.
TECHNISCHE DATEN
Speisung der Steuereinheit
24 Vdc
Stromversorgung
230 Vac 50/60 Hz
Motorausgang
1 motor 24Vdc
Maximale Motorenleistung
120 W
Ausgang Speisung Zubehör
24Vdc 1 A max.
Schutzklasse
IP54
Betriebstemperatur
-20°C / +70°C
Funkempfänger
Die Zentrale ist mit einem eingebauten Funkmodul für den Empfang von
Fernbedienungen mit fixem oder variablem Code bei einer Frequenz von
433.92MHz ausgestattet.
Steuerzentralen CP.J3M
FUNKTIONEN DER EIN-/AUSGÄNGE
Nr. Klemme Funktion
Beschreibung
(1-2)
Antenne
Vorbereitung Antennenanschluss eingebaute Funkempfangsplatine
(1-Signal/2-Schirm). Nur für den Einsatz einer externen Antenne; in diesem Fall den an “ANT” angeschweißten Draht abschneiden.
5
COM
Gemeinsam für alle Steuerungseingänge.
6
PP
Eingang Taste Schrittschaltung (Arbeitskontakt)
7
STOPP
Eingang Taste STOPP (Ruhekontakt)
8
PHOT
Eingang Anschluss Sicherheitsvorrichtungen, Ruhekontakt (z.B. Photozellen)
In Verschlussphase: Das Öffnen des Kontakts löst das Anhalten des
Motors und die umgehende Umkehr seiner Drehrichtung aus (öffnet). In
Öffnungsphase: Nicht aktiv.
JP1 /JP7
Motor 24Vdc
Encoder
Steckverbinder für den Anschluss an den Motor 24Vdc + Encoder
A: + Encoder
B: S Encoder-Signal
C: - Encoder
14-15
Blinkleuchte
Anschluss Blinkleuchte 24Vac 15W max.
24 Vac
Ausgang Zubehörspeisung 24Vac/1A max.
ACHTUNG: Falls die Karte des Batterieladegeräts JM.CB installiert ist,
weist der Ausgang (bei Ausfall der Netzversorgung) eine polarisierte
Spannung von 24Vdc auf. Den korrekten Anschluss der Vorrichtungen
kontrollieren (16:+24Vdc - 17:-24Vdc).
JP4
Sekundärwicklung
Anschluss Sekundärwicklung des Transformators.
18 Grau: Angeschlossen an 0V Ausgang
19 Rot: Verlangsamungsgeschwindigkeit.
Den Faston-Verbinder an den 20V.
20 Braun: Angeschlossen an 24V Ausgang.
21 Weiß: Motorlaufgeschwindigkeit.
Siehe Absatz “Einstellung der Motorgeschwindigkeit”.
J3
Funkempfänger
Eingebauter Funkempfänger.
16-17
Hinweis: Für die Steuerung der Automatisierung während der Installation kann die Taste P.P.
(Schrittschaltung) an der Zentrale benutzt werden.
15
TCA AMPO
AMPC
Funktion der Trimmer
Ermöglicht die Einstellung der automatischen Verschlusszeit, wenn mittels Dip-Switch Nr. 1
aktiviert. Die Einstellung reicht von min. 1s bis max. 90s.
Regelt die Empfindlichkeit des amperometrischen Sensors zur Erkennung von Hindernissen
während des Öffnens.
Regelt die Empfindlichkeit des amperometrischen Sensors zur Erkennung von Hindernissen
während des Schließens.
Die Trimmer im Uhrzeigersinn (+) drehen, um das Drehmoment zu erhöhen, und gegen den
Uhrzeigersinn (-), um das Drehmoment zu verringern.
Die Einstellung der Trimmer AMP-O und AMP-C muss unter Einhaltung der einschlägigen
Vorschriften erfolgen.
Wenn ein Hindernis erfasst wird:
Während des Öffnens wird die Bewegung angehalten.
Während des Schließens wird der Torflügel angehalten und für zirka 3s wieder geöffnet.
Funktion der Dip-Switches
DIP 1 “TCA”
Aktiviert oder deaktiviert das automatische Schließen.
Off: Automatisches Schließen deaktiviert.
On: Automatisches Schließen aktiviert.
DIP 2 “COND.”
Aktiviert oder deaktiviert die Mehrbenutzerfunktion.
Off: Mehrbenutzerfunktion deaktiviert.
On: Mehrbenutzerfunktion aktiviert. Der Impuls der Schrittschaltung oder des
Senders wirkt sich nicht aus während des Öffnens oder während der TCA-Phase
(sofern aktiviert).
DIP 3 nicht verwendet.
DIP 4 “Radio”
Aktiviert oder deaktiviert die Sender mit programmierbarem Code
On: Funkempfänger ausschließlich für Sender mit variablem Code aktiviert (RollingCode).
Off: Empfänger für Sender mit variablem (Rolling-Code) und programmierbarem
(Selbstlernung und Dip-Switch) Code aktiviert.
Regelung der Motorgeschwindigkeit
ACHTUNG! Diese Regelung beeinflusst die Sicherheit der Automatisierung. Sicherstellen, dass die
am Torflügel angewandte Kraft den Vorgaben der einschlägigen Normen entspricht.
Jede Änderung der Geschwindigkeit erfordert die erneute Justierung des amperometrischen
Sensors.
Am Trafo befinden sich 2 Faston:
Der Faston F1 (weiß) regelt die Öffnungs- und Schließgeschwindigkeit des Tors und kann auf drei
Spannungswerte eingestellt werden:
• 20V: (niedrige Geschwindigkeit)
• 28V: (mittlere Geschwindigkeit)
• 35V: (hohe Geschwindigkeit)
Der Faston F2 (rot) darf von der Position 20V nicht verstellt werden.
Konfiguration des eingebauten Empfängers
Die Zentrale ist mit einem eingebauten Funkmodul für den Empfang von Fernbedienungen mit fixem oder
variablem Code (siehe Funktionen Dip-Switch 4), bei einer Frequenz von 433.92MHz ausgestattet. Um eine
Fernbedienung benutzen zu können, muss diese zunächst programmiert werden. Das Speicherverfahren
wird nachstehend beschrieben. Die Vorrichtung kann bis zu 64 verschiedene Codes speichern.
Speicherung eines neuen Sendegeräts und Aktivierung der Funktion P.P.
- Ein Mal die Taste PGM 1 Sekunde lang drücken; die LED DL1 blinkt ein Mal pro Sekunde.
- Innerhalb von 10s Sekunden die Taste des Sendegeräts drücken, die mit der Funktion P.P.
gespeichert werden soll.Nachdem das Sendegerät gespeichert worden ist, beendet der Empfänger die
Programmierungsphase.
Um die Programmierung zu beenden, ohne das Sendegerät zu speichern, 10s warten.
16
Selbstlernfunktion: ein Sendegerät von fern lernen (nur Rolling-Code)
Wenn man über ein Sendegerät verfügt, das schon gespeichert ist, kann man andere Sendegeräte speichern, ohne die Zentrale dazu verwenden zu müssen. Das Speichern von fern muss bei vollständig geöffnetem Torflügel und unabhängig von der TCA Einstellung erfolgen. Folgendermaßen vorgehen:
1 Versteckte Taste des schon gespeicherten Sendegeräts drücken. Die Höflichkeitsleuchte erlischt.
2 An dem schon gespeicherten Sendegerät, die Taste drücken, deren Funktion kopiert werden soll. Die
Höflichkeitsleuchte und die LED DL1 leuchten auf.
3 Innerhalb von 10 Sekunden die Taste des neuen Sendegeräts drücken, dem die Funktion zugeteilt werden
soll. Die Höflichkeitsleuchte und die LED DL1 blinken (1 Mal pro Sekunde).
4 Innerhalb von 10 Sekunden die Taste des neuen Sendegeräts drücken, dem die unter Punkt 2 gewählte
Funktion zugeteilt werden soll. Die Höflichkeitsleuchte und die LED DL1 leuchten 1s lang auf.
5 Nachdem das Sendegerät gespeichert worden ist, beendet der Empfänger die Programmierungsphase.
Bsp.: An der Taste 1 des TX “A” ist die Funktion P.P. gespeichert, die der Taste 2 des neuen TX „B“
zugeteilt werden soll. Der Reihe nach folgende Tasten drücken:
versteckte Taste des TX A >> Taste 1 des TX A >>versteckte Taste des TX B>>Taste 2 des TX B
Löschen aller Sender aus dem Speicher
- Die Taste PGM 15 Sekunden lang gedrückt halten; die Leuchte DL1 und die Höflichkeitsleuchte blinken
schnell und erlöschen, wenn der Löschvorgang beendet ist.
- Die Taste PGM loslassen, der Speicher ist gelöscht.
NB: Aus Sicherheitsgründen können die Sender nicht während des Öffnens/Schließens des Motors
gespeichert werden. Wenn nach Zugriff auf das Speicherverfahren der Sender die LED für Power lange
blinkt und dann ausgeht, bedeutet dies, dass der Speicher des Senders voll ist und keine weiteren Sender
eingespeichert werden können, oder dass der Sender nicht kompatibel ist.
Speichern der Öffnungs- und Schließpositionen
Nachdem die Einheit, die Sicherheitsvorrichtungen, die Steuerung und die Signalisierung elektrisch
angeschlossen worden sind, müssen die Öffnungs- und Schließpositionen gespeichert werden.
Als Erstes die mechanischen Anschläge für das Öffnen und Schließen positionieren:
- von Hand den Flügel entsichern und vollkommen schließen; danach den mechanischen Anschlag für die
Schließposition am Zugwagen positionieren und blockieren.
- den Flügel vollkommen öffnen; danach den mechanischen Anschlag für die Öffnungsposition am
Zugwagen positionieren und blockieren.
Weitere Informationen sind in den mitgelieferten Gebrauchsanweisungen enthalten.
Nun können die Öffnungs- und die Schließposition gespeichert werden:
-bei stillstehender Tür, die Tasten PGM+CL 5 Sekunden lang drücken bis die LED DL1 aufleuchtet;
-die Einheit ist nun zum Speichern der Schließposition bereit;
-die Taste CL drücken und gedrückt halten, bis der Zugwagen am mechanischen Anschlag der
SCHLIESSPOSITION anschlägt; danach die Taste CL loslassen und die Taste PGM drücken. Die Led
erlischt und leuchtet wieder auf. Nun ist die Position in der Zentrale gespeichert.
-die Taste PP drücken und gedrückt halten, bis der Zugwagen am mechanischen Anschlag der
ÖFFNUNGSPOSITION anschlägt; danach die Taste PP loslassen und die Taste PGM 1s lang drücken. Die
Led erlischt. Nun ist die Position in der Zentrale gespeichert.
Riemen spannen
Um zu vermeiden, dass der Riemen beim Schließen und nach Erreichen des mechanischen Anschlags
gespannt bleibt, erfolgt eine kurze Umsteuerung in Richtung Öffnen.
Die Umkehrung kann, falls erforderlich, eingestellt bzw. ausgeschlossen werden. Folgendermaßen vorgehen:
- Ein Mal die Taste PGM 1s lang drücken; die Höflichkeitsleuchte und die LED DL1 blinken ein Mal pro
Sekunde.
- Nochmals die Taste PGM drücken und gedrückt halten, bis die Höflichkeitsleuchte und die LED DL 1
aufleuchten.
-Die Taste PGM loslassen. Die LED DL 1 blinkt (1 bis 4 Blinksignale gefolgt von einer Pause).
- Über die Taste P.P. kann die Anzahl der Blinksignale folgendermaßen geändert werden:
1 BLINKSIGNAL mit Pause: Umschalten deaktiviert.
2 BLINKSIGNALE mit Pause: kurzes Umschalten
17
3 BLINKSIGNALE mit Pause: mittellanges Umschalten (Default)
4 BLINKSIGNALE mit Pause: langes Umschalten
- Die Wahl über die Taste PGM bestätigen oder 10s warten.
Einige Steuerungen vornehmen, um den einwandfreien Betrieb zu prüfen.
Selbstdiagnose der Einheit
Im Normalbetrieb wird der Zustand der Einheit im folgenden Modus angezeigt:
-LED DL 1 aus: Motor in Betrieb oder Motor im Stillstand ohne Alarm;
-die LED DL1 blinkt im Abstand von 1 sec. 2 Mal: Eingang Stop belegt;
-die LED DL1 blinkt im Abstand von 1 sec. 3 Mal: Eingang der Fotozelle länger als 5 Sekunden belegt;
-die LED DL1 und die Höflichkeitsleuchte blinken im Abstand von 1 sec. 4 Mal: Stromsensor aktiviert.
-die LED DL1 und die Höflichkeitsleuchte blinken im Abstand von 1 sec. 5 Mal: Encoder funktioniert nicht
richtig.
-die LED DL1 und die Höflichkeitsleuchte blinken im Abstand von 1 sec. 7 Mal: Eingang P.P. länger als 5
Sekunden belegt.
* Die Höflichkeitsleuchte meldet die Störung circa 30s lang und erlischt danach. Die Led DL1 blinkt weiter,
bis die Störung behoben worden ist.
Stromausfall
Wenn der Flügel vollkommen geöffnet oder geschlossen ist und die Stromversorgung durch einen
Stromausfall unterbrochen wird, schaltet die Einheit nach Wiederherstellung der Stromversorgung
automatisch auf den Normalbetrieb zurück. Wenn die Stromversorgung während der Flügelbewegung
unterbrochen wird, fährt der Flügel nach der Wiederherstellung der Stromversorgung ab der mittleren
Position weiter; beim Öffnen wird der Vorgang durch das Einschalten des Stromsensors gestoppt, sobald
der Zugwagen den mechanischen Anschlag erreicht hat. Mit der darauffolgenden Steuerung wird der
Normalbetrieb der Automatik wieder hergestellt.
18
Déclaration de conformité CE
Déclaration en accord avec les Directives 2004/108/CE(CEM) ; 2006/95/CE(DBT)
Fabricant :
Automatismi Benincà SpA
Adresse :
Via Capitello, 45 - 36066 Sandrigo (VI) - ITALIE
Déclare que le produit :
Centrale de commande pour 1 moteur:
CP.J3M
est conforme aux conditions des Directives CE suivantes :
• DIRECTIVE 2004/108/CE DU PARLEMENT EUROPÉEN ET DU CONSEIL du 15 décembre 2004 concernant
le rapprochement des législations des États membres relatives à la compatibilité électromagnétique et qui abroge la
directive 89/336/CEE, selon les normes harmonisées suivantes :
EN 61000-6-2:2005, EN 61000-6-3:2007.
• DIRECTIVE 2006/95/CE DU PARLEMENT EUROPÉEN ET DU CONSEIL du 12 décembre 2006 concernant
le rapprochement des législations des États membres relatives au matériel électrique destiné à être employé dans
certaines limites de tension, selon les normes harmonisées suivantes :
EN 60335-1:2002 + A1:2004 + A11:2004 + A12:2006 + A2:2006 + A13:2008; EN 60335-1-103:2003.
si applicable :
• DIRECTIVE 1999/5/CE DU PARLEMENT EUROPÉEN ET DU CONSEIL du 9 mars 1999
concernant les équipements radio et les terminaux de télécommunications et la reconnaissance
réciproque de leur conformité, selon les normes harmonisées suivantes :
ETSI EN 301 489-3 V1.4.1 (2002) + ETSI EN 301 489-1 V1.4.1 (2002) + ETSI EN 300 220-3 V1.1.1
(2000) + EN 60950-1 (2001)
Benincà Luigi, Responsable légal.
Sandrigo, 08/07/2008.
RECOMMENDATIONS GÉNÉRALES
Ce manuel est destiné exclusivement au personnel qualifié
pour l’installation et la maintenance des ouvertures automatiques.
Aucune information donnée dans ce manuel ne sera d’intérêt
ou d’utilité a l’utilisateur final.
Conservez ce manuel pour de futures utilisations.
L’installateur doit donner tout renseignement relatif au
fonctionnement automatique, manuel e de secours de
l’automatisme, et consigner à l’utilisateur du produit le livret
d’instructions.
•
Il faut prévoir dans le réseau d’alimentation un interrupteur/sectionneur omnipolaire avec une distance
d’ouverture des contacts égale ou supérieure à 3 mm.
Vérifier la présence en amont de l’installation électrique
d’un disjoncteur différentiel et d’une protection contre la
surintensité adéquats. Si nécessaire, raccorder la porte
ou le portail motorisé à une installation de mise à la terre
réalisée conformément aux prescriptions des normes de
sécurité en vigueur.
L’installation électrique et la logique de fonctionnement
doivent être conformes aux normes en vigueur.
Les conducteurs alimentés à des tensions différentes doivent
être séparés physiquement ou bien, ils doivent être isolés
en manière appropriée avec une gaine supplémentaire d’au
moins 1 mm.
Les conducteurs doivent être assurés par une fixation supplémentaire à proximité des bornes.
Pendant toute intervention d’installation, maintenance et
réparation, couper l’alimentation avant de procéder à toucher
les parties électriques.
Recontrôler toutes les connexions faites avant d’alimenter la
logique de commande.
Les entrées N.F. non utilisées doivent être shuntées
Les descriptions et les illustrations contenues dans ce manuel
ne sont pas contraignantes. Le fabricant se réserve le droit
d’apporter n’importe quelle modification du coté technique,
de construction ou commerciale, en laissant inaltérées les
caractéristiques essentielles du produit sans être contraint à
mettre au jours cette publication.
19
DONNÉES TECHNIQUES
Alimentation centrale de commande
24 Vdc
Alimentation du réseau
230 Vac 50/60 Hz
Sortie Moteur
1 moteur 24Vdc
Puissance maximale moteur
120 W
Sortie alimentation accessoires
24Vdc 1 A max.
Dégrée de protection
IP54
Temp. de fonctionnement
-20°C / +70°C
Récepteur
La logique de commande est munie d’un module radio incorporé pour la réception
d’émetteurs aussi bien à code fixe qu’à code variable à la fréquence de 433,92 MHz.
Logiques de commande CP.J3M
FONCTIONS ENTRÉES/SORTIES
N° Bornes Fonction
Description
(1-2)
Antenne
Prévision connexion antenne carte récepteur radio incorporé
(1-signal/2-blindage).
Seulement pour utilisation antenne extérieure, dans ce cas couper le fil
soudé sur «ANT».
5
COM
Commun pour toutes les entrées de commande.
6
Pas à pas
Entrée touche pas à pas (contact N.O.)
7
STOP
Entrée touche STOP (contact N.F.)
8
PHOT
Entrée connexion dispositifs de sécurité, contact N.F.
(par ex. photocellules)
En phase de fermeture: l’ouverture du contact provoque l’arrêt du moteur
et l’inversion instantanée de son sens de marche (ouverture).
En phase d’ouverture: non active.
JP1 /JP7
Moteur 24 Vcc
Encoder
EncodeurConnecteur embrochable pour le branchement au moteur 24Vdc
+ Encodeur
A: + Encodeur
B: S Signal Encodeur
C: - Encodeur
14-15
Clignotant
Connexion clignotant 24 Vca 15 W max.
24 Vca
Sortie alimentation accessoires 24 Vca/1 A max.
ATTENTION: En cas d’installation de la carte chargeur de batterie
JM.CB, la sortie (en l’absence d’alimentation de secteur) présente une
tension de 24 Vcc - polarisée.
Vérifier la connexion correcte des dispositifs (16:+24Vdc - 17:-24Vdc).
JP4
Secondaire
Connexion bobinage secondaire transformateur.
18 Gris: Connecté à la sortie 0V
19 Rouge: Vitesse ralentissement.
Connecter le faston à la sortie 20V
20 Brun: Connecté à la sortie 24 V
21 Blanc : vitesse marche moteur.
Voir paragraphe «Réglage vitesse moteur»
J3
Récepteur Radio Récepteur radio incorporé
16-17
N.B.: Pour la commande de l’automatisme durant la phase d’installation il est possible d’utiliser la touche P.P.
présente sur la logique de commande.
20
TCA AMP-O
AMP-C
Fonction des Trimmers
Permet de régler le temps de fermeture automatique si elle est activée par le dip-switch N°1.
Le réglage varie d’un minimum d’1 s à un maximum de 90 s
Règle la sensibilité du capteur ampèremétrique de détection des obstacles en phase
d’ouverture.
Règle la sensibilité du capteur ampèremétrique de détection des obstacles en phase de
fermeture.
Tourner les trimmers dans le sens des aiguilles d’une montre (+) pour augmenter le couple,
tourner dans le sens inverse des aiguilles d’une montre (-) pour diminuer le couple.
Le réglage des trimmers AMP-O et AMP-C doit être effectué dans le respect des normes en
vigueur.
En cas de détection d’obstacle:
En phase d’ouverture, il arrête le mouvement:
En phase de fermeture, arrête et rouvre le vantail pendant environ 3 s.
DIP 1 “TCA”
DIP 2 “COND.”
DIP 3
DIP 8 “Radio”
Fonction dip-switchs
Active ou désactive la fermeture automatique.
Off: fermeture automatique désactivée
On: fermeture automatique activée
Active ou désactive le fonctionnement collectif
Off: Fonctionnement collectif désactivé.
On: Fonctionnement collectif activé. L’impulsion P.P. ou de l’émetteur n’a pas d’effet
durant la phase d’ouverture ni durant la phase TCA (si elle est activée).
Non utilisé
Active ou désactive les émetteurs à code programmable
On: Récepteur radio compatible exclusivement avec les émetteurs à code variable
(rolling-code).
Off: Récepteur radio compatible avec les émetteurs à code variable (rolling-code) et
programmable (auto-apprentissage et dip-switch).
Réglage de la vitesse moteur
ATTENTION! Ce réglage influence le degré de sécurité de l’automatisme.
Vérifier que la force appliquée sur le portail est conforme aux prescriptions des normes en vigueur.
Toute modification de la vitesse demande un nouvel étalonnage du capteur ampèremétrique.
Sur le transformateur il y a deux connecteurs:
Le connecteur F1 (blanc) règle la vitesse d’ouverture et de fermeture de la porte et prévoit trois valeurs de
tension:
• 20V: (baisse vitesse)
• 28V: (vitesse moyenne)
• 35V: (grande vitesse)
Le connecteur F2 (rouge) à ne pas déplacer de la position 20V.
Configuration récepteur incorporé
La logique de commande est munie d’un module radio incorporé pour la réception d’émetteurs aussi bien à
code fixe qu’à code variable (voir fonctions dip-switch 4), à la fréquence de 433,92 MHz.
Pour utiliser un émetteur, il faut d’abord l’enregistrer, la procédure de mémorisation est illustrée ci-après, le
dispositif est en mesure de mémoriser jusqu’à 64 codes différents.
Mémorisation d’un nouveau transmetteur avec activation de la fonction P.P.
- Appuyer 1 fois sur la touche PGM pendant 1s, la LED DL1 commence à clignoter avec 1s de pause.
- Appuyer sur la touche du transmetteur que l’on désire mémoriser avec la fonction P.P., après la mémorisation
le récepteur sort automatiquement de la phase de programmation.
Pour sortir de la programmation, sans mémoriser le transmetteur, il faut attendre 10s.
Apprentissage à distance d’un transmetteur (seulement rolling-code)
Si l’on dispose d’un transmetteur déjà mémorisé, il est possible d‘en mémoriser d’autres sans accéder à la
centrale. La mémorisation à distance doit être exécutée avec le portail complètement ouvert, indépendamment du TCA (Temps de Fermeture Automatique).
21
Vous pouvez procéder comme il suit:
1 Appuyer sur la touche du transmetteur déjà mémorisé, la lumière de courtoisie s’éteint.
2 Appuyer dans les 10s sur la touche du transmetteur déjà mémorisé dont on veut copier la fonction. La
lumière de courtoisie et la LED DL1 s’allument.
3 Appuyer dans les 10s sur la touche cachée du nouveau transmetteur auquel l’on veut associer la fonction.
La lumière de courtoisie et la LED DL1 commencent à clignoter (1 clignotement/s).
4 Appuyer dans les 10s sur la touche du nouveau transmetteur auquel l’on veut associer la fonction choisie
au point 2. La lumière de courtoisie et la LED DL1 s’allument pendant 1s.
5 Le nouveau transmetteur est mémorisé, le récepteur sort de la phase de programmation.
Ex: sur la touche 1 du TX “A” est mémorisée la fonction P.P. que l’on veut attribuer à la touche 2 du nouveau
TX “B”; appuyer en séquence:
touche cachée du TX A >> touche 1 du TX A >> touche cachée du TX B >>touche 2 du TX B
Effacement de tous les émetteurs de la mémoire
- Gardez appuyez la touche PGM pendant 15s, la LED DL1 et la lumière de courtoisie commencent à
clignoter rapidement pour s’éteindre une fois que l’effacement a eu lieu.
- Relâchez la touche PGM, la mémoire a été effacée.
N.B.:
Pour des raisons de sécurité, il n’est pas possible de mémoriser des émetteurs durant les phases d’ouverture
et de fermeture.
Si la LED Power émet un long clignotement puis s’éteint quand on entre dans la procédure de mémorisation,
cela signifie que la mémoire du récepteur est pleine et qu’il n’est pas possible de mémoriser d’autres émetteurs
ou que l’émetteur n’est pas compatible.
Mémorisation des positions d’ouverture et de fermeture
Après avoir réalisé le branchement électrique de la centrale et des dispositifs de sécurité, commande et
signalisation, il faut mémoriser les positions d’ouverture et de fermeture de la porte.
Avant tout positionnez les arrêts mécaniques d’ouverture et de fermeture:
- débloquez manuellement le vantail et portez-le en position de fermeture totale, placez l’arrêt mécanique de
fermeture en butée sur le chariot d’entraînement et bloquez-le.
- portez le vantail en position d’ouverture totale, placez l’arrêt mécanique d’ouverture en butée sur le chariot
d’entraînement et bloquez-le .
Pour avoir d’ultérieures informations, voir le Manuel d’instructions fourni avec l’opérateur.
Vous pouvez désormais commencer les opérations de mémorisation des positions d’ouverture et de
fermeture:
- la porte arrêtée appuyez pendant 5 secondes environ les touches PGM+CL, jusqu’à ce que le LED DL1
s’allume
- la centrale est maintenant prête à mémoriser la position de fermeture
- appuyer et maintenir appuyée la touche CL jusqu’à porter le chariot de guidage sur la butée mécanique de
FERMETURE, relâcher la touche CL et appuyer pendant 1s la touche PGM, la LED s’éteint et se rallume, la
position est ainsi mémorisée de la centrale
- appuyer et maintenir appuyée la touche PP jusqu’à porter le chariot de guidage sur la butée mécanique
d’OUVERTURE, relâcher la touche PP et appuyer pendant 1s la touche PGM, la LED s’éteint, la position est
ainsi mémorisée de la centrale
Tension de la courroie
Pour éviter que la courroie reste en tension une fois la butée mécanique de fermeture atteinte, on donne une
commande d’une courte inversion en direction d’ouverture.
Cette inversion, si nécessaire, peut être réglée (ou exclue), en suivant la procédure suivante:
- Appuyer 1 une fois sur la touche PGM pendant 1s, la lumière de courtoisie et la LED DL1 commencent à
clignoter avec 1s de pause.
- Appuyer à nouveau et maintenir appuyé pour PGM jusqu’à l’allumage de la lumière de courtoisie et de la LED
DL1.
- Relâcher PGM, la LED DL1 commence à clignoter (de 1 à 4 clignotements) suivi par un pause.
- Avec la touche P.P. on peut changer le nombre de clignotements, la valeur peut être choisie parmi le valeurs
ci-dessous:
1 CLIGNOTEMENT avec pause: inversion désactivée
2 CLIGNOTEMENTS avec pause: inversion minime
22
3 CLIGNOTEMENTS avec pause: inversion moyenne (affichage par défaut)
4 CLIGNOTEMENTS avec pause: inversion maxi
- Confirmer le choix en appuyant sur la touche PGM ou en attendant 10 s.
Tester le fonctionnement correct en effectuant un certain nombre de manœuvres d’essai.
Autodiagnostic de la centrale
Durant le fonctionnement normal l’état de la centrale est affiché selon les modes suivants:
-LED DL1 éteint: moteur en mouvement ou moteur arrêté sans alarme
- 2 flash du LED DL1 chaque seconde: entrée d’arrêt occupée
-3 flashes de la LED DL1 avec 1 sec d’intervalle: entrée de photocellule engagée pendant plus de 5 secs.
-4 clignotements de la LED DL1 et de la lumière de courtoisie* entrecoupés d’un arrêt de 1 sec: le senseur
ampérométrique entre en action.
-5 clignotements de la LED DL1 et de la lumière de courtoisie * entrecoupés d’un arrêt de 1 sec: l’encodeur
ne fonctionne pas correctement.
-7 clignotements de la LED DL1 et de la lumière de courtoisie * entrecoupés d’un arrêt de 1 sec: entrée
P.P. engagée pendant plus de 5 sec.
* La lumière de courtoisie indique l’anomalie pendant environ 30s, après quoi elle s’éteint. La led DL1
continue à indiquer la condition d’alarme jusqu’à sa solution.
Coupure de l’alimentation de réseau
Si l’interruption de l’alimentation a lieu dans les positions d’ouverture totale ou de fermeture, la centrale revient
à son normal fonctionnement lorsque l’alimentation électrique est rétablie.
Si le réseau est coupé en phase de course et quand le courant est rétabli la porte part de la position intermédiaire,
durant l’ouverture se produira une arrestation par l’intervention du senseur ampérométrique dès que le chariot
d’entraînement arrive en butée sur l’arrêt mécanique.
Avec la manœuvre suivante l’automation reprendra son normal fonctionnement.
23
Declaración CE de Conformidad
Declaración según las Directivas 2004/108/CE(EMC); 2006/95/CE(LVD)
Fabricante:
Automatismi Benincà SpA
Dirección:
Via Capitello, 45 - 36066 Sandrigo (VI) - Italia
Declara que el producto:
Central de mando para 1 motor:
CP.J3M
es conforme a las condiciones de las siguientes Directivas CE:
• DIRECTIVA 2004/108/CE DEL PARLAMENTO EUROPEO Y DEL CONSEJO del 15 de diciembre
de 2004 sobre la armonización de las legislaciones de los Estados miembros sobre la compatibilidad electromagnética
y que abroga la directiva 89/336/CEE, según las siguientes normas armonizadas:
EN 61000-6-2:2005, EN 61000-6-3:2007.
• DIRECTIVA 2006/95/CE DEL PARLAMENTO EUROPEO Y DEL CONSEJO del 12 de diciembre de 2006 sobre
la armonización de las legislaciones de los Estados miembros sobre el material eléctrico destinado a implementarse
dentro de determinados límites de tensión, según las siguientes normas armonizadas:
EN 60335-1:2002 + A1:2004 + A11:2004 + A12:2006 + A2:2006 + A13:2008; EN 60335-1-103:2003.
si es aplicable:
• DIRECTIVA 1999/5/CE DEL PARLAMENTO EUROPEO Y DEL CONSEJO del 9 de marzo de 1999 sobre
los equipos de radio y terminales de telecomunicación y el recíproco reconocimiento de su conformidad según las
siguientes normas armonizadas:
ETSI EN 301 489-3 V1.4.1 (2002) + ETSI EN 301 489-1 V1.4.1 (2002) + ETSI EN 300 220-3 V1.1.1
(2000) + EN 60950-1 (2001)
Benincà Luigi, Responsable legal.
Sandrigo, 08/07/2008.
ADVERTENCIAS
Este manual está destinado exclusivamente a personal cualificado para la instalación y el mantenimiento de aperturas
automáticas.
Ninguna información de las aquí presentadas es de interés o
de utilidad para el usuario final.
Guardar este manual para futuras consultas.
El instalador debe proporcionar todas las informaciones relativas al funcionamiento automático, manual y de emergencia
de la automatización y entregar al usuario de la instalación
las instrucciones de uso.
•
Prever en la red de alimentación un interruptor/
cortacircuitos omnipolar con distancia de apertura de los contactos igual o mayor que 3 mm.
Comprobar que entre el aparato y la red eléctrica general haya un interruptor diferencial y
una protección contra sobrecorriente adecuados.
Algunos tipos de instalación requieren que se conecte la
hoja con una instalación de puesta a tierra conforme a las
vigentes normas de seguridad.
24
La instalación eléctrica y la lógica de funcionamiento deben
cumplir las normas vigentes.
Los conductores alimentados con tensiones distintas deben
estar físicamente separados, o bien deben estar adecuadamente aislados con aislamiento suplementario de por lo
menos 1 mm.
Los conductores deben estar vinculados por una fijación
suplementaria cerca de los bornes.
Durante las operaciones de instalación, mantenimiento y
reparación, cortar la alimentación antes de acceder a las
partes eléctricas.
Comprobar todas las conexiones efectuadas antes de dar
la tensión.
Las entradas N.C. no utilizadas deben estar puenteadas.
Las descripciones y las ilustraciones presentadas en este
manual no son vinculantes. Sin cambiar las características
esenciales del producto, el fabricante se reserva el derecho
de aportar cualquier modificación de carácter técnico, constructivo o comercial sin obligación de actualizar la presente
publicación.
DATOS TÉCNICOS
Alimentación central de mando
24 Vdc
Alimentación de red
230 Vac 50/60 Hz
Salida Motor
1 motor 24Vdc
Potencia máxima motor
120 W
Salida alimentación accesorios
24Vdc 1 A max.
Grado de protección
IP54
Temp. de funcionamiento
-20°C / +70°C
Receptor radio
La centralita incorpora un módulo radio para recibir desde los telemandos el
código fijo y también el código variable con frecuencia de 433.92MHz.
Centralitas de comando CP.J3M
FUNCIONES ENTRADAS/SALIDAS
N° terminales Función
Descripción
(1-2)
Antena
Preparación de la conexión de la antena a la tarjeta del radiorreceptor
incorporado (1-señal/2-protección).
Solo para utilizar una antena exterior, en este caso cortar el hilo soldado en “ANT”.
5
COM
Común para todas la entradas de comando.
6
Paso-Paso
Entrada del pulsador paso-paso (contacto N.A.)
7
STOP
Entrada del pulsador STOP (contacto N.C.)
8
PHOT
Entrada de la conexión dispositivos de seguridad, contacto N.C. (por
ej. fotocélulas)
En fase de cierre: al abrir el contacto se para el motor y éste invierte
instantáneamente la dirección de marcha (abre).
En fase de apertura: no activo.
JP1/JP7
Motor 24Vdc
Encoder
Conector enchufable para conexión al motor 24Vdc + Encoder
A: + Encoder
B: S Señal Encoder
C: - Encoder
14-15
Lámpara
Conexión de la lámpara destellante 24Vac 15W máx.
24 Vac
Salida de alimentación de los accesorios 24Vac/1A máx.
ATENCIÓN: De estar instalada la tarjeta carga-baterías JM.CB, la
tensión de la salida (sin alimentación de red) es de 24Vdc - polarizada.
Verificar que los dispositivos (16:+24Vdc - 17:-24Vdc) estén conectados correctamente.
JP4
Secundario
Conexión del bobinado secundario transformador.
18 Gris: Conectado a la salida 0V
19 Rojo: Velocidad deceleración.
Conectar el faston a la salida 20V
20 Marrón: Conectado a la salida 24V
21 Blanco: Velocidad de marcha del motor.
Véase el párrafo “Regulación de la velocidad del motor”
J3
Radiorreceptor
Radiorreceptor incorporado
16-17
Nota: Para accionar la automatización en la fase de instalación se utiliza el pulsador P.P. puesto en la
centralita.
25
TCA AMP-O
AMP-C
Función de los Trimmer
Permite regular el tiempo de cierre automático si se activa el Dip-Switch N°1.
La regulación varía de mínimo 1 seg. a máximo 90 segs
Regula la sensibilidad del sensor amperimétrico de detección de obstáculo en la fase de
apertura.
Regula la sensibilidad del sensor amperimétrico de detección de obstáculo en la fase de
cierre.
Girar los trimmers en el sentido de las agujas del reloj (+) para aumentar el par y en sentido
contrario (-) para disminuirlo.
La regulación de los trimmer AMP-O y AMP-C se realizará en observancia de las
normativas vigentes.
En caso se detecte un obstáculo:
En la fase de apertura para el movimiento.
En la fase de cierre, para y abre otra vez la cancela por cerca de 3 segs.
Función Dip-Switch
DIP 1 “TCA”
Habilita o deshabilita el cierre automático.
Off: cierre automático deshabilitado
On: cierre automático habilitado
DIP 2 “COND.”
Habilita o deshabilita la función comunidad.
Off: Función comunidad deshabilitada.
On: Función comunidad habilitada. El impulso P.P. o del transmisor no tiene
efecto durante la fase de apertura ni durante la fase TCA (de estar activada).
DIP 3
No utilizado
.
DIP 8 “Radio”
Habilita o deshabilita los transmisores de código programable
On: Radiorreceptor habilitado exclusivamente con transmisores de código
variable (rolling-code).
Off: Receptor habilitado con transmisores de código variable (rolling-code) y
programable (autoaprendizaje y dip/switch) .
Regulación de la velocidad del motor
¡CUIDADO! Esta regulación afecta al nivel de seguridad de la automatización.
Verificar que la fuerza aplicada a la puerta cumpla las disposiciones de las normativas vigentes.
Cada vez que se modifique la velocidad será necesario calibrar de nuevo el sensor amperimétrico.
En el transformador hay presentes dos faston:
El faston F1 (blanco) ajusta la velocidad de apertura y cierre de la puerta y se puede poner en tres valores
de tensión:
• 20V : (baja velocidad)
• 28V : (velocidad media)
• 35V : (alta velocidad)
El faston F2 (rojo) no se debe desplazar de la posición 20V.
Configuración del receptor incorporado
La centralita incorpora un módulo radio para recibir desde los telemandos el código fijo y también el código
variable (véase funciones dip-switch 4), con frecuencia de 433.92MHz.
Para utilizar un telemando hay que aprenderlo primero; a continuación se indica el procedimiento de
memorización, el dispositivo está capacitado para memorizar hasta 64 códigos diversos.
Memorización de un nuevo transmisor con activación de la función P.P.
- Pulsar 1 vez el botón PGM durante 1 s, el LED DL1 empieza a parpadear con 1 s de pausa.
- Pulsar, dentro de 10 s el botón del transmisor que se desea memorizar con función P.P., después de la
memorización la receptora sale automáticamente de la fase de programación.
Para salir de la programación, sin memorizar el transmisor, esperar 10 s.
Aprendizaje remoto de un transmisor (sólo rolling-code)
Se si dispone de un transmisor ya memorizado è posible memorizar otros sin acceder a la central. La
memorización remota debe ser efectuada con la puerta totalmente abierta, independientemente de las
configuraciones del TCA.
26
Proceder como sigue:
1 Pulsar el botón oculto del transmisor ya memorizado, la luz de cortesía se apaga.
2 Pulsar, dentro de 10 s, el botón del transmisor ya memorizado del cual se quiere copiar la función. La luz
de cortesía y el LED DL1 se encienden.
3 Pulsar, dentro de 10 s, el botón oculto del nuevo transmisor con el cual se desea asociar la función. La
luz de cortesía y el LED DL1 empiezan a parpadear (1 parpadeo/s).
4 Pulsar, dentro de 10 s, el botón del nuevo transmisor con el cual se desea asociar la función seleccionada
en el punto 2. La luz de cortesía y el LED DL1 se encienden por 1 s.
5 El nuevo transmisor está memorizado, la receptora sale de la fase de programación.
Ej: en el botón 1 del TX “A” está memorizada la función P.P. que se desea atribuir al botón 2 del nuevo
TX “B”; pulsar en secuencia:
botón oculto del TX A >> botón 1 del TX A >> botón oculto del TX B >> botón 2 del TX B
Cancelación de la memoria de todos los transmisores
- Mantener presionada la tecla PGM por 15 segundos, el LED DL1 y la luz de cortesía empiezan a parpadear
rápidamente y se apagan una vez efectuado el borrado.
- Soltar la tecla PGM, la memoria ha sido borrada
NOTA:
Por razones de seguridad, no es posible memorizar los transmisores durante las fases de apertura/cierre
del motor.
Si al entrar en el procedimiento de memorización de los transmisores el LED Power emite un destello
largo y luego se apaga, significa que la memoria del receptor está llena y que no es posible guardar otros
transmisores, o que el transmisor empleado no es compatible.
Memorización de las posiciones de apertura y cierre
Después de haber efectuado la conexión eléctrica de la central y de los dispositivos de seguridad, mando
y señalización, es necesario memorizar las posiciones de apertura y cierre de la puerta.
Antes que nada se deben colocar los topes mecánicos de apertura y cierre:
- desbloquear manualmente la hoja de la puerta y llevarla a la posición de cierre completo, colocar el tope
mecánico de cierre a tope contra el carro de arrastre y bloquearlo.
- Llevar la hoja de la puerta a la posición de apertura completa, colocar el tope mecánico de apertura a tope
contra el carro de arrastre y bloquearlo.
Para más información hágase referencia al manual de instrucciones que acompaña al automatismo.
Ahora se puede proceder con la memorización de las posiciones de apertura y cierre:
-con la puerta parada, presionar durante aproximadamente 5 segundos las teclas PGM+CL, hasta que se
encienda el LED DL1
-la central ahora está lista para memorizar la posición de cierre
-pulsar y mantener pulsado el botón CL hasta llevar el carro de arrastre a tope contra el tope mecánico de
CIERRE, soltar el botón CL y apretar por 1 s el botón PGM, el LED se apaga y vuelve a encenderse, de
esta manera la central memoriza la posición
-pulsar y mantener pulsado el botón PP hasta llevar el carro de arrastre a tope contra el tope mecánico
de APERTURA, soltar el botón PP y pulsar el botón PGM, el LED se apaga, de esta manera la central
memoriza la posición
Tensión de la correa
Para evitar que la correa quede tensa una vez alcanzado el tope mecánico de cierre, se manda una breve
inversión en dirección de la apertura.
Esta inversión, a ser necesario, se puede ajustar (o excluir), efectuando las siguientes operaciones:
- Pulsar 1 vez el botón PGM por 1 s, la luz de cortesía y el LED DL1 empiezan a parpadear con 1 s de
pausa.
- Pulsar de nuevo y mantener pulsado PGM hasta que se enciendan la luz de cortesía y el LED DL1.
-Soltar PGM, el LED DL1 empieza a efectuar un cierto número de parpadeos (entre 1 y 4) seguidos de una
pausa.
- Con el botón P.P. se puede modificar el número de parpadeos; seleccionar el valor entre los siguientes:
1 PARPADEO con pausa:
inversión desactivada
2 PARPADEOS con pausa: inversión mínima
3 PARPADEOS con pausa: inversión media (configuración por omisión)
27
4 PARPADEOS con pausa: inversión máxima
- Confirmar la selección pulsando el botón PGM o esperar 10 s.
Efectuar algunas maniobras de prueba para comprobar que el funcionamiento sea correcto.
Autodiagnosis de la central
Durante el funcionamiento normal, el estado de la central es visualizado en la modalidad siguiente:
-LED DL1 apagado: motor en movimiento o motor parado sin alarma
-2 destellos del LED DL1 con un intervalo de 1 seg: entrada de Stop ocupada
-3 destellos del LED DL1 con un intervalo de 1 s.: entrada de fotocélula ocupada por más de 5 s.
-4 destellos del LED DL1 y de la luz de cortesía* intervalo de 1 segundo: actuación sensor amperimétrico.
-5 destellos del LED DL1 y de la luz de cortesía* intervalo de 1 segundo: el encoder no funciona
correctamente.
-7 destellos del LED DL1 y de la luz de cortesía* intervalo de 1 segundo: entrada P.P. ocupada por más de
5 s.
* La luz de cortesía indica la anomalía durante aproximadamente 30s, luego se apaga. El LED DL1 sigue
indicando la condición de alarma hasta que se soluciona dicha condición.
Interrupción de la alimentación de red
Cuando se corta la alimentación estando en las posiciones de completa apertura o cierre, la central, al
volver la corriente, retoma el funcionamiento normal.
Si el corte de la alimentación tiene lugar durante la carrera y al regreso de la corriente la puerta arranca
desde la posición intermedia, entonces durante la apertura se tendrá la parada por actuación del sensor
amperimétrico tan pronto el carro de arrastre llega al tope mecánico.
Con la maniobra siguiente se restablece el funcionamiento normal de la automatización.
28
Deklaracja UE o zgodności
Deklaracja spełnia wymogi Dyrektyw 2004/108/WE(EMC); 2006/95/WE(LVD)
Producent:
Automatismi Benincà SpA
Adres:
Via Capitello, 45 - 36066 Sandrigo (VI) - Włochy
Oświadcza, że maszyna:
Centralka sterowania 1 silnika:
CP.J3M
spełnia wymogi następujących dyrektyw WE:
• DYREKTYWA 2004/108/WE PARLAMENTU EUROPEJSKIEGO I RADY z 15 grudnia 2004 w sprawie
harmonizacji ustawodawstw państw członkowskich odnośnie kompatybilności elektromagnetycznej i znosząca
dyrektywę 89/336/EWG, zgodnie z następującymi normami zharmonizowanymi:
EN 61000-6-2:2005, EN 61000-6-3:2007.
• DYREKTYWA 2006/95/WE PARLAMENTU EUROPEJSKIEGO I RADY z dnia 12 grudnia 2006 w sprawie
harmonizacji ustawodawstw państw członkowskich odnośnie sprzętu elektrycznego przewidzianego do stosowania
w określonych granicach napięcia, zgodnie z następującymi normami zharmonizowanymi:
EN 60335-1:2002 + A1:2004 + A11:2004 + A12:2006 + A2:2006 + A13:2008; EN 60335-2-103:2003.
jeśli ma zastosowanie:
• DYREKTYWA 1999/5/WE PARLAMENTU EUROPEJSKIEGO I RADY z dnia 9 marca 1999 dotycząca
urządzeń radiowych i końcowych urządzeń telekomunikacyjnych oraz wzajemnego uznawania ich zgodności, zgodnie z następującymi normami zharmonizowanymi. ETSI EN 301 489-3 V1.4.1 (2002) + ETSI EN 301 489-1 V1.4.1
(2002) + ETSI EN 300 220-3 V1.1.1 (2000) + EN 60950-1 (2001)
Benincà Luigi, Przedstawiciel prawny.
Sandrigo, 02.11.2010.
OSTRZEŻENIA
Niniejszy podręcznik przeznaczony jest wyłącznie dla wykwalifikowanego personelu w celu instalacji I konserwacji bram
automatycznych.
Żadna z zawartych tu informacji nie jest użyteczna ani celowa
dla końcowego użytkownika.
Przechowywać niniejszy podręcznik do przyszłego użytku.
Instalator ma obowiązek podać wszystkie informacje
dotyczące działania automatycznego, ręcznego i stanu alarmu
urządzenia automatyzacji oraz przekazać użytkownikwi
urządzenie i instrukcję użytkowania.
Należy przewidzieć w sieci wyłącznik/odłącznik sekcyjny
wielobiegunowy, gdzie odległość rozwarcia między stykami
będzie równa lub większa 3 mm.
•
Sprawdzić, czy przed instalacją elektryczną jest
odpowiedni wyłącznik dyferencjalny i zabezpieczenie przed przetężeniem.
Niektóre typologie instalacji wymagają podłączenia skrzydła
do uziemienia, zgodnego z obowiązującymi normami
bezpieczeństwa.
Instalacja elektryczna i tryb funkcjonowania musza być
zgodne z obowiązującymi normami.
Przewody zasilane różnym napięciem muszą być materialnie
oddzielone, albo odpowiednio izolowane dodatkową izolacją
o grubości co najmniej 1 mm.
W pobliżu zacisków przewody musza być umocowane dodatkowym zaciskiem.
Podczas prac instalacyjnych, konserwacji i naprawy, przed
przystąpieniem do prac na częściach elektrycznych należy
odciąć zasilanie.
Przed przywróceniem napięcia należy dokładnie sprawdzić
wszystkie połączenia elektryczne.
Nieużywane wejścia N.C. należy zmostkować.
Opisy i ilustracje znajdujące się w niniejszym podręczniku
podane są wyłącznie przykładowo. Pozostawiając niezmienione istotne charakterystyki techniczne produktu, producent
zastrzega sobie prawo do wprowadzanie każdej zmiany o
charakterze technicznym, konstrukcyjnym lub handlowym,
bez konieczności modyfikowania niniejszej publikacji.
29
DANE TECHNICZNE
Zasilanie centralki sterowania
24 Vdc
Zasilanie sieciowe
230 Vac 50/60 Hz
Wyjście silnika
1 silnik 24Vdc
Maksymalna moc silnika
120 W
Wyjście zasilania dodatkowych
24Vdc 1 A max.
Stopień zabezpieczenia
IP54
Temperatura działania
-20°C / +70°C
Odbiornik radio
Szafa sterownicza posiada wbudowany moduł radiowy do odbierania poleceń
zarówno na kod stały jak i na kod zmienny z częstotliwością 433.92MHz.
Szafy sterownicze CP.J3M
FUNKCJE WEJŚĆ/WYJŚĆ
Il. zacisków Funkcja
Opis
(1-2)
Antena
Przystosowanie podłączenia anteny z kartą odbiornika radio wbudowaną
(1-sygnał/2-ekran).
Tylko do stosowania anteny zewnętrznej, w tym przypadku należy
przeciąć drut przyspawany do “ANT”.
5
COM
Wspólna dla wszystkich wejść sterowania.
6
Posuw-Posuw
Wejście przycisku posuw-posuw (styk N.O.)
7
STOP
Wejście przycisku STOP (styk N.Z.)
8
PHOT
Wejście podłączenia przyrządów zabezpieczających, styk N.Z. (n.p. fotokomórki).
W fazie zamykania: otwarcie styku powoduje zatrzymanie silnika i
natychmiastową zmianę kierunku jego ruchu (otwiera).
W fazie otwierania: nieczynna.
JP1 /JP7
Silnik 24Vdc
Enkoder
Enkoder Łącznik zaczepowy do podłączenia silnika 24Vdc + Enkodera
A: + Enkoder
B: S Sygnał Enkodera
C: - Enkoder
14-15
Światło migające Połączenie światła migającego 24Vac 15W max.
24 Vac
Wyjście zasilania akcesoriów 24Vac/1A max.
UWAGA: W przypadku instalacji karty przekaźnika prądu baterii JM.CB,
wyjście (bez napięcia sieciowego) wykazuje napięcie 24Vdc-spolaryzowane.
Sprawdzić podłączenie przyrządów (16:+24Vdc - 17:-24Vdc).
JP4
Wtórne
Połączenie wtórnego uzwojenia transformatora.
18 Szary: Połączony z wyjściem 0V
19 Czerwony: Prędkość zwalniania.
Połączyć Faston z wyjściem 20V.
20 Brązowy: Połączony z wyjściem 24V
21 Biały: Prędkość ruchu silnika.
Zobacz paragraf “Regulacja prędkości silnika”
J3
Odbiornik Radio Odbiornik radio wbudowany
16-17
Uwaga: Do sterowania automatyzmu w fazie instalacji możliwe jest używanie przycisku P.P. z centralki.
30
Funkcje Trimerów
TCA Pozwala regulować czas zamykania automatycznego jeśli funkcja włączana jest przez DipSwitch N°1. Regulacja ma zakres od minimum 1s do maksymum 90s.
AMPO
Reguluje wrażliwość czujnika amperometrycznego na wyczuwanie przeszkody w fazie
otwierania.
AMPC
Reguluje wrażliwość czujnika amperometrycznego na wyczuwanie przeszkody w fazie
zamykania.
Pokręcać trimer w kierunku wskazówek zegara (+) dla zwiększenia pary, pokręcać w kierunku
odwrotnym do ruchu wskazówek zegara (-) by zmniejszyć parę.
Regulacja trimerów AMP-O i AMP-C musi być dokonywana zgodnie z obowiązującymi
normami.
W przypadku wyczucia przeszkody:
W fazie otwierania zatrzymuje ruch.
W fazie zamykania zatrzymuje i otwiera skrzydło na około 3s
DIP 1 “TCA”
Funkcje Dip-Switch
Włącza lub wyłącza zamykanie automatyczne.
Off: zamykanie automatyczne wyłączone.
On: zamykanie automatyczne włączone.
DIP 2 “COND.”
Włącza i wyłącza funkcję współużytkową.
Off: Funkcja współużytkowa wyłączona.
On: Funkcja współużytkowa włączona. Impuls P.P. lub przekaźnika pozostaje bez
efektu podczas fazy otwierania i podczas fazy TCA (jeśli czynna).
DIP 3 Nie używany.
DIP 4 “Radio”
Włącza lub wyłącza przekaźniki na kod programowany
On: Odbiornik radio współpracujący wyłącznie z przekaźnikami na kod zmienny
(rolling-code).
Off: Odbiornik współpracujący z przekaźnikami na kod zmienny (rolling-code) i
programowany (samowzbudny i dip/switch) .
Regulacja prędkości silnika
UWAGA! Regulacja ta wpływa na stopień bezpieczeństwa automatyzmu.
Sprawdzić czy siła oddziaływania na skrzydło bramy jest zgodna z obowiązującymi normami.
Każda zmiana prędkości wymaga nowego wzorcowania czujnika amperometrycznego.
Na transformatorze znajdują się dwa przełączniki:
Przełącznik F1 (biały) reguluje prędkość otwierania i zamykania bramy i może być ustawiony na trzech
wartościach napięcia:
• 20V: (niska prędkość)
• 28V: (średnia prędkość)
• 35V: (wysoka prędkość)
Przełącznik F2 (czerwony) nie może być przemieszczony z pozycji 20V.
Konfiguracja odbiornika wbudowanego
Szafa sterownicza posiada wbudowany moduł radiowy do odbierania poleceń zarówno na kod stały jak i na
kod zmienny (zobacz funkcje dip-switch 8), z częstotliwością 433.92MHz.
W celu używania pilota należy wcześniej zapoznać się z jego funkcjonowaniem, proces utrwalania w pamięci
przedstawiony jest poniżej, przyrząd jest w stanie zapamiętać aż do 64 kodów odmiennych.
Zapisywanie nowego nadajnika z aktywacją funkcji P.P.
- Nacisnąć 1 raz przycisk PGM przez okres 1s, dioda LED DL1 zacznie migać z 1s odstępem.
- Przed upływem 10s nacisnąć przycisk nadajnika, który ma być zapisany z aktywacją funkcji P.P., po zapisaniu,
nadajnik automatycznie kończy fazę programowania.
Aby opuścić fazę programowania bez zapisywania nadajnika należy odczekać 10s.
Zdalne ustawianie nadajnika (dotyczy tylko rolling-code)
Jeżeli nadajnik został już wcześniej ustawiony można ustawić pozostałe nadajniki bez dostępu do centralki.
Zdalne ustawianie powinno mieć miejsce przy całkowicie otwartym skrzydle, niezależnie od ustawienia
TCA.
31
Postępować w następujący sposób:
1 Nacisnąć ukryty przycisk wcześniej ustawionego nadajnika, światełko ostrzegawcze wyłączy się.
2 Przed upływem 10s nacisnąć przycisk wcześniej zapisanego nadajnika, którego funkcję chce się
skopiować. Światełko ostrzegawcze i dioda LED DL1 włączą się.
3 Przed upływem 10 s nacisnąć ukryty przycisk nowego nadajnika, do którego chce się przypisać funkcję.
Światełko ostrzegawcze i dioda LED DL1zaczynają migać (1 błysk/s).
4 Przed upływem 10 s nacisnąć przycisk nowego nadajnika, do którego chce się przypisać funkcję wybraną
w punkcie 2. Światełko ostrzegawcze i dioda LED DL1 włączają się na 1s.
5 Nowy nadajnik został zapisany, odbiornik wychodzi z fazy programowania.
Np.: na przycisku 1 nadajnika TX “A” jest zapisana funkcja P.P., którą chce się przypisać do przycisku 2
nowego nadajnika TX “B”; kolejno nacisnąć:
ukryty przycisk nadajnika TX A >> przycisk 1 nadajnika TX A >> ukryty przycisk nadajnika TX B >>przycisk
2 nadajnika TX B
Wycofanie z pamięci wszystkich przekaźników
- Trzymać wciśnięty przycisk PGM przez 15 s, LED DL1 i lampka kontrolna zaczynają błyskać w trybie
szybkim i gasną po zakończeniu kasowania.
- Zwolnić przycisk PGM, pamięć została wykasowana.
UWAGA: Z racji na bezpieczeństwo, nie można utrwalać w pamięci przekaźników podczas faz otwierania/
zamykania silnika.
Jeśli podczas procesu wprowadzania do pamięci przekaźników LED Power zaświeci się na dłużej i zgaśnie,
oznacza to że pamięć odbiornika jest przepełniona i nie jest w stanie zapamiętać innych przekaźników lub
że stosowany przekaźnik nie jest kompatybilny.
Wprowadzenie do pamięcie położenia otwierania i zamykania
Po dokonaniu połączenia elektrycznego centralki z urządzeniami bezpieczeństwa, steru i sygnalizacji,
należy wprowadzić do pamięci położenia otwierania i zamykania bramy.
Przede wszystkim należy ustawić mechaniczne ograniczniki ruchu otwierania i zamykania:
- odblokować ręcznie skrzydło i przesunąć je do położenia całkowitego zamknięcia, ustawić mechaniczny
ogranicznik ruchu zamykania w położeniu kontaktu z wózkiem pociągnikiem i zablokować go.
- ustawić skrzydło w położeniu całkowitego otwarcia, ustawić mechaniczny ogranicznik ruchu otwierania w
położeniu kontaktu z wózkiem pociągnikiem i zablokować go.
Dla dodatkowych wyjaśnień należy skonsultować instrukcję obsługi załączoną wraz z siłownikiem przez
producenta.
Teraz można przystąpić do wprowadzania do pamięci położenia otwarcia i zamknięcia:
-przy bramie zamkniętej należy trzymać wciśnięte przez około 5 sekund przyciski PGM+CL, aż do momentu
zaświecenia się LEDu DL1.
-centralka gotowa jest teraz do zapamiętania położenia zamknięcia
-podtrzymać na wciśniętej pozycji przycisk CL do ustawienia wózka pociągowego na ograniczniku
mechanicznym ZAMKNIĘCIA, zwolnić przycisk CL i nacisnąć przez 1s przycisk PGM, dioda led wyłącza
się, a następnie ponownie się włącza, w ten sposób pozycja została zapamiętana przez centralkę
-podtrzymać na wciśniętej pozycji przycisk PP do ustawienia wózka pociągowego na ograniczniku
mechanicznym OTWARCIA, zwolnić przycisk PP i nacisnąć przez 1s przycisk PGM, dioda led wyłącza
się, w ten sposób pozycja została zapamiętana przez centralkę
Naciąg paska
Aby pasek nie pozostał naciągnięty po tym, jak ogranicznik mechaniczny zamknięcia został osiągnięty, jest
wydawane polecenie krótkiej zmiany kierunku w kierunku otwarcia.
Zmiana kierunku, w razie takiej konieczności, może być wyregulowana (lub wyłączona), wg następującej
procedury:
- Nacisnąć 1 raz przycisk PGM przez okres 1s, światełko ostrzegawcze i dioda LED DL1 zacznie migać z
1s odstępem.
- Ponownie nacisnąć i podtrzymać na pozycji wciśniętej PGM do chwili włączenia światełka ostrzegawczego
i diody LED DL1.
-Zwolnić przycisk PGM, dioda LED DL1 zaczyna migać (od 1 do 4 błysków) w regularnym odstępie.
- Za pomocą przycisku P.P. można zmienić liczbę błysków, wybrać jedną z poniższych wartości:
1 MIGANIE z odstępem: zmiana kierunku wyłączona
32
2 MIGANIA z odstępem: minimalna zmiana kierunku
3 MIGANIA z odstępem: średnia zmiana kierunku (ustawienie fabryczne)
4 MIGANIA z odstępem: maksymalna zmiana kierunku
- Potwierdzić wybór za pomocą przycisku PGM lub odczekać 10 s.
Wykonać kilka prób, aby sprawdzić poprawność funkcjonowania.
Autodiagnoza centralki
Podczas normalnego działania stan centralki wizualizowany jest w następujący sposób:
-LED DL1 zgaszony: silnik w ruchu lub silnik zatrzymany nie w trybie alarmowym
-2 błyski diody LED DL1 z przerwą di 1 sek: wejście stop zajęte
-3 błyski diody LED DL1 przerywanych co 1 sek: wejście fotokomórki zajętej przez więcej niż 5 s
-4 błyski diody LED DL1 i światełka dodatkowego* w odstępie 1 sek.: włączenie się czujnika amperometrycznego.
-5 błyski diody LED DL1 i światełka dodatkowego* w odstępie 1 sek.: enkoder nie działa prawidłowo.
-7 błyski diody LED DL1 i światełka dodatkowego* w odstępie 1 sek.: wejście P.P. przesłonięte przez okres
dłuższy niż 5 sek.
* Światełko dodatkowe sygnalizuje awarię przez około 30s, po czym wyłącza się. Dioda DL1 dalej sygnalizuje
stan alarmowy, do czasu usunięcia awarii.
Przerwa zasilania sieciowego
Kiedy przerwa zasilania sieciowego ma miejsce przy położeniu kompletnego otwarcia lub zamknięcia, po
przywróceniu napięcia centralka powróci do normalnego działania. Jeżeli odcięcie zasilania ma miejsce
podczas biegu i po przywróceniu zasilania brama startuje z położenia pośredniego, podczas otwierania
dojdzie do zatrzymania z powodu zadziałania czujnika amperometrycznego w momencie kiedy wózek pociągnika zetknie się z ogranicznikiem mechanicznym. Kolejny manewr powoduje przywrócenie normalnego
działania urządzenia automatyzacji.
33
AUTOMATISMI BENINCÀ SpA - Via Capitello, 45 - 36066 Sandrigo (VI) - Tel. 0444 751030 r.a. - Fax 0444 759728