1
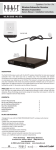
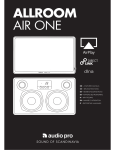
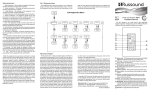
X1-TX8
X1- RX2
X1-RX220
X1 Products
X1-TX8 Multi-channel Wireless Transmitter
X1-RX2 Wireless Receiver
X1-RX220 Wireless Receiver Amplifier
Installation Manual
X1_Manual.indd 1
1/24/14 7:52 AM
SAFETY INSTRUCTIONS
Lisez les instructions - Toutes les instructions de
sécurité et doivent être lues avant d'utiliser l'appareil.
ATTENTION:
RISQUE DE CHOC ÉLECTRIQUE NE PAS OUVRIR.
WARNING: TO REDUCE THE RISK OF FIRE
OR ELECTRIC SHOCK, DO NOT EXPOSE THIS
APPLIANCE TO RAIN OR MOISTURE.
ATTENTION: AFIN DE RÉDUIRE LES RISQUES
D'INCENDIE OU DE CHOC ÉLECTRIQUE, NE PAS
EXPOSER CET APPAREIL À LA PLUIE OU.
CAUTION: TO REDUCE THE RISK OF ELECTRIC
SHOCK, DO NOT REMOVE THE COVER. NO
USER-SERVICEABLE PARTS INSIDE. REFER
SERVICING TO QUALIFIED SERVICE PERSONNEL.
ATTENTION: AFIN DE RÉDUIRE LE RISQUE
DE CHOC ÉLECTRIQUE, NE PAS RETIRER LE
CAPOT. AUCUNE PIÈCE À L'INTÉRIEUR. CONFIER
L'ENTRETIEN DE PERSONNEL QUALIFIÉ.
The lightning flash with arrowhead symbol,
within an equilateral triangle, is intended to
alert the user to the presence of uninsulated
dangerous voltage within the product’s
enclosure that may be of sufficient magnitude
to constitute a risk of electric shock to persons.
The exclamation point within an equilateral
triangle is intended to alert the user to
the presence of important operating and
maintenance (servicing) instructions in the
literature accompanying the appliance.
Safety Instructions
1. Read Instructions - All the safety and operating
instructions should be read before the appliance is
operated.
2
X1_Manual.indd 2
2.
Retain Instructions - The safety and operating
instructions should be retained for future reference.
Conservez les instructions - Les instructions de
sécurité et devrait être conservé pour référence
future.
3.
Heed Warnings - All warnings on the appliance in the
operating instructions should be adhered to.
Tenez compte des avertissements - Tous les
avertissements figurant sur l'appareil dans les
instructions de fonctionnement doivent être
respectées.
4.
Follow Instructions - All operating and user
instructions should be followed.
Suivez les instructions - Toutes les instructions de
fonctionnement et d'utilisation doivent être suivies.
5.
Water and Moisture - The appliance should not
be used near water; for example, near a bathtub,
washbowl, kitchen sink, laundry tub, in a wet
basement, or near a swimming pool. The apparatus
shall not be exposed to dripping or splashing liquids
and no objects filled with liquids, such as vases,
shall be placed on the apparatus. Do not touch
the appliance with wet hands. Do not handle the
appliance or power cord with wet or damp hands.
If water or any other liquid enters the appliance
cabinet, take it to qualified service personnel for
inspection.
Eau et humidité - L'appareil ne doit pas être
utilisé près de l'eau, par exemple près d'une
baignoire, d'un lavabo, d'un évier, machine à
laver, dans un sous-sol humide ou près d'une
piscine. L'appareil ne doit pas être exposé à des
éclaboussures de liquides et aucun objet rempli
de liquide, comme des vases, ne doit être posé
sur l'appareil. Ne pas toucher l'appareil avec les
mains mouillées. Ne manipulez pas l'appareil ou
le cordon d'alimentation avec les mains mouillées
ou humides. Si de l'eau ou tout autre liquide
pénètre dans le coffret de l'appareil, il amène à un
personnel qualifié pour l'inspection.
6.
Cleaning - The appliance should be cleaned only as
recommended by the manufacturer. From time to
time you should wipe off the front and side panels
and the cabinet with a soft cloth. Do not use rough
material, thinners, alcohol or other chemical solvents
or cloths since this may damage the finish or remove
the panel lettering.
Nettoyage - L'appareil doit être nettoyé uniquement
tel que recommandé par le fabricant. De temps en
temps vous devriez essuyer les panneaux latéraux
avant et arrière et le boîtier avec un chiffon doux. Ne
pas utiliser de matériel rugueux, de diluant, d'alcool
ou d'autres solvants chimiques ou de chiffons
car cela pourrait endommager la finition ou faire
disparaître la sérigraphie du boîtier.
7.
Ventilation - The appliance should be situated so
that its location or position does not interfere with
its proper ventilation. For example, the appliance
should not be situated on a bed, sofa, rug, or similar
surface that may block the ventilation openings, or
placed in a built-in installation, such as a bookcase
or cabinet that may impede the flow of air through
the ventilation openings. Place the unit in a wellventilated location, leaving at least 2 inches (5 cm)
of clearance on all sides, top and rear of unit for air
flow. If ventilation is blocked, the unit may overheat
and malfunction.
Ventilation - L'appareil doit être placé de telle sorte
que son emplacement ou sa position ne gêne pas
sa propre ventilation. Par exemple, l'appareil ne
doit pas être placé sur un lit, un canapé, un tapis
ou une surface similaire qui pourrait obstruer
les ouvertures de ventilation, ou placés dans un
haut-installation, comme une bibliothèque ou un
meuble qui pourrait empêcher le flux d'air à travers
les ouvertures de ventilation. Placer l'appareil dans
un endroit bien aéré, laissant au moins 2 pouces
(5 cm) de dégagement de tous les côtés, en haut
et à l'arrière de l'unité de circulation de l'air. Si la
ventilation est bloqué, l'appareil peut surchauffer et
mal fonctionner.
Russound X1 Products Installation Manual
1/24/14 7:53 AM
SAFETY INSTRUCTIONS
8.
Heat - The appliance should be situated away from heat sources such as radiators,
heat registers, stoves, or other appliances (including amplifiers) that produce heat.
Chaleur - L'appareil doit être placé loin des sources de chaleur telles que
des radiateurs, registres de chaleur, poêles ou autres appareils (incluant les
amplificateurs) qui produisent de la chaleur.
9.
Grounding or Polarization - Precaution should be taken so that the grounding or
polarization means of an appliance is not defeated.
La terre ou polarisation - précautions doivent être prises pour que les moyens d'un
appareil à la terre ou polarisation ne soit pas annulée.
10. Power Cord Protection - Power supply cords should be routed so that they are not
likely to be walked on or pinched by items placed upon or against them, paying
particular attention to cords at plugs, receptacles, and the point where they exit
from the appliance.
Protection du cordon d'alimentation - Les cordons d'alimentation doivent être
acheminés de sorte qu'ils ne sont pas susceptibles d'être piétinés ou coincés par
des objets placés sur ou contre eux, en accordant une attention particulière aux
cordons au niveau des fiches, des prises et à l'endroit où ils sortent de l'appareil.
11. Power Sources - The appliance should be connected to a power supply only of the
type described in the operating instructions or as marked on the appliance.
Sources d'énergie - Cet appareil doit être connecté à une source d'alimentation du
type décrit dans le mode manuel ou tel qu'indiqué sur l'appareil.
12. Main Power Disconnect - The power switch is a single-pole switch. When the
switch is in the “Off ” position, the appliance is not completely disconnected from
the main power. The main power plug is used as the disconnect device and shall
remain readily operable. When installing the product, ensure that the plug is easily
accessible.
Débranchez l'alimentation principale - L'interrupteur est un interrupteur unipolaire.
Lorsque l'interrupteur est en position "Off ", l'appareil n'est pas complètement
déconnecté de l'alimentation principale. La fiche d'alimentation est utilisée comme
dispositif de déconnexion et doit rester facilement accessible. Lors de l'installation
du produit, assurez-vous que la prise soit facilement accessible.
13. Non-Use Periods - The power cord of the appliance should be unplugged from the
outlet when left unused for a long period of time.
Périodes de non-utilisation - Le cordon d'alimentation de l'appareil doit être
débranché de la prise en cas de non utilisé pendant une longue période de temps.
14. Attachments - Only use attachments/accessories specified by the manufacturer.
Accessoires - N'utilisez que des fixations / accessoires spécifiés par le fabricant.
15. Carts and Stands - The appliance should be used only with a cart or stand that is
recommended by the manufacturer. An appliance and cart combination should be
moved with care. Quick stops, excessive force and uneven surfaces
may cause the appliance and cart combination to overturn.
Chariots et supports - L'appareil doit être utilisé uniquement
avec un chariot ou un support recommandé par le fabricant.
Une combinaison de l'appareil et chariot doit être déplacé avec
précaution. Des arrêts brusques, une force excessive et des surfaces
inégales peuvent provoquer la chute de l'appareil et du chariot.
16. Wall or Ceiling Mounting - The appliance should be mounted to a wall or ceiling
only as recommended by the manufacturer.
Mur ou au plafond - L'appareil doit être fixé au mur ou au plafond, tel que
recommandé par le fabricant.
17. Location of the Amplifier - Do not mount this unit under a kitchen cabinet. Do not
expose the amplifier to direct sun light or heating units as the amplifier internal
components’ temperature may rise and shorten the life of the components. Avoid
damp and dusty places.
Localisation de l'amplificateur - Ne montez pas cet appareil dans une armoire de
cuisine. N'exposez pas l'amplificateur à la lumière directe du soleil ou appareils de
chauffage comme la température des composants internes de l'amplificateur de
risque d'augmenter et raccourcir la durée de vie des composants. Evitez les endroits
humides et poussiéreux.
18. Object and Liquid Entry - Care should be taken so that objects do not fall and
liquids are not spilled into the enclosure through the openings.
Objets et de liquides - Des précautions doivent être prises afin que des objets ne
tombent ou que des liquides coulent dans le boîtier à travers les ouvertures.
19. Servicing - The user should not attempt to service the appliance beyond that
described in the operating instructions. All other servicing should be referred to
qualified service personnel.
Entretien - L'utilisateur ne doit pas tenter de réparer l'appareil au-delà de celle
qui est décrite dans le manuel d'instructions. Toutes les réparations doivent être
effectuées par un technicien qualifié.
20. Damage Requiring Service - The appliance should be serviced by qualified service
personnel when: A. The power supply cord or the plug has been damaged; B.
Objects have fallen, liquid has been spilled into the appliance; C. The appliance has
been exposed to rain; or D. The appliance does not appear to operate normally; or
E. The appliance has been dropped or the enclosure is damaged.
Dommages nécessitant des réparations - L'appareil doit être réparé par un
personnel qualifié lorsque: A. Le cordon d'alimentation ou la prise a été
endommagé; B. Des objets sont tombés, du liquide a été renversé dans l'appareil
C. Si l'appareil a été exposé à pluie; ou D. l'appareil ne semble pas fonctionner
normalement, ou E. L'appareil est tombé ou son boîtier est endommagé.
Russound X1 Products Installation Manual
X1_Manual.indd 3
3
1/24/14 7:53 AM
COMPLIANCE
Caution:
This device complies with Part 15 of the FCC Rules / Industry Canada licence-exempt RSS
standard(s). Operation is subject to the following two conditions: (1) this device may not
cause harmful interference, and (2) this device must accept any interference received,
including interference that may cause undesired operation.
Le présent appareil est conforme aux CNR d'Industrie Canada applicables aux appareils
radio exempts de licence. L'exploitation est autorisée aux deux conditions suivantes:
(1) l'appareil ne doit pas produire de brouillage, et (2) l'utilisateur de l'appareil doit
accepter tout brouillage radioélectrique subi, même si le brouillage est susceptible d'en
compromettre le fonctionnement.
Changes or modifications not expressly approved by the party responsible for
compliance could void the user's authority to operate the equipment.
This equipment has been tested and found to comply with the limits for a Class B digital
device, pursuant to part 15 of the FCC Rules. These limits aredesigned to provide reasonable
protection against harmful interference in a residential installation. This equipment
generates uses and can radiate radio frequency energy and, if not installed and used in
accordance with the instructions, may cause harmful interference to radio communications.
However, there is no guarantee that interference will not occur in a particular installation.
If this equipment does cause harmful interference to radio or television reception, which
can be determined by turning the equipment off and on, the user is encouraged to try to
correct the interference by one or more of the following measures:
• Reorient or relocate the receiving antenna.
• Increase the separation between the equipment and receiver.
• Connect the equipment into an outlet on a circuit different from that
to which the receiver is connected.
• Consult the dealer or an experienced radio/TV technician for help.
Under Industry Canada regulations, this radio transmitter may only operate using an
antenna of a type and maximum (or lesser) gain approved for the transmitter by Industry
Canada. To reduce potential radio interference to other users, the antenna type and its
gain should be so chosen that the equivalent isotropically radiated power (e.i.r.p.) is not
more than that necessary for successful communication.
Conformément à la réglementation d'Industrie Canada, le présent émetteur radio peut
fonctionner avec une antenne d'un type et d'un gain maximal (ou inférieur) approuvé
pour l'émetteur par Industrie Canada. Dans le but de réduire les risques de
brouillage radioélectrique à l'intention des autres utilisateurs, il faut choisirle type
d'antenne et son gain de sorte que la puissance isotrope rayonnée équivalente (p.i.r.e.) ne
dépasse pas l'intensité nécessaire à l'établissement d'une communication satisfaisante.
4
X1_Manual.indd 4
MPE Reminding
To satisfy FCC / IC RF exposure requirements, a separation distance of 20 cm or more
should be maintained between the antenna of this device and persons during device
operation.
To ensure compliance, operations at closer than this distance is not recommended.
Les antennes installées doivent être situées de facon à ce que la population ne puisse y
être exposée à une distance de moin de 20 cm. Installer les antennes de facon à ce que
le personnel ne puisse approcher à 20 cm ou moins de la position centrale de l’ antenne.
La FCC des éltats-unis stipule que cet appareil doit être en tout temps éloigné d’au moins
20 cm des personnes pendant son functionnement.
Only for detachable antennas:
This radio transmitter (identify the device by certification number, or model number if
Category II) has been approved by Industry Canada to operate with the antenna types
listed below with the maximum permissible gain and required antenna impedance
for each antenna type indicated. Antenna types not included in this list, having a gain
greater than the maximum gain indicated for that type, are strictly prohibited for use
with this device.
Gain of antenna: 3.0dBi max.
Type of antenna: Omni-directional
Impedance of antenna: 50ohm
Le présent émetteur radio (identifier le dispositif par son numéro de certification ou son
numéro de modèle s'il fait partie du matériel de catégorie I) a été approuvé par Industrie
Canada pour fonctionner avec les types d'antenne énumérés ci-dessous et ayant un
gain admissible maximal et l'impédance requise pour chaque type d'antenne. Les types
d'antenne non inclus dans cette liste, ou dont le gain est supérieur au gain maximal
indiqué, sont strictement interdits pour l'exploitation de l'émetteur.
Gain d'antenne: 3.0dBi maximal
Type d'antenne: 50 ohm, Omni-directionnel
This device complies with RSS-310 of Industry Canada. Operation is subject to the
condition that this device does not cause harmful interference.
Contains of FCC ID: XCO-HSDWAM83 and IC: 7756A-HSDWAM83.
Russound X1 Products Installation Manual
1/24/14 7:53 AM
TABLE OF CONTENTS
Product Operation ......................................................................... 6-7
X1-TX8 Front, Back Panel ................................................................. 8
X1-RX2 Front, Back Panel ................................................................. 9
X1-RX220 Front, Back Panel ..........................................................10
Connection Diagram .......................................................................11
Installation Overview ......................................................................12
Features ...............................................................................................13
Technical specifications .................................................................13
Warranty ....................................................................................... 14-15
Russound X1 Products Installation Manual
X1_Manual.indd 5
5
1/24/14 7:53 AM
PRODUCT OPERATION
Thank you for choosing the Russound XStream X1 family of
products, the new performance standard in wireless audio.
The X1 products operate over three bands, 2.4GHz, 5.2GHz and
5.8GHz and feature Channel Hopping Mode or Fixed Channel
Mode.
Although the X1 product uses bands that are in the Wi-Fi
spectrum, the proprietary digital signal transmitted is not used
in the Wi-Fi system. This provides a more reliable connection with
very low latency between the original source signal and the output
receiver, eliminating any echo effect.
The 2.4GHz operates better through walls than the higher
frequency. However, this band is widely used in many systems
including Wi-Fi. If the band is crowded interference may occur.
The 5.2GHz and 5.8GHz bands do not go through walls at the
same distance as the lower bands. However, they will have less
interference.
Channel Hopping or Fixed Channel Mode
The channel hopping technology will combat crowded spaces by
searching for the cleanest channel within the band. Determining
the modes and band used is a question of application, distance
requirements and may require some trial.
ID. Sets the channel and the Band
Channels are determined by the inputs 1-4 on the rear panel of
the X1-TX8 and selecting the corresponding channel on the X1-RX2
or X1-RX220 receivers. Source input 1 on the X1-TX8 is Channel 1 on
the receiver, source input 2 is Channel 2, etc.
Fixed Mode
Hopping Mode
ID 1 = 2.41GHz
ID’s 1, 2 and 3 = 2.4GHz
ID 2 = 2.438GHz
ID’s 4, 5 and 6 = 5.2GHz
ID 3 = 2.464GHz
ID’s 7, 8 and 9 = 5.8GHz
ID 4 = 4.18GHz
ID 5 = 5.210GHz
ID 6 = 5.240GHz
ID 7 = 5.736GHz
Channel
Hopping
Fixed
ID 8 = 5.762GHz
ID 9 = 5.814GHz
Depending on the amount of RF signals in your installation you may
choose to select between Channel Hopping or Fixed Channel mode.
To select between these modes, press and hold the ID button on
the front of the X1-TX8 while applying power, look for 2 LED’s or 3
LED’s illuminated on the front of the unit. 2 LED’s represents Fixed
Mode, 3 LED’s represents hopping mode. To change the mode
press the ID button on the X1-TX8 while applying power, verify the
selection with the LED illumination
6
X1_Manual.indd 6
Russound X1 Products Installation Manual
1/24/14 7:53 AM
PRODUCT OPERATION
Antenna placement
For best performance, locate the transmitter and receiver in an
area that is not surrounded by metal or other equipment that may
interfere with transmission. Placement should be carefully thought
out. Transmitter and receiver antennas should be in vertical and
parallel position for maximum performance - see illustration.
Russound X1 Products Installation Manual
X1_Manual.indd 7
7
1/24/14 7:53 AM
X1-TX8 FRONT, BACK PANEL
Front panel
1
Power
4
ID Number
2
Digital In
Confirms digital audio in
5
3
Link
Confirms connection to
receiver X1-RX2 or X1-RX220
ID
Sets ID to match receiver
X1-RX2 or X1-RX220
5
4
2
1
Note:
Channels are the inputs 1-4
on the back of the X1-TX8
3
Back panel
1
Power Plug Inlet
2
Power Supply
5VDC 1.2A
3
Channels
1 thru 4
4
Audio In
Audio inputs:
1–3 Line level
4 Line in or optical
5
Antenna
1
3
5
4
5
2
8
X1_Manual.indd 8
Russound X1 Products Installation Manual
1/24/14 7:53 AM
X1-RX2 FRONT, BACK PANEL
Front panel
1
Power
4
2
Link
Confirms connection to
transmitter X1-TX8
ID
Sets ID to match
transmitter X1-TX8
5
Channel
Sets Channel (inputs on
the back of X1-TX8
(see page 8)
3
1
3
2
4
ID Number
Displays specific band
used/desired
(see page 8)
5
Channel#
Displays inputs on
back of X1-TX8 (see page 8)
Back panel
4
1
3
1
Power Plug Inlet
3
Audio Out
Audio output RCA and
optical connectors
2
Power Supply
5VDC 1.2A
4
Antenna
4
2
Russound X1 Products Installation Manual
X1_Manual.indd 9
9
1/24/14 7:53 AM
X1-RX220 FRONT, BACK PANEL
Front panel
1
Power
4
2
Link
Confirms connection to
transmitter X1-TX8
ID
Sets ID to match
transmitter X1-TX8
5
Channel
Sets Channel (inputs on
the back of X1-TX8
(see page 8)
3
1
3
4
2
ID Number
Displays specific band
used/desired (see page 8)
5
Channel#
Displays input # on back of X1-TX8
(see page 8)
Back panel
5
1
10
X1_Manual.indd 10
2
3
4
5
1
Power Plug Inlet
2
Power Supply
27VDC 2.4A
3
Speaker Out
4 ohm, screw down
connector
4
Gain
Independently adjust the
sound level for each channel
when L or R gain is adjusted.
Displayed on front panel.
5
Antenna
Russound X1 Products Installation Manual
1/24/14 7:53 AM
X1 CONNECTION DIAGRAM
Russound X1 Products Installation Manual
X1_Manual.indd 11
11
1/24/14 7:53 AM
INSTALLATION OVERVIEW
The X1 products can be placed on any flat surface or
securely mounted in place with the included bracket and
screws.
To mount, simply fasten the bracket to a desired location
with the screws and snap the X1 into place with the front of
the unit against the flap. Make sure the bracket ridge is in
line with groove on the sides of the X1.
X1
(X1-RX220 shown)
Note: For wall mount installations make sure that the
bracket flap is oriented on the bottom to prevent the X1
from sliding downward.
Groove
Ridge
Bracket
Screw holes
Flap
12
X1_Manual.indd 12
Russound X1 Products Installation Manual
1/24/14 7:53 AM
FEATURES
TECHNICAL SPECIFICATIONS
X1-TX8
X1-TX8
• Simultaneously transmits 4 separate wireless audio
zones, sources
• Wireless Signal Range 30M (100ft)
via proprietary digital RF
• Transmits signals to RX220 or RX2
• Hides easily, small footprint
X1-RX2
Dimensions (without antennas): 3.625" W x 4.75"D x 1.5"H
(92 x 121 x 38mm)
Weight: 0.62 lbs. (0.28 kg)
X1-RX2
• Receives audio signals from TX8 transmitter
• Outputs line level or optical audio signals from TX8
• Wireless Signal Range 30m (100ft) via proprietary
digital RF
• Requires TX8 transmitter
• Hides easily, small footprint
X1-RX220
•
•
•
•
Digital Audio Inputs: RCA, Optical
Power Requirements: 5VDC 1.2A (must use supplied
power supply)
Digital Audio Outputs: RCA, Optical
Power Requirements: 5VDC 1.2A (must use supplied
power supply)
Dimensions (without antennas): 3.625" W x 4.75"D x 1.1875"H
(92 x 121 x 30mm)
Weight: 0.64 lbs. (0.29 kg)
X1-RX220
Receives audio signals from TX8 transmitter
Built in Amplifier 2 x 20 WRMS into 4 ohm
Individual Gain Adjustments
Wireless Signal Range 30M (100ft) from TX8
via proprietary digital RF
• Requires TX8 transmitter
• Hides easily, small footprint
Digital Audio Outputs: 20W x 2, 4 ohms min
Power Requirements: 27VDC 2.4A (must use supplied
power supply)
Dimensions (without antennas): 5.125" W x 4.75"D x 1.1875"H
(131 x 121 x 30mm)
Weight: 0.86 lbs. (0.39 kg)
Russound X1 Products Installation Manual
X1_Manual.indd 13
13
1/24/14 7:53 AM
WARRANTY
Warranty
The Russound X1 products are fully guaranteed against
all defects in materials and workmanship for one (1) year
from the date of purchase. During this period, Russound
will replace any defective parts and correct any defect in
workmanship without charge for either parts or labor.
For this warranty to apply, the unit must be installed
and used according to its written instructions. If service
is necessary, it must be performed by Russound. The unit
must be returned to Russound at the owner’s expense
and with prior written permission. Accidental damage
and shipping damage are not considered defects, nor
is damage resulting from abuse or from servicing by an
agency or person not specifically authorized in writing by
Russound.
This Warranty does not cover:
• Damage caused by abuse, accident, misuse, negligence,
or improper installation or operation
Russound sells products only through authorized Dealers
and Distributors to ensure that customers obtain proper
support and service. Any Russound product purchased
from an unauthorized dealer or other source, including
retailers, mail order sellers and online sellers will not be
honored or serviced under existing Russound warranty
policy. Any sale of products by an unauthorized source or
other manner not authorized by Russound shall void the
warranty on the applicable product.
Damage to or destruction of components due to
application of excessive power voids the warranty on those
parts. In these cases, repairs will be made on the basis of
the retail value of the parts and labor. To return for repairs,
the unit must be shipped to Russound at the owner’s
expense, along with a note explaining the nature of service
required. Be sure to pack the unit in a corrugated container
with at least three (3) inches of resilient material to protect
the unit from damage in transit.
• Power surges and lightning strikes
• Normal wear and maintenance
• Products that have been altered or modified
• Any product whose identifying number, decal, serial
number, etc. has been altered, defaced or removed.
14
X1_Manual.indd 14
Before returning a unit for repair, call Russound at (603)
659-5170 for a Return Authorization number. Write this
number on the shipping label and ship to:
Russound X1 Products Installation Manual
1/24/14 7:53 AM
WARRANTY
Russound
ATTN: Service
5 Forbes Road
Newmarket, NH 03857
Due to continual efforts to improve product quality
as new technology and techniques become available,
Russound/FMP, Inc. reserves the right to revise system
specifications without notice.
Russound X1 Products Installation Manual
X1_Manual.indd 15
15
1/24/14 7:53 AM
X1 Products
X1-TX8 Multi-channel Wireless Transmitter
X1-RX2 Wireless Receiver
X1-RX220 Wireless Receiver Amplifier
Installation Manual
©2014 Russound. All rights reserved.
All trademarks are the property of their respective owners.
Specifications are subject to change without notice.
Russound is not responsible for typographical errors or omissions.
Russound, Inc.
5 Forbes Road, Newmarket, NH 03857
tel 603.659.5170 • fax 603.659.5388
email: [email protected] www.russound.com
28-1383
X1_Manual.indd 16
01.24.14, Rev.5
1/24/14 7:53 AM