1
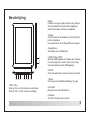
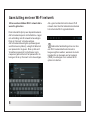
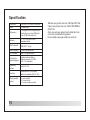
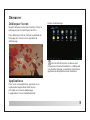
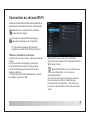
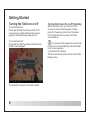
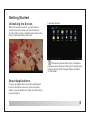
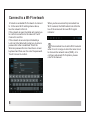
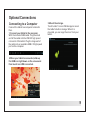
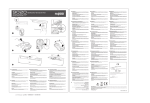
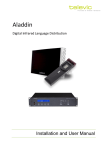
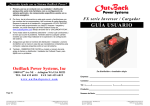
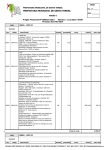
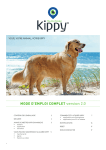
MID-8106LCM 70g书纸,135x102mm,钉装,荷兰语
GEBRUIKSAANWIJZING
TAB8001
Inhoud
Inhoud..................................................1
Eigenschappen........................................2
Beschrijving...............................................3
Aan de slag...............................................4-5
Betreffende applicaties..............................................6
Aansluiting aan een Wi-Fi netwerk..........................7-8
Andere aansluitingen.......................9-10
S p e c i f i c a t i e s . . . . . . . . . . . . . . . . . . . . . . . . . . . . . . . . . . . . . . . . . . . 11
1
Eigenschappen
Doorloop het Web.
Bezoek uw voorkeurwebsites.
Bekijk YouTube™ video’s
Doorloop ’s werelds meest populaire
videogemeenschap.
Lees uw voorkeurboeken.
Download duizenden boeken met de
meegeleverde E-book lezer*
Ontdek duizenden apps voor Android™.
Spelletjes, applicaties en veel meer met
Marketplace (moet door gebruiker
geïnstalleerd worden).
Sluit draadloos aan op het internet.
Hoge snelheid Wi-Fi 802.11 b/g/n om op het net
te werken.
2
Geniet eender waar van uw mediabibliotheek.
Krachtige draagbare weergave van populaire
muziek, video en foto’s.
microSD geheugenkaartlezer.
Verhoog uw geheugencapaciteit (ondersteunt
tot 32 GB).
Ingebouwde camera’.
Gemakkelijke naar voren wijzende camera
Automatische richtingbepaling.
Lees zoals u wil; het scherm past zich
automatisch aan.
Het lezen van boeken in ePub formaat vereist
de meegeleverde E-book lezer applicatie.
Beschrijving
2.Back
Drukken om terug te gaan naar het vorig scherm.
Als het toetsenbord op het scherm afgebeeld
wordt, hier drukken om het te verwijderen.
3.Power
Om het toestel in te schakelen of om het scherm
in/uit te schakelen.
Hou ingedrukt om in het PowerOff menu te gaan.
4.Headphone
Aansluiting voor hoofdtelefoon.
1
2
5.USB OTG en HOST
Sluit een USB apparaat of computer aan om data
over te brengen (bv. muziek, video, foto’s, files).
Voor aansluiting met een USB apparaat.
6.DC IN
Om het toestel aan te sluiten en de accu te laden.
3 4 5
6 7 8
9
1.VOL-/VOL+
Druk op VOL- om het volume te verminderen.
Druk op VOL+ om het volume te verhogen.
7.Reset
Om terug naar de fabrieksinstellingen te gaan.
8.microSD
Breng hier een microSD kaart in.
9.Camera
Om foto’s of video’s op te nemen.
3
Aan de slag
Het tablet in- en uitschakelen
Om het tablet in te schakelen:
Hou de Power toets ingedrukt totdat het LCD
scherm oplicht.
Wacht totdat het hoofdscherm (home)
verschijnt; het tablet is nu klaar voor gebruik.
Om het tablet uit te schakelen:
1.Hou de Power toets ingedrukt totdat het
Device Options menu verschijnt.
2.Druk op het scherm op OK om het tablet uit
te schakelen.
4
Het scherm in- en uitschakelen
(stand-by)
Als het tablet ingeschakeld is kan u het
scherm uitschakelen om de accu te besparen.
Druk kort op de Power toets om het scherm uit
te schakelen. Druk opnieuw op de Power toets
om het scherm terug in te schakelen.
Om het verbruik van de accu te beperken
kan het scherm automatisch uitgeschakeld
worden als het tablet niet gebruikt wordt
(tussen 1 minuut en 30 minuten).
De instelling van deze optie kan gevonden
worden in het schermmenu.
Aan de slag
Het scherm deblokkeren
Lanceerscherm:
Als het scherm uitgeschakeld is moet u het
deblokkeren om het terug in te schakelen.
Om het scherm te deblokkeren, sleep het lock
symbool over het scherm naar de unlock
positie.
Het hierboven getoonde scherm dient
alleen als illustratie. Wij behouden het recht
om de lijst van geïnstalleerde applicaties te
wijzigen of te verbeteren.
Betreffende applicaties
Om een applicatie te openen, druk op het
symbool van de applicatie in het home scherm
of op het lanceerscherm.
5
Betreffende applicaties
Geïnstalleerde applicaties
Applicaties installeren
Voor uw gemak werden reeds aan aantal
applicaties in het tablet geïnstalleerd.
U kan applicaties downloaden en installeren
die u kan vinden op de Marketplace, de web
browser of andere bronnen.
Deze applicaties zijn:
Het web doorlopen
Eenvoudige berekeningen maken
Foto’s of video’s maken met de voorste
camera
e-mail controleren
Muziek weergeven
Instelmenu om de opties van het tablet in
te stellen
6
Het tablet moet ingesteld zijn om de installatie
van applicaties afkomstig van een niet-Market
bron te kunnen uitvoeren. De optie
‘onbekende bron’ kan in het menu voor
applicatie-instellingen geregeld worden.
Aansluiting met een Wi-Fi netwerk
De informatiestrook toont symbolen aangaande
de Wi-Fi status van het tablet.
Aanduiding dat een open Wi-Fi netwerk
binnen bereik is.
Aangesloten op een Wi-Fi netwerk (de
golven geen een indicatie over de
signaalsterkte)
Er zijn geen Wi-Fi netwerken binnen bereik
of de Wi-Fi radio is uitegeschakeld.
1.Schakel de Wi-Fi radio in als dat nog niet
het geval is.
Om Wi-Fi in te schakelen:
a. Ga naar het home scherm: druk op het Home
symbool.
b. Open het instelmenu: druk op het symbool
rechts op het home scherm om in het
lanceermenu te komen en druk dan op het
instelsymbool.
c. Open het Wireless & networks menu: sleep
het symbool naar ON status.
Als Wi-Fi ingeschakeld is zoekt de tablet naar
beschikbare Wi-Fi netwerken en geeft die in
een lijst weer.
Als er een netwerk gevonden wordt dat u
vroeger reeds gebruikt heeft, zal het tablet dit
netwerk selecteren.
Als u uw netwerk niet in de lijst terugvindt, kan
u het tablet forceren om opnieuw te zoeken.
Om het zoeken te starten, druk op de Menu
toets en vervolgens op het symbool Scan.
7
Aansluiting met een Wi-Fi netwerk
2.Kies een beschikbaar Wi-Fi netwerk dat u
wenst te gebruiken
Druk in dezelfde lijst op een bepaald netwerk.
Als het netwerk open is zal het tablet u vragen
om verbinding met dit netwerk te bevestigen.
Druk op ‘Connect’ om te bevestigen.
Als het netwerk beveiligd is (wat weergeven
wordt met een symbool), vraagt het tablet om
een paswoord in te geven. Druk op het veld
‘draadloos paswoord’ om het klavier op te
roepen en gebruik het om het paswoord in te
brengen. Druk op ‘Connect’ om te bevestigen.
8
Als u goed verbonden bent met een Wi-Fi
netwerk toont de informatiestrook onderaan
het scherm de Wi-Fi signaalindicator.
Gebruik de handleiding om te zien hoe
een Wi-Fi netwerk dat buiten bereik is
toegevoegd kan worden; wanneer de router
ingesteld is om de naam van het netwerk
(SSID) te verbergen of om verdere Wi-Fi
opties in te stellen.
Andere aansluitingen
Aansluiting met een computer
U kan het tablet met een computer verbinden
om files uit te wisselen.
1.Het tablet aansluiten op de computer
Gebruik de meegeleverde USB kabel. Stop de
kleine stekker van de kabel in de USB 2.0 hoge
snelheid aansluiting van het tablet. Stop de
grote stekker van de kabel in de USB 2.0 hoge
snelheid aansluiting van de computer.Stop de
grote stekker van de kabel in de USB 2.0 hoge
snelheid aansluiting van de computer.
3.Oproepen van het geheugen
Druk op ‘Turn on USB storage’ om het
ingebouwde geheugen van de tablet op te
roepen. U kan nu files naar en van de tablet
kopiëren.
2.Als het tablet aangesloten is, sleep het
USB symbool naar beneden op het scherm
en druk dan op aangesloten USB.
9
Specificaties
Processor
RAM
BOXCHIP A10 1GHz (Cortex A8)
512 MB DDR3
Geheugen
4 GB ingebouwd flashgeheugen;
Aansluiting voor microSD kaart
(max 32 GB ondersteund)
Scherm
8.0”TFT LCD (800 x 600)
Aanraakscherm
Wi-Fi netwerk
IEEE 802.11 b/g/n
Audio uitgang
PC interface
3.5 mm hoofdtelefoon
USB 2.0 hoge snelheid
Bijkomende
eigenschappen
Ingebouwde microfoon
Camera vooraan (0.3 MP)
1 x 0.7 W luidpreker
Operating
system
Android™ 4.0
Voeding
Oplaadbare Li-Poly batterij
Netstroomadapter (DC 5V, 2A)
Weergavetijd
(uren)
± 5 uren muziek
± 2.5 uren video
± 3.5 uren zoeken op web
10
Muziek was getest met een 128 kbps MP3 file;
Video was getest met een 1920x1080 MPEG4/AVC file
Zoek op web was getest met helderheid van
scherm om standaard ingesteld.
De werkelijke weergavetijd kan variëren.
MID-8106LCM 70g书纸,135x102mm,钉装,法语
MANUEL D’UTILISATION
TAB8001
SOMMAIRE
Sommaire..................................................1
Caractéristiques........................................ 2
Description............................................... 3
Démarrer............................................... 4-5
Applications.............................................. 6
Connexion réseau Wi-Fi.......................... 7-8
Connexions optionnelles....................... 9-10
Spécifications...........................................11
1
Caractéristiques
Parcourir le web
Visiter les sites web préférés
Vérifier votre e-mail
Tenir contact avec amis et famille
Regarder votre librairie à n’importe quel endroit.
La puissance permet de reproduire la musique,
des vidéos et des photos.
Lecteur carte mémoire microSD
Augmentez votre capacité de mémoire (jusqu’à
32 GB)
Regarder les vidéos YouTube
Parcourir la communauté vidéo la plus
populaire au monde.
Caméra incorporé.
Caméra frontal
Lire les livres préférés
Télécharger des milliers de livres avec le
lecteur E-reader incorporé*
Détection automatique de la direction.
Utiliser comme vous voulez ; l’écran s’adapte
automatiquement
Découvrir des milliers d’applications pour
Adnroid™
Des jeux, des applications et beaucoup
d’autres avec marketplace (à installer par
l’utilisateur)
Lire les livres dans le format ePub nécésite
l’application lecteur E-book (incorporé).
Connecter au réseau sans fil internet à haute
vitesse Wi-Fi 802.11 b/g/n.
2
Description
2.Back
Poussez pour revenir à l’écran précédent.
Quand le clavier est affiché sur l’écran,
poussez pour le faire disparaître.
3.Power
Poussez pour mettre l’appareil en fonction ou
pour mettre en/hors fonction l’écran.
Enfoncez pour entrer dans le menu PowerOff.
4.Headphone
Connexion pour casque d’écoute
1
2
5.USB OTG et HOST
Connexion pour appareil USB ou ordinateur
pour transférer data (p.e. musique, vidéos,
photos, documents).
6.DC IN
Connexion courant secteur en chargeur.
3 4 5
6 7 8
9
1.VOL-/VOL+
Poussez VOL- pour diminuer le volume.
Poussez VOL+ pour augmenter le volume.
7.Reset
Remettre les réglages d’usine.
8.microSD
Connexion pour cartes mémoires microSD
9.Caméra
Pour prendre des photos ou vidéos.
3
Démarrer
Mettre la tablette en et hors
fonction
Pour mettre la tablette en fonction :
Enfoncez le bouton Power jusqu’au moment
où l’écran LCD s’allume. Attendez que l’écran
principal apparaît. La tablette est prêt pour
être utilisé.
Pour mettre la tablette hors fonction :
1.Enfoncez le bouton Power jusqu’au moment
où le menu Options apparaît.
2.Poussez OK sur l’écran pour mettre la
tablette hors fonction.
4
Mettre l’écran en et hors fonction
(standby)
Quand l’appareil est en fonction vous pouvez
mettre hors fonction l’écran pour diminuer la
consommation de l’accu. Poussez le bouton
Power pour mettre l’écran hors fonction.
Repoussez le bouton Power pour remettre
l’écran en fonction.
Pour conserver la puissance de l’accu,
l’appareil peut être programmé pour éteindre
automatiquement l’écran quand il n’y a pas
d’utilisation (entre 1 et 30 minutes). Vous
pouvez trouver cette fonction dans le menu
Display (écran).
Démarrer
Débloquer l’écran
Ecran de démarrage :
Quand l’écran s’est mis hors fonction, il faut le
débloquer pour le remettre en fonction.
Pour débloquer l’écran, traînez le symbole de
bloquage sur l’écran vers le symbole de
débloquage.
L’écran affiché comme ci-dessus sert
uniquement comme illustration. Le fabriquant
a le droit de changer ou améliorer la liste des
applications disponibles dans la tablette.
Applications
Pour ouvrir une application, poussez sur le
symbole de l’application dans l’écran
principal ou l’écran de démarrage.
L’application s’ouvre immédiatement.
5
Applications
Applications installées
Applications installées
Un nombre d’applications ont déjà été
installées sur votre tablette.
Cettes applications comportent :
Installer les applications
Vous pouvez télécharger et installer d’autres
applications à partir du marketplace, web
browser ou autre source.
Parcourir le web
Faire des calculs mathématiques
simples
Prendre des photos ou vidéo avec le
caméra frontal
Vérifier votre mail
Reproduire la musique
Entrer dans le menu réglages pour
sélectionner les options de la tablette.
6
La tablette doit être préréglé pour pouvoir
installer des applications qui ne viennent pas
d’une source marketplace. Cette fonction
peut être réglé dans le menu réglages
applications.
Connexion au réseau Wi-Fi
La bande d’information affiche des symboles qui
représentent la situation Wi-Fi de votre tablette.
Indication qu’un réseau Wi-Fi ouvert se
trouve dans la rangée.
Connecté au réseau Wi-Fi (les vagues
indiquent la puissance de connexion).
Il n’y a pas des réseaux Wi-Fi dans la
rangée ou le radio Wi-Fi est hors fonction.
1.Mettre le radio Wi-Fi en fonction :
a. Allez vers l’écran pricnipal : poussez le bouton
‘Home’.
b. Ouvrez le menu de réglage : poussez le
bouton droit dans l’écran pour entrer dans
l’écran de démarrage et poussez le bouton
réglage (settings).
c. Ouvrez le menu Wireless&networks : mettez
le symbole en position ON.
Quand Wi-Fi est en fonction, la tablette
recherche les réseaux Wi-Fi disponibles et les
affiche sur l’écran.
Quand la tablette trouve un réseau que
vous aviez déjà utlisé, il s’y connecte
automatiquement.
Si vous ne trouvez pas votre réseau dans la
liste vous pouvez forcer la tablette pour
recommencer la recherche. Pour faire ceci,
poussez le bouton Menu et ensuite le bouton
Scan.
7
Connexion au réseau Wi-Fi
2.Sélectionner un réseau Wi-Fi disponible
Dans le même menu comme ci-dessu, poussez
un réseau dans la liste.
Quand vous êtes connecté au réseau la
bande d’information dans le bas de l’écran
affiche le symbole du signal Wi-Fi.
Quand le réseau est ouvert, la tablette vous
demande de confirmer la connexion au réseau.
Poussez Connect pour confirmer.
Quand le réseau est protégé (indiqué par un
symbole de blocquage) la tablette vous
demande d’introduire un mot de passe. Touchez
la fenêtre pour entrer le mote de passe et le
clavier apparaît. Utilisez-le pour entrer le mot
de passe et poussez Connect pour confirmer.
8
Pour apprendre comment ajouter un
réseau Wi-Fi hors portée ou quand le router
n’affiche pas le nom du réseau (SSID), ou
pour effectuer les réglages d’options Wi-Fi
avancés, consultez le manuel.
Connexions optionnelles
Connexion au ordinateur
Connectez la tablette au ordinateur pour
échanger des documents.
1.Connexion de la tablette au ordinateur
Insérez la petite prise du câble USB à l’entrée
USB 2.0 haute vitesse de la tablette et la
grande prise à l’entrée USB 2.0 haute vitesse
de l’ordinateur.
3.Affichage de la mémoire
Touchez le bouton ‘Turn on USN Storage’ pour
afficher la mémoire de la tablette. Vous
pouvez copier des documents vers ou à partir
de votre tablette.
2.Quand la tablette est connéctée, trainez
le symbole USB sur la bas de l’écran et
touchez le symbole USB connecté.
9
Spécifications
Processeur
RAM
Mémoire
BOXCHIP A10 1 GHz (Cortex A8)
512MB DDR3
4 GB (mémoire flash incorporé);
Prise pour carte microSD
(max. 32 GB)
Ecran
8.0’’ TFT LCD (800 x 600)
Ecran capactive
Réseau Wi-Fi
IEEE 802.11 b/g/n
Sortie audio
Interface PC
3.5mm casque d’écoute
USB 2.0 haute vitesse
Microphone incorporé
Autres
caractéristiques Caméra frontal (0.3MP)
1 x 0.7 W haut-parleur
Système
d’opération
Alimentation
Android ™ 4.0
Accu rechargeable Li-poly
Adaptateur (DC 5V, 2A)
± 5 heures musique
Temps de lecture ± 2.5 heures vidéo
± 3.5 web
10
La musique a été testée avec un document
MP3 de 128 kps.
La vidéo a été testtée avec un document
MPEG-4/AVC
Parcourir le web a été testé avec la luminosité
réglé standard.
Les temps de lecture peuvent varier.
MID-8106LCM 70g书纸,135x102mm,钉装,英语
USER'S MANUAL
TAB 8001
Table of Contents
Table of Contents......................................P1
Features..................................................P2
Unit at a Glance .......................................P3
Getting Started....................................P4-P5
About Applications....................................P6
Connect to a Wi-Fi network...................P7-P8
Optional Connections.........................P9-P10
Specifications.........................................P11
1
Features
Browse the Web.
Visit your favorite websites
Check your e-mail
Keep in touch with friends and family
Enjoy your media library anywhere
Portable powerhouse plays popular music,
video,and photo formats
microSD memory card reader
Increase your storage capacity (up to 32 GB
supported)
Watch YouTube™ videos
Browse the world’s most popular
video-sharing community
Built-in camera
Convenient front-facing camera
Read your favorite books
Download thousands of books with the
included E-book reader *
Automatic orientation detection
Read any way you want; the display adjusts
automatically!
Discover thousands of apps for Android™
Games, applications, and more with
marketplace(need for customer installed)
Reading books in the ePub format requires the
included E-book reader application.
Connect to the Internet wirelessly
High-speed Wi-Fi 802.11 b/g/n networking
2
Unit at a Glance
2. Back
Press to return to the previous screen. If the
keyboard is on the screen, Press to close the
keyboard.
3. Power
Press to turn the unit on, or to turn the screen
on or off.
Press and hold to access the Power Off menu.
4. Headphone
Audio output connection for headphones.
1
2
5. USB OTG AND HOST
Connect to a USB device or a computer to
transfer data (e.g. music, videos,photos, files).
Connect to a USB device
6. DC IN
Charge and power the tablet with adapter.
3 4 5
6 7 8
9
1. VOL-/VOL+
Press VOL- to decrease the volume level.
Press VOL+ to increase the volume level.
7. Reset
Reset the tablet.
8. microSD
Load external microSD memory cards here.
9. Camera
Use it to take pictures or capture videos.
3
Getting Started
Turning the Tablet on or off
To turn the tablet on:
Press and hold the Power key until the LCD
screen turns on. Wait until the Home screen
appears; the tablet is now ready for use.
To turn the tablet off:
Press and hold the Power key until the Device
Options menu appears.
2. Touch ok the screen to turn off the tablet.
4
Turning the Screen On or off (Standby)
When the tablet is on, you can turn off the
screen to conserve battery power. Simply
press the Power key once to turn the screen
off. Press the Power key again to turn the
screen back on.
To conserve battery power, the screen can
be set to turn off automatically when the tablet
is not in use (between
1 minute and 30 minutes).
This Screen timeout option can be found in the
Display menu.
Getting Started
Unlocking the Screen
Launcher screen:
When the screen turns off, you will have to
unlock the screen when you turn it back on.
To unlock the screen, drag the lock icon across
the screen towards the lock icon.
The screen shown above is for illustrative
purposes only. Reserves the right to modify and
improve the final list of applications available
on the tablet.
About Applications
To open an application, touch the application
icon on the home screen or in the Launcher
where you can tap theicon right up on the home
screen to get in.
5
About Applications
Preinstalled Applications
Installing Applications
Some applications have been installed on your
tablet for your convenience.
These applications include:
You can also download an install additional
applications from the device’s applications
marketplace, the web browser, or other sources.
Browse the web.
Perform simple mathematical operations.
Take pictures or videos with the
frontfacing camera.
Check your e-mail.
Play music.
Access the Settings menu to adjust the
tablet’s options.
6
The tablet must be set to allow installation of
applications from non-Market sources. The
Unknown sources option can be set in the
Application settings menu.
Connect to a Wi-Fi network
The Notification bar displays icons that indicate
your tablet’s Wi-Fi status.
Notification that an open Wi-Fi network is in
range.
Connected to a Wi-Fi network
(waves indicate connection strength).
[no icon] There are no Wi-Fi networks in range,
or the Wi-Fi radio is off.
1. Turn on the Wi-Fi radio if it is not already on.
To turn on Wi-Fi:
a.Go to the Home screen: Press the Home key.
b.Open the Settings menu: tap the icon right up
on the home screen to get into the launcher,
then touch Settings icon.
c.Open the Wireless & networks menu: Slide the
icon to ON status.
When Wi-Fi is on, the tablet will look for and
display a list of available Wi-Fi networks.
If a network that you have connected to
previously is found, the tablet will connect to it.
If you don’t see your network in the list,you can
force the tablet to re-scan.To scan for networks,
tap the Menu key, and then touch Scan.
7
Connect to a Wi-Fi network
2. Select an available Wi-Fi network to connect
to: In the same Wi-Fi settings menu above,
touch a network in the list.
If the network is open,the tablet will prompt you
to confirm connection to the network. Touch
Connect to confirm.
If the network is secured (as indicated by a
Lock icon),the tablet will prompt you to enter a
password or other credentials.Touch the
Wireless password box to show the on-screen
keyboard and then use it to enter the password.
Touch Connect to confirm.
8
When you have successfully connected to a
Wi-Fi network, the Notifications bar at the the
low of the screen will show a Wi-Fi signal
indicator.
To learn about how to add a Wi-Fi network
when it is not in range or when the router is set
to obscure the network name (SSID); or to
configure advanced Wi-Fi options, please
refer to the manual.
Optional Connections
Connecting to a Computer
Connect the tablet to a computer to transfer
files.
1.Connect your tablet to the computer.
With the included USB cable: Plug the small
end of the cable into the USB 2.0 high speed
connector of the tablet. Plug the large end of
the cable into an available USB 2.0 high speed
port on the computer.
3.Mount the storage.
Touch button Turn on USB storage to mount
the tablet’s built-in storage. When it is
mounted, you can copy files to or from your
tablet.
2.When your tablet is connected,slide up
the USB icon right down on the screen and
then touch icon USB connected.
9
Specifications
Processor
RAM
Storage
BOXCHIP A13 1GHz(Cortex A8)
512MB DDR3
4GB (option) flash built-in;
microSD card slot (max.32GB
supported)
Display
8.0”TFT LCD(800x600),
Capactive touch screen
Wi-Fi
Networking
IEEE 802.11 b/g/n
Audio Output
PC Interface
3.5mm headphone
USB 2.0 high speed
Additional
Features
Built-in microphone
Front facing camera(0.3MP)
1x0.7W speaker
Operating
System
Android™ 4.0
Power
Rechargeable Li-poly battery
power Adapter(DC 5V,2A)
Playback Time
(hours)
5 hours music,
2.5 hours video,
3.5 hours web browsing
10
Music was tested with a 128 kbps MP3 file;
video was tested with a 1920x1080 MPEG-4
/AVC file; browsing was tested with the screen
brightness set to default. Actual playback
results may vary.