1
Operating Guide
Manuel d’utilisation
Gebruiksaanwijzing
Manual de funcionamiento
Guida all’uso
Gebrauchsanweisung
PBC17-13475
PBC45-13476
Deluxe Outdoor Bark Control
Système de contrôle des aboiements
de luxe pour l’extérieur
Deluxe blafbeheersing voor buitenshuis
Control de los ladridos deluxe
para exteriores
Dispositivo per il controllo
dell’abbaio all’aperto Deluxe
Bellkontrolle Deluxe für
Aussenbereiche
Please read this entire guide before beginning
Veuillez lire ce manuel en entier avant de commencer
Gelieve deze gids volledig door te lezen voordat u begint
Por favor, lea detenidamente este manual antes de empezar
Si prega di leggere attentamente la guida all’uso prima di utilizzare il collare
Bitte lesen Sie die ganze Gebrauchsanleitung vor der Inbetriebnahme aufmerksam durch
EN
IMPORTANT SAFETY INFORMATION
Explanation of Attention Words and Symbols Used in this Guide
FR
This is the safety alert symbol. It is used to alert you to potential personal injury
hazards. Obey all safety messages that follow this symbol to avoid possible
injury or death.
NL
WARNING indicates a hazardous situation which, if not avoided, could result
in death or serious injury.
CAUTION, used with the safety alert symbol, indicates a hazardous situation
which, if not avoided, could result in minor or moderate injury.
ES
CAUTION, used without the safety alert symbol, indicates a hazardous
situation which, if not avoided, could result in harm to your pet.
DE
IT
• Risk of explosion. Do not short circuit, mix old and new batteries, dispose
of in fire, or expose to water. When batteries are stored or disposed, they
must be protected from shorting. Dispose of spent batteries properly.
• Not for use with aggressive dogs. Do not use this Product if your dog is
aggressive, or if your dog is prone to aggressive behaviour. Aggressive
dogs can cause severe injury and even death to their owner and others.
If you are unsure whether this product is appropriate for your dog, please
consult your veterinarian or certified.
• Humans cannot hear the ultrasonic sound; however, precautions should be
taken when preparing the Deluxe Outdoor Bark Control for use.
• Keep at arms length away from the human ear to avoid hearing damage if
a dog begins barking while you are setting up, mounting, or hanging the
Outdoor Bark Control.
• Humans should avoid standing very close to the Deluxe Outdoor Bark
Control when it is turned on.
• This device is intended for use only with dogs. Never attempt to use it for
any purpose not described in this manual.
• For outdoor use only. Please visit our website or contact the Customer Care
Centre for information on PetSafe® Bark Control products appropriate for
indoor use.
• The Deluxe Outdoor Bark Control is not a toy. Keep it out of the reach of
children. Use it only for its bark control purpose.
2
www.petsafe.net
EN
Thank you for choosing the PetSafe® brand. You and your pet deserve a companionship that
includes memorable moments and a shared understanding together. Our products and training
tools promote a lifestyle of protection, teaching, and love - essentials that influence memories
for a lifetime. If you have any questions about our products or training your pet, please visit our
website at www.petsafe.net or contact our Customer Care Centre. For a listing of Customer Care
Centre telephone numbers in your area, visit our website at www.petsafe.net.
FR
NL
To get the most protection out of your warranty, please register your product within 30 days
at www.petsafe.net. By registering and keeping your receipt you will enjoy the product’s full
warranty and, should you ever need to call the Customer Care Centre, we will be able to help
you faster. Most importantly, your valuable information will never be given or sold to anyone.
Complete warranty information is available online at www.petsafe.net.
Table of Contents
IT
DE
www.petsafe.net
ES
Components . . . . . . . . . . . . . . . . . . . . . . . . . . . . . . . . . . . . . . . . . . . . . . . . . . . . . . . . . . . . . . . . 4
Features . . . . . . . . . . . . . . . . . . . . . . . . . . . . . . . . . . . . . . . . . . . . . . . . . . . . . . . . . . . . . . . . . . . . 4
Possible Uses for the Deluxe Outdoor Bark Control . . . . . . . . . . . . . . . . . . . . . . . . . . . . . . . . 4
How the System Works . . . . . . . . . . . . . . . . . . . . . . . . . . . . . . . . . . . . . . . . . . . . . . . . . . . . . . . 5
Key Definitions . . . . . . . . . . . . . . . . . . . . . . . . . . . . . . . . . . . . . . . . . . . . . . . . . . . . . . . . . . . . . . 5
Installation and Setup . . . . . . . . . . . . . . . . . . . . . . . . . . . . . . . . . . . . . . . . . . . . . . . . . . . . . . . . 6
To Insert and Remove the Battery . . . . . . . . . . . . . . . . . . . . . . . . . . . . . . . . . . . . . . . . . . . . . . . 6
Three Colour LED . . . . . . . . . . . . . . . . . . . . . . . . . . . . . . . . . . . . . . . . . . . . . . . . . . . . . . . . . . . . 7
Operating the Clock/Timers . . . . . . . . . . . . . . . . . . . . . . . . . . . . . . . . . . . . . . . . . . . . . . . . . . . 7
LCD Display . . . . . . . . . . . . . . . . . . . . . . . . . . . . . . . . . . . . . . . . . . . . . . . . . . . . . . . . . . . . . . . . 7
Set the Time Format . . . . . . . . . . . . . . . . . . . . . . . . . . . . . . . . . . . . . . . . . . . . . . . . . . . . . . . . . . 8
Set the Clock. . . . . . . . . . . . . . . . . . . . . . . . . . . . . . . . . . . . . . . . . . . . . . . . . . . . . . . . . . . . . . . . 8
Set Timer 1 OFF/ON . . . . . . . . . . . . . . . . . . . . . . . . . . . . . . . . . . . . . . . . . . . . . . . . . . . . . . . . 9
Set Timer 2 OFF/ON . . . . . . . . . . . . . . . . . . . . . . . . . . . . . . . . . . . . . . . . . . . . . . . . . . . . . . . . 9
Reset the Clock and Timers . . . . . . . . . . . . . . . . . . . . . . . . . . . . . . . . . . . . . . . . . . . . . . . . . . . 10
Test the Deluxe Outdoor Bark Control . . . . . . . . . . . . . . . . . . . . . . . . . . . . . . . . . . . . . . . . . . 10
What to Expect During Use of the Deluxe Outdoor Bark Control . . . . . . . . . . . . . . . . . . . . .11
Regular Maintenance . . . . . . . . . . . . . . . . . . . . . . . . . . . . . . . . . . . . . . . . . . . . . . . . . . . . . . . .11
Frequently Asked Questions. . . . . . . . . . . . . . . . . . . . . . . . . . . . . . . . . . . . . . . . . . . . . . 11
Troubleshooting. . . . . . . . . . . . . . . . . . . . . . . . . . . . . . . . . . . . . . . . . . . . . . . . . . . . . . . . . . 12
Compliance . . . . . . . . . . . . . . . . . . . . . . . . . . . . . . . . . . . . . . . . . . . . . . . . . . . . . . . . . . . . . . . 12
Battery Disposal . . . . . . . . . . . . . . . . . . . . . . . . . . . . . . . . . . . . . . . . . . . . . . . . . . . . . . . . . . . . 12
Terms of Use and Limitation of Liability . . . . . . . . . . . . . . . . . . . . . . . . . . . . . . . . . . . . . . . . . . 13
Warranty. . . . . . . . . . . . . . . . . . . . . . . . . . . . . . . . . . . . . . . . . . . . . . . . . . . . . . . . . . . . . . . . . . 14
3
FR
EN
Components
®
ES
NL
PetSafe
Deluxe Outdoor
Bark Control
IT
Operating Guide
Features
DE
• Built in timer for two OFF/ON presets
• Uses ultrasonic sound to disrupt nuisance barking
• Detects barking up to 15 m away
• Durable and weatherproof
• Three colour LED shows good or low battery, is an indicator for the Timer 1 and Timer 2 OFF,
and indicates ultrasonic stimulations
Possible Uses for the Deluxe Outdoor
Bark Control
• Stop your barking dog
• Stop your neighbours’ barking dogs
• Stop barking at specific times of day
• Train puppies not to bark
• Deter barking dogs on camping trips
4
www.petsafe.net
EN
How the System Works
FR
When the PetSafe® Deluxe Outdoor Bark Control is within range of a barking dog, an internal
microphone picks up the sound and the unit is automatically activated. The Deluxe Outdoor Bark
Control emits an ultrasonic sound. The ultrasonic sound can be heard by dogs but is silent to most
humans. Startled by the high-pitched sound that is safe and effective, the dog should stop barking
as it will associate its bark with this unpleasant noise. When the dog stops barking the ultrasonic
sound also stops. Programmable timers let you curb barking at certain times of day, for example,
after school as children pass by. Setting the timer(s) also helps conserve battery life. The Deluxe
Outdoor Bark Control includes a timer for two OFF/ON presets. It is effective up to 15 m.
Note: If the dog is deaf or hearing impaired, he may not react to the Deluxe Outdoor Bark Control.
NL
Key Definitions
Metal Hanger
Back
Hour
Three Colour
LED
LCD
Display
Back
View
Select
DE
Select Button: Used to rotate through and
select a menu item.
Hour Button: Used to set the time format,
clock, Timer 1, and Timer 2 hour(s).
Bottom
Minute Button: Used to set the time format, View
clock, Timer 1, and Timer 2 minute(s).
Three Colour LED: Shows good or low
battery, is an indicator for the Timer 1
and Timer 2 OFF, and indicates ultrasonic
stimulations.
LCD Display: Used to show the time format,
clock, timers, test, and reset functions.
Microphone
Sound Activated
Speaker
IT
Metal Hanger: For hanging the Deluxe
Outdoor Bark Control.
Microphone: Used to detect barking.
Sound Activated Speaker: Produces the
ultrasonic sound.
Front
View
ES
Front
Minute
Battery Door
Bottom
Battery Door: Used to enclose the Battery.
www.petsafe.net
5
EN
Installation and Setup
ES
NL
FR
The Deluxe Outdoor Bark Control should be placed facing the dog and within range of the
dog. The unit is designed with provisions for hanging or it can also stand alone and should be
positioned at a height of no more than 1.5 m. It can be placed in a tree, hanging from a pole,
on a fence post, etc. For best results, the area between the Deluxe Outdoor Bark Control and the
dog should be free of any large obstacles.
IT
To Insert and Remove the Battery
DE
Important: When inserting or removing battery, setting the clock, or programming the timer(s),
no dog(s) should be within range of the unit to ensure they don’t receive a stimulation during
set-up.
1. The Deluxe Outdoor Bark Control utilizes a replaceable 9-volt battery (not included). The
battery door is located on the bottom of the unit. Pull the battery door open.
2. Insert the 9-volt battery with the positive side oriented as shown.
3. To replace the battery door, position the top edge and then snap the bottom of battery door
into place.
4. After installing the battery, the Deluxe Outdoor Bark Control will be ON and will begin to
detect and correct barking. The LCD display will be blank with the exception of the battery
indicator until the clock and timers are set.
Note: Ensure a working 9-volt battery is installed in the battery compartment.
6
www.petsafe.net
EN
Battery Life
We recommend using the built in timers to conserve battery life. Depending on how often the dog
barks and whether the timers are used, average battery life can be up to 2 months.
FR
Do not attempt to cut into or pry open the battery. Be sure to discard the
spent battery properly.
NL
Three Colour LED
The three colour LED indicator shows good or low battery and indicates when a timer is in use
but OFF. Good battery equals 1 flash every 5 seconds with the green LED. Low battery equals 3
flashes every 5 seconds with the red LED. The orange LED indicates Timer 1 and/or Timer 2 is set
and the unit is OFF. When in test mode, the red LED will flash.
ES
Operating the Clock/Timers
IT
The Deluxe Outdoor Bark Control includes a timer with two OFF/ON settings per 24 hour
period. Using the timer extends battery life and also helps prevent dogs from becoming
desensitized to the ultrasonic sound.
Note: Before using the automatic timer the clock must be set. Once the battery is installed, the
Deluxe Outdoor Bark Control is always ON unless a timer is set or the battery is removed.
DE
LCD Display
Use the LCD display to set the time format, clock, and timers for the Deluxe Outdoor Bark Control.
Each press of the Select button cycles the LCD display through the available menu options, in the
below order. The LCD display also shows battery life.
Time Format: Set clock to 12 hour or 24 hour time format
Set Clock: Set clock hour and minute using the H and M buttons
Timer 1: Set Timer 1 OFF or ON
Timer 2: Set Timer 2 OFF or ON
Reset (rSt): Reset the clock and timer(s)
Test (tSt): Test the unit
Note: After 1 minute of no push-button activity, the LCD display will appear blank. Press any
button for the clock to display or to review menu options.
www.petsafe.net
7
EN
Set the Time Format
NL
FR
1. To begin TIME FORMAT mode, press and release the Select button
once.
2. Press and release the H button for 12 hour time format or the M button
for 24 hour time format.
3. Press the Select button to confirm the time format setting.
4. After confirming the TIME FORMAT, the Deluxe Outdoor Bark Control will automatically switch
to SET CLOCK mode in the LCD display menu (1) and you can begin to adjust the time.
Set the Clock
After you have set the time format, you are ready to set the clock time.
1
DE
IT
ES
1. Press and release the Select button until SET CLOCK appears in the
LCD display (1). Note: After setting the time format, the menu will
automatically default to SET CLOCK.
Once you have pressed either the H button or M button, the LCD
2
display will change (2) and you can begin to adjust the time.
2. Press and release the H button to the correct hour (if in 12 hour time
format, be sure to note the correct AM/PM setting).
3. Press and release the M button to the correct minutes.
Note: Pressing and holding the H or M button will advance the
3
digits faster.
4. Press and release the Select button to confirm the time.
5. After confirming the time, the Deluxe Outdoor Bark Control
will automatically switch to TIMER 1 OFF mode in the LCD
4
display menu (3).
6. If you choose not to set Timer 1 after setting the clock, press
and release the Select button until the LCD display returns to the
clock (4).
7. If you choose to use Timer 1 see the “Set Timer 1 OFF/ON”
section. When using Timer 1 (and Timer 2 if desired) the OFF/ON settings will repeat daily.
Note: The clock and timers must be reprogrammed when the battery is replaced.
8
www.petsafe.net
After you have set the clock you are ready to program timed events.
EN
Set Timer 1 OFF/ON
5
2. Press and release the H button once and “0:00” will flash (5).
Note: In 12 hour time format “12:00AM” will flash.
FR
1. Press the Select button until TIMER 1 OFF (3) appears in the LCD
display. Note: After setting the clock, the LCD display menu will
default to TIMER 1 OFF mode.
6
4. Press and release the M button to the correct minutes.
NL
3. Press and release the H button to the correct hour (if in 12 hour time
format, be sure to note the AM/PM setting).
7
5. Press and release the Select button to confirm the
TIMER 1 OFF time.
ES
6. After setting the TIMER 1 OFF time, the LCD display menu will
automatically default to TIMER 1 ON mode. This step must be
completed for the Timer 1 sequence to be set.
7. Press and release the H button once and “0:00” will flash (6). Note: In 12 hour time format
“12:00AM” will flash.
IT
8. Press and release the H button to the correct hour (if in 12 hour time format, be sure to note
the AM/PM setting).
9. Press and release the M button to the correct minutes.
10. Press and release the Select button to confirm the TIMER 1 ON time.
DE
11. After confirming the time, the Deluxe Outdoor Bark Control will automatically switch to TIMER
2 OFF mode in the LCD display menu (7). If you choose not to set Timer 2 after setting Timer
1, press and release the Select button until the LCD display returns to the clock (4).
12. If you choose to use Timer 2 see the “Set Timer 2 OFF/ON” section.
Note: If you have scheduled Timer 1, the Deluxe Outdoor Bark Control will continue to turn
OFF/ON daily until the time is reset or the battery is replaced.
Set Timer 2 OFF/ON
8
1. Press the Select button until TIMER 2 OFF (7) appears in the LCD
display. Note: After setting Timer 1, the LCD display menu will
default to TIMER 2 OFF mode.
2. Press and release the H button once and “0:00” (8) will flash. Note:
In 12 hour time format “12:00AM” will flash.
3. Press and release the H button to the correct hour (if in 12 hour time format, be sure to note
the AM/PM setting).
4. Press and release the M button to the correct minutes.
5. Press and release the Select button to confirm the TIMER 2 OFF time.
www.petsafe.net
9
NL
FR
EN
6. After setting the TIMER 2 OFF time, the LCD display menu will automatically default to TIMER
2 ON mode. This step must be completed for the Timer 2 sequence
9
to be set.
7. Press and release the H button once and “0:00” will flash (9). Note:
In 12 hour time format “12:00AM” will flash.
8. Press and release the H button to the correct hour (if in 12 hour time
format, be sure to note the AM/PM setting).
9. Press and release the M button to the correct minutes.
10. Press and release the Select button to confirm the TIMER 2 ON time.
11. After confirming the time, the Deluxe Outdoor Bark Control will automatically switch to RESET
mode in the LCD display menu. Continue to press and release the Select button until the LCD
display returns to the clock (3). If you have scheduled Timer 2 it will continue to turn OFF/
ON daily until the time is reset or the battery is replaced.
ES
Reset the Clock and Timers
DE
IT
1. Press and release the Select button until “rSt” flashes in the LCD display.
2. Press and hold the H button for 5 seconds. Continue to hold the H
button and then press and release the M button.
3. All times are now reset.
Note: To keep the clock time and reset only the Timer 1 and/or Timer
2 times, you do not have to reset all times. Press and release the Select button to scroll through
the LCD display menu options until you arrive at the timer you wish to reset. Press the H or
M buttons to change the time. Press the Select button to confirm the updated time. Press and
release the Select button until the LCD display menu returns to the clock.
Test the Deluxe Outdoor Bark Control
Important: When testing the Deluxe Outdoor Bark Control no dog(s) should be within range of
the unit to ensure they don’t receive a stimulation while testing.
1. Press and hold the H and M buttons simultaneously for 3 seconds.
2. The Deluxe Outdoor Bark Control will display “tSt” to indicate it is in
Test Mode.
3. Say the word “Bark” loudly or blow into the microphone located on
the top front of the unit.
4. The Deluxe Outdoor Bark Control will detect this sound and emit 3
short beeps and flash the red LED to show it is working.
5. You may repeat steps 3 – 4 if necessary to ensure the unit is working.
6. After 30 seconds the Test Mode will automatically time-out and the unit will return to normal
operation. You may also press and release the Select button to end the Test Mode.
10
www.petsafe.net
EN
Precautions should be taken when testing the Deluxe Outdoor Bark Control.
Avoid repeating the Test Mode for long periods of time. See Important
Safety Information on page 2 for more details.
FR
What to Expect During Use of the Deluxe
Outdoor Bark Control
NL
Place the Deluxe Outdoor Bark Control within range of the dog with the unit turned ON. Most
dogs will understand very quickly that the Deluxe Outdoor Bark Control is disrupting their urge to
bark and will relax and stop barking.
You should notice a reduction in the dog’s barking within the first two weeks that the Deluxe
Outdoor Bark Control is in use. Please note this product may not work on deaf or hearing
impaired dogs.
ES
Excessive barking can cause a real strain on your relationship with your pet, as well as cause
disruptions in your neighbourhood. Please visit our website to view other customized solutions to
the problem of too much barking.
IT
Regular Maintenance
DE
• Remove the battery before cleaning.
• Clean the Deluxe Outdoor Bark Control with a damp cloth.
• Do no use any kind of spray chemicals or solvent to clean.
• Do not immerse in water or any other liquid.
Note: The Deluxe Outdoor Bark Control is weatherproof. However, if water enters into the
microphone it may disrupt the unit’s operation. After the microphone is dry the unit will resume
working properly.
Frequently Asked Questions
What is the range for the
Deluxe Outdoor Bark
Control?
The Deluxe Outdoor Bark Control detects barking and sends
the ultrasonic sound up to 15 m.
Can I use the Deluxe
Outdoor Bark Control
indoors?
No, we do not recommend using the product indoors. The
PetSafe® Indoor Bark Control is an ultrasonic product that is
safe for indoor use. For product information, please visit our
website at www.petsafe.net or call our Customer Care Centre.
There are some situations where dogs become desensitized.
To avoid this, use the timers to turn the Deluxe Outdoor Bark
Control ON during periods of unwanted barking (i.e. leave
the unit off when you are away).
Can a dog become
desensitized to the
ultrasonic sound?
www.petsafe.net
11
EN
Troubleshooting
FR
The green LED light
stopped flashing and
there is no red light.
• Ensure that the battery is properly installed.
• Replace the battery.
• If the green LED light is still not flashing, contact the
Customer Care Centre.
NL
Compliance
ES
This equipment has been tested and found to comply with the EU Electromagnetic Compatibility
and Low Voltage Directive. Unauthorized changes or modifications to the equipment that are
not approved by Radio Systems Corporation could void the user’s authority to operate the
equipment, and void the warranty.
This product is in compliance with the provisions of the EMC and LV directives. The Declaration of
Conformity can be found at: www.petsafe.net/customercare/eu_docs.php
DE
IT
IC
This device complies with Industry Canada licence-exempt RSS standard(s). Operation is subject
to the following two conditions: (1) this device may not cause interference, and (2) this device
must accept any interference, including interference that may cause undesired operation of the
device.
ACMA
This device complies with the applicable EMC requirements specified by the ACMA (Australian
Communications and Media Authority).
Battery Disposal
Separate collection of spent batteries is required in many regions; check the regulations in your
area before discarding spent batteries. Please see page 6 for instructions on how to remove the
battery for separate disposal. This unit operates on one (1) 9V alkaline battery; replace only with
equivalent battery. At the end of the product life, please contact our Customer Care Centre to
receive instructions on proper disposal of the unit. Please do not dispose of the unit in household
or municipal waste. For a listing of Customer Care Centre telephone numbers in your area, visit
our website at www.petsafe.net.
12
www.petsafe.net
EN
Important Recycling Advice
FR
Please respect the Waste Electrical and Electronic Equipment regulations in your country. This
equipment must be recycled. If you no longer require this equipment, do not place it in the normal
municipal waste system. Please return it to where it was purchased in order that it can be placed
in our recycling system. If this is not possible, please contact the Customer Care Centre for further
information. For a listing of Customer Care Centre telephone numbers, visit our website
at www.petsafe.net.
NL
Terms of Use and Limitation of Liability
ES
1. Terms of Use
Use of this Product is subject to your acceptance without modification of the terms, conditions
and notices contained herein. Use of this Product implies acceptance of all such terms,
conditions and notices. If you do not wish to accept these terms, conditions and notices,
please return the Product, unused, in its original packaging and at your own cost and risk to the
relevant customer care centre together with proof of purchase for a full refund.
IT
2. Proper Use
This Product is designed for use with pets where training is desired. The specific temperament or
size/weight of your pet may not be suitable for this Product (please refer to “How the System
Works” in this Operating Guide). Radio Systems Corporation recommends that this Product is
not used if your pet is aggressive and accepts no liability for determining suitability in individual
cases. If you are unsure whether this Product is appropriate for your pet, please consult your
veterinarian or certified trainer prior to use. Proper use includes, without limitation, reviewing
the entire Operating Guide and any specific Caution statements.
DE
3. No Unlawful or Prohibited Use
This Product is designed for use with pets only. This pet training device is not intended to harm,
injure or provoke. Using this Product in a way that is not intended could result in violation of
Federal, State or local laws.
4. Limitation of Liability
In no event shall Radio Systems Corporation or any of its associated companies be liable for
(i) any indirect, punitive, incidental, special or consequential damage and/or (ii) any loss or
damages whatsoever arising out of or connected with the misuse of this Product. The Purchaser
assumes all risks and liability from the use of this Product to the fullest extent permissible by law.
For the avoidance of doubt, nothing in this clause 4 shall limit Radio Systems Corporation’s
liability for human death or personal injury or fraud or fraudulent misrepresentation.
5. Modification of Terms and Conditions
Radio Systems Corporation reserves the right to change the terms, conditions and notices
governing this Product from time to time. If such changes have been notified to you prior to
your use of this Product, they shall be binding on you as if incorporated herein.
www.petsafe.net
13
EN
Warranty
Three Year Non-Transferrable Limited Warranty
FR
This Product has the benefit of a limited manufacturer’s warranty. Complete details of the warranty
applicable to this Product and its terms can be found at www.petsafe.net and/or are available by
sending a stamped addressed envelope to Radio Systems PetSafe Europe Ltd, 2nd Floor, Elgee
Building, Market Square, Dundalk, Ireland.
Australia/New Zealand – In compliance with the Australian Consumer Law, Warranties
Against Defects, effective January 1, 2012, warranty details of this Product are as follows:
NL
Three Year Non-Transferrable Limited Warranty
IT
ES
What is covered: Radio Systems Australia Pty Ltd (hereinafter referred to as “Radio Systems”)
warrants to the original retail purchaser, and not any other purchaser or subsequent owner,
that its Product, when subject to normal and proper residential use, will be free from defects in
material or workmanship for a period of three (3) years from the purchase date. An “original
retail consumer purchaser” is a person or entity who originally purchases the Product, or a
gift recipient of a new Product that is unopened and in its original packaging. When serviced
by Radio Systems Customer Service, Radio Systems covers labor and parts for the first three
years of ownership; after the first three years, a service or upgrade charge will apply relative to
replacement of the product with new or refurbished items at Radio Systems' sole discretion.
DE
The limited warranty is non-transferrable and shall automatically terminate if the original retail
consumer purchaser resells the Radio Systems product or transfers the property on which the
Radio Systems product is installed. This Limited Warranty excludes accidental damage due to dog
chews; lightning damage; or neglect, alteration, and misuse. Consumers who purchase products
outside of Australia, New Zealand, or from an unauthorized dealer will need to return the Product
to the original place of purchase for any warranty issues.
Please note that Radio Systems does not provide refunds, replacements, or upgrades for change
of mind, or for any other reason outside of these Warranty terms.
Claims Procedure
Any claim made under this Warranty should be made directly to Radio Systems Australia Pty Ltd
Customer Care Centre at:
Radio Systems Australia Pty Ltd
PO Box 765, Mudgeeraba QLD 4213
Australia Residents: 1800 786 608
New Zealand Residents: 0800 543 054
Email: [email protected]
To file a claim, a proof of purchase must be provided. Without a proof of purchase, Radio
Systems will not repair or replace faulty components. Radio Systems requests the Consumer to
contact the Radio Systems Customer Care Centre to obtain a Warranty Return number, prior to
sending the Product. Failure to do so may delay in the repair or replacement of the Product.
If the Product is deemed to be faulty within 30 days from date of original purchase, Radio
Systems will organise for a replacement to be sent in advance of returning the faulty Product. A
Post Bag will be included with the replacement Product for the return of the faulty Product. The
14
www.petsafe.net
EN
Product must be returned within 7 days of receiving the replacement. If the Product is deemed to
be faulty after 30 days from the date of original purchase, the consumer will be required to return
the Product to Radio Systems at the consumer’s own expense. Radio Systems will test and replace
the faulty unit or its components and return to the consumer free of charge, provided the Product is
within its said warranty period. This warranty is in addition to other rights and remedies available
to you under the law. Radio Systems goods come with guarantees that cannot be excluded under
the Australia Consumer Law. You are entitled to a replacement or refund for a major failure and
for compensation for any other reasonably foreseeable loss or damage. You are also entitled to
have the goods repaired or replaced if the goods fail to be of acceptable quality and the failure
does not amount to a major failure.
FR
NL
Should you have any queries or require any further information, please contact our Customer
Care Centre on 1800 786 608 (Australia) or 0800 543 054 (New Zealand).
Protected by US Patent 6,724,919
ES
IT
DE
www.petsafe.net
15
EN
CONSIGNES DE SÉCURITÉ IMPORTANTES
Description des termes et symboles utilisés dans ce manuel
FR
Ce symbole est une alerte de sécurité. Il est utilisé pour vous alerter
des risques de blessures. Veuillez respecter tous les messages de
sécurité qui suivent ce symbole pour éviter tout risque de blessure ou
de décès.
NL
AVERTISSEMENT indique une situation dangereuse qui, si elle n’est
pas évitée, pourrait entraîner la mort ou des blessures graves.
ATTENTION, utilisé avec le symbole d’alerte de sécurité, indique
une situation dangereuse qui, si elle n’est pas évitée, pourrait
entraîner des blessures légères à modérées.
ES
ATTENTION, utilisé sans le symbole d’alerte de sécurité, indique
une situation dangereuse qui, si elle n’est pas évitée, pourrait blesser
votre animal.
DE
IT
• Risque d'explosion. Ne provoquez pas de court-circuit, ne
mélangez pas les piles neuves avec les piles usagées, ne les jetez
pas au feu et ne les exposez pas à l'eau. Lorsque les piles sont
entreposées ou mises au rebut, elles doivent être protégées contre
les courts-circuits. Jetez les piles usagées de façon appropriée.
• Ne peut être utilisé avec des chiens dangereux. N’utilisez pas ce
produit si votre chien est agressif ou si votre chien a tendance à
être agressif. Les chiens agressifs peuvent provoquer chez leurs
maîtres ou autrui des blessures graves ou la mort. Si vous doutez de
l’opportunité d’utiliser ce produit avec votre chien, veuillez consulter
votre vétérinaire ou un dresseur agréé.
• Les humains ne peuvent pas entendre les ultrasons, cependant des
précautions doivent être prises lors de la préparation du système de
contrôle des aboiements de luxe pour l’extérieur en vue de son utilisation.
• Tenez l’appareil à bout de bras pour l’éloigner de votre oreille afin
d’éviter des dommages auditifs si un chien commence à aboyer
pendant que vous configurez, montez ou installez le système de
contrôle des aboiements pour l’extérieur.
• Il est également préférable que les personnes évitent de se tenir
très près de celui-ci lorsqu’il est en marche.
• Cet appareil à vocation à être utilisé uniquement sur des chiens. Ne jamais
essayer de l'utiliser à des fins autres que celles décrites dans ce manuel.
• Réservé à un usage à l’extérieur uniquement. Veuillez consulter notre site
internet pour obtenir des informations sur les systèmes de contrôle des
aboiements pour l’intérieur de PetSafe® ou appeler notre service clientèle.
• Le système de contrôle des aboiements de luxe pour l'extérieur
n'est pas un jouet. Le tenir hors de portée des enfants. Ce système
est exclusivement destiné au contrôle des aboiements.
16
www.petsafe.net
EN
Merci d'avoir choisi la marque PetSafe®. Votre relation avec votre animal doit être faite de
moments mémorables et d'une complicité mutuelle. Nos produits et outils de dressage promeuvent
l'attention, l'éducation et l'amour, des éléments essentiels qui imprègnent les souvenirs de toute
une vie. Si vous avez des questions sur nos produits ou sur le dressage de votre chien, veuillez
contacter notre service clientèle ou visitez notre site web, www.petsafe.net. Pour connaître les
numéros de téléphone du service clientèle, visitez notre site Internet www.petsafe.net.
FR
NL
Pour bénéficier pleinement de votre garantie, veuillez enregistrer votre article dans les 30 jours
sur le site www.petsafe.net. Grâce à cet enregistrement et en conservant le reçu, votre produit
sera totalement couvert par notre garantie et si vous avez la moindre question, veuillez contacter
notre service clientèle, nous serons heureux de vous aider. Il est important de souligner que vos
informations personnelles ne seront jamais données ni vendues à qui que ce soit. Une description
complète de la garantie est disponible sur le site www.petsafe.net.
Table des matières
ES
DE
www.petsafe.net
IT
Contenu du kit . . . . . . . . . . . . . . . . . . . . . . . . . . . . . . . . . . . . . . . . . . . . . . . . . . . . . . . . . . . . . 18
Caractéristiques . . . . . . . . . . . . . . . . . . . . . . . . . . . . . . . . . . . . . . . . . . . . . . . . . . . . . . . . . . . . 18
Utilisations possibles du système de contrôle des aboiements de luxe pour l'extérieur . . . 18
Fonctionnement du système . . . . . . . . . . . . . . . . . . . . . . . . . . . . . . . . . . . . . . . . . . . . . . . . . . . 19
Définitions . . . . . . . . . . . . . . . . . . . . . . . . . . . . . . . . . . . . . . . . . . . . . . . . . . . . . . . . . . . . . . . . . 19
Installation et configuration . . . . . . . . . . . . . . . . . . . . . . . . . . . . . . . . . . . . . . . . . . . . . . . . . . . 20
Insertion et retrait de la pile . . . . . . . . . . . . . . . . . . . . . . . . . . . . . . . . . . . . . . . . . . . . . . . . . . . 20
Voyant lumineux tricolore . . . . . . . . . . . . . . . . . . . . . . . . . . . . . . . . . . . . . . . . . . . . . . . . . . . . 21
Fonctionnement de l'horloge et des temporisateurs . . . . . . . . . . . . . . . . . . . . . . . . . . . . . . . . 21
Écran LCD . . . . . . . . . . . . . . . . . . . . . . . . . . . . . . . . . . . . . . . . . . . . . . . . . . . . . . . . . . . . . . . . . 21
Réglage du format de l'heure . . . . . . . . . . . . . . . . . . . . . . . . . . . . . . . . . . . . . . . . . . . . . . . . . 22
Réglage de l'horloge . . . . . . . . . . . . . . . . . . . . . . . . . . . . . . . . . . . . . . . . . . . . . . . . . . . . . . . . 22
Réglage du temporisateur 1 ARRÊT/MARCHE . . . . . . . . . . . . . . . . . . . . . . . . . . . . . . . . . . 23
Réglage du temporisateur 2 ARRÊT/MARCHE . . . . . . . . . . . . . . . . . . . . . . . . . . . . . . . . . . 23
Réinitialisation de l'horloge et des temporisateurs . . . . . . . . . . . . . . . . . . . . . . . . . . . . . . . . . 24
Tester le système de contrôle des aboiements de luxe pour l'extérieur . . . . . . . . . . . . . . . . 24
À quoi faut-il s’attendre lors de l’utilisation du système de contrôle
des aboiements de luxe pour l'extérieur. . . . . . . . . . . . . . . . . . . . . . . . . . . . . . . . . . . . . . . . . 25
Entretien régulier . . . . . . . . . . . . . . . . . . . . . . . . . . . . . . . . . . . . . . . . . . . . . . . . . . . . . . . . . . . 25
Questions fréquemment posées . . . . . . . . . . . . . . . . . . . . . . . . . . . . . . . . . . . . . . . . . .25
Dépannage . . . . . . . . . . . . . . . . . . . . . . . . . . . . . . . . . . . . . . . . . . . . . . . . . . . . . . . . . . . . . .26
Conformité . . . . . . . . . . . . . . . . . . . . . . . . . . . . . . . . . . . . . . . . . . . . . . . . . . . . . . . . . . . . . . . . 26
Élimination des piles usagées . . . . . . . . . . . . . . . . . . . . . . . . . . . . . . . . . . . . . . . . . . . . . . . . . 26
Conditions d’utilisation et limitation de responsabilité . . . . . . . . . . . . . . . . . . . . . . . . . . . . . . 27
Garantie . . . . . . . . . . . . . . . . . . . . . . . . . . . . . . . . . . . . . . . . . . . . . . . . . . . . . . . . . . . . . . . . . . 28
17
FR
EN
Contenu du kit
ES
NL
Système de contrôle des
aboiements de luxe pour
®
l'extérieur de PetSafe
IT
Manuel d’utilisation
Caractéristiques
DE
• Temporisateur intégré pour deux préréglages de ARRÊT/MARCHE
• Utilise les ultrasons pour interrompre les aboiements indésirables
• Détection des aboiements sur une distance maximale de 15 mètres
• Durabilité et résistance aux intempéries
• Le voyant lumineux tricolore indique la charge de la pile, l'activité des Temporisateur 1 et
Temporisateur 2 et l'émission des stimulations ultrasonores
Utilisations possibles du système de
contrôle des aboiements de luxe pour
l'extérieur
• Faire cesser les aboiements de votre chien
• Faire cesser les aboiements du chien du voisin
• Faire cesser les aboiements à des moments précis de la journée
• Dresser les chiots pour qu’ils n’aboient pas
• Empêcher les chiens d’aboyer lorsque vous faites du camping
18
www.petsafe.net
EN
Fonctionnement du système
FR
Lorsqu’un chien qui aboie se trouve dans la zone couverte par le système de contrôle des aboiements de
luxe pour l’extérieur de PetSafe®, un microphone interne capte le son et l’unité est automatiquement activée.
Le système de contrôle des aboiements de luxe pour l’extérieur émet des ultrasons. Les chiens les entendent,
mais pas les humains. Surpris par ce son aigu, par ailleurs sûr et efficace, le chien devrait cesser d’aboyer,
car il fera l’association de l’aboiement avec ce bruit désagréable. Lorsque le chien arrête d’aboyer, les
ultrasons cessent également. Des temporisateurs vous permettent de faire cesser les aboiements à certaines
heures de la journée, lorsque les enfants passent devant chez vous après l'école, par exemple. Le réglage
du ou des temporisateurs permet également de préserver l'autonomie de la pile. Le système de contrôle
des aboiements de luxe pour l'extérieur dispose d'un temporisateur avec deux préréglages ARRÊT/
MARCHE. Il est efficace jusqu’à 15 mètres. Remarque : si le chien est sourd ou malentendant, il se peut
qu’il ne réagisse pas au système de contrôle des aboiements de luxe pour l’extérieur.
NL
ES
Définitions
Vue avant
Crochet métallique
IT
Crochet métallique : permet d'accrocher
le système de contrôle des aboiements de
luxe pour l'extérieur.
Microphone : détecte les aboiements.
Haut-parleur activé par le son : produit
les ultrasons.
Vue
avant
Microphone
Haut-parleur activé
par le son
Vue
arrière
DE
Vue arrière
Touche de Sélection : permet de naviguer
Sélectionner
Heure
dans le menu et de sélectionner un élément.
Voyant lumineux
Minute
tricolore
Touche Heure : permet de régler le
Vue du
Écran
format de l'heure, l'horloge, les heures du
bas
LCD
Temporisateur 1 et du Temporisateur 2.
Touche Minute : permet de régler le
format de l'heure, l'horloge, les minutes du
Couvercle du compartiment à pile
Temporisateur 1 et du Temporisateur 2.
Voyant lumineux tricolore : indique la
charge de la pile, l'activité des Temporisateur
1 et Temporisateur 2 et l'émission des stimulations ultrasonores.
Écran LCD : affiche les fonctions format de l'heure, temporisateurs, test et réinitialisation.
Bas
Couvercle du compartiment à pile : maintient la pile en place.
www.petsafe.net
19
EN
Installation et configuration
ES
NL
FR
Le système de contrôle des aboiements de luxe pour l’extérieur doit être placé face au chien et à portée
du chien. L’unité est conçue de façon à pouvoir l’accrocher ou la fixer à un support, et elle doit être placée
à une hauteur ne dépassant pas 1,5 mètre. Il peut être accroché à un arbre, suspendu à un poteau ou
à un montant de clôture, etc. Pour obtenir de meilleurs résultats, la zone entre le système de contrôle des
aboiements de luxe pour l’extérieur et le chien ne doit comporter aucun obstacle de grande taille.
IT
Insertion et retrait de la pile
20
www.petsafe.net
PILE
PILE
DE
Important : Lors de l'insertion ou du retrait de la pile, du réglage de l'horloge ou de la
programmation des temporisateurs, aucun chien ne doit se trouver à portée de l'unité afin de
s'assurer qu'il ne reçoit pas de stimulation pendant le réglage.
1. Le système de contrôle des aboiements de luxe pour l’extérieur fonctionne avec une pile de
9 volts (non fournie) qui peut être remplacée. Le couvercle du compartiment à pile se trouve à
l’arrière de l’unité. Ouvrez-le.
2. Insérez la pile de 9 volts, avec la borne positive orientée comme sur l’illustration.
3. Replacez le couvercle du compartiment à pile en positionnant d’abord la partie supérieure, et
en enclenchant la partie inférieure du couvercle.
4. Après l'installation de la pile, le système de contrôle des aboiements de luxe pour l'extérieur
commencera à détecter et corriger les aboiements. Tant que l'horloge et les temporisateurs ne
sont réglés, l'écran LCD reste vierge, à l'exception de l'indicateur de charge de la pile.
Remarque : Assurez-vous d'insérer une pile de 9 volts chargée dans le compartiment à pile.
EN
Autonomie de la pile
Nous vous recommandons d'utiliser les temporisateurs intégrés pour préserver l'autonomie de la
pile. L'autonomie moyenne d’une pile est de 2 mois, en fonction de l'utilisation des temporisateurs
et de la fréquence à laquelle le chien aboie.
FR
N'essayez pas de couper ni d'ouvrir la pile. Éliminez
convenablement la pile usagée.
NL
Voyant lumineux tricolore
ES
Le voyant lumineux tricolore indique la charge de la pile et si un temporisateur est activé avec l'unité à
l'arrêt. Le voyant lumineux vert qui clignote toutes les cinq secondes indique que la pile est chargée. Le
voyant lumineux rouge qui clignote trois fois toutes les cinq secondes indique que le niveau de la pile
est faible. Le voyant lumineux orange indique que le temporisateur 1 et/ou le temporisateur 2 sont
actifs et que l'unité est à l'arrêt. En mode Test, le voyant lumineux rouge clignote.
IT
Fonctionnement de l'horloge et des
temporisateurs
DE
Le système de contrôle des aboiements de luxe pour l'extérieur est équipé d'un temporisateur
avec deux réglages ARRÊT/MARCHE par période de 24 heures. L'utilisation du temporisateur
rallonge l'autonomie de la pile et permet d'éviter toute désensibilisation du chien aux ultrasons.
Remarque : l'horloge doit être réglée avant le temporisateur automatique. Une fois que la pile est
installée, le système de contrôle des aboiements de luxe pour l'extérieur est toujours en marche,
sauf si un temporisateur est réglé ou la pile est retirée.
Écran LCD
L'écran LCD permet de régler le format de l'heure, l'horloge et les temporisateurs du système de
contrôle des aboiements de luxe pour l'extérieur. Chaque pression sur la touche de Sélection fait
défiler les différentes options du menu à l'écran LCD, dans l'ordre indiqué ci-dessous. L'écran LCD
indique également la charge de la pile.
Format de l'heure : règle l'horloge sur un format 12 heures ou 24 heures
Réglage de l'horloge : règle les heures et les minutes à l'aide des touches H et M
Temporisateur 1 : Active ou désactive le temporisateur 1
Temporisateur 2 : Active ou désactive le temporisateur 2
Réinitialisation (rSt) : réinitialise l'horloge et les temporisateurs
Test (tSt) : Teste l'unité
Remarque : après 1 minute sans pression sur une touche, l'écran LCD devient vierge. Appuyez sur
l'une des touches pour afficher l'horloge ou revoir les options du menu.
www.petsafe.net
21
EN
Réglage du format de l'heure
NL
FR
1. Pour activer le mode TIME FORMAT (Format de l'heure), appuyez une
fois sur le bouton de Sélection.
2. Appuyez brièvement sur la touche H pour le format 12 heures ou sur la
touche M pour le format 24 heures.
3. Appuyez sur la touche de Sélection pour confirmer le réglage du format
de l'heure.
4. Une fois le TIME FORMAT (Format de l'heure) confirmé, le système de contrôle des aboiements
de luxe pour l'extérieur passe directement au mode SET CLOCK (Réglage de l'horloge) dans le
menu à l'écran LCD (1) et vous pouvez commencer à régler l'heure.
Réglage de l'horloge
ES
Une fois le format de l'heure défini, vous pouvez régler l'heure de
l'horloge.
1
DE
IT
1. Appuyez sur la touche de Sélection jusqu'à ce que SET
CLOCK (Réglage de l'horloge) apparaisse à l'écran LCD (1).
Remarque : après le réglage du format de l'heure, le menu passe
2
automatiquement sur SET CLOCK (Réglage de l'horloge). Une fois
que vous avez appuyé sur la touche H ou M, l'affichage à l'écran
LCD change (2) et vous pouvez commencer à régler l'heure.
2. Appuyez sur la touche H jusqu'à l'heure correcte (pour le format
d'heure 12 heures, faites attention au réglage AM/PM).
3
3. Appuyez sur la touche M jusqu'à la minute correcte. Remarque :
une pression continue sur la touche H ou M permet de faire avancer
les chiffres plus rapidement.
4. Appuyez sur la touche de Sélection pour confirmer le réglage
4
de l'heure.
5. Une fois l'heure confirmée, le système de contrôle des aboiements
de luxe pour l'extérieur passe directement au mode TIMER 1 OFF
(Temporisateur 1 Arrêt) dans le menu à l'écran LCD (3).
6. Si vous ne voulez pas régler le temporisateur 1 après avoir réglé
l'horloge, appuyez sur la touche de Sélection jusqu'à ce que l'écran LCD revienne
à l'horloge (4).
7. Si vous voulez utiliser le temporisateur 1, reportez-vous à la section « Réglage du
temporisateur 1 ARRÊT/MARCHE ». Lorsque vous utilisez le temporisateur 1 (et le
temporisateur 2, éventuellement), les réglages Arrêt/Marches seront répétés quotidiennement.
Remarque : la reprogrammation de l'horloge et des temporisateurs est nécessaire à chaque
remplacement de la pile.
22
www.petsafe.net
EN
Réglage du temporisateur 1 ARRÊT/MARCHE
FR
Une fois que vous avez réglé l'horloge, vous pouvez programmer des évènements. 5
1. Appuyez sur la touche de Sélection jusqu'à ce que TIMER 1 OFF
(Temporisateur 1 Arrêt) (3) apparaisse à l'écran LCD.
Remarque : après le réglage de l'horloge, le menu à l'écran LCD
passe automatiquement sur TIMER 1 OFF (Temporisateur 1 Arrêt).
6
2. Appuyez brièvement sur la touche H une fois et « 0:00 » clignote (5).
Remarque : dans le format 12 heures « 12:00AM » clignote.
3. Appuyez sur la touche H jusqu'à l'heure correcte (pour le format
d'heure 12 heures, faites attention au réglage AM/PM).
4. Appuyez sur la touche M jusqu'à la minute correcte.
7
5. Appuyez sur la touche de Sélection pour confirmer l'heure
TIMER 1 OFF (Temporisateur 1 ARRÊT).
6. Après avoir réglé l'heure du TIMER 1 OFF (Temporisateur 1
ARRÊT), le menu à l'écran LCD revient automatiquement sur le
mode TIMER 1 ON (Temporisateur 1 MARCHE). Cette étape doit
être réalisée pour que la séquence du temporisateur 1 soit réglée.
7. Appuyez brièvement sur la touche H une fois et « 0:00 » clignote (6). Remarque : dans le
format 12 heures « 12:00AM » clignote.
8. Appuyez sur la touche H jusqu'à l'heure correcte (pour le format d'heure 12 heures, faites
attention au réglage AM/PM).
9. Appuyez sur la touche M jusqu'à la minute correcte.
10. Appuyez sur la touche de Sélection pour confirmer l'heure TIMER 1 ON (Temporisateur 1 MARCHE).
11. Une fois l'heure confirmée, le système de contrôle des aboiements de luxe pour l'extérieur
passe directement au mode TIMER 2 OFF (Temporisateur 2 ARRÊT) dans le menu à l'écran
LCD (7). Si vous ne voulez pas régler le temporisateur 2 après avoir réglé le temporisateur 1,
appuyez sur la touche de Sélection jusqu'à ce que l'écran LCD revienne à l'horloge (4).
12. Si vous voulez utiliser le temporisateur 2, reportez-vous à la section « Réglage du
temporisateur 2 ARRÊT/MARCHE ». Remarque : si vous avez programmé le temporisateur 1,
le système de contrôle des aboiements de luxe pour l'extérieur continuera de s'activer/
désactiver quotidiennement, tant que l'heure n'est pas réinitialisée ou la pile remplacée.
NL
ES
IT
DE
Réglage du temporisateur 2 ARRÊT/MARCHE
1. Appuyez sur la touche de Sélection jusqu'à ce que TIMER 2 OFF
8
(Temporisateur 2 Arrêt) (7) apparaisse à l'écran LCD. Remarque :
après le réglage du temporisateur 1, le menu à l'écran LCD passe
automatiquement sur TIMER 2 OFF (Temporisateur 2 ARRÊT).
2. Appuyez brièvement sur la touche H une fois et « 0:00 » clignote (8).
Remarque : dans le format 12 heures « 12:00AM » clignote.
3. Appuyez sur la touche H jusqu'à l'heure correcte (pour le format d'heure 12 heures, faites
attention au réglage AM/PM).
4. Appuyez sur la touche M jusqu'à la minute correcte.
5. Appuyez sur la touche de Sélection pour confirmer l'heure TIMER 2 OFF (Temporisateur 2 ARRÊT).
www.petsafe.net
23
NL
FR
EN
6. Après avoir réglé l'heure du TIMER 2 OFF (Temporisateur 2
9
ARRÊT), le menu à l'écran LCD revient automatiquement sur le
mode TIMER 2 ON (Temporisateur 2 MARCHE). Cette étape doit
être réalisée pour que la séquence du temporisateur 2 soit réglée.
7. Appuyez brièvement sur la touche H une fois et « 0:00 » clignote
(9). Remarque : dans le format 12 heures « 12:00AM » clignote.
8. Appuyez sur la touche H jusqu'à l'heure correcte (pour le format d'heure 12 heures, faites
attention au réglage AM/PM).
9. Appuyez sur la touche M jusqu'à la minute correcte.
10. Appuyez sur la touche de Sélection pour confirmer l'heure TIMER 2 ON (Temporisateur 2 MARCHE).
11. Une fois l'heure confirmée, le système de contrôle des aboiements de luxe pour l'extérieur passe
directement au mode RESET (Réinitialisation) dans le menu à l'écran LCD. Continuez d'appuyer sur
la touche de Sélection jusqu'à ce que l'écran LCD revienne à l'horloge (3). Si vous avez programmé
le temporisateur 2, le système de contrôle des aboiements de luxe pour l'extérieur continuera de
s'activer/désactiver quotidiennement, tant que l'heure n'est pas réinitialisée ou la pile remplacée.
ES
Réinitialisation de l'horloge et des
temporisateurs
DE
IT
1. Appuyez sur la touche de Sélection jusqu'à ce que « rSt »
(Réinitialisation) clignote à l'écran LCD.
2. Appuyez sur la touche H et maintenez-la enfoncée pendant 5
secondes. Maintenez la touche H enfoncée et appuyez ensuite
brièvement sur la touche M.
3. Toutes les heures sont désormais réinitialisées.
Remarque : pour conserver l'heure et réinitialiser uniquement le temporisateur 1 et/ou le temporisateur 2,
vous ne devez pas tout réinitialiser. Appuyez sur la touche de Sélection pour naviguer dans les options du
menu à l'écran LCD jusqu'à ce que vous arriviez au temporisateur que vous voulez réinitialiser. Appuyez sur
les touches H ou M pour changer l'heure. Appuyez sur la touche de Sélection pour confirmer l'heure mise à
jour. Appuyez sur la touche de sélection jusqu'à ce que l'écran LCD affiche l'horloge.
Tester le système de contrôle des
aboiements de luxe pour l'extérieur
Important : Lorsque vous testez le système de contrôle des aboiements de luxe pour l'extérieur, assurez-vous
qu'aucun chien ne se trouve à portée de l'unité afin de s'assurer qu'il ne reçoit pas de stimulation pendant le test.
1. Appuyez simultanément sur les touches H et M pendant 3 secondes.
2. Le système de contrôle des aboiements de luxe pour l'extérieur affiche
« tSt » pour indiquer qu'il est en mode Test.
3. Prononcez le mot « ouaf » à voix haute ou sifflez dans le microphone
situé en haut à l'avant de l'unité.
4. Le système de contrôle des aboiements de luxe pour l'extérieur
détectera ce son, puis il émettra 3 bips courts et le voyant lumineux rouge clignotera pour
indiquer que le système fonctionne.
5. Vous pouvez recommencer les étapes 3 et 4, si nécessaire, pour vous assurer que l'unité fonctionne.
6. Passé 30 secondes le mode Test s'arrête automatiquement et l'unité repasse en mode de fonctionnement
normal. Vous pouvez également appuyer brièvement sur la touche de Sélection pour quitter le mode Test.
24
www.petsafe.net
EN
Des précautions doivent être prises lors du test du système de contrôle
des aboiements de luxe pour l'extérieur. Évitez d'activer le mode Test
pendant de longues période. Reportez-vous aux informations de sécurité
importantes de la page 16 pour plus de détails.
FR
À quoi faut-il s’attendre lors de
l’utilisation du système de contrôle des
aboiements de luxe pour l'extérieur
NL
Placez le système de contrôle des aboiements de luxe pour l'extérieur à portée du chien, avec
l'unité sous tension. La plupart des chiens comprendront rapidement que le système de contrôle des
aboiements de luxe pour l’extérieur leur coupe l’envie d’aboyer. Ils se détendront et arrêteront d’aboyer.
Vous devriez remarquer une diminution des aboiements du chien au cours des deux premières
semaines d’utilisation du système de contrôle des aboiements de luxe pour l’extérieur. Veuillez
noter qu’il se peut que ce produit ne fonctionne pas sur des chiens sourds ou malentendants.
Des aboiements excessifs peuvent causer une tension réelle affectant la relation que vous
entretenez avec votre chien et déranger vos voisins. Veuillez consulter notre site internet pour vous
informer sur d’autres solutions personnalisées au problème de l’aboiement excessif.
ES
IT
Entretien régulier
DE
• Retirez la pile avant le nettoyage.
• Nettoyez le système de contrôle des aboiements de luxe pour l’extérieur à l’aide d’un linge humide.
• N’utilisez aucun produit chimique ou solvant de quelque sorte que ce soit pour nettoyer l’appareil.
• N’immergez pas le système dans l’eau ni dans aucun autre liquide.
Remarque : le système de contrôle des aboiements de luxe pour l’extérieur est résistant aux
intempéries. Cependant, si l’eau pénètre dans le microphone, le fonctionnement de l’unité peut
être affecté. Une fois que le microphone est sec, il fonctionnera de nouveau correctement.
Questions fréquemment posées
Quelle est la portée du
système de contrôle des
aboiements de luxe pour
l’extérieur ?
Puis-je utiliser le
système de contrôle
des aboiements pour
l’extérieur à l’intérieur ?
Le système de contrôle des aboiements de luxe pour
l’extérieur détecte les aboiements et envoie des ultrasons à
une distance allant jusqu’à 15 mètres.
Non, nous ne vous recommandons pas d’utiliser ce produit à
l’intérieur. Le système de contrôle des aboiement pour l'intérieur
de PetSafe® est un système émetteur d’ultrasons qui peut être utilisé
à l’intérieur. Rendez-vous sur notre site Web www.petsafe.net ou
appelez notre service clientèle pour des informations sur le produit.
Un chien peut-il devenir
Les chiens deviennent insensibles aux ultrasons dans certains
insensible aux ultrasons ? cas. Pour éviter ce phénomène, mettez le système de contrôle
des aboiements de luxe pour l’extérieur en marche uniquement
pendant les périodes où vous désirez que votre chien n’aboie pas
(c’est-à-dire, éteignez-le lorsque vous n’êtes pas chez vous).
www.petsafe.net
25
EN
Dépannage
FR
Le voyant vert cesse de
clignoter et il n'y a pas de
voyant rouge.
• Vérifiez que la pile est correctement installée.
• Remplacez la pile.
• Si le voyant vert ne clignote toujours pas, contactez le
centre de service clientèle.
NL
Conformité
ES
Cet équipement a été testé et il est conforme à la directive européenne applicable à la
compatibilité électromagnétique et la basse tension. Toute modification du dispositif non autorisée
par Radio Systems Corporation peut annuler la capacité de l'acheteur à utiliser le dispositif et
annuler la garantie.
Ce produit est conforme aux dispositions des directives EMC et LV. Vous trouverez la déclaration
de conformité à l’adresse : www.petsafe.net/customercare/eu_docs.php
DE
IT
IC
Ce dispositif est conforme aux normes d'exemption de licence RSS d'Industrie Canada. Le
fonctionnement est subordonné aux deux conditions suivantes : (1) cet appareil ne peut pas
provoquer d'interférences et (2) il doit accepter toutes les interférences reçues, y compris celles
qui peuvent être à l'origine d'un fonctionnement non souhaité.
ACMA
Cet appareil est conforme aux normes applicables relatives aux EMC et spécifiées par l'ACMA
(Autorité Australienne pour la Communication et les Médias - Australian Communications and
Media Authority).
Élimination des piles usagées
La collecte sélective des piles usagées est exigée dans de nombreuses régions ; familiarisez-vous
avec les réglementations locales en vigueur avant d’éliminer les piles usagées. Veuillez lire les
instructions à la page 20 sur la façon de retirer la pile du produit pour l’éliminer. Cet appareil
fonctionne avec une (1) pile alcaline de 9 volts ; ne la remplacez que par une pile semblable.
Lorsque ce produit aura atteint la fin de sa vie utile, veuillez contacter le service clientèle afin
d'obtenir des directives relatives à l'élimination adéquate de ces piles. Veuillez ne pas éliminer
le dispositif avec les déchets ménagers ou urbains. Pour connaître les numéros de téléphone du
service clientèle, visitez notre site Internet www.petsafe.net.
26
www.petsafe.net
EN
Remarque importante concernant le
recyclage
FR
Veuillez vous conformer aux réglementations concernant les déchets des équipements électriques et
électroniques de votre pays. Cet appareil doit être recyclé. Si vous n’avez plus besoin de cet appareil, ne
l'éliminez pas avec les déchets municipaux. Veuillez le rapporter là où vous l’avez acheté pour qu’il soit
recyclé. Si vous ne pouvez pas le faire, veuillez contacter le service clientèle pour de plus amples informations.
Pour connaître les numéros de téléphone du service clientèle, visitez notre site Internet www.petsafe.net.
NL
Conditions d’utilisation et
limitation de responsabilité
IT
DE
www.petsafe.net
ES
1. Conditions d’utilisation
L'utilisation de ce produit est soumise à votre acceptation sans modification des termes, conditions et
consignes d’utilisation tels qu’ils sont stipulés dans ce manuel. L’utilisation de ce produit revient à en
accepter les termes, conditions et consignes d’utilisation. Si vous n’acceptez pas ces termes, conditions et
consignes d’utilisation, veuillez renvoyer ce produit, inutilisé, dans son emballage d’origine et à vos frais et
risques, au service clientèle approprié avec une preuve d’achat afin d’obtenir un remboursement complet.
2. Utilisation adéquate
Ce produit est conçu pour être utilisé avec des animaux pour lesquels un dressage est désiré. Le
tempérament spécifique ou la taille/le poids de votre chien peuvent ne pas convenir pour ce
Produit (veuillez consulter la section « Fonctionnement du système » dans ce manuel d’utilisation).
Radio Systems Corporation recommande de ne pas utiliser ce Produit si votre animal est agressif
et n'endosse aucune responsabilité concernant la détermination du caractère approprié à
chaque cas. Si vous n'êtes pas sûr que ce Produit soit adapté à votre animal, veuillez consulter
votre vétérinaire ou un dresseur certifié avant emploi. Une utilisation appropriée comprend, entre
autres, la consultation de l’intégralité de ce manuel ainsi que de l’ensemble des avertissements.
3. Usage illégal ou interdit
Ce produit a été conçu pour le dressage des chiens uniquement. Ce dispositif de dressage
n’est pas destiné à blesser ni à provoquer un animal. L’utilisation inappropriée de ce produit
peut représenter une violation des lois fédérales, nationales ou locales.
4. Limitation de responsabilité
Radio Systems Corporation et ses sociétés affiliées ne peuvent en aucun cas être tenus
responsables pour (i) des dommages directs, indirects, punitifs, accidentels, spéciaux ou
secondaires,(ii) ni pour des dommages occasionnés ou associés à l’utilisation ou à l’utilisation
inappropriée de ce produit. L’acheteur assume les risques et les responsabilités en rapport avec
l’utilisation de ce produit et dans la pleine mesure prévue par la loi. Dans le but d’éviter toute
ambiguïté, aucune partie de la clause 4 ne peut engager la responsabilité de Radio Systems
Corporation en cas de décès, de blessures corporelles, de fraude ou de fausse déclaration.
5. Modification des termes et des conditions
Radio Systems Corporation se réserve le droit de modifier les termes, les conditions et les
consignes d’utilisation applicables à ce produit. Si de telles modifications vous ont été
communiquées avant que vous n'utilisiez ce Produit, elles ont une valeur contractuelle et
s'appliquent comme si elles faisaient partie du présent document.
27
EN
Garantie
Trois ans non transférable Garantie limitée
FR
Ce produit bénéficie d'une garantie limitée du fabricant. Une description détaillée de la garantie
et des conditions de celle-ci est disponible sur le site Internet www.petsafe.net. Vous pouvez
également obtenir une copie des conditions de garantie en adressant une enveloppe préaffranchie marquée à votre nom et à votre adresse à Radio Systems PetSafe Europe Ltd, 2nd
Floor, Elgee Building, Market Square, Dundalk, Irlande.
DE
IT
ES
NL
Protégé par le brevet américain 6,724,919
28
www.petsafe.net
EN
BELANGRIJKE VEILIGHEIDSINFORMATIE
Uitleg van legenda in deze gids
FR
Dit is het symbool voor een veiligheidswaarschuwing. Het wordt
gebruikt om u te wijzen op mogelijke risico’s van persoonlijk letsel.
Volg alle veiligheidsberichten op die volgen op dit symbool om
mogelijk letsel of overlijden te voorkomen.
NL
WAARSCHUWING geeft een risicovolle situatie aan die, wanneer
deze niet vermeden wordt, kan leiden tot overlijden of ernstig letsel.
VOORZICHTIG in combinatie met het symbool voor
veiligheidsalarm geeft een risicovolle situatie aan die, wanneer
deze niet vermeden wordt, kan leiden tot licht of matig letsel.
ES
VOORZICHTIG zonder de combinatie met het symbool voor een
veiligheidswaarschuwing geeft een risicovolle situatie aan die, wanneer
deze niet vermeden wordt, kan leiden tot letsel bij uw huisdier.
IT
• Explosiegevaar. Voorkom dat batterijen kortsluiting maken,
worden blootgesteld aan vuur of water, of dat oude en nieuwe
batterijen gezamenlijk worden gebruikt. Wanneer u batterijen
bewaart of weggooit, moeten deze worden beveiligd tegen
kortsluiting. Verwerk gebruikte batterijen op een correcte manier.
• Niet voor gebruik bij agressieve honden. Gebruik dit product niet
wanneer uw hond agressief is, of wanneer uw hond een neiging heeft
tot agressief gedrag. Agressieve honden kunnen ernstig letsel en zelfs
het overlijden van hun eigenaren en anderen veroorzaken. Als u er
niet zeker van bent of dit product geschikt is voor uw hond, neem dan
contact op met uw dierenarts of een gediplomeerd trainer.
DE
• De meeste mensen kunnen het ultrasone geluid niet horen,
maar u dient voorzorgen te nemen wanneer u de Deluxe
blafbeheersing voor buitenshuis klaar maakt voor gebruik.
• Houd het apparaat op armslengte afstand van het menselijk oor om
gehoorbeschadiging te voorkomen wanneer een hond begint te
blaffen terwijl u de blafbeheersing voor buitenshuis gereedmaakt,
monteert of ophangt.
• Mensen moeten niet vlakbij de Deluxe blafbeheersing voor
buitenshuis staan wanneer deze wordt ingeschakeld.
• Dit apparaat is alleen bedoeld voor gebruik met honden.
Probeer het nooit te gebruiken voor een doel dat niet in deze
handleiding beschreven staat.
• Uitsluitend voor gebruik buitenshuis. Bezoek onze website of
neem contact op met de klantenservice voor informatie over
PetSafe® blafbeheersingsproducten voor gebruik binnenshuis.
• De Deluxe blafbeheersing voor buitenshuis is geen speelgoed. Houd
het buiten bereik van kinderen. Gebruik het alleen voor blafbeheersing.
www.petsafe.net
29
FR
EN
Bedankt dat u voor het merk PetSafe® heeft gekozen. U en uw huisdier verdienen vriendschap
met onvergetelijke momenten en wederzijds begrip. Met onze producten en trainingsmiddelen
bevorderen we een levensstijl van bescherming, leren en liefde; van essentieel belang om unieke
herinneringen te creëren. Als u vragen heeft over onze producten of het trainen van uw huisdier,
bezoek dan onze website: www.petsafe.net of neem contact op met de klantenservice. Voor een lijst
van telefoonnummers van de klantenservice in uw regio bezoekt u onze website: www.petsafe.net.
NL
Als u optimaal wilt profiteren van uw garantie, verzoeken wij u uw product binnen 30 dagen te
registreren via www.petsafe.net. Door te registeren en uw aankoopbon te bewaren, hebt u volledige
garantie op het product en zijn wij in staat u sneller te helpen, mocht u ooit een keer genoodzaakt
zijn de klantenservice te bellen. Belangrijk: uw waardevolle informatie wordt nooit aan derden
gegeven of verkocht. De volledige informatie over de garantie is beschikbaar op www.petsafe.net.
Inhoudsopgave
DE
IT
ES
Onderdelen . . . . . . . . . . . . . . . . . . . . . . . . . . . . . . . . . . . . . . . . . . . . . . . . . . . . . . . . . . . . . . . 31
Productkenmerken . . . . . . . . . . . . . . . . . . . . . . . . . . . . . . . . . . . . . . . . . . . . . . . . . . . . . . . . . . 31
Mogelijke toepassingen voor de Deluxe blafbeheersing voor buitenshuis . . . . . . . . . . . . . 31
Zo werkt het systeem . . . . . . . . . . . . . . . . . . . . . . . . . . . . . . . . . . . . . . . . . . . . . . . . . . . . . . . . 32
Definities . . . . . . . . . . . . . . . . . . . . . . . . . . . . . . . . . . . . . . . . . . . . . . . . . . . . . . . . . . . . . . . . . . 32
Installatie en gereedmaken . . . . . . . . . . . . . . . . . . . . . . . . . . . . . . . . . . . . . . . . . . . . . . . . . . . 33
Plaatsen en verwijderen van de batterij . . . . . . . . . . . . . . . . . . . . . . . . . . . . . . . . . . . . . . . . . 33
3-kleurig ledlampje . . . . . . . . . . . . . . . . . . . . . . . . . . . . . . . . . . . . . . . . . . . . . . . . . . . . . . . . . 34
De klok/timers gebruiken . . . . . . . . . . . . . . . . . . . . . . . . . . . . . . . . . . . . . . . . . . . . . . . . . . . . 34
LCD-display . . . . . . . . . . . . . . . . . . . . . . . . . . . . . . . . . . . . . . . . . . . . . . . . . . . . . . . . . . . . . . . 34
De tijdweergave instellen . . . . . . . . . . . . . . . . . . . . . . . . . . . . . . . . . . . . . . . . . . . . . . . . . . . . 35
De klok instellen . . . . . . . . . . . . . . . . . . . . . . . . . . . . . . . . . . . . . . . . . . . . . . . . . . . . . . . . . . . . 35
Schakel Timer 1 UIT/AAN . . . . . . . . . . . . . . . . . . . . . . . . . . . . . . . . . . . . . . . . . . . . . . . . . . . 36
Schakel Timer 2 UIT/AAN . . . . . . . . . . . . . . . . . . . . . . . . . . . . . . . . . . . . . . . . . . . . . . . . . . . 36
De klok en timers resetten . . . . . . . . . . . . . . . . . . . . . . . . . . . . . . . . . . . . . . . . . . . . . . . . . . . . 37
De Deluxe blafbeheersing voor buitenshuis testen . . . . . . . . . . . . . . . . . . . . . . . . . . . . . . . . 37
Wat kunt u verwachten tijdens het gebruik van de Deluxe blafbeheersing voor buitenshuis . . . . . 38
Regulier onderhoud . . . . . . . . . . . . . . . . . . . . . . . . . . . . . . . . . . . . . . . . . . . . . . . . . . . . . . . . . 38
Veel gestelde vragen. . . . . . . . . . . . . . . . . . . . . . . . . . . . . . . . . . . . . . . . . . . . . . . . . . . . .38
Probleemoplossing. . . . . . . . . . . . . . . . . . . . . . . . . . . . . . . . . . . . . . . . . . . . . . . . . . . . . . .39
Conformiteit . . . . . . . . . . . . . . . . . . . . . . . . . . . . . . . . . . . . . . . . . . . . . . . . . . . . . . . . . . . . . . . 39
Verwijdering van batterijen . . . . . . . . . . . . . . . . . . . . . . . . . . . . . . . . . . . . . . . . . . . . . . . . . . . 39
Gebruiksvoorwaarden en beperking van aansprakelijkheid . . . . . . . . . . . . . . . . . . . . . . . . 40
Garantie . . . . . . . . . . . . . . . . . . . . . . . . . . . . . . . . . . . . . . . . . . . . . . . . . . . . . . . . . . . . . . . . . . 41
30
www.petsafe.net
EN
Onderdelen
FR
®
PetSafe
Deluxe blafbeheersing
voor buitenshuis
NL
ES
Gebruiksaanwijzing
IT
Productkenmerken
DE
• Ingebouwde timer voor twee UIT/AAN-voorinstellingen
• Gebruikt ultrasoon geluid om irriterend geblaf te onderbreken
• Detecteert blaffen tot op 15 m afstand
• Duurzaam en weerbestendig
• De driekleurige LED toont de status van de batterij, geeft aan of Timer 1 en Timer 2 UIT staan
en brandt wanneer er een ultrasone stimulans wordt gegeven
Mogelijke toepassingen voor de Deluxe
blafbeheersing voor buitenshuis
• Uw hond laten stoppen met blaffen
• De hond van de buren laten stoppen met blaffen
• De hond op bepaalde momenten op de dag laten stoppen met blaffen
• Puppy's leren om niet te blaffen
• Blaffende honden afschrikken tijdens kampeertochten
www.petsafe.net
31
EN
Zo werkt het systeem
ES
NL
FR
Wanneer de PetSafe® Deluxe blafbeheersing voor buitenshuis zich binnen bereik van een blaffende
hond bevindt, wordt het geluid door een interne microfoon opgevangen en wordt de unit automatisch
geactiveerd. De Deluxe blafbeheersing voor buitenshuis zendt een ultrasoon geluid uit. Honden kunnen
dit ultrasone geluid wel horen, maar de meeste mensen niet. De hond schrikt van de veilige en effectieve
hoge toon en zal met blaffen stoppen, omdat hij zijn geblaf aan dit onaangename geluid koppelt.
Wanneer de hond stopt met blaffen, stopt de ultrasone toon ook. Met behulp van programmeerbare
timers kunt u het blaffen op bepaalde tijdstippen van de dag beheersen, bijv. wanneer kinderen na
schooltijd langslopen. Door gebruik te maken van deze timer(s) wordt de levensduur van de batterij
verlengd. De Deluxe blafbeheersing voor buitenshuis is voorzien van een timer voor twee UIT/AANvoorinstellingen. De blafbeheersing is effectief tot op een afstand van 15 m.
Opmerking: als de hond doof of slechthorend is, kan het zijn dat deze niet reageert op de Deluxe
blafbeheersing voor buitenshuis.
Definities
Voorkant
IT
Metalen hanger: om de Deluxe
blafbeheersing voor buitenshuis op te hangen.
Microfoon: om het blaffen te detecteren.
Geluid-geactiveerde luidspreker:
produceert het ultrasone geluid.
Vooraanzicht
DE
Achterkant
Metalen hanger
Microfoon
Geluid-geactiveerde
luidspreker
Keuzeknop: om door het menu te bladeren
en een keuze te maken.
Uren
Urenknop: om de uren voor de tijdweergave,
3-kleurig
ledlampje
klok, Timer 1 en Timer 2 in te stellen.
LCDMinutenknop: om de minuten voor de
Onderaanzicht
display
tijdweergave, klok, Timer 1 en Timer 2 in te
stellen.
3-kleurig ledlampje: toont de status
Batterijdeksel
van de batterij, geeft aan of Timer 1 en
Timer 2 UIT staan en brandt wanneer er een
ultrasone stimulans wordt gegeven.
LCD-display: toont de tijdweergave, klok, timers, test- en resetfunctie.
Onderkant
Batterijdeksel: hiermee wordt de batterij opgeborgen.
32
www.petsafe.net
Achteraanzicht
Keuzeknop
Minuten
EN
Installatie en gereedmaken
FR
De Deluxe blafbeheersing voor buitenshuis moet binnen bereik van de hond en naar de hond
gericht worden neergelegd. De unit kan worden opgehangen, maar kan ook los worden
neergezet, echter niet hoger dan 1,5 m. De unit kan in een boom of aan een paal of hek e.d.
worden gehangen. Voor het beste resultaat dient het gebied tussen de Deluxe blafbeheersing en
de hond vrij te zijn van grote obstakels.
NL
ES
IT
Plaatsen en verwijderen van de batterij
BATTERIJ
DE
Belangrijk: bij het plaatsen of verwijderen van de batterij, het instellen van de klok of het
programmeren van de timer(s) mogen er geen honden binnen bereik van de unit zijn om te
voorkomen dat zij een stimulans krijgen tijdens het gereedmaken.
1. De Deluxe blafbeheersing voor buitenshuis maakt gebruik van een vervangbare 9 volt-batterij (niet
inbegrepen). Het Batterijdeksel bevindt zich aan de onderzijde van de unit. Open het Batterijdeksel.
2. Plaats de 9 volt-batterij met de positieve zijde georiënteerd zoals getoond.
3. Plaats het Batterijdeksel terug door de bovenrand te positioneren en vervolgens de onderkant
op zijn plek te klikken.
4. Na plaatsing van de batterij staat de Deluxe blafbeheersing voor buitenshuis AAN en begint
direct met het detecteren en corrigeren van blaffen. Met uitzondering van de batterij-indicator
is het LCD-display leeg tot de klok en timers zijn ingesteld.
Opmerking: zorg dat er een goed werkende 9 volt-batterij in het batterijvak zit.
www.petsafe.net
33
EN
Levensduur va de batterij
Wij adviseren de ingebouwde timers te gebruiken om de batterij te sparen. De gemiddelde
levensduur van de batterij is 2 maanden, afhankelijk van het blafgedrag van de hond en of de
timers worden gebruikt.
FR
Probeer niet in de batterij te prikken of de batterij te openen. Lever de
gebruikte batterij in bij een inzamelpunt voor klein chemisch afval.
NL
3-kleurig ledlampje
ES
De 3-kleurig ledlampje-indicator toont de status van de batterij en geeft aan of er een timer is
geactiveerd, maar UIT staat. Bij een volle batterij knippert de groene LED 1 x per 5 seconden. Bij
een lege batterij knippert de rode LED 3 x per 5 seconden. De oranje LED duidt erop dat Timer 1
en/of Timer 2 is/zijn ingesteld en de unit UIT staat. Wanneer de unit in de testmodus staat, zal de
rode LED knipperen.
IT
De klok/timers gebruiken
DE
De Deluxe blafbeheersing voor buitenshuis is voorzien van een timer voor twee UIT/AANvoorinstellingen per 24 uur. Door gebruik te maken van de timer wordt de levensduur van de
batterij verlengd en wordt voorkomen dat honden ongevoelig worden voor het ultrasone geluid.
Opmerking: alvorens de automatische timer in te stellen, moet de klok worden ingesteld. Zodra
de batterij is geïnstalleerd, staat de Deluxe blafbeheersing voor buitenshuis altijd AAN, tenzij er
een timer is ingesteld of de batterij uit de unit is genomen.
LCD-display
Stel de tijdweergave, klok en timers in met behulp van het LCD-display van de Deluxe
blafbeheersing voor buitenshuis. Met elke druk op de keuzeknop zal het LCD-display door de
mogelijke menu-opties bladeren, in de hieronder vermelde volgorde. Het LCD-display toont ook
het resterende batterijvermogen.
Tijdweergave: stel de klok in op 12-uurs- of 24-uursweergave
De klok instellen: stel de uren en minuten van de klok in met behulp van knoppen H (uur) en
M (minuut)
Timer 1: schakel Timer 1 UIT of AAN
Timer 2: schakel Timer 2 UIT of AAN
Reset (rSt): reset de klok en timer(s)
Test (tSt): test de unit
Opmerking: als er gedurende 1 minuut geen drukknopactiviteit plaatsvindt, zal het LCD-display
worden leeggemaakt. Druk op een willekeurige knop om de klok weer te geven of om de menuopties te bekijken.
34
www.petsafe.net
EN
De tijdweergave instellen
FR
1. Druk de keuzeknop eenmaal kort in om de modus TIME FORMAT
(tijdweergave) te starten.
2. Druk kort op knop H (uur) voor de 12-uursweergave of op knop M
(minuut) voor de 24-uursweergave.
3. Druk op de keuzeknop om de instelling van de tijdweergave te bevestigen.
4. Na bevestiging van de TIME FORMAT (tijdweergave) zal de Deluxe blafbeheersing voor
buitenshuis automatisch overschakelen naar de modus SET CLOCK (klok instellen) in het LCDdisplaymenu (1) en kunt u beginnen met het instellen van de tijd.
NL
De klok instellen
Na instellen van de gewenste tijdweergave kunt u de kloktijd instellen. 1
IT
DE
www.petsafe.net
ES
1. Druk de keuzeknop steeds kort in tot SET CLOCK (klok instellen)
in het LCD-display verschijnt (1). Opmerking: na instellen van de
tijdweergave zal het menu automatisch overschakelen naar de
modus SET CLOCK (klok instellen). Zodra u knop H (uur) of M
2
(minuut) hebt ingedrukt, zal het LCD-display veranderen (2) en kunt
u beginnen met een instellen van de tijd.
2. Druk knop H (uur) steeds kort in tot het juiste uur verschijnt
(wanneer u de 12-uursweergave hebt gekozen, moet u controleren
of de AM-/PM-instelling juist is).
3
3. Druk knop M (minuut) steeds kort in tot de juiste minuten
verschijnen. Opmerking: door knop H (uur) of M (minuut) ingedrukt
te houden, zullen de cijfers sneller veranderen.
4. Druk de keuzeknop kort in om de instelling van de tijd te
4
bevestigen.
5. Na bevestiging van de tijd zal de Deluxe blafbeheersing voor
buitenshuis automatisch overschakelen naar de modus TIMER 1
OFF (Timer 1 UIT) in het LCD-displaymenu (3).
6. Als u ervoor kiest om na het instellen van de klok Timer 1 niet in te
stellen, drukt u de keuzeknop steeds kort in tot het LCD-display weer terugkeert naar de klok
(4).
7. Als u ervoor kiest Timer 1 wel te gebruiken, kunt u de paragraaf "Schakel Timer 1 UIT/AAN"
raadplegen. Wanneer u Timer 1 (en desgewenst Timer 2) gebruikt, zullen de UIT/AANinstellingen dagelijks worden herhaald. Opmerking: na vervanging van de batterij moeten de
klok en timers opnieuw worden geprogrammeerd.
35
EN
Schakel Timer 1 UIT/AAN
Na instellen van de klok kunt u getimede gebeurtenissen programmeren.
5
DE
IT
ES
NL
FR
1. Druk op de keuzeknop tot TIMER 1 OFF (Timer 1 UIT) (3) in het
LCD-display verschijnt. Opmerking: nadat de klok is ingesteld, zal
het LCD-displaymenu standaard terugkeren naar de modus TIMER
1 OFF (Timer 1 UIT).
6
2. Druk knop H (uur) eenmaal kort in en "0:00" gaat knipperen (5).
Opmerking: in de 12-uursweergave zal "12:00AM" gaan knipperen.
3. Druk knop H (uur) steeds kort in tot het juiste uur verschijnt
(wanneer u de 12-uursweergave hebt gekozen, moet u controleren
7
of de AM-/PM-instelling juist is).
4. Druk knop M (minuut) steeds kort in tot de juiste minuten verschijnen.
5. Druk de keuzeknop kort in om de tijd voor TIMER 1 OFF (Timer 1
UIT) te bevestigen.
6. Nadat de tijd voor TIMER 1 OFF (Timer 1 UIT) is ingesteld, zal het
LCD-displaymenu standaard naar de modus TIMER 1 ON (Timer 1 AAN) gaan. Deze stap
moet worden voltooid voordat de Timer 1-instelling definitief is.
7. Druk knop H (uur) eenmaal kort in en "0:00" gaat knipperen (6). Opmerking: in de
12-uursweergave zal "12:00AM" gaan knipperen.
8. Druk knop H (uur) steeds kort in tot het juiste uur verschijnt (wanneer u de 12-uursweergave
hebt gekozen, moet u controleren of de AM-/PM-instelling juist is).
9. Druk knop M (minuut) steeds kort in tot de juiste minuten verschijnen.
10. Druk de keuzeknop kort in om de tijd voor TIMER 1 ON (Timer 1 AAN) te bevestigen.
11. Na bevestiging van de tijd zal de Deluxe blafbeheersing voor buitenshuis automatisch
overschakelen naar de modus TIMER 2 OFF (Timer 2 UIT) in het LCD-displaymenu (7). Als u
ervoor kiest om na het instellen van Timer 1, Timer 2 niet in te stellen, drukt u de keuzeknop
steeds kort in tot het LCD-display weer terugkeert naar de klok (4).
12. Als u ervoor kiest Timer 2 wel te gebruiken, kunt u de paragraaf "Schakel Timer 2 UIT/AAN"
raadplegen. Opmerking: als u Timer 1 hebt geprogrammeerd, dan zal de Deluxe blafbeheersing
voor buitenshuis dagelijks UIT- en AAN tot de tijd wordt gereset of de batterij wordt vervangen.
Schakel Timer 2 UIT/AAN
8
1. Druk op de keuzeknop tot TIMER 2 OFF (Timer 2 UIT) (7) in het LCDdisplay verschijnt. Opmerking: nadat Timer 1 is ingesteld, zal het LCDdisplaymenu standaard naar de modus TIMER 2 OFF (Timer 2 UIT) gaan.
2. Druk knop H (uur) eenmaal kort in en "0:00" gaat knipperen (8).
Opmerking: in de 12-uursweergave zal "12:00AM" gaan knipperen.
3. Druk knop H (uur) steeds kort in tot het juiste uur verschijnt (wanneer u de 12-uursweergave
hebt gekozen, moet u controleren of de AM-/PM-instelling juist is).
4. Druk knop M (minuut) steeds kort in tot de juiste minuten verschijnen.
5. Druk de keuzeknop kort in om de tijd voor TIMER 2 OFF (Timer 2 UIT) te bevestigen.
36
www.petsafe.net
EN
6. Nadat de tijd voor TIMER 2 OFF (Timer 2 UIT) is ingesteld, zal het LCD-displaymenu
standaard naar de modus TIMER 2 ON (Timer 2 AAN) gaan. Deze stap moet worden
doorlopen voordat de Timer 2-instelling definitief is.
9
7. Druk knop H (uur) eenmaal kort in en "0:00" gaat knipperen
(9). Opmerking: in de 12-uursweergave zal "12:00AM" gaan
knipperen.
8. Druk knop H (uur) steeds kort in tot het juiste uur verschijnt (wanneer
u de 12-uursweergave hebt gekozen, moet u controleren of de AM-/PM-instelling juist is).
9. Druk knop M (minuut) steeds kort in tot de juiste minuten verschijnen.
10. Druk de keuzeknop kort in om de tijd voor TIMER 2 ON (Timer 2 AAN) te bevestigen.
11. Na bevestiging van de tijd zal de Deluxe blafbeheersing voor buitenshuis automatisch
overschakelen naar de modus RESET in het LCD-displaymenu. Blijf de keuzeknop steeds
kort indrukken tot het LCD-display weer terugkeert naar de klok (3). Als u Timer 2 hebt
geprogrammeerd, dan zal de Deluxe blafbeheersing voor buitenshuis dagelijks UIT- en AAN
tot de tijd wordt gereset of de batterij wordt vervangen.
FR
NL
ES
De klok en timers resetten
IT
1. Blijf de keuzeknop steeds kort indrukken tot "rSt" knippert in het LCD-display.
2. Houd knop H (uur) 5 seconden ingedrukt. 0Blijf knop H (uur) ingedrukt
houden en druk kort op knop M (minuut).
3. Alle tijden zijn nu gereset.
Opmerking: om de kloktijd te bewaren en alleen de tijden voor Timer 1
en/of Timer 2 te resetten, hoeft u niet alle tijden te resetten. Druk de keuzeknop kort in om door
de LCD-displaymenu-opties te scrollen tot u bij de timer komt die u wilt resetten. Druk op knop H
(uur) of M (minuut) om de tijd te wijzigen. Druk de keuzeknop kort in om de aangepaste tijd te
bevestigen. Blijf de keuzeknop steeds kort indrukken tot het LCD-display weer terugkeert naar de
klok.
DE
De Deluxe blafbeheersing voor
buitenshuis testen
Belangrijk: wanneer u de Deluxe blafbeheersing voor buitenshuis test, mogen er geen honden
binnen bereik van de unit zijn om te voorkomen dat zij een stimulans krijgen tijdens het testen.
1. Houd knop H (uur) en knop M (minuut) tegelijkertijd 3 seconden ingedrukt.
2. Op het display van de Deluxe blafbeheersing voor buitenshuis
verschijnt "tSt" om aan te geven dat de unit in de testmodus staat.
3. Zeg het woord “blaf” met luide stem of blaas in de microfoon bovenop de unit.
4. De Deluxe blafbeheersing voor buitenshuis detecteert dit geluid en geeft middels
3 korte pieptonen en een knipperende rode LED aan dat het apparaat werkt.
5. U kunt stappen 3 - 4 herhalen om er zeker van te zijn dat de unit werkt.
6. Na 30 seconden wordt de modus Test automatisch beëindigd en keert de unit terug naar de
normale werking. U kunt ook kort op de keuzeknop drukken om de modus Test te beëindigen.
www.petsafe.net
37
EN
Voor het testen van de Deluxe blafbeheersing voor buitenshuis zijn
voorzorgsmaatregelen nodig. Herhaal de modus Test niet lang achter
elkaar. Zie pagina 29 voor belangrijke informatie m.b.t. de veiligheid.
NL
FR
Wat kunt u verwachten tijdens het
gebruik van de Deluxe blafbeheersing
voor buitenshuis
IT
Regulier onderhoud
DE
ES
Plaats de ingeschakelde Deluxe blafcontrole voor buitenshuis binnen bereik van de hond.
De meeste honden zullen snel begrijpen dat de Deluxe blafbeheersing voor buitenshuis hun
behoefte om te blaffen verstoort en zullen dan ontspannen en stoppen met blaffen.
Er zou binnen de eerste twee weken nadat met het gebruik van de Deluxe blafbeheersing voor
buitenshuis begonnen is, een vermindering moeten optreden in het blafgedrag van de hond.
Bedenk dat dit product mogelijk niet werkt bij dove of slechthorende honden.
Overmatig blaffen kan de relatie met uw huisdier onder druk zetten en ook problemen in de buurt
veroorzaken. Bezoek onze website om andere specifieke oplossingen voor overmatig blaffen te bekijken.
• Verwijder de batterij vóór reiniging.
• Reinig de Deluxe blafbeheersing voor buitenshuis met een vochtige doek.
• Gebruik geen spuitbus met chemicaliën of oplosmiddelen voor reiniging.
• Niet onderdompelen in water of andere vloeistof.
Opmerking: de Deluxe blafbeheersing voor buitenshuis is weerbestendig. Als er echter water
in de microfoon loopt, kan dit de werking van de eenheid verstoren. Als de microfoon weer
opdroogt, zal de unit weer normaal werken.
Veel gestelde vragen
38
Wat is het bereik van de
Deluxe blafbeheersing
voor buitenshuis?
De Deluxe blafbeheersing voor buitenshuis detecteert blaffen
en zendt een ultrasoon geluid uit over een afstand van
maximaal 15 m.
Kan ik de Deluxe
blafbeheersing voor
buitenshuis ook
binnenshuis gebruiken?
Kan een hond ongevoelig
worden voor het
ultrasone geluid?
Nee, we adviseren dit product niet binnenshuis te gebruiken.
De PetSafe® blafbeheersing voor binnenshuis is een ultrasoon product
dat veilig is voor gebruik binnenshuis. Bezoek onze website
www.petsafe.net of bel met onze klantenservice voor productinformatie.
Er zijn bepaalde situaties waarin honden ongevoelig kunnen worden.
Om dit te voorkomen kunt u de timers gebruiken om de Deluxe
blafbeheersing voor buitenshuis AAN te zetten tijdens perioden met
ongewenst blaffen (d.w.z. dat u de unit uitschakelt als u niet thuis bent).
www.petsafe.net
• Controleer of de batterij goed is geplaatst.
• Vervang de batterij.
• Neem contact op met de klantenservice als het groene
LED-lampje nog altijd niet knippert.
FR
Het groene LED-lampje
is gestopt met knipperen
en er brandt geen rood
lampje.
EN
Probleemoplossing
NL
Conformiteit
ES
Deze apparatuur is getest en in overeenstemming bevonden met de EU-richtlijn voor
Elektromagnetische Compatibiliteit en laagspanning (EU Electromagnetic Compatibility en Low
Voltage Directive). Ongeoorloofde wijzigingen of aanpassingen aan de apparatuur, die niet zijn
goedgekeurd door Radio Systems Corporation kunnen leiden tot het niet langer toestaan van het
gebruik van de apparatuur en tot het nietig verklaren van de garantie.
Dit product is in overeenstemming met de voorzieningen van de EMC- en LV-richtlijnen. De
verklaring van conformiteit is te vinden op: www.petsafe.net/customercare/eu_docs.php
IT
Verwijdering van batterijen
www.petsafe.net
DE
Gescheiden inzameling van gebruikte batterijen is in veel landen verplicht; controleer de
plaatselijke voorschriften voordat u lege batterijen weggooit. Raadpleeg pagina 33 voor
instructies voor het verwijderen van de batterij uit het product voor gescheiden afvoer. Deze unit
werkt op één (1) alkalinebatterij van 9 v; alleen vervangen door een vergelijkbare batterij.
Aan het einde van de gebruiksduur verzoeken wij u contact op te nemen met de klantenservice
om instructies voor gepaste opruiming van het apparaat te ontvangen. Wij verzoeken u om de
unit niet in het huishoudelijk of gemeentelijke afval te plaatsen. Voor een lijst van telefoonnummers
van de klantenservice in uw regio bezoekt u onze website: www.petsafe.net.
39
EN
Belangrijk advies voor recyling
FR
Respecteer de in uw land geldende regels betreffende de veilige afvoer van elektrisch afval en
elektrische apparaten. Dit apparaat dient hergebruikt te worden. Indien u dit apparaat niet langer
nodig hebt, werp het dan niet weg bij het gewone huisvuil. Breng het apparaat terug naar de
plaats van aankoop, zodat het kan worden opgenomen in ons systeem van hergebruik. Als dit
niet mogelijk is, neem dan contact op met de klantenservice voor meer informatie. Voor een lijst
van telefoonnummers van de klantenservice bezoekt u onze website: www.petsafe.net.
NL
Gebruiksvoorwaarden en beperking
van aansprakelijkheid
DE
IT
ES
1. Gebruiksvoorwaarden
Dit product wordt u aangeboden onder voorwaarde van uw acceptatie, zonder wijziging, van
de voorwaarden, condities en opmerkingen die hierin staan. Gebruik van dit product impliceert
aanvaarding van alle dergelijke voorwaarden, condities en kennisgevingen. Indien u deze
voorwaarden, termijnen en berichten niet wenst aan te nemen, retourneer dan alstublieft het Product,
ongebruikt, in zijn oorspronkelijke verpakking terug voor eigen kosten aan het van toepassing zijnde
Klantendienstcentrum, samen met het bewijs van aankoop voor een volledige terugbetaling.
2. Correct gebruik
Dit product is ontworpen voor gebruik met huisdieren wanneer training gewenst is. Het specifieke
temperament of afmeting/gewicht van uw huisdier kan ongeschikt voor dit Product zijn (zie
alstublieft “Zo werkt het systeem” in deze gebruiksaanwijzing). Radio Systems Corporation raadt
aan dit Product niet te gebruiken indien uw huisdier agressief is en is niet aansprakelijk voor het
vaststellen van de geschiktheid van het huisdier in individuele gevallen. Als u er niet zeker van
bent of dit een goed idee is voor uw huisdier, neem dan contact op met uw dierenarts of een
gediplomeerd trainer. Gepast gebruik omvat, zonder beperking, het lezen van de volledige
gebruiksaanwijzing en specifieke waarschuwingsverklaringen.
3. Geen onwettelijk of verboden gebruik
Dit product is alleen ontworpen voor gebruik met huisdieren. Dit systeem voor training van huisdieren
is niet bedoeld om te schaden, verwonden of te provoceren. Gebruik van dit product op een wijze
waarvoor het niet bedoeld is, kan leiden tot het schenden van nationale of plaatselijke wetten.
4. Beperking van aansprakelijkheid
Radio Systems Corporation of één van de aangesloten bedrijven kan in geen enkel geval
aansprakelijk gesteld worden voor (i) enige indirecte, geldelijke, incidentele, bijzondere of
gevolgschade en/of (ii) enig verlies of welke schade dan ook die voortvloeit uit of verband
houdt met het misbruik van dit product. De koper aanvaardt alle risico’s en aansprakelijkheden
die samenhangen met het gebruik van dit product conform de wetgeving. Om twijfel te
vermijden: niets in deze clausule 4 beperkt de aansprakelijkheid van Radio Systems Corporation
voor het overlijden, persoonlijke verwondingen, fraude of frauduleuze voorstellingen.
5. Wijziging van de algemene voorwaarden
Radio Systems Corporation behoudt zich het recht voor om de voorwaarden, condities en
kennisgevingen voor dit product van tijd tot tijd te wijzigen. Indien u voorafgaand aan het
gebruik van dit product over dergelijke wijzigingen bent geïnformeerd, zijn deze wijzigingen
bindend alsof zij hierin opgenomen waren.
40
www.petsafe.net
EN
Garantie
Drie jaar niet-overdraagbare beperkte garantie
FR
Dit product heeft het voordeel van een beperkte fabrieksgarantie. Volledige details van de
toepasselijke garantie van dit product en de algemene voorwaarden daarvan kunt u vinden
op www.petsafe.net en/of zijn verkrijgbaar door een gefrankeerde en geadresseerde envelop
te sturen naar Radio Systems PetSafe Europe Ltd, 2nd Floor, Elgee Building, Market Square,
Dundalk, Ierland.
NL
In de VS beschermd volgens patent 6,724,919
ES
IT
DE
www.petsafe.net
41
EN
INFORMACIÓN DE SEGURIDAD IMPORTANTE
Explicación de las palabras de atención y símbolos utilizados en este guía
FR
Este es el símbolo de alerta de seguridad. Se utiliza para alertarle sobre riesgos
de lesiones personales potenciales. Siga todos los mensajes de seguridad que
aparecen a continuación de este símbolo para evitar posibles daños o la muerte.
NL
ADVERTENCIA indica una situación peligrosa que, si no se evita,
podría provocar la muerte o lesiones graves.
ATENCIÓN, utilizada con el símbolo de alerta de seguridad, indica
una situación peligrosa que, si no se evita podría provocar lesiones
menores o moderadas.
ES
ATENCIÓN, utilizada sin el símbolo de alerta de seguridad, indica una
situación peligrosa que, si no se evita podría provocar daños a su mascota.
DE
IT
• Riesgo de explosión. No provoque cortocircuitos, no mezcle pilas viejas
y nuevas, no las deseche echándolas al fuego ni las exponga al agua.
Cuando las pilas se guarden o se desechen, deben estar protegidas, para
que no sufran cortocircuitos. Deseche las pilas gastadas adecuadamente.
• No se debe utilizar con perros agresivos. No use este producto si su perro
es agresivo o si es propenso a mostrar una conducta agresiva. Los perros
agresivos pueden causar lesiones graves e incluso la muerte a su dueño y
a otras personas. Si no está seguro de si este producto es apropiado para
su perro, consulte a su veterinario o a un adiestrador profesional.
• Los humanos no pueden oír los ultrasonidos; no obstante, se deben
tomar precauciones cuando se prepare para su uso el control de los
ladridos deluxe para exteriores.
• Para evitar dañar los oídos de las personas en el caso de que un
perro empiece a ladrar mientras está configurando, montando o
manipulando el control de los ladridos para exteriores, mantenga la
unidad alejada de los oídos a una distancia igual a la de los brazos.
• Las personas deberían evitar estar demasiado cerca del control de
los ladridos deluxe para exteriores cuando esté encendido.
• Este aparato solo debe usarse con perros. No intente usarlo para
ningún propósito no descrito en este manual.
• Exclusivamente para su uso en exteriores. Visite nuestro sitio web
o contacte con el Centro de Atención al Cliente para obtener
información sobre los productos de control de los ladridos PetSafe®
adecuados para su uso en interiores.
• El control de los ladridos deluxe para exteriores no es un juguete.
Manténgalo fuera del alcance de los niños. Utilícelo solo para controlar
los ladridos.
42
www.petsafe.net
EN
Gracias por elegir PetSafe®. Usted y su mascota se merecen disfrutar de una relación repleta
de momentos memorables y de comprensión mutua. Nuestros productos y dispositivos de
adiestramiento fomentan la protección, la enseñanza y el cariño, elementos esenciales de una
relación que le dejará inolvidables recuerdos. Si tiene alguna pregunta sobre nuestros productos
o sobre el adiestramiento de su mascota, visite nuestro sitio web, www.petsafe.net o contacte con
nuestro Centro de Atención al Cliente. Para obtener un listado de los números de teléfono de los
Centros de atención al cliente de su zona visite nuestro sitio web en www.petsafe.net.
FR
NL
Para obtener la mayor protección de su garantía, por favor registre su producto dentro de los 30
días posteriores a la compra en www.petsafe.net. Al registrarse y conservar su recibo de compra
disfrutará de la garantía plena del producto y si tuviera necesidad de contactar con el Centro
de Atención al Cliente, podremos ayudarle con mayor rapidez. Y lo que es más importante, su
valiosa información personal nunca se cederá ni venderá a nadie. La descripción completa de la
garantía está disponible online en www.petsafe.net.
ES
Índice de contenidos
DE
www.petsafe.net
IT
Componentes . . . . . . . . . . . . . . . . . . . . . . . . . . . . . . . . . . . . . . . . . . . . . . . . . . . . . . . . . . . . . . 44
Características . . . . . . . . . . . . . . . . . . . . . . . . . . . . . . . . . . . . . . . . . . . . . . . . . . . . . . . . . . . . . 44
Usos posibles del control de los ladridos deluxe para exteriores . . . . . . . . . . . . . . . . . . . . 44
Cómo funciona el sistema . . . . . . . . . . . . . . . . . . . . . . . . . . . . . . . . . . . . . . . . . . . . . . . . . . . . 45
Definiciones clave . . . . . . . . . . . . . . . . . . . . . . . . . . . . . . . . . . . . . . . . . . . . . . . . . . . . . . . . . . 45
Instalación y configuración . . . . . . . . . . . . . . . . . . . . . . . . . . . . . . . . . . . . . . . . . . . . . . . . . . . 46
Inserción y extracción de la pila . . . . . . . . . . . . . . . . . . . . . . . . . . . . . . . . . . . . . . . . . . . . . . . 46
Indicador luminoso de 3 colores . . . . . . . . . . . . . . . . . . . . . . . . . . . . . . . . . . . . . . . . . . . . . . 47
Uso del reloj/temporizadores . . . . . . . . . . . . . . . . . . . . . . . . . . . . . . . . . . . . . . . . . . . . . . . . 47
Pantalla LCD . . . . . . . . . . . . . . . . . . . . . . . . . . . . . . . . . . . . . . . . . . . . . . . . . . . . . . . . . . . . . . . 47
Ajuste del formato de hora . . . . . . . . . . . . . . . . . . . . . . . . . . . . . . . . . . . . . . . . . . . . . . . . . . . 48
Ajuste del reloj . . . . . . . . . . . . . . . . . . . . . . . . . . . . . . . . . . . . . . . . . . . . . . . . . . . . . . . . . . . . . 48
Desactivar/activar el temporizador 1 . . . . . . . . . . . . . . . . . . . . . . . . . . . . . . . . . . . . . . . . . . 49
Desactivar/activar el temporizador 2 . . . . . . . . . . . . . . . . . . . . . . . . . . . . . . . . . . . . . . . . . . 49
Restaurar el reloj y los temporizadores . . . . . . . . . . . . . . . . . . . . . . . . . . . . . . . . . . . . . . . . . 50
Probar el control de los ladridos deluxe para exteriores . . . . . . . . . . . . . . . . . . . . . . . . . . . 50
Qué se puede esperar durante el uso del control de los ladridos deluxe para exteriores . 51
Mantenimiento periódico . . . . . . . . . . . . . . . . . . . . . . . . . . . . . . . . . . . . . . . . . . . . . . . . . . . . 51
Preguntas frecuentes . . . . . . . . . . . . . . . . . . . . . . . . . . . . . . . . . . . . . . . . . . . . . . . . . . . . . 51
Resolución de problemas. . . . . . . . . . . . . . . . . . . . . . . . . . . . . . . . . . . . . . . . . . . . . . . . .52
Conformidad . . . . . . . . . . . . . . . . . . . . . . . . . . . . . . . . . . . . . . . . . . . . . . . . . . . . . . . . . . . . . . 52
Eliminación de las pilas . . . . . . . . . . . . . . . . . . . . . . . . . . . . . . . . . . . . . . . . . . . . . . . . . . . . . . 52
Condiciones de uso y limitación de responsabilidad . . . . . . . . . . . . . . . . . . . . . . . . . . . . . . 53
Garantía . . . . . . . . . . . . . . . . . . . . . . . . . . . . . . . . . . . . . . . . . . . . . . . . . . . . . . . . . . . . . . . . . . 54
43
FR
EN
Componentes
ES
NL
Control de los ladridos
deluxe para
®
exteriores PetSafe
IT
Manual de funcionamiento
Características
DE
• Temporizador incorporado con dos preajustes (desactivado/activado)
• Utiliza ultrasonidos para interrumpir los ladridos molestos
• Detecta los ladridos hasta a 15 metros de distancia
• Duradero y estanco
• El indicador luminoso de 3 colores muestra si la batería está bien o baja, indica que el
temporizador 1 y el temporizador 2 están desactivados, e indica los estímulos ultrasónicos
Usos posibles del control de los ladridos
deluxe para exteriores
• Logra que el perro deje de ladrar
• Logra que dejen de ladrar los perros de sus vecinos
• Logra que los perros dejen de ladrar a determinadas horas del día
• Permite adiestrar a los cachorros para que no ladren
• Evita que ladren los perros en campings
44
www.petsafe.net
EN
Cómo funciona el sistema
FR
Cuando el control de los ladridos deluxe para exteriores PetSafe® está dentro del alcance de los ladridos
de un perro, un micrófono interno recoge el sonido y la unidad se activa automáticamente. El control de
los ladridos deluxe para exteriores emite una señal de ultrasonidos. La mayoría de los humanos no pueden
oír el ultrasonido, pero los perros sí. Sobresaltado por un sonido agudo, seguro y eficaz, el perro debería
dejar de ladrar ya que asociará el ladrido con este sonido tan molesto. Cuando el perro deja de ladrar, el
ultrasonido también se detiene. La unidad cuenta con temporizadores programables que le permiten frenar
los ladridos a ciertas horas del día, por ejemplo, después del colegio cuando pasan los niños. Además,
ajustar los temporizadores permite conservar la duración de la pila. El control de los ladridos deluxe para
exteriores incluye un temporizador con dos preajustes (desactivado/activado) y es eficaz hasta 15 metros.
Nota: si el perro es sordo o tiene problemas de audición, es posible que no reaccione al control de los
ladridos deluxe para exteriores.
NL
Parte delantera
Vista
frontal
Gancho de metal
Micrófono
Altavoz activado
por sonido
Vista
posterior
DE
Parte trasera
IT
Gancho de metal: permite colgar el control
de los ladridos deluxe para exteriores.
Micrófono: se usa para evitar los ladridos.
Altavoz activado por sonido: produce
el sonido ultrasónico.
ES
Definiciones clave
Botón de selección: se emplea para
Botón de
desplazarse por el menú y seleccionar un
Horas
selección
elemento del mismo.
Indicador luminoso
Minutos
de
3
colores
Botón de horas: se usa para ajustar el
Vista
Pantalla
formato de la hora, el reloj, el temporizador inferior
LCD
1, y las horas del temporizador 2.
Botón de minutos: se usa para ajustar el
formato de la hora, el reloj, el temporizador
Tapa de la pila
1, y los minutos del temporizador 2.
Indicador luminoso de 3 colores:
muestra si la batería está bien o baja, indica
si el temporizador 1 y el temporizador 2 están desactivados, e indica los estímulos ultrasónicos.
Pantalla LCD: muestra las funciones de la hora (en su formato), el reloj, los temporizadores, las
pruebas y la opción restaurar.
Parte inferior
Tapa de la pila: sirve para encerrar la pila.
www.petsafe.net
45
EN
Instalación y configuración
ES
NL
FR
El control de los ladridos deluxe para exteriores debe colocarse cara arriba hacia el perro y dentro del
alcance del animal. La unidad está diseñada de forma que pueda colgarse o bien dejarse de forma
autónoma, y debe situarse a una altura máxima de 1,5 m. Se puede colocar en un árbol, colgando de
un poste, en el soporte de una verja, etc. Para obtener los mejores resultados, en el área que quede entre
el control de los ladridos deluxe para exteriores y el perro no debe haber ningún obstáculo grande.
IT
Inserción y extracción de la pila
46
www.petsafe.net
PILA
PILA
DE
Importante: para insertar y extraer la pila, ajustar el reloj o programar los temporizadores, no
debe haber ningún perro dentro del alcance de la unidad para evitar que reciban un estímulo
durante la configuración.
1. El control de los ladridos deluxe para exteriores usa una pila sustituible de 9 voltios (no incluida).
La tapa de la batería se encuentra en la parte inferior de la unidad. Abra la tapa tirando de ella.
2. Introduzca la pila de 9 voltios con el lado positivo orientado como se muestra en la imagen.
3. Para volver a colocar la tapa de la pila, sitúe el borde superior y cierre a presión la parte
inferior de la tapa de la pila.
4. Después de instalar la pila, el control de los ladridos deluxe para exteriores se activará (ON)
y empezará a detectar y corregir los ladridos. Hasta que se ajusten el reloj y el temporizador,
la pantalla LCD estará en blanco a excepción del indicador de carga de la pila.
Nota: asegúrese de introducir en el compartimento una pila de 9 voltios cargada.
EN
Duración de la pila
Para prolongar la duración de la pila, recomendamos usar los temporizadores incorporados.
Dependiendo de la frecuencia con la que ladre el perro y de si se usan los temporizadores, una
pila puede durar de media hasta 2 meses.
FR
No intente cortar ni abrir la pila para curiosear dentro. Asegúrese de
desechar la pila agotada adecuadamente.
NL
Indicador luminoso de 3 colores
ES
El indicador luminoso de 3 colores muestra si la pila está bien o baja de carga, e indica si un
temporizador está en uso aunque la unidad esté apagada (OFF). Si la pila está bien, el LED
verde emite 1 destello cada 5 segundos. Si la pila está baja, el LED rojo emite 3 destellos cada 5
segundos. El LED naranja indica que el temporizador 1 y/o el 2 están ajustados y la unidad está
apagada. En el modo de prueba, el LED rojo parpadeará.
Uso del reloj/temporizadores
IT
DE
El control de los ladridos deluxe para exteriores incluye un temporizador con dos ajustes
(desactivado/activado) por cada periodo de 24 horas. Si usa el temporizador se prolongará la
duración de la pila y además evitará que los perros se insensibilicen al ultrasonido.
Nota: antes de usar el temporizador automático hay que ajustar el reloj. Cuando la pila esté
instalada, el control de los ladridos deluxe para exteriores siempre estará encendido a no ser
que se configure un temporizador o se quite la pila.
Pantalla LCD
Use la pantalla LCD para ajustar el formato de la hora, el reloj y los temporizadores del control
de los ladridos deluxe para exteriores. Cada pulsación del botón de selección hace avanzar
la pantalla LCD por las opciones del menú disponibles en el orden siguiente. La pantalla LCD
también muestra la duración de la batería.
Formato de hora: permite cambiar el formato del reloj entre 12 o 24 horas
Ajuste del reloj: permite determinar la hora y los minutos usando los botones H y M
Temporizador 1: permite desactivar o activar el temporizador 1
Temporizador 2: permite desactivar o activar el temporizador 2
Restaurar (rSt): permite poner a cero el reloj y los temporizadores
Prueba (tSt): permite realizar una prueba de la unidad
Nota: si después de 1 minuto no se ha pulsado ningún botón, la pantalla LCD se pondrá en
blanco. Pulse cualquier botón para que aparezca el reloj o revisar las opciones del menú.
www.petsafe.net
47
EN
Ajuste del formato de hora
NL
FR
1. Para iniciar el modo TIME FORMAT (formato de la hora), pulse y suelte
el botón de selección una vez.
2. Pulse y suelte el botón H para elegir el formato de tiempo de 12 horas
o el botón M para el formato de 24 horas.
3. Pulse el botón de selección para confirmar el ajuste del formato
de hora.
4. Después de confirmar el TIME FORMAT (formato de la hora), el menú de la pantalla LCD
del control de los ladridos deluxe para exteriores cambiará automáticamente al modo SET
CLOCK (ajustar el reloj) (1) y podrá ajustar la hora.
Ajuste del reloj
ES
Después de haber ajustado el formato de la hora, ya puede introducir
la hora en el reloj.
1
DE
IT
1. Pulse y suelte el botón de selección hasta que aparezca
SET CLOCK (ajustar el reloj) en la pantalla LCD (1). Nota:
después de determinar el formato de la hora, el menú `pasará
2
automáticamente a SET CLOCK (ajustar el reloj). Cuando haya
pulsado el botón H o M, la pantalla LCD cambiará (2) y podrá
comenzar a ajustar la hora.
2. Pulse y suelte el botón H para cambiar la hora (si está en el formato
de tiempo de 12 horas, asegúrese de introducir la hora correcta
3
en AM/PM).
3. Pulse y suelte el botón M para cambiar los minutos. Nota: si pulsa y
mantiene pulsado el botón H o M, los dígitos pasarán más rápido.
4. Pulse y suelte el botón de selección para confirmar la hora.
5. Después de confirmar la hora, el menú de la pantalla LCD
4
del control de los ladridos deluxe para exteriores cambiará
automáticamente al modo TIMER 1 OFF (temporizador 1
desactivado) (3).
6. Si no desea ajustar el temporizador 1 después de ajustar el reloj,
pulse y suelte el botón de selección hasta que la pantalla LCD vuelva al reloj (4).
7. Si desea ajustar el temporizador 1, consulte la sección “Desactivar/activar el temporizador
1”. Cuando use el temporizador 1 (y el 2 si lo desea) los ajustes de desactivación/activación
se repetirán a diario.
Nota: el reloj y los temporizadores deben reprogramarse cuando cambie la pila.
48
www.petsafe.net
EN
Desactivar/activar el temporizador 1
FR
Después de haber ajustado el reloj, ya puede programar el temporizador. 5
1. Pulse el botón de selección hasta que aparezca TIMER 1 OFF
(temporizador 1 desactivado) (3) en la pantalla LCD. Nota: después
de ajustar el reloj, el menú de la pantalla LCD pasará al modo TIMER
1 OFF (temporizador 1 desactivado) de forma predeterminada.
2. Pulse y suelte el botón H una vez y “0:00” parpadeará (5). Nota: en 6
el formato de tiempo de 12 horas parpadeará “12:00AM”.
3. Pulse y suelte el botón H para cambiar la hora (si está en el formato de
tiempo de 12 horas, asegúrese de introducir la hora en AM/PM).
4. Pulse y suelte el botón M para cambiar los minutos.
7
5. Pulse y suelte el botón de selección para confirmar la hora de
TIMER 1 OFF (temporizador 1 desactivado).
6. Después de ajustar la hora de TIMER 1 OFF (temporizador 1 desactivado),
el menú de la pantalla LCD pasará automáticamente al modo TIMER 1
ON (temporizador 1 activado). Este paso debe realizarse para ajustar la
secuencia del temporizador 1.
7. Pulse y suelte el botón H una vez y “0:00” parpadeará (6). Nota: en el formato de tiempo
de 12 horas parpadeará “12:00AM”.
8. Pulse y suelte el botón H para cambiar la hora (si está en el formato de tiempo de
12 horas, asegúrese de introducir la hora en AM/PM).
9. Pulse y suelte el botón M para cambiar los minutos.
10. Pulse y suelte el botón de selección para confirmar la hora de TIMER 1 ON (temporizador 1 activado).
11. Después de confirmar la hora, el menú de la pantalla LCD del control de los ladridos
deluxe para exteriores cambiará automáticamente al modo TIMER 2 OFF (temporizador 2
desactivado) (7). Si no desea ajustar el temporizador 2 después de ajustar el temporizador 1,
pulse y suelte el botón de selección hasta que la pantalla LCD vuelva al reloj (4).
12. Si desea ajustar el temporizador 2, consulte la sección “Desactivar/activar el temporizador 2”.
Nota: si ha programado el temporizador 1, el control de los ladridos deluxe para exteriores
seguirá desactivándose/activándose a diario según los ajustes hasta que se cambien las horas
o se sustituya la pila.
NL
ES
IT
DE
Desactivar/activar el temporizador 2
1. Pulse el botón de selección hasta que aparezca TIMER 2 OFF
8
(temporizador 2 desactivado) (7) en la pantalla LCD. Nota: después de
ajustar el temporizador 1, el menú de la pantalla LCD pasará al modo
TIMER 2 OFF (temporizador 2 desactivado) de forma predeterminada.
2. Pulse y suelte el botón H una vez y “0:00” parpadeará (8). Nota: en el
formato de tiempo de 12 horas parpadeará “12:00AM”.
3. Pulse y suelte el botón H para cambiar la hora (si está en el formato de tiempo de 12 horas, asegúrese
de introducir la hora en AM/PM).
4. Pulse y suelte el botón M para cambiar los minutos.
5. Pulse y suelte el botón de selección para confirmar la hora de TIMER 2 OFF (temporizador 2
desactivado).
www.petsafe.net
49
NL
FR
EN
6. Después de ajustar la hora de TIMER 2 OFF (temporizador 2 desactivado), el menú de la
pantalla LCD pasará automáticamente al modo TIMER 2 ON
(temporizador 2 activado). Este paso debe realizarse para ajustar 9
la secuencia del temporizador 2.
7. Pulse y suelte el botón H una vez y “0:00” parpadeará (9). Nota:
en el formato de tiempo de 12 horas parpadeará “12:00AM”.
8. Pulse y suelte el botón H para cambiar la hora (si está en el formato
de tiempo de 12 horas, asegúrese de introducir la hora en AM/PM).
9. Pulse y suelte el botón M para cambiar los minutos.
10. Pulse y suelte el botón de selección para confirmar la hora de TIMER 2 ON (temporizador 2 activado).
11. Después de confirmar la hora, el menú de la pantalla LCD del control de los ladridos deluxe
para exteriores cambiará automáticamente al modo RESET (restaurar). Siga pulsando y
soltando el botón de selección hasta que la pantalla LCD vuelva al reloj (4). Si ha programado
el temporizador 2, el control de los ladridos deluxe para exteriores seguirá desactivándose/
activándose a diario según los ajustes hasta que se cambien las horas o se sustituya la pila.
ES
Restaurar el reloj y los temporizadores
DE
IT
1. Pulse y suelte el botón de selección hasta que en la pantalla LCD
parpadee “rSt” (restaurar).
2. Pulse y mantenga pulsado durante 5 segundos el botón H. Mantenga
pulsado el botón H y después pulse y suelte el botón M.
3. Todas las horas se habrán puesto a cero.
Nota: para mantener la hora del reloj y restaurar solo la hora del temporizador 1 y/o el 2, no es
necesario poner a cero todas las horas. Pulse y suelte el botón de selección para desplazarse por las
opciones del menú en la pantalla LCD hasta que llegue al temporizador que quiere restaurar. Pulse los
botones H o M para cambiar la hora. Pulse el botón de selección para confirmar el cambio de hora.
Pulse y suelte el botón de selección hasta que el menú de la pantalla LCD vuelva al reloj.
Probar el control de los ladridos deluxe
para exteriores
Importante: cuando pruebe el control de los ladridos deluxe para exteriores no debería haber perros
dentro del alcance de la unidad para asegurarse de que no reciban un estímulo durante la prueba.
1. Pulse y mantenga pulsados durante 3 segundos el botón H y el botón
M a la vez.
2. El control de los ladridos deluxe para exteriores mostrará "tSt"
(prueba) para indicar que está en el modo de prueba.
3. Grite la palabra "ladrar" o sople en el micrófono situado en la parte
frontal de la unidad.
4. El control de los ladridos deluxe para exteriores detectará el sonido, y para confirmar que
está en funcionamiento emitirá 3 pitidos breves y parpadeará el LED rojo.
5. Para asegurarse de que la unidad está funcionando, puede repetir los pasos 3 – 4 si es necesario.
6. Después de 30 segundos, el modo de prueba se cancelará automáticamente y la unidad volverá al
50
www.petsafe.net
funcionamiento normal. También puede pulsar y soltar el botón de selección para salir del modo de prueba.
EN
Se deben tomar precauciones cuando se pruebe el control de los ladridos deluxe
para exteriores. Evite repetir el modo de prueba durante mucho tiempo. Consulte
la información de seguridad importante en la página 42 para más información.
FR
Qué se puede esperar durante el uso del
control de los ladridos deluxe para exteriores
NL
Coloque el control de los ladridos deluxe para exteriores al alcance del perro con la unidad
activada. La mayoría de los perros comprenderán muy rápidamente que el control de los ladridos
deluxe para exteriores está interrumpiendo sus ladridos, se relajarán y dejarán de ladrar.
Notará que su perro reduce los ladridos en las dos primeras semanas de uso control de los
ladridos deluxe para exteriores. Tenga en cuenta que el producto puede no funcionar con perros
sordos o con discapacidad auditiva.
Los ladridos excesivos pueden suponer una verdadera tensión en la relación con su mascota,
además de causar molestias a sus vecinos. Visite nuestro sitio web para ver otras soluciones
personalizadas al problema que supone el exceso de ladridos.
ES
IT
Mantenimiento periódico
DE
• Retire la pila antes de la limpieza.
• Limpie el control de los ladridos deluxe para exteriores con un paño húmedo.
• No utilice ningún tipo de productos químicos en spray ni disolventes para limpiar la unidad.
• No sumerja la unidad en agua ni en ningún otro líquido.
Nota: el control de los ladridos deluxe para exteriores es estanco. No obstante, si entra agua
por el micrófono se puede interrumpir el funcionamiento de la unidad. Cuando se seque el
micrófono, la unidad volverá a funcionar correctamente.
Preguntas frecuentes
¿Qué alcance tiene el
control de los ladridos
deluxe para exteriores?
El control de los ladridos deluxe detecta los ladridos y emite
el ultrasonido con un alcance de 15 metros.
¿Puedo usar el control de
los ladridos deluxe para
exteriores en el interior?
No recomendamos usar el producto en interiores. El control
de los ladridos deluxe para uso en interiores PetSafe® sí es
un producto por ultrasonidos que se puede usar en el interior
con seguridad. Visite nuestro sitio web www.petsafe.net o
póngase en contacto con el Centro de Atención al Cliente
para obtener más información sobre el producto.
Hay algunas situaciones en las que los perros se vuelven
insensibles. Para evitarlo, use los temporizadores para
activar el control de los ladridos deluxe para exteriores en
los periodos en que no quiera que el perro ladre (es decir,
desactive la unidad cuando se vaya).
¿Es posible que un perro
se vuelva insensible al
sonido ultrasónico?
www.petsafe.net
51
EN
Resolución de problemas
FR
El indicador luminoso
LED verde ha dejado
de parpadear y no hay
ninguna luz roja.
• Asegúrese de que la pila esté instalada correctamente.
• Sustituya la pila.
• Si el indicador luminoso LED verde sigue sin parpadear,
póngase en contacto con el Centro de Atención al Cliente.
NL
Conformidad
ES
Este equipo ha sido sometido a pruebas y ha demostrado cumplir con las principales normas de
compatibilidad electromagnética y de bajo voltaje de la UE. Los cambios o modificaciones sin
autorización realizados en el equipo que no estén aprobados por Radio Systems Corporation
podrían anular la autoridad del usuario para usar el equipo y anularán la garantía.
IT
Este producto cumple las normas de las directivas EMC y LV. La declaración de conformidad se
puede encontrar en: www.petsafe.net/customercare/eu_docs.php
Eliminación de las pilas
DE
En muchas regiones se requiere que las pilas gastadas se recojan por separado; compruebe las
normas de su localidad antes de deshacerse de las baterías gastadas. Consulte la página 46
para ver instrucciones sobre cómo retirar la pila para desecharla por separado. Esta unidad
funciona con una (1) pila alcalina de 9V; sustitúyala solo por una pila igual. Al final de la vida
útil del producto, póngase en contacto con nuestro Centro de Atención al Cliente para recibir
instrucciones sobre la eliminación correcta de la unidad. No tire la unidad en la basura
doméstica o municipal. Para obtener un listado de los números de teléfono de los Centros de
Atención al Cliente de su zona visite nuestro sitio web www.petsafe.net.
52
www.petsafe.net
EN
Aviso importante sobre el reciclaje
FR
Respete las normas relativas a la eliminación de equipos eléctricos y electrónicos de su país. Este
equipo debe ser reciclado. Si no necesita más este equipo, no lo tire a la basura convencional.
Devuélvalo a la tienda donde lo compró para que pueda ser incluido en nuestro sistema de
reciclado. Si esto no es posible, póngase en contacto con el Centro de Atención al Cliente para
obtener más información. Para obtener un listado de los números de teléfono de los Centros de
Atención al Cliente visite nuestro sitio web www.petsafe.net.
NL
Condiciones de uso y limitación de
responsabilidad
IT
DE
www.petsafe.net
ES
1. Condiciones de uso
El uso de este producto está sujeto a su aceptación sin modificación alguna de los términos,
las condiciones y las notificaciones aquí incluidas. El uso de este producto implica la
aceptación de dichos términos, condiciones y notificaciones. Si no desea aceptar estos
términos, condiciones y notificaciones, devuelva el Producto, sin utilizar en su paquete
original, con portes pagados y asumiendo el riesgo del envío al Centro de Atención al Cliente
pertinente, junto con la prueba de compra para obtener una devolución total.
2. Uso correcto
Este producto está diseñado para utilizarse con mascotas cuando se quiere adiestrarlas. El
temperamento específico o tamaño/peso de su mascota puede que no sean adecuados
para este producto (consulte “Cómo funciona el sistema” en este manual de funcionamiento).
Radio Systems Corporation recomienda no usar este producto si su mascota es agresiva, y no
acepta ninguna responsabilidad para determinar la idoneidad en casos individuales. Si no
está seguro de si este producto es apropiado para su mascota, consulte con su veterinario o
un adiestrador certificado antes de usarlo. El uso correcto incluye, sin limitación, la revisión de
todo el manual de funcionamiento y cualquier declaración de precaución específica.
3. Uso ilegal o prohibido
Este producto está diseñado para utilizarse solo con mascotas. Este dispositivo de adiestramiento de
mascotas no tiene como propósito herir, dañar ni provocar al animal. El uso de este producto de una
forma que no sea la prevista podría ocasionar una infracción de las leyes federales, estatales o locales.
4. Limitación de responsabilidad
Radio Systems Corporation o cualquiera de sus empresas asociadas no serán responsables en ningún
caso por (i) ningún daño indirecto, punitivo, accidental, especial o consecuencial, o (ii) cualquier pérdida
o daño que resulte o esté relacionado con el uso indebido de este producto. El comprador asume todos los
riesgos y responsabilidades del uso de este producto hasta el límite máximo que permita la ley. Para evitar
cualquier duda, nada de lo estipulado en esta cláusula 4 limitará la responsabilidad de Radio Systems
Corporation respecto a muerte humana, daños personales, fraude o tergiversación fraudulenta.
5. Modificación de las condiciones generales
Radio Systems Corporation se reserva el derecho a cambiar periódicamente los términos, condiciones y
notificaciones bajo las que este producto se ofrece. Si dichos cambios le han sido notificados antes de usar
este producto, serán vinculantes para usted del mismo modo que si estuvieran incluidos en este documento.
53
EN
Garantía
De tres años no transferible garantía limitada
FR
El fabricante de este producto ofrece una garantía limitada. La información relativa a la garantía
aplicable a este producto y sus condiciones se pueden encontrar en www.petsafe.net. También
las puede solicitar enviando un sobre prefranqueado a Radio Systems PetSafe Europe Ltd, 2nd
Floor, Elgee Building, Market Square, Dundalk, Ireland.
DE
IT
ES
NL
Protegido por la patente estadounidense 6,724,919
54
www.petsafe.net
EN
IMPORTANTI INFORMAZIONI
DI SICUREZZA
Spiegazione dei termini e dei simboli di attenzione utilizzati in questa guida
FR
È il simbolo di allerta sicurezza. Si usa per avvisare di ogni possibile
rischio di infortunio alle persone. Osservare tutti i messaggi di sicurezza
segnalati da questo simbolo per evitare possibili infortuni o la morte.
NL
AVVERTENZA indica una situazione di rischio che, se non evitata,
potrebbe provocare la morte o gravi lesioni.
ATTENZIONE, utilizzato con il simbolo di allerta sicurezza, indica una
situazione di pericolo che, se non evitata, potrebbe causare infortuni di
lieve o moderata entità.
ES
ATTENZIONE, utilizzato senza il simbolo di allerta sicurezza, indica una
situazione di pericolo che, se non evitata, potrebbe nuocere all’animale.
IT
• Rischio di esplosione. Non mandare in cortocircuito, mescolare
batterie usate con quelle nuove, bruciare o esporre all'acqua. Per
conservare o eliminare le batterie, proteggerle da cortocircuito.
Eliminare le batterie esauste conformemente alle disposizioni vigenti.
• Da non utilizzare con cani aggressivi. Non utilizzare questo prodotto
se il cane è o tende ad avere un comportamento aggressivo. I cani
aggressivi possono causare gravi ferite e persino il decesso del loro
padrone e di altri. Se non si sa con certezza se il prodotto sia adatto al
cane, consultare il veterinario di fiducia o un addestratore autorizzato.
DE
• La maggioranza degli esseri umani non avverte gli ultrasuoni,
adottare tuttavia le precauzioni del caso nel preparare il dispositivo
per il controllo dell'abbaio all'aperto Deluxe.
• Tenere il dispositivo per il controllo dell'abbaio all'aperto a distanza
di un braccio dall'orecchio del padrone onde evitare lesioni dell'udito
se il cane inizia ad abbaiare durante l'impostazione, il montaggio o
quando si appende il dispositivo.
• Evitare di stazionare nelle immediate vicinanze del dispositivo per il
controllo dell'abbaio all'aperto Deluxe quando è acceso.
• Questo dispositivo è destinato esclusivamente all'uso con cani. Non cercare
mai di utilizzarlo per scopi diversi da quelli descritti nel presente manuale.
• Solo per esterni. Per informazioni sui prodotti per il controllo dell'abbaio
PetSafe® più indicati per gli esterni, rivolgersi al Centro di assistenza clienti.
• Il dispositivo per il controllo dell'abbaio all'aperto Deluxe non è un
giocattolo. Tenere lontano dalla portata dei bambini. Usarlo solo per
controllare l'abbaio del cane.
www.petsafe.net
55
FR
EN
Grazie per aver scelto il marchio PetSafe®. Voi e il vostro animale meritate un'amicizia fatta
di momenti indimenticabili e di comprensione reciproca. I nostri prodotti e strumenti per
l'addestramento promuovono uno stile di vita all'insegna della protezione, dell'insegnamento
e dell'amore che rimangono nei ricordi per tutta la vita. Per ogni domanda sui nostri prodotti o
sull'addestramento del vostro cane, visitare il nostro sito all'indirizzo www.petsafe.net o rivolgersi
al nostro Centro di assistenza clienti. Per l'elenco dei numeri di telefono dei Centri di assistenza
nella vostra zona, visitare il sito Web www.petsafe.net.
NL
Per usufruire della copertura integrale della nostra garanzia, è necessario registrare il prodotto
entro 30 giorni sul sito www.petsafe.net. La registrazione e la conservazione della ricevuta
consentono di usufruire della completa garanzia sul prodotto e di ottenere un’assistenza più
rapida dal Centro di assistenza clienti in caso di necessità. Soprattutto, i vostri preziosi dati
personali non verranno mai cedutio venduti a terzi. Il testo completo della garanzia si trova sul
nostro sito web all’indirizzo www.petsafe.net.
ES
Indice
DE
IT
Componenti . . . . . . . . . . . . . . . . . . . . . . . . . . . . . . . . . . . . . . . . . . . . . . . . . . . . . . . . . . . . . . . 57
Caratteristiche . . . . . . . . . . . . . . . . . . . . . . . . . . . . . . . . . . . . . . . . . . . . . . . . . . . . . . . . . . . . . 57
Usi possibili del dispositivo per il controllo dell'abbaio all'aperto Deluxe . . . . . . . . . . . . . 57
Come funziona il sistema . . . . . . . . . . . . . . . . . . . . . . . . . . . . . . . . . . . . . . . . . . . . . . . . . . . . . 58
Definizioni chiave. . . . . . . . . . . . . . . . . . . . . . . . . . . . . . . . . . . . . . . . . . . . . . . . . . . . . . . . . . . 58
Installazione e impostazione . . . . . . . . . . . . . . . . . . . . . . . . . . . . . . . . . . . . . . . . . . . . . . . . . . 59
Inserimento e rimozione delle batterie . . . . . . . . . . . . . . . . . . . . . . . . . . . . . . . . . . . . . . . . . . 59
Spia luminosa a tre colori . . . . . . . . . . . . . . . . . . . . . . . . . . . . . . . . . . . . . . . . . . . . . . . . . . . . 60
Utilizzo dell'orologio/timer . . . . . . . . . . . . . . . . . . . . . . . . . . . . . . . . . . . . . . . . . . . . . . . . . . . 60
Display LCD . . . . . . . . . . . . . . . . . . . . . . . . . . . . . . . . . . . . . . . . . . . . . . . . . . . . . . . . . . . . . . . 60
Impostazione del formato dell'ora . . . . . . . . . . . . . . . . . . . . . . . . . . . . . . . . . . . . . . . . . . . . . 61
Impostazione dell'orologio . . . . . . . . . . . . . . . . . . . . . . . . . . . . . . . . . . . . . . . . . . . . . . . . . . . 61
Impostazione del timer 1 su Spento/Acceso. . . . . . . . . . . . . . . . . . . . . . . . . . . . . . . . . . . . . 62
Impostazione del timer 2 su Spento/Acceso. . . . . . . . . . . . . . . . . . . . . . . . . . . . . . . . . . . . . 62
Reimpostazione dell'orologio e dei timer . . . . . . . . . . . . . . . . . . . . . . . . . . . . . . . . . . . . . . . . 63
Test del dispositivo per il controllo dell'abbaio all'aperto Deluxe . . . . . . . . . . . . . . . . . . . . 63
Cosa aspettarsi dall'uso del dispositivo per il controllo dell'abbaio all'aperto Deluxe . . . 64
Manutenzione . . . . . . . . . . . . . . . . . . . . . . . . . . . . . . . . . . . . . . . . . . . . . . . . . . . . . . . . . . . . . 64
Domande frequenti . . . . . . . . . . . . . . . . . . . . . . . . . . . . . . . . . . . . . . . . . . . . . . . . . . . . . .64
Individuazione e risoluzione dei guasti . . . . . . . . . . . . . . . . . . . . . . . . . . . . . . . . . . .65
Conformità . . . . . . . . . . . . . . . . . . . . . . . . . . . . . . . . . . . . . . . . . . . . . . . . . . . . . . . . . . . . . . . . 65
Eliminazione delle batterie . . . . . . . . . . . . . . . . . . . . . . . . . . . . . . . . . . . . . . . . . . . . . . . . . . . 65
Limitazione di responsabilità e condizioni di utilizzo . . . . . . . . . . . . . . . . . . . . . . . . . . . . . . 66
Garanzia . . . . . . . . . . . . . . . . . . . . . . . . . . . . . . . . . . . . . . . . . . . . . . . . . . . . . . . . . . . . . . . . . 67
56
www.petsafe.net
EN
Componenti
FR
Dispositivo per il controllo
antiabbaio all'aperto
®
Deluxe PetSafe
NL
ES
Manuale d'uso
IT
Caratteristiche
DE
• Timer integrato per due pre-impostazioni SPENTO/ACCESO
• Utilizza gli ultrasuoni per inibire ogni fastidioso abbaio
• Rileva l'abbaio fino a 15 metri di distanza
• Duraturo e resistente all'azione degli agenti atmosferici
• Il LED a tre colori segnala il buon funzionamento della batteria e lo stato di batteria scarica,
funge da indicatore di Timer 1 e Timer 2 spenti, e segnala l'attivazione della stimolazione a
ultrasuoni
Usi possibili del dispositivo per il
controllo dell'abbaio all'aperto Deluxe
• Arresta l'abbaio del vostro cane
• Arresta l'abbaio dei cani dei vicini
• Arresta l'abbaio in specifiche ore del giorno
• Addestra i cuccioli a non abbaiare
• Ha effetto deterrente sui cani in campeggio
www.petsafe.net
57
EN
Come funziona il sistema
NL
FR
Quando il dispositivo per il controllo dell'abbaio all'aperto Deluxe PetSafe® si trova in prossimità di un
cane che abbaia, un microfono interno rileva il suono e attiva automaticamente l'unità. Il dispositivo per il
controllo dell'abbaio all'aperto Deluxe emette un segnale ad ultrasuoni che viene percepito dai cani, ma
risulta silente per la maggioranza degli uomini. Sorpreso dalla tonalità elevata del segnale, il cane cessa
di abbaiare poiché associa l'abbaio allo spiacevole segnale. Quando il cane cessa di abbaiare, anche il
segnale a ultrasuoni si interrompe. Alcuni timer programmabili permettono di inibire l'abbaio in certe ore del
giorno ad esempio al passaggio dei bambini che tornano da scuola. L'impostazione dei timer aiuta anche a
preservare la durata della batteria. Il dispositivo per il controllo dell'abbaio all'aperto Deluxe è munito di un
timer per due pre-impostazioni di spegnimento/accensione. È efficace fino a 15 metri.
Nota: se il cane è sordo o debole di udito, potrebbe non reagire al dispositivo per il controllo dell'abbaio
all'aperto Deluxe.
ES
Definizioni chiave
Lato anteriore
IT
Gancio metallico: per appendere il
dispositivo per il controllo dell'abbaio
all'aperto Deluxe.
Microfono: utilizzato per rilevare l'abbaio.
Microfono attivato dal suono: produce
il segnale a ultrasuoni.
Vista
anteriore
Gancio metallico
Microfono
Microfono attivato
dal suono
Vista
posteriore
DE
Lato posteriore
Pulsante di
Pulsante di Selezione: si usa per scorrere
Ore
Selezione
tra le voci di menu e per selezionarle.
Spia luminosa
Minuti
a
tre
colori
Pulsante dell'ora: imposta il formato
Parte
Display
dell'ora, l'orologio e l'ora del Timer 1 e del
inferiore
LCD
Timer 2.
Pulsante minuti: imposta i minuti dell'ora,
dell'orologio, del Timer 1 e del Timer 2.
Coperchio del vano batteria
Spia luminosa a tre colori: segnala il
buon funzionamento della batteria e lo stato
di batteria scarica, funge da indicatore di
Timer 1 e Timer 2 spenti, e segnala l'attivazione delle stimolazioni a ultrasuoni.
Display LCD: indica il formato dell'ora, l'orologio, i timer, i test e le funzioni di reset.
Lato inferiore
Coperchio del vano batteria: chiude il vano batteria.
58
www.petsafe.net
EN
Installazione e impostazione
FR
Il dispositivo per il controllo dell'abbaio all'aperto Deluxe deve essere collocato di fronte al cane
ed entro il raggio di azione dell'animale. L'unità è munita di ganci per appenderla o può funzionare
autonomamente ad un'altezza non superiore a 1,5 m. Può essere posizionata su un albero, appesa
ad un palo, a una staccionata, ecc. Per ottenere i migliori risultati, tenere lo spazio tra il dispositivo
per il controllo dell'abbaio all'aperto Deluxe e il cane, libero da ostacoli di grandi dimensioni.
NL
ES
IT
Inserimento e rimozione delle batterie
BATTERIE
DE
Importante: all'inserimento o alla rimozione delle batterie, all'impostazione dell'orologio o alla
programmazione dei timer, il cane deve essere a distanza sufficiente dall'unità da non ricevere
alcuna stimolazione.
1. Il dispositivo per il controllo dell'abbaio all'aperto Deluxe utilizza una batteria sostituibile da 9 volt
(non inclusa). Il coperchio del vano batteria è sul fondo dell'unità. Per aprire, sollevare il coperchio.
2. Inserire la batteria da 9 volt con il lato positivo orientato come nell'illustrazione.
3. Rimontare il coperchio del vano batteria posizionando il lato superiore e facendo scattare in
posizione quello inferiore.
4. Dopo l'installazione della batteria, il dispositivo per il controllo dell'abbaio all'aperto Deluxe
si accenderà e inizierà a rilevare e inibire l'abbaio. Il display a LCD sarà vuoto ad eccezione
dell'indicatore di stato di carica della batteria finché l'orologio e i timer non saranno impostati.
Nota: verificare che nel vano batteria sia installata una pila da 9 volt funzionante.
www.petsafe.net
59
EN
Autonomia della batteria
Per preservare l'autonomia della batteria si raccomanda di utilizzare i timer integrati. In base alla
frequenza di abbaio del cane e all'utilizzo o meno dei timer, la batteria può durare fino a 58 mesi.
FR
Non provare a tagliare né a fare leva per aprire la batteria. Smaltire
la batteria in modo corretto.
NL
Spia luminosa a tre colori
ES
La spia luminosa LED a tre colori segnala lo stato della batteria (in funzione o scarica) e indica
quando un timer è in uso, ma è spento. Se la batteria è funzionante il LED verde lampeggia 1
volta ogni 5 secondi. Se la carica della batteria è in esaurimento il LED rosso lampeggia
3 volte ogni 5 secondi. Se il LED è arancione, il Timer 1 e/o il Timer 2 è impostato, ma l'unità è
spenta. In modo di test, il LED rosso inizierà a lampeggiare.
Utilizzo dell'orologio/timer
DE
IT
Il dispositivo per il controllo dell'abbaio all'aperto Deluxe è munito di un timer con due preimpostazioni di accensione/spegnimento per un'escursione totale di 24 ore. L'utilizzo del timer
prolunga la vita della batteria e aiuta a impedire che i cani perdano la sensibilità agli ultrasuoni.
Nota: prima di utilizzare il timer automatico, è necessario impostare l'orologio. Quando la
batteria è installata, il dispositivo per il controllo dell'abbaio all'aperto Deluxe è sempre acceso
(ON) tranne se il timer è impostato o la batteria è stata rimossa.
Display LCD
Utilizzare il display LCD per impostare il formato dell'ora, l'orologio e i timer del dispositivo per
il controllo dell'abbaio all'aperto Deluxe. Ad ogni pressione del pulsante di Selezione il display
LCD scorre tra le opzioni disponibili di menu nell'ordine seguente. Il display LCD indica inoltre
l'autonomia restante della batteria.
Formato dell'ora: imposta l'orologio nel formato ore 12 o 24
Impostazione dell'orologio: imposta l'ora e i minuti dell'orologio agendo sui pulsanti
H (ore) e M (minuti)
Timer 1: imposta lo spegnimento o l'accensione del Timer 1
Timer 2: imposta lo spegnimento o l'accensione del Timer 2
Reset (rSt): reimposta l'orologio e i timer
Test (tSt): prova il funzionamento dell'unità
Nota: dopo 1 minuto d'inattività o se non si preme alcun pulsante, il display LCD appare vuoto.
Premere qualsiasi pulsante perché l'orologio visualizzi le opzioni di menu o per scorrere tra di esse.
60
www.petsafe.net
EN
Impostazione del formato dell'ora
FR
1. Per avviare la modalità TIME FORMAT (Formato ora), premere e
rilasciare una volta il pulsante di Selezione.
2. Premere e rilasciare il pulsante H (ore) per impostare il formato su 12
ore o il pulsante M (minuti) per impostare il formato su 24 ore.
3. Premere il pulsante di Selezione per confermare l'impostazione del
formato dell'ora.
4. Dopo la conferma del TIME FORMAT (Formato ora), il dispositivo per il controllo dell'abbaio
all'aperto Deluxe commuta automaticamente sulla modalità SET CLOCK (Imposta orologio)
del menu del display LCD (1) e diviene possibile regolare l'ora.
NL
Impostazione dell'orologio
1
ES
Dopo l'impostazione del formato ora, è possibile accedere
all'impostazione dell'ora dell'orologio.
DE
www.petsafe.net
IT
1. Premere e rilasciare il pulsante di Selezione fino a visualizzare
SET CLOCK (Imposta orologio) sul display LCD (1). Nota: dopo
aver impostato il formato dell'ora il menu torna a visualizzare
2
automaticamente l'impostazione di default SET CLOCK (Imposta
orologio). Premendo il pulsante H (ore) o M (minuti), il display LCD
si modifica (2) e diviene possibile regolare l'ora.
2. Premere e rilasciare il pulsante H (ore) fino a visualizzare l'ora
3
corretta (se il formato è di 12 ore, verificare di aver impostato la
notazione AM/PM, ossia ante/post meridiem).
3. Premere e rilasciare il pulsante M (minuti) fino a visualizzare i minuti
corretti.
Nota: tenendo premuti i pulsanti H (ore) o M (minuti) si avanzerà
4
tra i numeri più rapidamente.
4. Per confermare l'impostazione del formato dell'ora premere il
pulsante di Selezione.
5. Dopo la conferma del TIME FORMAT (Formato ora), il
dispositivo per il controllo dell'abbaio all'aperto Deluxe commuta
automaticamente sulla modalità TIMER 1 OFF ( Timer 1 spento) nel menu del display LCD (3).
6. Se si sceglie di non impostare il Timer 1 dopo aver impostato l'orologio, premere e rilasciare il
pulsante di Selezione finché il display LCD non torna all'orologio (4).
7. Se si è scelto di utilizzare Timer 1 consultare la sezione “Impostazione del timer 1 su Spento/
Acceso”. Quando si usa il Timer 1 (e il Timer 2, se si desidera), l'impostazione Spento/
Acceso programmata verrà ripetuta ogni giorno. Nota: l'orologio e i timer devono essere
riprogrammati quando si sostituisce la batteria.
61
EN
Impostazione del timer 1 su Spento/Acceso
DE
IT
ES
NL
FR
Dopo l'impostazione dell'orologio, è possibile accedere alla
5
programmazione degli eventi a tempo.
1. Premere il pulsante di selezione fino a visualizzare TIMER 1 OFF
(Timer 1 spento) (3) sul display LCD. Nota: dopo aver impostato
l'orologio, il menu del display LCD torna per impostazione
predefinita alla modalità TIMER 1 OFF (Timer 1 spento).
6
2. Premere e rilasciare una volta il pulsante H (ore) e “0:00” inizierà a
lampeggiare (5). Nota: nel formato su 12 ore lampeggerà “12:00AM”.
3. Premere e rilasciare il pulsante H (ore) fino a visualizzare l'ora
corretta (se il formato è di 12 ore, verificare di aver impostato la
notazione AM/PM, ossia ante/post meridiem).
7
4. Premere e rilasciare il pulsante M (minuti) fino a visualizzare i minuti corretti.
5. Per confermare l'impostazione TIMER 1 OFF (Timer 1 spento)
premere e rilasciare il pulsante di Selezione.
6. Dopo aver impostato l'ora del TIMER 1 OFF (Timer 1 spento),
il menu del display LCD torna automaticamente per impostazione
predefinita alla modalità TIMER 1 ON (Timer 1 acceso). Questa fase deve essere completata
per poter impostare la sequenza del Timer 1.
7. Premere e rilasciare una volta il pulsante H (ore) e “0:00” inizierà a lampeggiare (6).
Nota: nel formato su 12 ore lampeggerà “12:00AM”.
8. Premere e rilasciare il pulsante H (ore) fino a visualizzare l'ora corretta (se il formato è di 12
ore, verificare di aver impostato la notazione AM/PM, ossia ante/post meridiem).
9. Premere e rilasciare il pulsante M (minuti) fino a visualizzare i minuti corretti.
10. Per confermare l'impostazione TIMER 1 ON (Timer 1 acceso) premere e rilasciare il pulsante
di Selezione.
11. Dopo la conferma dell'ora, il dispositivo per il controllo dell'abbaio all'aperto Deluxe
commuta automaticamente sulla modalità TIMER 2 OFF (Timer 2 spento) nel menu del
display LCD (7). Se si sceglie di non impostare il Timer 2 dopo aver impostato il Timer 1,
premere e rilasciare il pulsante di Selezione finché il display LCD non torna all'orologio (4).
12. Se si è scelto di utilizzare Timer 2 consultare la sezione “Impostazione del timer 2 Spento/
Acceso”. Nota: se si è programmato il Timer 1, il dispositivo per il controllo dell'abbaio
all'aperto Deluxe continuerà a spegnersi/accendersi ogni giorno fino a quando non si
reimposterà l'ora o si sostituirà la batteria.
Impostazione del timer 2 su Spento/Acceso
8
1. Premere il pulsante di Selezione fino a visualizzare TIMER 2 OFF
(Timer 2 spento) (7) sul display LCD. Nota: dopo aver impostato il
Timer 1, il menu del display LCD torna per impostazione predefinita
alla modalità TIMER 2 OFF (Timer 2 spento).
2. Premere e rilasciare una volta il pulsante H (ore) e “0:00” inizierà a
lampeggiare (8). Nota: nel formato su 12 ore lampeggerà “12:00AM”.
3. Premere e rilasciare il pulsante H (ore) fino a visualizzare l'ora corretta (se il formato è di 12
ore, verificare di aver impostato la notazione AM/PM, ossia ante/post meridiem).
4. Premere e rilasciare il pulsante M (minuti) fino a visualizzare i minuti corretti.
5. Per confermare l'impostazione TIMER 2 OFF (Timer 2 spento) premere e rilasciare il pulsante
di Selezione.
62
www.petsafe.net
EN
6. Dopo aver impostato l'ora del TIMER 2 OFF (Timer 2 spento), il menu del display LCD torna
automaticamente per impostazione predefinita alla modalità
9
TIMER 2 ON (Timer 2 acceso). Questa fase deve essere
completata per poter impostare la sequenza del Timer 2.
7. Premere e rilasciare una volta il pulsante H (ore) e “0:00” inizierà a
lampeggiare (9).
Nota: nel formato su 12 ore lampeggerà “12:00AM”.
8. Premere e rilasciare il pulsante H (ore) fino a visualizzare l'ora corretta (se il formato è di 12
ore, verificare di aver impostato la notazione AM/PM, ossia ante/post meridiem).
9. Premere e rilasciare il pulsante M (minuti) fino a visualizzare i minuti corretti.
10. Per confermare l'impostazione TIMER 2 ON (Timer 2 acceso) premere e rilasciare il pulsante
di Selezione.
11. Dopo la conferma dell'ora, il dispositivo per il controllo dell'abbaio all'aperto Deluxe
commuta automaticamente sulla modalità RESET nel menu del display LCD. Tenere premuto
il pulsante di Selezione finché il display LCD non torna all'orologio (3). Se si è programmato
il Timer 2, il dispositivo continuerà a spegnersi/accendersi ogni giorno fino a quando non si
reimposterà l'ora o si sostituirà la batteria.
FR
NL
ES
Reimpostazione dell'orologio e dei timer
IT
1. Premere e rilasciare il pulsante di Selezione finché “rSt” non inizia a
lampeggiare sul display LCD.
2. Premere e tenere premuto per 5 secondi il pulsante H (ore), mentre si
preme e si rilascia il pulsante M (minuti).
3. L'impostazione dell'ora è completata. Nota: per mantenere l'ora dell'orologio
e reimpostare unicamente l'ora del Timer 1 e/o del Timer 2, non è necessario reimpostare ogni volta.
Premere e rilasciare il pulsante di Selezione per scorrere tra le opzioni di menu sul display LCD fino
a visualizzare il timer da impostare. Premere i pulsanti H (ore) o M (minuti) per modificare l'ora. Per
confermare l'impostazione aggiornata dell'ora premere il pulsante di Selezione. Premere e rilasciare il
pulsante di Selezione finché il menu visualizzato sul display LCD non torna a visualizzare l'orologio.
DE
Test del dispositivo per il controllo
dell'abbaio all'aperto Deluxe
Importante: quando si prova il funzionamento del dispositivo per il controllo dell'abbaio
all'aperto Deluxe, non vi devono essere cani nel raggio d'azione dell'unità per evitare che
ricevano una stimolazione involontaria durante la prova.
1. Tenere premuti contemporaneamente il pulsante H (ore) e M (minuti)
per 3 secondi.
2. Il dispositivo per il controllo dell'abbaio all'aperto Deluxe visualizzerà
“tSt” per indicare che funziona in modo di test.
3. Pronunciare ad alta voce la parola "Abbaia" o soffiare nel microfono sul lato anteriore
dell'unità.
4. Il dispositivo per il controllo dell'abbaio all'aperto rileva il suono ed emette tre brevi segnali
acustici con LED rosso lampeggiante per dimostrare che funziona.
5. Per verificare che l'unità sia in funzione, è possibile ripetere le fasi 3 – 4.
www.petsafe.net
63
EN
6. Dopo 30 secondi il modo di test segnala tempo scaduto e l'unità riprende il normale
funzionamento. Per porre fine al Modo di test, basterà premere e rilasciare il pulsante di Selezione.
FR
Quando si eseguono i test di funzionamento del dispositivo per il controllo
dell'abbaio all'aperto Deluxe è necessario adottare alcune precauzioni.
Evitare di attivare ripetutamente a lungo il Modo di test. Per ulteriori
dettagli, consultare le Importanti informazioni di sicurezza a pagina 55.
NL
Cosa aspettarsi dall'uso del dispositivo per
il controllo dell'abbaio all'aperto Deluxe
IT
ES
Collocare il dispositivo per il controllo dell'abbaio all'aperto Deluxe acceso entro il raggio di azione
dell'animale. La maggioranza dei cani capisce molto rapidamente che il dispositivo per il controllo
dell'abbaio all'aperto interferisce con il bisogno di abbaiare, si rilassa e cessa di abbaiare.
La riduzione dell'abbaio del cane dovrebbe risultare osservabile entro le prime due settimane
dall'utilizzo iniziale del dispositivo per il controllo dell'abbaio all'aperto Deluxe. Il prodotto
potrebbe non funzionare in caso di cani sordi o deboli di udito.
Un abbaio eccessivo può condizionare negativamente il rapporto con il vostro cane e disturbare
particolarmente i vicini. Per altre soluzioni personalizzate al problema dell'abbaio, si prega di
visitare il nostro sito web.
Manutenzione
DE
• Rimuovere la batteria prima della pulizia.
• Pulire il dispositivo per il controllo dell'abbaio all'aperto Deluxe con un panno inumidito.
• Non utilizzare alcun tipo di prodotto chimico spray o solvente per la pulizia.
• Non immergere in acqua o in altro liquido.
Nota: il dispositivo per il controllo dell'abbaio all'aperto Deluxe è resistente all'azione degli
agenti atmosferici. Tuttavia, se penetra acqua nel microfono, il funzionamento dell'unità potrebbe
interrompersi. Una volta asciugato il microfono, l'unità riprende a funzionare correttamente.
Domande frequenti
Qual è la portata del
dispositivo per il controllo
dell'abbaio all'aperto
Deluxe?
Posso usare il dispositivo
per il controllo dell'abbaio
all'aperto Deluxe al
chiuso?
Un cane può diventare
insensibile agli
ultrasuoni?
64
Il dispositivo per il controllo dell'abbaio all'aperto Deluxe
rileva l'abbaio ed emette un segnale ad ultrasuoni in un
raggio di 15 m.
No, l'uso del prodotto al chiuso è sconsigliato. Il dispositivo per il
controllo antiabbaio per interni PetSafe® è il prodotto ad ultrasuoni
più adatto per interni. Per ulteriori informazioni sul prodotto, visitare
il nostro sito Web www.petsafe.net o telefonare al nostro Centro
assistenza clienti.
Ci sono casi in cui il cane si desensibilizza. Per evitarlo, utilizzare
i timer per accendere il dispositivo per il controllo dell'abbaio
all'aperto unicamente quando si vuole evitare un abbaio
fastidioso (e lasciare invece spenta l'unità se ci si assenta).
www.petsafe.net
• Verificare che la batteria sia installata correttamente.
• Sostituire la batteria.
• Se luce verde a LED non lampeggia ancora, rivolgersi al
Centro di assistenza clienti.
FR
La luce verde a LED ha
smesso di lampeggiare e
non vi è luce rossa.
EN
Individuazione e risoluzione dei guasti
NL
Conformità
ES
Questo dispositivo è stato sottoposto a test che ne hanno comprovato la conformità con EU
Electromagnetic Compatibility e Low Voltage Directive. Modifiche o variazioni non autorizzate
da Radio Systems Corporation possono invalidare l’autorizzazione all’uso del dispositivo e
rendere nulla la garanzia.
Questo prodotto è conforme alle disposizioni delle direttive EMC e LV. La dichiarazione di
conformità è disponibile sul sito web: www.petsafe.net/customercare/eu_docs.php
IT
Eliminazione delle batterie
DE
In molti Paesi è obbligatorio raccogliere separatamente le batterie esaurite; controllare le norme
in vigore nella propria zona prima di eliminare le batterie esaurite. Per le istruzioni su come
rimuovere la batteria dal prodotto per smaltirla separatamente, vedere a pagina 59. Questa
unità utilizza un'unica (1) batteria alcalina da 9 volt: sostituirla solo con una equivalente.
Al termine della vita utile del prodotto, contattare uno dei nostri Centri di assistenza clienti per
ricevere istruzioni sul corretto smaltimento dell'unità. Non smaltire l'unità nei normali rifiuti
domestici o urbani. Per l'elenco dei numeri di telefono dei Centri di assistenza clienti nella propria
zona, visitare il sito web www.petsafe.net.
Avviso importante per il riciclaggio
Rispettare le normative per lo smaltimento delle apparecchiature elettriche ed elettroniche vigenti
nel proprio Paese. Questo apparecchio deve essere riciclato. Se non fosse più necessario, non
immetterlo nel normale sistema di smaltimento dei rifiuti urbani. Riportarlo al negozio dove è stato
acquistato perché sia inserito nel nostro sistema di riciclaggio. Se ciò non fosse possibile,
rivolgersi al Centro di assistenza clienti per ulteriori informazioni. Per un elenco dei numeri di
telefono dei Centri di assistenza clienti, visitare il nostro sito web: www.petsafe.net.
www.petsafe.net
65
EN
Limitazione di responsabilità
e condizioni di utilizzo
DE
IT
ES
NL
FR
1. Termini di utilizzo:
l’uso di questo prodotto è soggetto all'accettazione da parte dell'acquirente senza alcuna
modifica dei termini, condizioni e avvisi quivi contenuti. L'uso di questo prodotto implica
l’accettazione della totalità di tali termini, condizioni e avvisi. Se non si desiderano accettare
tali termini, condizioni e avvisi, restituire il prodotto, non utilizzato, nella sua confezione
originale a proprie spese e a proprio rischio, al Centro assistenza clienti di pertinenza assieme
alla prova di acquisto per ottenere il rimborso completo.
2. Utilizzo corretto
Il prodotto è stato progettato per essere utilizzato unicamente per l'addestramento di animali
domestici. Nel caso specifico, il temperamento o la taglia/il peso dell’animale possono non essere
adatti al prodotto (fare riferimento alla sezione “Come funziona il sistema” in questa Guida all'uso).
Radio Systems Corporation sconsiglia di utilizzare questo prodotto se l'animale è aggressivo e
non si assume la responsabilità di stabilire l'idoneità nei singoli casi. Se si nutrono dubbi in merito
all'idoneità del prodotto per il proprio animale, prima dell'uso, consultare il veterinario di fiducia o
un addestratore certificato. Il corretto utilizzo comprende, a titolo esemplificativo ma non esaustivo,
la lettura dell’intera Guida all'uso e di ogni messaggio di attenzione pertinente.
3. Divieto di uso illegale o proibito
Questo prodotto deve essere usato unicamente su animali domestici. Il dispositivo per
l’addestramento non deve essere usato con l’intento di danneggiare, ferire o provocare il cane.
L’uso del prodotto in un modo a cui non è destinato, potrebbe violare le leggi statali o locali.
4. Limitazione di responsabilità
In nessun caso Radio Systems Corporation o una delle sue società consociate deve essere
ritenuta responsabile per (i) danni indiretti, punitivi, accidentali, speciali o consequenziali
e/o (ii) eventuali perdite o danni di qualsiasi genere insorti per causa o in qualunque
modo connessi con l'utilizzo improprio del prodotto. L’acquirente si assume tutti i rischi o le
responsabilità per l’uso di questo prodotto nella misura massima consentita dalla legge. Per
fugare ogni dubbio, nulla nella presente clausola 4 limiterà la responsabilità di Radio Systems
Corporation per la morte di persone, lesioni personali, frode o dichiarazioni fraudolente.
5. Modifica delle condizioni generali
Radio Systems Corporation si riserva il diritto di modificare periodicamente i termini, le
condizioni e gli avvisi che disciplinano l'uso di questo prodotto. Se tali modifiche sono state
notificate all'acquirente prima dell'uso del prodotto, risulteranno vincolanti per il cliente come
se fossero incorporate all'interno di questo documento.
66
www.petsafe.net
EN
Garanzia
Tre anni non trasferibile garanzia limitata
FR
Questo prodotto è fornito completo di una garanzia limitata del produttore. Il testo completo di questa
garanzia applicabile al prodotto e le sue condizioni sono reperibili sul sito web: www.petsafe.net e/o
possono essere richieste inviando una busta affrancata con l'indirizzo del mittente a Radio Systems
PetSafe Europe Ltd, 2nd Floor, Elgee Building, Market Square, Dundalk, Irlanda.
Per ogni dubbio o per richiedere ulteriori informazioni, rivolgersi al Centro di assistenza clienti al
numero: 1800 786 608 (Australia) o 0800 543 054 (Nuova Zelanda).
NL
Protetto da brevetto USA n° 6,724,919.
ES
IT
DE
www.petsafe.net
67
EN
WICHTIGE SICHERHEITSINFORMATION
Erklärung der in diesem Führer verwendeten Warnhinweise und Symbole
FR
Das ist das Sicherheitswarnsymbol. Es wird verwendet, um Sie auf mögliche
persönliche Verletzungsgefahren hinzuweisen. Befolgen Sie alle Sicherheitsmeldungen
nach diesem Symbol, um mögliche Verletzungen oder den Tod zu vermeiden.
NL
WARNUNG weist auf eine Gefahrensituation hin, die, sofern sie nicht vermieden
wird, den Tod oder eine ernsthafte Verletzung zur Folge haben könnte.
VORSICHT weist in Verbindung mit dem Sicherheitswarnsymbol auf
eine Gefahrensituation hin, die, sofern sie nicht vermieden wird, zu einer
geringfügigen oder moderaten Verletzung führen könnte.
ES
VORSICHT weist ohne das Sicherheitswarnsymbol auf eine Gefahrensituation hin,
die, sofern sie nicht vermieden wird, Ihrem Haustier Schaden zufügen könnte.
DE
IT
• Explosionsgefahr. Nicht kurzschließen, neu und alte Batterien vermischen,
in Feuer entsorgen oder mit Wasser in Berührung bringen. Wenn Batterien
gelagert oder entsorgt werden, müssen Sie vor einem Kurzschluss geschützt
werden. Entsorgen Sie verbrauchte Batterien angemessen.
• Nicht zur Verwendung bei aggressiven Hunden. Dieses Produkt nicht
verwenden, wenn Ihr Hund aggressiv ist oder wenn Ihr Hund zu
aggressivem Verhalten tendiert. Aggressive Hunde können ihren Besitzern
und anderen Personen schwere Verletzungen zufügen und sie sogar töten.
Wenn Sie nicht sicher sind, ob dieses Produkt für Ihren Hund angemessen
ist, konsultieren Sie bitte Ihren Tierarzt oder einen zertifizierten Trainer.
• Menschen können das Ultraschallgeräusch nicht hören; es sollten jedoch
Vorsichtsmaßnahmen ergriffen werden, wenn die Bellkontrolle Deluxe für
Aussenbereiche auf den Gebrauch vorbereitet wird.
• Halten Sie sie eine Armlänge von Ihrem Ohr entfernt, um einen Gehörschaden
zu vermeiden, falls ein Hund anfängt zu bellen, während Sie die Bellkontrolle
für Aussenbereiche einrichten, anbringen oder aufhängen.
• Menschen sollten es vermeiden, in unmittelbarer Nähe der Bellkontrolle
Deluxe für Aussenbereiche zu sein, wenn sie eingeschaltet ist.
• Dieses Gerät ist ausschließlich für Hunde vorgesehen. Versuchen Sie nie, es
für Zwecke zu verwenden, die nicht in diesem Handbuch beschrieben sind.
• Nur für den Gebrauch im Freien. Besuchen Sie bitte unsere Website oder wenden
Sie sich an das Kundenservicezentrum, um Informationen über die angemessene
Verwendung von PetSafe® Bellkontrolle-Produkten für Innenräume zu erhalten.
• Die Bellkontrolle Deluxe für Aussenbereiche ist kein Spielzeug. Außer
Reichweite von Kindern aufbewahren. Ausschließlich zum Stoppen von
Bellen verwenden.
68
www.petsafe.net
EN
Vielen Dank für den Kauf der Marke PetSafe®. Sie und Ihr Haustier verdienen eine Freundschaft,
die unvergessliche Momente und ein gegenseitiges Verstehen umfasst. Unsere Produkte und
Trainingstools fördern Geborgenheit, Zuneigung und eine angenehme Lernatmosphäre –
wesentliche Faktoren, die ein Leben lang im Gedächtnis haften bleiben. Bei Fragen zu unseren
Produkten oder zum Training Ihres Haustiers besuchen Sie bitte unsere Website auf www.petsafe.net
oder wenden Sie sich an unser Kundenservicezentrum. Für eine Liste mit den Telefonnummern des
Kundenservicezentrums besuchen Sie bitte unsere Website auf www.petsafe.net.
FR
NL
Um den größten Schutz für Ihre Garantie zu erhalten, registrieren Sie bitte Ihr Produkt innerhalb
von 30 Tagen auf www.petsafe.net. Wenn Sie das Gerät registrieren und Ihre Quittung behalten,
können Sie die volle Garantieleistung für das Produkt in Anspruch nehmen, und sollten Sie das
Kundenservicezentrum kontaktieren müssen, können wir Ihnen schneller helfen. Sehr wichtig Ihre wertvollen Informationen werden nie an Dritte weitergegeben oder verkauft. Die kompletten
Gewährleistungsdetails finden Sie auf www.petsafe.net.
ES
Inhaltsverzeichnis
DE
www.petsafe.net
IT
Bestandteile . . . . . . . . . . . . . . . . . . . . . . . . . . . . . . . . . . . . . . . . . . . . . . . . . . . . . . . . . . . . . . . 70
Produkteigenschaften . . . . . . . . . . . . . . . . . . . . . . . . . . . . . . . . . . . . . . . . . . . . . . . . . . . . . . . . 70
Mögliche Verwendung der Bellkontrolle Deluxe für Aussenbereiche . . . . . . . . . . . . . . . . . 70
So funktioniert das system . . . . . . . . . . . . . . . . . . . . . . . . . . . . . . . . . . . . . . . . . . . . . . . . . . . . 71
Definitionen. . . . . . . . . . . . . . . . . . . . . . . . . . . . . . . . . . . . . . . . . . . . . . . . . . . . . . . . . . . . . . . . 71
Installation und Einrichtung . . . . . . . . . . . . . . . . . . . . . . . . . . . . . . . . . . . . . . . . . . . . . . . . . . . 72
Einsetzen und Herausnehmen der Batterie . . . . . . . . . . . . . . . . . . . . . . . . . . . . . . . . . . . . . . . 72
Dreifarbige LED . . . . . . . . . . . . . . . . . . . . . . . . . . . . . . . . . . . . . . . . . . . . . . . . . . . . . . . . . . . . 73
Verwendung von Uhrzeit/Timern . . . . . . . . . . . . . . . . . . . . . . . . . . . . . . . . . . . . . . . . . . . . . . 73
LCD-Anzeige . . . . . . . . . . . . . . . . . . . . . . . . . . . . . . . . . . . . . . . . . . . . . . . . . . . . . . . . . . . . . . 73
Einstellung des Zeitformats . . . . . . . . . . . . . . . . . . . . . . . . . . . . . . . . . . . . . . . . . . . . . . . . . . . 74
Einstellung der Uhrzeit . . . . . . . . . . . . . . . . . . . . . . . . . . . . . . . . . . . . . . . . . . . . . . . . . . . . . . . 74
AUS/EIN-Schaltung von Timer 1 . . . . . . . . . . . . . . . . . . . . . . . . . . . . . . . . . . . . . . . . . . . . . . 75
AUS/EIN-Schaltung von Timer 2 . . . . . . . . . . . . . . . . . . . . . . . . . . . . . . . . . . . . . . . . . . . . . . 75
Rückstellung von Uhrzeit und Timern . . . . . . . . . . . . . . . . . . . . . . . . . . . . . . . . . . . . . . . . . . . 76
Testen der Bellkontrolle Deluxe für Aussenbereiche . . . . . . . . . . . . . . . . . . . . . . . . . . . . . . . 76
Verwendung der Bellkontrolle Deluxe für Aussenbereiche . . . . . . . . . . . . . . . . . . . . . . . . . . 77
Regelmäßige Wartung . . . . . . . . . . . . . . . . . . . . . . . . . . . . . . . . . . . . . . . . . . . . . . . . . . . . . . 77
Häufig gestellte Fragen. . . . . . . . . . . . . . . . . . . . . . . . . . . . . . . . . . . . . . . . . . . . . . . . . . .77
Fehlerbehebung. . . . . . . . . . . . . . . . . . . . . . . . . . . . . . . . . . . . . . . . . . . . . . . . . . . . . . . . . .78
Konformität . . . . . . . . . . . . . . . . . . . . . . . . . . . . . . . . . . . . . . . . . . . . . . . . . . . . . . . . . . . . . . . 78
Batterieentsorgung . . . . . . . . . . . . . . . . . . . . . . . . . . . . . . . . . . . . . . . . . . . . . . . . . . . . . . . . . . 78
Nutzungsbedingungen und Haftungsbeschränkung . . . . . . . . . . . . . . . . . . . . . . . . . . . . . . . 79
Garantie . . . . . . . . . . . . . . . . . . . . . . . . . . . . . . . . . . . . . . . . . . . . . . . . . . . . . . . . . . . . . . . . . . 79
69
FR
EN
Bestandteile
®
ES
NL
PetSafe
Bellkontrolle Deluxe
für Aussenbereiche
IT
Gebrauchsanweisung
Produkteigenschaften
DE
• Integrierter Timer für zwei AUS/EIN-Voreinstellungen
• Verwendet ein Ultraschallgeräusch, um lästiges Bellen zu unterbrechen
• Erkennt Bellen auf eine Entfernung von bis zu 15 m
• Haltbar und wetterfest
• Eine dreifarbige LED zeigt den Batteriestatus und Timer 1 und Timer 2 AUS sowie Reizimpulse
durch Ultraschall an
Mögliche Verwendung der Bellkontrolle
Deluxe für Aussenbereiche
• Stoppt das Bellen Ihres Hundes
• Stoppt das Bellen der Hunde Ihrer Nachbarn
• Stoppt Bellen zu festgelegten Tageszeiten
• Bringt Welpen bei, nicht zu bellen
• Unterbindet das Bellen von Hunden auf Camping-Reisen
70
www.petsafe.net
EN
So funktioniert das system
FR
Wenn sich die PetSafe® Bellkontrolle Deluxe für Aussenbereiche in der Nähe eines bellenden Hundes
befindet, nimmt ein internes Mikrofon das Geräusch auf und das Gerät wird automatisch aktiviert.
Die Bellkontrolle Deluxe für Aussenbereiche sendet ein Ultraschallgeräusch aus. Hunde können das
Ultraschallgeräusch hören, die meisten Menschen jedoch nicht. Irritiert durch das hohe Tonsignal, das sicher
und wirksam ist, wird Ihr Hund mit dem Bellen aufhören, da er das Bellen mit dem unangenehmen Geräusch
in Verbindung bringt. Wenn der Hund zu bellen aufhört, stoppt auch das Ultraschallgeräusch. Durch
programmierbare Timer kann Bellen zu festgelegten Tageszeiten unterbunden werden, zum Beispiel wenn
Kinder nach Schulschluss vorbeigehen. Die Verwendung des Timers kann auch die Batterielebensdauer
verlängern. Die Bellkontrolle Deluxe für Aussenbereiche verfügt über einen Timer für AUS/EINVoreinstellungen. Sie ist auf eine Entfernung bis zu 15 m effektiv.
Hinweis: Falls der Hund taub oder schwerhörig ist, reagiert er vielleicht nicht auf die Bellkontrolle Deluxe für
Aussenbereiche.
NL
ES
Definitionen
Vorne
Metallaufhängung
IT
Metallaufhängung: Zum Aufhängen der
Bellkontrolle Deluxe für Aussenbereiche.
Mikrofon: Zum Erkennen von Bellen.
Geräuschaktivierter Lautsprecher:
Erzeugt das Ultraschallgeräusch.
Vorderansicht
Mikrofon
Hinten
Auswahltaste: Um durch das Menü zu
gehen und die Menüauswahl zu treffen.
Stundentaste: Zur Einstellung von Zeitformat,
Uhrzeit, Timer 1 und Timer 2 in Stunden.
Minutentaste: Zur Einstellung von
Zeitformat, Uhrzeit, Timer 1 und Timer 2 in
Minuten.
Dreifarbige LED: Zeigt den Batteriestatus
und Timer 1 und Timer 2 AUS sowie
Reizimpulse durch Ultraschall an.
LCD-Display: Zur Anzeige von Zeitformat,
Uhrzeit, Timern, Test und Rückstellung.
Unteransicht
Stunde
Dreifarbige
LED
LCDDisplay
Rückansicht
DE
Geräuschaktivierter
Lautsprecher
Auswahl
Minute
Batterieklappe
Unten
Batterieklappe: Zur Abdeckung der Batterie.
www.petsafe.net
71
EN
Installation und Einrichtung
ES
NL
FR
Die Bellkontrolle Deluxe für Aussenbereiche sollte in der Nähe des Hundes und gut sichtbar aufgestellt
werden. Das Gerät ist so konstruiert, dass es aufgehängt oder auch hingestellt werden kann und es sollte
nicht höher als 1,5 m hoch positioniert werden. Es kann an einem Baum, an einer Stange hängend,
auf einem Zaunpfosten, etc. angebracht werden. Für beste Ergebnisse sollte der Bereich zwischen der
Bellkontrolle Deluxe für Aussenbereiche und dem Hund frei von großen Hindernissen sein.
IT
Einsetzen und Herausnehmen der Batterie
BATTERIE
DE
Wichtig: Beim Einsetzen oder Entnehmen einer Batterie, Stellen der Uhr oder Programmieren der
Timer sollte sich kein Hund in der Nähe des Geräts befinden, um sicherzustellen, dass er während
der Einrichtung keinem Reizimpuls ausgesetzt ist.
1. Die Bellkontrolle Deluxe für Aussenbereiche verwendet eine wiederaufladbare 9-Volt-Batterie
(nicht im Lieferumfang enthalten). Die Batterieklappe befindet sich unten am Gerät. Zum Öffnen
ziehen Sie die Batterieklappe.
2. Setzen Sie die 9-Volt-Batterie mit der +-Seite in die dargestellte Richtung ein.
3. Um die Batterieklappe wieder einzusetzen, setzen Sie die Oberkante an und lassen Sie die
Unterseite der Batterieklappe einrasten.
4. Nach Einsetzen der Batterie befindet sich die Bellkontrolle Deluxe für Aussenbereiche in
der Stellung EIN und erkennt und korrigiert das Bellen. Das LCD-Display ist bis auf die
Batterieanzeige solange leer, bis die Uhr und die Timer eingestellt worden sind.
Hinweis: Stellen Sie sicher, dass eine 9-Volt-Batterie ins Batteriefach eingesetzt wird.
72
www.petsafe.net
EN
Batterielebensdauer
Wir empfehlen die Verwendung der integrierten Timer, um die Batterielebensdauer zu
verlängern. Die Batterielebensdauer kann im Durchschnitt bis zu 2 Monate betragen, hängt aber
davon ab, wie oft der Hund bellt und ob die Timer verwendet werden.
FR
Versuchen Sie nicht, die Batterie gewaltsam zu öffnen. Entsorgen Sie die
verbrauchte Batterie ordnungsgemäß.
NL
Dreifarbige LED
ES
Die dreifarbige LED zeigt den Batteriestatus an und wenn ein Timer in Gebrauch, jedoch AUS
ist. Wenn die Batterie voll aufgeladen ist, blinkt die grüne LED alle 5 Sekunden einmal. Ein
niedriger Batteriestand wird durch 3-maliges Blinken alle 5 Sekunden der roten LED zeigt. Die
orangefarbene LED zeigt an, dass Timer 1 und/oder Timer 2 eingestellt und das Gerät AUS ist.
Im Testmodus blinkt die rote LED.
Verwendung von Uhrzeit/Timern
IT
DE
Die Bellkontrolle Deluxe für Aussenbereiche verfügt über einen Timer mit zwei AUS/
EIN-Einstellungen für eine 24-Stunden-Periode. Bei Verwendung des Timers wird die
Batterielebensdauer verlängert und es wird einer Desensibilisierung des Hundes gegenüber dem
Ultraschallgeräusch vorgebeugt.
Hinweis: Vor Verwendung des automatischen Timers muss die Uhrzeit eingestellt werden. Sobald
die Batterie eingesetzt ist, ist die Bellkontrolle Deluxe für Aussenbereiche immer EIN, außer wenn
ein Timer eingestellt oder die Batterie entnommen wird.
LCD-Anzeige
Nehmen Sie die Einstellung von Zeitformat, Uhr und Timern der Bellkontrolle Deluxe für
Aussenbereiche auf dem LCD-Display vor. Bei jedem Drücken der Auswahltaste durchläuft das
LCD-Display die verfügbaren Menüoptionen in der im Folgenden dargestellten Reihenfolge. Das
LCD-Display zeigt auch die Batterielebensdauer an.
Zeitformat: Einstellung der Uhr auf die 12-Stunden- oder 24-Stunden-Zählung
Uhrzeit: Einstellung von Stunden und Minuten mithilfe der H (Stunden)- und M (Minutten)-Tasten
Timer 1: AUS/EIN-Schaltung von Timer 1
Timer 2: AUS/EIN-Schaltung von Timer 2
Rückstellung (rSt): Rückstellung von Uhr und Timer(n)
Test (tSt): Gerätetest
Hinweis: Wenn eine Minute lang keine Taste gedrückt wird, wird das LCD-Display dunkel.
Drücken Sie irgendeine Taste, um die Uhr anzuzeigen oder um die Menüoptionen anzusehen.
www.petsafe.net
73
EN
Einstellung des Zeitformats
NL
FR
1. Zur Einstellung des TIME FORMAT (Zeitformat)-Modus drücken Sie die
Auswahltaste einmal und lassen Sie sie los.
2. Drücken Sie die H (Stunden)-Taste für das 12-Stunden-Format oder die
M (Minuten)-Taste für das 24-Stunden-Format.
3. Drücken Sie zur Bestätigung der Zeitformateinstellung die Auswahltaste.
4. Nach Bestätigung von TIME FORMAT (Zeitformat) geht die Bellkontrolle Deluxe für
Aussenbereiche automatisch in den SET CLOCK (Uhrzeiteinstellung)-Modus (1) im Menü des
LCD-Displays über und Sie können die Zeit einstellen.
Einstellung der Uhrzeit
Nach Einstellen des Zeitformats können Sie die Uhrzeit einstellen.
1
DE
IT
ES
1. Drücken Sie die Auswahltaste so oft, bis SET CLOCK (Uhrzeit
einstellen) auf dem LCD-Display erscheint (1). Hinweis: Nach
Einstellen des Zeitformats geht das Menü standardmäßig auf
SET CLOCK (Uhrzeit einstellen) über. Sobald Sie entweder die H
2
(Stunden)-Taste oder die M (Minuten)-Taste gedrückt haben, ändert
sich das LCD-Display (2) und Sie können die Zeit einstellen.
2. Drücken Sie die H (Stunden)-Taste so oft, bis die korrekte Uhrzeit
angezeigt wird (achten Sie im 12-Stunden-Format darauf, die
korrekte AM/PM-Einstellung vorzunehmen).
3
3. Drücken Sie die M (Minuten)-Taste so oft, bis die korrekte Zeit
eingestellt ist. Hinweis: Wenn Sie die H (Stunden)- oder M (Minuten)Taste gedrückt halten, werden die Ziffern schneller durchlaufen.
4. Drücken Sie die Auswahltaste, um die Zeit zu bestätigen.
4
5. Nach Bestätigung der Zeiteinstellung geht die Bellkontrolle Deluxe
für Aussenbereiche automatisch in den TIMER 1 OFF (Timer 1 AUS)Modus (3) im Menü des LCD-Displays über.
6. Falls Sie den Timer 1 nach Einstellung der Uhrzeit nicht einstellen
möchten, drücken Sie die Auswahltaste solange, bis das LCDDisplay zur Uhrzeit zurückkehrt (4).
7. Wenn Sie den Timer 1 verwenden möchten, ziehen Sie den Abschnitt “AUS/EIN-Schaltung
von Timer 1” zu Rate. Wenn Sie den Timer 1 (und falls gewünscht Timer 2) verwenden,
wiederholt sich die AUS/EIN-Schaltung täglich.
Hinweis: Wenn die Batterie ausgewechselt wird, müssen Uhrzeit und Timer neu
programmiert werden.
74
www.petsafe.net
EN
AUS/EIN-Schaltung von Timer 1
FR
Nach Einstellung der Uhrzeit können sie nun zeitlich festgelegte
5
Maßnahmen programmieren.
1. Drücken Sie die Auswahltaste solange, bis TIMER 1 OFF
(Timer 1 AUS) (3) auf dem LCD-Display erscheint.
Hinweis: Nach Einstellung der Uhrzeit geht das Menü des LCD-Displays
6
standardmäßig in den TIMER 1 OFF (Timer 1 AUS)-Modus über.
2. Drücken Sie die H (Stunden)-Taste einmal und es blinkt “0:00” (5).
Hinweis: Im 12-Stunden-Format blinkt “12:00AM”.
3. Drücken Sie die H (Stunden)-Taste so oft, bis die korrekte Uhrzeit
angezeigt wird (falls Sie das 12-Stunden-Format eingestellt haben,
7
achten Sie bitte auf die AM/PM-Einstellung).
4. Drücken Sie die M (Minuten)-Taste so oft, bis die korrekte Zeit eingestellt ist.
5. Drücken Sie zur Bestätigung von TIMER 1 OFF (Timer 1 AUS) die
Auswahltaste.
6. Nach Einstellung von TIMER 1 OFF (Timer 1 AUS) geht das Menü des
LCD-Displays standardmäßig in den TIMER 1 ON (Timer 1 EIN)-Modus
über. Dieser Schritt muss fertig gestellt werden, damit die Timer 1-Abfolge eingestellt werden kann.
7. Drücken Sie die H (Stunden)-Taste einmal und es blinkt “0:00” (6). Hinweis: Im 12-StundenFormat blinkt “12:00AM”.
8. Drücken Sie die H (Stunden)-Taste so oft, bis die korrekte Uhrzeit angezeigt wird (falls Sie
das 12-Stunden-Format eingestellt haben, achten Sie bitte auf die AM/PM-Einstellung).
9. Drücken Sie die M (Minuten)-Taste so oft, bis die korrekte Zeit eingestellt ist.
10. Drücken Sie zur Bestätigung von TIMER 1 ON (Timer 1 EIN) die Auswahltaste.
11. Nach Bestätigung der Zeiteinstellung geht die Bellkontrolle Deluxe für Aussenbereiche
automatisch in den TIMER 2 OFF (Timer 2 AUS)-Modus (7) im Menü des LCD-Displays über.
Falls Sie den Timer 2 nach Einstellung von Timer 1 nicht einstellen möchten, drücken Sie die
Auswahltaste, bis das LCD-Display zur Uhrzeit zurückkehrt (4).
12. Wenn Sie den Timer 2 verwenden möchten, ziehen Sie den Abschnitt “AUS/EIN-Schaltung
von Timer 2” zu Rate.
Hinweis: Wenn Sie den Timer 1 programmiert haben, schaltet sich die Bellkontrolle Deluxe
für Aussenbereiche weiterhin täglich AUS/EIN, bis die Zeit rückgestellt oder die Batterie
ausgewechselt wird.
NL
ES
IT
DE
AUS/EIN-Schaltung von Timer 2
1. Drücken Sie die Auswahltaste, bis TIMER 2 OFF (Timer 2 AUS)
8
(7) auf dem LCD-Display erscheint. Hinweis: Nach Einstellung von
Timer 1 geht das Menü des LCD-Displays standardmäßig in den
TIMER 2 OFF (Timer 2 AUS)-Modus über.
2. Drücken Sie die H (Stunden)-Taste einmal und es blinkt “0:00” (8).
Hinweis: Im 12-Stunden-Format blinkt “12:00AM”.
3. Drücken Sie die H (Stunden)-Taste so oft, bis die korrekte Uhrzeit angezeigt wird (falls Sie
das 12-Stunden-Format eingestellt haben, achten Sie bitte auf die AM/PM-Einstellung).
4. Drücken Sie die M (Minuten)-Taste so oft, bis die korrekte Zeit eingestellt ist.
5. Drücken Sie zur Bestätigung von TIMER 2 OFF (Timer 2 AUS) die Auswahltaste.
www.petsafe.net
75
ES
NL
FR
EN
6. Nach Einstellung von TIMER 2 OFF (Timer 2 AUS) geht das Menü des LCD-Displays
standardmäßig in den TIMER 2 ON (Timer 2 EIN)-Modus über. Dieser Schritt muss fertig
gestellt werden, damit die Timer 2-Abfolge eingestellt werden kann.
7. Drücken Sie die H (Stunden)-Taste einmal und es blinkt “0:00” (9). 9
Hinweis: Im 12-Stunden-Format blinkt “12:00AM”.
8. Drücken Sie die H (Stunden)-Taste so oft, bis die korrekte Uhrzeit
angezeigt wird (falls Sie das 12-Stunden-Format eingestellt haben,
achten Sie bitte auf die AM/PM-Einstellung).
9. Drücken Sie die M (Minuten)-Taste so oft, bis die korrekte Zeit eingestellt ist.
10. Drücken Sie zur Bestätigung von TIMER 2 ON (Timer 2 EIN) die Auswahltaste.
11. Nach Bestätigung der Zeiteinstellung geht die Bellkontrolle Deluxe für Aussenbereiche
automatisch in den RESET (Rückstellung)-Modus im Menü des LCD-Displays über. Drücken
Sie weiterhin so oft die Auswahltaste, bis das LCD-Display zur Uhrzeit zurückkehrt (3). Wenn
Sie den Timer 2 programmiert haben, schaltet er sich weiterhin täglich AUS/EIN, bis die Zeit
rückgestellt oder die Batterie ausgewechselt wird.
Rückstellung von Uhrzeit und Timern
DE
IT
1. Drücken Sie die Auswahltaste, bis "rSt" (Zurückstellen) auf dem LCDDisplay blinkt.
2. Drücken und halten Sie den H (Stunden)-Taste gedrückt. Nach 5
Sekunden und ohne den H (Stunden)-Taste loszulassen, drücken Sie
kurz den M (Minuten)-Taste.
3. Alle Zeiten sind nun zurückgestellt.
Hinweis: Um die Uhrzeit beizubehalten und nur Timer 1 und/oder Timer 2 zurückzustellen, müssen Sie
nicht alle Zeiten zurückstellen. Um durch die Menüoptionen des LCD-Displays zu scrollen, drücken Sie die
Auswahltaste so oft, bis der Timer erscheint, den Sie zurückstellen möchten. Drücken Sie die H (Stunden)Taste oder M (Minuten)-Taste, um die Zeit zu ändern. Drücken Sie die Auswahltaste, um die aktualisierte Zeit
zu bestätigen. Drücken Sie die Auswahltaste so oft, bis das LCD-Display-Menü zur Uhrzeit zurückgekehrt ist.
Testen der Bellkontrolle Deluxe für
Aussenbereiche
Wichtig: Beim Testen der Bellkontrolle Deluxe für Aussenbereiche sollten keine Hunde in der
Reichweite des Gerätes sein, um zu vermeiden, dass sie während des Testens einen statischen
Reizimpuls erhalten.
1. Drücken und halten Sie die H (Stunden)-Taste und die M (Minuten)Taste gleichzeitig 3 Sekunden lang.
2. Die Bellkontrolle Deluxe für Aussenbereiche zeigt "tSt" an, was
bedeutet, dass sie sich im Testmodus befindet.
3. Sprechen Sie laut das Wort "Bellen" aus oder blasen Sie in das Mikrofon vorne oben am Gerät.
4. Die Bellkontrolle Deluxe für Aussenbereiche erkennt dieses Geräusch, gibt 3 kurze Pieptöne
aus und die rote LED blinkt, um anzuzeigen, dass sie funktioniert.
5. Sie können die Schritte 3-4, falls nötig, wiederholen, um sicherzustellen, dass das Gerät funktioniert.
6. Nach 30 Sekunden wird der Testmodus automatisch unterbrochen und das Gerät nimmt wieder seinen
normalen Betrieb auf. Sie können den Testmodus auch durch Drücken der Auswahltaste beenden.
76
www.petsafe.net
EN
Beim Testen der Bellkontrolle Deluxe für Aussenbereiche sollten
Vorsichtsmaßnahmen getroffen werden. Vermeiden Sie es, den Testmodus
über eine längere Zeit ständig zu wiederholen. Ziehen Sie die Wichtige
Sicherheitsinformation auf Seite 68 für mehr Details zu Rate.
FR
Verwendung der Bellkontrolle Deluxe
für Aussenbereiche
NL
Platzieren Sie die Bellkontrolle Deluxe für Aussenbereiche innerhalb der Reichweite des Hundes
und achten Sie darauf, dass sie in der Position EIN ist. Die meisten Hunde verstehen sehr schnell,
dass die Bellkontrolle Deluxe für Aussenbereiche ihren Drang zum Bellen unterbricht und werden
sich entspannen und mit dem Bellen aufhören.
Sie sollten in den ersten zwei Wochen der Verwendung der Bellkontrolle Deluxe für
Aussenbereiche eine Reduzierung des Bellens bei Ihrem Hund bemerken. Beachten Sie bitte, dass
dieses Produkt vielleicht nicht bei tauben oder hörgeschädigten Hunden funktioniert.
Übermäßiges Bellen kann Ihre Beziehung zu Ihrem Tier schwer belasten - und auch zu
Unfrieden in der Nachbarschaft führen. Besuchen Sie bitte unsere Website, um sich andere
kundenspezifische Lösungen für das Problem des übermäßigen Bellens anzusehen.
ES
IT
Regelmäßige Wartung
DE
• Nehmen Sie vor dem Reinigen die Batterie heraus.
• Reinigen Sie die Bellkontrolle Deluxe für Aussenbereiche mit einem feuchten Tuch.
• Verwenden Sie keine Sprühchemikalien oder Lösungsmittel zum Reinigen.
• Tauchen Sie sie nicht in Wasser oder eine andere Flüssigkeit ein.
Hinweis: Die Bellkontrolle Deluxe für Aussenbereiche ist wasserdicht. Wenn jedoch Wasser in
das Mikrofon gerät, kann dies den Betrieb des Geräts unterbrechen. Wenn das Mikrofon wieder
trocken ist, wird das Gerät wieder ordnungsgemäß funktionieren.
Häufig gestellte Fragen
Was ist die Reichweite der Die Bellkontrolle Deluxe für Aussenbereiche erkennt
Bellen auf eine Entfernung von bis zu 15 m und sendet das
Bellkontrolle Deluxe für
Ultraschallgeräusch bis zu dieser Entfernung aus.
Aussenbereiche?
Kann ich die
Bellkontrolle Deluxe für
Aussenbereiche auch in
Innenräumen benutzen?
Kann ein Hund für den
Ultraschall unempfindlich
werden?
Nein, wir raten von der Verwendung des Produkts in
Innenräumen ab. Die PetSafe® Bellkontrolle für Innenräume
ist ein Ultraschallprodukt, das für die Verwendung in
Innenräumen sicher ist. Bitte besuchen Sie unsere Website auf
www.petsafe.net oder rufen Sie unser Kundenservicezentrum
an, um mehr Informationen über das Produkt zu erhalten.
Es gibt Situationen, in denen Hunde unempfindlich gemacht
werden. Um dies zu vermeiden, verwenden Sie die Timer,
um die Bellkontrolle Deluxe für Aussenbereiche nur zu Zeiten,
in den Bellen unerwünscht ist, einzuschalten (d. h. lassen Sie
das Gerät ausgeschaltet, wenn Sie weg sind).
www.petsafe.net
77
EN
Fehlerbehebung
FR
Die grüne LED hört auf zu
blinken und es gibt kein
rotes Licht.
• Stellen Sie sicher, dass die Batterie richtig
eingesetzt wurde.
• Tauschen Sie die Batterie aus.
• Falls die grüne LED immer noch nicht blinkt, kontaktieren
Sie bitte das Kundenservicezentrum.
NL
Konformität
ES
Dieses Gerät wurde getestet und stimmt nachweislich mit den entsprechenden EU-Richtlinien für
elektromagnetische Kompatibilität und Niederspannung überein. Nicht autorisierte Änderungen
oder Modifikationen am Gerät, die nicht von der Radio Systems Corporation genehmigt sind,
könnten die Autorisierung des Benutzers das Gerät zu betreiben annullieren und die Garantie
ungültig machen.
IT
Dieses Produkt ist mit den Bestimmungen der EMC- und LV-Direktiven konform. Die
Konformitätserklärung finden Sie unter: www.petsafe.net/customercare/eu_docs.php
DE
Batterieentsorgung
In vielen Regionen ist die separate Sammlung von verbrauchten Batterien erforderlich; prüfen Sie
die Bestimmungen in Ihrer Gegend, bevor Sie verbrauchte Batterien wegwerfen. Siehe bitte Seite
72 für Anleitungen zum Herausnehmen der Batterie für die separate Entsorgung. Dieses Gerät
wird mit einer (1) 9V-Alkali-Batterie betrieben; nur durch eine gleichwertige Batterie ersetzen.
Am Ende des Produktlebens kontaktieren Sie bitte unser Kundenservicezentrum, um Anweisungen
zur richtigen Entsorgung des Geräts zu erhalten. Entsorgen Sie das Gerät bitte nicht im Hausmüll.
Für eine Liste mit den Telefonnummern des Kundenservicezentrums besuchen Sie bitte unsere
Website auf www.petsafe.net.
Wichtige Recyclinghinweise
Respektieren Sie bitte die Bestimmungen zur Entsorgung von elektrischen und elektronischen Abfällen in
Ihrem Land. Diese Geräte müssen recycelt werden. Wenn Sie ein Gerät nicht mehr benötigen, führen Sie es
nicht dem normalen Müll bei der städtischen Müllentsorgung zu. Bitte geben Sie es dahin zurück, wo Sie
es gekauft haben, damit es unserem Recyclingsystem zugeführt werden kann. Wenn dies nicht möglich ist,
setzen Sie sich bitte mit dem Kundenservicezentrum für weitere Informationen in Verbindung. Für eine Liste
der Telefonnummern des Kundenservicezentrums besuchen Sie bitte unsere Website auf www.petsafe.net.
78
www.petsafe.net
EN
Nutzungsbedingungen und
Haftungsbeschränkung
FR
1. Nutzungsbedingungen
Dieses Produkt wird Ihnen unter der Bedingung angeboten, dass Sie es ohne eine Modifizierung der
darin enthaltenen Bedingungen und Hinweise annehmen. Die Verwendung dieses Produkts stellt die
stillschweigende Annahme all dieser Bedingungen und Hinweise dar. Wenn Sie diese Bedingungen
und Hinweise nicht akzeptieren möchten, geben Sie das Produkt bitte unverwendet in seiner
Originalverpackung und auf Ihre Kosten und Ihr Risiko an das entsprechende Kundenservicezentrum
zusammen mit dem Kaufnachweis für eine vollständige Kostenrückerstattung zurück.
2. Richtige Verwendung
Dieses Produkt ist zur Verwendung für Haustiere mit dem erforderlichen Training ausgelegt. Das
spezifische Temperament oder die Größe/das Gewicht Ihres Haustiers ist eventuell nicht passend
für dieses Produkt (siehe bitte “So funktioniert das System” in dieser Gebrauchsanweisung).
Radio Systems Corporation empfiehlt, dass dieses Produkt nicht verwendet wird, wenn Ihr Hund
aggressiv ist, und übernimmt keine Haftung für die Feststellung der Eignung in einem bestimmten
Fall. Wenn Sie nicht sicher sind, ob dieses Produkt für Ihr Haustier angemessen ist, konsultieren
Sie bitte Ihren Tierarzt oder zertifizierten Trainer. Die richtige Verwendung umfasst unbeschränkt
das Durchlesen der gesamten Gebrauchsanweisung und spezifischen Warnhinweise.
3. Keine gesetzeswidrige oder verbotene Verwendung
Dieses Produkt ist nur für den Gebrauch mit Haustieren vorgesehen. Diese Trainingsvorrichtung
für Haustiere soll weder Schaden zufügen, noch verletzen, noch provozieren. Eine
Verwendung dieses Produkts auf eine nicht vorgesehene Art und Weise könnte eine Verletzung
von Bundes-, staatlichen oder lokalen Gesetzen zur Folge haben.
4. Haftungsbeschränkung
Radio Systems Corporation oder eines ihrer verbundenen Unternehmen ist in keinem Fall für (i)
etwaige direkte, indirekte, Straf-, Zufalls-, Sonder- oder Folgeschäden und/oder (ii) jedwede
Verluste oder Schäden haftbar, die sich aus der Verwendung bzw. dem Missbrauch dieses Produkts
ergeben oder damit in Zusammenhang stehen. Der Käufer übernimmt alle Risiken und Haftung aus
der Verwendung dieses Produkts im vollsten vom Gesetz zulässigen Umfang. Um alle Zweifel zu
verhindern, beschränkt nichts in diesem Artikel 4 die Haftung von Radio Systems Corporation für den
Tod eines Menschen oder persönliche Verletzung oder Betrug oder betrügerisch falsche Darstellung.
5. Änderungen der Allgemeinen Verkaufs- und Lieferbedingungen
Radio Systems Corporation behält sich das Recht vor, die Bedingungen, Pflichten und Hinweise, unter
denen dieses Produkt angeboten wird, zu ändern. Wenn Sie über solche Änderungen vor der Verwendung
dieses Produkts informiert wurden, sind diese für Sie bindend als wären sie hierin eingeschlossen.
NL
ES
IT
DE
Garantie
Nicht übertragbare eingeschränkte dreijährige Garantie
Dieses Produkt besitzt eine eingeschränkte Herstellergarantie. Die vollständigen Details der
Garantie, die für dieses Produkt gilt und deren Bedingungen, finden Sie unter www.petsafe.net
und/oder erhalten Sie durch Zusendung eines beschrifteten und frankierten Umschlags an
Radio Systems PetSafe Europe Ltd., 2nd Floor, Elgee Building, Market Square, Dundalk, Irland.
Geschützt durch US-Patent 6,724,919
www.petsafe.net
79
Radio Systems Corporation
10427 PetSafe Way
Knoxville, TN 37932
865-777-5404
www.petsafe.net
400-1619-19
©2013 Radio Systems Corporation


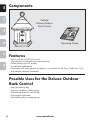
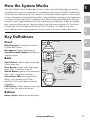
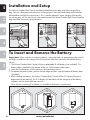
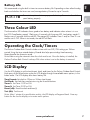


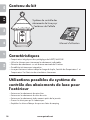

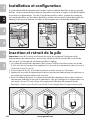

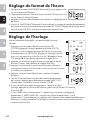


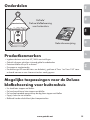


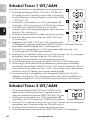


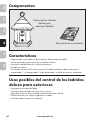
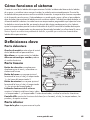
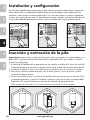

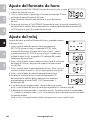


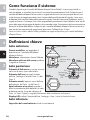
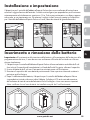
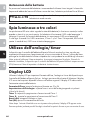
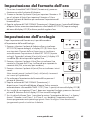

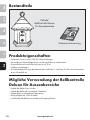
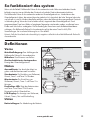
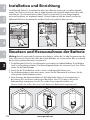

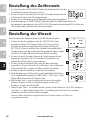
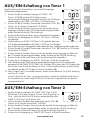


![[Cover Page] Bedienungsanleitung 6,2 Zoll](http://vs1.manualzilla.com/store/data/006747984_1-c64bd7db36466b345325b2f8b2846c7b-150x150.png)