1
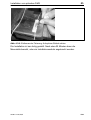
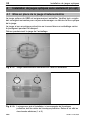
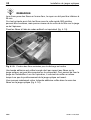
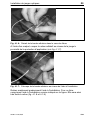
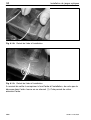
Instructions for use Gebrauchsanweisung Instructions d’emploi Optical strain gages Optische Dehnungsmessstreifen Jauges d’extensométrie optiques K-OP A2397-3.2 en/de/fr English . . . . . . . . . . . . . . . . . . . . . . . . . . . . . . . . . . . . . . . . . . . . . . . . Page 3 ... 34 Deutsch . . . . . . . . . . . . . . . . . . . . . . . . . . . . . . . . . . . . . . . . . . . . . . Seite 35 ... 66 Français . . . . . . . . . . . . . . . . . . . . . . . . . . . . . . . . . . . . . . . . . . . . . . Seite 68 ... 99 Installing optical strain gages Contents 3 Page 1 Preparing the installation area . . . . . . . . . . . . . . . . . . . . . . . . . . . . . . . . 4 2 Marking the measuring point . . . . . . . . . . . . . . . . . . . . . . . . . . . . . . . . . . 6 3 Installation of optical strain gages with potting (Standard) . . . . . . . 7 4 5 3.1 Positioning optical strain gages . . . . . . . . . . . . . . . . . . . . . . . . . . . . 7 3.2 Installation of standard strain gages with Z70 superglue . . . . . . . 11 3.3 Installation of standard strain gages with X60 superglue . . . . . . 15 Installat. of optical strain gages without potting (optional) . . . . . . . 20 4.1 Positioning optical strain gages . . . . . . . . . . . . . . . . . . . . . . . . . . . . 20 4.2 Installing strain gages with Z70 superglue . . . . . . . . . . . . . . . . . . . 25 4.3 Installing strain gages with X60 superglue . . . . . . . . . . . . . . . . . . . 29 Specifications . . . . . . . . . . . . . . . . . . . . . . . . . . . . . . . . . . . . . . . . . . . . . . . 34 A2397-3.2 en/de/fr HBM 4 Installing optical strain gages NOTE Optical strain gages from HBM can be installed using the same processes and materials as for metal foil strain gages. Please comply with the ”Notes on strain gage application” document, or the instructional film, which is available on DVD. This document describes how to install optical strain gages with potting (standard) and optical strain gages without potting (customized). Both Z70 superglue and X60 two−component superglue can be used for both types of installation. These instructions for use describe both methods. The general process is identical up to chapter 3. Then specific instructions are provided. Use the table of contents to quickly find relevant information. 1 Preparing the installation area The surface of the test object must first be cleaned and be flat when installing strain gages. To do this, the measuring point must first be cleaned with the cleaning agent RMS1 (Order No. 1-RMS1 or as spray - 1-RMS1-Spray, see Fig. 1.1) and a cleaning pad (Order No. 1-8402.0026) for the following mechanical preparation. Fig. 1.1: HBM Basic cleaning of measuring point with RMS-SPRAY A2397-3.2 en/de/fr Installing optical strain gages 5 Prepare the test object for installation using Z70 adhesive by roughening the surface using emery cloth of grain size 180...240 (figure 1.2). When using X60 adhesive, select grain size 180. Fig. 1.2: Roughening the surface of the measuring body In the next step, the roughened installation surface is cleaned with RMS1 and a non-woven pad, see Fig. 1.3. Fig. 1.3: Cleaning the roughened installation surface A2397-3.2 en/de/fr HBM 6 2 Installing optical strain gages Marking the measuring point In the ideal case, an empty ball point pen cartridge is recommended for marking the installation point. The length of the marking line should be approx. 60 mm in the measurement direction. A vertical marking line, approx. 40 mm long, must be drawn starting at the center of the installation point, see Fig. 2.1. Fig. 2.1: Applying the marking lines Once the area is marked out, the installation point must be cleaned very thoroughly, see Fig. 2.2. Please note that a new cleaning pad must be used each time the point is wiped. The cleaning process is complete when no residues can be recognized on the cleaning pad. Fig. 2.2: HBM Final cleaning of the installation point A2397-3.2 en/de/fr Installing optical strain gages 3 7 Installation of optical strain gages with potting (Standard) 3.1 Positioning optical strain gages The optical strain gage is carefully packed in a protective wallet inside a box. Please note the following unpacking steps in order not to damage the glass fibers of the optical strain gage, see Fig. 3.1.1 to 3.1.4. Example of a package for chains with 1 or 2 optical strain gages. Packages for chains with more than 2 optical strain gages differ from the package shown here. Fig. 3.1.1: Packed optical strain gage with installation aid Fig. 3.1.2: Unpack the optical strain gage with installation aid A2397-3.2 en/de/fr HBM 8 Installing optical strain gages Fig. 3.1.3: Remove both adhesive strips to take out the optical strain gage Fig. 3.1.4: Optical strain gage prior to removal from the protective HBM A2397-3.2 en/de/fr Installing optical strain gages 9 Fig. 3.1.5: Unpacked optical strain gage with installation aid Fig. 3.1.6: Removing the protective film from the strain gage Now transfer the optical strain gage with the Teflon installation aid to the measuring point, see Fig. 3.1.7. The fibers help to align the strain gage. A2397-3.2 en/de/fr HBM 10 Installing optical strain gages Fig. 3.1.7: Fix the outgoing fibers to relieve the strain in a distance of approx. 20 cm After alignment, fix the outgoing fibers in place with polyimide adhesive tape (Order No. 1-Klebeband) in order to protect the fibers against mechanical influences. NOTE If the fibers form an arch when laid, the bend radius must not be less than 25 mm! The fiber may be bent only after having been fixed with X60 superglue (see figure 3.2.4), however, it must not be bent at the point where the fiber protrudes from the strain gage or the splice. Fix an approx. 10 cm long polyimide adhesive tape on the Teflon installation aid. Pull the adhesive tape tight, align the optical strain gage with the adhesive tape on the marking line and stick the adhesive tape on the measuring body, see Fig. 3.1.8. Fig. 3.1.8: Fixing the optical strain gage with the installation aid and adhesive tape HBM A2397-3.2 en/de/fr Installing optical strain gages 11 3.2 Installation of standard strain gages with Z70 superglue Fig. 3.2.1: Installation aid fixed in place Have the adhesive Z70 and a hand-sized piece of Teflon film ready at hand (Order No. 1-Teflon). Use the installation aid as a hinge for the optical strain gage. Place 3 drops of Z70 adhesive on the measuring point under the optical strain gage, without allowing the Z70 bottle to touch the surface, see Fig. 3.2.2. Fig. 3.2.2: Applying the Z70 adhesive Fold the optical strain gage quickly back down over the adhesive and use the Teflon film to press the strain gage down evenly with the ball of your thumb for one minute, see Fig. 3.2.3. A2397-3.2 en/de/fr HBM 12 Installing optical strain gages Fig. 3.2.3: Gluing on the optical strain gage It is recommended to wait five minutes before removing the Teflon film. Subsequently, the fibers close to the optical strain gage must be fixed to the surface for strain relief with two drops X60 adhesive, see Fig. 3.2.3. Fig. 3.2.4: Fixing the optical fibers in place with X60 adhesive After the X60 adhesive has hardened for 10 minutes, all adhesive strips and the installation aid can be removed. The adhesive strips should be pulled off at an angle to the surface, see Fig. 3.2.5. HBM A2397-3.2 en/de/fr Installing optical strain gages 13 Fig. 3.2.5: Removing the adhesive strips Fig. 3.2.6: Loosening the foil A2397-3.2 en/de/fr HBM 14 Installing optical strain gages If the Teflon installation aid is stuck to the measuring body, carefully release it using a scalpel or with tweezers, see Fig. 3.2.7. Fig. 3.2.7: Removing the Teflon installation aid Fig. 3.2.8: Completed installation of the optical strain gage HBM A2397-3.2 en/de/fr Installing optical strain gages 15 3.3 Installation of standard strain gages with X60 superglue Preparation and positioning of the optical strain gage on the measurement object are identical to the procedure described for Z70 superglue. Fig. 3.3.1: Making a hinge from adhesive tape: Fixing the optical strain gage with installation aid and adhesive tape A mask is required when applying X60 superglue. First fix an additional adhesive strip parallel to the optical strain gage on its Teflon installation aid (white). Fig. 3.3.2: Making a mask Attach a further piece of adhesive tape parallel to the optical strain gage. Mix the X60 as stated in the instructions for use. A2397-3.2 en/de/fr HBM 16 Installing optical strain gages Fig. 3.3.3: Mixing X60 adhesive Apply a generous amount of adhesive to the installation point. Fig. 3.3.4: Applying the adhesive Use one of the enclosed small cellophane-sheets to carefully press on the adhesive. Press with a rolling motion from the center to the edges. HBM A2397-3.2 en/de/fr Installing optical strain gages 17 Fig. 3.3.5: Rolling out the adhesive with your finger. Use the enclosed cellophane as a separating layer. The adhesive escaping in the longitudinal direction fixes and secures the fiber. You can remove the cellophane as soon as the residual adhesive in the mixing container has cured (after approx. max. 5 min). Fig. 3.3.6: Removing the cellophane once the adhesive has cured We recommend that you pull off the adhesive strips as soon as the cellophane has been removed. Pull tight at an angle of 45 degrees. This will peel off the X60. A2397-3.2 en/de/fr HBM 18 Installing optical strain gages Fig. 3.3.7: Removing the mask The last step now is to remove the fixing. To do this, first peel off the adhesive tape as far as the edge of the adhesive. Then pull off the remaining adhesive tape at an acute angle. Fig. 3.3.8: Removing the fixing with flat tweezers. Note the acute angle HBM A2397-3.2 en/de/fr Installing optical strain gages 19 Fig. 3.3.9: Removing the Teflon installation aid with flat tweecers Installation is now complete. After about 30 minutes, you can use the measuring point, or attach installation protection. A2397-3.2 en/de/fr HBM 20 4 Installing optical strain gages Installat. of optical strain gages without potting (optional) 4.1 Positioning optical strain gages HBM optical strain gages are carefully packaged. Please follow the instructions below, to avoid damaging or destroying the fiberglass of the strain gage. The strain gage is placed in a protective wallet in cardboard packaging, to protect it during transportation. Carefully remove the strain gage from its packaging. Fig. 4.1.1: Strain gage and installation aid in their packaging 1 2 Fig. 4.1.2: The strain gage with installation aid (seen here with protective wallet) must be removed from the protective wallet. To do this, remove the two adhesive strips (1, 2). HBM A2397-3.2 en/de/fr Installing optical strain gages 21 Fig. 4.1.3: Strain gage with installation aid, without protective wallet Remove the protective film from the back of the optical strain gage (Fig. 4.1.4). Fig. 4.1.4: Removing the protective film Then transfer the optical strain gage with the installation aid to the measurement object. The fiber helps to align the strain gage. Fix and secure the outgoing fibers as soon as possible, as the net weight of the additional strain gages in the chain or the connector plugs can cause damage. A2397-3.2 en/de/fr HBM 22 Installing optical strain gages NOTE The fiber may be bent only after having been fixed with X60 superglue (see figure 4.2.7), however, it must not be bent at the point where the fiber protrudes from the strain gage or the splice. If the fibers form an arch when laid, the radius must be no less than 25 mm. Securely fasten the fibers with adhesive tape, or similar. (Fig. 4.1.5) Fig. 4.1.5: Fixing the outgoing fibers to relieve the strain A piece of adhesive tape is attached to the optical strain gage at right-angles to the fiber; this can be pressed onto the component. This fixes the strain gage to the measurement object. At the same time, you must make sure that the optical strain gage is positioned exactly. You can now remove the adhesive strip attached to the optical strain gage in the direction of the fibers. (Fig. 4.1.6) HBM A2397-3.2 en/de/fr Installing optical strain gages 23 Fig. 4.1.6: Removing the adhesive strip in the direction of the fibers Use a scalpel to cut the adhesive tape on the strain gage close to the installation protection, as shown in Fig. 4.1.7. Fig. 4.1.7: Cutting the adhesive strip on the installation aid Now carefully remove the installation aid. To do this, squeeze the edges of the installation aid together, as shown. It will then be very easy to remove (Figs. 4.1.8 and 4.1.9). A2397-3.2 en/de/fr HBM 24 Installing optical strain gages Fig. 4.1.8: Removing the installation aid 1 Fig. 4.1.9: Removing the installation aid Make sure that you squeeze both edges of the installation aid together, so that the cut in the aid opens up (1). The aid is then easy to remove. HBM A2397-3.2 en/de/fr Installing optical strain gages 25 4.2 Installing strain gages with Z70 superglue Preparation and positioning of the optical strain gage on the measurement object are identical to the procedure described for X60 superglue. Fig. 4.2.1: Removing the installation aid Once the installation aid has been removed (see Fig. 4.2.1), a mask can be bonded on. This prevents the adhesive spreading onto the measurement object during installation. The optical strain gage is withdrawn a little, see Fig. 4.2.2. Fig. 4.2.2: Withdrawing the strain gage with tweezers A2397-3.2 en/de/fr HBM 26 Installing optical strain gages The superglue is now dripped onto the measurement object. Make sure that the Z70 falls onto the measurement object, to avoid inadvertent curing from pressure on the adhesive. Fig. 4.2.3: Allow about two drops of Z70 to fall onto the measurement object Once the adhesive has spread, place a piece of Teflon-film over the installation point (Fig. 4.2.4). Fig. 4.2.4: Teflon -film over the installation point Now press down on the strain gage on the measurement object with the ball of your thumb. Maintain a constant pressure for about 1 minute (Fig. 4.2.5). HBM A2397-3.2 en/de/fr Installing optical strain gages 27 Fig. 4.2.5: The requisite pressure is easily applied with the ball of your thumb We recommend that you wait five minutes before removing the Teflon. Immediately afterwards, use two drops of X60 to fix the fibers to protect them from mechanical influences. Fig. 4.2.6: Removing the Teflon after about five minutes A2397-3.2 en/de/fr HBM 28 Installing optical strain gages Fig. 4.2.7: Two dots of X60 adhesive prevent mechanical influences acting on the fibers and protect the optical strain gage Fig. 4.2.8: Removing the hinge. The installation is now capable of measurement. Now is the time to fit the protective cover. Now the hinge can be removed and installation protection fitted. As Z70, like all cyanacrylates, should be protected against moisture, HBM recommends using a protective cover. We recommend an initial layer of elastic SG250 silicone rubber (order no.: 1-SG250). ABM75 (order no.: 1-ABM75) covering tape can be carefully applied as the second layer. HBM A2397-3.2 en/de/fr Installing optical strain gages 29 4.3 Installing strain gages with X60 superglue A mask is required when applying X60 superglue. First fix an additional adhesive strip parallel to the optical strain gage on its Teflon installation aid. Fig. 4.3.1: Making a mask With a scalpel, cut the fixing adhesive strip close to the optical strain gage. Fig. 4.3.2: Making a hinge from adhesive tape Attach a further piece of adhesive tape parallel to the optical strain gage. A2397-3.2 en/de/fr HBM 30 Installing optical strain gages Fig. 4.3.3: Bonding the complete mask for the hinge from adhesive tape Mix the X60 as stated in the instructions for use. Fig. 4.3.4: Mixing X60 adhesive Apply a generous amount of adhesive to the installation point. HBM A2397-3.2 en/de/fr Installing optical strain gages 31 Fig. 4.3.5: Applying the adhesive Use one of the enclosed small cellophane-sheets to carefully press on the adhesive. Press with a rolling motion from the center to the edges. Fig. 4.3.6: Rolling out the adhesive with your finger. Use the enclosed cellophane as a separating layer The adhesive escaping in the longitudinal direction fixes and secures the fiber. You can remove the cellophane as soon as the residual adhesive in the mixing container has cured. A2397-3.2 en/de/fr HBM 32 Installing optical strain gages Fig. 4.3.7: Removing the cellophane once the adhesive has cured We recommend that you pull off the adhesive strips as soon as the cellophane has been removed. Pull tight at an angle of 45 degrees. This will peel off the X60. Fig. 4.3.8: Removing the mask The last step now is to remove the fixing. To do this, first peel off the adhesive tape as far as the edge of the adhesive. Then pull off the remaining adhesive tape at an acute angle. HBM A2397-3.2 en/de/fr Installing optical strain gages 33 Fig. 4.3.9: Removing the fixing with flat tweezers. Note the acute angle. Installation is now complete. After about 30 minutes, you can use the measuring point, or attach installation protection. A2397-3.2 en/de/fr HBM 34 5 Installing optical strain gages Specifications Design Outside diameter of the glass fiber Core diameter of the glass fiber Diameter with buffer Dimensions µm µm mm Length Width Thickness Connector (plug)1) Available Bragg wavelengths mm mm mm Glass fiber with Bragg grating, symmetrically embedded in modified acrylic resin 185 5 1.5 SG with potting SG without potting (Standard) (on cust. request) 40"1 30"1 12"0.5 5"1 2.0"0.5 0.5"0.01 FC/ACP 1520, 1525, 1530, 1535, 1540, 1545, 1550, 1555, 1560, 1565, 1570, 1575, 1580 Bragg wavelength tolerance nm "1 Gage factor approx. 0.79, specified on each package Gage factor tolerance % 2 Reference temperature °C [°F] 23 [73.4] Operating temperature range °C [°F] −10 ... +80 [14 ... +176] Storage temperature range °C [°F] −20 ... +100 [−4 ... +212] Temperature response (thermal expanµm/ sion coefficient of the test object 0 µm/m/K) m/K 7.8 ppm/K 6.1 Tolerance of the temperature response µm/ 1 m/K Max. elongation at reference temperature using Z70 adhesive absol. strain value for positive direction µm/m 10,000 (1 %) absol. strain value for negat. direction µm/m 10,000 (1 %) Fatigue life, at reference temperature using Z70 adhesive Number of load cycles LW at alternating strain εw = "1000 µm/m a. variat. of zero point εm∆ ≤ 30 µm/m >>107 (interrupted after 107 load cycles) alternating strain εw = "3000 µm/m a. variat. of zero point εm∆ ≤ 60 µm/m >>107 (interrupted after 107 load cycles) Fatigue life, at reference temperature using X280 adhesive2) Number of load cycles LW at alternating strain εw = "5000 µm/m a. variat. of zero point εm∆ ≤ 100 µm/m >>107 (interrupted after 107 load cycles) Minimum radius of curvature (longitudinal and transverse) mm 25 at reference temperature Bonding material that can be used cold curing adhesives Z70, X60, X280 nm 1) Spliced fiber optic cable with connector and buffer is available as an option (length as specified by customer). 2) Contact pressure when using X280 with optical strain gages: 1 N/cm2. The achievable number of load cycles is dependent on the quality of the installation and the endurance strength of the component under investigation HBM A2397-3.2 en/de/fr Installation von optischen DMS Inhalt 35 Seite 1 Vorbereitung der Installationsfläche . . . . . . . . . . . . . . . . . . . . . . . . . . . 36 2 Anzeichnen der Messstelle . . . . . . . . . . . . . . . . . . . . . . . . . . . . . . . . . . . . 38 3 Installation von optischen DMS mit Verguss (Standard) . . . . . . . . . 39 4 5 3.1 Positionieren des optischen DMS . . . . . . . . . . . . . . . . . . . . . . . . . . 39 3.2 Installation der Standard-DMS mit Schnellklebstoff Z70 . . . . . . . 43 3.3 Installation der Standard-DMS mit Schnellklebstoff X60 . . . . . . . 47 Installation von optischen DMS ohne Verguss (optional) . . . . . . . . 52 4.1 Positionieren des DMS . . . . . . . . . . . . . . . . . . . . . . . . . . . . . . . . . . . 52 4.2 Installation der DMS mit Schnellklebstoff Z70 . . . . . . . . . . . . . . . . 57 4.3 Installation der DMS mit Schnellklebstoff X60 . . . . . . . . . . . . . . . . 61 Technische Daten . . . . . . . . . . . . . . . . . . . . . . . . . . . . . . . . . . . . . . . . . . . . 66 A2397-3.2 en/de/fr HBM 36 Installation von optischen DMS HINWEIS Optische Dehnungsmessstreifen (DMS) von HBM lassen sich mit den gleichen Verfahren und Materialien wie Metallfolie-DMS installieren. Bitte beachten Sie hierzu die Schrift „Hinweise zum Applizieren von Dehnungsmessstreifen“ oder den Lehrfilm, der auf DVD erhältlich ist. Diese Unterlage beschreibt die Installation von optischen DMS mit Verguss (Standard) und optischen DMS ohne Verguss (auf Kundenwunsch). Zur Installation kann jeweils sowohl der Schnellklebstoff Z70 als auch der Zweikomponenten-Schnellklebstoff X60 verwendet werden. Beide Verfahren sind in dieser Gebrauchsanweisung beschrieben. Die allgemeine Vorgehensweise ist bis Kapitel 3 identisch. Danach sind die Angaben jeweils spezifisch. Nutzen Sie das Inhaltsverzeichnis um schnell an die für Sie relevanten Informationen zu gelangen. 1 Vorbereitung der Installationsfläche Bei der Installation von Dehnungsmessstreifen muss die Oberfläche des Testobjekts zunächst gereinigt und eben sein. Dazu wird erst die Messstelle mit dem Reinigungsmittel RMS1 (Best.Nr. 1-RMS1 oder als Spray 1-RMS1-Spray, siehe Abb. 1.1) und einem Vliesstoff-Pad (Best.Nr. 1-8402.0026) für eine nachfolgende mechanische Bearbeitung grundgereinigt. Abb. 1.1: HBM Grundreinigung der Messstelle mit 1-RMS-SPRAY A2397-3.2 en/de/fr Installation von optischen DMS 37 Zur Vorbereitung des Werkstückes für die Installation mit dem Klebstoff Z70 muss die Oberfläche mit Schmirgelleinen der Körnung 180...240 aufgeraut werden (Bild 1.2). Soll der Klebstoff X60 verwendet werden, ist die Körnung 180 zu benutzen. Abb. 1.2: Aufrauen der Oberfläche des Messkörpers Im nächsten Schritt wird die aufgeraute Installationsfläche mit RMS1 und Vliesstoff-Pad gereinigt, siehe Abb. 1.3. Abb. 1.3: Reinigung der aufgerauten Installationsfläche A2397-3.2 en/de/fr HBM 38 2 Installation von optischen DMS Anzeichnen der Messstelle Zum Anzeichnen der Installationsstelle wird eine im Idealfall leere Kugelschreibermine empfohlen. In Messrichtung sollte die Länge der Markierungslinie ca. 60 mm betragen. Von der Mitte der Installationsstelle aus wird senkrecht dazu eine insgesamt ca. 40 mm lange Markierungslinie gezogen, siehe Abb. 2.1. Abb. 2.1: Anzeichnen der Markierungslinien Nach dem Anzeichnen ist eine sehr gründliche Reinigung der Installationsstelle notwendig, siehe Abb. 2.2. Hierbei ist zu beachten, dass für jeden Wischvorgang ein neues Vliesstoff-Pad verwendet wird. Der Reinigungsvorgang ist beendet, wenn kein Abrieb mehr auf dem Vliesstoff-Pad zu erkennen ist. Abb. 2.2: HBM Schlussreinigung der Installationsstelle A2397-3.2 en/de/fr Installation von optischen DMS 3 39 Installation von optischen DMS mit Verguss (Standard) 3.1 Positionieren des optischen DMS Der optische DMS ist sorgfältig in einer Schutzmappe innerhalb eines Kartons verpackt. Bitte beachten Sie die folgenden Schritte beim Auspacken, um nicht die Glasfaser des optischen DMS zu beschädigen, siehe Abb.3.1.1 bis 3.1.4. Beispiel einer Verpackung für Ketten mit 1 oder 2 optischen DMS. Verpackung von Ketten mit mehr als 2 optischen DMS sind abweichend von der hier dargestellten Verpackung. Abb. 3.1.1: Verpackter optischer DMS mit Installationshilfe Abb. 3.1.2: Auspacken des optischer DMS mit Installationshilfe A2397-3.2 en/de/fr HBM 40 Installation von optischen DMS Abb. 3.1.3: Entfernen beider Klebestreifen zur Entnahme des optischen DMS Abb. 3.1.4: Optischer DMS vor der Entnahme aus der Schutzhülle HBM A2397-3.2 en/de/fr Installation von optischen DMS 41 Abb. 3.1.5: Ausgepackter optischer DMS mit Installationshilfe Abb. 3.1.6: Entfernen der Schutzfolie vom DMS Übertragen Sie anschließend den optischen DMS mit Teflon-Installationshilfe auf die Messstelle, siehe Abb. 3.1.7. Die Faser dient dabei der Ausrichtung des DMS. A2397-3.2 en/de/fr HBM 42 Installation von optischen DMS Abb. 3.1.7: Fixieren der optischen Fasern mit Klebeband, ca 20 cm vom DMS entfernt Fixieren Sie nach dem Ausrichten die abgehenden Fasern mit PolyimidKlebeband (Best.Nr. 1-Klebeband) um die Faser vor mechanischen Einflüssen zu schützen. HINWEIS Bei bogenförmigem Verlegen der Faser darf der Krümmungsradius nicht kleiner als 25 mm sein! Erst nach einer Fixierung mit dem Schnellklebstoff X60 (siehe Abb. 3.2.4) darf die Faser gekrümmt werden, jedoch nicht am Faseraustritt des DMS bzw. am Spleiß! Fixieren Sie ein ca. 10 cm langes Polyimid-Klebeband auf der Teflon-Installationshilfe. Ziehen Sie das Klebeband straff, richten Sie den optischen DMS mit dem Klebeband an der Anzeichenlinie aus und fixieren Sie das Klebeband auf dem Messkörper, siehe Abb. 3.1.8. Abb. 3.1.8: Fixieren des optischen DMS mittels Installationshilfe und Klebeband HBM A2397-3.2 en/de/fr Installation von optischen DMS 43 3.2 Installation der Standard-DMS mit Schnellklebstoff Z70 Abb. 3.2.1: Fixierte Installationshilfe Halten Sie nun den Klebstoff Z70 und ein etwa handgroßes Stück Teflon-Folie (Best.Nr.1-Teflon) bereit. Verwenden Sie die Installationshilfe als Scharnier für den optischen DMS. Lassen Sie 3 Tropfen des Klebstoffs Z70 auf die Messstelle unter den optischen DMS fallen, ohne mit dem Z70-Fläschchen die Oberfläche zu berühren, siehe Abb. 3.2.2. Abb. 3.2.2: Aufbringen des Klebstoffs Z70 Klappen Sie den optischen DMS zügig auf die Klebefläche und drücken Sie ihn mit dem Handballen gleichmäßig unter Verwendung der Teflon -Folie für eine Minute an, siehe Abb. 3.2.3. A2397-3.2 en/de/fr HBM 44 Installation von optischen DMS Abb. 3.2.3: Ankleben des optischen DMS Es empfiehlt sich die Teflon-Folie erst nach ca. 5 min zu entfernen. Im Anschluss sollte die Faser nahe dem optischen DMS zur Zugentlastung mit zwei Tropfen X60-Klebstoff an der Oberfläche befestigt werden, siehe Abb. 3.2.3. Abb. 3.2.4: Befestigung der optischen Faser mit Klebstoff X60 Nach 10-minütiger Aushärtezeit des X60-Klebstoffs können alle Klebestreifen und die Installationshilfe entfernt werden. Die Klebestreifen sollte man schräg zur Oberfläche abziehen, siehe Abb. 3.2.5. HBM A2397-3.2 en/de/fr Installation von optischen DMS 45 Abb. 3.2.5: Entfernen der Klebestreifen Abb. 3.2.6: Ablösen der Folie A2397-3.2 en/de/fr HBM 46 Installation von optischen DMS Sollte die Teflon-Installationshilfe an dem Messkörper haften bleiben, ist diese vorsichtig mit einem Skalpell oder Pinzette abzulösen, siehe Abb. 3.2.7. Abb. 3.2.7: Ablösen der Teflon-Installationshilfe Abb. 3.2.8: Fertige Installation des optischen DMS HBM A2397-3.2 en/de/fr 47 Installation von optischen DMS 3.3 Installation der Standard-DMS mit Schnellklebstoff X60 Die Vorbereitung und Positionierung des optischen DMS auf dem Messobjekt sind identisch mit der Vorgehensweise, wie Sie beim Schnellklebstoff Z70 beschrieben ist. Abb. 3.3.1: Herstellung eines Scharniers aus Klebeband: Fixieren des optischen DMS mittels Installationshilfe und Klebeband Zur Anwendung des Schnellklebstoffes X60 ist eine Maske erforderlich. Fixieren Sie hierzu zunächst einen zusätzlichen Klebestreifen parallel zum optischen DMS auf dessen Teflon-Installationshilfe (weiß). Abb. 3.3.2: Anfertigen einer Maske Bringen Sie ein weiteres Klebeband parallel zum optischen DMS an. Mischen Sie den X60 nach Gebrauchsanleitung. A2397-3.2 en/de/fr HBM 48 Installation von optischen DMS Abb. 3.3.3: Mischen des Klebstoffes X60 Bringen Sie den Klebstoff in großzügiger Menge auf die Installationsstelle. Abb. 3.3.4: Auftragen des Klebstoffes Benutzen Sie eines der beiliegenden Cellophan-Blättchen, um den Klebstoff sorgfältig anzudrücken. Hierzu rollende Bewegungen von der Mitte zu den Rändern ausführen. HBM A2397-3.2 en/de/fr Installation von optischen DMS 49 Abb. 3.3.5: Ausrollen des Klebstoffes mit dem Finger. Als Trennschicht ist das beiliegende Cellophan zu verwenden. Der in Längsrichtung austretende Klebstoff fixiert und sichert die Faser. Sie können das Cellophan entfernen, so bald der Klebstoffrest im Anrührgefäß ausgehärtet ist (nach max. ca. 5 min). Abb. 3.3.6: Entfernen des Cellophan nach dem Aushärten des Klebstoffes Wir empfehlen, die Klebestreifen sofort nach Entfernen des Cellophan abzuziehen. Ziehen Sie straff in einem Winkel von 45 Grad. Hierdurch platzt der X60 ab. A2397-3.2 en/de/fr HBM 50 Installation von optischen DMS Abb. 3.3.7: Entfernen der Maske Als letzten Schritt ist nun die Fixierung zu entfernen. Hierzu ist zunächst das Klebeband bis zum Rand des Klebstoffes abzulösen. Das restliche Klebeband auf der Installationshilfe danach im spitzen Winkel mit einer flachen Pinzette vorsichtig abziehen. Abb. 3.3.8: Entfernen der Fixierung mit einer flachen Pinzette. Auf spitzen Winkel achten. HBM A2397-3.2 en/de/fr Installation von optischen DMS 51 Abb. 3.3.9: Entfernen der Teflon-Installationshilfe mit einer flachen Pinzette. Die Installation ist nun fertig gestellt. Nach etwa 30 Minuten kann die Messstelle benutzt, oder ein Installationsschutz angebracht werden. A2397-3.2 en/de/fr HBM 52 4 Installation von optischen DMS Installation von optischen DMS ohne Verguss (optional) 4.1 Positionieren des DMS Der optische DMS von HBM ist sorgfältig verpackt. Beachten Sie bitte folgende Hinweise, um die Glasfaser des DMS nicht zu beschädigen oder zu zerstören. Der DMS befindet sich mit seiner Schutzmappe in einer Kartonverpackung, die ihn während des Transportes schützt. Nehmen Sie den DMS vorsichtig aus der Packung. Abb. 4.1.1: Verpackter Dehnungsmessstreifen mit Installationshilfe 1 2 Abb. 4.1.2: Der DMS mit Installationshilfe und Schutzmappe ist aus der Schutzmappe zu entnehmen. Hierzu die beiden Klebestreifen (1, 2) entfernen HBM A2397-3.2 en/de/fr 53 Installation von optischen DMS Abb. 4.1.3: DMS mit Installationshilfe ohne Schutzmappe Entfernen Sie die Schutzfolie auf der Rückseite des optischen DMS (Abb. 4.1.4). Abb. 4.1.4: Entfernen der Schutzfolie Übertragen Sie dann den optische DMS mit der Installationshilfe auf das Messobjekt. Die Faser dient dabei der Ausrichtung des DMS. Fixieren und sichern Sie möglichst früh die abgehenden Fasern, da das Eigengewicht weiterer DMS in der Kette oder der Anschlußstecker zu Beschädigungen führen kann. A2397-3.2 en/de/fr HBM 54 Installation von optischen DMS HINWEIS Bei bogenförmigem Verlegen der Faser, darf der Radius nicht kleiner als 25 mm sein. Erst nach einer Fixierung mit dem Schnellklebstoff X60 darf die Faser gekrümmt werden, jedoch nicht am Faseraustritt des DMS bzw. am Spleiß. Fixieren Sie die Faser mit einem Klebeband o.ä. sicher. (Bild 4.1.5) Abb. 4.1.5: Fixierung der abgehenden Fasern zur Zugentlastung Rechtwinklig zur Faser ist ein Klebeband auf den optischen DMS geklebt, das auf das Bauteil angedrückt werden kann. Hierdurch ist der DMS auf das Messobjekt fixiert. Dabei ist gleichzeitig auf eine exakte Positionierung des optischen DMS zu achten. Sie können nun den Klebestreifen, der in Faserrichtung auf dem optischen Messstreifen geklebt ist, entfernen. (Bild 4.1.6) HBM A2397-3.2 en/de/fr Installation von optischen DMS 55 Abb. 4.1.6: Entfernen des Klebestreifens in Faserrichtung Mit einem Skalpell ist gemäß Abb. 4.1.7 das Klebeband am DMS in Nähe des Installationsschutzes zu schneiden. Abb. 4.1.7: Schneiden des Klebestreifens an der Installationshilfe Entfernen Sie jetzt die Installationshilfe vorsichtig. Hierzu ist die Installationshilfe wie gezeigt zusammen zudrücken. Sie lässt sich dann sehr leicht entfernen (Abb. 4.1.8 und 4.1.9). A2397-3.2 en/de/fr HBM 56 Installation von optischen DMS Abb. 4.1.8: Entfernen der Installationshilfe 1 Abb. 4.1.9: Entfernen der Installationshilfe Es ist darauf zu achten, dass die Installationshilfe vollständig zusammen gedrückt wird, so dass der Schnitt in der Hilfe aufklappt (1). Dann lässt sich die Hilfe leicht entfernen. HBM A2397-3.2 en/de/fr Installation von optischen DMS 57 4.2 Installation der DMS mit Schnellklebstoff Z70 Die Vorbereitung und Positionierung des optischen DMS auf dem Messobjekt sind identisch mit der Vorgehensweise, wie Sie beim Schnellklebstoff X60 beschrieben ist. Abb. 4.2.1: Entfernen der Installationshilfe Nach dem die Installationshilfe entfernt wurde (siehe Abb. 4.2.1) kann eine Maske geklebt werden. Hierdurch verhindert man, dass der Klebstoff sich während der Installation auf dem Messobjekt verteilt. Der optische DMS wird ein kleines Stück zurückgezogen, siehe Abb. 4.2.2. Abb. 4.2.2: Zurückziehen des DMS mit einer Pinzette A2397-3.2 en/de/fr HBM 58 Installation von optischen DMS Jetzt wird der Schnellklebstoff auf das Messobjekt getropft. Es ist darauf zu achten, dass der Z70 auf das Messobjekt fällt, um ein ungewolltes Aushärten durch Druck auf den Klebstoff zu vermeiden. Abb. 4.2.3: Ca. zwei Tropfen Z70 auf das Messobjekt fallen lassen Nachdem der Klebstoff verteilt ist, legen Sie bitte ein Stück Teflon-Folie auf die Installationsstelle (Abb. 4.2.4) Abb. 4.2.4: Teflon -Folie auf der Installationsstelle Nun wird der DMS mit dem Handballen auf dem Messobjekt angedrückt. Halten Sie den Druck für ca. 1 min. konstant (Abb. 4.2.5). HBM A2397-3.2 en/de/fr Installation von optischen DMS 59 Abb. 4.2.5: Der nötige Druck kann einfach mit dem Handballen aufgebracht werden Wir empfehlen fünf Minuten zu warten, dann kann das Teflon entfernt werden. Unmittelbar danach sollte die Faser mittels zweier Tropfen X60 gegen mechanische Einflüsse fixiert werden. Abb. 4.2.6: Entfernen des Teflons nach ca. fünf Minuten A2397-3.2 en/de/fr HBM 60 Installation von optischen DMS Abb. 4.2.7: Schützen des optischen DMS gegen mechanische Einwirkungen auf die Faser durch zwei Klebstoffpunkte X60 Abb. 4.2.8: Abziehen des Scharniers. Die Installation ist nun messfähig. Die Schutzabdeckung kann montiert werden. Jetzt kann das Scharnier entfernt, und der Installationsschutz montiert werden. Da Z70 wie alle Cyanacrylate gegen Feuchtigkeit geschützt werden soll, empfiehlt HBM eine Schutzabdeckung. Hierzu empfehlen wir als erste Schicht den elastischen Silikongummi SG250 (Bestellnummer: 1-SG250). Als zweites kann das Abdeckband ABM75 sorgfältig aufgebracht werden. HBM A2397-3.2 en/de/fr 61 Installation von optischen DMS 4.3 Installation der DMS mit Schnellklebstoff X60 Zur Anwendung des Schnellklebstoffes X60 ist eine Maske erforderlich. Fixieren Sie hierzu zunächst einen zusätzlichen Klebestreifen parallel zum optischen DMS auf dessen Klebestreifen. Abb. 4.3.1: Anfertigen einer Maske Schneiden Sie mit einem Skalpell den fixierenden Klebestreifen eng am optischen DMS ab. Abb. 4.3.2: Herstellung eines Scharniers aus Klebeband Bringen Sie ein weiteres Klebeband parallel zum optischen DMS an. A2397-3.2 en/de/fr HBM 62 Installation von optischen DMS Abb. 4.3.3: Kleben der vollständigen Maske für das Scharnier aus Klebeband Mischen Sie den X60 nach Gebrauchsanleitung. Abb. 4.3.4: Mischen des Klebstoffes X60 Bringen Sie den Klebstoff in großzügiger Menge auf die Installationsstelle. HBM A2397-3.2 en/de/fr Installation von optischen DMS 63 Abb. 4.3.5: Auftragen des Klebstoffes Benutzen Sie eines der beiliegenden Cellophan-Blättchen, um den Klebstoff sorgfältig anzudrücken. Hierzu rollende Bewegungen von der Mitte zu den Rändern ausführen. Abb. 4.3.6: Ausrollen des Klebstoffes mit dem Finger. Als Trennschicht ist das beiliegende Cellophan zu verwenden. Der in Längsrichtung austretende Klebstoff fixiert und sichert die Faser. Sie können das Cellophan entfernen, so bald der Klebstoffrest im Anrührgefäß ausgehärtet ist. A2397-3.2 en/de/fr HBM 64 Installation von optischen DMS Abb. 4.3.7: Entfernen des Cellophan nach dem Aushärten des Klebstoffes Wir empfehlen, die Klebestreifen sofort nach Entfernen des Cellophan abzuziehen. Ziehen Sie straff in einem Winkel von 45 Grad. Hierdurch platzt der X60 ab. Abb. 4.3.8: Entfernen der Maske Als letzten Schritt ist nun die Fixierung zu entfernen. Hierzu ist zunächst das Klebeband bis zum Rand des Klebstoffes abzulösen. Das restliche Klebeband danach im spitzen Winkel vorsichtig abziehen. HBM A2397-3.2 en/de/fr Installation von optischen DMS 65 Abb. 4.3.9: Entfernen der Fixierung. Auf spitzen Winkel achten. Die Installation ist nun fertig gestellt. Nach etwa 30 Minuten kann die Messstelle benutzt, oder ein Installationsschutz angebracht werden. A2397-3.2 en/de/fr HBM 66 5 Installation von optischen DMS Technische Daten Konstruktion Außendurchmesser der Glasfaser Kerndurchmesser der Glasfaser, ca. Durchmesser mit Schutzhülle (Buffer), ca. Abmessungen µm µm mm Länge Breite Dicke Anschluss (Stecker)1) Verfügbare Bragg-Wellenlängen mm mm mm Toleranz der Bragg-Wellenlänge k-Faktor k-Faktor-Toleranz Referenztemperatur Gebrauchstemperaturbereich Lagerungstemperaturbereich Temperaturgang (Wärmeausdehnungskoeffizient des Messobjekts 0 µm/m/K) nm Toleranz des Temperaturgangs Maximale Dehnbarkeit bei Referenztemperatur unter Verwendung von Klebstoff Z70 Dehnungsbetrag in positiver Richtung Dehnungsbetrag in negat. Richtung Dauerschwingverhalten bei Referenztemperatur unter Verwendung von Klebstoff Z70 Erreichte Lastwechselzahl Lw bei Wechseldehnung εw = "1000 µm/m u. Nullpunktänderung εm∆ ≤ 30 µm/m Wechseldehnung εw = "3000 µm/m u. Nullpunktänderung εm∆ ≤ 60 µm/m Dauerschwingverhalten bei Referenztemperatur unter Verwendung von Klebstoff X2802) Erreichte Lastwechselzahl Lw bei Wechseldehnung εw = "5000 µm/m u. Nullpunktänderung εm∆ ≤ 100 µm/m Kleinster Krümmungsradius längs und quer bei Referenztemperatur Verwendbare Befestigungsmittel kalt härtende Klebstoffe 1) Angespleißtes Glasfaserkabel Kundenwunsch). HBM nm % °C °C °C µm/ m/K ppm/K µm/ m/K µm/m µm/m in modifiziertes Acrylharz symmetrisch eingebettete Glasfaser mit Bragg-Gitter; in Kunststoff vergossen 185 5 1,5 DMS mit Verguss DMS ohne Verguss (Standard) (auf Kundenwunsch) 40"1 30"1 12"0,5 5"1 2,0"0,5 0,5"0,01 FC/ACP 1520, 1525, 1530, 1535, 1540, 1545, 1550, 1555, 1560, 1565, 1570, 1575, 1580 "1 ca. 0,79 (auf jeder Packung angegeben) 2 23 −10 ... +80 −20 ... +100 7,8 6,1 1 10.000 (1%) 10.000 (1%) >>107 (nach 107 Lastwechsel abgebr.) >>107 (nach 107 Lastwechsel abgebr.) >>107 (nach 107 Lastwechsel abgebr.) mm 25 Z70, X60, X280 mit Stecker und Schutzhülle ist optional erhältlich (Länge auf A2397-3.2 en/de/fr Installation von optischen DMS 67 2) Anpressdruck bei Verwendung von X280 mit optischen DMS: 1 N/cm2 Erreichbare Lastwechselzahl abhängig von der Qualität der Installation und Dauerschwingfestigkeit des zu untersuchenden Bauteils. A2397-3.2 en/de/fr HBM 68 Installation von optischen DMS HBM A2397-3.2 en/de/fr Installation de jauges optiques Sommaire 69 Page 1 Préparation de la surface d’installation . . . . . . . . . . . . . . . . . . . . . . . . 69 2 Traçage du point de mesure . . . . . . . . . . . . . . . . . . . . . . . . . . . . . . . . . . . 71 3 Installation de jauges optiques avec scellement (std.) . . . . . . . . . . . 72 4 5 3.1 Mise en place de la jauge optique . . . . . . . . . . . . . . . . . . . . . . . . . . 72 3.2 Installation de la jauge std. avec de la colle rapide Z70 . . . . . . . 76 3.3 Installation de la jauge std. avec de la colle rapide X60 . . . . . . . 80 Installation de jauges optiques sans scellement (en opt.) . . . . . . . . 85 4.1 Mise en place de la jauge d’extensométrie . . . . . . . . . . . . . . . . . . 85 4.2 Installation de la jauge avec de la colle rapide Z70 . . . . . . . . . . . 90 4.3 Installation de la jauge avec de la colle rapide X60 . . . . . . . . . . . 94 Caractéristiques techniques . . . . . . . . . . . . . . . . . . . . . . . . . . . . . . . . . . 99 A2397-3.2 en/de/fr HBM 70 Installation de jauges optiques REMARQUE Les jauges d’extensométrie optiques (jauges) de HBM s’installent de la même manière et avec les mêmes matériaux que les jauges métalliques. Veuillez tenir compte à ce sujet du document ”Consignes d’application de jauges d’extensométrie” ou du film d’apprentissage disponible sur DVD. Le présent document décrit comment installer des jauges optiques avec scellement (standard) et des jauges optiques sans scellement (sur demande). Pour l’installation, vous pouvez aussi bien utiliser la colle rapide Z70 que la colle rapide à deux composants X60. Les deux méthodes sont décrites dans ces instructions de service. La procédure générale est identique jusqu’au chapitre 3. Les indications sont ensuite données de façon spécifique. Veuillez utiliser le sommaire pour accéder rapidement aux informations qui vous concernent. 1 Préparation de la surface d’installation Pour pouvoir installer des jauges d’extensométrie, il faut tout d’abord nettoyer et aplanir la surface de l’objet d’essai. Pour ce faire, procéder à un premier nettoyage du point de mesure à l’aide du produit de nettoyage RMS1 (réf. 1-RMS1 ou 1-RMS1-Spray pour la bombe aérosol, voir fig. 1.1) et d’un tampon de gaze (réf. 1-8402.0026) afin de le préparer à un traitement mécanique ultérieur. Fig. 1.1: HBM Premier nettoyage du point de mesure avec 1-RMS-SPRAY A2397-3.2 en/de/fr Installation de jauges optiques 71 En vue de préparer la pièce pour l’installation avec la colle Z70, la surface doit être passée à la toile émeri d’un grain compris entre 180 et 240 (fig. 1.2). En cas d’utilisation de la colle X60, le grain doit être de 180. Fig. 1.2: Grattage de la surface de l’élément de mesure La surface grattée est ensuite nettoyée avec du RMS1 et un tampon de gaze (voir fig. 1.3). Fig. 1.3: Nettoyage de la surface d’installation grattée A2397-3.2 en/de/fr HBM 72 2 Installation de jauges optiques Traçage du point de mesure Pour tracer l’emplacement d’installation, il est conseillé d’utiliser un stylo à bille vide. La ligne repère doit mesurer env. 60 mm dans le sens de la mesure. Tracez ensuite une ligne repère d’env. 40 mm perpendiculaire à cette ligne en partant du milieu de l’emplacement d’installation (voir fig. 2.1). Fig. 2.1: Traçage des lignes repères A l’issue du traçage, il est nécessaire de nettoyer très soigneusement l’emplacement d’installation (voir fig. 2.2). Pour ce faire, il faut utiliser un tampon de gaze neuf à chaque passage. Le nettoyage est terminé lorsque le tampon de gaze ne présente plus aucune trace de restes d’abrasion. Fig. 2.2: HBM Nettoyage final de l’emplacement d’installation A2397-3.2 en/de/fr Installation de jauges optiques 3 73 Installation de jauges optiques avec scellement (std.) 3.1 Mise en place de la jauge optique La jauge optique est soigneusement emballée dans un carton, dans une enveloppe protectrice. Veuillez respecter les étapes suivantes lors du déballage afin de ne pas endommager les fibres de verre de la jauge optique (voir fig. 3.1.1 à 3.1.4). Exemple d’un emballage pour des chaînes avec 1 ou 2 jauges optiques. Les emballages pour des chaînes avec plus de 2 jauges optiques diffèrent de l’emballage figuré ici. Fig. 3.1.1: Jauge optique emballée avec aide à l’installation Fig. 3.1.2: Déballage de la jauge optique avec l’aide à l’installation A2397-3.2 en/de/fr HBM 74 Installation de jauges optiques Fig. 3.1.3: Retrait des deux bandes adhésives pour enlever la jauge optique Fig. 3.1.4: Jauge optique avant sa sortie de l’enveloppe protectrice HBM A2397-3.2 en/de/fr Installation de jauges optiques 75 Fig. 3.1.5: Jauge optique déballée avec aide à l’installation Fig. 3.1.6: Retrait du film protecteur de la jauge Installez ensuite la jauge optique avec l’aide à l’installation en téflon sur le point de mesure (voir fig. 3.1.7). La fibre sert ici à orienter la jauge. A2397-3.2 en/de/fr HBM 76 Installation de jauges optiques Fig. 3.1.7: Fixation des fibres optiques à l’aide de ruban adhésif, à env. 20 cm de la jauge Après avoir positionné la jauge, fixez les fibres sortantes à l’aide de ruban adhésif polyimide (réf. 1-Klebeband) afin de protéger les fibres des sollicitations mécaniques. REMARQUE Lors d’une pose des fibres en forme d’arc, le rayon de courbure ne doit pas être inférieur à 25 mm ! Ce n’est qu’après avoir fixé les fibres avec la colle rapide X60 (voir fig. 3.2.4) qu’elles peuvent être courbées, mais pas au niveau de la sortie de la fibre sur la jauge ou de l’épissure ! Collez une bande de ruban adhésif polyimide d’env. 10 cm sur l’aide à l’installation en téflon. Tirez bien sur le ruban adhésif, orientez la jauge optique de façon à ce que le ruban adhésif longe la ligne tracée et collez le ruban adhésif sur l’élément de mesure (voir fig. 3.1.8). Fig. 3.1.8: Fixation de la jauge optique avec l’aide à l’installation et le ruban adhésif HBM A2397-3.2 en/de/fr Installation de jauges optiques 77 3.2 Installation de la jauge std. avec de la colle rapide Z70 Fig. 3.2.1: Aide à l’installation fixée Préparez maintenant la colle Z70 ainsi qu’un film téflon de la taille d’une main environ (réf.1-Teflon). Utilisez l’aide à l’installation comme charnière pour la jauge optique. Mettez 3 gouttes de colle Z70 sur le point de mesure, sous la jauge optique, sans toucher la surface avec le flacon de colle Z70 (voir fig. 3.2.2). Fig. 3.2.2: Application de la colle Z70 Rabattez immédiatement la jauge optique sur la surface avec la colle et appuyez pendant une minute de façon homogène avec la paume de la main en vous servant du film téflon (voir fig. 3.2.3). A2397-3.2 en/de/fr HBM 78 Installation de jauges optiques Fig. 3.2.3: Collage de la jauge optique Il est conseillé de ne retirer le film téflon qu’au bout de 5 min environ. Il convient ensuite de fixer les fibres situées à proximité de la jauge optique avec deux gouttes de colle X60 afin de la décharger en traction (voir fig. 3.2.3). Fig. 3.2.4: Fixation des fibres optiques avec de la colle X60 Laissez la colle X60 durcir pendant 10 minutes, puis retirez toutes les bandes adhésives et l’aide à l’installation. Il est conseillé de tirer sur les bandes adhésives de biais par rapport à la surface (voir fig. 3.2.5). HBM A2397-3.2 en/de/fr Installation de jauges optiques 79 Fig. 3.2.5: Retrait des bandes adhésives Fig. 3.2.6: Dégagement du film A2397-3.2 en/de/fr HBM 80 Installation de jauges optiques Si l’aide à l’installation en téflon devait rester collée à l’élément de mesure, elle doit être retirée prudemment à l’aide d’un scalpel ou d’une pincette (voir fig. 3.2.7). Fig. 3.2.7: Détachement de l’aide à l’installation en téflon Fig. 3.2.8: Installation terminée de la jauge optique HBM A2397-3.2 en/de/fr Installation de jauges optiques 81 3.3 Installation de la jauge std. avec de la colle rapide X60 La préparation et le positionnement de la jauge optique sur l’échantillon sont les mêmes que celles décrites pour la procédure avec la colle rapide Z70. Fig. 3.3.1: Fabrication d’une charnière en ruban adhésif, fixation de la jauge optique avec l’aide à l’installation et le ruban adhésif L’utilisation de la colle rapide X60 nécessite de se servir d’un masque. Collez d’abord à cet effet une bande adhésive supplémentaire parallèle à la jauge optique sur l’aide à l’installation en téflon (blanche). Fig. 3.3.2: Fabrication d’un masque Collez une autre bande adhésive parallèle à la jauge optique. Mélangez la colle X60 conformément à son mode d’emploi. A2397-3.2 en/de/fr HBM 82 Installation de jauges optiques Fig. 3.3.3: Mélange de la colle X60 Enduisez généreusement la surface d’installation de colle. Fig. 3.3.4: Application de la colle Utilisez l’un des feuillets de cellophane fournis pour appuyer soigneusement sur la colle. Faire à cet effet des mouvements rotatoires du centre vers les bords. HBM A2397-3.2 en/de/fr Installation de jauges optiques 83 Fig. 3.3.5: Etalement de la colle avec le doigt. Le cellophane fourni doit être utilisé en tant que couche séparatrice. La colle sortant dans la longueur fixe et bloque la fibre. Vous pouvez retirer le cellophane dès que le résidu de colle a durci dans le récipient ayant servi à préparer le mélange (5 min maxi.). Fig. 3.3.6: Retrait du cellophane à l’issue du durcissement de la colle Nous recommandons de retirer les bandes adhésives immédiatement après le retrait du cellophane. Tirez fermement à 45 degrés. Ceci entraîne l’éclatement de la X60. A2397-3.2 en/de/fr HBM 84 Installation de jauges optiques Fig. 3.3.7: Retrait du masque La dernière étape consiste à enlever la fixation. A cet effet, décollez d’abord le ruban adhésif jusqu’au bord de la colle. Retirez ensuite prudemment le ruban adhésif restant sur l’aide à l’installation en angle aigu à l’aide d’une pincette plate. Fig. 3.3.8: Retrait de la fixation à l’aide d’une pincette plate. Veiller à l’angle aigu. HBM A2397-3.2 en/de/fr Installation de jauges optiques 85 Fig. 3.3.9: Retrait de l’aide à l’installation en téflon à l’aide d’une pincette plate. L’installation est maintenant terminée. Après 30 minutes, le point de mesure est utilisable ou une protection d’installation peut être appliquée. A2397-3.2 en/de/fr HBM 86 4 Installation de jauges optiques Installation de jauges optiques sans scellement (en opt.) 4.1 Mise en place de la jauge d’extensométrie La jauge optique de HBM est soigneusement emballée. Veuillez tenir compte des consignes suivantes pour ne pas endommager ou détruire la fibre optique de la jauge. La jauge et son enveloppe protectrice se trouvent dans un emballage carton la protégeant pendant le transport. Retirez prudemment la jauge de l’emballage. Fig. 4.1.1: Jauge d’extensométrie emballée avec l’aide à l’installation 1 2 Fig. 4.1.2: La jauge avec aide à l’installation, ici accompagnée de l’enveloppe protectrice, doit être retirée de l’enveloppe protectrice. Retirez à cet effet les deux bandes adhésives (1 et 2). HBM A2397-3.2 en/de/fr Installation de jauges optiques 87 Fig. 4.1.3: Jauge avec aide à l’installation et sans enveloppe protectrice Retirez le film protecteur au dos de la jauge optique (fig. 4.1.4). Fig. 4.1.4: Retrait du film protecteur Transférez ensuite la jauge optique et l’aide à l’installation sur l’échantillon. La fibre sert ici à orienter la jauge. Fixez et bloquez le plus tôt possible les fibres sortantes, car le poids d’autres jauges de la chaîne ou des connecteurs de raccordement risque de provoquer des endommagements. A2397-3.2 en/de/fr HBM 88 Installation de jauges optiques REMARQUE Lors d’une pose des fibres en forme d’arc, le rayon ne doit pas être inférieur à 25 mm. Ce n’est qu’après avoir fixé les fibres avec la colle rapide X60 qu’elles peuvent être courbées, mais pas au niveau de la sortie de la fibre sur la jauge ou de l’épissure. Fixez les fibres à l’aide de ruban adhésif ou équivalent (fig. 4.1.5). Fig. 4.1.5: Fixation des fibres sortantes pour la décharge en traction Une bande adhésive est collée à angle droit par rapport aux fibres sur la jauge optique, qui peut être pressée sur le composant. Ceci permet de fixer la jauge sur l’échantillon. Lors de l’opération, il convient de veiller en même temps à ce que le positionnement de la jauge optique soit exact. Vous pouvez maintenant retirer la bande adhésive collée dans le sens des fibres sur la jauge optique (fig. 4.1.6). HBM A2397-3.2 en/de/fr Installation de jauges optiques 89 Fig. 4.1.6: Retrait de la bande adhésive dans le sens des fibres A l’aide d’un scalpel, coupez le ruban adhésif au niveau de la jauge à proximité de la protection d’application (voir fig. 4.1.7). Fig. 4.1.7: Découpe de la bande adhésive au niveau de l’aide à l’installation Retirez maintenant prudemment l’aide à l’installation. Pour ce faire, comprimez l’aide à l’installation comme indiqué sur la figure. Elle sera ainsi très facile à retirer (fig. 4.1.8 et 4.1.9). A2397-3.2 en/de/fr HBM 90 Installation de jauges optiques Fig. 4.1.8: Retrait de l’aide à l’installation 1 Fig. 4.1.9: Retrait de l’aide à l’installation Il convient de veiller à comprimer à fond l’aide à l’installation, de sorte que la découpe dans l’aide s’ouvre en se relevant (1). Cela permet de retirer aisément l’aide. HBM A2397-3.2 en/de/fr Installation de jauges optiques 91 4.2 Installation de la jauge avec de la colle rapide Z70 La préparation et le positionnement de la jauge optique sur l’échantillon sont les mêmes que celles décrites pour la procédure avec la colle rapide X60. Fig. 4.2.1: Retrait de l’aide à l’installation Un masque peut être collé après le retrait de l’aide à l’installation (voir fig. 4.2.1). Ceci permet d’éviter que la colle ne se répartisse sur l’échantillon pendant l’installation. La jauge optique est quelque peu mise en retrait (voir fig. 4.2.2). Fig. 4.2.2: Mise en retrait de la jauge à l’aide d’une pincette A2397-3.2 en/de/fr HBM 92 Installation de jauges optiques Mettez maintenant quelques gouttes de colle rapide sur l’échantillon. Il convient de veiller à ce que la colle Z70 tombe sur l’échantillon, afin d’éviter tout durcissement indésirable lié à une pression sur la colle. Fig. 4.2.3: Faire tomber env. 2 gouttes de Z70 sur l’échantillon Une fois la colle répartie, posez un morceau de film téflon sur la surface d’installation (fig. 4.2.4). Fig. 4.2.4: Film téflon sur la surface d’installation Pressez à présent la jauge sur l’échantillon avec la paume de la main. Maintenez la pression constante pendant env. 1 min. (fig. 4.2.5). HBM A2397-3.2 en/de/fr Installation de jauges optiques 93 Fig. 4.2.5: La pression requise peut être appliquée simplement avec la paume de la main Nous recommandons d’attendre 5 minutes avant de retirer le téflon. Immédiatement après, il faut fixer les fibres à l’aide de 2 gouttes de colle X60 afin de les protéger contre les sollicitations mécaniques. Fig. 4.2.6: Retrait du téflon après env. 5 minutes A2397-3.2 en/de/fr HBM 94 Installation de jauges optiques Fig. 4.2.7: Protection de la jauge optique contre les sollicitations mécaniques sur la fibre grâce à deux points de colle X60 Fig. 4.2.8: Retrait de la charnière. L’installation est maintenant prête à la mesure. Le cache de protection peut être monté. Vous pouvez à présent retirer la charnière et poser la protection d’installation. Comme la colle Z70 doit être protégée contre l’humidité, au même titre que tous les cyanoacrylates, HBM recommande l’utilisation d’un cache de protection. A cet effet, nous recommandons d’appliquer en première couche le gel silicone SG250 (référence : 1-SG250). Le ruban adhésif ABM75 peut être ensuite soigneusement appliqué en tant que seconde couche. HBM A2397-3.2 en/de/fr Installation de jauges optiques 95 4.3 Installation de la jauge avec de la colle rapide X60 L’utilisation de la colle rapide X60 nécessite de se servir d’un masque. Collez d’abord à cet effet une bande adhésive supplémentaire parallèle à la jauge optique sur la bande adhésive de cette dernière. Fig. 4.3.1: Fabrication d’un masque Coupez le ruban adhésif servant de fixation à l’aide d’un scalpel tout près de la jauge optique. Fig. 4.3.2: Fabrication d’une charnière en ruban adhésif Collez une autre bande adhésive parallèle à la jauge optique. A2397-3.2 en/de/fr HBM 96 Installation de jauges optiques Fig. 4.3.3: Collage du masque complet pour la charnière en ruban adhésif Mélangez la colle X60 conformément à son mode d’emploi. Fig. 4.3.4: Mélange de la colle X60 Enduisez généreusement la surface d’installation de colle. HBM A2397-3.2 en/de/fr Installation de jauges optiques 97 Fig. 4.3.5: Application de la colle Utilisez l’un des feuillets de cellophane fournis pour appuyer soigneusement sur la colle. Faire à cet effet des mouvements rotatoires du centre vers les bords. Fig. 4.3.6: Etalement de la colle avec le doigt. Le cellophane fourni doit être utilisé en tant que couche séparatrice. La colle sortant dans la longueur fixe et bloque la fibre. Vous pouvez retirer le cellophane dès que le résidu de colle a durci dans le récipient ayant servi à préparer le mélange. A2397-3.2 en/de/fr HBM 98 Installation de jauges optiques Fig. 4.3.7: Retrait du cellophane à l’issue du durcissement de la colle Nous recommandons de retirer les bandes adhésives immédiatement après le retrait du cellophane. Tirez fermement à 45 degrés. Ceci entraîne l’éclatement de la X60. Fig. 4.3.8: Retrait du masque La dernière étape consiste à enlever la fixation. A cet effet, décollez d’abord le ruban adhésif jusqu’au bord de la colle. Retirez ensuite prudemment le ruban adhésif restant en angle aigu. HBM A2397-3.2 en/de/fr Installation de jauges optiques 99 Fig. 4.3.9: Retrait de la fixation. Veiller à l’angle aigu. L’installation est maintenant terminée. Après 30 minutes, le point de mesure est utilisable ou une protection d’installation peut être appliquée. A2397-3.2 en/de/fr HBM 100 5 Installation de jauges optiques Caractéristiques techniques % °C °C Fibres de verre en réseau de Bragg noyées de manière symétrique dans de la résine acrylique modifiée 185 5 1,5 Jauge avec Jauge sans scellescellement (stand.) ment (sur dem.) 40"1 30"1 12"1 5"1 2,0"0,5 0,5"0,01 FC/ACP 1520, 1525, 1530, 1535, 1540, 1545, 1550, 1555, 1560, 1565, 1570, 1575, 1580 "1 env. 0,79 (indiqué sur chaque emballage) 2 23 −10 ... 80 µm/m/K ppm/K µm/m/K 7,8 6,1 1 µm/m 10 000 (1%) Construction Diamètre extérieur des fibres de verre Diamètre du noyau des fibres de verre Diam. avec gaine de prot. (tampon), env. Dimensions de la jauge optique µm µm mm Longueur Largeur Epaisseur Raccordement (connecteur)1) Longueurs d’ondes de Bragg disponibles Tolérance de la long. d’onde de Bragg Facteur k Tolérance de facteur k Température de référence Plage utile de température Réponse en température (coef. de dilatation therm. de l’échantillon 0 µm/m/K) mm mm mm Tolér. de la réponse en température Allongement maximum à température de référence lors de l’utilisation de colle Z70 Valeur d’extension dans le sens positif Valeur d’extension dans le sens négatif Tenue en fatigue à température de référence lors de l’utilisation de colle Z70 No. de charg. alternées atteint Lw avec déformation alternée εw = "1000 µm/m et variation du zéro εm∆ ≤ 30 µm/m déformation alternée εw = "3000 µm/m et variation du zéro εm∆ ≤ 60 µm/m Tenue en fatigue à température de référence lors de l’utilisation de colle X2802) No. de charg. alternées atteint Lw avec déformation alternée εw = "5000 µm/m et variation du zéro εm∆ ≤ 100 µm/m Plus petit rayon de courbure dans le sens longit. et transvers. à temp. de réf. Produits de collage utilisable Colles à polymérisation à froid 1) nm nm 10 000 (1%) 107 (interrompu après 107 charges alternées) 107 (interrompu après 107 charges alternées) 107 (interrompu après 107 charges alternées) mm 25 Z70, X60, X280 Câble en fibre optique épissé avec connecteur et gaine de protection disponible en option (longueur sur mesure). HBM A2397-3.2 en/de/fr Installation de jauges optiques 2) 101 Pression appliquée en cas d’utilisation de la X280 avec des jauges optiques : 1 N/cm2 Nombre de charges alternées pouvant être atteint en fonction de la qualité de l’installation et de la résistance à la fatigue du composant à étudier. A2397-3.2 en/de/fr HBM Modifications reserved. All details describe our products in general form only.They are not to be understood as express warranty and do not constitute any liability whatsoever. Änderungen vorbehalten. Alle Angaben beschreiben unsere Produkte in allgemeiner Form. Sie stellen keine Beschaffenheits- oder Haltbarkeitsgarantie im Sinne des §443 BGB dar und begründen keine Haftung. Document non contractuel. Les caractéristiques indiquées ne décrivent nos produits que sous une forme générale. Elles n’établissent aucune assurance formelle au terme de la loi et n’engagent pas notre responsabilité. 7-2001.2397 Hottinger Baldwin Messtechnik GmbH A2397-3.2 en/de/fr Postfach 10 01 51, D-64201 Darmstadt Im Tiefen See 45, D-64293 Darmstadt Tel.: +49 6151 803-0 Fax: +49 6151 8039100 Email: [email protected] Internet: www.hbm.com