1
Caution!
1. RapID™ Yeast Plus Reagent A may cause irritation to skin,
eyes, and respiratory system.
2. RapID™ Yeast Plus Reagent B is toxic and may cause harm to
the environment. Harmful by inhalation, contact with skin or eyes,
or if swallowed. May impair fertility or cause harm to unborn
child.
3. Refer to Material Safety Data Sheet for detailed information on
reagent chemicals.
Notes:
•
Select well-isolated colonies of the test isolate and add
incrementally to the RapID™ Inoculation Fluid to avoid
clumping and over-inoculation. Continue to add organism
until the turbidity of the suspension completely obliterates
the black lines on the Inoculation Card. Once the black
lines on the Inoculation Card are no longer visible,
inoculum preparation is complete.
•
Suspensions significantly less turbid than the required
inoculum density will result in aberrant reactions.
•
Suspensions that are slightly more turbid than the
required inoculum density will not affect test performance
and are recommended for stock cultures and quality
control strains. However, suspensions that are significantly
more turbid will compromise test performance.
•
Suspensions should be mixed thoroughly and vortexed if
required.
•
Suspensions should be used within 15 minutes of
preparation.
STORAGE
The RapID™ Yeast Plus System should be stored in its original
container at 2-8°C until used. Allow product to come to room
temperature before use. DO NOT interchange reagents among
different RapID™ systems. Remove only the number of panels
necessary for testing. Reseal the plastic pouch and promptly return
to 2-8°C. Panels must be used the same day they are removed from
storage. RapID™ Inoculation Fluid should be stored in its original
container at room temperature (20-25°C) until used.
3.
PRODUCT DETERIORATION
This product should not be used if (1) the color of the reagent has
changed, (2) the expiration date has passed, (3) the plastic tray is
broken or the lid is compromised, or (4) there are other signs of
deterioration.
Inoculation of RapID™ Yeast Plus Panels
1.
SPECIMEN COLLECTION, STORAGE, AND TRANSPORT
Specimens should be collected and handled following recommended
11,12
guidelines.
2.
MATERIALS SUPPLIED
(1) 20 RapID™ Yeast Plus Panels,
RapID™ Yeast Plus Reagents A
containing reagent sufficient for
incubation trays, (5) 1 RapID™
(6) Instructions for use.
An agar plate may be inoculated for purity and any additional
testing that may be required using a loopful of the test
suspension from the inoculation fluid tube. Incubate the plate
for 24-72 hours at 30°C.
(2) 20 report forms, (3) 1 each,
and B (plastic dropper-bottles
20 panels), (4) 2 chipboard
Yeast Plus Inoculation Card,
3.
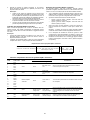
Peel back the lid of the panel over the inoculation port by pulling
the tab marked “Peel to Inoculate” up and to the left.
Using a pipette, gently transfer the entire contents of the
Inoculation Fluid tube into the upper right-hand corner of the
panel. Reseal the inoculation port of the panel by pressing the
peel-back tab back in place.
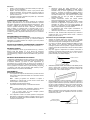
After adding the test suspension, and while keeping the panel
on a level surface, tilt the panel back away from the reaction
cavities at approximately a 45-degree angle (see below).
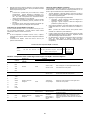
Reaction Cavities
MATERIALS REQUIRED BUT NOT SUPPLIED
Inoculating Trough
(Back of Tray)
(1) Loop sterilization device, (2) Inoculating loop, swab, collection
containers, (3) Incubators, alternative environmental systems,
(4) Supplemental media, (5) Quality control organisms, (6) Gram
stain reagents or demineralized water, (7) Microscope slides,
(8) Cotton swabs, (9) RapID™ Inoculation Fluid - 2 ml (REF 8325106),
(10) Pipettes, (11) RapID™ Yeast Plus Code Compendium (REF
®
8327007) or ERIC (Electronic RapID™ Compendium, REF
8323600).
4.
While tilted back, gently rock the panel from side to side to
evenly distribute the inoculum along the rear baffles as
illustrated below.
5.
While maintaining a level, horizontal position (best achieved by
using the bench top against the reaction cavity bottoms), slowly
tilt the panel forward toward the reaction cavities until the
inoculum flows along the baffles into the reaction cavities (see
below). This should evacuate all of the inoculum from the rear
portion of the panel.
PROCEDURE
Inoculum Preparation
1.
Test organisms must be grown in pure culture and examined by
Gram stain or wet mount prior to use in the system.
Note: Only organisms which demonstrate yeast-like appearance
and growth characteristics should be tested using the RapID™
Yeast Plus System.
2.
The following medium is recommended:
Sabouraud Dextrose Agar (SDA) - Emmons formulation
Note: If the panel is tilted too quickly, air may be trapped at the
test cavity junction, restricting fluid movement.
Notes:
•
Plates used for inoculum preparation should be incubated
at 30°C and should be 48 hours old.
•
The use of media other than that recommended may
compromise test performance.
3.
Using a cotton swab or inoculating loop, suspend sufficient
growth from the agar plate culture in RapID™ Inoculation Fluid
(2 ml) to achieve a visual turbidity as detailed under Notes,
using the RapID™ Yeast Plus Inoculation Card.
Reaction Cavities
(Front of Tray)
3