1
ENGLISH
INSTRUCTIONS FOR USE
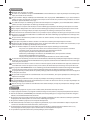
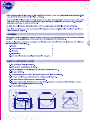
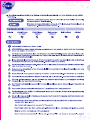
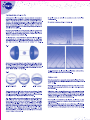
1. Place the projector
on a flat, stable surface such as a table.
(The ideal projection
distance is between
2 and 2.30 metres.)
2. Connect one end
of the adaptor to
the projector and
the other end to the
power supply.
3. Open the disc box
using the pull tab, insert the disc so that the
logo SEGA TOYS 2005
is not reversed and close the box manually.
4. Remove the lens
cap.
5. Turn the projector
on. The pilot light
will light up. When
the room is dark, the
stars will be visible.
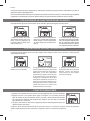
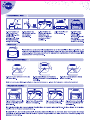
FOCUSING
If the centre of the projected image is out of focus, turn the plastic ring of the focus adjustment.
The stars on the edge may appear to be more out of focus than those at the centre. This difference is due to the lens structure and does not indicate that the projector is faulty.
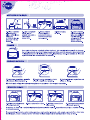
ADJUSTING THE ANGLE
1. Loosen the
screws on both
sides of the
projector.
2. Lift
the
central body
of the projector and adjust
the angle of
projection.
3. Tighten the
screws on both
sides again.
Do not try to change the angle without loosening the screws and do not tighten them excessively.
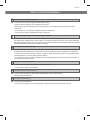
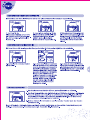
INSERTING THE DISC
1. Turn the projector off by
turning the switch to OFF.
2. Open the box and remove the disc.
3. Insert the new disc and
close the box.
4. Turn the projector on by
turning the switch to ON.
Changing the disc when the projector is turned on can cause eye injuries. To avoid this danger, the projector turns itself
off automatically.
It is advisable to insert and remove the disc when the room is lit and not when the projector is the only light source, one
reason being that the projector must be turned off each time a disc is inserted or removed.
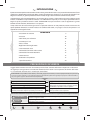
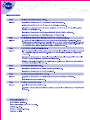
USING THE SHOOTING STARS FUNCTION
Remember that a shooting star will be seen approximately every 30 seconds, always in the same place.
1. Turn the Shooting Stars function
switch on the front
of the projector to
ON. The SS pilot
light will come on.
22
5. Then press the
Rotation function
button to ON (the
Shooting Stars
function
only
activates when
the Rotation function is on).
3. As the image of the
sky turns, the shooting stars appear. If
you turn the Shooting
Stars function button
to OFF, the function will
be deactivated and the
pilot light will turn off.