Transcript
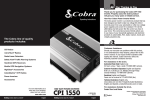
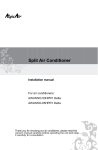
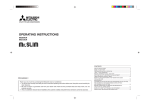
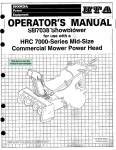
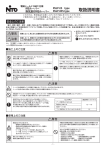
Mat Knife
Remove one bl
ade from pack
of 5. Remove nu
Plate. Align blad
Cutting a Boa
t and Cover
e hole over thre
rd to Size
ad. Be sure shar
blade is facing
p edge of
downward. Re
The Mat Knife
as
se
is used for trim
m
ble Cover Plate.
blade to double
ming matboard
Adjust
to size for the ou
thick, standard
or foamboard
tside dimensio
or safety setting
to lock in place.
ns. The Mat Kn
. Tighten nut
settings: Doub
ife has three
le thick mat bo
ar
2. Bevel Cutte
d/
fo
st
am board (fully
andard (middle
r
extended),
setting) or safe
ty setting (fully
Remove the Bl
1. Utilisation
Prèparation
Use a Slip Sh
ade Holding Sc
retracted).
eet
rew from the fro
Cutter. Remove
nt of the Bevel
Before cutting
onlames
e blade from th
Couteau
à, be
passe-partout
Insertion
sure to use a sli
e package of 5.
blade downdes
Fig. 1
onto the FRON
p sheet of scra
the same sizd’une
Slide the
e or largplanche
T
Découpe
psouhaitée
of
matboard
the chrome Blad
1.shar
Couteau
er than theà pilaecdimension
p edge doàwpasse-partout
e
un
Ho
e
n, un
de
yo
ld
rn
er,
u
ea
til
ar
th
th
e
e botto
theàmpasse-partout
ing touncut
Le couteau
utilisé pourgo
tailler
atOperation
lamePreparation
du paquet
dem5,rigRetirer
board you west
bladRetirer
ht handl’écrou
e enteune
rs into
corneretoflathplaque
ill be cutting. Th
provides a plac
the Blade Slot
e
e foou
passe-partout
planche
de mousse auxe dimensions
slip sheet
andlathlame
r thune
Aligner
le trou de
filetages.
linesduupcouvercle.
e
bl
e holesurinles
ad
e
with the ho
tip
to
Inserting
Blades
th
surface you are
e blade
go so
Knife
itpourvu
in thcoupant
won’t cu
e chromest
extérieures souhaitées.
Le
couteau
est
det trois
cuttiMat
into the
lelecôté
sur
laHo
courbe
du
manche.
ng
BladS’assurer
e
Bl
on
ad
e Holdingque
an
e
d also helps st
lder. Replace
to get nice stra
Screw inMat
holeKnife
ilize
ancouvercle.
ight cu
the bladesimple
réglages comme
précédemment
mentionné
: sécurité,
d re-tighten.
Cutting
a Board
to ab
Size
Ré-assembler la1.plaque
du
Régler la lame
sur l’un
ts.
Remove
one blade from pack
5. Remove
Cover
Fig. 1
eaépaisseur
épaisseur ou planche de mousse.
su
ring et doubleThe
ces trois réglages
: passe-partout/planche
de of
mousse
à 2.nutMand
Cautde
Mat Knife is used for trimming matboard or foamboard
ion!! at Cutti Plate. Align blade hole over thread. Be sure sharp
edge
feuille
d’appui
ng(complètement
penciloflinune
Blades are Sh
doubleMépaisseur
déployé), standard (réglage Dr1.awUtiliser
es on backtoofsize
the outside dimensions. The Mat Knife has three
arp
matfor
bo
blade isdefacing
downward.
Reassemble
CoverthPlate.
e chAvant
d at deune
s’assurer
dearplacer
feuille
d’appui,
anAdjust
nel lasiddécoupe,
intermédiaire) ou réglage
sécurité
(complètement
rétracté).
sired
sizboard/foam
e of the ra
e. Pl
settings:
Double
thick
mat
board (fully extended),
ace
il
ed
ge
al
pe
on
nc
g thde
ilfaite
passe-partout
taille
plus
e lelaft même
line.d’une
to double
thick, standard or safety setting. Tighten
Serrer l’écrou pour blade
verrouiller
en place.
Finut
sid
g. 1chute destandard
e
of
the ousetting
Fig. 2
(middle setting) or safety
(fully retracted).
3. Precutgrande que le morceau à découper, sous le passe-partout
2. Couteau à biseauto lock in place.
1.
Use
a
Slip
Sheet
à
découper.
Pour
le
moment,
utiliser
un
des
10
morceaux
Hold the rail fir
Retirer la vis maintenant
lame de l’avant du couteau à
2. BevellaCutter
mly inlaplboîte.
be sure to use
a slip sheet of scrap matboard
aceBefore
wLa
dans
l’espace
ithfeuille
yocutting,
hand of
ur led’appui
ft hand.assure
hofournis
biseau. Retirer une Remove
lame du the
paquet
deHolding
5. FaireScrew
glisserfrom
la lame
ld
Blade
the front
thethBevel
e Mat Knife vethe same
With
yothe
ur
size
or
larger
than
piece
ht you are going to cut
rti
ca
nécessaire
à
la
lame
pour
éviter
qu’elle
ne
coupe
larig
surface
l
so
that the handle
eeSlide
vers le bas sur l’AVANT
duRemove
support one
de lame
(bord
anglethe
Cutter.
bladechromé
from the
packagedeofgr5.
putting the tipunderneath
isyou
at awill
45 beàcutting. The slip sheet
the matboard
agaiest
sur
laquelle
la
découpe
effectuée
et
contribue
aussi
ns
t
th
e
St
tranchant vers le bas)
jusqu’à
ce
que
l’angle
inférieur
droit
de
If
ra
you arHolder,
ight Edge. Fig.
blade down onto the FRONT of the chrome Blade
e cutting across provides a place for
thedroites
blade tip
to go so it won’t cut into the
stabiliser
la lameapour
coupes
et2nettes.
sheeobtenir
Fig. 2
t of matdes
bladcorner
la lame entre dans sharp
la fente
à lame
et que
trou
de la right
lame hand
edge
down,
untillethe
bottom
e beyoof
bo
ard,
nd the
simplon
the top edge of
y stand
surface
you
are
cutting
art also
2.
Mesure
the helps stabilize the blade
th
e
bo
co
s’aligne avec celui blade
du support
de
lame
chromé.
Remettre
la
ar
m
d
pl
enters into the Blade Slot and the hole in et
the
and
elyblade
throdes
the Mat Knife aux
ugh.lignes autocrayon
get nice
Tracer
au straight
versopudullcuts.
passe-partout
vis maintenant la lame
le trou
la resserrer.
4. CuHolder.
linesdans
up with
theethole
in the chrome Blade
Replace
tting dimensions
souhaitées.
Placer
le
côté
profilé
du bord du rail
2. Measuring
Blade Holding Screw in hole and re-tighten.
Draw the Mat
le longKndu
gauche
de
la
ligne
au
crayon.
Fig.
1
ifecôté
Attention !! Les lames du couteau à passe partout
to
w
ar
Draw
pencil
lines
on
back
of matboard
at desired size. Place
d
yo
u along the Stra
keeping consta
Fig. 3
ight
nt pressure onthe channel
Edrail
ge edge along the left side of the
sont tranchantes
side
of
the
3.re Pré-découpage
th
e
St
pr
ra
es
ig
su
ht Edge and do
on the Mat Knife
Caution!! Mat Cutting Blades are Sharp
wnw
ard gauche.
Fipencil
g. 2 line.
Maintenir le rail .fermement
en Fig.
place1 avec votre
main
WARNING! Be
Maintenir le couteau
verticalement de la main droite de
3.
Precut
care
hen knsoit
mat so that itsorte quefulal w
ifethe
à 45°
en
l’extrémité
contre
re
Fig. 4
ac
Hold
railhe
firmly
with your
left hand. With your right
s plaçant
theinenplace
does not ”jpoignée
d of th
e
p” de
towlaar
la règle. Fig
2.um
Lors
découpe
à travers
feuille
d yo
u. Mat
hand
hold
the
Knife une
vertical
so de
that the handle is at a 45
passe-partout, engager
simplement
la lame
du bord
degree
angle putting
the au-delà
tip against
the Straight Edge. Fig. 2
Fig. 3
supérieur de la planche et tirer le couteau à passe-partout
Operatio
If you are cutting across a sheet of matboard, simply start the
n
à travers.
Bevel Cuttcomplètement
blade beyond the top edge of the board and pull the Mat Knife
er
4. Découpe
completely through.
Cutting a Sing
Fig. 4
Tirer
à passe-partout vers soi le long de la règle en
le le
Mcouteau
at
4. Cutting
1. Using the scmaintenant une pression de contact sur la règle et une presale side of Stra Draw the Mat Knife toward you along the Straight Edge
ightsur
sion
descendante
Fig. 3
Edle
gecouteau
mat for the ex
, mar
k thàe passe-partout
bapressure
constant
act border you keeping
ck of the on the Straight Edge and downward
want.
2. Place theAVERTISSEMENT
!
Faire
attention
à
éviter
que
pressure on the Mat Knife. Fig.le2passemat face down
on thepas
Matboard
Sl
partout
ne
«saute»
le couteau
ipvers
Edge EXAC
Sheel’utilisateur
t. Place the Stlorsque
TLY on the left
raight knife reaches the end of the
hand
bopasse-partout.
Problèmes et Solutions
du
rder so thBe
edge of thatteint
WARNING!
careful
at th
e channel’extrémité
e outsidwhen
l is lined up alon
e
Make sure that
mat sog th
that
”jump”
toward you.
e peitncdoes
La découpe en biseau présente un bord brut
il line.not
the bulk of the
Fig. 4
mat is to the rig
of the Straig
1. Il peut être nécessaire de remplacer la lame plus fréquemment.
ht Edge. Havin à biseau ht hand side
Couteau
g the mat on th
Les lames émoussées arrachent le passe-partout au lieuSt
deraleight Edge
e left side of th
will resultd’un
e
in a repasse-partout
Découpe
découper.
versed bevel cu simple
302 Bevel Cu
t. Attach the
tte
r to the straightOperation
2. Remplacer la feuille d’appui. Le fait de couper sur la même
suredgradué
ge by fitde
nylon guides1.ovEn utilisant le côté
la
règle,
marquer
le verso du
ting the black
er the raised edBevel Cutter
face de feuille d’appui de façon répétée peut rendre la découpe
ge of bord
Mat Cutter so passe-partout
e chexact
annel.souhaité.
difficile.
that the silver pour le th
Po
sition the
indiCutting
cator linealinSingle
bottom intersec
Ne coupe pas au travers le passe-partout
Mat
es
2. tin
Placer
g pele
ith sur
the la feuille d’appui.
ncilpasse-partout
line. Fig. 5 face versuplewbas
1. Maintenir une pression descendante constante sur3.le support
Hold downwar Placer la règle EXACTEMENT
sur
la
bordure
gauche Edge,
de sorte
mark the back of the
d pressure on th 1. Using the scale side of Straight
de lame chromé tout au long de la coupe. Le fait de relâcher la
e Stramat
que le bord extérieur
profilé
soit
aligné
le you
longwant.
de la ligne au
igdu
ht
Ed
for
the
exact
border
ge
pression permet à la lame de sortir du passe-partout. hand. Place the th
w
ith
yo
umb of your rig
ur
le
ft
ht hand on
quethle
plus gros du passe-partout est
on the retractab crayon. Fig. 4. S’assurer
Coupes excessives dans les coins
emat
th
um
le Blade Holder 2. Place
b didown
vopasse-partout
thefait
face
Sheet.
t on the Slip du
du côté droit deanlad règle.
d’avoir
le
côté Place the Straight
matlame
1. Vérifier la profondeur de la lame.
Une profondeur de
plungeLe
.
th
e
Passe-partout
bl
adeon
into
Edge EXACTLY
the
hand border
so that the outside
thleft
ela coupe
supplémentaire peut provoquer le dépassement des
lignes
de
gauche
de
la
règle
provoque
l’inversion
de
en
biseau.
4. KeMatboard
Slip Sheet repère par l’extrémité de la lame, entraînant une coupe
eping downwarFixer le couteau à biseau
up along
the pencil line. Fig. 4
excesFig. 5
302the
surchannel
la règleisenlined
ajustant
les guides
d pressure on th edge of
e BlMake
e Bevel Cutter de nylon
ade Ho
sive. En utilisant la vis dans le renfoncement au bas duthcouteau
lder,that
sure
the bulk
of the matleiscouteau
to the right hand side
sur
le
bord
relevé
du
profilé.
Positionner
sli
away fromnoir
de
you until the sil
tersecents with th à passe-partout
à biseau, régler l’extrémité de la lame pour que 1/8 deinpouce
veStraight
r lin
of theque
Havingsoit
thealignée
mat onavec
the left side of the
laeligne
onEdge.
e upper pencil de sorte
itargentée
Fig. 6
soit visible. La lame doit juste entailler la surface dedolawfeuille
line. d’intersection
Be
sure toEdge
nward pressurela ligne inférieure
tracée
au crayon.
Fig. 5 bevel cut. Attach the
Straight
will
in a reversed
keep
evenresult
. Fig. 6
d’appui.
Bevelune
Cutter
to thedescendante
straight edgesur
bylafitting the black
5. Use your th 3. Maintenir de la main302
Entailles ou courbes dans la coupe
gauche
pression
umb to pull the
BladeleHopouce
guides
over
the
raised
edge of the
channel. Position the
1. Vérifier la profondeur de la lame. Une profondeur depolame
ldernylon
sitionexPlacer
de
la
main
droite
sur
l’emplacement
prévu
ba
ck
so the bladrègle.
in
to
th
up the silver indicator line
e is removed fro Mat Cutter soe that
cessive peut provoquer un arrondi de la lame produisant
lines up with the
steps foune
m
th
à
cet
effet
sur
le
support
de
lame
rétractable
et
insérer
la
lame
e
m
r
th
at
e
.
Fig. 5
Repeat these
remaining thre
entaille ou une courbe. En utilisant la vis dans le renfoncement
e sides. Congbottom
intersecting
pencil
line.
Fig.
5
have just cut yo
dans
le
passe-partout.
ratulations! Yo
ur first mat.
au bas du couteau à biseau, régler l’extrémité de la lame pour
u
que 1/8 de pouce en soit visible. La lame doit juste entailler la
3. Hold
downward
pressure on
Edge with your left
4. Tout en maintenant
une pression
descendante
surthe
le Straight
support de
Fig. 6
surface de la feuille d’appui.
Place the
thumbà of
your de
right
on the thumb divot
la lame, faire glisserhand.
le couteau
à biseau
l’écart
soihand
jusqu’à
2. Remplacer la lame. Une lame émoussée cause un arrondi proce que sa ligne argentée
la ligneBlade
au crayon
on thecroise
retractable
Holdersupérieure.
and plunge the blade into the
voquant une entaille ou une courbe.
S’assurer de maintenir
mat.une pression descendante constante.
Logan Graph
À PROPOS DES LAMES:
ic Pro cts In
Fig. 6
c., 11
Deux lames n’auront jamais la même durée du
de vie. Toujours
com00 Brown Str
Keeping downward pressure on the Blade Holder, slide
ee Wau4.pour
mencer
avecdíappui
une lame neuve avant chaque projet pour garantir les
Planche
cothe
5. Utiliser let,pouce
ramener
le 08
support
de lame
enuntil
position
nd
a, IL Cutter
Bevel
you
the silver line on it
60
4away
meilleurs résultats.
84from
7-52Répéter
6-55
relevée afin de retirer
la lame du
passe-partout.
15ces
Slip Sheet
intersects
with
the upper pencil
line.
Bewsure
even
wwto
.lokeep
gang
raphic.com
étapes pour les trois côtés restants. Félicitations! Le premier
downward pressure. Fig. 6
passe-partout est coupé.
5. Use your thumb to pull the Blade Holder back into the up
position so the blade is removed from the mat. Repeat these
steps for the remaining three sides. Congratulations! You
have just cut your first mat.
Mode D’emploi
Instruction Manual
Team System Plus
Team System Plus
Modèle 424-1 | 440-1
Model 424-1 | 4
Logan Graphic Products Inc., 1100 Brown Street, Wauconda, IL 60084 847-526-5515 www.logangraphic.com
Fig
F
F