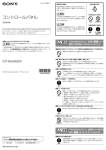
1
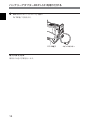
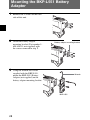
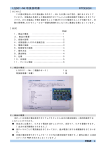
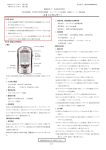
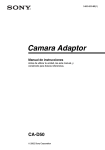
* 3 - 6 2 0 - 5 3 2 - 0 3 * Camera Adaptor JP 取扱説明書 2ページ Operating Instructions Page 18 お買い上げいただきありがとうございます。 電気製品は、安全のための注意事項を守らないと、 火災や人身事故になることがあります。 この取扱説明書には、事故を防ぐための重要な注意事項と製品の 取り扱いかたを示してあります。この取扱説明書をよくお読みの うえ、製品を安全にお使いください。お読みになったあとは、 いつでも見られるところに必ず保管してください。 CA-D50 2002 Sony Corporation GB 日本語 安全のために ソニー製品は安全に十分に配慮して設計されています。しか 警告表示の意味 し、電気製品はまちがった使いかたをすると、火災や感電など この取扱説明書および により死亡や大けがなど人身事故につながることがあり、危険 です。 製品では、次のような 表示をしています。表 事故を防ぐために次のことを必ずお守りください。 安全のための注意事項を守る 示の内容をよく理解し てから本文をお読みく ださい。 3∼ 5 ページの注意事項をよくお読みください。 この表示の注意事項を 定期点検を実施する 長期間安全に使用していただくために、定期点検を実施するこ とをおすすめします。点検の内容や費用については、お買い 上げ店またはソニーのサービス窓口にご相談ください。 故障したら使用を中止する 守らないと、火災や感 電などにより死亡や大 けがなど人身事故につ ながることがありま す。 お買い上げ店またはソニーのサービス窓口にご連絡ください。 この表示の注意事項を 万一、異常が起きたら • 煙が出たら , 守らないと、感電やそ 1 電源を切る 2 カメラケーブルや電源 • 異常な音、におい コードを抜く がしたら 3 お買い上げ店またはソ • 内部に水、異物が ニーのサービス窓口に 入ったら キャビネットを破 損したときは 安全のために 損害を与えたりするこ とがあります。 注意を促す記号 行為を禁止する記号 , すぐに電源を切り、消火す る。 2 をしたり周辺の物品に 連絡する。 • 製品を落としたり 炎が出たら の他の事故によりけが 行為を指示する記号 目次 ................................................................................. 3 ................................................................................. 5 概要 ........................................................................................ 6 CD-ROMマニュアルの使いかた ................................................. 7 各部の名称と働き ................................................................... 9 カメラに取り付ける ............................................................. 11 バッテリーアダプターBKP-L551を取り付ける ................. 13 使用上のご注意 .................................................................... 15 保証書とアフターサービス .................................................. 16 仕様 ...................................................................................... 17 下記の注意を守らないと、 火災や感電により死亡や大けが につながることがあります。 表示された電源電圧で使用する 製品の表示と異なる電源電圧で使用すると、火災や感電の原因となりま す。 分解や改造をしない 分解や改造をすると、火災や感電、けがの原因となることがあります。 内部の点検や修理は、お買い上げ店またはソニーのサービス窓口にご依 頼ください。 3 JP 日 本 語 下記の注意を守らないと、火災や感電により 死亡や大けがにつながることがあります。 内部に水や異物を入れない 水や異物が入ると、火災や感電の原因となることがあります。 万一、水や異物が入ったときは、すぐに電源を切り、電源コードや接続 コードを抜いて、お買い上げ店またはソニーのサービス窓口にご相談くだ さい。 カメラケーブルや電源コードを傷つけない カメラケーブルや電源コードを傷つけると、火災や感電の原因となります。 • ケーブルやコードを加工したり、傷つけたりしない。 • 重いものをのせたり、引っ張ったりしない。 • 熱器具に近づけたり、加熱したりしない。 • ケーブルやコードを抜くときは、必ずプラグを持って抜く。 万一、 ケーブルが傷んだら、お買い上げ店またはソニーのサービス窓口に 交換をご依頼ください。 油煙、湯気、湿気、ほこりの多い場所では設置•使用 しない 上記のような場所で設置・使用すると、火災や感電の原因となることがあ ります。取扱説明書に記されている使用条件以外の環境での使用は、火 災や感電の原因となることがあります。 撮影時は周囲の状況に注意をはらう 周囲の状況を把握しないまま撮影を行うと、事故やけがなどの原因となり ます。 4 下記の注意を守らないと、 下記の注意を守らないと、火災や感電により 死亡 や大けがにつながることがあります。 けが をしたり周辺の物品に 損害を与えることがあ ります。 カメラ側の固定ネジを締める カメラと一体化して運用するときは、カメラの取っ手およびショルダーパッ ド部分にある固定ネジをしっかり締めてください。固定ネジを締めずに使用 するとカメラとカメラアダプターが分離し、落下した機器でけがをすること があります。 指定された電源コード、接続コードを使う 取扱説明書に記されている電源コード、接続コードを使わないと、感電や 故障の原因となることがあります。 不安定な場所に設置しない ぐらついた台の上や傾いたところなどに設置すると、倒れたり落下したり して、けがの原因となることがあります。 また、設置・取り付け場所・使用する三脚の強度を充分にお確かめくださ い。 5 概要 概要 CA-D50は、デジタルビデオカメラDXC-D35/D50/D55シリーズに取り付 けて使用するカメラアダプターです。本機を介して、ビデオカメラ(以下 カメラ) とカメラコントロールユニットCCU-D50/M5Aを接続することができ ます。 本機には以下の特長があります。 デジタル/アナログ信号伝送機能 CCU-D50と接続する場合、アナログ伝送に加えて、デジタル伝送が可能 となり、劣化の少ないビデオ信号を伝送することができます(オーディオ 信号は除く) 。 SDI信号出力端子を装備 デジタルビデオ信号を出力できるSDI 出力端子を備えています。 バッテリー装着可能 別売りのBKP-L551バッテリーアダプターとバッテリー金具を使用して、本 機にバッテリーを装着することができます。 ご注意 • 本書で記載されている周辺機器や関連機器は、 「生産完了」 となってい る場合があります。 機器の選定にあたっては、ソニーの営業担当者またはお買い上げ店に お問い合わせください。 • 下記の表に記載されているシリアルナンバーのDXC-D35/D35WSを本 機を介してCCU-D50に接続する場合、ROMのバージョンアップが必要 です。バージョンの確認やバージョンアップについては、お買い上げ店 またはソニーのサービス窓口にご相談ください。 6 カメラ シリアルナンバー DXC-D35 30001 ∼ 30355、38001∼ 38305、300001∼ 300040、 310001 ∼ 310015 DXC-D35WS 30001 ∼ 30055、38001∼ 38055、300001∼ 300055 CD-ROMマニュアルの使いかた 付属のCD-ROM には、CA-D50シリーズのオペレーションマニュアル(日 本語、英語、フランス語、ドイツ語、イタリア語、スペイン語)が PDF 形式 で記録されています。 準備 付属のCD-ROMに収納されているオペレーションマニュアルをご覧いた だくためには、以下のソフトウェアがコンピューターにインストールされてい る必要があります。 • Adobe Reader 6.0 以上 メモ Adobe Reader がインストールされていない場合は、下記 URLよりダウン ロードできます。 http://www.adobe.co.jp/products/acrobat/readstep2.html AdobeおよびAdobe Readerは、Adobe Systems Incorporated(アドビシステムズ社)の 商標です。 7 概要 オペレーションマニュアルを読むには CD-ROMに入っているオペレーションマニュアルを読むには、次のように します。 1 CD-ROM をCD-ROMドライブに入れる。 表紙ページが自動的にブラウザーで表示されます。 ブラウザーで自動的に表示されないときは、CD-ROMに入っている index.htmファイルをダブルクリックしてください。 2 読みたいオペレーションマニュアルを選択してクリックする。 オペレーションマニュアルの PDFファイルが開きます。 メモ Adobe Readerのバージョンによって、 ファイルが正しく表示されないことが あります。 「準備」の項のURLより最新のソフトウェアをダウンロードしてお 使いください。 ご注意 CD-ROMが破損または紛失したため、新しい CD-ROMをご希望の場合 は、ソニーのサービス担当者にご依頼ください(有料) 。 8 各部の名称と働き 前面 アクセサリーシュー ショルダーベルト取り付け金具 1 カメラ接続端子 後面 2 CALLボタン 3 RET/VTRボタン 4 CCU/VTR/CMA端子 5 INTERCOMつまみ 6 EARPHONEジャック 7 INTERCOM端子 8 PROMPT/GENLOCK端子 9 DC IN端子 q; SDI OUT端子 1 カメラ接続端子(PRO 76ピン ご注意 DIGITAL) CA-D50とCCU-M5A でシステムを構成して カメラの VTR 端子と接続します。 使用する場合、CALLボタンは機能しません。 2 CALL(コール)ボタン カメラコントロールユニット(CCU)やリモートコ ントロールパネルのオペレーターを呼び出す ときに押します。 押すと、CCUやリモートコントロールパネルの タリーランプ(赤)が点灯します。 9 各部の名称と働き 3 RET/VTR(リターンビデオ/VTRス タート)ボタン 7 INTERCOM(インターカム)端子 (ミニインターカムジャック) CCU/VTR/CMA 端 子に、CCU-D50/M5A 別売りのヘッドセットDR-100を接続します。 や VTRを接続した場合に使用します。 DR-100を使用すると、CCU や特殊効果装 CCU-D50/M5A を接続しているとき:ボ タンを押している間、リターンビデオの 置、スイッチャーなどのオペレーターと通話で きます。 映像がビューファインダーに表示されま す。ボタンを離すと、カメラで撮影中の 8 PROMPT/GENLOCK(プロンプ 映像に戻ります。 ター信号出力/ゲンロック信号入力)端子 VTR を接続しているとき:VTR の記録ス タート/ストップボタンとして働きます。 押すと記録が始まり、再度押すと停止 します。 (BNC型) CCUを接続していない場合:外部同期用 の基準ビデオ信号(ブラックバースト信 号またはコンポジットビデオ信号)を入 力します。 4 CCU/VTR/CMA端子(26ピン、 CCU を接続している場合:CCUにプロン オス) プター信号が入力されているときは、プ CCU-D50/M5A、VTRまたは ACアダプター ロンプター信号が出力されます。 CMA-8Aを接続します。この端子に接続した 機器と本機の間では、この端子を介して、本 9 DC IN(DC電源入力)端子(XLR型 機への電源の供給や信号の受け渡しが行わ 4ピン) れます。 ACアダプターCMA-8A(別売り)に接続した DC電源コードCCQX-3(別売り)をこの端子 5 INTERCOM(インターカム)つまみ に接続して、外部直流電源(12V)を供給し インターカム音声の受信レベルを調整します。 ます。CCU/VTR/CMA 端子から供給される 電源よりもDC IN端子から供給される電源の 6 EARPHONE(イヤホン)ジャック ほうが優先されます。 (ミニジャック) イヤホンを接続して、本機に接続したVTRで q; SDI OUT端子(BNC型) 記録または再生中の音声をモニターできます。 カメラからのビデオ信号をデジタルビデオ信 号(SDI 信号)として出力します。 10 カメラに取り付ける 本機は、デジタルビデオカメラDXC-D35/D50/D55シリーズに取り付ける ことができます。 DXC-D35/D50/D55シリーズに取り付ける場合、 あらかじめカメラのショル ダーパッドを外しておきます。ショルダーパッドの外しかたについては、各 カメラに付属している取扱説明書の「VTRを取り付ける」の手順を参照し てください。 ご注意 本機を取り付ける前に、必ずカメラの電源を切ってください。 1 本機底面の突起部をカメラの凹部には 本機 める。 凹部 カメラ 2 溝 突起部 溝に沿って本機をスライドさせ、 しっかり 止まるところまではめ込む。 (続く) 11 カメラに取り付ける 3 図の2 本のネジを締める。 4 カメラ底面の 2 本のネジを締める。 取り付けネジ 5 ショルダーパッドを取り付ける カメラから取り外すときは 取り付けと逆の手順を行います。 12 バッテリーアダプターBKP-L551を取り付ける 1 本機後面のネジ4 本を外す。 2 外したネジで別売りのバッテリー金具 (部 品番号:3-690-850-01)を取り付ける。 3 バッテリー金具 BKP-L551に付属のレンチとネジでバッ テリー金具にバッテリーアダプターBKPレンチ L551(別売り)を取り付ける。 BKP-L551 (続く) 13 バッテリーアダプターBKP-L551を取り付ける 4 BKP-L551 の 4ピンコネクターを本機の DC IN 端子に接続する。 DC IN端子 取り外すときは 取り付けと逆の手順を行います。 14 4ピンコネクター 使用上のご注意 使用・保管場所 次のような場所での使用および保管は避けてください。 • 極端に寒いところや暑いところ(使用温度は− 10 ∼+ 45℃です。) • 直射日光が長時間当たるところや暖房器具の近く(真夏の窓を締め切っ た自動車内では 50℃を越えることがありますので、ご注意ください。) • 湿気、ほこりの多いところ • 雨があたるところ • 激しく振動するところ • 強い磁気を発生するものの近く • 強力な電波を発生するテレビ、ラジオの送信所の近く 強い衝撃を与えないでください 落としたりして強い衝撃を与えると故障することがあります。 動作中は布などで包まないでください 内部の温度が上がり動作不良の原因となります。 お手入れ キャビネットやパネルの汚れは、乾いた柔らかい布で軽くふきとってくださ い。汚れがひどいときは、中性洗剤溶液を少し含ませた布で汚れをふき とり、乾いた布で仕上げてください。アルコール、ベンジン、シンナー、殺 虫剤など、揮発性のものをかけると、変質したり塗装がはげたりすることが あります。 15 カメラに取り付ける 保証書とアフターサービス 保証書 • この製品には保証書が添付されていますので、お買い上げの際お受け 取りください。 • 所定事項の記入および記載内容をお確かめのうえ、大切に保存してくだ さい。 アフターサービス 調子が悪いときはまずチェックを この説明書をもう一度ご覧になってお調べください。 それでも具合の悪いときはサービスへ お買い上げ店、またはお近くのソニーサービス窓口にご相談ください。 保証期間中の修理は 保証書の記載内容に基づいて修理させていただきます。詳しくは保証書 をご覧ください。 保証期間経過後の修理は 修理によって機能が維持できる場合は、ご要望により有料修理させてい ただきます。 保証期間中の修理など、アフターサービスについてご不明な点は、お買 い上げ店またはお近くのソニーサービス窓口にお問い合わせください。 16 仕様 一般 電源電圧 付属品 CCU 端子から電源を供 給する場合:DC 12V DC IN 端子から電源を 取扱説明書(1) CD-ROMマニュアル(1) 保証書(1) 供給する場合:12V (10.5∼ 17V) 消費電力 3.8W 別売り品 動作温度 − 10℃∼+ 45℃ 5インチビューファインダーDXF-51 動作湿度 20%∼ 90% ACアダプターAC-DN10 保存温度 − 20℃∼+ 60℃ DC 電源コード 外形寸法 113 × 183 × 168mm バッテリーアダプターBKP-L551 (幅×高さ×奥行き) バッテリー金具 質量 1.1kg (BKP-L551 取り付け用、部品番号: 3-690-850-01) 入出力端子 仕様および外観は、改良のため予告なく変 CCU/VTR/CMA 端子 更することがありますが、ご了承ください。 Z 型、26ピン(1) PROMPTER OUT/GENLOCK IN BNC 型(1)、1Vp-p、 75 Ω DC IN • 必ず事前に記録テストを行い、正常に記 録されていることを確認してください。本 機や記録メディア、外部ストレージなどを XLR 型 4ピン(1)、 使用中、万一これらの不具合により記録 DC 10.5∼ 17V されなかった場合の記録内容の補償に カメラ接続端子 PRO 76ピンDIGITAL SDI OUT BNC 型(1)、0.8Vp-p、 (1) 75 Ω、270Mbps ついては、ご容赦ください。 • お使いになる前に、必ず動作確認を 行ってください。故障その他に伴う営業 上の機会損失等は保証期間中および保 INTERCOM ミニジャック(1) 証期間経過後にかかわらず、補償はい EARPHONE ミニジャック(1)、8 Ω たしかねますのでご了承ください。 17 English For the customers in the U.S.A. For the customers in Europe This equipment has been tested and found to comply with the limits for a Class A digital device, pursuant to Part 15 of the FCC Rules. These limits are designed to provide reasonable protection against harmful interference when the equipment is operated in a commercial environment. This equipment generates, uses, and can radiate radio frequency energy and, if not installed and used in accordance with the instruction manual, may cause harmful interference to radio communications. Operation of this equipment in a residential area is likely to cause harmful interference in which case the user will be required to correct the interference at his own expense. This product with the CE marking complies with the EMC Directive issued by the Commission of the European Community. Compliance with this directive implies conformity to the following European standards: • EN55103-1: Electromagnetic Interference (Emission) • EN55103-2: Electromagnetic Susceptibility (Immunity) This product is intended for use in the following Electromagnetic Environments: E1 (residential), E2 (commercial and light industrial), E3 (urban outdoors), E4 (controlled EMC environment, ex. TV studio). You are cautioned that any changes or modifications not expressly approved in this manual could void your authority to operate this equipment. All interface cables used to connect peripherals must be shielded in order to comply with the limits for a digital device pursuant to Subpart B of Part 15 of FCC Rules. 18 The manufacturer of this product is Sony Corporation, 1-7-1 Konan, Minato-ku, Tokyo, Japan. The Authorized Representative for EMC and product safety is Sony Deutschland GmbH, Hedelfinger Strasse 61, 70327 Stuttgart, Germany. For any service or guarantee matters please refer to the addresses given in separate service or guarantee documents. Für Kunden in Europa Ce produit portant la marque CE est conforme à la Directive sur la compatibilité électromagnétique (EMC) émise par la Commission de la Communauté européenne. La conformité à cette directive implique la conformité aux normes européennes suivantes : • EN55103-1: Interférences électromagnétiques (émission) • EN55103-2: Sensibilité électromagnétique (immunité) Ce produit est prévu pour être utilisé dans les environnements électromagnétiques suivants: E1 (résidentiel), E2 (commercial et industrie légère), E3 (urbain extérieur) et E4 (environnement EMC contrôlé, ex. studio de télévision). Dieses Produkt besitzt die CEKennzeichnung und erfüllt die EMVRichtlinie der EG-Kommission. Angewandte Normen: • EN55103-1: Elektromagnetische Verträglichkeit (Störaussendung) • EN55103-2: Elektromagnetische Verträglichkeit (Störfestigkeit) Für die folgenden elektromagnetischen Umgebungen: E1 (Wohnbereich), E2 (kommerzieller und in beschränktem Maße industrieller Bereich), E3 (Stadtbereich im Freien) und E4 (kontrollierter EMV-Bereich, z.B. Fernsehstudio). Le fabricant de ce produit est Sony Corporation, 1-7-1 Konan, Minato-ku, Tokyo, Japon. Le représentant autorisé pour EMC et la sécurité des produits est Sony Deutschland GmbH, Hedelfinger Strasse 61, 70327 Stuttgart, Allemagne. Pour toute question concernant le service ou la garantie, veuillez consulter les adresses indiquées dans les documents de service ou de garantie séparés. Der Hersteller dieses Produkts ist Sony Corporation, 1-7-1 Konan, Minato-ku, Tokyo, Japan. Der autorisierte Repräsentant für EMV und Produktsicherheit ist Sony Deutschland GmbH, Hedelfinger Strasse 61, 70327 Stuttgart, Deutschland. Bei jeglichen Angelegenheiten in Bezug auf Kundendienst oder Garantie wenden Sie sich bitte an die in den separaten Kundendienst- oder Garantiedokumenten aufgeführten Anschriften. 19 GB English Pour les clients européens 20 Table of Contents Overview ......................................................................... 22 Using the CD-ROM Manual ......................................... 23 Location and Functions of Parts .................................. 24 Mounting on Video Camera .......................................... 26 Mounting the BKP-L551 Battery Adapter .................... 28 Notes on Use .................................................................. 30 Specifications ................................................................ 31 21 Overview The CA-D50 is a camera adaptor for mounting on a DXC-D35/ D50/D55 series digital video camera. The CA-D50 allows a CCU-D50/D50P/M5A/M5AP Camera Control Unit to be connected to the camera. This unit has the following features. Digital and analog transmission functions Connecting a CCU-D50/D50P enables, in addition to analog transmission, digital transmission of video signals, which enhances picture quality by preventing signal degradation. (Audio signal transmission is not digital.) SDI output connector This unit is equipped with an SDI output connector for output of digital video signals. Battery power The optional BKP-L551 Battery Adapter and battery adaptor mounting bracket allow a battery to be mounted on this unit. Notes • Production of some of the peripherals and related devices described in this manual has been discontinued. For advice about choosing devices, please contact your Sony dealer or a Sony sales representative. • When a DXC-D35/D35P/D35WS/D35WSP camera with a serial number indicated in the following table is connected to a CCU-D50/D50P through this unit, the ROM of the camera must be replaced. For more information about checking the version and exchanging ROMs, contact your Sony dealer or a Sony service representative. Camera Serial number DXC-D35 10001 to 11325, 18001 to 18581, 100001 to 100356, 110001 to 110030 DXC-D35P 40001 to 42755, 48001 to 49261, 400001 to 402001, 410001 to 410033 DXC-D35WS 10001 to 10750, 18001 to 18336, 100001 to 100394 DXC-D35WSP 40001 to 40420, 48001 to 48366, 400001 to 400030 22 Using the CD-ROM Manual The supplied CD-ROM includes versions of the Operation Manual for the CA-TX50/50P in English, Japanese, French, German, Italian and Spanish in PDF format. Preparations The following program must be installed on your computer in order to read the operation manuals contained on the CD-ROM. • Adobe Reader Version 6.0 or higher Memo If Adobe Reader is not installed, you can download it from the following URL: http://www.adobe.com/ Adobe and Adobe Reader are trademarks of Adobe Systems Incorporated in the United States and/or other countries. Reading the CD-ROM Manual To read the operation manual contained on the CD-ROM, do the following: 1 2 Insert the CD-ROM in your CD-ROM drive. A cover page appears automatically in your browser. If it does not appear automatically in the browser, doubleclick on the index.htm file on the CD-ROM. Select and click on the operation manual that you want to read. This opens the PDF file of the operation manual. Memo The files may not be displayed properly, depending on the version of Adobe Reader. In such a case, install the latest version you can download from the URL mentioned in “Preparations” above. Note If you have lost or damaged the CD-ROM, you can purchase a new one to replace it. Contact your Sony service representative. 23 Location and Functions of Parts Front side Accessory shoe Shoulder strap fitting 1 Camera connector Rear side 2 CALL button 3 RET/VTR button 4 CCU/VTR/CMA connector 5 INTERCOM knob 6 EARPHONE jack 7 INTERCOM connector 8 PROMPT/GENLOCK connector 9 DC IN connector 0 SDI OUT connector 1 Camera connector (PRO 76-pin DIGITAL) Connect to the camera’s VTR connector. 2 CALL button Press to call the operator of a camera control unit (CCU) or remote control panel. When this button is pressed, a red tally indicator lights on the CCU and remote control panel. 24 Note The CALL button does not function in a system which combines the CA-D50 with a CCU-M5A/M5AP. 3 RET/VTR button Use this button when a CCU-D50/ D50P/M5A/M5AP or VTR is connected to the CCU/VTR/CMA connector. When a CCU-D50/D50P/M5A/ M5AP is connected: Holding down this button displays return video in the viewfinder. When the button is released, the viewfinder returns to the video being shot by the camera. When a VTR is connected: This button functions as a VTR recording start/stop button. Recording starts when the button is pressed and stops when it is pressed again. 4 CCU/VTR/CMA connector (26-pin, male) Connect a CCU-D50/D50P/M5A/ M5AP, VTR, or CMA-8A/8ACE AC Adaptor. This connector sends and receives power and all video, audio, and control signals between this unit and the connected device. 5 INTERCOM knob Adjusts the received signal level of intercom audio. 6 EARPHONE jack (mini jack) Connect earphones. Earphones allow you to monitor the recording or playback audio of a VTR connected to this unit. 7 INTERCOM connector (mini intercom jack) Connect the DR-100 headset (not supplied). The DR-100 allows you to talk with the operators of camera control units, special effects units, switchers, and so on. 8 PROMPT/GENLOCK connector (BNC type) When a CCU is not connected: Input a reference video signal (black burst or composite video signal) for external synchronization. When a CCU is connected: This connector outputs prompter signals whenever prompter signals are input to the CCU. 9 DC IN connector (XLR 4-pin) Connect to an external DC power supply (12 V). Use the CCQX-3 DC Power Cord (not supplied) to connect this connector and the CMA-8A/ 8ACE AC Adaptor (not supplied). Power supplied from the DC IN connector is given priority over power supplied from the CCU/VTR/CMA connector. 0 SDI OUT connector (BNC type) Outputs video signals from the camera as digital video (SDI) signals. 25 Mounting on Video Camera This unit is dockable with a DXC-D35/D50/D55 series digital video camera. Before mounting on a DXC-D35/D50/D55 series camera, remove the camera’s shoulder pad. On how to remove the shoulder pad, refer to the procedure of mounting a VTR described in the operating instructions for the DXC-D35/D50/D55 series camera. Note Always power the camera off before mounting this unit. 1 Fit the projection on the bottom of this unit into the slot on the camera. This unit Slot Camera 2 26 Slide the unit along the groove on the camera, and press firmly until fixed. Groove Projection 3 Tighten the two screws in the figure. 4 Tighten the two screws on the bottom side of the camera. Attachment screws 5 Attach the shoulder pad. To remove this unit from the camera Carry out the mounting procedure in reverse. 27 Mounting the BKP-L551 Battery Adapter 1 Remove the 4 screws on the back side of this unit. 2 Attach the battery adaptor mounting bracket (Part number 3690-850-01; not supplied) with the screws removed in step 1. 3 Using the wrench and screws supplied with the BKP-L551, mount the BKP-L551 Battery Adapter (not supplied) on the battery adaptor mounting bracket. Battery adaptor mounting bracket Wrench BKP-L551 28 4 Connect the 4-pin connector of the BKP-L551 to the DC IN connector of this unit. DC IN connector 4-pin connector To remove the battery adapter Repeat the mounting procedure in reverse. 29 Notes on Use Use and storage locations Avoid using or storing the unit in the following places: • Where it is subject to extremes of temperature (operating temperature: –10ºC to +45ºC (14ºF to 113ºF)). Note that in summer the temperature in a car with the windows closed can reach 50ºC (122ºF). • Very damp or dusty places. • Where rain is likely to reach the unit. • Places subject to severe vibration. • Near strong magnetic fields • Near transmitting stations generating strong radio waves. Avoid violent impacts Dropping the unit, or otherwise imparting a violent shock to it, is likely to cause it to malfunction. Do not cover with cloth While the unit is in operation, do not cover it with a cloth or other material. This can cause the temperature to rise, leading to a malfunction. Care If the body of the unit is dirty, wipe it with a dry cloth. For severe dirt, use a soft cloth steeped in a small amount of neutral detergent, then wipe dry. Do not use volatile solvents such as alcohol or thinners, as these may damage the finish. 30 Specifications General Power requirements When supplied via CCU connector: 12 V DC When supplied via DC IN connector: 12 V (10.5 to 17 V) Power consumption 3.8 W Operating temperature –10°C to +45°C (14°F to 113°F) Operating humidity 20% to 90% Storage temperature –20°C to +60°C (–4°F to 140°F) Dimensions (w/h/d) 113 × 183 × 168 mm (4 1/2 × 7 1/4 × 6 5/8 inches) Mass 1.1 kg (2 lb 6 oz) Output connectors CCU/VTR/CMA Z type 26-pin (1) PROMPTER OUT/GENLOCK IN BNC type (1), 1 Vp-p, 75 Ω DC IN XLR 4-pin (1), 10.5 to 17 V DC Camera connector PRO 76-pin DIGITAL (1) SDI OUT BNC type (1), 0.8 Vp-p, 75 Ω, 270 Mbps INTERCOM Minijack (1) EARPHONE Minijack (1), 8 Ω Accessories supplied Operating Instructions (1) CD-ROM Manual (1) Warranty card (1) Accessories not supplied DXF-51/51CE 5-inch viewfinder AC-DN10 AC Adaptor DC power cord BKP-L551 Battery Adapter Battery adapter mounting bracket for BKP-L551 (part number 3-690850-01) Design and specifications are subject to change without notice. Note Always verify that the unit is operating properly before use. SONY WILL NOT BE LIABLE FOR DAMAGES OF ANY KIND INCLUDING, BUT NOT LIMITED TO, COMPENSATION OR REIMBURSEMENT ON ACCOUNT OF THE LOSS OF PRESENT OR PROSPECTIVE PROFITS DUE TO FAILURE OF THIS UNIT, EITHER DURING THE WARRANTY PERIOD OR AFTER EXPIRATION OF THE WARRANTY, OR FOR ANY OTHER REASON WHATSOEVER. 31 Sony Corporation Printed in Belgium * 3 - 6 2 0 - 5 3 2 - 0 3 *