1
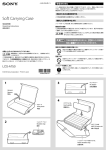
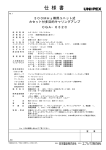
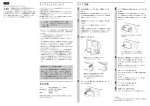
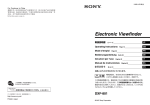
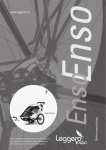
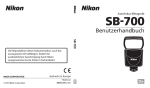
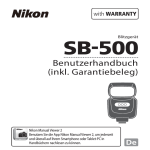
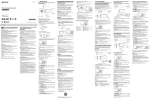
4-400-728-01(1) 外形寸法 質量 付属品 Soft Carrying Case 取扱説明書 158 × 160 × 57 mm(幅×高さ×奥行き) 約280 g 取扱説明書(1) マウントプレート(1) ショルダーベルト(1) 仕様および外観は、改良のため予告なく変更することがありますが、ご了承くだ さい。 Bedienungsanleitung Istruzioni per l’uso Manual de instrucciones Operating Instructions Mode d’emploi Insertion du DWA-F01D dans la mallette (Figure ) 主な仕様 E お使いになる前に、必ず動作確認を行ってください。故障その他に伴う営業上 の機会損失等は保証期間中および保証期間経過後にかかわらず、補償はいたし かねますのでご了承ください。 w; お買い上げいただきありがとうございます。 電気製品は、安全のための注意事項を守らないと、人身事故になるこ とがあります。 ˎ この取扱説明書には、事故を防ぐための重要な注意事項と製品の取り扱いかたを示 してあります。この取扱説明書をよくお読みのうえ、製品を安全にお使いく ださい。お読みになったあとは、いつでも見られるところに必ず保管してください。 ˎ ご使用にあたっては、DWA-F01D 本体および本体と組み合わせの接続機器に付属 © 2011 Sony Corporation Printed in Japan 4400728010 A 安全のために ソニー製品は安全に充分に配慮して設計されています。しかし、まちがった使い かたをすると、製品の落下などにより人身事故につながることがあり、危険です。 事故を防ぐために次のことを必ずお守りください。 ˎˎ 安全のための注意事項を守る。 ˎˎ 破損したら使わずに、ソニーのサービス窓口に相談する。 行為を禁止する記号 この取扱説明書および製品では、次のような 表示をしています。表示の内容をよく理解し てから本文をお読みください。 4 2 5 この表示の注意事項を守らないと、けがをし たり周辺の物品に損害を与えたりすることが あります。 6 7 qd qf 下記の注意を守らないと、けがをしたり周辺の 物品に損害を与えることがあります。 指定以外の機器を収納・使用しない 指定以外の機器を収納した場合、その機器が落下し、ケガの原因と なることがあります。 ショルダーベルトは確実に取り付けて使用する 確実に取り付けないと、運搬中にキャリングケースが落下して、け がの原因となることがあります。 qg qh 機器の切替以外はレシーバーカバーを確実にしめる 移動、運搬時にレシーバーカバーが開いていると、収納している製 品が落下してけがの原因となることがあります。 改造しない 改造するとキャリングケースの強度が低下し、収納している製品 が落下して、けがの原因となることがあります。 日本語 q; 8 qa qs B ソフトキャリングケースLCS-F01Dは、ソニーワイヤレスアダプター DWA-F01D (別売)を持ち運ぶための専用ソフトケースです。 ˎˎ 本ケースにDWA-F01Dを入れたままでバッテリー(別売)の着脱が可能です。 ˎˎ カバーを開くと、本ケースにDWA-F01Dを入れたままで、ケーブル接続やス イッチ/ボタン操作が可能です。 ˎˎ クリアー窓により、本ケースにDWA-F01Dを入れたままディスプレイやラン プ表示の確認が可能です。 ˎˎ ショルダーベルトの取り付けが可能です。 ˎˎ 付属のマウントプレートを使用して、本ケースをカムコーダーに取り付けるこ とができます。 各部の名称(図) インジケーター窓 OUTPUT 1端子トップカバー OUTPUT 2端子トップカバー レ シーバーディスプレイ/インジ qj ケーター窓 レシーバーカバー ショルダーベルト取付金具 端子カバー Vシュー DCケーブル用ストラップ 端子カバー 端子カバー 端子カバー バッテリーボトムカバー バッテリートップカバー バッテリーサイドカバー OUTPUT端子カバー DWA-F01Dをケースに入れる(図) DWA-F01D()を、本ケースのトップカバー類(、、、)を開き、上方 から入れます。を閉め、、、も閉めます。はスナップボタンを留め ます。 注意 ˎˎ DWA-F01Dを入れる際、トップカバー類をはさみ込まないようにしてくださ い。 ˎˎ DWA-F01Dの端子にコネクターを接続する際は、カバー類をはさみ込まない ようにしてください。 ˎˎ NP-F570以外(NP-F770、NP-F970)のバッテリーを取り付けている場合は、 DWA-F01Dをケースから外す際に、先にバッテリーを外してください。 DWA-F01Dにバッテリーを取り付ける(図) 111 ファスナーをはがしてとを開く。 (取り付け方法はDWA-F01Dの取扱 222 バッテリーをDWA-F01Dに取り付ける。 説明書を参照してください。) 333 バッテリーの形に沿ってとのファスナーを貼り合わせる。 カムコーダーに取り付ける(図) C 本 ケ ー ス を カ ム コ ー ダ ー に 装 着 す る に は、別 売 り の マ ウ ン ト 金 具(A-8278()と付属のマウントプレート()を使用します。 057-B) マウントプレートからDWA-F01Dを取り外すには、プレート上のレバーを押しま す。 の取り付け位置を変更することにより、カムコーダーに対するDWA-F01Dの 左右方向への取り付け位置を変更できます。 注意 を取り付ける際には、落下の危険を避けるため上下の向きに注意して、3本の ねじを確実に締めてください。 XLRコネクターを接続する(図) 111 とを開く。 222 は閉じたまま、XLRコネクターを接続する。 D 注意 ˎˎ をはさみ込まないようにしてください。 ˎˎ カチッと音がするまで差し込みます。 ショルダーベルトを取り付ける(図) 付属のショルダーベルトを本ケースに取り付けると、DWA-F01Dを肩から下げ て使用できます。 111 ショルダーベルトをに通す。 222 ショルダーベルトをストッパー()に通し、長さを調節し、ベルトを引いて 固定する。 ケーブルを接続する 、、、を開いて、ケーブルを接続してください。 電源ケーブルを固定する際はを使用してください。 注意 DWA-F01Dの端子にコネクターを接続する際は、カバー類をはさみ込まないよう にしてください。 qk ql DC cable loop Connector cover Connector cover Connector cover Battery cover (bottom) Battery cover (top) Battery cover (side) OUTPUT connector flap Inserting the DWA-F01D into the Case (Fig. ) Notes ˎˎWhen inserting the DWA-F01D, make sure that the top covers and flaps do not get caught inside. ˎˎWhen connecting cables to the DWA-F01D connectors, make sure that the covers do not get caught. ˎˎIf a battery other than the NP-F570 (NP-F770, NP-F970) is attached, remove the battery from the DWA-F01D before removing it from the case. Attaching the Battery to the DWA-F01D (Fig. ) 1. Undo the fasteners to open and . 2. Attach the battery to the DWA-F01D. (For details on attachment, refer to the operating instructions for the DWA-F01D.) 3. Fit and to the shape of the battery and close the fasteners. Mounting to a Camcorder (Fig. ) Use a separately supplied mount bracket (A-8278-057-B) () and the supplied mount plate () to mount the case to a camcorder. When unmounting the DWA-F01D from the mount plate, press the lever on the top of the plate. By changing the position at which is attached, you can change the left/right mounting position of the DWA-F01D on the camcorder. Note When attaching , make sure its top/bottom orientation is correct, and secure the three screws tightly to prevent accidental falling. Connecting an XLR Connector (Fig. ) 概要 9 Indicator window Top cover for OUTPUT 1 connector Top cover for OUTPUT 2 connector Receiver display/indicator window Receiver cover Shoulder belt attachment point Connector cover V shoe 1. Open and . 2. Connect the XLR connector while leaving closed. Notes ˎˎMake sure that does not get caught. ˎˎInsert the connector until it clicks into place. Attaching the Shoulder Belt (Fig. ) By attaching the supplied shoulder belt to the case, you can use the DWA-F01D while it hangs from your shoulder. 1. Pass the shoulder belt through . 2. Pass the shoulder belt through the stopper (), adjust its length, and then pull the belt to secure it. Connecting Cables Open , , , and and connect the cables. You can use to secure the power cable. Note When connecting cables to the DWA-F01D connectors, make sure that the covers and flaps do not get caught. Specifications Dimensions 158 × 160 × 57 mm (6 1/4 × 6 3/8 × 2 1/4 in.) (W × H × D) Mass Approx. 280 g (9.9 oz.) Supplied accessories Operating Instructions (1) Mount plate (1) Shoulder belt (1) Design and specifications are subject to change without notice. Note Always verify that the unit is operating properly before use. SONY WILL NOT BE LIABLE FOR DAMAGES OF ANY KIND INCLUDING, BUT NOT LIMITED TO, COMPENSATION OR REIMBURSEMENT ON ACCOUNT OF THE LOSS OF PRESENT OR PROSPECTIVE PROFITS DUE TO FAILURE OF THIS UNIT, EITHER DURING THE WARRANTY PERIOD OR AFTER EXPIRATION OF THE WARRANTY, OR FOR ANY OTHER REASON WHATSOEVER. Français Avant d’utiliser l’appareil, veuillez lire attentivement ce manuel et le conserver pour future référence. Présentation La mallette de transport souple LCS-F01D est une mallette de transport spécialement conçue pour l’adaptateur sans fil DWA-F01D de Sony (non fourni). ˎˎLa batterie (non fournie) peut être fixée à l’adaptateur DWA-F01D lorsqu’il est dans la mallette. ˎˎEn ouvrant les languettes de protection, vous pouvez raccorder les câbles et faire fonctionner les interrupteurs et les touches sans avoir à retirer le DWA‑F01D de la mallette. ˎˎLa fenêtre transparente vous permet de voir l’afficheur et les indicateurs du DWA-F01D. ˎˎIl est possible de fixer une bandoulière à la mallette. ˎˎLa plaque de montage fournie peut être utilisée pour monter la mallette sur un caméscope. Identification des parties (Figure ) Fenêtre de l’indicateur Languette de protection supérieure du connecteur OUTPUT 1 Languette de protection supérieure du connecteur OUTPUT 2 Fenêtre des indicateurs/de l’afficheur du récepteur Languette de protection du récepteur Point de fixation de la bandoulière Languette de protection des connecteurs Griffe en V Boucle du câble CC le mode d’emploi du DWA-F01D.) 3. Placez et de façon à épouser la forme de la batterie et fermez les attaches. Montage sur un caméscope (Figure ) The LCS-F01D Soft Carrying Case is a carrying case specifically designed for the Sony DWA-F01D Wireless Adapter (not supplied). ˎˎThe battery (not supplied) can be attached to the DWA-F01D while it is inside the case. ˎˎBy opening the covers, you can connect cables and operate switches and buttons without removing the DWA-F01D from the case. ˎˎThe clear window allows you to view the DWA-F01D display and indicators. ˎˎA shoulder belt can be attached to the case. ˎˎThe supplied mount plate can be used to mount the case to a camcorder. Open the top covers of the case (, , , ), and insert the DWA-F01D () from the top of the case. First close , and then close , , and . Close the snap buttons for . 行為を指示する記号 1 Overview Parts Identification (Fig. ) 警告表示の意味 3 ˎˎLors de l’insertion du DWA-F01D, veillez à ce que les languettes de protection supérieures et les rabats ne restent pas coincés à l’intérieur. ˎˎLors du raccordement des câbles aux connecteurs du DWA-F01D, veillez à ce que les languettes de protection ne restent pas coincées. ˎˎSi une batterie autre que la NP-F570 (NP-F770, NP-F970) est fixée, retirez la batterie de l’adaptateur DWA-F01D avant de le retirer de la mallette. 1. Défaites les attaches pour ouvrir et . 2. Fixez la batterie au DWA-F01D. (Pour en savoir plus sur la fixation, consultez Before operating the unit, please read this manual thoroughly and retain it for future reference. LCS-F01D Remarques Fixation de la batterie au DWA-F01D (Figure ) F English の取扱説明書の「安全のために」と「 警告」、 「 注意」をよくお読みください。 お読みになったあとは、いつでも見られるところに必ず保管してください。 Ouvrez les languettes de protection supérieures de la mallette (, , , ) et insérez le DWA-F01D () par le haut de la mallette. Fermez d’abord , puis fermez , et . Fermez les boutons-pression de . Languette de protection des connecteurs Languette de protection des connecteurs Languette de protection des connecteurs Languette de protection de la batterie (inférieure) Languette de protection de la batterie (supérieure) Languette de protection de la batterie (latérale) Rabat du connecteur OUTPUT Utilisez un support de montage fourni séparément (A-8278-057-B) () et la plaque de montage fournie () pour monter la mallette sur un caméscope. Lors du démontage du DWA-F01D de la plaque de montage, appuyez sur le levier situé en haut de la plaque. En modifiant la position à laquelle est fixée, vous pouvez modifier la position de montage gauche/droite du DWA-F01D sur le caméscope. Remarque Lors de la fixation de , vérifiez que son orientation haut/bas est correcte et serrez fermement les trois vis pour éviter toute chute accidentelle. Raccordement d’un connecteur XLR (Figure ) 1. Ouvrez et . 2. Raccordez le connecteur XLR tout en laissant fermé. Remarques ˎˎVeillez à ce que ne reste pas coincé. ˎˎInsérez le connecteur jusqu’à ce qu’il se mette en place en émettant un déclic. Fixation de la bandoulière (Figure ) En fixant la bandoulière fournie à la mallette, vous pouvez utiliser le DWA-F01D alors qu’il est suspendu à votre épaule. 1. Passez la bandoulière dans . 2. Passez la bandoulière dans l’attache (), ajustez la longueur, puis tirez sur la bandoulière pour la fixer. Raccordement des câbles Ouvrez , , et et raccordez les câbles. Vous pouvez utiliser pour fixer le câble d’alimentation. Remarque Lors du raccordement des câbles aux connecteurs du DWA-F01D, veillez à ce que les languettes de protection et les rabats ne restent pas coincés. Spécifications Dimensions 158 × 160 × 57 mm (6 1/4 × 6 3/8 × 2 1/4 po) (L × H × P) Poids Environ 280 g (9.9 oz) Accessoires fournis Mode d’emploi (1) Plaque de montage (1) Bandoulière (1) La conception et les spécifications sont modifiables sans préavis. Remarque Vérifiez toujours que l’appareil fonctionne correctement avant l’utilisation. Sony n’assumera pas de responsabilité pour les dommages de quelque sorte qu’ils soient, incluant mais ne se limitant pas à la compensation ou au remboursement, à cause de la perte de profits actuels ou futurs suite à la défaillance de cet appareil, que ce soit pendant la période de garantie ou après son expiration, ou pour toute autre raison quelle qu’elle soit. Collegamento della batteria al DWA-F01D (Fig. ) Deutsch A 3 Bitte lesen Sie dieses Handbuch vor der Benutzung des Geräts sorgfältig durch und bewahren Sie es zum späteren Nachschlagen auf. 4 Die Tragetasche LCS-F01D wurde speziell für den drahtlosen Adapter DWA-F01D von Sony (nicht im Lieferumfang enthalten) konzipiert. ˎˎDer Akku (nicht im Lieferumfang enthalten) kann in den DWA-F01D eingesetzt werden, wenn dieser sich in der Tasche befindet. ˎˎWenn Sie die Abdeckungen öffnen, können Sie Kabel anschließen und Schalter und Tasten bedienen, ohne den DWA-F01D aus der Tasche nehmen zu müssen. ˎˎDurch das Klarsichtfenster können Sie die Anzeige und Indikatoren des DWA‑F01D sehen. ˎˎEin Schultergurt kann an der Tasche angebracht werden. ˎˎMit der mitgelieferten Montageplatte kann die Tasche an einem Camcorder befestigt werden. 1 5 6 7 qd qf Beschreibung der Teile (Abb. ) Anzeigefenster Obere Abdeckung für Anschluss OUTPUT 1 Obere Abdeckung für Anschluss OUTPUT 2 Anzeige-/Indikatorfenster für Empfänger Empfängerabdeckung Befestigungsstelle für Schultergurt Anschlussabdeckung qg qh Befestigungsschuh Schleife für Gleichspannungskabel Anschlussabdeckung Anschlussabdeckung Anschlussabdeckung Batterieabdeckung (unten) Batterieabdeckung (oben) Batterieabdeckung (Seite) OUTPUT-Anschlussklappe Einsetzen des DWA-F01D in die Tasche (Abb. ) 9 Öffnen Sie die oberen Abdeckungen der Tasche (, , , ), und setzen Sie den DWA-F01D () von der Oberseite der Tasche aus ein. Schließen Sie zuerst , und dann , , und . Schließen Sie die Druckknöpfe für . q; Hinweise 8 ˎˎAchten Sie beim Einsetzen des DWA-F01D darauf, dass die oberen Abdeckungen und Klappen nicht im Inneren der Tasche eingeklemmt werden. ˎˎAchten Sie beim Anschließen der Kabel am DWA-F01D darauf, dass die Abdeckungen nicht eingeklemmt werden. ˎˎWenn ein anderer Akku als der NP-F570 (NP-F770, NP-F970) eingesetzt wird, nehmen Sie zuerst den Akku aus dem DWA-F01D und dann aus der Tasche. qa qs Einsetzen des Akkus in den DWA-F01D (Abb. ) B 1. Öffnen Sie die Abdeckungen und . 2. Setzen Sie den Akku in den DWA-F01D ein. (Ausführliche Informationen zum Einsetzen finden Sie in der Bedienungsanleitung zum DWA-F01D.) 3. Passen Sie und an die Form des Akkus an und schließen Sie die Abdeckungen. Montieren auf einen Camcorder (Abb. ) Verwenden Sie die separat erhältliche Montagehalterung A-8278-057-B () und die mitgelieferte Montageplatte (), um die Tasche an einem Camcorder zu befestigen. Beim Abmontieren des DWA-F01D von der Montageplatte drücken Sie den Hebel oben auf der Platte. Indem Sie die Stelle ändern, an der angebracht wird, können Sie wählen, ob der DW-F01D links oder rechts am Camcorder angebracht wird. qj Hinweis Wenn Sie anbringen, achten Sie darauf, dass er richtig ausgerichtet ist (oben/ unten), und ziehen Sie die drei Schrauben fest an, um ein versehentliches Herunterfallen zu vermeiden. Anschließen eines XLR-Steckers (Abb. ) 1. Öffnen Sie und . 2. Schließen Sie den XLR-Stecker an, während geschlossen bleibt. Hinweise ˎˎAchten Sie darauf, dass nicht eingeklemmt wird. ˎˎSchieben Sie den Stecker ein, bis es „klick“ macht. Anbringen des Schultergurts (Abb. ) Wenn Sie den mitgelieferten Schultergurt an der Tasche anbringen, können Sie den DWA-F01D verwenden, während dieser an Ihrer Schulter hängt. 1. Führen Sie den Schultergurt durch . 2. Führen Sie den Schultergurt durch die Sicherung (), passen Sie seine Länge an, und ziehen Sie dann am Gurt, um ihn zu sichern. C Anschließen der Kabel Hinweis Achten Sie beim Anschließen der Kabel am DWA-F01D darauf, dass die Abdeckungen und Klappen nicht eingeklemmt werden. Technische Daten Abmessungen 158 × 160 × 57 mm (B × H × T) Gewicht Ca. 280 g Mitgeliefertes Zubehör Bedienungsanleitung (1) Montageplatte (1) Schultergurt (1) D Montaggio su un camcorder (Fig. ) Per montare la custodia su un camcorder utilizzare la staffa fornibile a richiesta (A-8278-057-B) () e la piastra di supporto in dotazione (). Per smontare il DWA-F01D dalla piastra di supporto, premere la leva in cima alla piastra. Modificando la posizione in cui viene collegato, è possibile variare la posizione di montaggio sinistra/destra del DWA-F01D sul camcorder. Nota In fase di collegamento , verificare il corretto orientamento alto/basso, quindi fissare saldamente le tre viti per prevenire la caduta accidentale. Especificaciones Dimensiones 158 × 160 × 57 mm (6 1/4 × 6 3/8 × 2 1/4 pulgadas) (ancho × alto × largo) Peso 280 g (9.9 oz.) aprox. Accesorios suministrados Manual de instrucciones (1) Placa de montaje (1) Correa para el hombro (1) El diseño y las especificaciones están sujetos a cambios sin previo aviso. Nota Verifique siempre que esta unidad funciona correctamente antes de utilizarlo. SONY NO SE HACE RESPONSIBLE POR DAÑOS DE NINGÚN TIPO, INCLUYENDO PERO NO LIMITADO A LA COMPENSACIÓN O PAGO POR LA PÉRDIDA DE GANANCIAS PRESENTES O FUTURAS DEBIDO AL FALLO DE ESTA UNIDAD, YA SEA DURANTE LA VIGENCIA DE LA GARANTÍA O DESPUÉS DEL VENCIMIENTO DE LA GARANTÍA NI POR CUALQUIER OTRA RAZÓN. Collegamento di un connettore XLR (Fig. ) 1. Aprire e . 2. Collegare il connettore XLR lasciando chiusa. Note ˎˎAccertarsi che non resti impigliata. ˎˎInserire il connettore fino a udirne lo scatto in sede. Fissaggio della cinghia a spalla (Fig. ) Fissando alla custodia la cinghia a spalla fornita, sarà possibile utilizzare il DWA‑F01D mentre è sospeso alla spalla dell’utente. 1. Infilare la cinghia a spalla nel punto . 2. Infilare la cinghia a spalla nel fermo (), regolarne la lunghezza, quindi tirare la cinghia per fermarla. Collegamento dei cavi Aprire , , , e e collegare i cavi. È possibile utilizzare per fissare il cavo di alimentazione. Nota Quando si collegano i cavi ai connettori del DWA-F01D, accertarsi che le coperture e le falde non restino impigliate. Caratteristiche tecniche Dimensioni 158 × 160 × 57 mm (L × A × P) Peso Circa 280 g Accessori in dotazione Istruzioni per l’uso (1) Piastra di supporto (1) Cinghia a spalla (1) Il design e le caratteristiche techiche sono soggetti a modifiche senza preavviso. Nota Verificare sempre che l’apparecchio stia funzionando correttamente prima di usarlo. LA SONY NON SARÀ RESPONSABILE DI DANNI DI QUALSIASI TIPO, COMPRESI, MA SENZA LIMITAZIONE A, RISARCIMENTI O RIMBORSI A CAUSA DELLA PERDITA DI PROFITTI ATTUALI O PREVISTI DOVUTA A GUASTI DI QUESTO APPARECCHIO, SIA DURANTE IL PERIODO DI VALIDITÀ DELLA GARANZIA SIA DOPO LA SCADENZA DELLA GARANZIA, O PER QUALUNQUE ALTRA RAGIONE. Español Antes de poner en funcionamiento la unidad, lea detenidamente este manual y consérvelo para referencias futuras. Información general La bolsa de transporte blanda LCS-F01D está especialmente diseñada para el adaptador inalámbrico DWA-F01D de Sony (no suministrada). ˎˎLa batería (no suministrada) se puede insertar en el DWA-F01D mientras éste se encuentra dentro de la bolsa. ˎˎAl abrir las solapas, puede conectar los cables y manejar los interruptores y botones del DWA-F01D sin necesidad de sacarlo de la bolsa. ˎˎLa ventana transparente le permite ver la pantalla y los indicadores del DWA‑F01D. ˎˎSe puede colocar en la bolsa una correa para el hombro. ˎˎLa placa de montaje se puede utilizar para colocar la bolsa en una videocámara. Identificación de las piezas (figura ) Öffnen Sie , , , und und schließen Sie die Kabel an. Sie können mit das Stromkabel sichern. collegamento, fare riferimento alle istruzioni per l’uso del DWA-F01D.) 3. Montare in sede e con la forma della batteria e chiudere le chiusure. Überblick 2 1. Allentare le chiusure per aprire e . 2. Collegare la batteria al DWA-F01D. (Per informazioni dettagliate sul Ventana del indicador Solapa superior del conector OUTPUT 1 Solapa superior del conector OUTPUT 2 Pantalla del receptor/ventana del indicador Solapa del receptor Punto de anclaje de la correa para el hombro Solapa del conector Zapata en V Bucle del cable de CC Solapa del conector Solapa del conector Solapa del conector Solapa de la batería (inferior) Solapa de la batería (superior) Solapa de la batería (lateral) Solapa del conector OUTPUT Introducción del DWA-F01D en la bolsa (figura ) Änderungen, die dem technischen Fortschritt dienen, bleiben vorbehalten. Abra las solapas de la parte superior de la bolsa (, , , ) e introduzca el DWA-F01D ()por arriba. Cierre primero y, a continuación, cierre , y . Cierre los botones de presión de . Notas Hinweis Bestätigen Sie vor dem Gebrauch immer, dass das Gerät richtig arbeitet. SONY KANN KEINE HAFTUNG FÜR SCHÄDEN JEDER ART, EINSCHLIESSLICH ABER NICHT BEGRENZT AUF KOMPENSATION ODER ERSTATTUNG, AUFGRUND VON VERLUST VON AKTUELLEN ODER ERWARTETEN PROFITEN DURCH FEHLFUNKTION DIESES GERÄTS ODER AUS JEGLICHEM ANDEREN GRUND, ENTWEDER WÄHREND DER GARANTIEFRIST ODER NACH ABLAUF DER GARANTIEFRIST, ÜBERNEHMEN. Leggere attentamente questo manuale prima di utilizzare l’unità, e conservarlo per riferimenti futuri. ql Descrizione generale E La custodia di trasporto morbida LCS-F01D è una custodia per il trasporto specificamente concepita per l’adattatore wireless Sony DWA-F01D (non in dotazione). ˎˎLa batteria (non in dotazione) può essere collegata al DWA-F01D mentre si trova all’interno della custodia. ˎˎAprendo le coperture è possibile collegare i cavi e azionare gli interruttori e pulsanti senza rimuovere il DWA-F01D dalla custodia. ˎˎLa finestrella trasparente consente di vedere il display e gli indicatori del DWA‑F01D. ˎˎÈ possibile collegare una cinghia a spalla alla custodia. ˎˎLa piastra di supporto fornita può essere utilizzata per montare la custodia su un camcorder. Identificazione delle parti (Fig. ) F w; Finestrella dell’indicatore Copertura superiore per connettore OUTPUT 1 Copertura superiore per connettore OUTPUT 2 Finestrella indicatore/display ricevitore Copertura del ricevitore Punto di fissaggio della cinghia a spalla Copertura per connettore Colocación de la batería en el DWA-F01D (figura ) 1. Quite los cierres y abra y . 2. Coloque la batería en el DWA-F01D. (Si desea obtener más información Italiano qk ˎˎCuando introduzca el DWA-F01D, asegúrese de que las solapas de la parte superior de la bolsa no se quedan enganchadas. ˎˎCuando conecte los cables a los conectores del DWA-F01D, asegúrese de que las solapas no se quedan enganchadas. ˎˎSi utiliza otra batería que no sea NP-F570 (NP-F770, NP-F970), extraiga la batería del DWA-F01D antes de sacarlo de la bolsa. Attacco a V Occhiello per cavo CC Copertura per connettore Copertura per connettore Copertura per connettore Copertura batteria (parte inferiore) Copertura batteria (parte superiore) Copertura batteria (parte laterale) Falda del connettore OUTPUT Inserimento del DWA-F01D nella custodia (Fig. ) Aprire le coperture superiori della custodia (, , , ) e inserire il DWA-F01D () dalla parte superiore della custodia. Chiudere dapprima e poi chiudere , , e . Chiudere i bottoni a scatto per . Note ˎˎIn fase di inserimento del DWA-F01D, accertarsi che le coperture superiori e le falde non restino impigliate all’interno. ˎˎQuando si collegano i cavi ai connettori del DWA-F01D, accertarsi che le coperture non restino impigliate. ˎˎSe è collegata una batteria diversa dalla batteria NP-F570 (NP-F770, NP-F970), togliere la batteria dal DWA-F01D prima di rimuoverlo dalla custodia. acerca de cómo colocar la batería, consulte las instrucciones de funcionamiento del DWA-F01D.) 3. Ajuste y a la forma de la batería y fije los cierres. Colocación en una videocámara (figura ) Utilice el soporte de montaje por separado (A-8278-057-B) () y la placa de montaje () suministrados para colocar la bolsa en una videocámara. Cuando desmonte el DWA-F01D de la placa de montaje, pulse la palanca que se encuentra en la parte superior de ésta. Si cambia la posición en la que está colocada, puede cambiar la posición de montaje a la izquierda o a la derecha del DWA-F01D en la videocámara. Nota Cuando coloque , asegúrese de que la orientación superior/inferior es correcta, y asegure con fuerza los tres tornillos para evitar que se caiga de manera accidental. Conexión a un conector XLR (figura ) 1. Abra y . 2. Conecte el conector XLR mientras mantiene cerrada. Notas ˎˎAsegúrese de que no se queda enganchada. ˎˎInserte el conector hasta que encaje en su lugar. Colocación de la correa para el hombro (figura ) Al colocar la correa para el hombro suministrada a la bolsa, podrá utilizar el DWA-F01D mientras éste cuelga de su hombro. 1. Pase la correa para el hombro a través de . 2. Pase la correa para el hombro a través del fijador (), ajuste su longitud y tire de ella para asegurarla. Conexión de los cables Abra , , y y conecte los cables. Puede utilizar para asegurar el cable de alimentación. Nota Cuando conecte los cables a los conectores del DWA-F01D, asegúrese de que las solapas no se quedan enganchadas. この説明書は、再生紙を使用しています。 Printed on recycled paper.