1
Ascotel Office Terminals by a
Office 150
Bedienungsanleitung
Mode d’emploi
Istruzioni per l’uso
Operating instructions
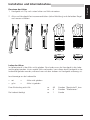
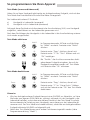
Toutes nos félicitations!
Table des matières
Nous vous félicitons sincèrement pour
l’achat de votre téléphone sans fil Ascom
Office 150. Cet appareil portatif vous
procure une liberté de mouvement bienvenue. Grâce à sa technique numérique,
l’Office 150 procure une excellente qualité de conversation. De surcroît, et le
petit appareil portatif vous offre le même
confort téléphonique qu'un Ascom Office
100, mais dans un design plus robuste..
Eléments d’exploitation et d'affichage ........1
Concept d’utilisation: la technique
des menus ..................................................3
Consignes de sécurité.................................4
Installation et mise en service .....................6
Avant de téléphoner pour la première fois ...8
Pour téléphoner........................................10
Pour utiliser les fonctions de confort.........15
Pour programmer l’appareil ......................21
Dérangements ..........................................37
Codes de fonction ....................................38
Index ........................................................42
Congratulazioni!
Indice
Congratulazioni per l’acquisto del vostro
nuovo telefono cordless Ascom Office
150. Questo pratico apparecchio vi offre
la mobilità desiderata e, malgrado le sue
dimensioni compatte, e il piccolo portatile Vi offre lo stesso comfort telefonico di
un Ascom Office 100, ma in un design
robusto.
Comandi e visualizzazioni ...........................1
Il metodo di comando: la tecnica a menu ...3
Avvertenze di sicurezza...............................4
Installazione e messa in servizio ..................6
Prima di telefonare la prima volta ...............8
Come telefonare.......................................10
Per usare le funzioni comfort....................15
Come programmare il vostro
apparecchio..............................................21
Malfunzionamenti ....................................37
Codici di funzione ....................................38
Indice analitico .........................................42
Congratulations!
Contents
Congratulations on the purchase of your
Ascom Office 150. This handset affords
you the freedom of movement you desire. The digital technology of the Office
150 guarantees excellent speech quality,
and the small handset offers you the
same level of telephony features as an
Ascom Office 100 but in a sturdy design.
Operation and display elements..................1
Operation: the menu system ......................3
Safety Advice..............................................4
Installation and putting into service ............6
Before you telephone for the first time.......8
Telephoning..............................................10
Using the extended-feature functions .......15
Programming your telephone ...................21
Troubleshooting........................................37
Function codes .........................................38
Index ........................................................42
Deutsch
Bedienungs- und Anzeigeelemente.............1
Das Bedienkonzept: die Menütechnik .........3
Sicherheitshinweise.....................................4
Installation und Inbetriebnahme .................6
Bevor Sie das erste Mal telefonieren ...........8
So telefonieren Sie....................................10
So benutzen Sie die Komfortfunktionen ...15
So programmieren Sie Ihren Apparat ........21
Störungen ................................................37
Funktionscodes.........................................38
Index ........................................................42
Français
Herzliche Gratulation zu Ihrem
Ascom Office 150 Funktelefon. Dieses
Handgerät verleiht Ihnen die gewünschte
Bewegungsfreiheit. Die Digitaltechnik
des Office 150 gewährleistet eine
ausgezeichnete Sprachqualität, und das
kleine Handgerät bietet Ihnen den gleichen Telefonkomfort wie ein Ascom
Office 100 aber in einem robusten
Design.
Italiano
Inhalt
English
Herzliche Gratulation!
I
Bedi
1
10
4
1
L
O
2
H
F
3
F
In
B
4
A
D
M
5
C
L
R
6
L
E
7
G
G
W
8
M
D
n
(
9
iZ
10
E
L
11
T
Z
E
v
c
B
2
3
8
9
M
7
3
AB
C
1
C
DE
F
JK
L
2
GH
I
4
11
MN
3
O
S TU
6
5
5
PQ
R
7
VW
X
6
8
YZ
•
9
0. . .
9
0
Im
II
III
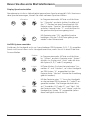
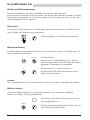
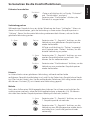
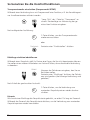
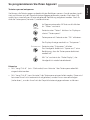
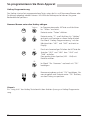
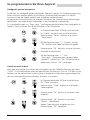
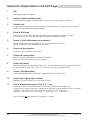
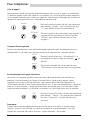
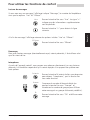
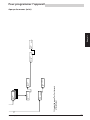
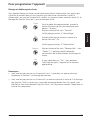
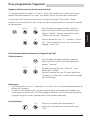
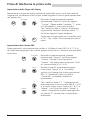
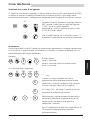
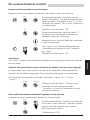
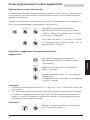
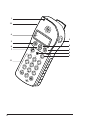
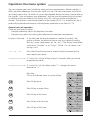
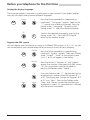
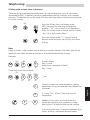
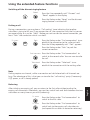
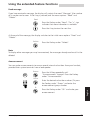
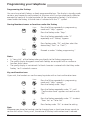
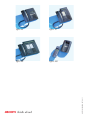
Bedienungs- und Anzeigeelemente
1
LED
Optische Anrufanzeige
2
Hotkey
Frei programmierbare Taste für bis zu 6 Nummern/Namen oder Funktionen
3
Foxtasten
In der untersten Display-Zeile wird die jeweilige Funktion angezeigt.
Beide Foxtasten sind frei programmierbar.
4
Anzeigefeld (Display)
Das hinterleuchtete Display umfasst die Symbol-, die Informations- und die
Menüzeile mit je 12 Symbolen/Zeichen:
5
C-/End-Taste (Lösch- oder Korrekturtaste)
Lösch- oder Korrekturtaste (Clear) bei der Zeicheneingabe.
Rückkehr zum vorherigen Menüpunkt oder in den Ruhezustand.
6
Lautsprechertaste
Ein- und Ausschalten des Lautsprechers
7
Gesprächstaste
Gleiche Wirkung wie das Abheben/Auflegen des Hörers.
Wieder einschalten des ausgeschalteten Handgeräts.
8
M-Taste (Menü-Taste)
Dient zur Suche des gewünschten Menüpunktes; wirkt zyklisch, d.h.
nach dem letzten Menüpunkt einer Liste wird wieder der erste angezeigt
(M-Symbol aktiv).
9
i-Taste (Info-Taste)
Zur Abfrage weiterer Informationen (i-Symbol aktiv)
10
Einstelltasten (nicht sichtbar)
Lautstärke einstellen, beim Lauthören oder im Hörer
11
Tastenblock 0 bis 9 (A bis Z), * und #
Zifferneingabe und Wahl von Komfortfunktionen mit */#-Prozeduren.
Eingabe von Namen und/oder Texten im Alpha-Modus. (Die Umschaltung
von Ziffern auf Buchstaben erfolgt autom. nach der Wahl eines entsprechenden Menüpunktes.)
Beispiel: 1x Taste 2 = D, 2x Taste 2 = E, 3x Taste 1 = C, 2x Taste 7 = T
Im Alpha-Modus kann die #-Taste auch einen Leerschlag erzeugen.
III
Technische Änderungen vorbehalten.
Der Leistungsumfang ist von der Software abhängig.
20BA310995/A0
Deutsch
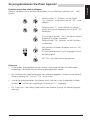
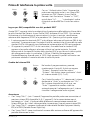
Bedienungs- und Anzeigeelemente
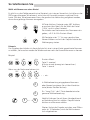
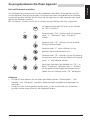
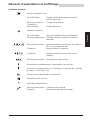
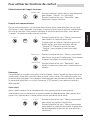
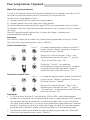
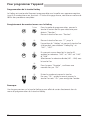
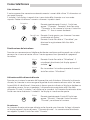
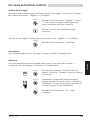
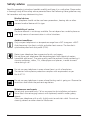
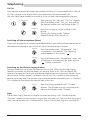
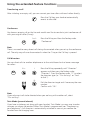
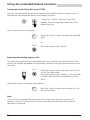
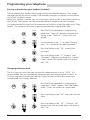
Besondere Display-Symbole
Ladezustand des Akkus
Keine Anzeige:
Ladezustand gut, Handgerät betriebsbereit
Blinkende Anzeige: Ladezustand tief (Warnung)
Blinkend + Warnton: Ladezustand sehr tief
Antennensymbol
Keine Anzeige:
Daueranzeige:
Ausserhalb des Empfangs-/Sendebereichs
Bereit für ankommende und abgehende
Verbindungen.
Daueranzeige:
Blinkend:
Handgerät im System A (B,C oder D) angemeldet und betriebsbereit.
Handgerät nicht betriebsbereit.
Blinkend:
Handgerät ist in keinem System angemeldet.
Daueranzeige:
Alpha-Wahl aktiv
Zusatzinformation (mit i-Taste abfragen)
Eine unter dem Hotkey/der Foxtaste gespeicherte Funktion
oder der Vibrator ist aktiv
Weitere Menüs (mit M-Taste ansteuern)
Mikrofon ausgeschaltet
Programmier-Modus
Daueranzeige:
Blinkend:
20310995de_ba_a0
Verbindung aufgebaut
Optische Signalisierung eines Anrufs
1
Bedienungs- und Anzeigeelemente
Weitere Symbole auf Informations- oder Menüzeile:
12¥ "Blättern" durch eine Liste (mit Laufnummer des Eintrags)
S
Anruf auf Sammelanschluss (Teilnehmergruppe)
U
Umgeleiteter Anruf
|
Funktion ist aktiv
Qualität der Funkverbindung (nur im Ruhe-Display)
$$$$
$$$
$$
$
....
Sehr gute Verbindungsqualität
Gute Verbindungsqualität
Telefonieren möglich, Störungen warscheinlich
Telefonieren nur bedingt möglich, starke Einschränkungen
Telefonieren nicht mehr möglich
Hinweis
Die Verbindungsqualität kann auch mit "Long Click 4" abgefragt werden. Gleichzeitig
wird die Nummer der betreffenden Funkeinheit angezeigt.
2
20310995de_ba_a0
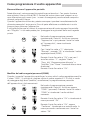
Sie können das Handgerät Ihren Bedürfnissen entsprechend programmieren. Es bietet Ihnen, neben der Mobilität, alle Telefoniefunktionen die Sie sich wünschen können. Trotzdem ist es einfach und leicht (intuitiv) zu bedienen; dafür sorgen die durchdachte Menütechnik und die Foxtasten. Das Kapitel "So programmieren Sie Ihren Apparat" und die
Programmieranleitung helfen Ihnen, die Leitstungsmerkmale Ihres Handgerätes voll auszuschöpfen. Zusätzlich zur nicht-akustischen Anrufanzeige mit LED kann ein Anruf auch mit
einem Vibrator signalisiert werden. Das Handgerät ist spritzwasser- und staubdicht (IP 54).
Es ist für den Einsatz in explosionsgefährdeter Umgebung mit Explosionsschutz gemäss
Eex ib IIC T4 lieferbar.
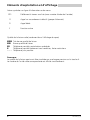
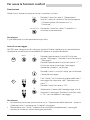
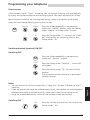
Allgemeine Bedienregeln
Es gibt zwei Menüarten:
– Die alltäglich gebrauchten Bedienmenüs für Telefoniefunktionen.
– Die Programmiermenüs, zur Einstellung Ihres Geräts, gemäss Ihren Bedürfnissen.
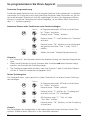
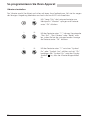
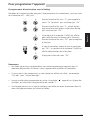
Ruhe-Display
Im Ruhezustand sind im Display einige Symbole, die Qualitätsanzeige sowie Datum und Uhrzeit oder ein individueller Ruhetext (z.B.
Name, Abteilung, Tel.Nr. etc.) zu sehen. Bei einem Anruf oder in der
Gesprächsphase wechselt die Anzeige automatisch zum Menü "Diskret" bzw. zu "Rückfragen" " Mikro".
—> —> —>
Mit der M-Taste (einmal oder mehrmals kurz drücken) gelangen Sie
zu dem gewünschten Bedienmenü.
————————> Ein "Long Click" der M-Taste (min. 2 Sekunden) bewirkt einen
Sprung in den Programmiermodus.
————————> Ein "Long Click" der Foxtaste unter "¥" ändert die Suchrichtung in
"ß".
Ruhezustand
Mit M-Taste das gewünschte Menü aufrufen
10.Apr 11:55
$$$$
M
M-Taste einmal drücken
10.Apr 11:55
ABC
Wahlw.
M
M-Taste ein zweites Mal drücken
10.Apr 11:55
Uml. Diskret
M
M-Taste ein drittes Mal drücken
10.Apr 11:55
Übern. Such
M
M-Taste ein viertes Mal drücken
10.Apr 11:55
Meld. Durchs
M
M-Taste ein fünftes Mal drücken
10.Apr 11:55
Prog.
20310995de_ba_a0
3
Deutsch
Das Bedienkonzept: die Menütechnik
Sicherheitshinweise
Lesen Sie bitte die Bedienungsanleitung und bewahren Sie diese auf. Bitte studieren Sie
die hier aufgeführten Sicherheitshinweise gründlich. Die Nichtbeachtung dieser Richtlinien
kann Gefahren verursachen und gegen bestehende Gesetze verstossen.
Medizinische Geräte
Das Telefon sollte nicht in der Nähe von persönlichen medizinischen Geräten wie
Herzschrittmachern oder Hörgeräten eingesetzt werden.
Verfügbarkeit der Telefonverbindung
Die Verfügbarkeit des Funkeinheiten-Netzes ist nicht immer gewährleistet.
Verlassen Sie sich in kritischen Situationen nicht auf das Mobiltelefon als einziges
Kommunikationsmittel.
Umgebungsbedingungen
Betreiben Sie Ihr Gerät nur im Temperaturbereich von +5 °C bis ca. +40 °C.
Vermeiden Sie direkte Sonnenbestrahlung und andere Wärmequellen.
Das Handgerät ist spritzwasser- und staubdicht (IP 54).
Schützen Sie Ihren Apparat vor aggressiven Flüssigkeiten und Dämpfen.
Setzen Sie Ihren Apparat nicht elektromagnetischen Feldern (Elektromotoren,
Haushaltgeräten) aus. Die Sprachqualität könnte beeinträchtigt werden. Vermeiden Sie einen Standort in unmittelbarer Nähe von Computer, Radio-, TV-, Videogeräten und anderen Telefonapparaten, um Störungen zu vermeiden.
Benutzen Sie Ihr Gerät nicht in explosionsgefährdeten Räumen.
Die Version mit Explosionsschutz erfüllt die Forderungen gemäss Eex ib IIC T4.
Benutzen Sie das Telefon nicht in der Nähe von Sprengarbeiten. Beachten Sie die
Einschränkungen und halten Sie sich an die einschlägigen Vorschriften.
Wartung
Verwenden Sie ausschliesslich Originalzubehör. Installationen und Reparaturen
sind immer durch den dafür qualifizierten Fachmann ausführen zu lassen.
Berühren Sie die Ladekontakte nicht mit spitzen, metallischen und/oder fettigen
Gegenständen.
Reinigen Sie Ihr Gerät mit einem weichen, leicht feuchten oder antistatischen
Tuch. Verwenden Sie keine Reinigungsmittel oder andere chemischen Substanzen.
4
20310995de_ba_a0
Deutsch
Sicherheitshinweise
Wichtige Information
Damit niemand mit anderen Handgeräten auf Ihre Kosten telefonieren kann,
findet zwischen Funkeinheit und Handgerät ständig ein Kennungsaustausch statt.
Stimmen die Kennungen nicht überein, wird die Verbindung abgebrochen bzw. gar nicht
erst aufgebaut.
Tastatur sperren/entsperren
Ihr Handgerät können Sie gegen das versehentliche Betätigen von Tasten sperren. Anrufe
können Sie trotzdem mit der Gesprächstaste entgegennehmen. Vor abgehenden Gesprächen ist die Tastatur zu entsperren.
Code/Passwort ändern
Nach dem erstmaligen Einschalten des Handgeräts hat der Code/das Passwort den Wert
"0000". Es wird empfohlen, sofort eine persönliche Kennzahl aus 2 bis 10 Ziffern zu
definieren, um die persönliche Einstellung Ihres Handgeräts und die darin gespeicherten
Daten vor unbefugter Benutzung zu schützen.
Akku
Im Lieferumfang des Handgeräts ist ein wiederaufladbarer Akku enthalten.
Für die Version mit Explosionsschutz darf nur der mitgelieferte Akku verwendet
werden.
•
Akku nicht ins Wasser tauchen, auch nicht ins Feuer werfen.
•
Für die Lademulde nur das mitgelieferte Steckernetzgerät verwenden.
•
Vor der Erstinbetriebnahme muss der Akku mindestens 1 Stunde ohne Unterbrechung aufgeladen werden.
Hinweise
• Der Akku kann während des Aufladens warm werden; dies ist ein normaler
und ungefährlicher Vorgang.
• Der Akku erreicht erst nach einigen Tagen Gebrauch seine volle Kapazität
und damit auch die volle "Bereitschafts- und Gesprächszeit".
Bei längerer Ausserbetriebnahme durch Stromabschaltung (z.B. bei Urlaub), ist das
Handgerät (bzw. der Akku) vor Wieder-Inbetriebnahme zu laden.
Defekte Akkus bitte der richtigen Entsorgung zuführen (kein Hausmüll).
20310995de_ba_a0
5
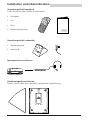
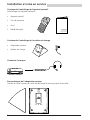
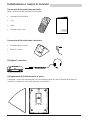
Installation und Inbetriebnahme
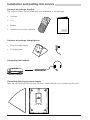
Verpackungsinhalt Handgerät
In der Verpackung des Gerätes sind enthalten:
•
Handgerät
•
Clip
•
Akku
•
Bedienungsanleitung
Bedienungsanleitung
Mode d'emploi
Istruzioni per l'uso
Operating instructions
Verpackungsinhalt Lademulde
•
Steckernetzgerät
•
Lademulde
Sprechgarnitur anschliessen
Steckernetzgerät anschliessen
Führen Sie das Kabel durch die dafür vorgesehene Zugentlastung.
6
20310995de_ba_a0
Deutsch
Installation und Inbetriebnahme
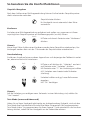
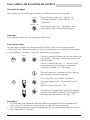
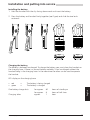
Einsetzen des Akkus
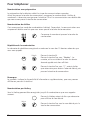
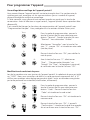
1. Handgerät mit Clip nach unten halten und Akku einsetzen.
2. Akku und Handgerät fest zusammendrücken (siehe Abbildung) und die beiden Riegel
nach aussen schieben.
entriegelt
verriegelt
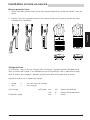
Laden des Akkus
Im Lieferzustand ist der Akku nicht geladen. Zum Laden muss das Handgerät in die Lademulde gelegt werden. Ist ein zweiter Akku vorhanden, kann dieser ohne Handgerät in der
Lademulde geladen werden, während man mit dem anderen im Handgerät unterwegs ist.
Leuchtanzeige an der Lademulde:
•
•
rot
grün
=
=
Akku wird geladen
Akku ist geladen
Eine Akkuladung reicht für
Die Ladezeit beträgt
20310995de_ba_a0
ca.
ca.
ca.
80
8
1
Stunden "Bereitschaft" bzw.
Stunden "Telefonieren"
Stunde
7
Bevor Sie das erste Mal telefonieren
Display-Sprache einstellen
Normalerweise ist die im Verkaufgebiet gesprochene Sprache eingestellt. Falls Sie eine andere Sprache bevorzugen, können Sie unter mehreren Sprachen wählen.
*Sprache
¥
M
Ok
C
Im Programmiermodus M-Taste so oft drücken
bis "*Sprache" erscheint (achten Sie dabei auf
das "*"-Zeichen bei einer Fremdsprache). Mit
Foxtaste unter "Sprache" die aktuelle Sprache
aufrufen. Foxtaste unter "¥" so oft drücken bis
die gewünschte Sprache angezeigt wird.
Mit Foxtaste unter "Ok" gewählte Sprache
bestätigen. Mit der C-/End-Taste gelangt man
wieder in den Ruhezustand.
An PBX-System anmelden
Sie können Ihr Handgerät an bis zu 4 verschiedenen PBX-Systemen (A, B, C, D) anmelden.
Somit sind Sie auch dann via Ihr Handgerät erreichbar, wenn Sie sich in einer Filiale Ihrer
Firma aufhalten.
System
Im Programmiermodus M-Taste so oft drücken
bis "System" erscheint. Foxtaste unter "System"
drücken. Im Display wird "Auto" oder das aktuelle System (A, B, C oder D) angezeigt.
Lösch.
M-Taste drücken. Erscheint beispielsweise "Anmelden: A" und "Löschen", so ist das Handgerät
am PBX-System "A" angemeldet (mit der
Foxtaste unter "Löschen" könnte die Anmeldung
gelöscht werden).
¥
Mit der Foxtaste unter "¥" kann das Handgerät
an drei weiteren PBX-Systemen (B, C oder D) angemeldet werden. Die Anzeige wechselt dann
auf "Anmelden: B (C oder D)" und "Neu". Mit
der Foxtaste unter "Neu" und "Home" wird das
Handgerät an System "B" angemeldet (sofern
dieses verfügbar und erlaubt ist).
M
M
Neu
8
Home
20310995de_ba_a0
Neu
GAP
1
2
3
4
5
6
7
8
9
0
Ok
Mit einem "Authentication Code" kann das
Handgerät auch an einem fremden PBX-System
mit GAP (Generic Access Profile) angemeldet
werden.
Foxtaste unter "Neu" und "GAP" drücken, nach
"AC: _____" den Authentication Code eingeben
und mit Foxtaste unter "Ok" bestätigen.
GAP-Anmeldung, Kompatibilität mit anderen DECT-Produkten
Ascotel DECT unterstützt alle Basis-Telefonie-Leistungsmerkmale, wie sie im Standard des
Generic Access Profile (GAP) definiert sind (Ausgabe Ende 1997). Hierzu gehören Auf- und
Abbau abgehender und ankommender Verbindungen, Rückfrage, Frequenzwahl (DTMF)
und */#-Prozeduren. Das heisst:
• Ihr DECT-Systemendgerät kann in PBX anderer Hersteller angemeldet und verwendet
werden. Voraussetzung für die Nutzung aller im GAP-Standard definierten BasisLeistungsmale ist, dass diese in der betreffenden PBX voll implementiert sind.
• DECT-Handgeräte anderer Hersteller, die den GAP-Standard erfüllen, können auch in
Ihrer Anlage angemeldet und verwendet werden. Sie bieten aber nur die durch den
GAP-Standard eingeschränkte Funktionalität und nicht die gleiche Qualität der Funkverbindung. Insbesondere die SW für das Mobility Management mit Handover/
Roaming ist nahezu zu 100% vom benutzen Handgeräte abhängig und kann nicht
optimal auf Ihre Anlage abgestimmt sein.
PBX-System einstellen
System
Im Programmiermodus M-Taste so oft drücken bis
"System" erscheint. Foxtaste unter "System"
drücken. Im Display wird "Auto" oder das aktuelle System (A, B, C oder D) angezeigt.
Ok
Mit der Foxtaste unter "¥" das gewünschte
System oder "Auto"wählen und mit "Ok"
bestätigen. (Wenn mehr als 1 System verfügbar
ist, nimmt das Handgerät bei "Auto" autom. die
Verbindung zu dem System mit der besten Funkverbindung auf).
M
¥
Hinweise
• Mit "Long Click 1" (min. 2 Sekunden) kann das Handgerät auf das nächste verfügbare
PBX-System (A, B, C oder D) umgeschaltet werden. Sofern die Umschaltung nicht auf
"Auto" steht, ist die manuelle Umschaltung des PBX-Systems zwingend, damit Ihr
Handgerät im neuen PBX-System funktionsbereit ist.
• Mit "Long Click 2" erfolgt die Anzeige der International Portable Equipment Identity
(IPEI) und des PARK (Portable Access Right Key).
• Mit "Long Click 5" erfolgt die Anzeige der SW-Versionsnummer des Handgeräts mit
Datum.
20310995de_ba_a0
9
Deutsch
Bevor Sie das erste Mal telefonieren
So telefonieren Sie
Anruf entgegennehmen
Auf dem Handgerät wird ein Anruf signalisiert.
Befindet sich das Handgerät ausserhalb der Lademulde, beantworten Sie den Anruf durch drükken der Gesprächstaste.
oder
Das Handgerät befindet sich in der Lademulde.
Der Anruf wird beim Herausnehmen direkt beantwortet (siehe "So programmieren Sie Ihren
Apparat", "Direkt beantworten").
Anruf übernehmen
Unter "Übernehmen" bietet Ihnen das System die Menüpunkte "Teilnehmer (Tln)",
"Zentralwecker/Ringsignal (Ring)" und "Personensuchanlage (Such)" an. Um zum Beispiel
einen Anruf zu einem Anschluss eines anderen gerade abweseneden Teilnehmers mit Ihrem Handgerät zu beantworten, ist die M-Taste so oft zu drücken bis "Übernehmen" erscheint. Die Foxtaste an dieser Stelle drücken, "Teilnehmer" wählen und die Nummer des
gerufenen Anschlusses eingeben, um den Anruf zu beantworten.
Gespräch
Während eines Gesprächs können Sie mit der M-Taste weitere Funktionen ausführen, wie
z.B. eine Rückfrage einleiten, das Mikrofon ausschalten ("Mic mute"), die Lautstärke im
Hörer von "Leise" auf "Laut" (oder umgekehrt) schalten.
M
M-Taste ein oder mehrmals drücken, um weitere
Funktionen auszuführen.
Gespräch beenden
Ein Gespräch wird durch das Drücken der Gesprächstaste oder durch das Zurücklegen des
Handgerätes in die Lademulde beendet. Selbstverständlich kann auch der Gesprächspartner die Verbindung beenden. Das Handgerät nimmt kurze Zeit danach den Ruhezustand
ein.
Hörerlautstärke einstellen
Die Lautstärke kann via Menü auf "Laut" oder "Leise" eingestellt werden.
Leise
M
Laut
M-Taste so oft drücken bis "Laut" erscheint.
Foxtaste unter "Laut" drücken.
Hinweis
Die vorgenommene Einstellung bleibt auch nach dem Gesprächsende beibehalten.
10
20310995de_ba_a0
Lauthören
Mit der Lauthöreinrichtung können Informationsdienste, z.B. Devisenkurse, abgefragt und
von mehreren Personen im Raum gemeinsam abgehört werden.
Nach dem Verbindungsaufbau die Lautsprechertaste drücken und die gewünschte Lautstärke
einstellen.
Hinweis
Das Mikrofon wird beim Einschalten des Lauthörens automatisch ausgeschaltet.
20310995de_ba_a0
11
Deutsch
So telefonieren Sie
So telefonieren Sie
Wählen mit Wahlvorbereitung
Die Wahlvorbereitung verringert die Gefahr von falschen Verbindungen.
Ohne vorher die Gesprächstaste zu drücken, die gewünschte Nummer eingeben. Eingabe
überprüfen und eventuell mit C-Taste korrigieren. Gesprächstaste drücken, erst jetzt wird
der betreffende Anschluss gerufen.
Ziffernwahl
Dies entspricht dem gewohnten Wahlvorgang, der Verbindungsaufbau wird aber erst mit
dem Drücken der Gesprächstaste eingeleitet.
1
2
3
4
5
6
7
8
9
Ziffern eingeben und Gesprächstaste drücken.
0
Wahlwiederholung
Im Wahlwiederholungsspeicher befinden sich die Nummern und evtl. die Namen der 10
zuletzt gerufenen Teilnehmer.
Wahlw.
M
¥
M-Taste drücken.
Foxtaste unter "Wahlwiederholung" drücken.
Die Nummer und eventuell der Name des zuletzt
gerufenen Teilnehmers wird angezeigt.
Foxtaste unter "¥" so oft drücken bis
die gewünschte Teilnehmernummer erscheint.
Gesprächstaste drücken.
Hinweis
Das i-Symbol verweist auf Zusatzinformation. Sie kann mit der i-Taste abgefragt werden.
Wahl mit Hotkey
Unter dem Hotkey können bis zu 6 Namen/Nummern von Teilnehmern abgelegt
werden, mit denen Sie häufig telefonieren.
Den Hotkey so oft drücken bis der gewünschte
Name angezeigt wird.
Meier
Foxtaste unter dem betreffenden Namen und danach Gesprächstaste drücken.
12
20310995de_ba_a0
Wahl mit Namen aus einer Kartei
Es gibt bis zu drei Telefonverzeichnisse (Karteien); ein internes Verzeichnis (mit allen an der
PBX angeschlossenen Teilnehmern), eine Liste mit Kurzwahlnummern und eine Privatkartei. Mit dem Teilnehmernamen kann die gewünschte Verbindung aufgebaut werden,
ohne die zugehörige Nummer einzugeben.
M-Taste drücken. Foxtaste unter ABC drücken;
es erscheint das Menü für die Wahl der Kartei.
("Alle" sucht in allen Karteien).
Die Initialen von Nachnamen und Vornamen eingeben,- z.B. E # A für Einstein Albert.
ABC
M
1
2
3
4
5
6
7
8
9
0
¥
Mit Foxtaste unter "¥" bis zum gewünschten
Namen blättern und mit der Gesprächstaste den
Wahlvorgang starten.
Hinweis
Das Eingeben der Initialen ist die einfachste Art, eine in einer Kartei gespeicherte Nummer
zu wählen; Sie brauchen weder die Telefonnummer noch die Kurzwahlnummer zu kennen.
Beispiel:
ABC
M
DE F
AB C
2
1
2x
1x
Einstein Albert:
Taste 2: zweimal
#-Taste: einmal (erzeugt ein Leerzeichen.)
Taste 1: einmal
1x
Wenn nur der Nachname bekannt ist:
ABC
M
DE F
GH I
MNO
2
3
5
2x
3x
2x
1
...
etc.
C
In Wahlvorbereitung eingegebene Nummern
oder Namen korrigieren Sie mit der Korrekturtaste (letztes Zeichen löschen).
C
Ein "Long Click" der C-Taste beendet eine begonnene Wahlvorbereitung.
... 9
Natürlich können Sie mit Ihrem Handgerät auch
auf herkömmliche Art wählen: Gesprächstaste
drücken und Nummer wählen.
Warten Sie bei der Eingabe zwischen zwei Ziffern
mehr als 10 Sekunden, wird die Wahl automatisch abgebrochen.
20310995de_ba_a0
13
Deutsch
So telefonieren Sie
So telefonieren Sie
Anrufliste
Ihr Handgerät speichert automatisch die Nummern der letzten 10 unbeantworteten
Anrufe in der Anfrufliste. Das i-Symbol im Display macht Sie auf die unbeantworteten Anrufe aufmerksam. Sie können die Nummern abfragen und die entsprechenden Personen
über diese Liste zurückrufen.
Anrufliste
¥
Löschen
i-Taste so oft drücken bis "Anrufliste" erscheint.
Foxtaste unter "Anrufliste" drücken und mit
Foxtaste unter "¥" bis zur gewünschten
Nummer blättern.
Gesprächstaste drücken, um die im Display
angezeigte Nummer anzurufen.
Foxtaste unter "Löschen" drücken, löscht den
Eintrag aus der Anrufliste.
Mikrofon ausschalten
Während eines Gesprächs möchten Sie mit einer anderen Person in Ihrem Büro ein paar
Worte wechseln. Dazu können Sie das Mikrofon Ihres Handgeräts ausschalten.
Mikro
Foxtaste unter "Mikrofon" drücken. Das Mikrofon ist ausgeschaltet (Im Display erscheint das
Symbol " ").
Mikro
Foxtaste unter "Mikrofon" nochmals drücken,
um das Mikrofon wieder einzuschalten.
Diskretruf einschalten
An einer Sitzung kann ein Anruf auf das Handgerät stören. Das Einschalten des Diskretrufs bewirkt, dass ein Anruf nur mit einem einzigen Rufton akustisch signalisiert wird. Sie
können den Anrufer aufgrund der Display-Anzeige identifizieren und entscheiden ob Sie
den Anruf beantworten wollen. Wenn nicht, wird er in die Anrufliste eingetragen. Das
i-Symbol im Display wird Sie später daran erinnern. Der Diskretruf bleibt solange eingeschaltet, bis er bewusst wieder ausgeschaltet wird. Auch daran erinnert Sie das i-Symbol
im Display.
Diskret
M
M-Taste so oft drücken bis "Diskretruf" erscheint. Durch das Drücken der Foxtaste unter
"Diskretruf", wird dieser eingeschaltet.
Hinweis
Der Diskretruf kann auch während eines Anrufs eingeschaltet werden. Bei jedem Anruf
erscheint auf dem Display der Menüpunkt "Diskretruf". Der Rufton (nur der Ton, nicht der
eigentliche Anruf) wird ausgeschaltet, sobald der Diskretruf eingeschaltet wird.
14
20310995de_ba_a0
Diskretruf ausschalten
Zurückst.
i-Taste so oft drücken bis im Display "Diskretruf"
und "Zurückstellen" erscheint.
Foxtaste unter "Zurückstellen" drücken; der
Diskretruf ist ausgeschaltet.
Verbindung parken
Während eines Gesprächs kann ein dritter Teilnehmer bei Ihnen "Anklopfen". Wenn sie
diesen Anruf beantworten, geht die Verbindung zu Ihrem ersten Gesprächspartner in
"Haltung". Bevor Sie die zweite Verbindung weitervermitteln können, müssen Sie die
gehaltene Verbindung parken.
2.–Gesp
Parken
M
Foxtaste unter "2._Gespräch" drücken, um die
Verbindung zum gehaltenen Gesprächspartner
wieder herzustellen.
M-Taste so oft drücken bis "Parken" angezeigt
wird. Foxtaste unter "Parken" drücken, um die
aktuelle Verbindung zu parken.
2.–Gesp
Foxtaste unter "2._Gespräch" drücken, um zum
zweiten Gesprächspartner zu wechseln. Nun
können Sie ihn weitervermitteln.
Zurückn.
Foxtaste unter "Zurücknehmen" drücken, um die
Verbindung zum wartenden Gesprächspartner
wieder herzustellen.
Hinweis
Im Unterschied zu einer gehaltenen Verbindung, während welcher beide
verfügbaren Gesprächskanäle belegt sind, wird für das Parken kein Gesprächskanal benötigt. Dies hat den Vorteil, dass Sie den anklopfenden Teilnehmer (falls nötig) weiter verbinden können. Erscheint [P], so ist bereits eine Verbindung geparkt.
Makeln
Nach dem Aufbau einer Rückfrageverbindung können Sie zu Ihrem ursprünglichen Gesprächspartner wechseln, ohne die Rückfrageverbindung zu beenden, d.h. Sie können
zwischen Ihren beiden Gesprächspartnern beliebig oft wechseln (makeln).
20310995de_ba_a0
2.–Gesp
Foxtaste unter "2._Gespräch" drücken, um zum
1. Gesprächspartner zu wechseln.
2.–Gesp
Foxtaste unter "2._Gespräch" drücken, um die
Verbindung zum Rückfragepartner wieder durchzuschalten usw. (so oft wie gewünscht oder
notwendig).
15
Deutsch
So benutzen Sie die Komfortfunktionen
So benutzen Sie die Komfortfunktionen
Gespräch übergeben
Nach dem Aufbau einer Rückfrageverbindung können Sie Ihre beiden Gesprächspartner
direkt miteinander verbinden.
Gesprächstaste drücken.
Ihr Handgerät nimmt automatisch den Ruhezustand ein.
Konferenz
Sie haben eine Rückfrageverbindung aufgebaut und wollen nun zusammen mit Ihrem
ursprünglichen Gesprächspartner ein Konferenzgespräch (zu dritt) führen.
Konf.
M-Taste und danach Foxtaste unter "Konferenz"
drücken.
M
Hinweis
Keine Angst! Beim Aufbau einer Konferenz werden keine Gespräche unterbrochen; Verbindungen werden allein mit der C-Taste oder der Gesprächstaste unterbrochen!
Anrufumleitung
Sie können Anrufe auf einen anderen Apparat bzw. auf denjenigen der Telefonistin umleiten, oder eine Nachricht hinterlassen.
Uml.
¥
M
Ok
1
2
3
4
5
6
7
8
9
0
M-Taste so oft drücken bis "Umleiten" erscheint
und Foxtaste unter "Umleiten" drücken.
Mit Foxtaste unter "¥" die Umleitungsart wählen
(z.B. Umleiten wenn besetzt oder Rufweiterschaltung).
Umleitziel wählen und ggf. neue Rufnummer
eingeben.
Mit "Ok" bestätigen.
.
Hinweis
Soll die Umleitung nur erfolgen wenn Sie bereits in einer Verbindung sind, wählen Sie
"Uml. besetzt".
Twin Mode (anwesend/abwesend)
Haben Sie zu Ihrem Handgerät gleichzeitig ein drahtgebundenes Endgerät, wird mit dem
Twin Mode Ihre Erreichbarkeit auf einfachste Weise sichergestellt. Bei programmiertem
Twin Mode (siehe "So programmieren Sie Ihren Apparat") wird automatisch die Anrufumleitung aktiviert, sobald Sie das Handgerät aus der Lademulde nehmen.
16
20310995de_ba_a0
Nachricht hinterlassen
Sie verlassen Ihren Arbeitsplatz (ohne Handgerät) und möchten Anrufern eine Nachricht
hinterlassen.
Uml.
¥
M-Taste so oft drücken bis "Umleiten" erscheint
Foxtaste unter "Umleiten" und danach unter
"¥" drücken bis im Display "Uml. zu Nachr."
(Umleiten zu Nachricht) erscheint.
Ok
¥
Foxtaste unter "Ok" drücken und danach
unter "¥" so oft drücken bis eine passende
Nachricht angezeigt wird (i-Symbol in
Display) .
M
i-Taste ein- oder mehrmals drücken, um die
ganze Nachricht anzuzeigen.
Mit C-Taste und Tastenblock Meldung editieren
(falls nötig, siehe "Wahl mit Namen").
Foxtaste unter "Ok" drücken.
Ok
C
1
2
3
4
5
6
7
8
9
0
Hinweis
Sie können die Standardnachricht mit der C-Taste auch ganz löschen und eine eigene
Nachricht schreiben.
Verlangter Rückruf (Rückruf ausführen)
Ein Teilnehmer hat eine wichtige Mitteilung für Sie. Trotz Ihres Handgeräts konnte er Sie
nicht erreichen. Von seinem Systemendgerät aus fordert er einen Rückruf von Ihnen an.
Im Display Ihres Handgeräts wird "Bitte Rückr." und "Anruf" "Lösche" angezeigt.
Anruf
Lösche
Foxtaste unter "Anrufen" drücken, um dem
Anrufer zurückzurufen oder unter "Löschen",
falls Sie den Rückruf nicht mehr für sinnvoll oder
notwendig halten.
Personensuche
Einen Teilnehmer nach einem erfolglosen Anrufversuch (oder direkt) via
Personensuchanlage suchen.
Such
M
Ok
20310995de_ba_a0
1
2
3
4
5
6
7
8
9
0
M-Taste so oft drücken bis "Suchen" erscheint.
Foxtaste an dieser Stelle drücken, die
Anschlussnummer des gesuchten Teilnehmers
eingeben und mit "Ok" bestätigen.
17
Deutsch
So benutzen Sie die Komfortfunktionen
So benutzen Sie die Komfortfunktionen
Rückruf verlangen
Sie bitten einen besetzten oder nicht antwortenden Teilnehmer, Sie zurückzurufen.
Rückr.
Zurückst.
Foxtaste unter "Rückruf" drücken. Sie hören den
Bestätigungston. Im Display erscheint "Anruf erwartet von Nummer nnn" und "Zurückstellen"
Mit der Foxtaste unter "Zurückstellen" kann die
Funktion "Rückruf verlangen" desaktiviert werden.
Hinweis
Gleichzeitig kann nur ein Rückruf aktiviert werden.
Meldung senden
In der PBX sind Standardmeldungen gespeichert. Sie können eine davon auswählen,
eventuell ergänzen oder ändern und an den betreffenden Teilnehmer oder eine Gruppe
senden.
Meld.
¥
M
Menütaste so oft drücken bis "Meldung" erscheint. Foxtaste unter "Meldung" drücken.
Foxtaste unter "¥" so oft drücken bis eine passende Meldung angezeigt wird
(i-Symbol in Display).
i-Taste ein- oder mehrmals drücken, um den Rest
der Meldung anzuzeigen.
C
1
2
3
4
5
6
7
8
9
Ok
Mit C-Taste und Tastenblock Meldung editieren
(falls nötig, siehe "Wahl mit Namen").
Foxtaste unter "Ok" drücken.
Ok
Nummer des Teilnehmers/der Guppe wählen, für
den die Meldung bestimmt ist. Foxtaste unter
"Ok" drücken, um die Meldung zu senden.
0
1
2
3
4
5
6
7
8
9
0
Hinweise
• Die Prozedur kann auch mit "Wahlvorbereitung" eingeleitet werden, d.h. zuerst die
Nummer eingeben und anschliessend die Meldung wählen.
• Sie können die Standardmeldung mit der C-Taste natürlich auch ganz löschen und
eine eigene Meldung schreiben.
18
20310995de_ba_a0
Deutsch
So benutzen Sie die Komfortfunktionen
Meldung lesen
Haben Sie eine Meldung erhalten, werden im Display "Meldung", die Nummer des Absenders sowie die Menüpunkte "Lesen" und "Löschen" angezeigt.
Lesen
Foxtaste unter "Lesen" drücken. Das "+"
Zeichen besagt, dass mehr Information vorhanden ist.
i-Taste drücken, um die nächste Zeile zu sehen.
Am Ende der Meldung wechselt die Display-Anzeige wieder zu den anfänglichen Menüpunkten "Lesen" und "Löschen".
Lösche
Foxtaste unter "Löschen" drücken.
Hinweis
Um weitere (evtl. vorhandene) Meldungen angezeigt zu erhalten, muss die gelesene
Meldung gelöscht werden.
Durchsage
Von Ihrem Handgerät aus können Sie Durchsagen zu einem oder mehreren internen
Teilnehmern machen, vorausgesetzt, dass deren Systemendgeräte über eine Lautsprecheinrichtung verfügen.
Durchs
M-Taste so oft drücken bis "Durchsage" erscheint. Foxtaste an dieser Stelle drücken.
Gruppe
Gewünschte Teilnehmernummer eingeben.
(Oder Foxtaste unter "Gruppe" drücken und
Gruppen-Nummer eingeben; für Durchsage zu
vordefinierter Teilnehmergruppe).
M
1
2
3
4
5
6
7
8
9
0
Ok
20310995de_ba_a0
Foxtaste unter "Ok" drücken und Durchsage
machen.
19
So benutzen Sie die Komfortfunktionen
Transparentmodus einschalten (Frequenzwahl DTMF)
Während einer Verbindung kann mit Frequenzwahl eine Funktion, z.B. die Fernabfrage eines Anrufbeantworters aktiviert werden.
1
2
3
4
5
6
7
8
9
0
"Long Click" der *-Taste bis "Transparent" erscheint. Zeichenfolge zur Aktivierung der gewünschten Funktion eingeben.
Nach erfolgreicher Ausführung:
C
C-Taste drücken, um den Transparentmodus
wieder auszuschalten.
oder
Zurückst.
Foxtaste unter "Zurückstellen" drücken.
Rückfrage einleiten/abschliessen
Während eines Gesprächs stellt Ihr Partner eine Frage, die Sie nicht beantworten können.
Sie wollen einen anderen Mitarbeiter um Auskunft bitten, ohne die aktuelle Verbindung
zu beenden.
Rückf.
1
2
3
4
5
6
7
8
9
0
Nummer des Teilnehmers eingeben, den Sie um
Rat bitten wollen.
Foxtaste unter "Rückfrage" drücken; der Teilnehmer wird gerufen (die bisherige Verbindung wird
gehalten).
Nach Erhalt der gewünschten Auskunft:
C
C-Taste drücken, um die Verbindung zum
wartenden Gesprächspartner wieder durchzuschalten.
Hinweis
Wird nach einer Rückfrage die Gesprächstaste gedrückt, so ertönt 10s lang ein Dauerruf.
Während des Dauerufs die Gesprächstaste drücken, um die Verbindung zum wartenden
Gesprächspartner wieder herzustellen.
20
20310995de_ba_a0
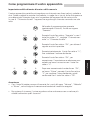
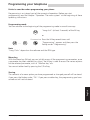
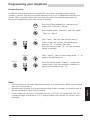
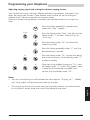
Was Sie beim Programmieren beachten müssen
Die Programmierung ist Bestandteil des Bedienkonzeptes; bevor Sie mit dem Programmieren beginnen, lesen Sie bitte das Kapitel "Bedienkonzept" am Anfang dieser Bedienungsanleitung.
Programmiermodus
Zum Anfang des Programmiermodus gelangt man auf 2 Arten:
M
"Long Click" (min. 2 Sekunden) der Menütaste.
oder
Prog.
M … M
Menütaste mehrmals drücken bis "Programmieren" angezeigt wird. Foxtaste unter "Programmieren" drücken.
Hinweis
"Long Clicks" sind von der Software und dem PBX-Typ abhängig.
Menü-Taste
Mit der Menütaste bewegen Sie sich auf zwei Ebenen: zunächst in den Programmiermenüs (PRG 1-…; anwählen des gewünschten zu programmierenden Bereichs, z.B.
"Tasten") und anschliessend auf der Ebene der Unterfunktionen (z.B. Belegen einer
Nummerntaste). Beide Ebenen verlassen Sie jeweils durch Drücken der C/End-Taste oder
der Geprächstaste.
Speichern
Ein von Ihnen eingegebener oder geänderter Inhalt unter einem Menüpunkt ist dann
gespeichert, wenn Sie die Foxtaste unter "Ok" drücken. Drücken Sie eine andere Taste,
wird die von Ihnen vorgenommene Programmierung nicht gespeichert.
20310995de_ba_a0
21
Deutsch
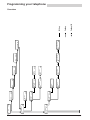
So programmieren Sie Ihren Apparat
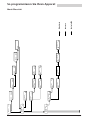
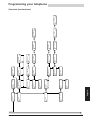
22
11:55
PRG-Menü 2
Tasten
Mobil
PRG-Menü 1
Kartei
Text
10.Apr
Wahlw.
Ladekontakt
Prog.
Beantw.
Name:_
Neu
Suchen
Ruhetext:_
Ok
ABC
ABC
Umleiten
Ok
Direkt:
Ok
¥
Nein
¥
Teilnehmer
Ok
¥
Kn:Name eing.
Ok
ABC
Lösche
Such
Kn:Nr.eing.
Ok
ABC
übern.
Peter
Lesen
Diskret
032 624 21 11
Ändern
n¥
Uml.
Durchs
Sp1:+1N#PX
Ok
ABC
Meld.
Sp2:I#21PX
Ok
ABC
Prog.
Foxtaste (Ok)
Foxtaste
Menütaste
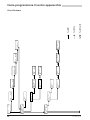
So programmieren Sie Ihren Apparat
Menü Übersicht
20310995de_ba_a0
20310995de_ba_a0
¥
¥
Hotkey
Ok
Foxtaste
Ok
Quittungston
Ok
¥
¥
Tastensperre
Ok
Nein
¥
Ja
¥
Ton:
Ok
Fox2
Ton:
Ok
Foxtaste:
Fox1
¥
Fn:Löschen
Ok
¥
¥
¥
Nn:Nummer
Ok
Fn:Funktion
Ok
Fn:Löschen
Ok
¥
¥
Fn: Funktion
Ok
Anrufschutz
Ok
Sp1:Nr. eing.
Ok
ABC
¥
Nn: Nummer
Ok
Ja
HotkeyPrg:
Hk3
Hk4
Sperre aus?
Nein
HotkeyPrg:
Hk1
Hk2
30. Juli
13:40
Entsperren
Anrufschutz
Ok
¥
Sp1:Nr. eing.
Ok
ABC
Sp1:I*26PX
Ok
ABC
Sp1:Name
Ok
ABC
HotkeyPrg:
Hk5
Hk6
Sp1:I*26PX
Ok
ABC
Sp1:Name
Ok
ABC
Sp1:Name
Ok
ABC
Sp1:Name
Ok
ABC
Sp2:I#26PX
Ok
ABC
Sp2:I#26PX
Ok
ABC
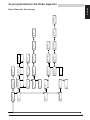
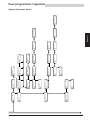
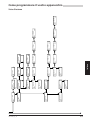
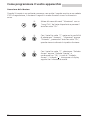
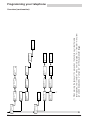
Menü Übersicht, Fortsetzung
Deutsch
So programmieren Sie Ihren Apparat
23
24
¥
¥
Normalruf
Ok
Diskretruf
Ok
1)
¥
¥
Sperren
Ok
Deutsch
Ok
¥
Ausschalten
Ok
Alt: ****
Ok
Zurück
Ruflautst.
Ok
Ruflautst.
Ok
1ß
3ß
Code: ****
Ok
Zurück
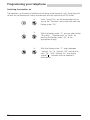
Neu ****
Ok
Zurück
Rufmelodie
Ok
Rufmelodie
Ok
frei
Ok
4ß
4ß
¥
Bestät.: ****
Ok
Zurück
Ruftempo
Ok
Ruftempo
Ok
Prog. gesp.
Ok
1) Ausserhalb des Funkbereichs erscheint hier das Menu "Vibrator".
Das "Vibrator" Menü kann auch mit einem "Long Click"
der Lautsprechertaste aufgerufen werden.
PRG-Menü 4
Ruf
*Sprache
PRG-Menü 3
Gerät
Code
2ß
3ß
¥
gesperrt
Ok
¥
So programmieren Sie Ihren Apparat
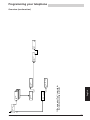
Menü Übersicht, Fortsetzung
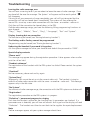
20310995de_ba_a0
20310995de_ba_a0
1)
A
¥
Anmelden:
><
Test
Look Show_HO
A
¥
System:
Ok
B
¥
Show_HO: None
Ok
¥
Anmelden:
Neu
1) Der Menüpunkt "Test" ist dem Installateur
vorbehalten
PRG-Menü 5
Test
System
Anmelden:
B
Home
GAP
AC:
Ok
Zurück
Menü Übersicht, Fortsetzung
Deutsch
So programmieren Sie Ihren Apparat
25
So programmieren Sie Ihren Apparat
Twin Mode (anwesend/abwesend)
Haben Sie zu Ihrem Handgerät gleichzeitig ein drahtgebundenes Endgerät, wird mit dem
Twin Mode Ihre Erreichbarkeit auf einfachste Weise sichergestellt.
Der Ladekontakt erkennt 2 Zustände:
a)
Handgerät in Lademulde (anwesend)
b)
Handgerät nicht in Lademulde (abwesend)
Aufgrund dieser Zustände wird die automatische Anrufumleitung (AUL) zum Handgerät
ausgeführt, sobald dieses aus der Lademulde genommen wird.
Nach dem Zurücklegen des Handgeräts in die Lademulde ist die Anrufumleitung automatisch wieder ausgeschaltet.
Twin Mode aktivieren
¥
Mobil
Im Programmiermodus M-Taste so oft drücken
bis "Mobil" erscheint. Foxtaste unter "Mobil"
drücken.
Ok
Foxtaste unter "Prog." drücken, danach mit
Foxtaste unter "¥" bis "Twin" blättern und mit
"Ok" bestätigen.
Ok
Bei "TwinNr:" die Anschlussnummer des drahtgebundenen Endgeräts eingeben, das auf das
Handgerät umgeleitet werden soll. Twin Mode
mit Foxtaste unter "Ok" aktivieren.
Mobil
Im Programmiermodus M-Taste so oft drücken
bis "Mobil" erscheint. Foxtaste unter "Mobil"
drücken.
M
Prog.
¥
1
2
3
4
5
6
7
8
9
0
Twin Mode deaktivieren
M
Prog.
¥
Ok
Foxtaste unter "Prog." drücken, danach mit
Foxtaste unter "¥" bis "Keine Funkt." blättern
und mit der Foxtaste unter "Ok" den Twin Mode
deaktivieren.
Hinweise
• Wird am drahtgebundenen Endgerät bewusst eine AUL/RWS zur Sekretärin, zu Voice
Mail oder zum eigenen GSM-Gerät etc. aktiviert, während sich das Handgerät in der
Lademulde befindet, so hat diese eine höhere Priorität als der Twin Mode. Es erfolgt
keine automatische Umleitung zum Handgerät, wenn dieses aus der Lademulde genommen wird. Der Twin Mode wird wieder aktiviert, sobald die am drahtgebundenen
Endgerät aktivierte AUL/RWS zurückgestellt wird.
• Nebst dem Twin Mode können auch andere Funktionen eingestellt werden (siehe
Programmieranleitung "Mobil")
26
20310995de_ba_a0
Privatkartei
Neben dem vorhandenen PBX-Teilnehmer-Verzeichnis und der Kurzwahlliste, können Sie
sich eine private Kartei mit bis zu 30 (00 bis 29) Telefonnummern und Namen anlegen.
Die Einträge können Sie durch das Sperren der Programmierfunktionen Ihres Handgerätes
vor fremdem Zugriff schützen.
M
Im Programmiermodus M-Taste so oft drücken
bis "Kartei" erscheint.
Kartei
Foxtaste unter "Kartei" und anschliessend unter
"Neu" oder "Suchen" drücken.
Neu
Ok
1
2
3
4
5
6
7
8
9
0
Suchen
Ändern
¥
Ok
1
2
3
4
5
6
7
8
9
Bei "Neu" wird die nächste freie Karteikarte angezeigt.
Nummer eingeben und mit "Ok" bestätigen,
Namen eingeben und mit "Ok" speichern.
Bei "Suchen" mit Foxtaste unter "¥" bis zum gesuchten Eintrag blättern.
Foxtaste unter "Ändern" drücken, die gespeicherten Einträge ändern und mit Foxtaste unter
"Ok" speichern.
0
Hinweise
• Wenn eine Karteikarte bereits ausgefüllt ist, wird der aktuelle Eintrag angezeigt. Sie
können diesen selbstverständlich editieren.
• Es ist ratsam zu jeder Nummer den zugehörigen Namen einzugeben; dies ermöglicht
die bequeme Suche und die Wahl mit Namen aus einer Kartei.
• Wird bei einem Anruf die Nummer das Rufenden auf dem Display angezeigt (CLIP), so
sucht das System in den Verzeichnissen und der Privatkartei nach dieser Nummer. Ist
sie bereits mit einem Namen gespeichert, so wird auch der Name angezeigt.
20310995de_ba_a0
27
Deutsch
So programmieren Sie Ihren Apparat
So programmieren Sie Ihren Apparat
Makrosprache
Die Makrosprache ermöglicht verschiedene Funktionen nacheinander unter einer Taste abzulegen.
I
X
P
N
.
Z
R
Belegen
Verbindung abbauen
Pause (1 Sekunde)
In Wahlvorbereitung eingegebene Nummer einsetzen
Steuertastenfunktion
Transparentmodus ein-/ausschalten
Zuletzt gewählte Nummer einsetzen
Beispiele:
I201
Belegen und 201 anrufen
I*21201X
Belegen, Anrufumleitung auf 201 und Verbindung abbauen.
Ruhetext programmieren
Anstelle von Datum und/oder Uhrzeit können Sie für den Ruhezustand Ihres Handgeräts
einen persönlichen Text definieren.
Text
Ok
C
Im Programmiermodus Foxtaste unter "Text"
drücken und Text eingeben (maximal 12 Zeichen).
Foxtaste unter "Ok" drücken, um die Eingabe zu
speichern.
Ruhetext editieren (falls nötig).
Mit der Korrekturtaste (C/End) können die Zeichen links vom Cursor gelöscht werden.
Ok
Nach dem Editieren des Ruhetextes Foxtaste unter "Ok" drücken.
Hinweis
Ein "Long Click" der C/End-Taste (min. 2 Sekunden) bewirkt einen Rücksprung zum vorhergehenden Menü.
28
20310995de_ba_a0
Tastatur sperren/entsperren
Sie können die Tastatur gegen unbeabsichtigtes Betätigen sperren. Anrufe werden signalisiert und können mit der Gesprächstaste entgegengenommen werden. Nach dem Gespräch kann innerhalb von 5s eine abgehende Verbindung aufgebaut werden. Nach 5s
wird die Tastensperre (Variante 1) wieder aktiviert.
M
Im Programmiermodus M-Taste so oft drücken
bis "Tasten" erscheint.
Tasten
Foxtaste unter "Tasten" drücken. Im Display erscheint "Tastensperre".
Ok
Tastensperre mit Foxtaste unter "Ok" aktivieren.
Die Display-Anzeige wechselt zu "Entsperren".
Entsperren
Foxtaste unter "Entsperren" drücken.
Das Handgerät fordert mit "Sperre aus?" eine
Bestätigung, dass die Tastensperre deaktiviert
werden soll.
Ja
Mit "Ja" erscheint das "Ruhe-Display"; das
Handgerät ist wieder betriebsbereit.
Hinweise
• Mit "Long Click 8" (min. 2 Sekunden) kann Variante 1 der Tastensperre ebenfalls
eingeschaltet werden.
•
Mit "Long Click 9" kann Variante 2 der Tastensperre eingeschaltet werden. Diese wird
bei einem Anruf nicht automatisch aufgehoben, sondern muss manuell erfolgen
(siehe oben) , um den Anruf mit der Gesprächstaste entgegennehmen zu können.
20310995de_ba_a0
29
Deutsch
So programmieren Sie Ihren Apparat
So programmieren Sie Ihren Apparat
Hotkey-Programmierung
Der Hotkey ist eine frei programmierbare Taste, unter der bis zu 6 Nummern/Namen oder
Funktionen abgelegt werden können. Mit Hilfe der Makrosprache können Sie ganze
Bedienabläufe speichern.
Nummer/Namen unter dem Hotkey ablegen
Tasten
M
¥
Ok
Foxtaste unter "¥" so oft drücken bis "Hotkey"
erscheint und Foxtaste an dieser Stelle drücken.
Das Menü "Hotkey Programmierung" mit den
Menüpunkten "Hk1" und "Hk2" erscheint im
Display.
Ok
Durch ein-/zweimaliges Drücken der M-Taste die
Speicher "Hk3" und "Hk4" bzw. "Hk5" und
"Hk6" aufrufen.
Den gewünschten Speicher (Hk1…Hk6) mit
Foxtaste wählen.
M
Ok
Ok
1
2
3
4
5
6
7
8
9
Im Programmiermodus M-Taste so oft drücken
bis "Tasten" erscheint.
Foxtaste unter "Tasten"drücken.
Im Menü "Nn : Nummer" nochmals mit "Ok"
bestätigen.
Nummer eingeben und mit "Ok" bestätigen, Namen eingeben und Foxtaste unter "Ok" drücken,
um den Eintrag zu speichern.
0
Hinweis
Ein "Long click" der Hotkey Taste bewirkt den direkten Sprung zur Hotkey-Programmierung.
30
20310995de_ba_a0
Deutsch
So programmieren Sie Ihren Apparat
Funktion unter dem Hotkey ablegen
Gleiches Vorgehen wie unter Nummern/Namen, bis zur Wahl des Speichers Hk1…Hk6,
danach:
¥
Ok
Foxtaste unter "¥" drücken, um das Menü
"Fn : Funktion" aufzurufen und mit "Ok" zu bestätigen.
¥
Ok
Foxtaste unter "¥" so oft drücken bis die gewünschte Funktion angezeigt wird und mit "Ok"
bestätigen.
Ok
Es wird Speicherinhalt 1 (Sp1) für diese Funktion
angezeigt (Funktion aktivieren).
Foxtaste unter "Ok" drücken, um die Funktion
zu speichern.
Ok
Falls gewünscht Namen eingeben und mit "Ok"
bestätigen.
Es wird Speicherinhalt 2 (Sp2) angezeigt (Funktion deaktivieren).
1
2
3
4
5
6
7
8
9
0
Ok
Mit "Ok" wird die Funktion gespeichert.
Hinweise
• In die beiden Speicherplätze werden autom. die entsprechenden Funktionscodes
eingetragen. Bei Bedarf können diese ergänzt/geändert werden.
•
Wird während des Speichervorgangs kein Name eingegeben, wird ein kurzer DefaultName eingesetzt z.B. "Anr.sch." für "Anrufschutz".
•
Ist eine der programmierten Funktionen aktiv, wird dies in der Symbolzeile mit dem
Symbol " " und bei der zugehörigen Funktion mit "|" angezeigt.
•
Ein "Long click" der Hotkey-Taste bewirkt den direkten Sprung zur Hotkey-Programmierung.
20310995de_ba_a0
31
So programmieren Sie Ihren Apparat
Foxtasten Programmierung
Sie können beide Foxtasten auch als frei programmierbare Tasten verwenden. Im Ruhezustand zeigt Ihr Display dann sehr häufig benutzte Nummern oder Funktionen an, die Sie
mit einem einzigen Tastendruck (auf das zugehörige Füchslein) sehr bequem ausführen
können. Ist unter der Foxtaste eine Funktion abgelegt, so wird deren Aktiv-Zustand mit
dem "| " Symbol angezeigt.
Nummern/Namen oder Funktionen unter Foxtaste ablegen
Tasten
M
Im Programmiermodus M-Taste so oft drücken
bis "Tasten" erscheint.
Foxtaste unter "Tasten" drücken.
¥
Foxtaste unter "¥" so oft drücken bis "Foxtaste"
erscheint.
Ok
Fox 1
Fox 2
Foxtaste unter "Ok" drücken und anschliessend
die gewünschte Taste ("Fox 1" oder "Fox 2")
wählen.
Weiter wie unter "Hotkey-Programmierung".
Hinweise
• Ein "Long click" der Foxtaste bewirkt den direkten Sprung zur Foxtasten-Programmierung.
• Wenn beide Foxtasten mit einer Nummer oder Funktion und einem Namen belegt
werden, verschwindet die Qualitätsanzeige.
• Die Qualitätsanzeige bleibt erhalten, wenn bei Foxtaste 1 oder 2 statt eines Namens
mit der # -Taste ein Leerzeichen eingegeben wird.
Tasten-Quittungston
Das Handgerät kann, wenn gewünscht, jeden Tastendruck mit einem kurzen Quittungston bestätigen.
Tasten
M
¥
Im Programmiermodus M-Taste so oft drücken
bis "Tasten" erscheint.
Foxtaste unter "Tasten"drücken.
Ok
Foxtaste unter "¥" drücken bis "Quittungston"
erscheint und mit "Ok" bestätigen.
¥
Ok
Mit Foxtaste unter "¥" "Ton: Ja" oder
"Ton: Nein" wählen.
Foxtaste unter "Ok" drücken, um die Einstellung
zu speichern.
Hinweis
Das Zurücklegen des Handgerätes in die Lademulde wird immer mit einem kurzen Ton
quittiert. Während eines Gesprächs ist die Lautstärke reduziert.
32
20310995de_ba_a0
Direkt beantworten (ohne Geprächstaste)
Ist das Handgerät auf "Direkt" beantworten eingestellt, wird ein Anruf durch das Herausnehmen des Handgeräts aus der Lademulde direkt entgegen genommen, ohne die
Gesprächstaste zu drücken.
Das Zurücklegen des Handgeräts in die Lademulde bewirkt immer das Abbauen einer Verbindung, falls diese nicht vorher mit der Gesprächstaste beendet wurde.
Mobil
Beantw
Im Programmiermodus M-Taste so oft drücken
bis "Mobil" erscheint.
Foxtaste unter "Mobil" und anschliessend unter
"Beantworten" drücken.
¥
Ok
Mit Foxtaste unter "¥" auf "Direkt: Ja" umschalten und diese Einstellung mit Foxtaste unter
"Ok" bestätigen.
M
Handgerät aus-/einschalten
Ausschalten
M
Im Programmiermodus M-Taste so oft drücken
bis "Gerät" erscheint.
Gerät
Foxtaste unter "Gerät"drücken; es erscheint
"Ausschalten".
Ok
Foxtaste unter "Ok" drücken, um das Gerät
auszuschalten.
Die Verbindung zur Funkeinheit wird unterbrochen (keine Displayanzeige).
Hinweise
• Mit "Long Click 0" (min. 2 Sekunden) wird das Handgerät ebenfalls ausgeschaltet.
• Ausserhalb des Funkbereichs versucht das Handgerät immer wieder eine Verbindung
zu einer Funkeinheit herzustellen. Um die Batterie zu schonen, sollte das Gerät ausgeschaltet werden, wenn der Bereich für längere Zeit verlassen wird.
Einschalten
Ja
20310995de_ba_a0
Gesprächstaste drücken und Gerät mit Foxtaste
unter "Ja" einschalten.
33
Deutsch
So programmieren Sie Ihren Apparat
So programmieren Sie Ihren Apparat
Handgerät sperren/entsperren
Sie können Ihr Handgerät gegen unbefugten Gebrauch sperren. Ihr Systemmanager kann
Ihnen Auskunft darüber geben, ob und wenn ja welche Verbindungen (z.B. Notrufnummern) trotz der Sperre gewählt und aufgebaut werden können.
Im gesperrten Zustand können Sie jederzeit Anrufe mit der Gesprächstaste sofort entgegennehmen. Vor abgehenden Gesprächen ist das Handgerät zu entsperren.
Es ist empfehlenswert mit "Prog.: gesp." die Programmierfunktionen Ihres Handgeräts zu
sperren. Damit schützen Sie z.B. die Einträge in Ihrer Privatkartei.
Gerät
M
¥
Ok
1
2
3
4
5
6
7
8
9
0
¥
Im Programmiermodus M-Taste so oft drücken
bis "Gerät" erscheint und anschliessend die
Foxtaste unter "Gerät" drücken; es erscheint
"Ausschalten".
Mit der Foxtaste unter "¥" "Sperren"wählen,
"Ok" drücken und Code (Passwort) eingeben.
Ok
Foxtaste unter "Ok" drücken, um eine PasswortKontrolle zu veranlassen.
Ok
Mit der Foxtaste unter "¥" "frei",
"Prog. gesp." (Programmieren gesperrt) oder
"gesperrt" wählen (mit "frei" wird eine Sperre
deaktiviert), und mit "Ok" bestätigen.
Code/Passwort ändern
Nach dem erstmaligen Einschalten des Handgeräts hat der Code/das Passwort den Wert
"0000". Es wird empfohlen sofort ein persönliches Passwort aus 2 bis zu 10 Ziffern zu definieren, um die persönliche Einstellung Ihres Handgeräts und die darin gespeicherten Daten vor unbefugter Benutzung (ändern, löschen) zu schützen.
Code
M
1
2
3
4
5
6
7
8
9
0
Ok
1
2
3
4
5
6
7
8
9
0
Ok
Ok
1
2
3
4
5
6
7
8
9
0
34
Im Programmiermodus M-Taste so oft drücken
bis "Code" erscheint.
Foxtaste unter "Code" drücken und aktuellen
Code eingeben.
Foxtaste unter "Ok" drücken und neuen Code
eingeben.
Foxtaste unter "Ok" drücken, es erscheint
"Bestät.:" (Bestätigen).
Neuen Code nochmals eingeben und mit
Foxtaste unter "Ok" bestätigen.
20310995de_ba_a0
Ruf und Diskretruf einstellen
Ihr Handgerät kann einen Anruf mit verschiedenen Lautstärken, Rufmelodien und Geschwindigkeiten (Tempo) signalisieren. Sie können die Ihnen zusagende Version wählen,
und erkennen dann leichter, ob ein Anruf für Sie bestimmt ist oder eventuell vom Handgerät Ihres Nachbarn stammt.
Bei "Diskretruf" wird ein Anruf nur mit einem einzigen Rufton akustisch signalisiert.
M
Ruf
¥
Ok
Ok
Im Programmiermodus M-Taste so oft drücken
bis "Ruf" erscheint.
Foxtaste unter "Ruf" drücken und mit Foxtaste
unter "¥" "Normalruf" oder "Diskretruf"
wählen.
Foxtaste unter "Ok" drücken,um das aktuelle
Rufsignal einzuschalten.
ß
Foxtaste unter "ß" so oft drücken bis die
gewünschte Lautstärke erreicht ist.
Ok
ß
Foxtaste unter "Ok" drücken, um die Einstellung
zu speichern und im nächsten Menü mit Foxtaste
unter "ß" eine Melodie wählen.
ß
Ok
Nach dem Speichern der Melodie mit "Ok", im
Menü "Ruftempo" Foxtaste unter"ß" drücken,
um die gewünschte Rufgeschwindigkeit einzustellen und mit Foxtaste unter "Ok" bestätigen.
Hinweise
• Mit der M-Taste können Sie zwischen den Menüpunkten "Ruflautstärke", "Rufmelodie" und "Ruftempo" wechseln, ohne eventuell ausgeführte Änderungen zu
speichern.
• Da der Ruf sehr laut eingestellt werden kann, ist der erste Rufton aus Sicherheitsgründen immer etwas leiser als die folgende Ruftöne.
20310995de_ba_a0
35
Deutsch
So programmieren Sie Ihren Apparat
So programmieren Sie Ihren Apparat
Vibrator einschalten
Der Vibrator macht Sie diskret und sicher auf einen Anruf aufmerksam, falls sie ihn wegen
der lärmigen Umgebung überhören und auch die Anruf-LED nicht beachten.
36
Ok
Mit "Long-Click" der Lautsprechertaste zum
Menüpunkt "Vibrator" springen und Foxtaste
unter "Ok" drücken.
¥
Ok
Mit der Foxtaste unter "¥" können Sie entweder
"Nur Ruf", "Nur Vibrator" oder "Beide" wählen, indem Sie bei der entsprechenden Anzeige
die Foxtaste unter "Ok" drücken.
¥
Ok
Mit der Foxtaste unter "¥" zwischen "Symbol:
Ein" oder "Symbol: Aus" wählen und mit "Ok"
bestätigen. Bei "Symbol: Ein" zeigt das DisplaySymbol " "an, dass der Vibrator eingeschaltet
ist.
20310995de_ba_a0
Verlassen des Funkbereichs
Kurz vor dem Verlassen des Funkbereichs erfolgt ein Warnton. Nach dem Verlassen erverschwindet.
scheint die Meldung "Kein System" und das Antennensymbol
Wird der Funkbereich während eines Gesprächs verlassen, wird dieses zwar unterbrochen,
jedoch die Verbindung nicht sofort abgebaut. Das System versucht dann ca. 20 s lang
eine neue Funkverbindung mit derselben oder einer anderen Funkeinheit herzustellen.
Erst danach wird die Verbindung in der PBX abgebaut.
Ausserhalb des Funkbereichs stehen Ihnen mit der M-Taste folgende Programmierfunktionen zur Verfügung:
"Prog.", "Tasten", "Mobil", "Gerät", "Ruf", "*Sprache", "Test" und "System"
Anzeige im Display, kein Wählton
Möglicherweise ist das Handgerät gesperrt (siehe "Handgerät sperren/entsperren").
Der Hotkey und/oder die Foxtaste lassen sich nicht programmieren
Möglicherweise ist die Programmierung gesperrt (siehe "Handgerät sperren/entsperren").
Entsperren des Handgeräts; Passwort vergessen
Bitten Sie die Telefonistin Ihr Passwort von der Zentrale aus zu überschreiben.
Anzeige im Display
"Bitte warten"
Diese Meldung kann während der Anmeldeprozedur erfolgen. Sie erscheint auch, wenn
ein Gesprächspartner die Verbindung in den Haltezustand gebracht hat.
"Handset unbekannt"
Die Anmeldung des Handgeräts am PBX-System ist misslungen. Bitte den Systemmanager
fragen.
"Überlast"
Keine freien Ressouren, bitte warten und nochmals versuchen.
"System Busy"
Über die aktuelle Funkeinheit kann momentan keine Verbindung aufgebaut werden. Das
Handgerät versucht eine bessere Funkverbindung mit derselben oder einer anderen Funkeinheit herzustellen. Die Meldung erscheint nur im Ruhezustand.
"Kein System"
Der Funkbereich wurde verlassen; die Funkverbindung ist unterbrochen.
"Anmelden"
Die Anmeldeprozedur am PBX-System ist in Gang.
"Defekt" / permanenter progressiver Ruf
Jedesmal wenn das Handgerät in die Lademulde gelegt wird, werden seine Parameter
überprüft. Wird ein Parameter-Fehler festgestellt, erfolgt ein akustisches Fehlersignal und
auf dem Display wird "Defekt" angezeigt. Das Handgerät muss zur Reparatur/Austausch
an den Lieferanten zurück.
Hinweis
Bei anderen Meldungen fragen Sie bitte Ihren Systemmanager.
20310995de_ba_a0
37
Deutsch
Störungen
Funktionscodes
Welche Ziffern muss man wählen?
Normalwahl
Tastenfolge
Amtsausgang
Geschäft ........................................................................... 0
Privat ................................................................................ 10
mit Kostenstelle-Nr ............................................................ 13 KST-Nr.
.........
.........
.........
Kurzwahlnummern PBX ................................................ 7000...7999 1)
.........
Leitwegnummern ........................................................... 170... 199 1)
.........
Notrufnummer ............................................................... 12
.........
Sammelanschlussnummern ........................................... 860... 888 1)
.........
Telefonistin ..................................................................... 11
.........
Türsprechstellen ............................................................. 851... 852 1)
.........
Nachwahl
Anklopfen .......................................................................
abweisen ........................................................................
beantworten, Verbindung halten ....................................
beantworten Verbindung nicht halten .............................
beantworten mit Konferenz ............................................
6 oder *43
0
2
1
3
Aufschalten .....................................................................
abweisen ........................................................................
beantworten, Verbindung halten ....................................
beantworten, Verbindung nicht halten ............................
7 oder *44
0
2
1
Bitte Rückruf Nr./ MESSAGE
aktivieren ........................................................................ *38
Coderuf aktivieren ......................................................... 8 oder *81
Konferenz
(aus Verbindung) aufbauen ............................................. 3
Teilnehmer (intern), ausschliessen .................................... *31
Makeln (hin- und herschalten
zwischen zwei Verbindungen) ......................................... 2
Personensuchanlage aktivieren .................................... 8 oder *81
Rückkehr zur Erstverbindung ........................................ 1
Rückruf
bei besetztem Teilnehmer aktivieren ................................ 9 oder *37
bei freiem Teilnehmer aktivieren ...................................... 9 oder *37
1) Definition und Bereich der Nummern sind von der Software und dem PBX-Typ abhängig.
38
20310995de_ba_a0
Deutsch
Funktionscodes
Umbuchen des laufenden
Gespräches auf Kostenstelle-Nr. ................................... *78 KST-Nr.
Verbindung parken ........................................................ *76
Vorwahl
Alle aktivierten Dienste deaktivieren 2) ........................ *00
(Ausser Sammelanschluss)
Amtsausgang
mit Gebührenrückruf aktivieren ...................................... *32 TN-Nr.
Anklopfen 2)
sich schützen vor ............................................................ *04
auf sich erlauben ............................................................ #04
Anruf übernehmen ........................................................ *86 TN-Nr.
Anrufumleitung AUL
sich schützen vor AUL 2) ..................................................
AUL auf sich erlauben 2) ..................................................
unbedingte AUL aktivieren 2) ...........................................
unbedingte AUL löschen 2) ..............................................
unbedingte AUL auf zuletzt progr. Nummer aktivieren ....
unbedingte AUL auf zuletzt progr. Nummer löschen .......
AUL auf vorprogrammierte Nummer aktivieren 2) ............
AUL auf vorprogrammierte Nummer löschen 2) ................
AUL wenn besetzt aktivieren 2) ........................................
AUL wenn besetzt löschen 2) ...........................................
AUL wenn besetzt auf zuletzt progr. Nummer aktivieren .
AUL wenn besetzt auf zuletzt progr. Nummer löschen ....
AUL auf Standardmeldung aktivieren 2) ...........................
AUL auf Standardmeldung löschen 2) ..............................
AUL auf Personensuchanlage PSA oder
auf Zentralwecker mit Coderuf aktivieren 2) ..................
AUL auf Personensuchanlage PSA oder
auf Zentralwecker mit Coderuf löschen 2) .....................
*02
#02
*21 Ziel-Nr.
#21
*21#
#21
*22
#22
*67 Ziel-Nr.
#67
*67#
#67
*24 Text-Nr.#
#24
*28
#28
2)
Aufschalten
sich schützen vor ............................................................ *04
auf sich erlauben ............................................................ #04
Bitte Rückruf Nr./ MESSAGE 2)
aktivieren ........................................................................ *38 TN-Nr.
löschen, Ziel-Apparat ...................................................... #38 TN-Nr.
Coderuf
aktivieren ........................................................................ *81 TN-Nr.
beantworten ................................................................... *82
1) Definition und Bereich der Nummern sind von der Software und dem PBX-Typ abhängig.
2) Fernbedienung möglich
20310995de_ba_a0
39
Funktionscodes
Courtesy (Ansage vor Melden)
einschalten Gruppe 1 ......................................................
ausschalten Gruppe 1 .....................................................
einschalten Gruppe 2 ......................................................
ausschalten Gruppe 2 .....................................................
*931
#931
*932 1)
#932 1)
Durchsage
an einen Teilnehmer ........................................................ *7998 TN-Nr.
an eine Gruppe ............................................................... *79 GR-Nr.
an Gruppe übernehmen ................................................. *89
Fernbedienung
einleiten (ab fremdem Apparat) ..................................... *06 TN-Nr. *21 Ziel-Nr.
Fernbedienung einleiten /
fernbedienbare Teilnehmernummer eingeben /
gewünschte *-Prozedur eingeben (z.B. *21 Ziel-Nr.)
ausschalten (ab fremdem Apparat) ................................ *06 TN-Nr. #21
Fernbedienung einleiten /
fernbedienbare Teilnehmernummer eingeben /
gewünschte #-Prozedur eingeben (z.B. #21)
ausschalten (ab eigenem Apparat) ................................ #21
#-Prozedur eingeben (z.B. #21)
Follow me
aktivieren ........................................................................ *23 TN-Nr.
löschen ........................................................................... #23
Konferenz aufbauen
variable ........................................................................... *71 TN-Nr. 1*
... TN-Nr.5# 1)
vorbestimmte ................................................................. *70 Konf.-Nr.
Meldungen (Standardmeldungen mit/ohne Parameter) 2)
an Teilnehmer senden ..................................................... *3598 TN-Nr. Text-Nr.#
an Gruppe senden .......................................................... *35 GR-Nr. Text-Nr.#
an alle senden ................................................................ *3599 Text-Nr.#
Personensuchanlage
suchen ............................................................................ *81 TN-Nr.
mit einem Suchweg beantworten ................................... *82
mit mehreren Suchwegen beantw. .................................. *82 TN-Nr.
Relais
einschalten ..................................................................... *755…*757 1)
ausschalten ..................................................................... #755…#757 1)
1) Definition und Bereich der Nummern sind von der Software und dem PBX-Typ abhängig.
2) Fernbedienung möglich
40
20310995de_ba_a0
Deutsch
Funktionscodes
Ruf auf Zentralwecker beantworten ............................... *83
Rückruf löschen ................................................................. #37
Rufweiterschaltung RWS (Anrufumleitung wenn keine Antwort)
sich schützen vor RWS 2) ................................................. *02
RWS auf sich erlauben 2) ................................................. #02
RWS aktivieren 2) ............................................................. *61 Ziel-Nr.
RWS löschen 2) ................................................................ #61
RWS auf zuletzt progr. Nummer aktivieren ...................... *61#
RWS auf zuletzt progr. Nummer löschen ......................... #61
RWS auf vorprogrammierte Nummer aktivieren 2) ............ *62
RWS auf vorprogrammierte Nummer löschen 2) ............... #62
RWS auf Personensuchanlage oder auf
Zentralwecker mit Coderuf aktivieren 2) ........................ *68
RWS auf Personensuchanlage oder auf
Zentralwecker mit Coderuf löschen 2) ........................... #68
Ruhe vor dem Telefon (Anrufschutz) 2)
aktivieren ........................................................................ *26
löschen ........................................................................... #26
Sammelanschluss 2)
sich einschalten .............................................................. *48
sich ausschalten .............................................................. #48
Tag-, Nacht-, Wochenend-Schaltung (Umschaltgr. 1)
Tag (Position 1) ............................................................... *8511
Nacht (Position 2) ........................................................... *8512
Wochenende (Position 3) ................................................ *8513
Terminruf (Weckauftrag) 2)
Dauerauftrag aktivieren ..................................................
Dauerauftrag löschen .....................................................
Einzelauftrag aktivieren ...................................................
Einzelauftrag löschen ......................................................
*56 hh mm
#56
*55 hh mm
#55
Türe öffnen ..................................................................... *751…*752 1)
Umschaltgruppe (ankommend)
Umschaltgruppe x, Pos. 1 ............................................... *85x1 1)
Umschaltgruppe x, Pos. 2 ............................................... *85x2 1)
Umschaltgruppe x, Pos. 3 ............................................... *85x3 1)
Hinweis: x ist eine Ziffer von 2…9
Verbindung
parken ............................................................................ *76
geparkte abrufen ............................................................ #76
1) Definition und Bereich der Nummern sind von der Software und dem PBX-Typ abhängig.
2) Fernbedienung möglich
20310995de_ba_a0
41
Index
A
9
ABC 13
Akku 5, 7
Anrufliste 14
Anrufumleitung 16
Ausschalten 33
4
C
Code/Passwort 5, 34
D
Direkt beantworten 33
Diskretruf 14, 15
Display-Sprache einstellen 8
Display-Symbole 1
DTMF 20
Durchsage 19
Tastensperre (Variante 2) 29
Verbindungsqualität 2
Vibrator einschalten 36
M
Makeln 15
Makrosprache 28
Meldung lesen 19
Meldung senden 18
Mikrofon ausschalten 14
N
Nachricht hinterlassen 17
P
F
Parken 15
Passwort 5, 34
PBX-System anmelden 8
PBX-System einstellen 9
Personensuche 17
Privatkartei 13, 27
Programmieren 21
Foxtasten Programmierung 32
Frequenzwahl DTMF 20
R
E
Einschalten 33
G
Gespräch übergeben 16
H
Handgerät aus-/einschalten 33
Handgerät sperren/entsperren 34
Hotkey-Programmierung 30, 31
I
Rückfrage 20
Rückruf 17, 18
Ruf und Diskretruf einstellen 35
Ruhetext 28
S
Sicherheitshinweise 4, 5
Störungen 37
Suchen 17
Installation 6, 7
T
K
Tastatur sperren/entsperren 29
Tasten-Quittungston 32
Transparentmodus 20
Kartei 13, 27
Konferenz 16
L
Lauthören 11
"Long Click" Funktionen
Foxtasten-Programmierung 32
Frequenzwahl DTMF einschalten 20
0
Handgerät ausgeschalten 33
Hotkey-Programmierung 30, 31
IPEI und PARK anzeigen 9
2
1
PBX-System einstellen 9
M
Programmiermodus 3, 21
C
Rücksprung zum vorhergehenden
Menü 13, 28
5
SW-Versionsnummer 9
Suchrichtung ändern in 3
8
Tastensperre (Variante 1) 29
U
Übernehmen 10
Umleitung 16
V
Verbindung parken 15
Vibrator 36
W
Wahl mit Hotkey 12
Wahl mit Namen aus einer Kartei 13
Wählen 12
Wahlwiederholung 12
¥
42
20310995de_ba_a0
Bedi
1
10
4
1
L
O
2
H
F
3
F
In
B
4
A
D
M
5
C
L
R
6
L
E
7
G
G
W
8
M
D
n
(
9
iZ
10
E
L
11
T
Z
E
v
c
B
2
3
8
9
M
7
3
AB
C
1
C
DE
F
JK
L
2
GH
I
4
11
MN
3
O
S TU
6
5
5
PQ
R
7
VW
X
6
8
YZ
•
9
0. . .
9
0
Im
II
III
Eléments d‘exploitation et d’affichage
1
DEL
Affichage optique des appels
2
Hotkey (touche multifonction)
Touche librement programmable acceptant jusqu’à 6 numéros/noms ou fonctions.
3
Touches Fox
La ligne inférieure de l’écran affiche la fonction correspondant à chaque touche. Les deux
touches fox sont librement programmables.
4
Ecran d’affichage
Eclairé par l’arrière, l’écran d’affichage comprend une ligne de symboles, une ligne
d’information et une ligne de menu de 12 caractères/symboles chacune.
5
Touche C/End (effacement ou correction)
Touche d’effacement ou de correction lors de l’introduction de chiffres.
Retour au point de menu précédent ou au repos.
6
Touche de haut-parleur
Mise en et hors service du haut-parleur
7
Touche de conversation
Remplit la fonction décrocher/raccrocher le combiné.
Permet la réactivation après arrêt de l‘appareil.
8
Touche M (menu)
Permet de rechercher le point désiré du menu; son fonctionnement est cyclique, c’est-à-dire
qu’après le dernier point d’un menu, on retrouve le premier (symbole M actif).
9
Touche i (d’information)
Permet de demander des informations supplémentaires (symbole i actif)
10
Touches de réglage (pas visibles)
Réglage du niveau sonore durant une conversation.
11
Clavier alphanumérique 0 à 9 (A à Z), * et #
Entrée de chiffres et numérotation de fonctions de confort par procédures */#.
Entrée de noms et/ou de textes en mode alphanumérique (le passage des chiffres aux lettres
s’effectue automatiquement dans les points de menu où il est nécessaire.)
Exemple: 1 x touche 2 = D, 2x touche 2 = E, 3x touche 1 = C, 2x touche 7 = T
Avec la touche
III
vous pouvez aussi générer un espace.
Sous réserve de modifications techniques.
Les services et fonctions disponibles dépendent du logiciel utilisé.
20310996fr_ba_a0
Eléments d'exploitation et d'affichage
Symboles spéciaux
Etat de charge de l’accu
Pas d’affichage:
Affichage clignotant:
Clignotant +
signal d’alerte:
Charge satisfaisante, appareil portatif
prêt à fonctionner.
Charge basse (alerte)
Charge très basse
Symbole d’antenne
Français
Pas d’affichage:
Hors de la portée d’émission/réception
Affichage permanent: Prêt pour communications entrantes et
sortantes
Affichage permanent: Appareil portatif annoncé dans le système A
(B,C ou D) et opérationnel.
Clignotant:
Appareil portatif inopérant.
Clignotant:
Appareil portatif annoncé dans aucun
système.
Affichage permanent: Numérotation alpha active
Informations supplémentaires (interrogation par touche i)
Une fonction programmée sur la Hotkey ou la touche Fox – ou bien
le vibreur – est à l'état actif.
Autres menus (commande par touche M)
Microphone hors service
Mode de programmation
Affichage permanent: Communication établie
Clignote:
Signalisation optique d’un appel
20310996fr_ba_a0
1
Eléments d'exploitation et d'affichage
Autres symboles sur ligne d’information ou de menu:
12¥
Défilement à travers une liste (avec numéro d’ordre de l’entrée)
S
Appel sur raccordement collectif (groupe d’abonnés)
D
Appel dévié
|
Fonction active
Qualité de la liaison radio (seulement dans l’affichage de repos)
$$$$
$$$
$$
$
....
Très bonne qualité de liaison
Bonne qualité de liaison
Téléphonie possible, perturbations probables
Téléphonie possible seulement sous condition, fortes restrictions
Téléphonie plus possible
Remarque
La qualité de la liaison peut aussi être visualisée par une longue pression sur la touche 4.
Le numéro de l’unité radio correspondante est affiché simultanément.
2
20310996fr_ba_a0
Concept d’utilisation: la technique des menus
Vous pouvez programmer votre téléphone sans fil en fonction de vos besoins. Outre la
mobilité, il vous offre toutes les fonctions téléphoniques que vous puissiez désirer, tout en
étant simple et facile à utiliser (de façon intuitive), grâce à la touche Fox et à l’ingénieuse
technique des menus. Le chapitre "Pour programmer l’appareil" et les instructions de programmation de votre terminal vous aideront à tirer le meilleur profit de toutes ses caractéristiques. Un appel peut également être signalé par un vibreur, en plus de l’affichage
silencieux de l’appels sur la DEL. L’appareil portatif est étanche aux projections d'eau et à
la poussière (IP 54). Il peut être livré avec protection antidéflagrante conformément à la
norme Eex ib IIC T4 pour une utilisation en milieu présentant un danger d’explosion.
Français
Règles générales d'exploitation
Il existe deux types de menus:
– les menus d'exploitation les plus courants, correspondant aux fonctions
téléphoniques;
– les menus de programmation, permettant d’adapter l’appareil à vos besoins.
Affichage au repos
A l’état de repos, il y a sur l’affichage quelques symboles, qui un
indicateur de la qualité de liaison ainsi que la date et l’heure ou un
texte individuel de repos (par ex. nom, département, nr. tél., etc.).
Lors d’un appel ou dans la phase de conversation, l’affichage passe
automatiquement respectivement, au menu "Silence", à "Rétro".
"Micro".
—> —> —>
Pressez la touche M (une ou plusieurs brèves impulsions) pour
obtenir le menu désiré.
————————> Avec une longue pression sur la touche M (min. 2 secondes), vous
entrez dans le mode de programmation.
————————> Une longue pression sur la touche Fox sous "¥" inverse le sens de
déplacement "ß".
Etat de repos
Appelez le menu désiré avec la touche M.
10 avr.11:55
$$$$
M
Pressez la touche M une fois.
10 avr.11:55
ABC
Répét.
M
Pressez la touche M une deuxième fois.
10 avr.11:55
Dévier Sil.
M
Pressez la touche M une troisième fois.
10 avr.11:55
Inter. Rech.
M
Pressez la touche M une quatrième fois.
10 avr.11:55
Msg Interph.
M
Pressez la touche M une cinquième fois.
10 avr.11:55
Programmer
20310996fr_ba_a0
3
Consignes de sécurité
Veuillez lire attentivement ce mode d’emploi et conservez-le avec soin. Examinez
attentivement les consignes de sécurité présentées ci-dessous. L’inobservation de ces
prescriptions pourrait vous exposer à des dangers et à des infractions de la législation en
vigueur.
Appareils médicaux
Evitez d’utiliser votre téléphone à proximité de personnes portant des appareils
médicaux tels que stimulateur cardiaque ou appareil auditif.
Disponibilité de communications téléphoniques
La disponibilité du réseau radio n’est pas toujours assurée. Dans une situation
critique, ne vous fiez jamais à votre téléphone mobile comme unique moyen de
communication.
Environnement
N’utilisez votre appareil que dans une plage de température comprise entre +5
et +40°C. L’appareil portatif est étanche aux projections d'eau et à la poussière
(IP 54).
Protégez votre appareil des liquides et vapeurs corrosives.
Evitez d’exposer votre appareil à des champs magnétiques (moteurs électriques,
appareils électroménagers), car la qualité de conversation s’en ressentirait. Evitez
de le placer à proximité immédiate d’ordinateurs, d’appareils radio, téléviseurs,
magnétoscopes et d’autres téléphones afin d’éviter des perturbations.
Evitez d’installer ou d’utiliser votre appareil dans un local présentant un danger
d’explosion. La version avec protection antidéflagrante est conforme aux
exigences Eex ib IIC T4.
Evitez d’utiliser votre appareil à proximité de travaux de dynamitage. Observez les
restrictions et conformez-vous aux directives en vigueur.
Entretien
Utilisez exclusivement des accessoires d’origine. Ne confiez les travaux
d’installation et de maintenance qu’à un spécialiste agréé. Ne touchez pas les
contacts enfichables avec un objet métallique ou pointu, et/ou avec des objets
gras.
Nettoyez votre appareil avec un chiffon doux, légèrement humide ou
antistatique. N’employez à cet effet aucun détergent ni produit chimique
quelconque.
4
20310996fr_ba_a0
Consignes de sécurité
Informations importantes
Afin que personne ne puisse effectuer de communications téléphoniques à vos frais avec
d’autres téléphones mobiles, il s’effectue continuellement un échange de codes entre
l’unité radio et l’appareil portatif. Si les codes ne coïncident pas, la communication est
coupée, ou n’est pas établie en premier ressort.
Modification du code/mot de passe
Lors de la première mise sous tension de l’appareil portatif, le code/mot de passe est réglé
sur "0000". Nous vous conseillons de définir un code personnel comprenant de 2 à 10
chiffres pour protéger votre réglage personnel et éviter l’accès à vos données par toute
personne non autorisée.
Accu
L’appareil portatif est livré avec un accu rechargeable.
•
Ne plongez jamais l’accu dans l’eau, et ne les jetez pas au feu.
•
N’utilisez que l’adaptateur secteur fourni avec la station de charge.
•
Avant la première mise en service, chargez l’accu durant 1 heure au minimum, sans
interruption.
Remarques
• L’accu est susceptible de s’échauffer durant la charge, ce qui est normal et ne présente
aucun danger.
• Ce n’est qu’après quelques jours d’utilisation que l’accu atteint sa pleine capacité, et
par conséquent sa pleine «durée de veille et de conversation".
Après une longue période d’arrêt par coupure du courant (par ex. durant les vacances),
l’appareil portatif (l’accu) doit être rechargé avant la mise en service. L’accu défectueux
doit être éliminé selon les règles (et ne pas être jeté dans les ordures domestiques).
20310996fr_ba_a0
5
Français
Blocage du clavier
Vous avez la possibilité de bloquer le clavier de l’appareil portatif pour empêcher toute
manipulation intempestive des touches. Avant de procéder à un appel, il vous faudra
déverrouiller le clavier.
Installation et mise en service
Contenu de l’emballage de l’appareil portatif
L’emballage de l’appareil contient:
•
Appareil portatif
•
Clip de transport
•
Accu
•
Mode d’emploi
Bedienungsanleitung
Mode d'emploi
Istruzioni per l'uso
Operating instructions
Contenu de l’emballage de la station de charge
•
Adaptateur secteur
•
Station de charge
Connecter le casque
Raccordement de l’adaptateur secteur
Guidez le câble à travers le canal de décharge de traction prévu à cet effet.
6
20310996fr_ba_a0
Installation et mise en service
Mise en place de l’accu
1. Tenez l’appareil portatif avec le clip de transport tourné vers le bas et mettez l’accu en
place.
Français
2. Pressez l’accu et l’appareil portatif l’un contre l’autre (voir figure) et glissez les deux
targettes vers l’extérieur.
déverrouillé
verrouillé
Charge de l’accu
A la livraison, l’accu n’est pas chargé. Pour la charge, l’appareil portatif doit être placé
dans la station de charge. Si un deuxième accu est disponible, celui-ci peut être chargé
dans la station de charge et l’appareil portatif peut être utiliIsé pendant ce temps.
Voyant lumineux sur la station de charge:
•
•
rouge
vert
=
=
Une charge
Durée de charge
20310996fr_ba_a0
accu en cours de charge
accu chargé
suffit pour env.
env.
env.
80
8
1
heures de veille ou
heures de conversation
heure
7
Avant de téléphoner pour la première fois
Réglage de la langue d’affichage
Normalement, l’appareil est réglé sur la langue utilisée dans le secteur de vente. Si vous
désirez utiliser une autre langue, vous pouvez en choisir une parmi celles enregistrées dans
le système.
*Langue
¥
M
Ok
C
Dans le mode de programmation pressez la
touche M autant de fois que nécessaire pour
obtenir l’option "*Langue" (observez le signe
"*" devant une langue étrangère).
Pressez la touche Fox sous "Langue" pour
appeler la langue désirée. Pressez la touche Fox
sous "¥" autant de fois que nécessaire pour
afficher la langue désirée.
Pressez la touche Fox sous "Ok" pour confirmer
la langue sélectionnée. La touche C/End permet
de retourner au menu précédent.
Annonce
Vous pouvez annoncer votre appareil mobile auprès d’au maximum 4 PBX (A, B, C, D).
Ainsi, vous serez également atteignable via votre appareil mobile lorsque vous vous
déplacez dans une autre filiale de votre entreprise.
Système
Dans le mode de programmation, pressez la
touche M autant de fois que nécessaire pour
obtenir l’option "Système". Pressez la touche Fox
sous "Système". "Auto" ou le système actuel (A,
B, C ou D) est alors affiché.
Retir.
Pressez la touche M. Si vous obtenez par exemple
"Annonce: A" et "Retirer", l’appareil portatif est
annoncé au PBX "A" (vous pouvez effacer cette
annonce en pressant la touche Fox sous
"Retirer").
M
M
¥
Nouv.
8
Home
L’appareil portatif peut être annoncé auprès de
trois autres PBX (B, C ou D) avec la touche Fox
sous "ß". L’affichage passe alors à "Annonce: B
(C ou D) et "Nouveau". En pressant la touche
Fox sous "Nouveau" et "Home", l’appareil est
identifié auprès du PBX "B" (à condition que
l’opération soit autorisée et que le PBX existe).
20310996fr_ba_a0
Avant de téléphoner pour la première fois
Nouv
GAP
Ok
1
2
3
4
5
6
7
8
9
0
L’appareil portatif peut également être annoncé
auprès d’un système PBX tiers avec GAP (Generic
Access Profile) au moyen d’un "code".
Pressez la touche Fox sous "Nouveau" et "GAP",
puis donnez le code à la suite de "code:" et
confirmez avec la touche Fox sous "Ok".
Ascotel DECT soutient toutes les caractéristiques téléphoniques de base, telles que
définies dans le standard du Generic Access Profile (GAP) (édition fin 1997). En font partie
l’établissement et l’achèvement de communications sortantes et entrantes, la
rétrodemande, la numérotation en fréquences (DTMF) et les procédures */#. Cela signifie
que:
• Votre terminal DECT peut être annoncé et utilisé dans le PBX d’autres fabricants. La
condition pour l’utilisation de toutes les caractéristiques téléphoniques de base
définies dans le standard GAP est que celles-ci soient complètement installées dans le
PBX correspondant.
• Les terminaux DECT d’autres fabricants qui répondent au standard GAP peuvent aussi
être annoncés et utilisés dans votre installation. Ils n’offrent cependant qu’une
fonctionnalité restreinte du standard GAP et pas la même qualité de liaison radio. En
particulier le logiciel pour la gestion de la mobilité avec repérage des déplacements et
passation dépend presque à 100% de l'appareil portatif utilisé et il ne peut pas être
adapté de manière optimale à votre installation.
Réglage du système PBX
Système
Dans le mode de programmation, pressez la
touche M autant de fois que nécessaire pour
obtenir l’option "Système". Pressez la touche Fox
sous "Système". "Auto" ou le système actuel (A,
B, C ou D) est alors affiché.
Ok
Pressez la touche Fox sous "ß", sélectionnez le
système désiré ou "Auto" et confirmez par
"Ok". (En position "Auto", si plusieurs systèmes
sont disponibles, l’appareil portatif adopte
automatiquement le système avec lequel il
obtient la meilleure liaison radio.)
M
ß
Remarques
• Une longue pression (min. 2 secondes) sur la touche 1 du clavier de numérotation vous
permet de passer au système PBX disponible suivant (A, B, C ou D). Si la commutation
ne se trouve pas sur "Auto", la sélection manuelle du système PBX est obligatoire pour
que votre appareil portatif puisse fonctionner au sein du nouveau système.
• Avec une longue pression sur la touche 2 on obtient l'affichage de l'International Portable Equipment Identity (IPEI) et du PARK (Portable Access Right Key).
• Avec une longue pression sur la touche 5 on obtient l'affichage de la version logicielle
de l'appareil portatif avec la date.
20310996fr_ba_a0
9
Français
Annonce GAP, compatibilité avec d’autres produits DECT
Pour téléphoner
Répondre à un appel
Un appel est signalé sur l’appareil portatif.
Si l’appareil portatif se trouve hors de la station
de charge, répondez en pressant la touche de
conversation.
Ou
L’appareil portatif est placé dans la station de
charge. Lorsqu’il est soulevé, l’appel est répondu
immédiatement (voir "Pour programmer
l’appareil" et "Prise directe").
Interception d’un appel
Sous "Intercepter" le système vous offre les options "Intercepter: Abonné", "Intercepter:
Recherche", et "Intercepter: Appel circulaire (RS)". Si vous voulez par exemple répondre
avec votre appareil portatif à un appel destiné à un abonné actuellement absent, pressez
la touche M autant de fois que nécessaire jusqu’à l’apparition de "Intercepter". Presser la
touche Fox à cet endroit, puis pressez sous "Intercepter: Abonné", composez le numéro
de l’abonné appelé et pressez la touche Fox sous "Ok".
Conversation
Durant une conversation, la touche M vous permet d’exécuter d’autres fonctions, telles
que par exemple introduire une rétrodemande, couper le microphone ("Micro"), régler le
volume sonore dans le combiné de "Faible" à "Fort" (ou vice versa).
M
Pressez la touche M une ou plusieurs fois pour
exécuter d’autres fonctions.
Fin d’une conversation
Pour mettre fin à une conversation, pressez la touche de conversation ou replacez
l’appareil portatif dans la station de charge. Bien entendu, votre interlocuteur peut
également couper la communication. Après un bref instant, l’appareil portatif retourne à
l’état de repos.
Réglage du niveau sonore dans l'écouteur et du haut-parleur
Le niveau sonore peut être réglé sur «Fort» ou «Faible» par menu.
Faible
M
Fort
Pressez la touche M autant de fois que nécessaire
pour obtenir "Fort". Pressez la touche Fox sous
"Fort".
Remarque
Les réglages effectués restent conservés même à la fin de la conversation.
10
20310996fr_ba_a0
Pour téléphoner
Ecoute par haut-parleur
Avec le haut-parleur, d’autres services d’information - comme par exemple les «Cours des
devises» - peuvent être écoutés par plusieurs personnes dans une même pièce.
Après l’établissement de la communication,
pressez la touche de haut-parleur et réglez le
volume sonore désiré.
Français
Remarque
Le microphone est mis automatiquement hors service lors de l’utilisation du haut-parleur.
20310996fr_ba_a0
11
Pour téléphoner
Numérotation avec préparation
La préparation de la sélection réduit le risque de communications erronées.
Avant de presser la touche de conversation, composez le numéro désiré. Vérifiez le
numéro et si nécessaire corrigez avec la touche C/End. La communication sera établie dès
que vous aurez pressé la touche de conversation.
Numérotation de chiffres
Ceci correspond au mode de numérotation habituel. Cependant, la communication sera
uniquement établie une fois que vous aurez pressé la touche de conversation.
1
2
3
4
5
6
7
8
9
Composez le numéro et pressez la touche de
conversation.
0
Répétition de la numérotation
La mémoire de répétition enregistre le numéro ou le nom des 10 derniers abonnés que
vous avez appelés.
Répét.
M
Pressez la touche M.
Pressez la touche Fox sous "Répéter". Le
numéro, et le cas échéant le nom du dernier
abonné appelé sont alors affichés.
¥
Pressez la touche Fox sous "¥" autant de fois
que nécessaire pour obtenir l’abonné désiré, puis
pressez la touche de conversation.
Remarque
Le symbole i indique la disponibilité d’informations supplémentaires, que vous pouvez
afficher en pressant la touche i.
Numérotation par Hotkey
Sous la Hotkey peuvent être enregistrés jusqu’à 6 numéros/noms que vous appelez
souvent.
Pressez la Hotkey autant de fois que nécessaire
pour afficher le nom désiré.
Meier
Pressez la touche Fox sous le nom désiré puis la
touche de conversation.
12
20310996fr_ba_a0
Pour téléphoner
Numérotation par le nom depuis un fichier
Il peut exister jusqu’à trois répertoires téléphoniques (fichiers); un répertoire interne
(contenant tous les abonnés raccordés au PBX), une liste de numéros abrégés et un fichier
privé. Il est possible d’établir la communication désirée en numérotant un nom, sans
devoir composer le numéro correspondant.
M
1
2
3
4
5
6
7
8
9
0
¥
Pressez la touche M. Pressez la touche Fox sous
ABC pour obtenir le menu de numérotation de
fichier. (Avec "Tous", la recherche s’effectue dans
tous les fichiers). Entrer les initiales des noms et
prénoms,- par ex. E # A pour Einstein Albert.
En pressant la touche Fox sous "¥", défilez à travers tous les noms et démarrez la procédure de
numérotation en pressant la touche de
conversation.
Remarque
L’entrée des initiales est le moyen le plus simple pour composer un numéro enregistré
dans un fichier vous n’avez besoin de connaître ni le numéro de téléphone, ni même un
numéro abrégé.
Exemple:
ABC
M
DE F
AB C
2
1
2x
1x
1x
Einstein Albert:
touche 2: deux fois
touche #: une fois (produit un espace.)
touche 1: une fois
Si seul le nom est connu:
ABC
M
DE F
GH I
MNO
2
3
5
2x
3x
2x
1
...
etc.
C
Pour corriger un numéro ou un nom composé
par préparation, utilisez la touche de correction
(effacement du dernier chiffre).
C
Une longe pression de la touche C met fin à une
préparation de numérotation commencée.
... 9
Vous pouvez bien entendu composer un numéro
sur votre appareil mobile de la manière
habituelle: pressez la touche de conversation puis
composez le numéro.
Si vous attendez plus de 10 secondes entre
l’entrée de deux chiffres successifs, la sélection
est automatiquement interrompue.
20310996fr_ba_a0
13
Français
ABC
Pour téléphoner
Liste d’appels
Votre appareil portatif enregistre automatiquement dans la liste d’appels le numéro des
10 derniers appels restés sans réponse. Le symbole i sur l’affichage attire votre attention
sur les appels auxquels vous n’avez pas répondu. Vous pouvez interroger ces numéros et
rappeler les correspondants par l’intermédiaire de cette liste.
Appels
¥
Effacer
Pressez la touche i autant de fois que nécessaire
pour obtenir "Appels", puis la touche Fox sous
"¥" pour défiler jusqu’au numéro désiré.
Pressez la touche de conversation pour appeler le
numéro affiché ou pressez la touche Fox sous
"Effacer" pour effacer l’entrée dans la liste
d’appels.
Coupure du microphone
Durant une conversation, vous désirez échanger quelques mots discrètement avec un
collaborateur. A cet effet, vous pouvez couper le microphone de l’appareil portatif.
Micro
Pressez la touche Fox sous "Microphone". Le
microphone est alors coupé (le symbole " " est
affiché ).
Micro
Pressez une nouvelle fois la touche Fox sous
"Microphone" pour réenclencher le microphone.
Enclenchement de l’appel silencieux
Les appels sur l’appareil portatif pourraient vous déranger durant une réunion par
exemple. L’enclenchement de l’appel silencieux fait en sorte que les appels seront
signalisés par un seul signal de sonnerie. Vous pouvez alors identifier l’appelant sur
l’affichage et décider si vous voulez répondre ou non. Si vous ne répondez pas, l’appel est
placé sur la liste d’appels. L’appel silencieux reste enclenché jusqu’à ce que vous l’ayez
supprimé volontairement. Le symbole i est présent sur l’affichage pour vous le rappeler.
Sil.
M
Pressez la touche M autant de fois que nécessaire
pour obtenir "Silence". Par pression de la touche
Fox sous "Silencieux", l’appel silencieux est
actionné.
Remarque
L’appel silencieux peut également être enclenché durant un appel. A chaque appel,
l’option "Silence" est affichée. Le signal de sonnerie (le signal seulement, mais pas
l’appel) est supprimé dès que la fonction "appel silencieux" est activée.
14
20310996fr_ba_a0
Pour utiliser les fonctions de confort
Déclenchement de l’appel silencieux
Désactiver
Pressez la touche i autant de fois que nécessaire
pour obtenir "Silence" sur l’affichage.
Pressez la touche Fox sous "Désactiver" pour
déclencher l’appel silencieux.
Parquer une communication
2.conv
P
Pressez la touche Fox sous "2ème_conversation"
pour rétablir la communication avec
l’interlocuteur en attente. Pressez la touche M
autant de fois que nécessaire pour afficher
"Parquer"(P). Pressez la touche Fox sous
"Parquer" pour parquer la communication
actuelle.
2ème–conv.
Pressez la touche Fox sous "2ème_conversation"
pour passer au second interlocuteur. Vous pouvez
à présent transférer la communication.
M
Reprendre
Pressez la touche Fox sous "Reprendre" pour
rétablir la communication avec l’interlocuteur en
attente.
Remarque
Contrairement à une communication mise en attente, durant laquelle les deux canaux de
conversation disponibles sont tous deux occupés, aucun canal n’est nécessaire pour une
communication parquée. Ceci présente l’avantage que vous pouvez transférer un abonné
(si nécessaire) ayant émis un signal d’annonce. Si [P] apparaît, une communication est
déjà parquée.
Va-et-vient
Après l'établissement d'une rétrodemande, vous pouvez passer à votre premier
interlocuteur tout en conservant la communication en rétrodemande. Vous pouvez ainsi
passer d’un interlocuteur à l’autre autant de fois que désiré (va-et-vient).
2.conv
20310996fr_ba_a0
2.conv
Pressez la touche Fox sous "2ème_conversation"
pour passer au premier interlocuteur.
Pressez la touche Fox sous "2ème_conversation"
pour rétablir la communication avec le partenaire
de rétrodemande (autant de fois que désiré ou
nécessaire).
15
Français
Durant une conversation, un troisième abonné peut attirer votre attention par un signal
d’annonce. Si vous répondez à cet appel, la communication avec le premier interlocuteur
est mise en maintien. Pour pouvoir transférer la seconde communication, vous devrez
"parquer" la communication mise en maintien.
Pour utiliser les fonctions de confort
Transfert d’une communication
Après l'établissement d'une rétrodemande, vous pouvez mettre vos deux interlocuteurs
en communication directe.
Pressez la touche de conversation. L’appareil
portatif retourne automatiquement à l’état de
repos.
Conférence
Vous avez établi une rétrodemande et désirez maintenant converser en conférence
(à trois) avec votre interlocuteur initial.
Conf.
M
Pressez la touche M puis la touche Fox sous
"Conférence".
Remarque
N’ayez crainte! Aucune conversation ne peut être perdue lorsque vous établissez une
conférence. Les conversations peuvent uniquement être coupées en pressant la touche C
ou la touche de conversation.
Déviation des appels
Vous pouvez dévier les appels qui vous sont destinés vers un autre appareil ou vers
l’opératrice, ou laisser une information.
Dévier
¥
M
Ok
1
2
3
4
5
6
7
8
9
0
Pressez la touche M autant de fois que nécessaire
jusqu’à ce que "Dévier" apparaisse, puis la
touche Fox sous "Dévier".
Pressez la touche Fox sous "¥" pour défiler
jusqu’au type de déviation desiré, par exemple
Déviation des appels vers abonné ou Déviation si
occupé ou Retransmission des appels vers
abonné.
Sélectionnez la destination de la déviation ou, le
cas échéant, introduisez un nouveau numéro
d’appel.
Confirmez par "Ok".
Remarque
Si la déviation doit se produire uniquement lorsque vous vous trouvez déjà en communication, sélectionnez "Déviation des appels si occupé" ("DDA si occ.").
Mode Twin (présent/absent)
Si en plus de l'appareil portatif vous disposez également d'un appareil raccordé par un fil,
ce mode assure votre accessibilité de la manière la plus simple possible. Si le mode Twin
est programmé (voir "Comment vous programmez votre appareil"), la déviation d’appel
sera activée automatiquement dès que vous sortez l'appareil portatif du chargeur.
16
20310996fr_ba_a0
Pour utiliser les fonctions de confort
Laisser une information pour un appelant
Vous quittez votre place de travail (sans l’appareil portatif) et désirez laisser une
information à vos appelants.
¥
Pressez la touche M autant de fois que nécessaire
jusqu’à ce que "Dévier" apparaisse. Pressez la
touche Fox sous "Dévier", puis sous "¥" jusqu’à
ce que "DDA info" (Déviation des appels vers
information) soit affiché.
Ok
¥
Pressez la touche Fox sous "Ok" puis sous "¥"
autant que fois que nécessaire jusqu’à obtenir
l'information appropriée (symbole i sur
l’affichage).
M
Français
Dévier
Pressez la touche i à une ou plusieurs reprises
pour afficher la suite de l'information.
Ok
C
1
2
3
4
5
6
7
8
9
0
Avec la touche C et le clavier, modifiez
l'information si désiré (voir "Numérotation par le
nom").
Pressez la touche Fox sous "Ok".
Remarque
Vous pouvez également effacer complètement une information standard avec la touche C
et en composer un nouveau.
Rappel demandé (exécution d’un rappel)
Un abonné désire vous communiquer une information importante, mais n’a pas réussi à
vous joindre. A partir de son appareil de système, il introduit une demande de rappel.
L’affichage de l’appareil portatif contient "Demande rappel", "Activ." et "Eff.".
Activ.
Eff.
Pressez la touche Fox sous "Activer" pour
rappeler l’appelant, ou sous "Effacer" si vous
considérez que le rappel n’est plus nécessaire.
Recherche de personnes
Vous désirez atteindre un interlocuteur directement, ou après un essai infructueux via
l’installation de recherche de personnes.
Rech.
M
1
2
3
4
5
6
7
8
9
0
Ok
Pressez la touche M autant de fois que nécessaire
jusqu’à ce que la fonction "Recherche"
apparaisse. Pressez la touche Fox à cet endroit et
composez la numéro de l’interlocuteur recherché.
Confirmez par "Ok".
20310996fr_ba_a0
17
Pour utiliser les fonctions de confort
Demande de rappel
Vous désirez qu’un interlocuteur occupé ou ne répondant pas vous rappelle.
Rappel
Pressez la touche Fox sous "Rappel". Sur
l’affichage apparaît "Appel attendu" et
"Désactiver".
Désactiver
Avec la touche Fox sous "Désactiver" vous
pouvez désactiver la demande de rappel.
Remarque
A un moment donné, un seul rappel peut être activé.
Envoi de messages
Des messages standard sont enregistrés dans le PBX. Après un ou plusieurs appels
infructueux, vous pouvez sélectionner l’un de ces messages, le cas échéant le compléter
ou le modifier, et l’envoyer à l’abonné concerné ou à un groupe.
Msg
¥
M
Pressez la touche M autant de fois que nécessaire
pour obtenir "Message" puis la touche Fox sous
cette fonction.
Pressez la touche Fox sous "¥" autant de fois
que nécessaire jusqu’à obtenir le message
approprié (symbole i sur l’affichage).
Pressez la touche i à une ou plusieurs reprises
pour afficher le reste du message.
Ok
C
1
2
3
4
5
6
7
8
9
0
Avec la touche C et le clavier, modifiez le
message si désiré (voir "Numérotation par le
nom").
Pressez la touche Fox sous "Ok".
Ok
1
2
3
4
5
6
7
8
9
0
Sélectionnez le numéro de l’abonné/du groupe
auquel le message est destiné. Pour envoyer le
message, pressez la touche Fox sous "Ok".
Remarques
• La procédure peut également être effectuée avec préparation de la numérotation,
c’est-à-dire en introduisant le numéro puis en sélectionnant le message.
• Vous pouvez également effacer complètement un message standard avec la touche C
et en composer un nouveau.
18
20310996fr_ba_a0
Pour utiliser les fonctions de confort
Lecture de messages
Si vous avez reçu un message, l’affichage indique "Message", le numéro de l’expéditeur
ainsi que les options "Lire" et "Effacer".
Lire
Pressez la touche Fox sous "Lire". Le signe "+"
indique que des informations supplémentaires
sont disponibles.
Français
Pressez la touche "i" pour obtenir la ligne
suivante.
A la fin du message, l’affichage retrouve les options initiales "Lire" et "Effacer".
Effacer
Pressez la touche Fox sous "Effacer".
Remarque
Pour que d’autres messages (éventuellement reçus) soient présentés, il faut effacer celui
que l’on vient de lire.
Interphone
A partir de l’appareil portatif, vous pouvez vous adresser directement à un ou plusieurs
abonnés, à la condition cependant qu’ils soient équipés d’un appareil de système avec
haut-parleur.
Interph.
M
Groupe
1
2
3
4
5
6
7
8
9
0
Ok
20310996fr_ba_a0
Pressez la touche M autant de fois que nécessaire
pour obtenir "Interphone", puis la touche Fox
sous cette fonction.
Composez le numéro d'abonné désiré (ou
pressez la touche Fox sous "Groupe" et
introduisez le numéro de groupe pour diffuser
votre message à un groupe d’abonnés prédéfini).
Pressez la touche Fox sous "Ok" et diffusez votre
message.
19
Pour utiliser les fonctions de confort
Activation du mode transparent (numérotation en fréquences DTMF)
Durant une communication, il est possible d’activer une fonction au moyen de la
numérotation en fréquences, comme par exemple l'interrogation à distance d'un
répondeur téléphonique.
1
2
3
4
5
6
7
8
9
0
Longue pression de la touche * jusqu’à ce que
"DTMF" apparaisse. Composez ensuite la série
de symboles pour activer la fonction désirée.
Lorsque cette exécution est terminée:
C
Désactiver
Pressez la touche C pour remettre le mode transparent hors service.
ou
Pressez la touche Fox sous "Désactiver".
Introduction et annulation de la rétrodemande
Durant une conversation, votre interlocuteur vous pose une question à laquelle vous ne
pouvez répondre. Vous désirez demander une information à un autre collaborateur, sans
couper la communication actuelle.
Rétro.
1
2
3
4
5
6
7
8
9
0
Composez le numéro de l’abonné auquel vous
désirez demander une information.
Pressez la touche Fox sous "Rétrodemande"; cet
abonné est appelé (la communication actuelle est
mise en maintien).
Lorsque vous avez obtenu l’information désirée:
C
Pressez la touche C pour retrouver la
communication avec l’interlocuteur en attente.
Remarque
Si vous pressez la touche de conversation alors qu'un interlocuteur est en attente, une
sonnerie continue a lieu durant 10 secondes. Durant ce signal continu, pressez la touche
de conversation pour rétablir la communication avec l’interlocuteur en attente.
20
20310996fr_ba_a0
Pour programmer l’appareil
Points à observer lors de la programmation
La programmation fait partie du concept d’utilisation de l’appareil. Avant de commencer
à programmer, lisez attentivement le chapitre "Concept d’utilisation" au début de ce
mode d’emploi.
Mode de programmation
Il existe deux façons d’accéder au mode de programmation:
M
Longue pression (min. 2 secondes) sur la touche M.
Programmer
M … M
Français
ou
Pressez plusieurs fois sur la touche M jusqu’à
obtenir "Programmer", puis pressez la touche
Fox sous "Programmer".
Remarque
L'activation par longue pression dépend du logiciel et du type de PBX.
Touche de menu
La touche de menu (M) permet de se déplacer sur deux niveaux: d’abord au niveau des
menus de programmation (sélectionnez PRG 1- puis le domaine à programmer, par ex.
"touches") puis au niveau de la sous-fonction (par exemple mémorisation d’une touche
de numéro). Ces deux niveaux peuvent être quittés en pressant la touche C ou la touche
de conversation.
Enregistrer
Le contenu que vous avez entré ou modifié sous une option donnée est enregistré par
pression de la touche Fox sous "Ok". Si vous pressez une autre touche, la programmation
faite préalablement n’est pas enregistrée.
20310996fr_ba_a0
21
22
13.39
Menu prog 2
Tches
Mobile
Menu prog 1
Fiche
Texte
2.Sep
Rép.
Cherch.
Nom:_
Nlle
Chargeur
Prog.
ABC
Répét.
Texte:_
Ok
ABC
Non
¥
¥
Direct
Ok
Dévier
Ok
Abonné
Ok
Fn:Nom
Ok
Fn:Numéro
Ok
ABC
Inter.
Peter
Lire
Sil.
032 624 21 11
Modif.
n¥
Dévier
¥
ABC
Effacer
Rech.
Interph.
Mé1:+1N#PX
Ok
ABC
Msg
Mé2:I#21PX
Ok
ABC
Programmer
Touche Fox (Ok)
Touche Fox
Touche de menu
Pour programmer l’appareil
Aperçu des menus
20310996fr_ba_a0
¥
¥
¥
¥
Verrrouillage
Ok
Hotkey
Ok
20310996fr_ba_a0
Touche-Fox
Ok
Bip confirm.
Ok
¥
Fn:Effacer
Ok
Non
¥
Oui
¥
Bip:
Ok
Bip:
Ok
Touche-Fox
Fox1
Fox2
¥
Fn: Fonction
Ok
¥
¥
¥
Nn:Numéro
Ok
Fn:Fonction
Ok
Fn:Effacer
Ok
¥
Mé1:Numéro
Ok
ABC
¥
Nn: Numéro
Ok
Pas déranger
Ok
HotkeyProg:
Hk3
Hk4
Débloquer?
Non
Oui
HotkeyPrg:
Hk1
Hk2
30. Juillet 13:40
Déverr.
ABC
Pas déranger
Ok
¥
Mé1:Numéro
Ok
ABC
Mé1:I*26PX
Ok
ABC
Mé1:Nom
Ok
HotkeyProg:
Hk5
Hk6
ABC
ABC
Mé1: Nom
Ok
ABC
Mé2:I#26PX
Ok
ABC
Français
Mé1:I*26PX
Ok
ABC
Mé1:Nom
Ok
Mé1:Nom
Ok
Mé2:I#26PX
Ok
ABC
Pour programmer l’appareil
Aperçu des menus (suite)
23
24
Menu prog4
Son. *Langue
Menu prog3
Term.
Code
¥
¥
Normal
Ok
Silencieux
Ok
Volume
Ok
Volume
Ok
1ß
3ß
Code: ****
Ok
Retour
Nouv: ****
Ok
Retour
Mélodie
Ok
Mélodie
Ok
libre
Ok
4ß
4ß
¥
Confir.: ****
Ok
Retour
Rythme
Ok
Rythme
Ok
Prog. bloq
Ok
2ß
3ß
¥
bloqué
Ok
¥
1) Le menu "Vibreur" apparaît ici en dehors du domaine radio.
Le menu "Vibreur" peut être appelé par une longue pression de la touche de haut-parleur .
1)
¥
¥
Verrouiller
Ok
Français
Ok
¥
Arrêter
Ok
Ancien: ****
Ok
Retour
Pour programmer l’appareil
Aperçu des menus (suite)
20310996fr_ba_a0
20310996fr_ba_a0
A
¥
Annonce:
><
Test
Look Show_HO
A
¥
Système:
Ok
B
¥
Show_HO: None
Ok
¥
Annonce:
Nouv.
1) Le point de menu "Test" est réservé
à l’installateur
1)
Annonce:
Home
B
GAP
Code:
Ok
Français
Retour
Pour programmer l’appareil
Aperçu des menus (suite)
25
Pour programmer l’appareil
Mode Twin (présent/absent)
Si en plus de l’appareil portatif vous disposez également d’un appareil raccordé par un fil,
ce mode assure votre accessibilité de la manière la plus simple possible.
Le contact de charge détecte 2 états:
a) Appareil portatif dans la station de charge (présent)
b) Appareil portatif hors de la station de charge (absent)
La function déviation automatique des appels (DDA) est programmée suivant ces états.
La déviation a lieu vers l’appareil portatif dès que celui-ci ne se trouve plus dans la station
de charge.
Une fois l’appareil portatif replacé dans la station de charge, la déviation est
automatiquement déclenchée.
Remarque
Des functions autres que le mode Twin peuvent étre programmées suivant ces 2 états
(voir instructions de programmation, menu "Mobile").
Activer le mode Twin
¥
Mobile
M
Prog.
¥
Ok
Ok
1
2
3
4
5
6
7
8
9
0
En mode programmation, presser la touche M
jusqu’à ce que „Mobile“ apparaisse. Presser sur
la touche Fox sous "Mobile".
Presser sur la touche Fox sous "Prog.", puis
feuilleter avec la touche Fox sous "¥" jusqu’à
"Twin" et confirmer avec "Ok".
Entrer sous "TwinNr:" le numéro de
raccordement du terminal relié par fil sur lequel
l'apparreil portatif doit être dévié. Activer le
mode Twin avec la touche Fox sous "Ok".
Désactiver le mode Twin
Mobile
M
Prog.
¥
Ok
En mode de programmation, presser la touche M
jusqu’à ce que "Mobile" apparaisse. Presser sur
la touche Fox sous "Mobile".
Presser sur la touche Fox sous "Prog.", puis
feuilleter avec la touche Fox sous "¥" jusqu’à
"Aucune fonct." et désactiver le mode Twin avec
la touche Fox sous "Ok".
Remarques
• Si, sur le terminal relié par fil, une déviation (DDA ou RDA) a été volontairement
activée vers la secrétaire, vers la boîte vocale ou vers un propre appareil GSM, pendant
que l'appareil portatif se trouve dans la station de charge, celui-ci aura une priorité
plus forte que le mode Twin. Il ne se fait aucune déviation automatique vers l'appareil
portatif si ce dernier est sorti de la station de charge. Le mode Twin sera de nouveau
activé dès que la déviation activée sur le terminal relié par fil aura été désactivée.
• Des fonctions autres que le Mode Twin peuvent être programmées ces 2 états (voir
instructions de programmation, menu "Mobile").
26
20310996fr_ba_a0
Pour programmer l’appareil
Fichier privé
Outre le répertoire des abonnés du PBX et la liste des numéros abrégés, vous disposez
d’un fichier privé qui vous permet de mémoriser jusqu’à 30 numéros et noms. Vous
pouvez protéger vos données privées en verrouillant les fonctions de programmation.
Fiche
Nlle
Ok
1
2
3
4
5
6
7
8
9
0
Cherch.
Dans le mode de programmation, pressez la
touche M autant de fois que nécessaire pour
obtenir "Fiche".
Pressez la touche Fox sous "Fiche" puis pressezla sous "Nouvelle" ("Nlle") ou "Chercher"
("Cherch.").
Avec "Nouvelle", la prochaine fiche libre est
appelée. Composez le numéro et le nom et
mémorisez-les avec "Ok".
Avec "Chercher", défilez jusqu’à l’entrée désirée
en pressant la touche Fox sous "¥".
¥
Modif.
Ok
1
2
3
4
5
6
7
8
9
Pressez la touche Fox sous "Modifier", modifiez
la fiche et mémorisez avec la touche Fox sous
"Ok".
0
Remarques
• Lorsqu’une fiche est déjà remplie, l’entrée actuelle est affichée. Vous pouvez bien
entendu la modifier.
• Il est conseillé de compléter chaque numéro par un nom, car cela simplifie la
recherche et la numérotation alphanumérique.
• Si lors d’un appel le numéro de l’appelant est affiché (CLIP), le système recherche ce
numéro au sein des répertoires et du fichier privé. Si ce numéro y est enregistré avec le
nom correspondant, ce nom est également affiché.
20310996fr_ba_a0
27
Français
M
Pour programmer l’appareil
Langage macro
Le langage macro permet d’enregistrer plusieurs fonctions successives sous une même
touche.
I
X
P
N
.
Z
R
Prendre la ligne
Libérer une communication
Pause (1 seconde)
Insérer un numéro composé en mode de préparation
Fonction de touche de commande
Mise en/hors service du mode transparent
Utiliser le dernier numéro composé
Exemple:
I201
Prendre la ligne et appeler le 201
I*21201X
Prendre la ligne, dévier les appels vers le 201 et libérer la
communication
Programmation du texte affiché au repos
Au lieu de la date et/ou de l’heure, vous pouvez définir un texte personnel qui sera affiché
au repos sur votre appareil portatif.
Texte
Dans le mode de programmation, pressez la
touche Fox sous "Texte" et introduisez le texte
(max. 12 caractères).
Ok
Pressez la touche Fox sous "Ok" pour enregistrer
ce texte.
C
Modification du texte affiché au repos (si désiré).
La touche de correction (C) permet d’effacer les
caractères situés à gauche du curseur.
Ok
Après l’édition, enregistrez le texte en pressant la
touche Fox sous "Ok".
Remarque
Une longue pression sur la touche C/End (min. 2 secondes) a pour effet un retour au
menu précédent.
28
20310996fr_ba_a0
Pour programmer l’appareil
Blocage et déblocage du clavier
Vous pouvez bloquer le clavier contre toute manipulation intempestive. Les appels sont
signalisés et peuvent être pris par pression de la touche de conversation. Après la
conversation, on peut en l’espace de 5 s établir un communication sortante. Après 5 s, le
blocage des touches (variante 1) sera de nouveau activé.
M
Ok
Dans le mode de programmation, pressez la
touche M autant de fois que nécessaire pour
obtenir "Touches".
Pressez la touche Fox sous "Touches".
L’affichage passe alors à "Verrouillage".
Français
Tches
Activez le blocage du clavier en pressant la
touche Fox sous "Ok".
L’affichage passe alors à "Déverrouiller".
Déverr.
Oui
Pressez la touche Fox sous "Déverrouiller". Avec
"Déverr.?", l’appareil portatif demande
confirmation de la désactivation du blocage du
clavier.
Si vous répondez par "Oui", vous obtenez
l’affichage au repos; l’appareil est à nouveau
opérationnel.
Remarques
• Avec une longue pression sur la touche 8 (min. 2 secondes), on peut enclencher
également la variante 1 du blocage des touches.
•
Avec une longue pression sur la touche 9, on peut enclencher la variante 2 du blocage
des touches. Celle-ci ne sera pas supprimée automatiquement lors d’un appel, mais
elle doit se faire manuellement (voir plus haut) , afin de pouvoir recevoir l’appel avec la
touche de conversation.
20310996fr_ba_a0
29
Pour programmer l’appareil
Programmation de la touche Hotkey
La Hotkey est une touche librement programmable sous laquelle vous pouvez enregistrer
jusqu’à 6 numéros/noms ou fonctions. A l’aide du langage macro, vous êtes en mesure de
définir des procédures complètes.
Enregistrement de numéros/noms sous la Hotkey
Tches
M
¥
Dans le mode de programmation, pressez la
touche M autant de fois que nécessaire pour
obtenir "Touches".
Pressez la touche Fox sous "Touches".
Ok
Pressez la touche Fox sous "¥" jusqu’ à
l’apparition de "Hotkey" et pressez la touche Fox
à cet endroit; vous obtenez "HotkeyPrg" et
"Hk1", "Hk2".
Ok
En pressant une ou deux fois la touche M,
appelez les mémoires "Hk3" et "Hk4" ou "Hk5"
et "Hk6".
Sélectionnez la mémoire désirée (Hk1…Hk6) avec
la touche Fox.
M
Ok
Dans le menu "Numéro", confirmez une
nouvelle fois par "Ok".
Ok
1
2
3
4
5
6
7
8
9
Entrez le numéro et pressez la touche.
Fox sous "Ok", entrez le nom et pressez la
touche Fox sous "Ok" pour enregistrer l’entrée.
0
Remarque
Une longue pression sur la touche Hotkey a pour effet de sauter directement dans le
menu de programmation de la touche Hotkey.
30
20310996fr_ba_a0
Pour programmer l’appareil
Enregistrement d’une fonction sous la Hotkey
¥
Ok
Pressez la touche Fox sous "¥" pour appeler le
menu "Fn: Fonction" puis confirmer par "Ok".
¥
Ok
Pressez la touche Fox sous "¥" autant de fois
que nécessaire pour obtenir la fonction désirée
puis confirmer par "Ok".
Ok
Le contenu de la mémoire 1 (Mé1) est affiché
pour cette fonction (activation de la fonction).
Pressez la touche Fox sous "Ok" pour enregistrer
la fonction.
Ok
1
2
3
4
5
6
7
8
9
Si vous le souhaitez, entrez le nom et confirmer
par "Ok". Le contenu de la mémoire 2 (Mé2) est
affiché (désactivation de la fonction).
0
Ok
Enregistrer la fonction avec "Ok".
Remarques
• Les codes de fonction correspondants sont automatiquement enregistrés dans la
mémoire sélectionnée. Au besoin, ceux-ci peuvent être modifiés ou complétés.
•
Si aucun nom n'est programmé, un court texte par défaut est utilisé, par exemple
"Pas-dér" pour "ne pas déranger".
•
Lorsqu’une fonction programmée est active, le symbole " " apparaît sur la ligne des
symboles, et la fonction correspondante est cochée "| ".
•
Une longue pression sur la touche Hotkey a pour effet de sauter directement dans le
menu de programmation de la touche Hotkey.
20310996fr_ba_a0
31
Français
Procédez de la même manière que pour l’enregistrement du numéro/nom, jusqu’au choix
de la mémoire Hk1…Hk6, puis:
Pour programmer l’appareil
Programmation des touches fox
Vous pouvez également utiliser les deux touches fox comme touches librement
programmables. Au repos, les numéros ou fonctions fréquemment utilisés sont affichés,
et vous pourrez les numéroter confortablement d’une seule pression (sur la touche Fox
correspondante). Lorsqu’une fonction est enregistrée sous une touche Fox, le symbole
"| " est affiché à l’état actif.
Enregistrement d’un numéro/nom ou d’une fonction sous une touche Fox
Tches
M
Dans le mode de programmation, pressez la
touche M autant de fois que nécessaire pour
obtenir "Touches".
Pressez la touche Fox sous "Touches".
¥
Pressez la touche Fox sous "¥" autant de fois
que nécessaire pour obtenir "Touche_fox".
Ok
Pressez la touche Fox sous "Ok" puis la touche
désirée "Fox 1" ou "Fox 2".
Fox 1
Fox 2
Poursuivez comme indiqué sous "Programmation
de la touche Hotkey".
Remarques
• Une longue pression sur la touche Fox a pour effet de sauter directement dans le
menu de programmation de la touche Fox.
• Si les deux touches Fox sont occupées par un numéro ou une fonction et un nom,
l’affichage de la qualité de liaison disparaît.
• L’affichage de la qualité de liaison reste maintenu si, pour la touche Fox 1 ou 2, on a
entré, au lieu d’un nom, un espace avec la touche #.
Tonalité de confirmation des touches
Si désiré, l’appareil portatif peut confirmer chaque pression de touche par l’émission
d’une tonalité.
Tches
M
¥
Ok
¥
Ok
Dans le mode de programmation, pressez la
touche M autant de fois que nécessaire pour
obtenir "Touches". Pressez la touche Fox sous
"Touches". Pressez la touche Fox sous "¥"
jusqu’à obtenir "Bip confirmation" et confirmez
par "Ok". Avec la touche Fox sous "¥",
sélectionnez "Bip: Non" ou "Bip: Oui".
Pressez la touche Fox sous "Ok" pour enregistrer
ce réglage.
Remarque
Le placement de l’appareil portatif dans la station de charge est toujours confirmé par une
brève tonalité. Le volume sonore est réduit lors d’une conversation.
32
20310996fr_ba_a0
Pour programmer l’appareil
Réponse directe (sans touche de conversation)
Si l’appareil portatif est réglé sur "Direct", le fait de le soulever de la station de charge
répond automatiquement à un appel, sans devoir presser la touche de conversation.
Mobile
Rép.
¥
Ok
M
Dans le mode de programmation, pressez la
touche M autant de fois que nécessaire pour
obtenir "Mobile". Pressez la touche Fox sous
"Mobile" et puis sous "Répondre".
Avec la touche Fox sous "¥", changer à "Direct:
Oui". Avec la touche Fox sous Ok, confirmez le
réglage "Direct: Oui".
Enclenchement/déclenchement de l’appareil portatif
Déclenchement
M
Term.
Ok
Dans le mode de programmation, pressez la
touche M autant de fois que nécessaire pour
obtenir "Terminal".
Pressez la touche Fox sous "Terminal". Vous
obtiendrez "Arrêter".
Pressez la touche Fox sous Ok pour déclencher
l’appareil. La liaison avec l’unité radio est coupée
(pas d’affichage).
Remarques
• Une longue pression (min. 2 secondes) sur la touche 0 du clavier permet également de
déclencher l’appareil.
• En dehors de la portée radio, l’appareil portatif tente continuellement d’établir une
liaison avec une unité radio. Afin de protéger la batterie, il est conseillé de déclencher
l’appareil lorsqu’on quitte la portée durant une période prolongée.
Enclenchement
Oui
20310996fr_ba_a0
Presser sur la touche de conversation et
enclencher l’appareil avec la touche Fox sous
"Oui".
33
Français
Le placement de l’appareil portatif dans la station de charge ("Raccrocher") libère
toujours la communication si cela n’avait pas été fait préalablement en pressant la touche
de conversation.
Pour programmer l’appareil
Verrouillage/déverrouillage de l’appareil portatif
Vous pouvez bloquer l’appareil portatif contre tout emploi abusif. Le gestionnaire du
système peut vous renseigner sur les communications (par ex. numéros d’urgence)
pouvant être établies malgré ce verrouillage.
A l’état verrouillé, vous pouvez à tout moment prendre un appel avec la touche de
conversation. Avant d’effectuer un appel sortant, l’appareil portatif devra cependant être
déverrouillé.
Il est conseillé de bloquer les fonctions de programmation de l’appareil portatif avec
"Programmation bloquée". Vous protégerez ainsi les entrées de votre fichier privé.
Term.
Dans le mode de programmation, pressez la
touche M autant de fois que nécessaire pour
obtenir "Terminal". Pressez la touche Fox sous
"Terminal". Vous obtiendrez "Arrêter".
M
¥
Ok
1
2
3
4
5
6
7
8
9
0
Sélectionnez "Verrouiller" avec la touche Fox
sous "¥", pressez "Ok" et introduisez votre code
(mot de passe).
Ok
Pressez la touche Fox sous "Ok" pour vérifier le
mot de passe.
¥
Ok
Avec la touche Fox sous "¥" sélectionnez
"libre", "Programmation bloquée." ou
"bloqué" (Sur "libre", le blocage est supprimé.)
et confirmez avec la touche Fox sous "Ok".
Modification du code/mot de passe
Lors de la première mise sous tension de l’appareil portatif, le code/mot de passe est réglé
sur "0000". Nous vous conseillons de définir un code personnel comprenant de 2 à 10
chiffres pour protéger votre réglage personnel et éviter l’accès aux données enregistrées
par toute personne non autorisée (modification, effacement).
Code
M
1
2
3
4
5
6
7
8
9
0
Ok
1
2
3
4
5
6
7
8
9
0
Ok
Ok
1
2
3
4
5
6
7
8
9
0
34
Dans le mode de programmation, pressez la
touche M autant de fois que nécessaire pour
obtenir "Code". Pressez la touche Fox sous
"Code" et introduisez le code actuel.
Pressez la touche Fox sous "Ok" et introduisez le
nouveau code.
Pressez la touche Fox sous "Ok"; il apparaît:
"Confirmation:" Introduisez le code une seconde
fois et confirmez avec la touche Fox sous "Ok".
20310996fr_ba_a0
Pour programmer l’appareil
Réglage du signal de sonnerie (appel normal et silencieux)
L’appareil portatif est capable de signaliser un appel avec des volumes sonores, mélodies
et cadence (rythme) réglables. Vous pouvez régler le type de signal de sonnerie qui vous
convient et ainsi reconnaître facilement si l’appel vous est destiné, ou le cas échéant s’il
provient de l’appareil portatif de votre voisin.
Avec "Silence", un appel est signalisé au moyen d’un unique signal de sonnerie.
Son.
Ok
Dans le mode de programmation, pressez la
touche M autant de fois que nécessaire pour
obtenir "Sonnerie" (Son.).
¥
Pressez la touche Fox sous "Sonnerie" et avec la
touche Fox sous "¥" sélectionnez "Normal" ou
"Silencieux".
Ok
Pressez la touche Fox sous "Ok" pour mettre en
service le signal de sonnerie actuel.
ß
Pressez la touche Fox sous "ß" autant que fois
que nécessaire pour obtenir le volume désiré.
Ok
¥
Pressez la touche Fox sous "Ok" pour enregistrer
le réglage et dans le prochain menu sélectionner
une mélodie avec la touche Fox sous "¥".
ß
Ok
Après enregistrement de la mélodie désirée par
"Ok", pressez la touche Fox sous "ß" dans le
menu "Rythme" pour régler le rythme des
signaux de sonnerie et confirmer avec la touche
Fox sous "Ok".
Remarques
• Avec la touche M, vous pouvez passer librement entre les options "Volume",
"Mélodie" et "Rythme" sans enregistrer les modifications éventuelles.
•
Comme la sonnerie peut être réglée à très fort volume, la premier signal de sonnerie
est, pour des raisons de sécurité, toujours plus bas que les signaux suivants.
20310996fr_ba_a0
35
Français
M
Pour programmer l’appareil
Activer le vibreur
Le vibreur vous avertit discrètement d’un appel au cas où vous ne l’entendez pas en raison
du bruit ambiant et que vous ne remarquez pas non plus la DEL d’appel.
36
Ok
Passez avec une longue pression sur la touche de
haut-parleur au point de menu "Vibreur" et
actionnez la touche Fox sous "Ok".
¥
Ok
Avec la touche Fox sous "¥", choisissez entre
"Sonnerie seule", "Vibreur seul" ou "Les deux"
en actionnant la touche Fox sous le "Ok"
correspondant à la possibilité choisie.
¥
Ok
Avec la touche Fox sous "¥" choisissez entre
"Symbole: en" et "Symbole: hors" et confirmez
avec "Ok". Pour "Symbole: en", le symbole de
l’affichage " " indique que le vibreur est activé.
20310996fr_ba_a0
Dérangements
Sortie de la portée radio
Lorsque vous sortez de la portée radio, une tonalité d’avertissement retentit et le message
"Aucun système" apparaît tandis que le symbole d’antenne
disparaît.
si cela a lieu pendant une conversation, celle-ci sera interrompue, mais la liaison n’est pas
immédiatement supprimée. Le système tente ensuite pendant 20 s d’établir une nouvelle
liaison radio avec la même unité radio ou une autre. Ensuite seulement la liaison sera
supprimée dans le PBX.
Hors de la portée radio, les fonctions de programmation suivantes restent accessibles avec
la touche M:
"Programmer", "Tches", "Mobile", "Term.", "Son.", "*Langue", "Test" et "Système".
Français
Affichage à l’écran, pas de tonalité de numérotation
L’appareil portatif est peut-être verrouillé (voir "Verrouillage/déverrouillage de l’appareil
portatif").
Les touches Hotkey et Fox ne peuvent pas être programmées
La programmation est peut-être bloquée (voir "Verrouillage/déverrouillage de l’appareil
portatif").
Déverrouillage de l’appareil portatif; oubli du mot de passe
Demandez à l’opératrice d’initialiser votre mot de passe à partir du central.
Affichages
"Attendez SVP"
Ce message peut apparaître durant la procédure d’identification. Il apparaît également
lorsqu’un interlocuteur a placé la communication en maintien.
"Term. inconnu"
L’identification de l’appareil portatif auprès du PBX a échoué. Interrogez le gestionnaire de
votre système.
"Surcharge"
Aucune resource disponible, veuillez attendre et essayer à nouveau.
"System Busy"
Aucune liaison ne peut être établie momentanément par l’unité radio actuelle. L'appareil
portatif tente d’établir une meilleure liaison radio avec la même unité radio ou une autre. Le
message n’apparaît qu’à l’état de repos.
"Hors système"
Vous avez quitté la portée radio; la liaison avec le PBX est interrompue.
"Annonce"
Procédure d’identification auprès du PBX en cours.
"En panne" / signal de sonnerie permanent progressif
Chaque fois que l'appareil portatif est posé dans le chargeur, ses paramètres sont vérifiés. Si
une erreur de paramètre est constatée, un signal acoustique de défectuosité retentit et sur
l'ecran apparaît "En panne". L'appareil portatif doit être renvoyé au fournisseur pour
réparation ou échange.
Remarque
Si d’autres messages de dérangement apparaissent, interrogez le gestionnaire de votre
système.
20310996fr_ba_a0
37
Codes de fonction
Quels chiffres faut-il composer?
Sélection normale
Séquence de touches
Interphone de porte ....................................................... 851... 852 1)
.........
Numéro de secours ........................................................ 12
.........
Numéros abrégés PBX .................................................... 7000...7999 1)
.........
Opératrice ....................................................................... 11
.........
Raccordements collectifs ............................................... 860... 888 1)
.........
Sortie réseau
société ............................................................................ 0
privé ............................................................................... 10
avec compte de frais ....................................................... 13 no-compte
.........
.........
.........
Voie d’acheminement .................................................... 170... 199 1)
.........
Postsélection
Appel codé ...................................................................... 8 ou *81
Conférence
établir à partir d’une communication .............................. 3
exclure les abonnés internes ........................................... *31
Demande rappel no./ MESSAGE
activer l'affichage ............................................................ *38
Intercalation ...................................................................
refuser ............................................................................
répondre avec maintien ..................................................
répondre sans maintien ...................................................
7 ou *44
0
2
1
Parcage d’une communication ...................................... *76
Rappel automatique (activer)
en cas d’abonné occupé ................................................. 9 ou *37
en cas d’abonné absent .................................................. 9 ou *37
Recherche de personnes ................................................ 8 ou *81
Retour à la 1ère communication ..................................... 1
Signal d’annonce ............................................................
refuser ............................................................................
répondre avec maintien ..................................................
répondre sans maintien ...................................................
répondre avec conférence ...............................................
6 ou *43
0
2
1
3
1) La définition et le domaine des numéros sont spécifiques au central et au logiciel
38
20310996fr_ba_a0
Codes de fonction
Transfert des taxes sur un
compte de frais ............................................................ *78 no-compte
Va-et-vient multiple (commuter entre
deux communications) .................................................... 2
Présélection
Annuler le rappel automatique ..................................... #37
Appel circulaire (répondre) .............................................. *83
Appel d’échéance (demande de réveil) 2)
activer ordre permanent ..................................................
désactiver ordre permanent ............................................
activer ordre unique ........................................................
désactiver ordre unique ...................................................
Français
Appel codé
activer ............................................................................ *81 no-abonné
répondre ......................................................................... *82
*56 hh mm
#56
*55 hh mm
#55
Communication
parquer ........................................................................... *76
reprendre la communication parquée .............................. #76
Conférence
variable ........................................................................... *71 no-abo. 1*
... no-abo.5# 1)
prédéterminée ................................................................ *70 no-conférence
Connexion de jour, de nuit et de fin de semaine (groupe de commutation 1)
jour (position 1) .............................................................. *8511
nuit (position 2) .............................................................. *8512
fin de semaine (position 3) .............................................. *8513
Courtesy (message d’accueil)
enclencher groupe 1 .......................................................
déclencher groupe 1 .......................................................
enclencher groupe 2 .......................................................
déclencher groupe 2 .......................................................
*931
#931
*932 1)
#932 1)
Demande rappel no./ MESSAGE 2)
activer l'affichage ............................................................ *38 no-abonné
effacer la destination ...................................................... #38 no-abonné
Désactiver toutes les fonctions activées 2) .................... *00
(excepté raccordement collectif)
Déviation des appels DDA
se protéger contre DDA 2) ............................................... *02
autoriser DDA vers soi 2) .................................................. #02
1) La définition et le domaine des numéros sont spécifiques au central et au logiciel
2) La télécommande est possible
20310996fr_ba_a0
39
Codes de fonction
activer DDA inconditionnelle 2) ........................................
désactiver DDA inconditionnelle 2) ...................................
activer DDA inconditionnelle vers dernier numéro prog. ..
désactiver DDA inconditionnelle vers dernier no. prog. ....
activer DDA vers le numéro préprogrammé 2) ..................
désactiver DDA vers le numéro préprogrammé 2) .............
activer DDA si occupé 2) ..................................................
désactiver DDA si occupé 2) .............................................
activer DDA si occupé vers dernier numéro progr. ...........
désactiver DDA si occupé vers dernier numéro progr. ......
activer DDA vers information standard 2) .........................
désactiver DDA vers information standard 2) ....................
activer DDA vers recherche de personnes IRP ou
vers sonnerie circulaire avec appel codé 2) .....................
désactiver DDA sur recherche de personnes IRP ou
vers sonnerie circulaire avec appel codé 2) .....................
*21 no-destination
#21
*21#
#21
*22
#22
*67 no-destination
#67
*67#
#67
*24 no-texte#
#24
*28
#28
Follow me
activer ............................................................................ *23 no-abonné
effacer ............................................................................ #23
Groupe de commutation (entrant)
groupe de commutation x, pos. 1 ................................... *85x1
groupe de commutation x, pos. 2 ................................... *85x2
groupe de commutation x, pos. 3 ................................... *85x3
remarque: x est un chiffre entre 2 et 9 ............................
Intercalation 2)
se protéger contre .......................................................... *04
l’autoriser ....................................................................... #04
Interception d’appel ....................................................... *86 no-abonné
Interphone
à un abonné ................................................................... *7998 no-abonné
à un groupe .................................................................... *79 no-groupe
répondre dans un groupe ............................................... *89
Messages (messages standard avec/sans paramètre) 2)
envoyer à un abonné ...................................................... *3598 no-abo. no-texte#
envoyer à un groupe ....................................................... *35 no-groupe no-texte#
envoyer à tous ................................................................ *3599 no-texte#
Ouvrir les portes ............................................................. *751/*752 1)
Raccordement collectif 2)
s’insérer .......................................................................... *48
se retirer ......................................................................... #48
1) La définition et le domaine des numéros sont spécifiques au central et au logiciel
2) La télécommande est possible
40
20310996fr_ba_a0
Codes de fonction
Recherche de personnes
chercher ......................................................................... *81 no-abonné
répondre (avec une voie de recherche) ............................ *82
répondre (avec plusieurs voies de recherche) ................... *82 no-abonné
Relais
enclencher ...................................................................... *755…*757 1)
déclencher ...................................................................... #755…#757 1)
Français
Retransmission des appels RDA (deviation si non réponse)
se protéger contre RDA 2) ................................................ *02
autoriser RDA vers soi 2) .................................................. #02
activer RDA 2) .................................................................. *61 no-destination
désactiver RDA 2) ............................................................. #61
activer RDA vers le dernier numéro programmé .............. *61#
désactiver RDA vers le dernier no. programmé ................ #61
activer RDA vers le numéro préprogrammé 2) .................. *62
désactiver RDA vers le numéro préprogrammé 2) ............. #62
activer RDA vers recherche de personnes IRP ou
vers sonnerie circulaire avec appel codé 2) ..................... *68
désactiver RDA vers recherche de personnes IRP ou
vers sonnerie circulaire avec appel codé 2) ..................... #68
Signal d'annonce 2)
se protéger contre .......................................................... *04
le permettre .................................................................... #04
Sortie réseau
activer avec rappel de taxes ............................................ *32 no-abonné
Suppression des appels (ne pas déranger) 2)
activer ............................................................................ *26
désactiver ....................................................................... #26
Télécommande
activer (à partir d'un appareil tiers) ................................. *06 no-abo. *21 no-dest.
lancer la télécommande /
introduire le numéro d'abonné activable à distance /
introduire la procédure à * souhaitée (p.ex. *21 no-dest.)
désactiver (à partir d'un appareil tiers) ........................... *06 no-abonné #21
lancer la télécommande /
introduire le numéro d'abonné activable à distance /
introduire la procédure à # souhaitée (p.ex. #21)
désactiver (à partir du propre appareil) .......................... #21
introduire la procédure à # (p.ex. #21)
1) La définition et le domaine des numéros sont spécifiques au central et au logiciel
2) La télécommande est possible
20310996fr_ba_a0
41
Index
A
ABC 13
Annonce 8
Appel silencieux 14, 15
M
5
B
4
Blocage du clavier 5
Blocage et déblocage du clavier 29
C
C
Code/mot de passe 5, 34
Codes de fonction 38
Conférence 16
Consignes de sécurité 4, 5
Coupure du microphone 14
D
Dérangements 37
Déviation des appels 16
Double-appel voir Rétrodemande
DTMF 20
E
Ecoute par haut-parleur 11
Enclenchement/déclenchement 33
Envoi de messages 18
F
Fichier privé 27
H
Haut-parleur 10
Hotkey 12, 30, 31
I
Interphone 19
L
Laisser une information 17
Langage macro 28
Langue d’affichage 8
Lecture de messages 19
Liste d’appels 14
"Longue pression" fonctions
Activer le vibreur 36
Affichage IPEI et PARK 9
2
Blocage des touches (variante 1) 29
8
Blocage des touches (variante 2) 29
9
Déclenchement de l’appareil portatif 33
0
Enclencher la numérotation en
fréquences 20
Inverse le sens de déplacement 3
1
Mode de programmation 3, 21
Numéro de version logicielle 9
Programmation de la touche Fox 32
Programmation de la touche
Hotkey 30, 31
Qualité de la liaison 2
Réglage du système PBX 9
Saut au menu précédent 13, 28
M
Messages 18, 19
Mode transparent 20
Mode Twin 26
Modification du code/mot de passe 34
Mot de passe 5, 34
N
Numérotation avec préparation 12
Numérotation en fréquences DTMF 20
Numérotation par Hotkey 12
P
Parquer une communication 15
Programmation de la touche Hotkey 30, 31
Programmer 21
R
Rappel 17, 18
Réglage de la langue d’affichage 8
Réglage du signal de sonnerie 35
Réglage du système PBX 9
Renvoi voir Déviation
Répétition de la numérotation 12
Réponse directe 33
Rétrodemande 20
S
Silencieux 14, 15, 35
Sortie de la portée radio 37
Symboles spéciaux 1
T
Texte affiché au repos 28
Transfert d’une communication 16
V
Va et vient 15
Verrouillage/déverrouillage 34
Vibreur 36
¥
42
20310996fr_ba_a0
Bedi
1
10
4
1
L
O
2
H
F
3
F
In
B
4
A
D
M
5
C
L
R
6
L
E
7
G
G
W
8
M
D
n
(
9
iZ
10
E
L
11
T
Z
E
v
c
B
2
3
8
9
M
7
3
AB
C
1
C
DE
F
JK
L
2
GH
I
4
11
MN
3
O
S TU
6
5
5
PQ
R
7
VW
X
6
8
YZ
•
9
0. . .
9
0
Im
II
III
Comandi e visualizzazioni
1
LED
Per la segnalazione delle chiamate in arrivo
2
Hotkey
Tasto programmabile liberamente per un massimo di 6 numeri/nomi o funzioni.
3
Tasti Fox
Nella riga più in basso del display viene sempre visualizzata la relativa funzione. Entrambi i
tasti Fox possono essere programmati liberamente.
4
Quadro di visualizzazione (display)
Il display retroilluminato comprende la riga dei simboli, la riga d’informazione e la riga dei
menu, ciascuna con 12 simboli/caratteri.
5
Tasto C/End (tasto di cancellazione/correzione)
Serve per cancellare o correggere (clear) i caratteri introdotti erroneamente.
Ritorno al punto del menu precedente o allo stato di riposo.
6
Tasto altoparlante
Accensione e spegnimento dell’altoparlante
7
Tasto gancio (su/giù)
Ha il medesimo effetto di sollevare/riagganciare il microtelefono.
Riaccende l’apparecchio quando è spento.
8
Tasto M (tasto menu)
Serve a cercare il punto del menu desiderato; è a funzionamento ciclico, ovvero dopo la
visualizzazione dell’ultimo punto del menu ricompare il primo (simbolo M attivo).
9
Tasto
(tasto informazioni)
Per richiamare ulteriori informazioni (simbolo i attivo)
10
Tasti di regolazione (non visibili)
.
Regolazione di volume durante la chiamata, nell'altoparlante oppure nel ricevitore.
11
Tastierino 0 - 9 (A - Z), * e #
Introduzione di cifre e selezione delle funzioni comfort con le procedure */#.
Introduzione di nomi e/o testi nel modo alfa. (il passaggio da cifre a lettere avviene
automaticamente dopo la selezione di un corrispondente punto del menu).
Esempio: 1 x tasto 2 = D, 2 x tasto 2 = E, 3 x tasto 1 = C, 2 x tasto 7 = T
Se la selezione alfa è attiva il tasto
III
può generare anche uno spazio.
Ci riserviamo il diritto di portare modifiche techniche.
Le funzionalità sono specifiche alla versione dell software.
20310998it_ba_a0
Comandi e visualizzazioni
Simboli speciali del display
Stato di carica dell’accumulatore
Nessuna indicazione: Accumulatore carico, apparecchio pronto
Simbolo lampeggiante: Accumulatore quasi scarico (avvertimento)
Simbolo lampeggiante +
segnale acustico:
Accumulatore scarico
Simbolo antenna
Nessuna indicazione:
Indicazione continua:
Indicazione continua:
Apparecchio al di fuori della portata
massima
Apparecchio pronto per telefonate in
entrata e uscita.
Lampeggiante:
L’apparecchio è registrato nel sistema A (B,
C o D) e pronto a funzionare.
L’apparecchio non è pronto.
Lampeggiante:
L’apparecchio non è stato registrato.
Indicazione continua:
La selezione alfa è attiva
Italiano
Informazioni supplementari (da richiamare con il tasto i)
E’ attiva una delle funzioni memorizzate nel tasto Hotkey/Fox
oppure il vibratore.
Altri menu (da richiamare con il tasto M)
Microfono disinserito
Modo di programmazione
Indicazione continua:
Lampeggiante
20310998it_ba_a0
Connessione attiva
Segnalazione ottica di una chiamata (p.es.
se è stata disattivata la suoneria)
1
Comandi e visualizzazioni
Altri simboli sulla riga d’informazione o dei menu:
12¥
Permette di "sfogliare" una lista (con indicazione del numero
progressivo della registrazione)
T
Chiamata per un gruppo di utenti
D
Chiamata deviata
|
La funzione è attiva
Qualità del collegamento radio (solo con display in stato di riposo o standby)
$$$$
$$$
$$
$
....
Qualità del collegamento ottima
Qualità del collegamento buona
È possibile telefonare, probabili disturbi
Non sempre è possibile telefonare, forti limitazioni
Non è più possibile telefonare
Avvertenza
La qualità del collegamento può essere verificata anche con "Long Click 4".
Contemporaneamente viene visualizzato il numero dell’unità radio corrispondente.
2
20310998it_ba_a0
Il metodo di comando: la tecnica a menu
Il vostro nuovo apparecchio cordless può essere programmato secondo le vostre esigenze
e, oltre alla mobilità, consente di eseguire tutte le funzioni telefoniche che desiderate. Ciò
nonostante, il suo impiego è semplice e facile (intuitivo), grazie all’intelligente tecnica a
menu e alla volpe ingegnosa (tasti Fox). Il capitolo "Come programmare il vostro
apparecchio" e le istruzioni per la programmazione vi aiutano a sfruttare integralmente le
caratteristiche di esercizio del vostro apparecchio. Oltre alla segnalazione non acustica
tramite LED, le chiamate in arrivo possono essere segnalate anche con il vibratore. Il
portatile è a tenuta stagna di spruzzi d’acqua e polvere (IP 54). E’ disponibile anche in
versione antideflagrante a norma Eex ib IIC T4, per l’impiego in ambienti con pericolo di
esplosione.
Regole generali per l’uso
Ci sono due tipi di menu:
– I menu di uso generale per le funzioni di telefonia.
– I menu di programmazione, per impostare il vostro apparecchio secondo le vostre
esigenze.
A riposo nel display appaiono alcuni simboli, il livello di qualità,
nonché la data e l’ora oppure un testo personalizzato (ad es. nome,
reparto, numero di telefono etc.). In caso di chiamata o in fase di
conversazione la visualizzazione passa automaticamente al menu
"Discreta" o "Richi." "Micro".
—> —> —>
Con il tasto M (va premuto una o più volte) si arriva al menu di
comando desiderato.
Italiano
Quadro di riposo
————————> Tenendo premuto il tasto M per almeno 2 secondi ("Long click") si
attiva il modo di programmazione.
————————> Un "Long Click" del tasto Fox sotto "¥" modifica la direzione di
ricerca in "ß".
Stato di riposo
Richiamate con il tasto M il menu desiderato
10.Apr 11:55
$$$$
M
Premete una volta il tasto Menu
10.Apr 11:55
ABC Ripetiz.
M
Premete una seconda volta il tasto Menu
10.Apr 11:55
Dev.
Discr
M
Premete una terza volta il tasto Menu
10.Apr 11:55
R.x–ass Ric.
M
Premete una quarta volta il tasto Menu
10.Apr 11:55
Mess. Annunc
M
Premete una quinta volta il tasto Menu
10.Apr 11:55
Programmare
20310998it_ba_a0
3
Avvertenze di sicurezza
Leggere le presenti istruzioni per l’uso e conservarle con cura. Studiate attentamente le
seguenti avvertenze di sicurezza. L’inosservanza di queste norme può comportare dei
rischi e costituire una violazione delle leggi vigenti.
Apparecchiature medicali
Il telefono non dovrebbe essere utilizzato nelle vicinanze di apparecchiature
medicali personali, come pace-maker o apparecchi acustici.
Disponibilità del collegamento telefonico
Non sempre può essere garantita la disponibilità della rete di unità radio. Nelle
situazioni critiche non fate affidamento sull’apparecchio cordless quale unico
mezzo di comunicazione.
Condizioni d’impiego
Usate il vostro apparecchio solo con temperature da +5 ºC fino a +40 ºC. Evitate
la luce diretta del sole e altre fonti di calore. Il portatile è a tenuta stagna di
spruzzi d’acqua e polvere (IP 54).
Tenete il vostro apparecchio al riparo da liquidi e vapori aggressivi.
Non esporre il vostro apparecchio a campi elettromagnetici (motori elettrici,
elettrodomestici), la qualità della voce potrebbe peggiorare. Evitate di usare
l’apparecchio nelle immediate vicinanze di computer, apparecchi radio, TV, video
e telefoni per evitare disturbi.
Non installate né utilizzate mai l’apparecchio in locali con rischio di esplosione.
La versione con protezione antideflagrante è a norma Eex ib IIC T4.
Non usare mai l’apparecchio vicino ai posti in cui si lavora con esplosivi.
Osservare le limitazioni imposte e le prescrizioni in materia.
Manutenzione
Utilizzate esclusivamente accessori originali. Installazioni e riparazioni devono
essere eseguite sempre da un tecnici qualificati.
Non toccate i contatti per la ricarica dell’accumulatore con oggetti acuminati,
metallici e/o unti.
Pulite l’apparecchio con un panno morbido, leggermente umido o antistatico.
Non utilizzate detergenti né altre sostanze chimiche.
4
20310998it_ba_a0
Avvertenze di sicurezza
Informazioni importanti
Per evitare che altre persone possano telefonare abusivamente a vostre spese con altri
apparecchi, l’unità radio e l’apparecchio portatile scambiano periodicamente dei segnali
d’identificazione. Se i segnali d’identificazione non corrispondono, il collegamento viene
interrotto, oppure non viene nemmeno stabilito.
Blocco e sblocco della tastiera
Potete bloccare il vostro apparecchio in modo da evitare che i tasti vengano azionati
involontariamente. Potete comunque rispondere alle chiamate premendo il tasto gancio.
Prima di effettuare una chiamata in uscita bisogna sbloccare la tastiera.
Modifica del codice segreto/password (PSWD)
Quando si accende l’apparecchio per la prima volta, la password è "0000". Si consiglia di
scegliere un numero personale d’identificazione di 2–10 cifre, in modo da proteggere le
programmazioni personali del vostro apparecchio portatile e i dati memorizzati ed evitare
che vengano modificati da persone non autorizzate.
•
Non immergete mai l’accumulatore in acqua e non gettateli nel fuoco.
•
Per la base di ricarica utilizzate esclusivamente l’alimentatore a spina fornito.
•
Prima della prima messa in funzione, l’accumulatore deve essere ricaricato per almeno
1 ora senza interruzione.
Avvertenze
• Durante la ricarica l’accumulatore può scaldarsi. Si tratta di un fenomeno normale che
non deve destare preoccupazione.
• L’accumulatore raggiunge solo dopo alcuni giorni la sua piena capacità e quindi anche
l’intera "durata di stand-by e conversazione".
Se l’apparecchio resta spento per parecchio tempo (p.es. durante le ferie), prima di
rimetterlo in funzione bisogna ricaricare l'accumulatore.
Smaltire correttamente gli accumulatori difettosi (non aggiungere ai rifiuti domestici).
20310998it_ba_a0
5
Italiano
Akku
Il portatile viene fornito con un accumulatore ricaricabile.
Installazione e messa in servizio
Contenuto della confezione portatile
Nella confezione dell’apparecchio trovate:
•
Apparecchio portatile
•
Clip
•
Akku
•
Istruzioni per l’uso
Bedienungsanleitung
Mode d'emploi
Istruzioni per l'uso
Operating instructions
Contenuto della confezione caricatore
•
Alimentatore a spinat
•
Base di ricarica
Collegare il ricevitore
Collegamento dell’allimentatore a spina
Collegare il cavo d’alimentazione nel connettore posto nel lato inferiore della base di
ricarica e sistemare il cavo nell’apposita scanalatura.
6
20310998it_ba_a0
Installazione e messa in servizio
Inserimento dell’accumulatore
1. Tenete il portatile con il clip rivolto verso il basso ed inserite l’accumulatore.
2. Premete l’accumulatore forte contro il portatile (vedi figura) e spingete verso l’esterno
i due fermi.
aganciato
Italiano
sganciato
Ricarica dell’accumulatore
Al momento della consegna l’accumulatore è scarico. Per ricaricarlo bisogna mettere
l’apparecchio nella sua base di ricarica. Un accumulatore di riserva può essere ricaricato
nella base di ricarica al posto del portatile.
Spia luminosa sulla base di ricarica:
•
•
rosso
verde
=
=
l’accumulatore viene ricaricato
ricarica dell’accumulatore completata
Una carica è sufficiente per:
circa
circa
80
8
ore in "Stand-by" o
ore in conversazione
Il tempo di ricarica è di:
circa
1
ora
20310998it_ba_a0
7
Prima di telefonare la prima volta
Impostazione della lingua del display
Normalmente la lingua del display impostata è quella della zona in cui è stato venduto
l’apparecchio. Se preferite un’altra lingua, potete scegliere un’altra di quelle memorizzate
nell’apparecchio.
*Lingua
¥
Nel modo di programmazione, premete
ripetutamente il tasto M, finché non appare
"*Lingua". (Potete vedere il carattere "*" anche
se l’indicazione è in una lingua straniera).
Con il tasto Fox sotto a "Lingua" richiamate la
lingua attuale. Premete il tasto Fox sotto a "¥",
finché non appare la lingua desiderata.
M
Ok
C
Confermate la lingua scelta con il tasto Fox sotto
a "Ok". Con il tasto C/End ritornate allo stato di
riposo.
Impostazione del sistema PBX
Potete registrare il vostro apparecchio cordless in 4 differenti sistemi PBX (A, B, C, D). In
tal modo siete raggiungibili con il vostro apparecchio anche se vi trovate in una sede della
vostra ditta.
Sistema
Nel modo di programmazione, premete
ripetutamente il tasto M, finché non appare
"Sistema".Premete il tasto Fox sotto a
"Sistema". Nel display viene visualizzato "Auto"
o il sistema attuale (A, B, C o D).
M
Canc.
M
¥
Nuovo
8
Home
Premete il tasto M. Se per esempio appare
l’indicazione "Registr: A" e "Cancellare",
significa che l’apparecchio è stato registrato nel
PBX "A" (premendo il tasto Fox sotto a
"Cancellare" si potrebbe cancellare la
registrazione).
Con il tasto Fox sotto a "¥" l’apparecchio può
essere registrato in altri tre sistemi PBX (B, C o D).
In tal caso il display indica "Registr: B (C o D)" e
"Nuovo". Con il tasto Fox sotto a "Nuovo" e
"Home" l’apparecchio cordless viene registrato
nel sistema "B" (sempre che sia disponibile e
autorizzato).
20310998it_ba_a0
Prima di telefonare la prima volta
Nuovo
GAP
Ok
1
2
3
4
5
6
7
8
9
0
Con un "Authentication Code" l’apparecchio
può essere registrato anche in un sistema PBX
estraneo con GAP (Generic Access Profile).
Premete i tasti Fox sotto a "Nuovo" e "GAP",
quindi dopo "AC: _____" introducete il codice
richiesto e confermate con il tasto Fox sotto a
"Ok".
Log on per GAP, compatibilità con altri prodotti DECT
Ascotel DECT supporta tutte le caratteristiche di prestazione della telefonia di base definite nello Standard del Generic Access Profile (GAP) (edizione di fine 1997). Qui rientrano
l’attivazione e la disattivazione di comunicazioni in uscita e in entrata, consultazione,
selezione della frequenza (DTMF) e le procedure */#-. Questo significa quanto segue:
• Il vostro apparecchio terminale DECT può collegarsi ed essere utilizzato nei PBX di altri
costruttori. Il presupposto per l’impiego di tutte le caratteristiche di base definite nello
standard GAP è che queste siano interamente implementate nel PBX corrispondente.
• Gli apparecchi portatili DECT di altri costruttori, che soddisfano lo standard GAP,
possono a loro volta collegarsi ed essere utilizzati nel vostro impianto. Essi però
offrono solo la funzionalità limitata dallo standard GAP e non danno la stessa qualità
del collegamento radio. In particolare, il SW per il Mobility Management con
Handover/Roaming dipende quasi al 100% dagli apparecchi portatili utilizzati e non
può essere adattato in maniera ottimale al vostro impianto.
System
Nel modo di programmazione, premete
ripetutamente il tasto M, finché non appare
"Sistema".Premete il tasto Fox sotto a
"Sistema". Nel display viene visualizzato "Auto"
o il sistema attuale (A, B, C o D).
Ok
Con il tasto Fox sotto a "¥" selezionate il sistema
desiderato o "Auto" e confermate con "Ok".
(Se il sistema disponibile è più di uno, con
"Auto" l’apparecchio cordless stabilisce
automaticamente il collegamento con il sistema
che offre il collegamento radio migliore).
M
¥
Avvertenze
• Con "Long Click 1" (min. 2 secondi) l’apparecchio portatile può essere commutato sul
prossimo sistema PBX disponibile (A, B, C oppure D). Se la commutazione non è
posizionata su "Auto", è indispensabile effettuare la commutazione manuale del
sistema PBX per far sí che il vostro portatile sia pronto per l’uso nel nuovo sistema PBX.
• Con "Long Click 2" vengono visualizzate la International Portable Equipment Identity
IPEI) e la PARK (Portable Access Right Key).
• Con "Long Click 5" viene visualizzato il numero della versione software dell’apparecchio
portatile insieme con la data.
20310998it_ba_a0
9
Italiano
Cambio del sistema PBX
Come telefonare
Rispondere alle chiamate
L’apparecchio segnala una chiamata.
Se l’apparecchio non è nel a sua base di ricarica,
per rispondere alla chiamata dovete premere il
tasto gancio
oppure
se l’apparecchio si trova nella sua base di ricarica,
risponde non appena viene sollevato (si veda
"Come programmare il vostro apparecchio",
"Risposta diretta").
Risposta per assente
Premete ripetutamente il tasto M finchè compare la funzione "R.x.ass" (Risposta per
assente). Premete in tale posizione il tasto Fox, sul display compare la scelta tra "Ute"
(Utente), "Ricer.p." (Ricerca persone) e "SC" (Suoneria centrale). Per rispondere alla
chiamata scegliere la funzione desiderata, componete il numero desiderato e premete il
tasto Fox sotto "Ok".
Durante la conversazione
Durante la conversazione il tasto M vi permette di eseguire altre funzioni, come p.es. fare
una richiamata, spegnere il microfono ("Mic mute"), regolare il volume dell’auricolare da
"Basso" ad "Alto" (o viceversa).
M
Per eseguire le altre funzioni, premete una o più
volte il tasto M.
Per terminare la conversazione
La conversazione viene interrotta premendo il tasto gancio o rimettendo l’apparecchio
nella sua base di ricarica. Ovviamente la conversazione può essere interrotta anche
dall’altro interlocutore. Dopo qualche secondo l’apparecchio ritorna nello stato di riposo.
Regolazione del volume del ricevitore
Tramite menù potete regolare il volume su "Alto" o "Basso".
Basso
M
Alto
Premete ripetutamente il tasto M finché non
appare l’indicazione "Alto". Premete il tasto Fox
sotto ad "Alto".
Avvertenza
La regolazione impostata rimane anche dopo la fine della conversazione.
10
20310998it_ba_a0
Come telefonare
Ascolto amplificato
Con il dispositivo di ascolto amplificato potete ascoltare per esempio un servizio
d’informazione attraverso l’altoparlante; in tal modo anche altre persone nella stanza
possono sentire l’informazione.
Dopo aver stabilito il collegamento, premere il
tasto altoparlante e regolare il volume desiderato
tramite i tasti di regolazione.
Italiano
Avvertenza
Durante l’ascolto amplificato, il microfono è automaticamente disattivato (nel display
appare il simbolo " ").
20310998it_ba_a0
11
Come telefonare
Preparazione della selezione
La preparazione della selezione consente di ridurre il rischio di comporre un numero
sbagliato.
Componete il numero desiderato senza premere prima il tasto gancio. Controllate il numero ed eventualmente correggetelo con il tasto C. A questo punto premete il tasto
gancio: il numero desiderato viene chiamato.
Selezione numerica
Corrisponde all’usuale procedura di selezione, però il collegamento viene stabilito solo nel
momento in cui si preme il tasto gancio.
1
2
3
4
5
6
7
8
9
Introducete il numero desiderato e premete il
tasto gancio.
0
Ripetizione della selezione
Nella memoria di ripetizione della selezione restano registrati i nomi ed eventualmente i
numeri degli ultimi 10 utenti chiamati.
Ripetiz.
M
Premete il tasto M.
Premete il tasto Fox sotto a "Ripetizione". Viene
visualizzato il numero ed eventualmente il nome
dell’ultimo utente chiamato.
¥
Premete ripetutamente il tasto Fox sotto a "¥",
finché non appare il numero dell’utente
desiderato.
Premete il tasto gancio.
Avvertenza
Il simbolo i indica che ci sono informazioni supplementari. Possono essere richiamate con
il tasto i.
Selezione con l’Hotkey
L’Hotkey consente di memorizzare fino a 6 nomi/numeri di utenti a cui dovete telefonare
spesso.
Premete ripetutamente l’Hotkey, finché non viene
visualizzato il nome desiderato.
Meier
Premete il tasto Fox sotto al nome desiderato e
poi premete il tasto gancio.
12
20310998it_ba_a0
Come telefonare
Selezione con i nomi di un‘agenda
Ci sono fino a tre elenchi (agende); un elenco interno (con tutti gli utenti derivati dal PBX),
un elenco di numeri di selezione abbreviata e un’agenda privata. I nomi degli utenti
consentono di realizzare il collegamento desiderato senza bisogno di introdurre il numero.
ABC
M
1
2
3
4
5
6
7
8
9
0
Premete il tasto M. Premete il tasto Fox sotto ad
ABC; appare il menu per la scelta dell‘agenda.
("Tutti" cerca in tutte le agende).
Immettere le iniziali di cognomi e nomi,- ad es.
E # A per Einstein Albert.
¥
Fate scorrere l’elenco con il tasto Fox sotto a "¥"
e premete il tasto gancio per avviare la selezione.
Avvertenza
L’immissione delle iniziali è il modo più semplice per selezionare un numero memorizzato
in una rubrica; in questo modo non occorre più ricordarsi il numero di telefono nè il numero abbreviato dell’utente desiderato.
Esempio:
M
DE F
AB C
2
1
2x
1x
1x
Einstein Albert:
tasto 2: due volte
tasto #: una volta (crea uno spazio vuoto)
tasto 1: una volta
Italiano
ABC
Se si conosce solo il cognome:
ABC
M
DE F
GH I
MNO
2
3
5
2x
3x
2x
1
...
etc.
C
I numeri o i nomi introdotti durante la
preparazione della selezione possono essere
corretti con il tasto di correzione (che cancella
l’ultima cifra ogni volta che lo si preme).
C
Un "Long Click" del tasto C pone fine ad una
procedura di selezione già avviata.
... 9
Naturalmente il vostro apparecchio portatile vi
consente di effettuare la selezione anche nel
modo usuale: premete il tasto gancio e
selezionate il numero.
Se fra l’introduzione di due cifre aspettate più di
10 secondi la selezione viene interrotta
automaticamente.
20310998it_ba_a0
13
Come telefonare
Lista chiamate
Il vostro apparecchio memorizza automaticamente i numeri delle ultime 10 chiamate a cui
non avete risposto.
Il simbolo i nel display vi segnala che ci sono state delle chiamate a cui non avete
risposto. Potete visualizzare i numeri e chiamare i rispettivi utenti.
Chiamate
¥
Cancellare
Premete ripetutamente il tasto i, finché non
appare "Chiamate". Premete il tasto Fox sotto
"Chiamate" e fat scorrere la lista con il tasto Fox
sotto a "¥" fino ai numeri desiderati.
Premete il tasto gancio, per chiamare il numero
visualizzato nel display.
Premete il tasto Fox sotto a "Cancellare" per
eliminare la registrazione dalla lista delle
chiamate.
Disattivazione del microfono
Durante una conversazione al telefono desiderate scambiare qualche parola con un’altra
persona che si trova nel vostro ufficio. Il vostro apparecchio vi permette di spegnere il
microfono.
Micro
Micro
Premete il tasto Fox sotto a "Microfono". Il
microfono è disattivato (nel display appare il
simbolo " ").
Per riaccendere il microfono premete di nuovo il
tasto Fox sotto a "Microfono".
Attivazione della chiamata discreta
Durante una riunione la suoneria dell’apparecchio può disturbare. Attivando la chiamata
discreta, le chiamate in arrivo vengono segnalate acusticamente solo una volta. Voi avete
la possibilità di identificare il chiamante in base a quanto indicato sul display e decidere se
rispondere o meno. Se non rispondete, il chiamante viene registrato nella lista delle
chiamate. Più tardi il simbolo i nel display ve lo ricorderà. La chiamata discreta resta attiva
finché non viene disattivata. Il simbolo i nel display vi ricorda anche questo.
Discr
M
Premete ripetutamente il tasto M finché non
appare "Discreta". Premete il tasto Fox sotto
"Discreta" per attivare la funzione.
Avvertenza
La chiamata discreta può essere attivata anche durante una chiamata. Ad ogni chiamata
sul display appare il punto del menu "Chiamata discreta". La suoneria viene disattivata
non appena si preme il tasto Fox sotto "Discreta".
14
20310998it_ba_a0
Per usare le funzioni comfort
Disattivazione della chiamata discreta
Disattivare
Premete ripetutamente il tasto i, finché nel
display non appare "Discreta" e "Disattivare".
Premete il tasto Fox sotto "Disattivare". La
chiamata discreta è disattivata.
"Parcheggio" di una conversazione
2.–conv
P
Premete il tasto Fox sotto a "2._conversazione",
in modo da ripristinare la conversazione con il
primo interlocutore. Premete ripetutamente il
tasto M, finché non viene visualizzato "P"
(Parcheggiare). Premete il tasto Fox sotto a "P",
per parcheggiare la conversazione in atto.
Riprendere
Premete il tasto Fox sotto a "2._conversazione"
per passare al secondo interlocutore. A questo
punto potete trasferire la chiamata a un altro
utente.
Premete il tasto Fox sotto a "Riprendere" per
ripristinare la conversazione con l’interlocutore in
attesa.
M
2.–conv
Avvertenza
A differenza di una chiamata in mantenimento, che occupa entrambi i canali vocali
disponibili, il parcheggio non occupa nessun canale, il che vi consente (se necessario) di
passare a un altro utente il vostro secondo chiamante. Se appare il Symbolo [P] il
parcheggio e gia occupato.
Richiamata alternata
Dopo aver eseguito una richiamata, potete ritornare al primo interlocutore senza
interrompere la connessione col secondo. In altre parole potete passare continuamente da
un interlocutore all’altro (richiamata alternata).
2.–conv
20310998it_ba_a0
2.–conv
Premete il tasto Fox sotto a "2._conversazione"
per passare al primo interlocutore.
Premete il tasto Fox sotto a "2._conversazione"
per ripristinare la conversazione con
l’interlocutore della richiamata e così via (tutte le
volte che lo desiderate o è necessario).
15
Italiano
Durante una conversazione, un terzo utente può "bussare" da voi, ossia trasmettere un
segnale di avviso. Se voi rispondete alla chiamata, la precedente viene messa in attesa.
Prima di poter trasferire la seconda chiamata a un altro utente, dovete "parcheggiare" la
prima.
Per usare le funzioni comfort
Trasferimento della conversazione
Dopo aver realizzato una richiamata potete collegare insieme direttamente i vostri due
interlocutori.
Premete il tasto gancio. Il vostro apparecchio
torna automaticamente allo stato di riposo.
Conferenza
Avete avviato una richiamata e adesso volete realizzare una conferenza telefonica (a tre)
insieme con il vostro primo interlocutore.
Confer
M
Premete il tasto M e poi il tasto Fox sotto a
"Conferenza".
Avvertenza
Niente paura! Realizzando una conferenza non si può "perdere" nessuna chiamata. Le
chiamate vengono interrotte soltanto premendo il tasto C o il tasto gancio!
Deviazione di chiamata
Potete deviare le chiamate su un altro apparecchio, anche su quello dell‘operatore oppure
lasciare un messaggio.
Dev.
¥
M
Premete il tasto M finché non appare
"Deviazione" e poi premete il tasto Fox sotto a
"Deviazione".
Premete il tasto Fox sotto "¥" per selezionare il
tipo di deviazione ( es: "se occupato" o
"a tempo")
Ok
1
2
3
4
5
6
7
8
9
0
Scegliete la destinazione della deviazione e se
necessario introducete il nuovo numero.
Confermate con "Ok".
Avvertenza
Se la deviazione deve essere effettuata quando il vostro telefono è occupato, scegliere
"Dev. su occ.".
Twin Mode (presente/assente)
Se oltre all'apparecchio cordless avete anche un telefono a filo, il twin mode vi permette
di essere sempre raggiungibili. In tal caso con il Twin Mode la vostra reperibilità sarà
garantita nel modo più semplice possibile. In caso di Twin Mode programmato (fare
riferimento a "Come programmare l’apparecchio") viene attivata automaticamente la
deviazione di chiamata, non appena sollevate l’apparecchio portatile dalla base di carica.
16
20310998it_ba_a0
Per usare le funzioni comfort
Lasciare un’informazione in caso d’assenza
Volete lasciare un’informazione ad eventuali interlocutori interni che chiamano.
Dev.
¥
Premete ripetutamente il tasto M finché non
appare "Deviazione". Successivamente premete il
tasto Fox sotto a "Deviazione" e poi "¥", finché
nel display non appare "Dev. su Info" (Deviazione
su informazione).
Ok
¥
Premete il tasto Fox sotto a "Ok".
Premete ripetutamente il tasto Fox sotto a "¥",
finché non viene visualizzato l’informazione
desiderata (simbolo i nel display).
M
Premete il tasto i una o più volte per visualizzare
l’intera informazione.
Ok
2
3
4
5
6
7
8
9
Con il tasto C e il tastierino potete modificare
l’informazione (se necessario, vedi "Selezione
con i nomi").
Premete il tasto Fox sotto a "Ok".
0
Avvertenza
Con il tasto C potete anche cancellare completamente il messaggio standard e scrivere un
testo a piacere.
Risposta alla prenotazione (come richiamare un utente a cui non avete risposto)
Un utente deve comunicarvi qualcosa di importante. Malgrado il vostro apparecchio
portatile, non ha potuto raggiungervi. Dal suo apparecchio esegue una prenotazione.
Nel display del vostro apparecchio appare l’indicazione "Prenot. da" e "Chiam."
"Cancel".
Chiam.
Cancel
Premete il tasto Fox sotto a "Chiamare" per
richiamare il chiamante oppure sotto a
"Cancellare" se non è più necessario o non ha
più senso richiamare.
Ricerca dell’interlocutore mediante l’impianto ricerca-persone
Se volete cercare un utente assente mediante il ricerca persone.
Ric.
M
1
2
3
4
5
6
7
8
9
0
Ok
Premete ripetutamente il tasto M finché compare
la funzione "Ricerca persone". Premete a questo
punto il tasto Fox e componete il numero
dell’interlocutore cercato.
Confermare con "Ok".
20310998it_ba_a0
17
Italiano
C
1
Per usare le funzioni comfort
Prenotazione
Volete che un utente occupato o che non risponde vi richiami.
Pren.
Cancellare
Premete il tasto Fox sotto a "Prenotazione".
Sentite il suono di conferma. Nel display appare
"Chiamata attesa dal Numero nnn" e
"Disattivare".
Premendo il tasto Fox sotto "Cancellare" si
annullare la prenotazione.
Avvertenza
Si può effettuare una sola prenotazione per volta.
Invio di un messaggio
Nel PBX sono memorizzati dei messaggi standard. Potete sceglierne uno, eventualmente
completarlo o modificarlo e trasmetterlo all’utente o al gruppo desiderato.
Mess.
¥
M
Premete ripetutamente il tasto M finché non
appare "Messaggio". Premete il tasto Fox sotto a
"Messaggio".
Premete ripetutamente il tasto Fox sotto a "¥",
finché non viene visualizzato il messaggio
desiderato (simbolo i nel display).
Premete il tasto i una o più volte, per visualizzare
il resto del messaggio.
Ok
C
1
2
3
4
5
6
7
8
9
0
Ok
1
2
3
4
5
6
7
8
9
0
Con il tasto C ed il tastierino potete modificare il
messaggio (se necessario, vedi "Selezione con i
nomi").
Premete il tasto Fox sotto a "Ok".
Selezionate il numero dell’utente/gruppo a cui è
destinato il messaggio. Premete il tasto Fox sotto
a "Ok" per trasmettere il messaggio.
Avvertenze
• La procedura può essere avviata anche con la "Preparazione della selezione", ovvero si
introduce prima il numero e poi si sceglie il messaggio.
• Naturalmente con il tasto C potete anche cancellare completamente il messaggio
standard e scrivere un vostro messaggio personale.
18
20310998it_ba_a0
Per usare le funzioni comfort
Lettura dei messaggi
Se avete ricevuto un messaggio, nel display appare "Messaggio", insieme con il numero
del mittente e le opzioni "Leggere" e "Cancellare".
Legg.
Premete il tasto Fox sotto a "Leggere". Il segno
"+" indica che una parola è stata spezzata e
viene visualizzata nella riga successiva.
Premete il tasto i, per visualizzare la riga
successiva.
Alla fine del messaggio il display ritorna alle opzioni iniziali "Leggere" e "Cancellare".
Cancel
Premete il tasto Fox sotto a "Cancellare".
Avvertenza
Per visualizzare eventuali altri messaggi, bisogna cancellare il messaggio letto.
Dal vostro apparecchio portatile potete fare annunci a uno o più utenti interni, a
condizione che i loro apparecchi siano muniti di altoparlante.
Annunc.
Premete ripetutamente il tasto M finché non
appare "Annuncio". Premete il tasto Fox sotto ad
"Annuncio".
Gruppo
Introducete il numero dell’utente desiderato
(oppure premete il tasto Fox sotto a "Gruppo" e
introducete il numero del gruppo; questo per gli
annunci ai gruppi di utenti predefiniti).
M
1
2
3
4
5
6
7
8
9
0
Ok
20310998it_ba_a0
Premete il tasto Fox sotto a "Ok" e fate
l’annuncio.
19
Italiano
Annuncio
Per usare le funzioni comfort
Modo trasparente (selezione in multifrequenza DTMF)
Durante un collegamento la selezione in multifrequenza consente di attivare una
determinata funzione, p.es. di ascoltare i messaggi della segreteria telefonica.
1
2
3
4
5
6
7
8
9
0
"Long Click" del tasto * fino a quando viene
visualizzato il messaggio "Trasparente".
Introducete la sequenza di caratteri per attivare la
funzione desiderata.
Terminata l’operazione:
C
Premete il tasto C per disattivare il modo
trasparente
oppure
Disattivare
premete il tasto Fox sotto ad "Disattivare".
Attivazione/conclusione di una richiamata
Durante una conversazione il vostro interlocutore vi pone una domanda a cui non siete in
grado di rispondere. Desiderate consultare un altro collaboratore, senza interrompere la
connessione.
Richi.
1
2
3
4
5
6
7
8
9
Introducete il numero dell’utente che volete
consultare.
Premete il tasto Fox sotto a "Richiamata";
l’utente viene chiamato (la conversazione
precedente viene posta in attesa).
0
Dopo aver ricevuto l’informazione desiderata:
C
Premete il tasto C per ritornare alla
conversazione con il primo interlocutore.
Avvertenza
Se dopo una richiamata si preme il tasto gancio, per 10 secondi viene emesso un segnale
acustico continuo. Per ripristinare il collegamento con l’interlocutore in attesa, premete il
tasto gancio.
20
20310998it_ba_a0
Come programmare il vostro apparecchio
Cosa occorre osservare nella programmazione
La programmazione fa parte del metodo di comando; prima di iniziare la
programmazione, leggete il capitolo "Metodo di comando" all’inizio delle presenti
istruzioni.
Modo di programmazione
Potete attivare il modo di programmazione in due modi:
M
"Long click" (min. 2 secondi) del tasto menu
oppure
Programmare
M … M
premete ripetutamente il tasto M finché non
viene visualizzato "Programmare".
Avvertenza
I "Long Click" dipendono dal software e dal tipo di PBX.
Italiano
Tasto menu
Il tasto M vi permette di muovervi a due livelli: dapprima nei menu di programmazione
(PRG 1-…; selezionate il settore che desiderate programmare, p.es. "Tasti") e
successivamente a livello delle sottofunzioni (p.es. occupazione di un tasto numerico). Da
entrambi i livelli potete uscire premendo il tasto C/End o il tasto gancio.
Memorizzazione
I dati da voi introdotti o modificati nel punto di un menu vengono memorizzati quando
premete il tasto Fox sotto a "Ok". Se invece premete un altro tasto, la programmazione
che avete effettuato non viene memorizzata.
20310998it_ba_a0
21
22
13:39
Menu prog 2
Tasti
Mobile
Menu prog 1
Agenda
Testo
2 Set
Cerca.
Ripetiz.
Cont. ricar.
Prog.
Risp.
Nome:_
Nuova
Testo:_
Ok
ABC
Deviazione
Ok
Diretto:
Ok
¥
No
¥
Utente
Ok
Rn:Nome
Ok
Rn:Numero
Ok
ABC
R.x._ass.
Peter
Legg.
Discr.
032 624 21 11
Modific
n¥
Dev.
¥
ABC
Cancel
Ric.
Annunc.
Me1:+1N#PX
Ok
ABC
Mess.
Me2:I#21PX
Ok
ABC
Programmare
Tasto Fox (Ok)
Tasto Fox
Tasto M
Come programmare il vostro apparecchio
Vista d’Insieme
20310998it_ba_a0
¥
¥
¥
¥
Blocco tasti
Ok
Hotkey
Ok
20310998it_ba_a0
Tasto_fox
Ok
Segn.conf.
Ok
No
¥
Si
¥
Segnale:
Ok
Fox2
Segnale:
Ok
Tasto_fox
Fox1
Fn: Cancel.
Ok
¥
¥
Fn:Funzione
Ok
Fn:Cancel.
Ok
Italiano
¥
Nn:Numero
Ok
¥
¥
Fn: Funzione
Ok
Non distur.
Ok
Me1:Numero
Ok
ABC
¥
Nn: Numero
Ok
Si
HotkeyPrg:
Hk3
Hk4
Sbloccare?
No
HotkeyPrg:
Hk1
Hk2
30. Juli
13:40
Sbloccare
Non distur.
Ok
¥
Me1:Numero
Ok
ABC
Me1:I*26PX
Ok
ABC
Me1:Nome
Ok
ABC
HotkeyPrg:
Hk5
Hk6
Me1:I*26PX
Ok
ABC
Me1:Nome
Ok
ABC
Me1:Nome
Ok
ABC
Me1:Nome
Ok
ABC
Me2:I#26PX
Ok
ABC
Me2:I#26PX
Ok
ABC
Come programmare il vostro apparecchio
Vista d’Insieme
23
24
Menu prog 4
Suon
*Lingua
Menu prog 3
Appar
PSWD
Volume
Ok
Chiam. discr.
Ok
1ß
3ß
Melodia
Ok
Melodia
Ok
libero
Ok
4ß
4ß
¥
Conferma: ****
Ok
Ritorno
Ritmo
Ok
Ritmo
Ok
Prog. blocc.
Ok
2ß
3ß
¥
bloccato
Ok
1) Al di fuori della portata massima dell’unità radio troverete qui anche
il menù "Vibrazione". A questo menù potete accedere anche con un
"Long-Click" del tasto altoparlante.
1)
¥
Volume
Ok
PSWD: ****
Ok
Ritorno
Nuova: ****
Ok
Ritorno
Chiam. norm.
Ok
¥
¥
¥
Bloccare
Ok
Italiano
Ok
¥
Spegnere
Ok
Corrente:****
Ok
Ritorno
¥
Come programmare il vostro apparecchio
Vista d’Insieme
20310998it_ba_a0
20310998it_ba_a0
A
¥
Annuncio:
><
Test
Look Show_HO
A
¥
Sistema:
Ok
1) Il punto del menu "Test" è
riservato all’installatore
1)
Menu prog 5
Test
Sistema
B
¥
Show_HO: None
Ok
¥
Annuncio:
Nuov.
Italiano
Annuncio:
B
Home
GAP
AC:
Ok
Ritorno
Come programmare il vostro apparecchio
Vista d’Insieme
25
Come programmare il vostro apparecchio
Twin Mode (presente/assente)
Se oltre all’apparecchio cordless avete anche un telefono a filo, il twin mode vi permette
di essere sempre raggiungibili.
Il contatto della base di ricarica riconosce 2 stati:
a) apparecchio nella base di ricarica (presente)
b) apparecchio fuori della base di ricarica (assente)
In base a tali due stati viene esseguita la deviazione automatica della chiamata (DDC)
sull’apparecchio cordless non appena viene tolto dalla base di ricarica.
Quando si rimette l’apparecchio nella base di ricarica la deviazione viene disinserita
automaticamente.
Attivazione del Twin Mode
¥
Mobile
Nel modo programmazione premere il tasto M
tante volte fino a far apparire la dicitura "Mobile". Premere il tasto Fox sotto "Mobile".
Ok
Premere il tasto Fox sotto "Prog.", quindi
effettuare lo scroll tra "¥" e "Twin" con il tasto
Fox e confermare con "Ok".
Ok
Alla voce "TwinN.:" immettere il numero di
allacciamento dell’apparecchio fisso che deve
essere deviato sull’apparecchio portatile. Attivare
il Twin Mode con il tasto Fox sotto "Ok".
M
Prog.
¥
1
2
3
4
5
6
7
8
9
0
Disattivazione del Twin Mode
Mobile
M
Prog.
¥
Ok
Nel modo programmazione premere il tasto M
tante volte fino a far apparire la dicitura "Mobile". Premere il tasto Fox sotto "Mobile".
Premere il tasto Fox sotto "Prog.", quindi
effettuare lo scroll tra "¥" e "Nessuna funzione"
e disattivare il Twin Mode con il tasto Fox sotto
"Ok".
Avvertenze
• Se su un apparecchio terminale fisso viene attivata una AUL/RWS verso la segretaria, la
Voice Mail o verso il proprio apparecchio GSM etc., mentre il portatile si trova nella
base di ricarica, in questo caso questa funzione ha una priorità maggiore rispetto al
Twin Mode. Non viene effettuata alcuna deviazione automatica al portatile se lo stesso
viene preso dalla base di ricarica. Il Twin Mode viene nuovamente attivato, non
appena viene disattivata la AUL/RWS impostata nell’apparecchio fisso.
• Oltre al Twin Mode è possibile impostare anche altre funzioni (fare riferimento al
manuale di programmazione "Mobile")
26
20310998it_ba_a0
Come programmare il vostro apparecchio
Agenda privata
Oltre all’elenco degli utenti del PBX e all’elenco di selezione abbreviata, potete preparare
un’agenda privata con un massimo di 30 (00..29) numeri telefonici e nomi. Bloccando le
funzioni di programmazione del vostro apparecchio portatile, potete evitare che tali dati
vengano modificati da persone non autorizzate.
M
Agenda
Nuova
Ok
1
2
3
4
5
6
7
8
9
Nel modo di programmazione premete
ripetutamente il tasto M, finché non appare
"Agenda".
Premete il tasto Fox sotto ad "Agenda" e quindi
sotto a "Nuova" o "Cerca".
Premendo "Nuova" viene visualizzata la prima
memoria libera.
0
Cerca.
Modific
¥
Ok
1
2
3
4
5
6
7
8
9
Dopo aver premuto "Cercare", fate scorrere
l’agenda con il tasto Fox sotto a "¥", finché non
appare la registrazione desiderata.
Premete il tasto Fox sotto a "Modificare",
modificate le registrazioni e memorizzatele
premendo il tasto Fox sotto a "Ok".
0
Avvertenze
• Se una memoria è già stata programmata, viene visualizzata la registrazione corrente.
Ovviamente potete modificare i dati registrati.
•
È consigliabile introdurre per ogni numero il nome corrispondente; ciò facilita
notevolmente la ricerca e la selezione alfabetica.
•
Quando durante una chiamata viene visualizzato il numero del chiamante sul display
(CLIP), il sistema cerca tale numero negli elenchi e nell’agenda privata. Se è stato
memorizzato già con un nome, viene visualizzato anche il nome.
20310998it_ba_a0
27
Italiano
Introducete numero e confermate con "Ok",
nome e memorizzateli con "Ok".
Come programmare il vostro apparecchio
Linguaggio macro
Il linguaggio macro consente di memorizzare sotto un solo tasto diverse funzioni una
dopo l’altra.
I
X
P
N
.
Z
R
Impegnare
Realizzare la connessione
Pausa (1 secondo)
Inserire il numero introdotto nella preparazione della selezione
Funzione tasto di registro
Attivare/disattivare modo trasparente
Inserire l’ultimo numero selezionato
Esempi:
I201
Impegnare e chiamare il 201
I*21201X
Impegnare, eseguire la deviazione delle chiamata sul 201 e chiamare
quest'ultimo.
Programmazione del testo per lo stato di riposo
Al posto di data e/o ora per lo stato di riposo del vostro apparecchio potete definire un
testo personale.
Testo
Nel modo di programmazione premete il tasto
Fox sotto a "Testo" e introducete il testo
desiderato (al massimo 12 caratteri).
Ok
Premete il tasto Fox sotto a "Ok" per
memorizzare il testo introdotto.
C
Ok
Modificate il testo per lo stato di riposo (se
necessario).
Con il tasto di correzione (C/End) si possono
cancellare i caratteri a sinistra del cursore.
Terminata l’editazione del testo, premete il tasto
Fox sotto a "Ok".
Avvertenza
Un "Long Click" del tasto C/End (min. 2 secondi) consente di ritornare al menu
precedente.
28
20310998it_ba_a0
Come programmare il vostro apparecchio
Blocco/sblocco della tastiera
Potete bloccare la tastiera per evitare che i tasti vengano premuti inavvertitamente. Le
chiamate vengono segnalate comunque e voi potete rispondere premendo il tasto gancio.
Dopo la conversazione è possibile effettuare una chiamata in uscita entro 5 secondi.
Trascorsi i 5 secondi il bloccaggio dei tasti viene immediatamente riattivato (variante 1).
M
Tasti
Ok
Sbloccare
Nel modo di programmazione premete
ripetutamente il tasto M finché non appare
"Tasti".
Premete il tasto Fox sotto a "Tasti".
Il display indica "Blocco tasti".
Bloccate la tastiera premendo il tasto Fox sotto
ad "Ok".
Il display indica "Sbloccare".
Premete il tasto Fox sotto a "Sbloccare".
L’apparecchio chiede una conferma con
"Sbloccare?", per sapere se il blocco della
tastiera deve veramente essere tolto.
Con "Sì" appare il "Display di riposo" e
l’apparecchio funziona di nuovo normalmente.
Avvertenze
• Con "Long Click 8" (min. 2 secondi) è possibile attivare anche la variante 1 del
bloccaggio tasti.
• Con "Long Click 9" è possibile attivare la variante 2 del bloccaggio tasti. In caso di
chiamata questa funzione non viene disabilitata automaticamente, ma deve avvenire
manualmente (fare riferimento a quanto scritto in precedenza), per poter rispondere
alla telefonata con il tasto di conversazione.
20310998it_ba_a0
29
Italiano
Si
Come programmare il vostro apparecchio
Programmazione dell’Hotkey
L’Hotkey è un tasto liberamente programmabile, che permette di memorizzare fino a 6
numeri/nomi o funzioni. Con le macro potete memorizzare intere procedure.
Memorizzazione di numeri/nomi sotto all’Hotkey
Tasti
Nel modo di programmazione premete il tasto M
finché non appare "Tasti".
Premete il tasto Fox sotto a "Tasti".
M
¥
Ok
Premete il tasto Fox sotto "¥", finchè compare
"Hotkey". Premendo il tasto Fox sotto "Ok"
compaiomo le scritte "Hotkey Prg:" (Hotkey
programmazione), "Hk1" e "Hk2"
Ok
Premendo una/due volte il tasto M, richiamate le
memorie "Hk3" e "Hk4", rispettivamente "Hk5"
e "Hk6".
Selezionate con il tasto Fox le memorie
desiderate (Hk1…Hk6).
M
Ok
Nel menu "Nn: Numero" confermate ancora con
"Ok".
Ok
1
2
3
4
5
6
7
8
9
Introducete numeri e confermate con "Ok",
nome e premete il tasto Fox sotto a "Ok" per
memorizzare la registrazione.
0
Avvertenza
Con un "Long click" sul tasto Hotkey si entra direttamente nel menu di programmazione.
30
20310998it_ba_a0
Come programmare il vostro apparecchio
Memorizzazione di una funzione sotto all’Hotkey
Si procede come sotto a numeri/nomi, fino alla selezione delle memorie Hk1…Hk6,
quindi:
¥
Ok
Premete il tasto Fox sotto a "¥" per richiamare il
menu "Fn: Funzione", quindi confermate con
"Ok".
¥
Ok
Premete ripetutamente il tasto sotto a "¥",
finché non viene visualizzata la funzione
desiderata, poi confermate con "Ok".
Ok
Viene visualizzato il contenuto della memoria 1
(Me1) per questa funzione (attivare la funzione).
Premete il tasto Fox sotto a "Ok" per
memorizzare la funzione.
Ok
Se desidarato introducete il nome e confermate
con "Ok". Il contenuto della memoria 1 (Me1)
viene memorizzato, simultaneamente viene
visualizzato il contenuto della memoria 2 (Me2)
(disattivare la funzione).
1
2
3
4
5
6
7
8
9
0
Ok
Italiano
Con "Ok" la funzione viene memorizzata.
Avvertenze
• Nelle due memorie vengono registrati automaticamente i corrispondenti codici di
funzione. Se necessario tali codici possono essere completati/modificati.
•
Se durante l’impostazione non viene introdotto un nome, il sistema introduce un
breve nome predefinito.
•
Se una delle funzioni programmate è attiva, nella riga dei simboli appare " " e la
funzione corrispondente viene marcata con "|".
•
Un "Long click" sul tasto Hotkey fa saltare direttamente al menu di programmazione.
20310998it_ba_a0
31
Come programmare il vostro apparecchio
Programmazione del tasto Fox
Potete utilizzare entrambi i tasti Fox come tasti programmabili liberamente. In tal modo
allo stato di riposo il vostro display indica poi i numeri utilizzati più spesso o le funzioni
che potete attivare comodamente premendo un unico tasto (la volpe corrispondente). Se
sotto al tasto Fox viene memorizzata una funzione, il suo stato attivo viene visualizzato
con il simbolo "| ".
Memorizzazione di numeri/nomi o funzioni sotto al tasto Fox
Tasti
Nel modo di programmazione premete
ripetutamente il tasto M, finché non appare
"Tasti". Premete il tasto Fox sotto a "Tasti".
M
¥
Ok
Fox1
Fox2
Premete ripetutamente il tasto Fox sotto a "¥",
finché non appare "Tasto_Fox".
Premete il tasto Fox sotto a "Ok" e quindi
scegliete il tasto desiderato ("Fox1" o "Fox2").
Continuate come con "Programmazione
dell’Hotkey".
Avvertenze
• Un "Long click" del tasto Fox consente di passare direttamente alla programmazione dei
tasti Fox.
• Se entrambi i tasti Fox sono occupati da un numero o una funzione e un nome, si perde la
visualizzazione della qualità.
• La visualizzazione della qualità viene invece conservata quando per il tasto Fox 1 o 2 al
posto di un nome viene immesso uno spazio con il tasto #.
Segnale acustico di conferma dei tasti
Se lo si desidera, l’apparecchio portatile può confermare con un breve segnale acustico
l’azionamento di ogni tasto.
Tasti
Nel modo di programmazione premete
ripetutamente il tasto M, finché non appare
"Tasti". Premete il tasto Fox sotto a "Tasti".
M
¥
Ok
Premete il tasto Fox sotto a "¥", finché non
appare "Segnale di conferma". Confermate con
"Ok".
¥
Ok
Con il tasto Fox sotto a "¥" scegliete
"Segnale: Si" oppure "Segnale: No".
Premete il tasto Fox sotto a "Ok" per confermare
programmazione.
Avvertenza
Quando si rimette l’apparecchio portatile nella sua base di ricarica viene sempre emesso
un breve segnale acustico di conferma. Durante una conversazione il volume del segnale
acustico è ridotto.
32
20310998it_ba_a0
Come programmare il vostro apparecchio
Risposta diretta (senza il tasto gancio)
Se l’apparecchio portatile è predisposto per rispondere in modo "Diretto", quando arriva
una chiamata è sufficiente togliere l’apparecchio dalla base di ricarica, senza bisogno di
premere il tasto gancio.
Quando si rimette l’apparecchio nella base di ricarica il collegamento viene interrotto, se
non è stato precedentemente interrotto con il tasto gancio.
Mobile
Risp.
Nel modo di programmazione premete
ripetutamente il tasto M, finché non appare
"Mobile". Premete il tasto Fox sotto a "Mobile"
e poi sotto a "Rispondere".
¥
Ok
Con il tasto Fox sotto a "¥" passate su "Diretto:
Si". Confermate con il tasto Fox sotto a "Ok" la
predisposizione "Diretto: Si".
M
Accensione e spegnimento dell’apparecchio portatile
Spegnimento
Appar.
Ok
Nel modo di programmazione premete
ripetutamente il tasto M, finché non appare
"Apparecchio".
Italiano
M
Premete il tasto Fox sotto ad "Apparecchio";
appare "Spegnere".
Premete il tasto Fox sotto a "Ok" per spegnere
l’apparecchio.
Il collegamento con l’unità radio viene interrotto
(il display si spegne).
Avvertenze
• L’apparecchio viene spento anche con un "Long click" (min. 2 secondi) del tasto 0 dei
tasti numerici.
• Al di fuori della portata massima dell’unità radio l’apparecchio portatile cerca sempre
di stabilire un collegamento con un’unità radio. Per non consumare inutilmente la
batteria, si consiglia di spegnere l’apparecchio quando si esce per parecchio tempo
dalla portata massima dell’unità radio.
Accensione
Si
20310998it_ba_a0
Premere il tasto gancio e attivare l’apparecchio
con il tasto Fox alla voce "Si".
33
Come programmare il vostro apparecchio
Bloccare/sbloccare l’apparecchio portatile
Potete bloccare il vostro apparecchio portatile per evitare abusi. Con questa funzione
viene attivato il blocco cifre del PBX. Il Gestore del vostro sistema può spiegarvi se e in
caso affermativo quali numeri (p.es. i numeri di emergenza) possono essere composti e
chiamati malgrado il blocco.
Quando l’apparecchio è bloccato, potete comunque rispondere immediatamente alle
chiamate premendo il tasto gancio. Prima di poter effettuare una telefonata in uscita
bisogna invece sbloccare l’apparecchio.
È consigliabile bloccare le funzioni di programmazione del vostro apparecchio portatile
con "Prog.blo". In tal modo potete p.es. proteggere le registrazioni della vostra agenda
privata.
Appar
M
¥
Nel modo di programmazione premete
ripetutamente il tasto M, finché non compare
"Apparecchio" e poi premete il tasto Fox sotto
ad "Apparecchio"; viene visualizzato
"Spegnere".
Ok
1
2
3
4
5
6
7
8
9
Con il tasto Fox sotto a "¥" selezionate
"Bloccare", premete "Ok" e introducete il codice
segreto/password (PSWD).
0
Ok
¥
Premete il tasto Fox sotto a "Ok" e poi con il
tasto Fox sotto a "¥" scegliete "libero",
"Prog._blo" (Programmazione bloccata" o
"bloccato" (con "libero" l’eventuale blocco viene
disattivato).
Premete il tasto Fox sotto a "Ok".
Ok
Modifica del codice segreto/password (PSWD)
Quando si accende l’apparecchio portatile per la prima volta il codice segreto/password ha
il valore "0000". Si consiglia di scegliere subito un codice segreto di 2–10 cifre, in modo
da proteggere dagli abusi (modifica, cancellazione) la programmazione personale
dell’apparecchio e i dati memorizzati.
Nel modo di programmazione premete
PSWD
ripetutamente il tasto M, finché non appare
"PSWD" (password). Premete il tasto Fox sotto a
"PSWD" e introducete il codice valido al
Ok
momento.
M
1
2
3
4
5
6
7
8
9
0
1
2
3
4
5
6
7
8
9
0
Ok
Ok
1
2
3
4
5
6
7
8
9
0
34
Premete il tasto Fox sotto a "Ok" e introducete la
nuova password "Ok".
Premete il tasto Fox sotto a "Ok", appare
"Conferma". Introducete una seconda volta la
nuova password e confermate con il tasto Fox
sotto a "Ok".
20310998it_ba_a0
Come programmare il vostro apparecchio
Impostazione della chiamata discreta e della suoneria
Il vostro apparecchio portatile può segnalare una chiamata con diversi volumi, melodie e
ritmi. Potete scegliere la versione che preferite, in modo che vi sia più facile distinguere se
una determinata chiamata è per voi o se proviene dall’apparecchio del vostro vicino.
In caso di "Chiamata discreta" l’apparecchio segnala ogni chiamata suonando una sola
volta.
M
Ok
¥
Premete il tasto Fox sotto a "Suoneria" e con il
tasto Fox sotto a "¥" scegliete "Chiamata normale" o "Chiamata discreta".
Ok
Premete il tasto Fox sotto a "Ok", per attivare il
segnale acustico impostato.
ß
Premete ripetutamente il tasto Fox sotto a "ß",
fino a ottenere il volume desiderato.
Ok
ß
Premete il tasto Fox sotto a "Ok", per
memorizzare l ‘impostazione e selezionare una
melodia nel menu successivo con il tasto Fox
sotto a "ß".
ß
Ok
Dopo aver memorizzato la melodia con "Ok",
nel menu "Ritmo" premete il tasto Fox sotto a
"ß" per scegliere il ritmo desiderato, quindi
confermate con il tasto Fox sotto a "Ok".
Italiano
Suon.
Nel modo di programmazione premete
ripetutamente il tasto M, finché non appare
"Suoneria".
Avvertenze
• Con il tasto M potete passare ciclicamente fra i punti del menu "Volume", "Melodia"
e "Ritmo", senza bisogno di memorizzare le eventuali modifiche eseguite.
•
Per ragione di sicurezza, il primo segnale acustico sarà emesso con un volume più
ridotto confronto a quelli successivi.
20310998it_ba_a0
35
Come programmare il vostro apparecchio
Accensione del vibratore
Quando Vi trovate in un ambiente rumoroso, non sentite il segnale acustico e non vedete
il LED di segnalazione, il vibratore Vi segnala in modo discreto e sicuro la chiamata in
arrivo.
36
Ok
Saltare alla voce del menù "Vibrazione" con un
"Long-Click" del tasto altoparlante e premere il
tasto Fox sotto "Ok".
¥
Ok
Con il tasto Fox sotto "¥" avete ora la possibilità
di selezionare "Suoneria", "Vibrazione" oppure
"Entrambi", premendo il tasto Fox sotto "Ok",
quando viene visualizzata la rispettiva funzione.
¥
Ok
Con il tasto Fox sotto "¥", selezionare "Simbolo:
Acceso" oppure "Simbolo: Spento" e
confermare con "Ok". In caso di "Simbolo:
Acceso", il simbolo " " che appare sul display
segnala che il vibratore è acceso.
20310998it_ba_a0
Malfunzionamenti
Uscita dalla portata massima dell'unità radio
Poco prima di uscire dal campo radio viene emesso un suono di avvertimento. Dopo essere usciti dal campo viene visualizzato il messaggio "Nessun sistema" e scompare il simbolo dell’antenna " ".
Se si esce dal campo radio nel corso di una conversazione, la stessa viene interrotta, ma il collegamento non viene subito sospeso. Il sistema cerca per 20 secondi un nuovo collegamento radio con la stessa o con un’altra unità radio. Solo
dopo il collegamento viene interrotto nel PBX.
Al di fuori della portata massima dell’unità radio con il tasto M avete a disposizione le
seguenti funzioni di programmazione:
"Prog.", "Tasti", "Mobile", "Appar", "Chiamata", "*Lingua" "Test" e "Sistema".
Il display è acceso, ma non si sente il tono continuo
Probabilmente l’apparecchio portatile è bloccato (si veda "Blocco/sblocco
dell’apparecchio").
Non si riesce a programmare l’Hotkey e/o i tasti Fox
Probabilmente la programmazione è bloccata (si veda "Blocco/sblocco dell’apparecchio").
Volete sbloccare l’apparecchio, ma avete dimenticato il codice segreto
Pregate l‘operatrice di cancellare il vostro codice segreto dal sistema.
Indicazioni del display
"Attendere p.f."
Questo messaggio può apparire durante la procedura di registrazione dell’apparechio.
Inoltre appare quando un interlocutore mette in attesa il collegamento.
Italiano
"Apparecchio ignoto"
L’apparecchio cordless non è riuscito a registrarsi nel PBX. Rivolgersi al Gestore del
sistema.
"Sovraccarico"
Nessuna risorsa disponibile, attendere un momento e riprovare.
"System Busy"
Attraverso l’unità radio attuale al momento non è possibile stabilire alcun collegamento.
L’apparecchio portatile cerca di stabilire un collegamento radio migliore con la stessa o
con un’altra unità radio. Il messaggio viene visualizzato solo durante lo standby.
"Nessun Sistema"
L’apparecchio è uscito dalla portata dell'unità radio; il collegamento con il sistema PBX è
stato interrotto.
"Registrare"
L'apparecchio sta registrandosi al sistema PBX.
"Averia" / chiamata progressiva permanente
Ogni volta che l’apparecchio portatile viene posato nella base di carica i suoi parametri
vengono verificati. Se viene rilevato un parametro errato il sistema emette un segnale
acustico e sul display viene visualizzata la dicitura "Errato". L’apparecchio portatile deve
essere rispedito al fornitore, il quale provvederà alla riparazione/sostituzione.
Avvertenza
Per altre segnalazioni rivolgersi al Gestore del sistema.
20310998it_ba_a0
37
Codici di funzione
Le cifre che bisogna comporre?
Selezione normale
Sequenza di tasti
L’operatore ....................................................................... 11
.........
Interfoni porte .................................................................. 851… 852 1)
.........
Itinerario ........................................................................... 170… 199 1)
.........
Numeri collegamenti collettivi ........................................ 860… 888 1)
.........
Numero di soccorso .......................................................... 12
.........
Selezione abbreviata in generale (PBX) ......................... 7000…7999 1)
.........
Uscita per linea urbana
ditta ................................................................................ 0
privato ............................................................................. 10
con centro di costo .......................................................... 13 N. C.d.C.
.........
.........
.........
Postselezione
Attivare impianto ricerca persone .................................. 8 o *81
Attivare la chiamata codificata ....................................... 8 o *81
Avvertimento/Avviso .......................................................
rifiuto ..............................................................................
risposta con mantenimento .............................................
risposta senza mantenimento ..........................................
risposta con conferenza ...................................................
6 o *43
0
2
1
3
Commutazione fra due collegamenti ............................. 2
Conferenza
stabilire (da un collegamento) .......................................... 3
escludere un interlocutore (interno) ................................. *31
Intercalazione/Inclusione .................................................
rifiuto ..............................................................................
risposta con mantenimento .............................................
risposta senza mantenimento ..........................................
7 o *44
0
2
1
Parcheggiare il collegamento .......................................... *76
Prenotazione da N./ MESSAGE
attivare segnalazione ....................................................... *38
Richiamo/Prenotazione automatica
attivare se l’utente è occupato ......................................... 9 o *37
attivare se l’utente è libero ............................................... 9 o *37
1) La definizione e il campo di numerazione dipendono dal centralino e del Software
38
20310998it_ba_a0
Codici di funzione
Ripresa della conversazione ............................................ 1
␣␣
Trasferire la conversazione in corso
su centro di costo no. ................................................... *78 N. C.d.C.
Preselezione
Annuncio/Chiamata su altoparlante
a un utente ...................................................................... *7998 N. utente
a un gruppo .................................................................... *79 N. gruppo
rispondere a un annuncio di gruppo ................................ *89
Aprire porta ...................................................................... *751… *752 1)
Avvertimento 2)
blocco ............................................................................. *04
autorizzazione ................................................................. #04
Cancellare prenotazione ................................................... #37
Chiamata codificata
attivare ............................................................................ *81 N. utente
rispondere ....................................................................... *82
*56 hh mm
#56
*55 hh mm
#55
Italiano
Italiano
Chiamata scadenza termine (ordine sveglia) 2)
attivare ordine permanente ..............................................
cancellare ordine permanente ..........................................
attivare ordine singolo .....................................................
cancellare ordine singolo .................................................
Collegamento
parcheggiare ................................................................... *76
riprendere il collegamento parcheggiata .......................... #76
Collegamento collettivo 2)
inserirsi ............................................................................ *48
disinserirsi ........................................................................ #48
Commutazione di giorno, notte, fine settimana (gr. commutaz. 1)
giorno (posizione 1) ......................................................... *8511
notte (posizione 2) ........................................................... *8512
fine settimana (posizione 3) ............................................. *8513
Conferenza
variabile ........................................................................... *71 N. ut. 1*
… N. utente 5# 1)
prestabilita ....................................................................... *70 N. conf.
1) La definizione e il campo di numerazione dipendono dal centralino e del Software
2) Telecomando possibile
20310998it_ba_a0
39
Codici di funzione
Deviazione di chiamata DDC
blocco della DDC sul proprio apparecchio 2) ......................
sblocco della DDC sul proprio apparecchio 2) ....................
attivare DDC incondizionata 2) ..........................................
cancellare DDC incondizionata 2) ......................................
attivare DDC incondizionata sull’ultimo numero progr. .....
cancellare DDC incondizionata sull’ultimo numero progr. .
attivare DDC sul numero preprogrammato 2) ....................
cancellare DDC sul numero preprogrammato 2) ................
attivare DDC se occupato 2) ..............................................
cancellare DDC se occupato 2) ..........................................
attivare DDC sull’ultimo numero programmato se occ. .....
cancellare DDC sull’ultimo numero programmato se occ. .
attivare DDC su messaggio standard 2) .............................
cancellare DDC su messaggio standard 2) ..........................
attivare DDC sull’impianto cercapersone IRP o
sulla suoneria centrale con chiamata codificata 2) ..............
cancellare DDC sull’impianto cercapersone IRP
o sulla suoneria centrale con chiamata codificata 2) ...........
*02
#02
*21 N. dest.
#21
*21#
#21
*22
#22
*67 N. dest.
#67
*67#
#67
*24 N. testo
#24
*28
#28
Disattivare tutti i servizi attivati 2) .................................. *00
(a parte il collegamento collettivo)
Dirottamento di chiamata DCA (deviazione di chiamata in caso di mancata risposta)
blocco della DCA 2) .......................................................... *02
sblocco della DCA 2) ......................................................... #02
attivare DCA 2) ................................................................. *61 N. dest.
cancellare DCA 2) .............................................................. #61
attivare DCA sull’ultimo numero progr. ........................... *61#
cancellare DCA sull’ultimo numero progr. ......................... #61
attivare DCA sul numero preprogrammato 2) .................... *62
cancellare DCA sul numero preprogrammato 2) ................ #62
attivare DCA sull’impianto cercapersone IRP
o sulla suoneria centrale con chiamata codificata 2) ........... *68
cancellare DCA sull’impianto cercapersone IRP
o sulla suoneria centrale con chiamata codificata 2) ........... #68
Gruppo commutazione (in entrata)
gruppo commutazione x, pos. 1 ....................................... *85x1
gruppo commutazione x, pos. 2 ....................................... *85x2
gruppo commutazione x, pos. 3 ....................................... *85x3
Avvertenza: x è una cifra da 2 a 9.
Impianto ricerca persone
cercare
....................................................................... *81 N. utente
rispondere con un canale di ricerca .................................. *82
rispondere con più canali di ricerca ................................... *82 N. utente
Intercalazione/Inclusione 2)
blocco
....................................................................... *04
autorizzazione ................................................................. #04
2) Telecomando possibile
40
20310998it_ba_a0
Codici di funzione
Intercezione di chiamata/Risposta per assente ....... *86 N. utente
Messaggi (messaggi standard con/senza parametri) 2)
trasmissione a un utente ............................................ *3598 N. utente N. testo #
trasmissione a un gruppo ........................................... *35 N. gruppo N. testo #
trasmissione a tutti .................................................... *3599 N. testo #
Prenotazione da N./ MESSAGE 2)
attivare segnalazione ................................................. *38 N. utente
cancellare, apparecchio destinazione ......................... #38 N. utente
Quiete telefonica (blocco chiamate in arrivo) 2)
attivare ...................................................................... *26
cancellare .................................................................. #26
Relè
attivare ...................................................................... *755…*757 1)
disattivare .................................................................. #755…#757 1)
Risposta alla chiam. circolare/suoneria central. ....... *83
Seguimi (Follow me)
attivare ...................................................................... *23 N. utente
cancellare .................................................................. #23
Italiano
Italiano
Servizio cortesia
attivare gruppo 1 ....................................................... *931
disattivare gruppo 1 ................................................... #931
attivare gruppo 2 ....................................................... *932 1)
disattivare gruppo 2 ................................................... #932 1)
Telecomando
avviare (da un apparecchio estraneo) ....................... *06 N. d’utente *21 N. dest.
avviate il telecomando /
introducete il numero d’utente il cui
apparecchio volete usare a distanza /
introdurre la procedura * desiderata (p.e. *21 N. dest.)
disattivare (da un apparecchio estraneo) .................. *06 N. d’utente #21
avviate il telecomando /
introducete il numero d’utente il cui
apparecchio è usato a distanza /
introdurre la procedura # desiderata (p.e. #21)
disattivare (dal proprio apparecchio) ........................ #21
introdurre la procedura # (p.e. #21)
Uscita per linea urbana 2)
attivare con richiamo per comunicazione addebiti ...... *32 N. utente
1) La definizione e il campo di numerazione dipendono dal centralino e del Software
2) Telecomando possibile
20310998it_ba_a0
41
Indice analitico
A
ABC 13
Accensione del vibratore 36
Accensione e spegnimento dell’apparecchio
portatil 33
Accu 5
Agenda privata 13, 27
Annuncio 19
Ascolto amplificato 11
Avvertenze di sicurezza 4, 5
4
C
0
5
Programmazione dei tasti Fox 32
Programmazione dell’Hotkey 30, 31
Qualità del collegamento 2
Ritornare al menu precedente 28
Spegnimento 33
Versione software dell’apparecchio 9
Bloccare/sbloccare l’apparecchio portatile 34
Blocco/sblocco della tastiera 29
M
Malfunzionamenti 37
Messaggio 18, 19
Microfono 14
Modifica del codice segreto/password 34
Modo di programmazione 21
Modo trasparente 20
C
P
Chiamata discreta 14, 15, 35
Chiamate 14
Codice segreto 5, 34
Conferenza 16
Conferma dei tasti 32
Parcheggio di una conversazione 15
Password 5, 34
Prenotazione 17, 18
Programmare 21, 22, 23, 24, 25, 26
Programmazione del tasto Fox 32
Programmazione dell’Hotkey 30, 31
B
D
Deviazione di chiamata 16
Disattivazione del microfono 14
Discreta 14, 15, 35
Display 1, 8
DTMF 20
H
Hotkey 12, 30, 31
I
Impostazione del sistema PBX 8
Impostazione della chiamata discreta 35
Impostazione della lingua del display 8
Installazione 6, 7
Invio di un messaggio 18
L
Lasciare un’informazione in caso d’assenza 17
Lettura dei messaggi 19
Lingua 8
Linguaggio macro 28
Lista chiamate 14
"Long Click" funzioni
Accensione del vibratore 36
Bloccaggio tasti (variante 1) 29
8
Bloccaggio tasti (variante 2) 29
9
1
Cambio del sistema PBX 9
Modifica la direzione di ricerca 3
Modo di programmazione 3, 21
M
Modo trasparente 20
Portable Equipment Identity IPEI 9
2
¥
42
R
Regolazione del volume del ricevitore 10
Regolazione del volume dell’auricolare 10
Ricerca persone 17
Richiamata 20
Richiamata alternata 15
Ripetizione della selezione 12
Risposta alla prenotazione 17
Risposta diretta 33
Risposta per assente 10
S
Selezione 12
Selezione con l’Hotkey 12
Selezione in multifrequenza DTMF 20
Spegnimento dell’apparecchio 33
Suoneria 35
T
Tasto Fox 32
Testo per lo stato di riposo 28
Trasferimento della conversazione 16
Twin Mode 26
U
Uscita dalla portata massima dell'unità radio 37
V
Vibratore 36
20310998it_ba_a0
Bedi
1
10
4
1
L
O
2
H
F
3
F
In
B
4
A
D
M
5
C
L
R
6
L
E
7
G
G
W
8
M
D
n
(
9
iZ
10
E
L
11
T
Z
E
v
c
B
2
3
8
9
M
7
3
AB
C
1
C
DE
F
JK
L
2
GH
I
4
11
MN
3
O
S TU
6
5
5
PQ
R
7
VW
X
6
8
YZ
•
9
0. . .
9
0
Im
II
III
Operation and display elements
1
LED
Visual call indicator
2
Hotkey
Freely-programmable key for up to 6 numbers/names or functions
3
Foxkeys
The current function is indicated in the bottom display line. Both Foxkeys are freely
programmable.
4
Display
The backlit display consists of 3 lines of text, each with 12 symbols/characters. The first line
consists only of symbols, the two others consist of information or menu options.
5
C/End key (deletion or correction key)
Deletion or correction key (clear).
Return to previous menu option or to the idle state.
6
Loudspeaker key
Switches the loudspeaker on/off
7
Call key
Has the same effect as lifting or replacing the handset of a corded terminal.
Also used for switching on the handset.
8
M-key (menu key)
This key is used to search for a menu option you desire. It operates cyclically, i.e. each
depression of the menu key will scroll you through the menu options.
9
i-key (information key)
Pressed to obtain further information (active i-symbol).
10
Volume adjustment keys (not visible)
Adjust the volume during conversation.
11
Keypad with 0 to 9 (A to Z), * and #
Used for entering characters, selecting extended-feature functions utilising */# procedures. Input of names and/or texts in alpha mode. (Automatic switchover from numeric to alpha input
following selection of corresponding menu option.)
Example: 1 x key 2 = D, 2 x key 2 = E, 3 x key 1 = C, 2 x key 7 = T
In alpha mode the #-key can also be used to create a space.
III
Specifications subject to change without notice.
The usable services and features depend on the installed software release.
20310997en_ba_a0
Operation and display elements
Special display symbols
Charge state of battery pack
Not displayed:
Blinking display:
Blinking +
warning tone:
Charge is ok, handset is ready for operation
Charge is low (warning)
Charge is very low
Antenna symbol
Not displayed:
Continuous display:
Outside of radio coverage range
Ready for incoming and outgoing calls
Continuous display:
Blinking:
Handset is registered and ready for operation
in system A (B, C, or D).
Handset is not ready for operation.
Blinking:
Handset is not registered in any system.
Continuous display:
Alpha dial feature is activated
Supplementary information (accessed by pressing i-key)
A function stored under the Hotkey/Foxkey is active or the vibrator
is active.
Further menus (trigger with M-key)
Microphone switched off
Programming mode
Connection made
Visual signal indicating a call always present!
English
Continuous display:
Blinking:
20310997en_ba_a0
1
Operation and display elements
Other symbols on the information or menu line:
12¥
Scrolling forwards through a list (the digit shows the entry’s
number)
G
Call for user group (internal subscriber group)
D
Diverted call
|
Function is active
Quality of the radio connection (only on idle display)
$$$$
$$$
$$
$
....
Very good connection quality
Good connection quality
Telephone calls possible, interference probable
Telephone calls possible only in part, severely restricted
No telephone calls possible
Note
You can also obtain the connection quality reading using "Long Click 4". The number of
the relevant radio unit is displayed at the same time.
2
20310997en_ba_a0
Operation: the menu system
You can program your new handset to meet your own requirements. Besides mobility, it
offers you every telephony function you could wish for. The menu technique and the clever Foxkeys see to that. To make full use of the extended-feature functions, please refer to
the chapter "How to program your telephone" and the special programming instructions.
In addition to the non-acoustic call display with LED a call can also be indicated by a
vibrator. The handset is splashwater-proof and dust-proof (IP 54). It is available for use in
potentially explosive environments with explosion protection as per Eex ib IIC T4.
General rules of operation
There are two types of menus:
– Everyday operating menus for telephony functions.
– Programming menus for setting your telephone to meet your requirements.
Display in idle state
In the idle state the display features a number of symbols, the
quality indicator, the date and time as well as a personal standby
text (e.g. name, department, tel. no., etc.). (The display immediately
switches to "Discreet" or to "Enqui" "Micro" if a call comes in or
during a call.)
—> —> —>
Press the M-key (briefly once or several times) to proceed to the
menu option you desire.
————————> A "Long click" of the M-key (at least 2 seconds) takes you to the
programming mode.
Idle state
Call up the desired menu using the M-key
10.Apr 11:55
$$$$
M
Press M-key once
10.Apr 11:55
ABC
Redial
M
Press M-key a second time
10.Apr 11:55
Div.
Discr
M
Press M-key a third time
10.Apr 11:55
Pick–up Page
M
Press M-key a fourth time
10.Apr 11:55
Msg. Announ
M
Press M-key a fifth time
10.Apr 11:55
Programming
20310997en_ba_a0
3
English
————————> A "Long click" of the Foxkey under "¥" changes the search
direction to "ß".
Safety advice
Read this operating instructions booklet carefully and keep it in a safe place. Please make
a thorough study of the safety advice presented here. Not following these guidelines may
be hazardous and may violate existing laws.
Medical devices
Your telephone should not be used near pacemakers, hearing aids or other
personal medical devices of this type.
Availability of service
The base network is not always available. Do not depend on a mobile phone as
your only means of communication in critical situations.
Ambient conditions
Only use your telephone in a temperature range from +5°C to approx. +40°C.
Avoid exposing it to direct sunlight and other heat sources. The handset is
splashwater-proof and dust-proof (IP 54).
Protect your telephone from aggressive liquids, and vapors.
Do not place your telephone near electromagnetic fields (electrical motors,
household appliances). The voice quality could be reduced. Avoid positioning it
close to computers, radios, TVs, video players and phones, in order to avoid
noise during a call .
Do not use your telephone in areas where there is a risk of explosions.
The version with explosion protection complies with requirements as per
Eex ib IIC T4.
Do not use your telephone in areas where blasting work is going on. Observe the
restrictions and follow the pertinent regulations.
Maintenance and repairs
Use original accessories only. Call on an expert to do installation and repairs.
Never touch the recharging contacts with optioned, metallic and/or greasy
objects.
Clean your telephone with a soft, slightly moist or antistatic cloth. Do not use
cleaning solvents or other chemical substances.
4
20310997en_ba_a0
Safety advice
Important information
There is a constant code exchange between radio base and handset to ensure that no one
with another handset can telephone at your expense. If the codes do not match, the call
is disconnected or no connection is established.
Locking the keypad
Your handset can be locked to prevent the accidental activation of keys. You can still
receive calls using the Call key. The keypad must be unlocked before outgoing calls can be
made.
Changing the code/password
When the handset is turned on for the first time, the code/password is "0000". We
recommend that you immediately programme a personal code consisting of 2 to 10 digits
so the personal settings of your handset and the data stored in it are protected from
unauthorized use.
Battery
The handset is supplied with a rechargeable battery.
•
Do not immerse the battery in water or throw into a fire.
•
Use only the plug-in power supply delivered with the telephone for the charging base.
•
The battery must be charged for at least 1 hour without interruption before being
used for the first time.
Notes
• The battery may become warm during charging: this is normal and perfectly safe.
• It takes several days of use for the battery to reach its full capacity and thus the full
standby and calling time.
English
After a prolonged period of non-use as a result of a power shutoff (e.g. while you are on
holiday), the handset (i.e. the battery) should be recharged prior to being used again.
Please dispose of defective batteries correctly (they are not household refuse).
20310997en_ba_a0
5
Installation and putting into service
Contents of package, handset
The following items are included with your telephone in the package:
•
Handset
•
Clip
•
Battery
•
Operating instructions booklet
Bedienungsanleitung
Mode d'emploi
Istruzioni per l'uso
Operating instructions
Contents of package, charging base
•
Plug-in power supply
•
Charging base
Connecting the headset
Connecting the plug-in power supply
Feed the cord through the channel, placing it under the tabs so it cannot be pulled out.
6
20310997en_ba_a0
Installation and putting into service
Installing the battery
1. Hold the handset with the clip facing downwards and insert the battery.
2. Press the battery and handset firmly together (see Figure) and slide the two locks
outwards.
unlocked
locked
Charging the battery
The battery is delivered uncharged. To charge the battery, you must place the handset on
the charging base. If there is a second battery available, it can be charged without the
handset being in the charging base. In the meantime the other can be used to operate
the handset.
LED display on the charging base:
red
green
=
=
The battery is being charged
The battery is charged
One battery charge lasts
Charging takes
20310997en_ba_a0
for approx.
for approx.
approx.
80
8
1
hours of standby or
hours of talk time
hour
English
•
•
7
Before you telephone for the first time
Setting the display language
The language spoken in the area is usually preset in your handset. If you prefer another
one, you can select among several different languages.
*Lang
¥
M
Ok
C
Press the M-key repeatedly in programming
mode until, "*Language" appears. (look for the
"*" symbol with a foreign language). Press the
Foxkey under "*Language". By pressing the
Foxkey under "¥" select the desired language.
Confirm the selected language by pressing the
Foxkey under "Ok". Press the C/End key to
return to the standby display.
Register the PBX system
You can register your handset for as many as 4 different PBX systems (A, B, C, D). So, you
can be reached on your handset even while you are at a branch of your company.
System
Press the M-key repeatedly in programming
mode until "System" appears. Then press Foxkey
under "System". "Auto" or the current system
(A, B, C, or D) will appear in the display.
Delete
Press the M-key. If "Register: A" and "Delete"
appear, the handset is registered with PBX system
"A" (this registration could be canceled by
pressing the Foxkey under "Delete").
¥
Using the Foxkey under "¥", the handset can be
registered with another three PBX systems (B, C
or D). The display then changes to "Register: B (C
or D)" and "New". Pressing the Foxkey under
"New" and "Home" causes the handset to be
registered in system "B" (provided this is allowed
and the system is available).
M
M
New
8
Home
20310997en_ba_a0
Before you telephone for the first time
New
GAP
1
2
3
4
5
6
7
8
9
0
Ok
The handset can also be registered with a PBX
system from a different manufacturer by using
GAP (Generic Access Profile) and the required
"Authentication code.
Press the Foxkey under "New" and "GAP".
When "AC: _____" appears, enter the
authentication code and acknowledge by
pressing the Foxkey under "Ok".
GAP log-on, compatibility with other DECT products
Ascotel DECT supports all the basic telephony features as defined in the Generic Access
Profile (GAP) standard (end 1997 version). They include setting up and clearing down
outgoing and incoming calls, inquiry call, DTMF and */# procedures. In other words:
• You can log on and use your DECT system terminal on a third-party PBX. The only
requirement to be able to use all the basic features defined in the GAP standard is that
they are fully implemented on the relevant PBX.
• Third-party DECT handsets that comply with the GAP standard can also be logged on
to and used on your system. However, they will provide only the functionality limited
by the GAP standard and not the same quality of radio connection. In particular the
software for Mobility Management with handover/roaming is virtually fully dependent
on the handsets used and cannot be adapted 100% to your system.
Setting the PBX system
Press the M-key repeatedly in programming
mode until "System" appears. Then press Foxkey
under "System". "Auto" or the current system
(A, B, C, or D) will appear in the display.
Ok
Select the desired system or „Auto“ with the
Foxkey under "¥" and confirm by pressing "Ok".
(If more than one system is available, and "Auto"
is selected the handset automatically establishes
a connection with the system that offers the best
radio connection.)
M
¥
English
System
Notes
• With "Long Click 1" (min. 2 seconds) you can switch your handset over to the next
available PBX system (A, B, C or D). Provided the switchover is not set on "Auto",
manual switchover of the PBX system is compulsory to ensure that your handset is
ready to operate in the new PBX system.
• "Long Click 2" is used to display the International Portable Equipment Identity (IPEI)
and PARK (Portable Access Right Key).
• "Long Click 5" displays the software version number of the handset along with the
date.
20310997en_ba_a0
9
Telephoning
Answering an incoming call
An incoming call is signalled on the handset.
If the handset is not in the charging base, simply
press the Call key to answer the call.
Or
The handset is in the charging base. The call can
be answered directly by lifting the handset (see
"How to program your telephone", "Direct
seizure").
Pick up a call
Under "Pick_up" the system offers you "Sub" (Subscriber), "Bell" (Central bell with
coded ringing) and "Page" (paging system).
To answer for instance a call directed to a terminal of a absent subscriber, press the M-key
repeatedly until "Pick_up" appears, press the Foxkey at this position and enter the
subscriber number of the called terminal.
During the call
During a call, you can use the M-key to execute other functions, for example, initiating an
enquiry call, muting the microphone ("Mic mute"), switching the volume on the receiver
from "Quiet" to "Loud" (or vice versa)
M
Press the M-key once or twice in order to execute
other functions.
Ending a call
A call is ended by pressing the Call key or by returning the handset to the charging base.
Of course, the party you are talking to can also end the call. The handset returns to idle
state shortly afterwards.
Adjusting the receiver volume during a call
The volume can be set on "loud" or "quiet" via the menu.
Quiet
M
Loud
Press the M-key repeatedly until "Loud" appears.
Press the Foxkey under "Loud".
Note
The new selting is retained until changed back.
10
20310997en_ba_a0
Telephoning
Listening by loudspeaker
With the loudspeaker it is possible that several people in the room may listen to
information services such as "rates of exchange" for foreign currencies etc.
After connection set-up press the Loudspeaker
key and adjust the desired volume.
English
Note
The microphone is switched off automatically as soon as "Listening by loudspeaker"
is switched on.
20310997en_ba_a0
11
Telephoning
Dialling with dialling preparation
Dialling preparation reduces the chance of misdialling.
Without pressing the Call key beforehand, enter the desired number, check it and make
any corrections using the C-key. Then press the Call key. It is only at this point that the
number is dialed.
Dialling using digits
This is just like traditional dialling, but dialling is not commenced until you press the Call
key.
1
2
3
4
5
6
7
8
9
Enter digits and press the Call key.
0
Dialling using repeat dialling function (redial)
The numbers and the names of up to the last 10 subscribers called are stored in the "Last
Number Redial" memory.
Redial
M
Press the M-key.
Press the Foxkey under "Redial". The display
shows the number and possibly the name of the
last subscriber called.
¥
Press Foxkey under "¥" until the number of the
desired subscriber appears. Press the Call key.
Note
The i-symbol refers to additional information, which you can call up by pressing this key.
Dialling using the Hotkey
You can store up to 6 names/numbers of frequently called subscribers in the Hotkey
memory.
Press the Hotkey repeatedly until the desired
name is displayed.
Mike
Press the Foxkey under the desired name and
then press the Call key.
12
20310997en_ba_a0
Telephoning
Dialling with a name from a directory
There are up to three telephone directories: an internal directory (with all subscribers
connected to PBX), a directory containing abbreviated dialling numbers, and a private
directory. The desired call can be made with the subscriber name without having to enter
his or her number.
ABC
M
1
2
3
4
5
6
7
8
9
0
¥
Press the M-key. Press the Foxkey under
ABC; the menu for selecting the directory
appears. ("All" runs a search in all directories).
Enter the initials of the surname and first name,
- e.g. E # A for Einstein Albert.
Press the Foxkey under "¥" to scroll to the
desired name and press the Call key to initiate
dialling.
Note
Entering initials is the simplest way of dialling a number stored in the index; you do not
need to know either the phone number or the abbreviated dialling number.
Example:
M
DE F
AB C
2
1
2x
1x
1x
If you only know the surname:
ABC
M
DE F
GH I
MNO
2
3
5
2x
3x
1
Einstein Albert:
Key 2: twice
# key: once (generates a blank)
Key 1: once
. . . etc.
2x
C
Correct numbers or names entered in dialling
preparation using the correction key (deletes last
character).
C
A "Long Click" of the C-key ends the call
preparation.
... 9
English
ABC
Needless to say, you can also dial the oldfashioned way with your handset by simply
pressing the Call key and dialling the number.
If you wait more than 10 seconds between digit
inputs, dialling is automatically terminated.
20310997en_ba_a0
13
Telephoning
Call list
Your handset automatically stores the numbers of the last 10 unanswered calls in the call
list. The i-symbol in the display draws your attention to the unanswered calls.
You can check these numbers and use this list to call back the corresponding persons.
Call–list
¥
Delete
Keep pressing the i-key until "Call_list" appears.
Press the Foxkey under "Call_list" and scroll to
the desired number with the Foxkey under "¥".
Press the Call key to call the number in the
display.
Pressing the Foxkey under "Delete"
deletes the entry from the call list.
Switching off the microphone (Mute)
If you wish to speak for a moment to somebody else in your office without the person on
the telephone listening in, you switch off the microphone of your handset.
Micro
Press the Foxkey under "Microphone". The
microphone is switched off. (The following
symbol appears in the display: " ").
Micro
Press the Foxkey under "Microphone" again, the
microphone is switched back on again and the
" " symbol is removed.
Switching on the discreet ringing feature
During a meeting a call to your handset can be intrusive. When the discreet ringing
feature is activated, the handset beeps just once to signal a call. You can identify the
caller by the name on the display and decide whether you want to answer the call. If you
decide not to, his/her number is entered in the call list. The i-symbol on the display will
remind you of this later. The discreet ringing feature remains activated until it is cancelled.
This i-symbol on the display also reminds you of this fact.
Discr
M
Press the M-key repeatedly until "Discreet"
appears. The discreet ringing is switched on by
pressing the Foxkey under "Discreet".
Note
The discreet ringing feature can also be switched on during a call. The menu option
"Discreet" appears on the display in conjunction with each call. The ring (only the ringing
itself, not the actually call) is switched off as soon as the discreet ringing is switched on.
14
20310997en_ba_a0
Using the extended-feature functions
Switching off the discreet ringing feature
Reset
Press the i-key repeatedly until "Discreet" and
"Reset" appears in the display.
Press the Foxkey under "Reset" and the discreet
ringing feature is switched off.
Parking a call
During a conversation, you may hear a "Call waiting" tone indicating that another
subscriber is trying to call you. If you answer the call, the connection with the first person
you were talking to is put on "Hold". Before you can transfer the second connection, you
must "Park" the connection which is on hold.
2.–conv
Park
Press the Foxkey under "2nd conversation" to reestablish the connection to the caller on hold.
Press the M-key repeatedly until "Park" appears.
Press the Foxkey under "Park" to park the
current connection.
2nd–convers.
Press the Foxkey under "2nd conversation" to
switch to the second caller. You can now transfer
the call.
M
Take–back
Press the Foxkey under "Take back" to reestablish the connection with the waiting caller.
Note
Parking requires no channel, unlike a connection on hold where both call channels are
busy. The advantage of this is that you can transfer the "call waiting" party (if necessary).
If [P] apears, a call is already parked.
After initiating an enquiry call, you can return to the first caller without ending the
enquiry call connection. Afterwards, you can then switch back and forth between the two
subscribers as many times as you wish (brokering).
20310997en_ba_a0
2.–conv
Press the Foxkey under "2nd conversation" to
switch to the first caller.
2.–conv
Press the Foxkey under "2nd conversation" to
switch back to the enquiry call subscriber, etc.
(and repeat this as often as desired or necessary).
15
English
Brokering
Using the extended-feature functions
Transferring a call
After initiating an enquiry call, you can connect your two callers with each other directly.
Press the Call key, your handset automatically
reverts to idle state.
Conference
You have an enquiry call on the line and would now like to conduct a joint conference call
with your original caller (3-way).
Conf.
M
Press the M-key and then the Foxkey under
"Conference".
Note
There is no need to worry about calls being disconnected when you set up the conference
call. The only way calls are disconnected is when the C-key or the Call key is pressed.
Call diversion
You can divert calls to another telephone or to the switchboard unit or leave a message
for callers.
Div.
¥
M
Press the M-key repeatedly until "Diversion"
appears and then press the Foxkey under
"Diversion". Press the Foxkey under "¥" to select
the diversion type (i.e. "Div. on busy" or "Fwd.
to Sub.").
Ok
1
2
3
4
5
6
7
8
9
0
Dial the diversion target and if necessary the new
number.
Confirm with "Ok".
Note
If you only want calls to be diverted when you are busy with another call, select
"Div. on busy".
Twin Mode (present/absent)
If you have a stationary set along with your handset, Twin Mode is an easy way to make
sure you can always be reached. When Twin Mode is programmed (see "Programming
your telephone"), call diversion is automatically activated as soon as you remove the
handset from the charging base.
16
20310997en_ba_a0
Using the extended-feature functions
Leaving a message
You leave your workplace (without your handset) and wish to leave any callers a message.
Div.
¥
Press the M-key repeatedly until "Diversion"
appears. Press the Foxkey under "Diversion" and
then under "¥" until "Div. to Msg." appears in
the display.
Ok
¥
Press the Foxkey under "Ok" and repeatedly
under "¥" until a suitable message appears (isymbol on the display).
M
Press the i-key once or several times to display
the entire message.
Edit the message using the C-key and the
alphanumeric dialling keypad (if necessary, see
"Dialling with a name").
Press the Foxkey under "Ok".
Ok
C
1
2
3
4
5
6
7
8
9
0
Note
If you wish, you can also delete the entire message with the C-key and write your own.
Call back requested (calling back)
A subscriber has an important message for you and was unable to reach you despite your
having a handset. He/she requests a call back.
"Call back" and "Call" "Delete" appears on the display of your handset.
Call
Delete
Press the Foxkey under "Call" to return the call
or under "Delete" if you think it no longer
necessary to return the call.
English
Paging
To page a person directly or after trying to phone.
Page
M
1
2
3
4
5
6
7
8
9
0
Ok
20310997en_ba_a0
Press the M-key repeatedly until "Page" appears.
Press the Foxkey at this position, enter the
number of the person sought and confirm with
"Ok".
17
Using the extended-feature functions
Requesting a callback
You request a call back from an internal subscriber whose line is busy or who is not
answering.
C–back
Reset
Press the Foxkey under "Call_back". The
message "Call expected from the number nnn"
appears in the display.
By pressing the Foxkey under "Reset" you can
cancel the requested call back.
Note
Only one call back can be activated at a time.
Sending a message
Standard messages are stored in the PBX. After failing to reach a subscriber, you can
select one of these messages, add to it or change it if necessary and then send it to the
subscriber or a group you are trying to reach.
Msg.
¥
M
Press the M-key repeatedly until "Message"
appears. Press the Foxkey under "Message".
Press the Foxkey repeatedly under "¥" until a
suitable message appears (i-symbol on the
display).
Press i-key once or several times to display the
entire message.
C
1
2
3
4
5
6
7
8
9
Ok
Edit the message using the C-key and the
alphanumeric dialling keypad (if necessary, see
"Dialling with a name").
Press the Foxkey under "Ok".
Ok
Dial the number of the subscriber/the group to
whom the message is directed. Press the Foxkey
under "Ok" to send the message.
0
1
2
3
4
5
6
7
8
9
0
Notes
• This procedure can also be initiated with "Dialling preparation", i.e. enter the number
first and then select the message.
• If you wish, you can also delete the entire message with the C-key and write your
own.
18
20310997en_ba_a0
Using the extended-feature functions
Read message
If you have received a message, the display will contain the word "Message" (the number
of its sender can be seen if the i-key is pressed) and the menu options "Read" and
"Delete".
Read
Press the Foxkey under "Read". The "+" sign
indicates that more infomation is available.
Press the i-key to view the next line.
At the end of the message, the display switches to the initial menu options "Read" and
"Delete".
Delete
Press the Foxkey under "Delete".
Note
To display other messages you may have received, the messages already read must first be
deleted.
Announcement
You can make announcements to one or several internal subscribers from your handset,
provided their system terminals have a loudspeaker.
Announ
M
Press the M-key repeatedly until
"Announcement" appears. Press the Foxkey
under "Announcement".
Group
1
2
3
4
5
6
7
8
9
Enter the desired subscriber number. (Or press
the Foxkey under "Group" and enter the
announcement group number.
0
Ok
20310997en_ba_a0
English
Press the Foxkey under "Ok" and make your
announcement.
19
Using the extended-feature functions
Transparent mode (Tone dial mode DTMF)
During a call connection the tone dial mode can be used ta activate a function such as,
for example, the remote control of an answering machine.
1
2
3
4
5
6
7
8
9
0
"Long Click" of the * key until "Tone Dial"
appears. Enter the character sequence of the
desired function.
After carrying out this procedure:
C
Press the C-key to switch the tone dial mode off
again
or
Reset
Press the Foxkey under "Reset".
Beginning and ending enquiry calls
The caller you are talking to on the telephone asks a question you cannot answer. You
wish to call a fellow employee for information, without cutting off your connection with
the caller.
Enqui
1
2
3
4
5
6
7
8
9
0
Enter the number of the subscriber you wish to
call for the information.
Press the Foxkey under "Enquiry"; the subscriber
is called (while the other connection is put on
hold).
After obtaining the information you needed:
C
Press the C-key to switch back to your call with
the waiting caller.
Note
If the Call key is pressed after an enquiry call, a continuous tone will sound for 10
seconds. Press the Call key while this tone is sounding to reconnect the handset to
the waiting subscriber.
20
20310997en_ba_a0
Programming your telephone
Points to consider when programming your phone
Programming is an integral part of the concept of operation. Before you start
programming, read the chapter "Operation: The menu system" at the beginning of these
operating instructions.
Programming mode
You can advance to the beginning of the programming mode in one of two ways:
M
"Long click" (at least 2 seconds) of the M-key
or
Programming
M … M
Press the M-key several times until
"Programming" appears and then press the
Foxkey under "Programming".
Note
"Long Clicks" depend on the software and the PBX type.
Menu key
With the Menu key (M-key) you can initially access all the programming parameters, once
a parameter has been selected (e.g. Keys), the M-key is used to access the various options
for the selected parameter, such as "Number key" etc.
You can exit either level by pressing the C/End key.
English
Storing
The contents of a menu option you have programmed or changed yourself will be stored
if you press the Foxkey under "Ok". If you press another key, the programming you have
carried out will not be stored.
20310997en_ba_a0
21
22
13:39
PRG Menu 2
Keys
Mobile
PRG Menu 1
Dir.
Text
2. Sep
Search
Name:_
New
Chrg.contct
Prog.
Answer
ABC
Redial
Idle text:
Ok
ABC
Diversion
Ok
Direct:
Ok
¥
No
¥
Subscriber
Ok
En:Name
Ok
En:Number
Ok
ABC
Pick_up
Peter
Read
Discr
032 624 21 11
Modify
n¥
Div.
¥
ABC
Delete
Page
Announ
Me1:+1N#PX
Ok
ABC
Msg.
Me2:I#21PX
Ok
ABC
Programming
Foxkey (Ok)
Foxkey
M-key
Programming your telephone
Overview
20310997en_ba_a0
20310997en_ba_a0
No
¥
Yes
¥
Tone:
Ok
Tone:
Ok
Confirm tone
Ok
¥
English
Fox2
Foxkey
Fox1
¥
¥
Fn: Delete
Ok
Foxkey
Ok
¥
Fn: Funct.
Ok
¥
¥
Fn:Function
Ok
Fn: Delete
Ok
¥
Nn:Number
Ok
¥
Me1:Number
Ok
ABC
¥
Nn: Number
Ok
No disturb
Ok
HotkeyPrg:
Hk3
Hk4
Unlock Keys?
No
Yes
HotkeyPrg:
Hk1
Hk2
¥
13:40
Hotkey
Ok
30. Juli
Unlock
¥
KeyLock
Ok
No disturb
Ok
¥
Me1:Number
Ok
ABC
Me1:I*26PX
Ok
ABC
Me1:Name
Ok
ABC
HotkeyPrg:
Hk5
Hk6
Me1:I*26PX
Ok
ABC
Me1:Name
Ok
ABC
Me1:Name
Ok
ABC
Me1:Name
Ok
ABC
Me2:I#26PX
Ok
ABC
Me2:I#26PX
Ok
ABC
Programming your telephone
Overview (continuation)
23
24
PRG Menu 4
Ring
*Lang
PRG Menu 3
Term.
Code
¥
¥
Normal ring
Ok
Discr ring
Ok
Ringing vol.
Ok
Ringing vol.
Ok
1ß
3ß
Code: ****
Ok
Back
New Code: ****
Ok
Back
Melody
Ok
Melody
Ok
free
Ok
4ß
4ß
¥
Confirm: ****
Ok
Back
Ring speed
Ok
Ring speed
Ok
Prog. barred
Ok
2ß
3ß
¥
barred
Ok
¥
1) When pressing the Foxkey at this place when the handset is outside the radio
coverage area, the "Trembler" menu item is displayed. This "Trembler" menu item
can also be displayed by a "Long Click" on the Loudspeaker key .
1)
¥
¥
Barring
Ok
English
Ok
¥
Switch off
Ok
Old code: ****
Ok
Back
Programming your telephone
Overview (continuation)
20310997en_ba_a0
20310997en_ba_a0
A
¥
Register:
><
Test:
Look Show_HO
A
¥
System:
Ok
English
B
¥
Show_HO: None
Ok
¥
Register:
New
1) The menu point "Test" is reserved for
the technician handling installation
1)
PRG-Menu 5
Test
System
Register:
Home
B
GAP
AC:
Ok
Back
Programming your telephone
Overview (continuation)
25
Programming your telephone
Twin Mode (present/absent)
If you have a stationary set along with your handset, Twin Mode is an easy way to make
sure you can always be reached.
The recharging contact acknowledges 2 states:
a) Handset in charging base (present)
b) Handset not in charging base (absent)
Based on these states automatic call diversion is executed as soon as the handset is taken
out of the charging base.
After returning the handset to the base, the diversion is automatically switched off.
Activating Twin Mode
¥
Mobile
M
Prog.
¥
1
2
3
4
5
6
7
8
9
In programming mode, keep pressing the M-key
until "Mobile" appears. Press the Foxkey under
"Mobile".
Ok
Press the Foxkey under "Prog.", then use the
Foxkey under "¥" to scroll to "Twin" and then
confirm with "Ok".
Ok
Under "TwinNo:" enter the access number of the
corded terminal that is to be diverted to the
handset. Activate Twin Mode with the Foxkey
under "Ok".
Mobile
In programming mode, keep pressing the M-key
until "Mobile" appears. Press the Foxkey under
"Mobile".
0
Deactivating Twin Mode
M
Prog.
¥
Ok
Press the Foxkey under "Prog.", then use the
Foxkey under "¥" to scroll to "No function" and
use the Foxkey under "Ok" to deactivate the
Twin Mode.
Notes
• If call diversion/call forwarding to secretary, voice mail or your own GSM set, etc. is
intentionally activated on the corded terminal with the handset still in the charging
base, that particular setting takes priority over Twin Mode, i.e. calls will not be
automatically diverted to the handset when you remove it from the charging base.
Twin Mode is reactivated as soon as the call diversion/call forwarding activated on the
corded terminal is reset.
• Other functions besides Twin Mode can also be set (see "Mobile" programming
instructions)
26
20310997en_ba_a0
Programming your telephone
Private directory
In addition to the directories of available PBX subscribers and abbreviated dialling
numbers, you can also set up a private directory with up to 30 telephone numbers and
names. You can protect the entries from being accessed by unauthorized parties by
barring the programming functions of your handset.
Dir.
New
Ok
1
2
3
4
5
6
7
8
9
0
Search
Modify
¥
Ok
1
2
3
4
5
6
7
8
9
0
Press the M-key repeatedly in programming
mode until "Directory" appears.
Press Foxkey under "Directory" and then under
"New" or "Search".
With "New", the next free directory entry is
shown. Enter the number, acknowledge by
pressing "Ok" and enter the name.
Press the Foxkey under "Ok" to have the entry
stored in memory.
With "Search", you can use Foxkey under "¥" to
page to the desired entry.
Press the Foxkey under "Modify", change the
stored entries, and then restore in memory by
pressing the Foxkey under "Ok".
Notes
• If a directory entry has been previously entered, the current entry details are displayed.
You can of course edit it.
• We advise you to enter the name corresponding to each number; this enables you to
use the convenient name dialling feature.
• If the number of the caller is displayed during a call (CLIP), the system looks for the
number through all directories. If it is already stored with a name, this name is also
displayed.
20310997en_ba_a0
27
English
M
Programming your telephone
Macro language
The macro language allows you to store several functions in succession under one key.
I
X
P
N
.
Z
R
Seizes line
Hangs up receiver (disconnect)
Pause (1 second)
Inserts the number entered/displayed in dialling preparation
Activates control key
Switches Tone Dial Mode ON/OFF
Redials last number dialed
Examples:
I201
I*21201X
Seize and call internal subscriber 201
Seize, divert call to internal subscriber 201, and hang up receiver.
Programming the text display for idle state
You can programme text string for the display in idle state instead of just displaying the
time and date.
Text
Ok
C
Press the Foxkey under "Text" in programming
mode and enter text (maximum of 12
characters).
Press the Foxkey under "Ok" to store the input in
the memory.
Edit the standby text (if necessary).
The correction key (C/End) can be used to delete
the characters to the left of the cursor.
Ok
After editing the standby text, press the Foxkey
under "Ok".
Note
A "Long Click" of the C/End key (min. 2 seconds) takes you straight back to the previous
menu.
28
20310997en_ba_a0
Programming your telephone
Locking the keypad
You can lock your keypad from accidental activation. Incoming calls are signaled and can
be taken by pressing the Call key. Unlock the keypad prior to making outgoing calls.
After the call you have 5 seconds within which to set up an outgoing call. The key lock
(Variant 1) is reactivated after the 5 seconds.
M
Press the M-key repeatedly in programming
mode until "Keys" appears.
Keys
Press the Foxkey under "Keys",
"Keylock" appears.
Ok
Press the Foxkey under "Ok" to activate the
"Keylock" feature.
"Unlock" appears on the display.
Unlock
Yes
Press the Foxkey under "Unlock".
The handset asks you "Unlock keys?" to confirm
that the keypad should be unlocked.
If you press "Yes", the standby display appears
and the handset is ready again for operation.
English
Notes
• "Long Click 8" (min. 2 seconds) can also be used to switch on Variant 1 of the
key lock.
• "Long Click 9" can be used to switch on Variant 2 of the key lock. This variant is not
automatically disabled when you receive a call and has to be disabled manually (see
above) to be able to answer the call with the Connect key.
20310997en_ba_a0
29
Programming your telephone
Programming the Hotkey
The Hotkey is a freely programmable key where up to 6 numbers/names or functions can
be stored. You can even store whole operating sequences using the macro language.
Storing numbers/names under the Hotkey
Keys
Press the M- key repeatedly in programming
mode until "Keys" appears.
Press the Foxkey under "Keys".
M
¥
Ok
Press the Foxkey repeatedly under "¥" until
"Hotkey" appears. After pressing the Foxkey
under "Ok" the strings "HotkeyPrg." and
"Hk1", "Hk2" will appear.
Ok
Press the M-key one or two times to call the
memories "Hk3" and "Hk4" or "Hk5" and
"Hk6", respectively.
Select the desired memory (Hk1…Hk6) by
pressing the Foxkey.
M
Ok
Confirm again with "Ok" in the menu
"Number : Nr.".
Ok
1
2
3
4
5
6
7
8
9
0
Enter the number, acknowledge by pressing
"Ok" and enter the name.
Press the Foxkey under "Ok" to have the entry
stored in memory.
Note
The program jumps directly to the Hotkey Programming when you "Long click" the
Hotkey.
30
20310997en_ba_a0
Programming your telephone
Storing functions under the Hotkey
Same procedure as under Number/Name until it comes time to select the memory
Hk1...Hk6. From that option:
¥
Ok
Press Foxkey under "¥" to call the menu
"Fn: Funct." (Function) and confirm by pressing
"Ok".
¥
Ok
Press the Foxkey under "¥" repeatedly until the
desired function is displayed and confirm with
"Ok".
Ok
The contents of memory 1 for this function are
displayed (activate function).
Press Foxkey under "Ok" to store the function in
memory.
Ok
1
2
3
4
5
6
7
8
9
0
If desired, enter a name and acknowledge with
"Ok". The contents of memory 2 are displayed
(deactivate function).
Ok
The function is stored in memory using "Ok".
Notes
• The corresponding function codes are entered in the two memory locations
automatically and can be added to/amended as required.
If you do not enter a name when storing, a short default name will be used, e.g.
"DND" for "Do not disturb".
•
The symbol " " in the symbol line and a "|" next to the function indicate that a
programmed function is active.
•
The program jumps directly to the Hotkey Programming when you "Long click" the
Hotkey.
English
•
20310997en_ba_a0
31
Programming your telephone
Programming the Foxkeys
You can also use both Foxkeys as freely programmable keys. The display in standby mode
contains very frequently used numbers or functions which can be conveniently dialled or
executed by means of a single keystroke (of the corresponding Foxkey). If a function is
stored under the Foxkey, its active state is indicated with the "|" symbol.
Storing Numbers/names or functions under the Foxkey
Keys
M
¥
Ok
Fox1
Fox2
Press the M-key repeatedly in programming
mode until "Keys" appears.
Press the Foxkey under "Keys".
Press the Foxkey repeatedly under "¥"
repeatedly until "Foxkey" appears.
Press Foxkey under "Ok" and then select the
desired key ("Fox1" or "Fox2").
Proceed as under "Hotkey programming."
Notes
• A "Long click" of the Foxkey takes you directly to the Foxkey programming.
• The quality display disappears once both Foxkeys are occupied with a number or
function and a name.
• The quality display is maintained if a blank character is entered with the #-key under
Foxkey 1 or 2 instead of a name.
Key confirmation tone
If you wish, the handset can confirm every keystroke with a short confirmation tone.
Keys
M
¥
Ok
¥
Ok
Press the M-key repeatedly in programming
mode until "Keys" appears.
Press the Foxkey under "Keys".
Press the Foxkey repeatedly under "¥" until
"Confirmation tone" appears and confirm with
"Ok".
Press the Foxkey repeatedly under "¥" to select
"Tone: Yes" or "Tone: No".
Press Foxkey under "Ok" to store the setting
Note
Whenever you place the handset into the charging base, a short tone always sounds to
confirm this action. During a call, the volume of the key confirmation tone is reduced.
32
20310997en_ba_a0
Programming your telephone
Direct answer
If the handset is set at "Direct" answering, you can answer incoming calls automatically
by simply taking the handset out of the charging base. You need not press the Call key.
Returning the handset to the charging base always causes a connection to be ended
unless this was already done by pressing the Call key.
Mobile
Answer
¥
Ok
M
Press the M-key repeatedly in programming
mode until "Mobile" appears, press the Foxkey
under "Mobile" and then under "Answer".
Press the Foxkey under "¥" to switch to "Direct:
Yes" and confirm this setting by pressing the
Foxkey under "Ok".
Switching handset (terminal) ON/OFF
Switching OFF
Term.
Ok
Press the M-key repeatedly in programming
mode until "Terminal" appears.
Press the Foxkey under "Terminal"; "Switch off"
will appear.
Press the Foxkey under "Ok" to switch off the
handset.
The connection to the radio base is terminated
(display is empty).
Notes
• You can also switch off the handset with a "Long click" (at least 2 seconds) of the 0
(zero) key.
• If you are outside the range for radiocommunications, the handset will make repeated
attempts to establish a connection with a radio base. If you plan on being out of
range for an extended period, switch off the handset to save your battery.
Switching ON
Yes
20310997en_ba_a0
Press the Call key and switch on the set with the
Foxkey under "Yes".
33
English
M
Programming your telephone
Barring and unbarring your handset (terminal)
You can protect your handset from being used by unauthorized persons. Your system
manager can tell you which numbers (for example, emergency numbers) can be dialled
whilst your handset is barred.
When your handset is barred, you can still answer incoming calls at any time by pressing
the Call key. The handset must be unbarred before an outgoing call can be made.
It is recommended that you bar the programming functions of your handset using "Prog.:
barred". This protects the entries in your private directory, among other data.
Term.
M
¥
Ok
1
2
3
4
5
6
7
8
9
0
Use the Foxkey under "¥" to select "Barring";
press "Ok" and enter the code (password).
Press the Foxkey under "Ok" to verify the
password.
Ok
¥
Press the M-key repeatedly in programming
mode until "Terminal" appears and press the
Foxkey under "Terminal"; "Switch off" will
appear.
Press the Foxkey under "¥" to select "free",
"Prog.barr" (Programming barred) or "barred"
("free" cancels the barred state) and confirm
with "Ok".
Ok
Changing code/password
The first time you switch on your handset the code/password is set at "0000". It is
recommended that you immediately reprogramme a personal password of from 2 to
10 digits to protect the personal settings in your handset and the data stored from
unauthorized use (change, deletion).
Code
M
1
2
3
4
5
6
7
8
9
0
Press the M-key repeatedly in programming
mode until "Code" appears. Press the Foxkey
under "Code" and enter the current code.
Ok
1
2
3
4
5
6
7
8
9
Press the Foxkey under "Ok" and enter the new
code.
0
Ok
Ok
1
2
3
4
5
6
7
8
9
0
34
Press the Foxkey under "Ok"; "Confirm" will
appear. Enter the new code again and confirm
with "Ok".
20310997en_ba_a0
Programming your telephone
Adjusting ringing signal and setting the discreet ringing feature
Your handset can signal a call with different volumes, ring melodies, and speeds. You
select the version you like best. These features make it easier for you to distinguish
whether a call is for you or possibly for a person nearby.
When the discreet ringing feature is activated, your handset sounds just a single ring
tone.
M
Ring
¥
Press the M-key repeatedly in programming
mode until "Ring " appears.
Press the Foxkey under "Ring " and then use the
Foxkey under "¥" to select "Normal ring" or
"Discr ring".
Ok
Press the Foxkey under "Ok" to activate the
current ring signal.
Ok
ß
Press the Foxkey repeatedly under "ß" until the
desired volume is reached.
Ok
ß
Press the Foxkey under "Ok" to store the setting
and in the next menu, use the Foxkey under "ß"
to select a melody.
ß
Ok
After storing the melody by pressing "Ok", press
the Foxkey under "ß" in the "Ring_speed" menu
in order to set the desired ring speed; then
confirm with the Foxkey under "Ok".
Notes
• You can use the M-key to scroll between the menu options "Ringing_vol.", "Melody"
and "Ring_speed" without having to make any changes.
The ringing signal may be set to be very loud. For safety reasons, the volume of the
first ring tone is always lower than that of the following ring tones.
English
•
20310997en_ba_a0
35
Programming your telephone
Switching the trembler on
The trembler is a discrete and reliable way of being made aware of a call, should you fail
to hear the call because of a noisy environment and not notice the call LED either.
36
Ok
Use a "Long-Click" on the loudspeaker key to
skip to the "Trembler" menu item and press the
Foxkey under "Ok".
¥
Ok
With the Foxkey under "¥" you can select either
"Ring only", "Trembler only" or "Both" by
pressing the Foxkey under "Ok" at the
appropriate display.
¥
Ok
With the Foxkey under "¥" select between
"Symbol: On" or "Symbol: Off" and confirm
with "Ok". With "Symbol: On" the display
symbol " " indicates that the trembler is
switched on.
20310997en_ba_a0
Troubleshooting
Leaving the radio coverage area
You will hear a warning tone if you are about to leave the area of radio coverage. Once
you have left the area the message "No System" will appear and the aerial symbol " "
will disappear.
If during a call you move out of range completely, your call will be interrupted but the
connection will not be cleared down immediately. The system will then attempt for
around 20 s to set up a new radio connection with the same - or another - radio unit.
Only then will the connection be cleared down in the PBX.
Outside radio coverage range, you have the following M-key programming functions at
your disposal:
"Prog.", "Keys", "Mobile", "Term.", "Ring", "*Language", "Test" and "System".
Display showing but no connection
The handset may be barred (see "Barring/unbarring handset").
The Hotkey and/or Foxkey cannot be programmed
Programming may be barred (see "Barring/unbarring handset").
Unbarring the handset if password is forgotten
Ask the system manager to unbar your handset and default the password to "0000".
Special display contents
"Please wait"
This message may appear during the registration procedure. It also appears when a caller
puts the call on hold.
"Handset unknown"
The registration of the handset with the PBX system has failed. Please contact the system
manager.
"Overload"
No free resources, please wait and try again.
"No System"
You are out of radio coverage range; the connection with the PBX system was broken off.
"Registration"
The registration procedure on the PBX system is in progress.
"Defective" / permanent progressive ringing
Each time the handset is placed on the charging box, its parameters are checked. If a
parameter error is detected, you will hear an acoustic fault signal and the display will read
"Defective". The handset must then be sent back to the supplier for repairs/replacement.
Note
If other messages appear, ask your system manager about them.
20310997en_ba_a0
37
English
"System Busy"
Temporarily, calls cannot be set up via the current radio unit. The handset is trying to
establish a better radio connection with the same - or another - radio unit. The message
appears only in the idle state.
Function codes
Which prefix code numbers to dial
Standard dialling
Key sequence
Abbreviated dialling numbers generally PBX .............. 7000…7999 1)
.........
Door intercoms ............................................................... 851… 852 1)
.........
Emergency codes ............................................................ 12
.........
External line
business .......................................................................... 0
private ............................................................................ 10
to include cost centre code ............................................. 13 CC no.
.........
.........
.........
Routing codes ................................................................. 170… 199 1)
.........
Switchboard attendant .................................................. 11
.........
User group codes ........................................................... 860… 888 1)
.........
Suffix dialling
Brokering (switching between
two connections) ............................................................ 2
Call back
activate while subscriber is busy ...................................... 9 or *37
activate while subscriber is free ....................................... 9 or *37
Call back reg. no. / MESSAGE
activate ........................................................................... *38
Call waiting .....................................................................
reject ..............................................................................
answer with hold ............................................................
answer without hold .......................................................
answer with conference ..................................................
6 or *43
0
2
1
3
Coded ringing
activate ........................................................................... 8 or *81
Conference
establish from connection ............................................... 3
exclude internal subscribers ............................................ *31
Intrusion ..........................................................................
reject ..............................................................................
answer with hold ............................................................
answer without hold .......................................................
7 or *44
0
2
1
Paging system on ........................................................... 8 or *81
1) The definition and the number range are software and PBX dependant
38
20310997en_ba_a0
Function codes
Re-booking ongoing call to cost centre number ......... *78 CC no.
Parking a call .................................................................. *76
Transfer call .................................................................... 1
Prefix dialling
Announcement
to a single subscriber ...................................................... *7998 subs. no.
to a group ...................................................................... *79 group no.
answer announcement to a group .................................. *89
Answer circular call ........................................................ *83
Appointments reminder call (wake-up call) 2)
activate standing order ...................................................
cancel standing order ......................................................
activate one-off order .....................................................
cancel one-off order .......................................................
*56 hh mm
#56
*55 hh mm
#55
Call back reg. no. / MESSAGE2)
activate ........................................................................... *38 subs. no.
cancel (target terminal) ................................................... #38 subs. no.
Call diversion
suppress incoming 2) .......................................................
enable incoming 2) ..........................................................
activate unconditional 2) ..................................................
cancel unconditional 2) ....................................................
activate to most recently defined subs. no., uncond. .......
cancel to most recently defined subs. no., uncond. .........
activate to pre-defined subs. no. 2) ..................................
cancel to pre-defined subs. no. 2) ....................................
activate when busy 2) ......................................................
cancel when busy 2) .........................................................
activate to most recently
defined subs. no., when busy .......................................
cancel to most recently
defined subs. no., when busy .......................................
activate to standard text 2) ...............................................
cancel to standard text 2) .................................................
activate to pager or circular call with ring code 2) .............
cancel to pager or circular call with ring code 2) ...............
#67
*24 text no.#
#24
*28
#28
Call forwarding (automatic call transfer if no answer)
suppress incoming 2) .......................................................
enable incoming 2) ..........................................................
activate 2) ........................................................................
cancel 2) ..........................................................................
activate to most recently defined subs. no. ......................
*02
#02
*61 dest. no.
#61
*61#
*02
#02
*21 dest. no.
#21
*21#
#21
*22
#22
*67 dest. no.
#67
English
*67#
2) Remote control possible
20310997en_ba_a0
39
Function codes
cancel to most recently defined subs. no. ........................
activate to pre-defined subs. no. 2) ..................................
cancel to pre-defined subs. no. 2) ....................................
activate to pager or circular call with ring code 2) .............
cancel to pager or circular call with ring code 2) ...............
#61
*62
#62
*68
#68
Call pick up ......................................................................... *86 subs.no.
Call waiting indication 2)
suppress incoming .......................................................... *04
enable incoming ............................................................. #04
Cancel call back .............................................................. #37
Code call
activate ........................................................................... *81 subs. no.
answer ........................................................................... *82
Conference
variable ........................................................................... *71 subs. no. 1*
… subs. no. 5# 1)
pre-defined ..................................................................... *70 conf. no
Connection
park ................................................................................ *76
recall parked ................................................................... #76
Courtesy Service
switch on group 1 ...........................................................
switch off group 1 ..........................................................
switch on group 2 ...........................................................
switch off group 2 ..........................................................
*931
#931
*932 1)
#932 1)
Day, night, weekend answer connection (Switch group 1)
day (Position 1) ............................................................... *8511
night (Position 2) ............................................................ *8512
weekend (Position 3) ...................................................... *8513
Deactivate all activated services 2) ................................ *00
(except user group)
Do not disturb (station guarding) 2)
activate ........................................................................... *26
cancel ............................................................................. #26
External line
activate with charge recall ............................................... *32 subs. no.
1) The definition and the number range are software and PBX dependant
2) Remote control possible
40
20310997en_ba_a0
Function codes
Follow me
activate ........................................................................... *23 subs. no.
cancel ............................................................................. #23
Intrusion 2)
suppress incoming .......................................................... *04
enable incoming ............................................................. #04
Messages (standard messages with/without
defined parameters) 2)
send to a single subscriber .............................................. *3598 subs. no text no.#
send to a group .............................................................. *35 group no. text no.#
broadcast ........................................................................ *3599 text no.#
Open doors ..................................................................... *751… *752 1)
Paging
page ............................................................................... *81 subs. no.
answer with one search path .......................................... *82
answer with multiple search paths .................................. *82 subs. no.
Relays
activate ........................................................................... *755… *757 1)
deactivate ....................................................................... #755… #757 1)
Remote control
activate (from another set) ............................................ *06 subs. no. *21 dest. no.
activate remote control /
enter remotely controllable number /
enter desired *-procedure (e.g. *21 dest. no.)
deactivate (from another set) ........................................ *06 subs. no. #21
activate remote control /
enter remotely controllable number /
enter desired #-procedure (e.g. #21)
deactivate (from own set) ............................................. #21
enter #-procedure (e.g. #21)
English
Switch groups (incoming)
switch group x, pos. 1 ..................................................... *85x1 1)
switch group x, pos. 2 ..................................................... *85x2 1)
switch group x, pos. 3 ..................................................... *85x3 1)
Note: x = 2 to 9
User group 2)
join ................................................................................. *48
leave ............................................................................... #48
1) The definition and the number range are software and PBX dependant
2) Remote control possible
20310997en_ba_a0
41
Index
A
ABC 13
Adjusting ringing signal 35
Adjusting the receiver volume during a call 11
Announcement 19
2
8
9
M
B
Barring and unbarring your terminal 34
Battery 5
Brokering 15
4
1
5
0
C
Call diversion 16
Call list 14
Callback 17, 18
Code/password 5, 34
Conference 16
Display IPEI 9
Foxkey programming 32
Hotkey Programming 30, 31
Key lock (Variant 1) 29
Key lock (Variant 2) 29
Programming mode 3, 21
Quality of the radio connection 2
Select PBX system 9
Software version number and date 9
Switching OFF 33
Switching the trembler on 33
Transparent mode 20
M
Macro language 28
Message 18, 19
Mute 14
D
P
Dialling 12, 13
Dialling with a name from a directory 13
Direct answer 33
Discreet ringing 14
Display 1, 8
Diversion 16
DTMF 20
Paging 17
Parking a call 15
PBX system 9
Pick up a call 10
Private directory 27
Programming 21
Programming the Foxkeys 32
Programming the Hotkey 30, 31
E
Enquiry calls 20
R
G
Read message 19
Receiver volume 10
Redial 12
Register the PBX systeme 9
General rules of operation 3
S
H
K
Safety Advice 4, 5
Sending a message 18
Setting the display language 8
Setting the PBX system 9
Switching handset (terminal) ON/OFF 33
Switching off the microphone 14
Switching the trembler on 36
Key confirmation tone 32
T
L
Text display for idle state 28
Tone Dial Mode 20
Transferring a call 16
Transparent mode 20
Trembler 36
Troubleshooting 37
Twin Mode 16, 26
F
Foxkey 32
Hotkey 12, 30, 31
I
Installation 6, 7
Leaving a message 17
Leaving the radio coverage range 37
Listening by loudspeaker 11
Locking the keypad 29
Loudspeaker 11
"Long Click" functions
C
Back to the previous menu 13, 28
Changes the search direction 3
¥
42
20310997en_ba_a0
English
Notes
20310997en_ba_a0
43
Office 30
Office 40
Office 100
a thinks ahead
ABSC 20310986_K.107_V4.11
Office 20