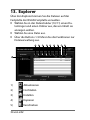
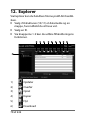
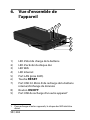
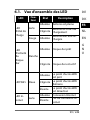
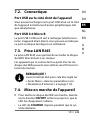
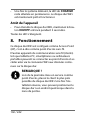
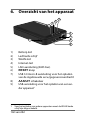
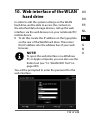
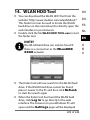
1
WLAN Festplatte 1.000 GB WLAN-harddisk 1.000 GB Disque dur WiFi 1.000 Go Harde schijf voor WLAN-gebruik 1.000 GB WLAN Hard Drive 1.000 GB MEDION® LIFE®S89044 (MD 90216) Bedienungsanleitung Betjeningsvejledning Mode d‘emploi Handleiding Instruction Manual Inhaltsverzeichnis 1. Hinweise zu dieser Anleitung ............................4 1.1. In dieser Anleitung verwendete Symbole und Signalwörter ................................................................4 2. Bestimmungsgemäßer Gebrauch......................6 3. Sicherheitshinweise ............................................6 3.1. Betriebssicherheit ......................................................7 3.2. Datensicherung ..........................................................9 3.3. Stromversorgung .................................................... 10 4. Hinweise zur Konformität ............................... 10 5. Vor der Inbetriebnahme .................................. 11 5.1. Lieferumfang prüfen.............................................. 11 5.2. Systemvoraussetzungen ...................................... 11 6. Geräteübersicht ............................................... 12 6.1. Übersicht der LED-Anzeigen............................... 13 7. Inbetriebnahme ............................................... 14 7.1. Akku aufladen .......................................................... 14 7.2. Anschlüsse................................................................. 15 7.3. RJ45-LAN Anschluss ............................................... 15 7.4. Gerät einschalten .................................................... 15 8. Betrieb .............................................................. 16 8.1. Netzwerkverbindung an einem Notebook/PC ............................................................ 17 8.2. App auf ein Android/Apple Smartphone/Tablet-PC installieren .................................................... 18 8.3. Netzwerkverbindung an einem Smartphone oder Tablet ................................................................ 19 9. Dateiverwaltung über die Android/ Apple App ......................................................... 20 2 von 242 9.1. Geräteauswahl ......................................................... 20 9.2. Menü-Icons ............................................................... 21 9.3. Dateiverwaltung ..................................................... 22 9.4. Menü Einstellungen ............................................... 23 10. Web-Interface der WLAN-Festplatte .............. 25 11. Einstellungen ................................................... 26 11.1. Benutzer ..................................................................... 27 11.2. Festplatte ................................................................... 28 11.3. Netzwerk .................................................................... 28 11.4. Dienste ........................................................................ 32 11.5. System......................................................................... 32 11.6. Assistent ..................................................................... 33 12. Information ...................................................... 33 13. Explorer ............................................................ 34 14. WLAN HDD Tool ................................................ 36 15. Gerät zurücksetzen .......................................... 37 16. Benötigen Sie weitere Unterstützung? .......... 38 17. Reinigung ......................................................... 39 18. Entsorgung ....................................................... 40 19. Technische Daten ............................................. 41 20. Glossar .............................................................. 42 21. Impressum ........................................................ 45 3 von 242 DE DK FR NL EN G N U 1. Hinweise zu dieser Anleitung Lesen Sie vor Inbetriebnahme die Sicherheitshinweise aufmerksam durch. Beachten Sie die Warnungen auf dem Gerät und in der Bedienungsanleitung. Bewahren Sie die Bedienungsanleitung immer in Reichweite auf. Wenn Sie das Gerät verkaufen oder weiter geben, händigen Sie unbedingt auch diese Anleitung und die Garantiekarte aus. 1.1. In dieser Anleitung verwendete Symbole und Signalwörter GEFAHR! Warnung vor unmittelbarer Lebensgefahr! WARNUNG! Warnung vor möglicher Lebensgefahr und/oder schweren irreversiblen Verletzungen! 4 von 242 VORSICHT! Hinweise beachten, um Verletzungen und Sachschäden zu vermeiden! DE ACHTUNG! Hinweise beachten, um Sachschäden zu vermeiden! HINWEIS! FR Weiterführende Information für den Gebrauch des Geräts. HINWEIS! Hinweise in der Bedienungsanleitung beachten! WARNUNG! Warnung vor Gefahr durch elektrischen Schlag! • Aufzählungspunkt/ Information über Ereignisse während der Bedienung Auszuführende Handlungsanweisung 5 von 242 DK NL EN G N U 2. Bestimmungsgemäßer Gebrauch Dieses Gerät ist eine USB-Festplatte, deren Daten über einen eingebauten WLAN-Access Point anderen, drahtlos kommunizierenden Geräten bereitgestellt werden können. Darüberhinaus verfügt das Gerät über USB-Anschlüsse für den Datentransfer bzw. zum Aufladen des internen Akkus und zum Aufladen eines externen Gerätes. Benutzen Sie das Gerät zu keinem anderen Zweck. Betreiben Sie das Gerät nur in Innenräumen. Das Gerät ist für den privaten Gebrauch bestimmt und nicht für die gewerbliche Nutzung geeignet. 3. Sicherheitshinweise Bitte lesen Sie dieses Kapitel und die ganze Anleitung aufmerksam durch und befolgen Sie alle aufgeführten Hinweise. So gewährleisten Sie einen zuverlässigen Betrieb und eine lange Lebenserwartung Ihres Gerätes. Halten Sie diese Bedienungsanleitung stets griffbereit in der Nähe Ihres Gerätes und bewahren diese gut auf, um sie bei einer Veräußerung dem neuen Besitzer weitergeben zu können. Wenden Sie sich bitte ausschließlich an unsere autorisierten Servicepartner, falls Sie Probleme mit dem Gerät haben. 6 von 242 3.1. Betriebssicherheit DE • Das Gerät ist nicht dafür bestimmt, durch Personen (einschließlich Kinder) mit eingeschränkten physischen, sensorischen oder geistigen Fähigkeiten oder mangels Erfahrung und/oder mangels Wissen benutzt zu werden, es sei denn, sie werden durch eine für ihre Sicherheit zuständige Person beaufsichtigt oder erhielten von ihr Anweisungen, wie das Gerät zu benutzen ist. Kinder sollten beaufsichtigt werden, um sicherzustellen, dass sie nicht mit dem Gerät spielen. • Befolgen Sie auch die Gebrauchsanweisungen der Geräte, die Sie mit der WLANFestplatte verbinden. • Verwenden Sie ausschließlich den mitgelieferten Netzadapter (KSAS0060500100VEU, Hersteller: Ktec, China). Versuchen Sie nie, den Stecker des Netzadapters an andere Buchsen anzuschließen, da sonst Schäden verursacht werden können. • Stellen Sie keine mit Flüssigkeit gefüllten 7 von 242 DK FR NL EN G N U • • • • Gefäße, wie z.B. Vasen, auf das Gerät oder in die nähere Umgebung. Das Gefäß kann umkippen und die Flüssigkeit kann die elektrische Sicherheit beeinträchtigen. Halten Sie das Gerät von Feuchtigkeit, Tropf- und Spritzwasser fern. Vermeiden Sie Erschütterungen, Staub, Hitze und direkte Sonneneinstrahlung, um Betriebsstörungen zu verhindern. Die Betriebstemperatur beträgt 5 bis 35 °C. Öffnen Sie niemals das Gehäuse. Dies würde den Garantieanspruch beenden und möglicherweise zur Zerstörung des Gerätes führen. Warten Sie nach einem Transport solange mit der Inbetriebnahme, bis das Gerät die Umgebungstemperatur angenommen hat. Bei großen Temperatur- oder Feuchtigkeitsschwankungen kann es durch Kondensation zur Feuchtigkeitsbildung kommen, die einen elektrischen Kurzschluss verursachen kann. Das Gerät ist für den Anschluss an Computern mit Anschlussabsicherung (Limited Power Source im Sinn der EN60950) vor- 8 von 242 • • • • gesehen. Verlegen Sie die Kabel so, dass niemand darauf treten, oder darüber stolpern kann. Stellen Sie keine Gegenstände auf die Kabel, da diese sonst beschädigt werden könnten. Um statische Aufladungen zu vermeiden, sollten Sie das Gerät nicht unter extrem trockenen Bedingungen betreiben. Unter Bedingungen mit elektrostatischer Entladung, kann es zu Fehlfunktionen des Gerätes kommen. In diesem Fall ist es erforderlich das Gerät auf die Werkseinstellungen zurückzusetzen. 3.2. Datensicherung Die Geltendmachung von Schadenersatzansprüchen für Datenverlust und dadurch entstandene Folgeschäden ist ausgeschlossen. Machen Sie vor jeder Aktualisierung Sicherungskopien Ihrer Daten auf externe Speichermedien (z. B. CD-R). 9 von 242 DE DK FR NL EN G N U 3.3. Stromversorgung • Betreiben Sie den Netzadapter der WLANFestplatte nur an einer leicht zugänglichen und geerdeten Steckdosen mit AC 100-240 V~ 50 Hz. 4. Hinweise zur Konformität Ihr Gerät erfüllt die Anforderungen der elektromagnetischen Kompatibilität und elektrischen Sicherheit. Mit diesem Gerät wurden folgende Funkausstattungen ausgeliefert: • Wireless LAN (optional) Hiermit erklärt die Medion AG, dass das Produkt mit den folgenden europäischen Anforderungen übereinstimmt: • R&TTE Richtline 1999/5/EG • Öko-Design Richtlinie 2009/125/EG • RoHS-Richtlinie 2011/65/EU. Vollständige Konformitätserklärungen sind erhältlich unter www.medion.com/conformity. 10 von 242 5. Vor der Inbetriebnahme DE 5.1. Lieferumfang prüfen DK Bitte überprüfen Sie die Vollständigkeit der Lieferung und benachrichtigen Sie uns bitte innerhalb von 14 Tagen nach dem Kauf, falls die Lieferung nicht komplett ist. Vergewissern Sie sich nach dem Auspacken, dass folgende Teile mitgeliefert worden sind: • WLAN-Festplatte • Netzadapter (KSAS0060500100VEU, Hersteller Ktec, China) mit USB-Kabel • Bedienungsanleitung und Garantieunterlagen FR GEFAHR! Halten Sie Verpackungsfolien von Kindern fern, es besteht Erstickungsgefahr! 5.2. Systemvoraussetzungen • • WLAN Standard 802.11b/g/n Windows 8/Microsoft Windows® 7/Windows Vista® SP1, Mac OS 10.6 oder neuer Android 2.2 oder neuer, iOS 4.0 oder neuer 11 von 242 NL EN G N U 6. Geräteübersicht 1 9 1) 2) 3) 4) 5) 6) 7) 8) 9) 1 2 3 4 5 6 7 8 Akku-LED Festplatten-LED WLAN-LED Internet-LED LAN-Anschluss (RJ45 Buchse) R E S E T -Taste USB 3.0 Micro-B Anschluss zum Aufladen des internen Akkus/Datenaustausch E I N - / A U S -Schalter USB-Anschluss zum Aufladen eines anderen Gerätes1 Zum Aufladen anderer Geräte muss die WLAN-Festplatte ausgeschaltet sein. 12 von 242 6.1. Übersicht der LED-Anzeigen LED Farbe Status Beschreibung leuchtet Akku ist geladen AkkuLED Grün Rot blinkt Akku wird geladen leuchtet Akku muss geladen werden DE DK FR NL EN Leuchtet Festplatte bereit FestplattenLED Weiß Blinkt Festplattenaktivität Der WLAN-Access Point ist bereit. Der WLAN-Access Point Blinkt startet Der WLAN-Access Point Aus ist ausgeschaltet Leuchtet Internetverbindung Keine InternetverbindAus ung Leuchtet WLANBlau LED InternetLED Grün 13 von 242 G N U 7. Inbetriebnahme 7.1. Akku aufladen Die WLAN-Festplatte besitzt einen eingebauten Akku. Sie können den Akku entweder mit dem mitgelieferten USB-Netzteil laden oder über den USB-Anschluss Ihres PCs oder eines anderen Gerätes mit USB-Anschluss. Schließen Sie das USB-Kabel an den USB 3.0 MicroB Anschluss der WLAN-Festplatte an. Schließen Sie das andere Ende an den USB-Netzadapter an und stecken Sie ihn in die Steckdose. Alternativ schließen Sie die das USB-Kabel an den USB-Anschluss Ihres PCs oder eines anderen Gerätes, welches 5 V Ausgangsspannung am USB-Anschluss liefert, an. Ladezustand-LEDs • • Während des Ladevorgangs blinkt die Akku-LED fortlaufend. Ist eine vollständige Ladung erreicht, leuchtet die Akku-LED dauerhaft. 14 von 242 7.2. Anschlüsse DE USB Anschluss rechte Geräteseite DK An den USB-Anschluss an der Geräteseite können Sie die Akkus anderer Geräte wie z. B. Smartphones laden. FR USB 3.0 Micro-B Anschluss NL Der USB 3.0 Micro-B Anschluss dient zum Aufladen des internen Akkus. Im ausgeschalteten Zustand können sie hierüber am PC auf die Festplatte zugreifen. EN G N Über die RJ45-LAN Buchse können Sie die WLAN-FestU 7.3. RJ45-LAN Anschluss platte direkt mit einem Router verbinden. Geräte, die sich am Access-Point der WLAN-Festplatte anmelden, können so drahtlos auf den Internetzugang des Routers zugreifen. HINWEIS! Hierzu muss in den Einstellungen der Internetzugriff auf „Kabelverbindung“ eingestellt sein (Siehe „Interneteinstellungen“ auf Seite 24). 7.4. Gerät einschalten Halten Sie den EIN-/AUS-Schalter so lange gedrückt, bis die Lade-LED leuchtet, um die WLANFestplatte einzuschalten. • Die L A D E -LED blinkt während das System hochfährt. 15 von 242 • Anschließend leuchtet die L A D E -LED dauerhaft. Die WLAN-Festplatte ist nun betriebsbereit. Gerät ausschalten • Um die WLAN-Festplatte auszuschalten, halten Sie den E I N - / A U S -Schalter für etwa 3 Sekunden gedrückt. Alle LEDs schalten sich aus. 8. Betrieb Die WLAN-Festplatte ist als Access-Point (AP), als drahtloser Zugangspunkt konfiguriert. Andere drahtlose Kommunikationsgeräte (Clients), wie Tablet-PCs, Smartphones oder Notebooks können sich an dem Access-Point anmelden und so über die WLAN-Verbindung auf die Daten der Festplatte zugreifen. HINWEIS! Bei der ersten Inbetriebnahme als Access Point platzieren Sie den Client möglichst nahe an der WLAN-Festplatte. Nach erfolgreicher Installation können Sie die Festplatte dann an einer beliebigen Position innerhalb der Reichweite aufstellen. 16 von 242 8.1. Netzwerkverbindung an einem DE Notebook/PC Schalten Sie die WLAN-Festplatte ein. Suchen Sie an ihrem Notebook/PC in den verfügbaren Drahtlosnetzwerken nach dem Netzwerk „WLAN-HDD XXXX“ und verbinden Sie das Gerät mit diesem Netzwerk. DK FR NL EN G N U Verbindungsbeispiel unter Windows Geben Sie nach Aufforderung das auf dem Typenschild auf der Rückseite der WLAN-Festplatte angegebene Netzkennwort (Password) ein. Der WLAN-Client verbindet sich nun mit der WLAN-Festplatte. Sie können die Dateiverwaltung nun über das WebInterface nutzen, wie unter „10. Web-Interface der WLAN-Festplatte“ auf Seite 25 beschrieben. 17 von 242 8.2. App auf ein Android/Apple Smartphone/Tablet-PC installieren Um die wesentlichen Menüfunktionen sowie den Dateizugriff der WLAN-Festplatte an einem Tablet-PC oder Smartphone nutzen zu können müssen Sie zunächst die über den Playstore (Android) bzw. AppStore (Apple) zur Verfügung gestellte App auf Ihrem Tablet-PC/Smartphone installieren. Rufen Sie mit Ihrem Smartphone/Tablet PC über den Webbrowser die Adresse „http://www.medion.com/wlanhddtool/“ auf. Laden Sie die entsprechende Android/Apple App von der Webseite herunter. Download der App über Direktlink: Über den nebenstehenden QR-Code gelangen Sie zum Download der iOS-App im AppStore. Über den nebenstehenden QR-Code gelangen Sie zum Download der AndroidApp in Google Play. 18 von 242 Nachdem Sie die App installiert haben müssen Sie die WLAN-Funktion an Ihrem Smartphone/Tablet aktivieren und das Gerät mit dem Netzwerk „WLAN-HDD-XXXX“ verbinden DE DK 8.3. Netzwerkverbindung an einem FR NL Smartphone oder Tablet Schalten Sie die WLAN-Festplatte ein. Aktivieren Sie die WLAN-Funktion an Ihrem Smartphone/Tablet und verbinden Sie Ihr Gerät mit dem Netzwerk „WLAN-HDD-XXXX“. Geben Sie nach Aufforderung das auf dem Typenschild auf der Rückseite der WLAN-Festplatte angegebene Netzkennwort (Password) ein Der WLAN-Client verbindet sich nun mit der WLAN-Festplatte. HINWEIS! Um die Dateiverwaltung an einem Smartphone/Tablet-PC nutzen zu können, installieren Sie die entsprechende App für Android/ Apple, wie unter „8.2. App auf ein Android/ Apple Smartphone/Tablet-PC installieren“ auf Seite 18 beschrieben. 19 von 242 EN G N U 9. Dateiverwaltung über die Android/Apple App Nachdem Sie die App auf ihrem Smartphone/Tablet PC geöffnet haben, erscheint das Home-Menü. 9.1. Geräteauswahl • • Am unteren Displayrand ist der Eintrag WLAN HDD aktiv. In dieser Ansicht werden alle Ordner der WLANFestplatte angezeigt. Um zur Ansicht der Dateien und Ordner des Smartphone/Tablet PCs zu wechseln, tippen Sie am unteren Displayrand auf den Eintrag Mein Gerät. 20 von 242 9.2. Menü-Icons DE Über die Menü-Icons am oberen Displayrand können Sie folgende Funktionen ausführen: Über Home gelangen Sie zurück zur obersten Dateiebene. Mit Anzeige wechseln Sie die Anzeige der Dateien und Ordner zwischen Kacheln und Liste Über Einst. rufen Sie das Menü Einstellungen auf (Siehe „9.4. Menü Einstellungen“ auf Seite 23). Verwenden Sie Zurück, um eine Ansicht zurück zu blättern. Mit Verwalten starten Sie die Dateiverwaltung. Der Button wechselt zum Button „Ende“ Tippen Sie auf Suchen, um direkt nach Dateinamen im aktuellen Ordner zu suchen. 21 von 242 DK FR NL EN G N U 9.3. Dateiverwaltung Tippen Sie auf den Button . Am unteren Displayrand wird folgende Menüleiste eingeblendet: Tippen Sie eine Datei an, die Sie verschieben, herunterladen oder löschen wollen. Alle ausw./Alle Abw. Um alle Dateien im aktuellen Ordner auszuwählen, tippen Sie auf Alle ausw. und um die Dateien wieder abzuwählen auf Alle abw.. Download/Upload Um die Datei herunterzuladen (Ansicht „WLAN HDD“) oder hochzuladen (Ansicht „Mein Gerät“), tippen Sie auf den entsprechenden Button und wählen Sie anschließend einen Speicherort aus. Status Tippen Sie auf Status, um den Status der aktiven und abgeschlossenen Datei-Transfers einzusehen. Löschen Um die Datei zu löschen tippen Sie auf Löschen. 22 von 242 Dateiverwaltung beenden Um die Dateiverwaltung zu beenden und zur Geräteauswahl zurück zu gelangen, tippen Sie auf Ende. DE DK FR 9.4. Menü Einstellungen Das Menü Einstellungen umfasst in der App für Smartphones/Tablet-PCs die wesentlichen Optionen zum konfigurieren der WLAN-Festplatte. HINWEIS! Um die vollständige Konfiguration vornehmen zu können, rufen Sie das Menü Einstellungen im Web-Interface der WLANFestplatte über einen Webbrowser auf (Siehe „10. Web-Interface der WLAN-Festplatte“ auf Seite 25). WLAN HDD-n-go-Einstellungen Gerätename Hier können Sie einen Namen für die WLAN-Festplatte vergeben. Sicherheitsopt. Stellen Sie hier die Verschlüsselung für die Anmeldung am Access-Point der WLAN-Festplatte ein. Firmware Upgrade Hier können Sie direkt prüfen, ob ein Update für die App vorliegt und heruntergeladen werden kann. 23 von 242 NL EN G N U Interneteinstellungen Hier können Sie den Internetzugriff zu einem WLANNetzwerk (Drahtlose Verbindung) oder über die RJ45 LAN-Buchse (Kabelverbindung) einstellen. Die WLAN-Festplatte stellt diese Internetverbindung nach dem Speichern den der WLAN-Festplatte angemeldeten Clients zur Verfügung. Um die Suche nach verfügbaren WLAN-Netzwerim ken zu starten, klicken Sie auf den Button Feld Netzwerkonfiguration. Geben Sie anschließend im Eintrag Passwort das Netzkennwort ein und klicken Sie auf Login. Erweiterte Einstellungen Tippen Sie auf den Pfeil neben dem Eintrag des Netzwerks, über das die WLAN-Festplatte eine Internetverbindung erhalten soll. Hier können Sie einstellen, ob IP-Adressen automatisch vom Netzwerk bezogen werden sollen (DHCP) oder eine IP-Adresse manuell vergeben (Statisch). 24 von 242 10. Web-Interface der WLANFestplatte Um die Systemeinstellungen der WLAN-Festplatte zu bearbeiten und auf die Inhalte der angeschlossenen Datenträger zugreifen zu können, rufen Sie das WebInterface über den Web-Browser Ihres Notebooks/PCs/ mobilen Endgerätes auf. Geben Sie dazu die auf dem Typenschild auf der Rückseite der WLAN-Festplatte angegebene IPAdresse in die Adresszeile Ihres Webbrowsers am Notebook/PC ein. HINWEIS! Sie können das Web-Interface an einem Windows oder Apple PC auch über das Finder-Tool öffnen (Siehe „14. WLAN HDD Tool“ auf Seite 36). Es erscheint die Passwortabfrage des Web Interface. 25 von 242 DE DK FR NL EN G N U Geben Sie beim ersten Login die auf dem Typenschild auf der Rückseite der WLAN-Festplatte angegebenen Login-Daten ein. (Auslieferungszustand User: admin, Password: [kein Passwort]). Sprache für das Web-Interface einstellen Stellen Sie im Fenster der Passwortabfrage auch die Sprache für das Web-Interface ein. HINWEIS! Vergeben Sie nach der ersten Anmeldung ein Passwort für den Administrator-Zugang, um Ihre Daten zu schützen (siehe „11.1. Benutzer“ auf Seite 27). Nachdem Sie sich erfolgreich am Web-Interface angemeldet haben, erscheint die Seite Einstellungen. 11. Einstellungen Über die Seite Einstellungen haben Sie Zugriff auf die verschiedenen Untermenüs, in denen Sie Einstellungen zu Benutzer, Datenträgern, Netzwerkverbindungen, Diensten, Systemeinstellungen vornehmen können, sowie den Assistenten starten. Die Untermenüs öffnen sich in einem neuen Fenster. Verlassen Sie ein Untermenü, indem Sie auf das X am oberen, rechten Rand des Untermenüs klicken. Die meisten Einstellungen müssen Sie mit SI26 von 242 CHERN bestätigen, damit sie wirksam werden. DE DK FR NL EN 11.1. Benutzer Hier können Sie das Administratorpasswort vergeben. Bestätigen Sie ein neu vergebenes Passwort mit SICHERN. 27 von 242 G N U 11.2. Festplatte Hier können Sie Informationen zu Speicherbelegung und Dateisystem der internen Festplatte anzeigen. 11.3. Netzwerk Hostname Hier können Sie einen Gerätenamen für die WLANFestplatte vergeben. Bestätigen Sie einen neu vergebenen Namen mit SICHERN. Wi-Fi & LAN Hier können Sie die Einstellungen für den Access-Point der WLAN-Festplatte vornehmen. SSID Geben Sie hier die SSID ein, mit der der Access-Point der WLAN-Festplatte für andere WLAN-Geräte zu erkennen ist. Modus Stellen Sie hier den WLAN-Funkstandard ein. Passwort Vergeben Sie hier ein Passwort mit dem sich andere WLAN-Geräte am Access-Point der WLAN-Festplatte anmelden sollen. MAC-Adresse Hier können Sie die MAC-Adressse Ihrer WLAN-Fest28 von 242 platte ablesen. DE IP-Adresse Geben Sie hier die IP-Adresse ein, unter der das WebInterface der WLAN-Festplatte aufgerufen werden kann. Subnetzmaske Geben Sie hier die Subnetzmaske für den Access-Point der WLAN-Festplatte ein. Wi-Fi-Kanal Falls andere WLAN-Netzwerke den Access-Point und den Betrieb der WLAN-Festplatte beeinträchtigen, können Sie hier einen anderen Kanal einstellen, auf dem das WLAN-Signal ausgestrahlt wird. Sicherheit Stellen Sie hier die Verschlüsselung für die Anmeldung am Access-Point der WLAN-Festplatte ein. SSID verbergen Stellen Sie hier ein, ob der Netzwerkname (SSID) der WLAN-Festplatte im Netzwerk sichtbar sein soll (Einstellung ON). 29 von 242 DK FR NL EN G N U DHCP-Server Hier können den DHCP-Server für die WLAN-Festplatte ein- oder ausschalten. • Aktivieren Sie den DHCP-Server, um die WLANFestplatte als Access-Point zu betreiben, der aktiv IP-Adressen an Clients vergibt, die sich am DHCPServer anmelden. • Deaktivieren Sie den DHCP-Server, um die IPAdressen an den Clients manuell festzulegen. Die IP-Adresse muss sich innerhalb des Adressbereichs befinden, den Sie bei aktiviertem DHCP-Server festlegen können (siehe nächster Abschnitt). DHCP-Server aktiviert: Bei aktiviertem DHCP-Server können sie über den Eintrag Client-Liste die aktuell an der WLANFestplatte angemeldeten Geräte einsehen. Über die Einträge Startadresse und Endadresse stellen Sie den IP-Adressbereich ein, innerhalb dessen der DHCP-Server IP-Adressen an Clients vergibt. Geben Sie unter Gateway die IP-Adresse an, unter der der Access-Point der WLAN-Festplatte erreichbar sein soll. HINWEIS! Die IP-Adresse des Gateways muss außerhalb des IP-Bereichs des DHCP-Servers liegen. 30 von 242 Pri DNS Server Wenn Sie im nächsten Menüeintrag „Internet“ einen Acccess Point angegeben haben, über den eine Internetverbindung hergestellt werden kann, erscheint hier die IP-Adresse dieses Access Points. Sie können die IP-Adresse für den primären DNS-Server hier auch manuell angeben. Sek DNS Server Wenn es noch einen zweiten DNS-Server im Netzwerk gibt, der IP-Adressen vergibt, tragen Sie hier die IP-Adresse des zweiten DNS-Servers ein. Internet Hier können Sie nach verfügbaren WLAN-Netzwerken mit einer Internetverbindung suchen. Klicken Sie dazu auf das Feld „Scan“. Geben Sie anschließend im Eintrag Passwort das Netzkennwort ein und vergeben Sie gegebenenfalls eine IP-Adresse (nur bei manueller IP). Die WLAN-Festplatte stellt diese Internetverbindung nach dem Speichern den an der Festplatte angemeldeten Clients zur Verfügung. 31 von 242 DE DK FR NL EN G N U 11.4. Dienste Hier können Sie Samba auf der WLAN-Festplatte aktivieren und deaktivieren (Bei Auslieferung: SambaDienst aktiviert). • Bei aktiviertem Samba können Windows-Clients die Dateien der an die WLAN-Festplatte angeschlossenen Geräte im Windows-Explorer anzeigen. • Bei deaktiviertem Samba können Dateien nur über die Apps bzw. über das Web-Interface angezeigt und verwaltet werden. 11.5. System Zeiteinstellungen Hier können Sie Datum und Uhrzeit, sowie die Zeitzone einstellen. Außerdem können Sie einstellen, ob die Uhrzeiteinstellung automatisch von einem Zeitserver über das Internet bezogen werden soll oder die aktuelle PC-Zeit für die Einstellung von Uhrzeit und Datum übernommen werden soll. Einstell. sichern Hier können Sie die aktuelle Einstellung der WLANFestplatte in einer Konfigurationsdatei sichern und auf Ihrem Gerät speichern. • Über den Eintrag WIEDERHERSTELLUNG können Sie den Speicherort einer früheren Konfigurationsdatei angeben und diese Konfiguration laden. 32 von 242 Firmware-Upgrade Wenn Sie ein Firmware-Update erhalten haben, können Sie dieses über den Eintrag Update installieren. Einstell. zurücks. Wählen Sie diesen Eintrag und klicken Sie anschließend auf SICHERN, um das Gerät auf die Werkseinstellungen zurück zu setzen. DE DK FR NL EN 11.6. Assistent Über den Assistenten können Sie alle Grundeinstellungen der WLAN-Festplatte Schritt für Schritt vornehmen. Folgen Sie den Anleitungsschritten und klicken Sie jeweils auf WEITER, um zur nächsten Einstellung zu gelangen. Nach Abschluss der Einstellungen startet die WLANFestplatte neu. 12. Information Über die Seite Information können Sie den Status von Gerät, Speicher und Netzwerk anzeigen. 33 von 242 G N U 13. Explorer Über den Explorer können Sie die Dateien auf der Festplatte der WLAN-Festplatte verwalten. Wählen Sie in der Dateistruktur (10/11) einen Datenträger und einen Ordner aus, dessen Inhalt sie anzeigen wollen. Wählen Sie eine Datei aus. Über die Buttons 1-9 führen Sie die Funktionen zur Dateiverwaltung aus. 1 2 10 1) Aktualisieren 2) Hochladen 3) Erstellen 4) Kopieren 5) Verschieben 34 von 242 3 4 5 6 7 8 9 6) Herunterladen DE 7) Löschen DK 8) Umbenennen 9) 10) FR Fotobetrachter starten Interne Festplatte NL EN G N U 35 von 242 14. WLAN HDD Tool Auf der Webseite „http://www.medion.com/ wlanhddtool/“ können Sie das WLAN HDD Tool herunterladen. Über dieses Finder-Tool können Sie nach der WLAN-Festplatte im Netzwerk suchen und direkt das Web-Interface im Browser öffnen. Doppelklicken Sie die Datei WLAN HDD TOOL.exe, um das Finder-Tool zu starten. HINWEIS! Die WLAN-Festplatte kann nur gefunden werden, wenn Verbindung zum Netzwerk WLanHDD XXXX besteht. Das Finder-Tool sucht nun die WLAN-Festplatte. Wenn die WLAN-Festplatte nicht gefunden werden konnte, platzieren Sie sie näher an den PC und klicken Sie anschließend auf Refresh, um eine erneute Suche zu starten. Wenn das Finder-Tool die WLAN-Festplatte gefunden hat, klicken Sie auf Log In, um direkt zum Web-Interface zu gelangen. Der Browser Ihres Win36 von 242 dows-PC öffnet sich und die Seite Einstellungen wird angezeigt. Um die WLAN-Festplatte direkt im Windows-Explorer anzuzeigen, klicken Sie auf My Storage. DE DK FR HINWEIS! Die Dateien der an die WLAN-Festplatte angeschlossenen Datenträger können im WindowsExplorer nur angezeigt werden, wenn der Samba-Server auf der WLAN-Festplatte aktiviert ist (Siehe „11.4. Dienste“ auf Seite 32). Wenn Sie den Finder nicht nutzen wollen, öffnen Sie Ihren Webbrowser und geben Sie „http://10.10.10.254“ in die Adresszeile ein. 15. Gerät zurücksetzen Mit der R E S E T -Taste an der Seite der WLANFestplatte können Sie die WLAN-Festplatte zurücksetzen für den Fall, dass das System nicht mehr reagiert oder Sie Ihr Administrator-Passwort verloren haben. Drücken Sie die RESET-Taste mit einem spitzen Gegenstand (etwa einer Büroklammer) ein und halten Sie die Taste etwa 5 Sekunden lang gedrückt. Die WLAN-Festplatte startet nun mit den werksseitigen Einstellungen. 37 von 242 NL EN G N U 16. Benötigen Sie weitere Unterstützung? Wenn die Vorschläge in den vorangegangenen Abschnitten Ihr Problem nicht behoben haben, nehmen Sie bitte Kontakt mit uns auf. Sie würden uns sehr helfen, wenn Sie uns folgende Informationen zur Verfügung stellen: • Welche externen Geräte sind angeschlossen? • Bei welchem Bedienungsschritt ist das Problem aufgetreten? • Welche Schritte haben Sie zur Lösung des Problems bereits unternommen? • Wenn Sie bereits eine Kundennummer erhalten haben, teilen Sie uns diese mit. 38 von 242 17. Reinigung DE Die Lebensdauer des Gerätes können Sie durch folgende Maßnahmen verlängern: • Ziehen Sie vor dem Reinigen immer den Netzadapter und alle Verbindungskabel. • Verwenden Sie keine Lösungsmittel, ätzende oder gasförmige Reinigungsmittel. • Reinigen Sie das Gerät mit einem weichen, fusselfreien Tuch. Bitte bewahren Sie das Verpackungsmaterial gut auf und benutzen Sie ausschließlich dieses, um das Gerät zu transportieren. ACHTUNG! Es befinden sich keine zu wartenden oder zu reinigenden Teile innerhalb des Gerätes. 39 von 242 DK FR NL EN G N U 18. Entsorgung Verpackung Ihr Gerät befindet sich zum Schutz vor Transportschäden in einer Verpackung. Verpackungen sind Rohstoffe und somit wiederverwendungsfähig oder können dem Rohstoffkreislauf zurückgeführt werden. Gerät Werfen Sie Ihr Gerät am Ende seiner Lebenszeit keinesfalls in den normalen Hausmüll! Erkundigen Sie sich bei Ihrer Stadt- oder Gemeindeverwaltung nach einer umwelt- und sachgerechten Entsorgung. 40 von 242 19. Technische Daten DE Allgemein Gesamtgewicht (ca.) Betriebstemperatur Luftfeuchtigkeit während des Betriebs Abmessungen: DK 5 % bis 65 % ca. 85 x 25 x 130 mm NL Interner Akku Kapazität 3000 mAh G N U WLAN-Festplatte Speicherkapazität WLAN-Standard: Netzadapter Modell Hersteller: Eingangsspannung: Ausgangsspannung: Anschlüsse: 280 g 5°C bis 35°C FR 1 TB (=1000 GB)2 802.11 b/g/n KSAS0060500100VEU Ktec, China 100 – 240 V ~ 50/60 Hz 0,18 A 5,0 V 1000 mA LAN (100 Mbit/s) USB 2.0 microUSB 3.0 Technische und optische Änderungen sowie Druckfehler vorbehalten. 2 1 GB entspricht 1 Milliarde Bytes. Die tatsächliche Speicherkapazität kann abweichen. 41 von 242 EN 20. Glossar Access Point (AP), Wireless AP Auch Basisstation genannt, ist ein elektronisches Gerät, das als Schnittstelle für kabellose Kommunikationsgeräte fungiert. Endgeräte stellen per Wireless Adapter (Funkadapter) eine Funkverbindung zum Wireless Access Point her, der wiederum über ein Kabel mit einem fest installierten Kommunikationsnetz verbunden sein kann. Betriebssystem Eine Software, mit der der Benutzer und auf dem System installierte Software mit der Computerhardware kommunizieren kann, wie der Festplatte. BSSID (MAC) Die Basic Service Set Identification (BSSID) entspricht der MAC-Adresse vom Wireless Access Point. Client-Mode Der Client Mode ist eine Betriebsart eines Wireless Access Points (Hier: Der WLAN-Festplatte), bei dem sich dieser gegenüber dem übergeordneten AP wie ein Wireless Adapter verhält. Mit einem im Client Mode betriebenen AP können einzelne Rechner ohne eigenen Wireless Adapter an übergeordnete Netze angebunden werden. DHCP – Dynamic Host Configuration Protocol Ein Protokoll, um Geräten im Netzwerk eine IP-Adresse 42 von 242 zuzuweisen. Mit den dynamischen Adressen kann ein Gerät jedes Mal eine andere IP-Adresse haben, wenn es sich mit einem Netzwerk verbindet. In manchen Systemen ändert sich die IP-Adresse selbst, während das Gerät verbunden ist. DHCP unterstützt auch eine Kombination aus statischen und dynamischen IP-Adressen. Siehe auch Protokoll. DNS – Domain Name Service Ein System, mit dem ein Netzwerk-Nameserver TextHostnamen in numerische IP-Adressen übersetzen kann, um ein mit dem Internet verbundenes Gerät eindeutig zu identifizieren. ESSID Mit der Vergabe unterschiedlicher Netzkennungen kann man auch verschiedene Wireless LANs am selben Ort betreiben. Die SSID wird an der Basisstation eingestellt. Um mehrere Basisstationen zu einem Netz zu verbinden, stellt man an diesen dieselbe SSID ein; sie wird dann als ESSID (Extended SSID) bezeichnet Gateway Das Standard-Gateway gibt den Rechner/Router im Netz an, an den alle Anfragen gestellt werden, die als Ziel keine Adresse im lokalen Netz haben (Anfragen ins Internet). Es schickt diese Anfragen dann weiter an einen Rechner/Router, der evtl. diese Anfrage beantworten kann. In der Regel tragen Sie als StandardGateway die IP-Adresse Ihres Heimrouters (DSL-Router) ein. 43 von 242 DE DK FR NL EN G N U IP-Adresse Eine binäre 32-Bit-Nummer, die jeden mit dem Internet verbundenen Computer eindeutig identifiziert. LAN – Local Area Network (Lokales Netzwerk) Ein System, bei dem Computerbenutzer innerhalb eines Unternehmen oder einer Organisation miteinander und oftmals auch mit zentral auf LAN-Servern gespeicherten Datensammlungen verbunden sind. MAC Adresse Die MAC-Adresse (Media-Access-Control-Adresse) ist die Hardware-Adresse jedes einzelnen Netzwerkadapters, die zur eindeutigen Identifizierung des Geräts in einem Rechnernetz dient. Passphrase Key Der Netzwerkschlüssel, der zur Authentifizierung an einem WEP/WPA2 verschlüsseltem Netzwerk dient. SSID Mit der Vergabe unterschiedlicher Netzkennungen kann man auch verschiedene Wireless LANs am selben Ort betreiben. Die SSID wird an der Basisstation eingestellt. Um mehrere Basisstationen zu einem Netz zu verbinden, stellt man an diesen dieselbe SSID ein; sie wird dann als ESSID (Extended SSID) bezeichnet Subnetzmaske Als Subnetz wird ein Teilnetz eines Netzwerkes bezeichnet. Es fasst mehrere aufeinanderfolgende IP-Adressen mittels einer Subnetzmaske zusammen. 44 von 242 21. Impressum DE Copyright © 2014 Alle Rechte vorbehalten. Diese Bedienungsanleitung ist urheberrechtlich geschützt. Vervielfältigung in mechanischer, elektronischer und jeder anderen Form ohne die schriftliche Genehmigung des Herstellers ist verboten Das Copyright liegt bei der Firma: Medion AG Am Zehnthof 77 45307 Essen Deutschland Die Anleitung kann über die Service Hotline nachbestellt werden und steht über das Serviceportal www.medionservice.de zum Download zur Verfügung. Sie können auch den oben stehenden QR Code scannen und die Anleitung über das Serviceportal auf Ihr mobiles Endgerät laden. 45 von 242 DK FR NL EN G N U Indholdsfortegnelse 1. Om denne brugsanvisning .............................. 48 1.1. Symboler og advarsler, der anvendes i denne brugsanvisning ........................................................ 48 2. Korrekt anvendelse .......................................... 50 3. Sikkerhedsanvisninger .................................... 50 3.1. Driftssikkerhed......................................................... 51 3.2. Sikkerhedskopiering af data ............................... 53 3.3. Strømforsyning ........................................................ 54 4. Meddelelse om overensstemmelse ................ 54 5. Før ibrugtagning .............................................. 55 5.1. Kontroller pakkens indhold................................. 55 5.2. Systemkrav ................................................................ 55 6. Oversigt over apparatet .................................. 56 6.1. Oversigt over LED-indikatorerne....................... 57 7. Ibrugtagning .................................................... 58 7.1. Opladning af batteriet .......................................... 58 7.2. Stik ................................................................................ 59 7.3. RJ45-LAN-stik ........................................................... 59 7.4. Tænd enheden ......................................................... 59 8. Anvendelse ....................................................... 60 8.1. Netværksforbindelse til en notebook/pc ....... 61 8.2. Installation af app'en på en Android/Apple smartphone/tablet ................................................. 62 8.3. Netværksforbindelse til en smartphone eller tablet .......................................................................... 63 9. Filhåndtering via Android-/Apple-app'en ..... 64 9.1. Enhedsvalg ................................................................ 64 9.2. Menuikoner ............................................................... 65 46 af 242 9.3. Filhåndtering ............................................................ 66 9.4. Menuen Indstillinger ............................................. 67 10. WLAN-harddiskens webinterface ................... 69 11. Indstillinger ...................................................... 71 11.1. User .............................................................................. 72 11.2. Disk............................................................................... 72 11.3. Network ...................................................................... 72 11.4. Services....................................................................... 75 11.5. System......................................................................... 76 11.6. Wizard ......................................................................... 77 12. Explorer ............................................................ 78 13. Information ...................................................... 79 14. WLAN HDD Tool ................................................ 79 15. Nulstilling af enheden ..................................... 81 16. Har du brug for yderligere hjælp? .................. 81 17. Rengøring ......................................................... 82 18. Bortskaffelse .................................................... 82 19. Tekniske data ................................................... 83 20. Ordliste ............................................................. 84 21. Kolofon ............................................................. 87 47 af 242 DE DK FR NL EN G N U 1. Om denne brugsanvisning Læs sikkerhedsanvisningerne grundigt igennem, før apparatet tages i brug. Tag hensyn til advarslerne på apparatet og i brugsanvisningen. Gem brugsanvisningen, så du altid har den ved hånden. Hvis du sælger apparatet eller forærer det væk, er det vigtigt, at denne brugsanvisning og garantibeviset også følger med. 1.1. Symboler og advarsler, der anvendes i denne brugsanvisning FARE! Advarsel om umiddelbar livsfare!! ADVARSEL! Advarsel om mulig livsfare og/eller alvorlige, uoprettelige kvæstelser! 48 af 242 FORSIGTIG! Følg anvisningerne for at undgå kvæstelser og materielle skader! DE PAS PÅ! Følg anvisningerne for at undgå materielle skader! BEMÆRK! FR Yderligere oplysninger om brugen af apparatet. DK NL EN G N BEMÆRK! Følg anvisningerne i denne brugsanvisning! U ADVARSEL! Advarsel om fare på grund af elektrisk stød! • Punktliste/oplysninger om hændelser under betjeningen Handling, der skal udføres 49 af 242 2. Korrekt anvendelse Denne enhed er en USB-harddisk, hvis data kan gøres tilgængelige for andre trådløst kommunikerende enheder via et indbygget WLAN-adgangspunkt . Desuden har enheden USB-stik til dataoverførsel og opladning af det interne batteri og af en anden enhed. Brug ikke enheden til andre formål. Brug kun enheden indendørs. Enheden er kun beregnet til privat brug og egner sig ikke til erhvervsmæssig brug. 3. Sikkerhedsanvisninger Læs dette kapitel og hele brugsanvisningen grundigt igennem, og følg alle anvisningerne. På den måde opnår du en pålidelig drift og en lang forventet levetid for din enhed. Sørg for altid at have denne brugsanvisning inden for rækkevidde i nærheden af enheden, og opbevar den godt, så du kan give den videre, hvis du overdrager enheden til en ny ejer. Du bør kun henvende dig til en af vores autoriserede servicepartnere, hvis du har problemer med enheden. 50 af 242 3.1. Driftssikkerhed DE • Denne enhed er ikke beregnet til at blive brugt af personer (herunder børn) med begrænsede fysiske, sensoriske eller mentale evner og/eller manglende viden, medmindre de er under opsyn af en anden person, der har ansvaret for deres sikkerhed, eller som giver dem anvisninger om, hvordan enheden skal bruges. Børn bør være under opsyn for at sikre, at de ikke leger med enheden. • Følg også anvisningerne for brugen af de enheder, som du tilslutter til WLAN-harddisken. • Brug kun den medfølgende lysnetadapter (KSAS0060500100VEU, producent: Ktec, China). Forsøg aldrig at tilslutte lysnetadapterens stik til andre stik, da dette kan forårsage skader. • Stil ikke væskefyldte beholdere som f.eks. vaser på enheden eller i umiddelbar nærhed af den. Beholderen kan vælte, og væsken kan kompromittere den elektriske sikkerhed. 51 af 242 DK FR NL EN G N U • Hold enheden på afstand af fugt, vanddryp og vandstænk. Undgå rystelser, støv, varme og direkte sollys for at forhindre driftsforstyrrelser. Driftstemperaturen er 5 til 35 °C. • Åbn aldrig kabinettet. Dette vil ophæve garantien og kan ødelægge enheden. • Efter transport af enheden skal du vente med at tage den i brug, til den har nået omgivelsestemperaturen. Ved større udsving i temperatur eller fugtighed kan der dannes fugt som følge af kondensering, hvilket kan medføre en elektrisk kortslutning. • Enheden er beregnet til tilslutning til computere med tilslutningssikring (Limited Power Source i henhold til EN60950). • Placer kablerne på en sådan måde, at man ikke kan træde på dem eller snuble over dem. • Stil ikke genstande på kablerne, da de ellers kan blive beskadiget. • For at forhindre statisk elektricitet bør enheden ikke anvendes under meget tørre forhold. 52 af 242 • Under forhold med statisk elektricitet kan DE der forekomme fejlfunktioner på enheden. DK I så fald skal enheden nulstilles til fabriksindstillingerne. FR 3.2. Sikkerhedskopiering af data NL Skadeserstatningskrav ved tab af data og deraf opståede følgeskader udelukkes. Hver EN gang du har opdateret dine data, bør du tage G sikkerhedskopier af dem på eksterne lagN ringsmedier (f.eks. CD-R). U 53 af 242 3.3. Strømforsyning • Tilslut kun WLAN-harddiskens lysnetadapter til en let tilgængelig og jordet stikkontakt med AC 100-240 V~ 50 Hz. 4. Meddelelse om overensstemmelse Enheden opfylder kravene til elektromagnetisk kompatibilitet og elektrisk sikkerhed. Med denne enhed følger følgende radioudstyr: • Trådløst LAN (ekstraudstyr) MEDION AG erklærer hermed, at produktet er i overensstemmelse med følgende EU-direktiver: • R&TTE-direktivet 1999/5/EF • Direktivet for miljøvenligt design 2009/125/EF • RoHS-direktivet 2011/65/EU. Den komplette overensstemmelseserklæring kan findes på www.medion.com/conformity. 54 af 242 5. Før ibrugtagning DE 5.1. Kontroller pakkens indhold DK Kontroller, at der ikke mangler noget i pakken, og giv os besked senest 14 dage efter købet, hvis der mangler noget. Kontroller efter udpakningen, at følgende dele er blevet leveret: • WLAN-harddisk • Lysnetadapter (KSAS0060500100VEU, producent Ktec, China) med USB-kabel • Brugsanvisning og garantidokumenter FR FARE! Opbevar emballagefilm utilgængeligt for børn. Kvælningsfare! 5.2. Systemkrav • • WLAN-standard 802.11b/g/n Windows 8/Microsoft Windows® 7/Windows Vista® SP1, Mac OS 10.6 eller nyere Android 2.2 eller nyere, iOS 4.0 eller nyere 55 af 242 NL EN G N U 6. Oversigt over apparatet 1 9 1) 2) 3) 4) 5) 6) 7) 8) 9) 1 2 3 4 5 6 7 8 Batteri-LED Harddisk-LED WLAN-LED Internet-LED LAN-stik (RJ45-stik) RESET-knap USB 3.0 Micro-B-stik til opladning af det interne batteri/dataudveksling TÆND/SLUK-knap USB-stik til opladning af en anden enhed1 Opladning af andre enheder kræver at WLAN-harddisken er slukket. 56 af 242 6.1. Oversigt over LEDindikatorerne LED BatteriLED Farve lyser Batteriet er opladet FR blinker Batteriet oplades NL lyser Batteriet skal oplades EN Lyser Harddisk klar G N U Blinker Harddiskaktivitet Hvid Lyser WLANBlå LED Blinker Slukket InternetLED DK Beskrivelse Grøn Rød HarddiskLED Status DE Lyser Grøn Slukket WLAN-adgangspunktet er klar. WLAN-adgangspunktet starter WLAN-adgangspunktet er slukket Internetforbindelse Ingen internetforbindelse 57 af 242 7. Ibrugtagning 7.1. Opladning af batteriet WLAN-harddisken har et indbygget batteri. Du kan enten oplade batteriet med den medfølgende USB-strømforsyning eller via USB-indgangen på din pc eller på en anden enhed, der har en USB-indgang. Tilslut USB-kablet til USB 3.0 Micro-B-stikket på WLAN-harddisken. Tilslut den anden ende til USB-lysnetadapteren, og sæt den i stikkontakten. Du kan også tilslutte USB-kablet til USB-stikket på din pc eller på en anden enhed, som leverer 5 V udgangsspænding på USB-stikket. Opladningstilstand-LED'er • • Under opladningen blinker batteri-LED'en konstant. Når batteriet er fuldt opladet, lyser batteri-LED'en konstant. 58 af 242 7.2. Stik DE USB-stik på enhedens højre side DK Via USB-stikket på enhedens side kan du oplade batteriet i andre enheder som f.eks. smartphones. FR USB 3.0 Micro-B-stik NL USB 3.0 Micro-B-stikket bruges til at oplade det interne batteri. I slukket tilstand kan du bruge det til at få adgang til harddisken fra pc'en. EN 7.3. RJ45-LAN-stik Via RJ45-LAN-stikket kan du tilsluttet WLAN-harddisken direkte til en router. Enheder, der logger på WLAN-harddiskens adgangspunkt, kan på den måde få trådløs adgang til routerens internetadgang. BEMÆRK! Dette kræver at indstillingerne af internetadgangen er sat til „Kabelforbindelse“ (se „Internetindstillinger“ på side 68). 7.4. Tænd enheden Tænd WLAN-harddisken ved at hold TÆND-/ SLUK-knappen nede, indtil opladnings-LED'en lyser. • OPLADER-LED'en blinker, mens systemet starter. • Derefter lyser OPLADER-LED'en konstant. WLAN-harddisken er nu klar til brug. 59 af 242 G N U Slukning af enheden • Hvis du vil slukke WLAN-harddisken, skal du holde TÆND/SLUK-knappen nede i ca. 3 sekunder. Alle LED'er slukkes. 8. Anvendelse WLAN-harddisken er konfigureret som trådløst adgangspunkt (AP). Andre trådløse kommunikationsenheder (klienter) som f.eks. tablets, smartphones eller notebooks kan logge på adgangspunktet og på den måde få adgang til dataene på harddisken via WLAN-forbindelsen. BEMÆRK! Ved den første ibrugtagning som adgangspunkt skal du placere klienten så tæt på WLAN-harddisken som muligt. Når installationen er gennemført, kan du placere harddisken et vilkårligt sted inden for rækkevidden. 60 af 242 8.1. Netværksforbindelse til en notebook/pc Tænd WLAN-harddisken. Søg blandt de trådløse netværk, der er tilgængelige på din notebook/pc, efter netværket „WLANHDD XXXX“, og tilslut enheden til dette netværk. DE DK FR NL EN G N U Forbindelseseksempel under Windows Når du bliver bedt om det, skal du indtaste den netværksadgangskode (Password), som er angivet på typeskiltet på WLAN-harddiskens bagside. WLAN-klienten opretter nu forbindelse til WLAN-harddisken. Du kan nu bruge filhåndteringen via webinterfacet som beskrevet under „10. WLAN-harddiskens webinterface“ på side 69. 61 af 242 8.2. Installation af app'en på en Android/Apple smartphone/ tablet For at kunne bruge WLAN-harddiskens menufunktioner og filadgang på en tablet eller smartphone skal du først installere den app, der stilles til rådighed via Playstore (Android) hhv. AppStore (Apple), på din tablet/smartphone. Åbn adressen „http://www.medion.com/wlanhddtool/“ i webbrowseren på din smartphone/tablet. Hent den relevante Android-/Apple-app fra websiden. Hentning af app'en via et direkte link: Via den nedenstående QR-kode kommer du til hentningen af iOS-app'en i AppStore. Via den nedenstående QR-kode kommer du til hentningen af Android-app'en på Google Play. 62 af 242 Når du har installeret app'en, skal du aktivere WLAN-funktionen på din smartphone/tablet og tilsluttet enheden til netværket „WLAN-HDDXXXX“ 8.3. Netværksforbindelse til en smartphone eller tablet Tænd WLAN-harddisken. Aktiver WLAN-funktionen til din smartphone/ tablet, og tilslut enheden til netværket „WLANHDD-XXXX“. Når du bliver bedt om det, skal du indtaste den netværksadgangskode (Password), som er angivet på typeskiltet på WLAN-harddiskens bagside WLAN-klienten opretter nu forbindelse til WLAN-harddisken. BEMÆRK! For at kunne bruge filhåndteringen på en smartphone/tablet, skal du installere den relevante app til Android/Apple som beskrevet under „8.2. Installation af app'en på en Android/Apple smartphone/tablet“ på side 62. 63 af 242 DE DK FR NL EN G N U 9. Filhåndtering via Android-/ Apple-app'en Når du har åbnet app'en på din smartphone/tablet, vises Home-menuen. 9.1. Enhedsvalg • • Ved skærmens nederste kant er punktet WLAN HDD aktivt. I denne visning vises alle WLAN-harddiskens mapper. Hvis du vil skifte til visningen af filer og mapper på smartphonen/tabletten, skal du trykke på punktet Min enhed ved skærmens nederste kant. 64 af 242 9.2. Menuikoner DE Via menuikonerne ved skærmens øverste kant kan du udføre følgende funktioner: Via Hjem kommer du tilbage til det øverste filniveau. Med Vis kan du skifte visning for filer og mapper mellem filer og liste. Med Indstl. kan du åbne menuen Einstellungen (se „9.4. Menuen Indstillinger“ på side 67). Brug Tilb. til at gå en visning tilbage. Med Admin. kan du starte filhåndteringen. Knappen ændres til knappen „Afslut“ Tryk på Søg for at søge direkte ud fra filnavn i den aktuelle mappe. 65 af 242 DK FR NL EN G N U 9.3. Filhåndtering Tryk på knappen . Ved skærmens øverste kant vises følgende menulinje: Tryk på en fil, som du vil flytte, downloade eller slette. Vælg alle/Fjern valg Hvis du vil vælge alle filer i den aktuelle mappe, skal du trykke på Vælg alle, og hvis du vil fravælge filerne igen, skal du trykke på Fjern valg. Download/Upload Hvis du vil hente filen (visningen „WLAN HDD“) eller overføre den (visningen „Min enhed“), skal du trykke på den tilsvarende knap og derefter vælge et lagringssted. Status Tryk på Status for at få vist status for de aktive og afsluttede filoverførsler. Slet Hvis du vil slette filen, skal du trykke på Slet. 66 af 242 Afslutning af filhåndteringen Hvis du vil afslutte filhåndteringen og gå tilbage til enhedsvalget, skal du trykke på Afslut. DE DK 9.4. Menuen Indstillinger FR Menuen Indstillinger indeholder i app'en til smartphones/tablets de vigtigste valgmuligheder til konfiguration af WLAN-harddisken. NL BEMÆRK! For at kunne foretage den fulde konfiguration skal du åbne menuen Indstillinger i WLAN-harddiskens webinterface via en webbrowser (se „10. WLAN-harddiskens webinterface“ på side 69). Indstilling forWLAN HDD-n-go Enhedsnavn Her kan du angive et navn til WLAN-harddisken. Sikkerhdsindst. Her kan du indstille krypteringen for logon til WLAN-harddiskens adgangspunkt. Firmware Upgrade Her kan du kontrollere direkte, om der findes en opdatering til app'en, som kan downloades. 67 af 242 EN G N U Internetindstillinger Her kan du indstille internetadgangen til et WLAN-netværk (Trådløs) eller via RJ45 LAN-stikket (Kabelverbindung). Når denne internetforbindelse er gemt, stiller WLAN-harddisken den til rådighed for de klienter, der er logget på WLAN-harddisken. Hvis du vil starte søgningen efter tilgængelige i felWLAN-netværk, skal du klikke på knappen tet Konfigurer din Wi-Fi-forbindelse. Indtast derefter netværksadgangskoden under punktet Adgangskode, og klik på Tilslut. Avancerede indstillinger Tryk på pilen ud for posten for det netværk, som WLAN-harddisken skal bruge til at få forbindelse til internettet. Her kan du indstille, om IP-adresser skal tildeles automatisk fra netværket (DHCP), eller du kan angive en IP-adresse manuelt (Statisk). 68 af 242 10. WLAN-harddiskens webinterface Hvis du vil ændre WLAN-harddiskens systemindstillinger og have adgang til indholdet på de tilsluttede datamedier, skal du åbne webinterfacet via webbrowseren på din notebook/pc/mobile terminalenhed. I den forbindelse skal du indtaste den IP-adresse, som er angivet på typeskiltet på WLAN-harddiskens bagside, på adresselinjen i webbrowseren på din notebook/pc. BEMÆRK! Du kan også åbne webinterfacet på en Windows- eller Apple-pc via Finder-værktøjet (se „14. WLAN HDD Tool“ på side 79). Webinterfacets adgangskodeforespørgsel vises. Første gang, du logger på, skal du indtaste de 69 af 242 DE DK FR NL EN G N U logondata, som er angivet på typeskiltet på WLAN-harddiskens bagside. (Ved leveringen User: admin, Password: [ingen adgangskode]). Indstilling af sproget for webinterfacet Indstil også sproget for webinterfacet i vinduet med adgangskodeforespørgslen. BEMÆRK! Når du har logget på første gang, kan du her angive adgangskoden for administratoradgang og på den måde beskytte dine data (se „11.1. User“ på side 72). Når du har logget på webinterfacet, vises siden Indstillinger. 70 af 242 11. Indstillinger DE Via siden Indstillinger har du adgang til de forskellige undermenuer, hvor du kan foretage indstillinger for User (Bruger), Disk (Datamedier), Network (Netværksforbindelser), Services (Tjenester), System (Systemindstillinger) og starte Wizard (Guiden). Undermenuerne åbnes i et nyt vindue. Du forlader en undermenu ved at klikke på X i undermenuens øverste højre hjørne. Du skal bekræfte de fleste indstillinger med SAVE, for at de kan træde i kraft. 71 af 242 DK FR NL EN G N U 11.1. User Her kan du angive administratoradgangskoden. Bekræft en ny adgangskode med SAVE. 11.2. Disk Her kan du få vist oplysninger om lageranvendelse og filsystem for den interne harddisk. 11.3. Network Hostname Her kan du angive et enhedsnavn til WLAN-harddisken. Bekræft et nyt navn med SAVE. Wi-Fi & LAN Her kan du foretage indstillingerne for WLAN-harddiskens adgangspunkt. SSID Her kan du angive det SSID, som WLAN-harddiskens adgangspunkt vises under for andre WLAN-enheder. Mode Her kan du indstille WLAN-standarden. Passwort Her kan du angive en adgangskode, som andre WLAN-enheder skal bruge til at logge på WLAN-harddiskens adgangspunkt. 72 af 242 MAC-Adress Her kan du se din WLAN-harddisks MAC-adresse. DE IP-adress Her kan du angive den IP-adresse, som kan bruges til at vise WLAN-harddiskens webinterface. DK Subnet Mask Her kan du angive undernetmasken for WLAN-harddiskens adgangspunkt. NL Channel Hvis andre WLAN-netværk forstyrrer WLAN-harddiskens adgangspunkt og funktionalitet, kan du her indstille en anden kanal, som WLAN-signalet skal udsendes på. G N U Security Her kan du indstille krypteringen for logon til WLAN-harddiskens adgangspunkt. Hide SSID Her kan du indstille, om WLAN-harddiskens netværksnavn (SSID) skal være synligt på netværket (indstillingen ON). DHCP-Server Her kan du slå DHCP-serveren for WLAN-harddisken til eller fra. • Activate DHCP-serveren, så WLAN-harddisken fungerer som et adgangspunkt, der aktivt tildeler IP-adresser til klienter, som logger på DHCP-serveren. 73 af 242 FR EN • Deactivate DHCP-serveren, så IP-adresserne kan tildeles manuelt til klienterne. IP-adressen skal ligge inden for det adresseområde, som du kan angive, når DHCP-serveren er aktiveret (se næste afsnit). DHCP-Server activiated: Hvis DHCP-serveren er aktiveret, kan du via punktet Client-List få vist de enheder, der er logget på WLAN-harddisken i øjeblikket. Via punkterne Start Adress og End Adress kan du indstille det IP-adresseområde, inden for hvilket DHCP-serveren tildeler IP-adresser til klienter. Under Gateway kan du angive den IP-adresse, som gør det muligt at få adgang til WLAN-harddiskens adgangspunkt. BEMÆRK! Gatewayens IP-adresse skal ligge uden for DHCP-serverens IP-område. Primary DNS Hvis du under det næste menupunkt, „Internet“, har angivet et adgangspunkt, som kan bruges til at oprette en internetforbindelse, vises her dette adgangspunkts IP-adresse. Du kan også angive IP-adressen for den primære DNS-server manuelt her. 74 af 242 Second DNS Hvis der også findes en sekundær DNS-server på netværket, som leverer IP-adresser, skal du angive denne DNS-servers IP-adresse her. DE DK FR Internet Her kan du søge efter tilgængelige WLAN-netværk med forbindelse til internettet. Hvis du vil gøre det, skal du klikke på feltet „Scan“. Indtast derefter netværksadgangskoden undere punktet Password, og tildel eventuelt en IP-Adress (kun ved manuel IP). Når denne internetforbindelse er gemt, stiller WLAN-harddisken den til rådighed for de klienter, der er logget på harddisken. 11.4. Services Her kan du aktivere og deaktivere Samba på WLAN-harddisken (ved leveringen: Samba-tjenesten er aktiveret). • Når Samba er aktiveret, kan Windows-klienter vise filerne fra de enheder, der er tilsluttet WLAN-harddisken, i Windows Stifinder. • Hvis Samba er deaktiveret, kan filer lun vises og håndteres via apps eller via webinterfacet. 75 af 242 NL EN G N U 11.5. System Time Settings Her kan du indstille dato og klokkeslæt samt tidszonen. Desuden kan du indstille, om klokkeslætindstillingen skal hentes automatisk fra en tidsserver via internettet, eller om den aktuelle pc-tid skal bruges til at indstille klokkeslæt og dato. Backup Settings Her kan du gemme WLAN-harddiskens aktuelle indstillinger i en konfigurationsfil og gemme den på din enhed. • Vi punktet RESTORE kan du angive lagringsstedet for en tidligere konfigurationsfil og indlæse denne konfiguration. Firmware-Upgrade Hvis du har modtaget en firmwareopdatering, kan du installere den via punktet Update. Reset Settings Vælg dette punkt, og klik derefter på SAVE for at nulstille enheden til fabriksindstillingerne. 76 af 242 11.6. Wizard DE Via guiden kan du foretage alle de grundlæggende indstillinger af WLAN-harddisken trin for trin. Følg instruktionerne, og klik hver gang på NEXT for at gå videre til den næste indstilling. Når indstillingerne er foretaget, genstarter WLAN-harddisken. DK FR NL EN G N U 77 af 242 12. Explorer Via Explorer kan du håndtere filerne på WLAN-harddisken. Vælg i filstrukturen (10/11) et datamedie og en mappe, hvis indhold du vil have vist. Vælg en fil. Via knapperne 1-9 kan du udføre filhåndteringens funktioner. 1 10 1) Opdater 2) Overfør 3) Opret 4) Kopier 5) Flyt 6) Download 78 af 242 2 3 4 5 6 7 8 9 7) Slet DE 8) Omdøb DK 9) 10) Start fotofremviseren Intern harddisk FR NL 13. Information Her kan du se oplysninger om lagerforbrug samt den interne harddisks og et tilsluttet datamedies størrelse. 14. WLAN HDD Tool På websiden „http://www.medion.com/ wlanhddtool/“ kan du hente WLAN HDD Tool. Via dette Finder-værktøj kan du søge efter WLAN-harddisken på netværket og åbne webinterfacet direkte i browseren. Dobbeltklik på filen WLAN HDD TOOL.exe for at starte Finder-værktøjet. BEMÆRK! WLAN-harddisken kan kun findes, når der er oprettet forbindelse til netværket WLanHDD XXXX. 79 af 242 EN G N U Finder-værktøjet søger nu på WLAN-harddisken. Hvis WLAN-harddisken ikke bliver fundet, skal du placere den tættere på pc'en og derefter klikke på Refresh for at starte en ny søgning. Når Finder-værktøjet har fundet WLAN-harddisken, skal du klikke på Log In for at få direkte til webinterfacet. Din Windows-pc's browser åbnes, og siden Indstillinger vises. Hvis du vil have vist WLAN-harddisken direkte i Windows Stifinder, skal du klikke på My Storage. BEMÆRK! Filerne på det datamedie, der er tilsluttet WLAN-harddisken, kan kun vises i Windows Stifinder, når Samba-serveren er aktiveret på WLAN-harddisken (se „11.4. Services“ på side 75). Hvis du ikke vil bruge Finder-værktøjet, skal du åbne en webbrowser og indtaste „http://10.10.10.254“ på adresselinjen. 80 af 242 15. Nulstilling af enheden DE Med RESET-knappen på siden af WLAN-harddisken kan du nulstille WLAN-harddisken, hvis systemet ikke længere reagere, eller hvis du har mistet din administratoradgangskode. Tryk på RESET-knappen med en spids genstand (f.eks. en papirclips), og hold knappen nede i ca. 5 sekunder. WLAN-harddisken genstarter nu med fabriksindstillingerne. 16. Har du brug for yderligere hjælp? Hvis forslagene i de foregående afsnit ikke har kunnet løse dit problem, bedes du kontakte os. Det vil være en stor hjælp for os, hvis du stiller de følgende oplysninger til rådighed: • Hvilke eksterne enheder er tilsluttet? • Ved hvilket betjeningstrin er problemet opstået? • Hvad har du allerede gjort for at prøve at løse problemet? • Hvis du allerede har fået et kundenummer, bedes du meddele os det. 81 af 242 DK FR NL EN G N U 17. Rengøring Du kan forlænge enhedens levetid ved hjælp af følgende forholdsregler: • Fjern altid lysnetadapteren og alle forbindelseskabler før rengøring. • Brug ikke opløsningsmidler eller ætsende eller gasformige rengøringsmidler. • Rengør enheden med en blød, fnugfri klud. Gem emballagen, og brug kun denne emballage ved transport af enheden. PAS PÅ! Enheden indeholder ingen dele, der kræver vedligeholdelse eller rengøring. 18. Bortskaffelse Emballage Enheden er placeret i en emballage for at beskytte den mod transportskader. Emballagen er lavet af råstoffer og kan således genbruges eller bringes tilbage i råstofkredsløbet. Enhed Når enheden er nået til slutningen af dens levetid, må du under ingen omstændigheder smide den ud som almindeligt husholdningsaffald! Forhør dig hos de lokale myndigheder om, hvordan du kan bortskaffe enheden på en miljømæssigt korrekt måde. 82 af 242 19. Tekniske data DE Generelt Samlet vægt (ca.) Driftstemperatur luftfugtighed ved drift Mål: DK 5 % til 65 % ca. 85 x 25 x 130 mm NL Internt batteri Kapacitet 3000 mAh G N U WLAN-harddisk Lagerkapacitet: WLAN-standard: Lysnetadapter Model Producent: Indgangsspænding: Udgangsspænding: Tilslutninger: 280 g 5° C til 35° C FR EN 1 TB (= 1000 GB)2 802.11 b/g/n KSAS0060500100VEU Ktec, China 100 – 240 V ~ 50/60 Hz 0,18 A 5,0 V 1000 mA LAN (100 Mbit/s) USB 2.0 microUSB 3.0 Der tages forbehold for tekniske og optiske ændringer samt trykfejl. 2 1 GB svarer til 1 milliard bytes. Den faktisk anvendelige hukommelseskapacitet kan afvige. 83 af 242 20. Ordliste Adgangspunkt (AP), trådløst AP Kaldes også for en basestation. En elektronisk enhed, der fungerer som interface for trådløse kommunikationsenheder. Terminalenheder opretter via et trådløst netværkskort en trådløs forbindelse til det trådløse adgangspunkt, som så kan tilsluttes et fast installeret kommunikationsnet via et kabel. Operativsystem Software, som gør brugeren og den software, der er installeret på systemet, i stand til at kommunikere med computerhardware som f.eks. en harddisk. BSSID (MAC) Basic Service Set Identification (BSSID) svarer til det trådløse adgangspunkts MAC-adresse. Client-Mode Client Mode er en funktionstilstand, som et trådløst adgangspunkt (her: WLAN-harddisken) kan anvendes i. Det trådløse adgangspunkt fungerer så som et trådløst netværkskort i forhold til det overordnede AP. Med et AP i Client Mode kan individuelle computere, som ikke selv har et trådløst netværkskort, tilsluttes til overordnede netværk. DHCP – Dynamic Host Configuration Protocol En protokol, der bruges til at tildele enheder på netværk en IP-adresse. Med dynamiske adresser kan en 84 af 242 enhed have forskellige IP-adresser, hver gang den har forbindelse til et netværk. I mange systemer ændrer IP-adressen sig også, mens enheden har forbindelse til netværket. DHCP understøtter også en kombination af statiske og dynamiske IP-adresser. Se også protokol. DNS – Domain Name Service Et system, som gør en netværksnavneserver i stand til at oversætte tekstværtsnavne til numeriske IP-adresser og på den måde entydigt identificere en enhed, der er tilsluttet internettet. ESSID Ved at tildele forskellige netværks-ID'er kan man have forskellige trådløse LAN'er kørende på samme sted. SSID'et indstilles på basestationen. Hvis flere basestationer skal forbindes til ét netværk, indstiller man det samme SSID på dem, og det omtales så som et ESSID (Extended SSID) Gateway Standardgatewayen angiver den computer/router på netværket, hvortil alle forespørgsler, hvis destination ikke findes på det lokale netværk (internetforespørgsler), sendes. Den sender så disse forespørgsler videre til en computer/router, som muligvis kan svare på forespørgslerne. Som regel skal du som standardgateway angive din hjemmerouters (DSL-routers) IP-adresse. 85 af 242 DE DK FR NL EN G N U IP-adresse Et binært 32-bit tal, som entydigt identificerer enhver computer, der er forbundet med internettet. LAN – Local Area Network (lokalnetværk) Et system, som forbinder computerbrugerne inden for en virksomhed eller organisation med hinanden og ofte også med centrale datasamlinger på LAN-servere. MAC Adresse MAC-adressen (Media Access Control-adressen) er hardwareadressen for et individuelt netværkskort, som bruges til entydigt at identificere enheden på et computernetværk. Passphrase Key Den netværksnøgle, der bruges til godkendelsen på et WEP/WPA2-krypteret netværk. SSID Ved at tildele forskellige netværks-ID'er kan man have forskellige trådløse LAN'er kørende på samme sted. SSID'et indstilles på basestationen. Hvis flere basestationer skal forbindes til ét netværk, indstiller man det samme SSID på dem, og det omtales så som et ESSID (Extended SSID) Undernetmaske Et undernet er et delnetværk inden for et netværk. Det samler flere på hinanden følgende IP-adresser ved hjælp af en undernetmaske. 86 af 242 21. Kolofon DE Copyright © 2014 Alle rettigheder forbeholdes. Denne brugsanvisning er ophavsretsligt beskyttet. Mangfoldiggørelse i mekanisk, elektronisk eller enhver anden form uden skriftlig tilladelse fra producenten, er forbudt. Ophavsretten tilhører firmaet: Medion AG Am Zehnthof 77 45307 Essen Tyskland Brugsanvisningen kan efterbestilles via vores servicehotline og er til rådighed til download via serviceportalen www.medion.com/dk/service/start/. Du kan også scanne den ovenstående QR-kode og indlæse brugsanvisningen på din mobile enhed via serviceportalen. 87 af 242 DK FR NL EN G N U Sommaire 1. Remarques concernant le présent mode d'emploi ................................... 90 1.1. Symboles et avertissements utilisés dans ce mode d'emploi......................................................... 90 2. Utilisation conforme ........................................ 92 3. Consignes de sécurité ...................................... 92 3.1. Sécurité de fonctionnement ............................... 93 3.2. Sauvegarde des données ..................................... 95 3.3. Alimentation ............................................................. 96 4. Remarques relatives à la conformité .............. 96 5. Avant la mise en service .................................. 97 5.1. Vérifier le contenu de la livraison ...................... 97 5.2. Configuration système requise .......................... 97 6. Vue d'ensemble de l'appareil .......................... 98 6.1. Vue d'ensemble des LED ...................................... 99 7. Mise en service ............................................... 100 7.1. Chargement de la batterie ................................100 7.2. Connectique ...........................................................101 7.3. Prise LAN RJ45 ........................................................101 7.4. Mise en marche de l'appareil ............................101 8. Fonctionnement............................................. 102 8.1. Connexion réseau à un ordinateur de bureau ou portable .............................................................103 8.2. Installation de l'application sur un smartphone/une tablette PC Android/Apple ........104 8.3. Connexion réseau à un smartphone ou à une tablette ....................................................................105 88 / 242 9. Gestionnaire de fichiers via l'application Android/Apple ............................................... 106 9.1. Sélection d'appareil .............................................106 9.2. Icônes de menu .....................................................107 9.3. Gestionnaire de fichiers ......................................108 9.4. Menu Réglages ......................................................109 10. Interface Web du disque dur WiFi ................. 111 11. Paramètres ..................................................... 113 11.1. Utilisateur.................................................................114 11.2. Disque .......................................................................114 11.3. Réseau .......................................................................114 11.4. Services.....................................................................118 11.5. Système ....................................................................118 11.6. Assistant ...................................................................119 12. Informations ................................................... 119 13. Explorer .......................................................... 120 14. WLAN HDD Tool .............................................. 122 15. Réinitialisation de l'appareil ......................... 123 16. Vous avez besoin d'aide ? .............................. 124 17. Nettoyage ....................................................... 124 18. Recyclage ........................................................ 125 19. Caractéristiques techniques ......................... 126 20. Glossaire ......................................................... 127 21. Mentions légales ............................................ 131 89 / 242 DE DK FR NL EN G N U 1. Remarques concernant le présent mode d'emploi Lisez attentivement les consignes de sécurité avant de mettre l'appareil en service. Tenez compte des avertissements figurant sur l'appareil et dans le mode d'emploi. Gardez toujours ce mode d'emploi à portée de main. Si vous vendez ou donnez l'appareil, pensez impérativement à remettre également ce mode d'emploi ainsi que le certificat de garantie au nouveau propriétaire. 1.1. Symboles et avertissements utilisés dans ce mode d'emploi DANGER ! Avertissement d'un risque vital immédiat ! AVERTISSEMENT ! Avertissement d'un risque vital possible et/ou de blessures graves irréversibles ! 90 / 242 PRUDENCE ! Respecter les consignes pour éviter toute blessure et tout dommage matériel ! ATTENTION ! Respecter les consignes pour éviter tout dommage matériel ! REMARQUE ! Information supplémentaire pour l'utilisation de l'appareil. REMARQUE ! Respecter les consignes du mode d'emploi ! AVERTISSEMENT ! Avertissement d'un risque d'électrocution ! • Énumération / information sur des événements se produisant en cours d'utilisation Action à exécuter 91 / 242 DE DK FR NL EN G N U 2. Utilisation conforme Cet appareil est un disque dur USB dont les données peuvent être, via un point d'accès WiFi intégré, mises à la disposition d'autres appareils communiquant sans fil. Il est en outre doté de ports USB permettant de transférer des données et de recharger la batterie interne et d’un autre appareil. N'utilisez cet appareil dans aucun autre but. Faites fonctionner cet appareil uniquement à l'intérieur de pièces. Cet appareil est destiné à un usage privé et non à une utilisation industrielle ou commerciale. 3. Consignes de sécurité Veuillez lire attentivement ce chapitre ainsi que le mode d'emploi complet et respecter toutes les consignes indiquées. Vous serez ainsi assuré du bon fonctionnement et de la durée de vie de l'appareil. Ayez toujours ce mode d'emploi à portée de main à proximité de l'appareil et conservez-le soigneusement afin de pouvoir le remettre au nouveau propriétaire si vous donnez ou vendez l'appareil. En cas de problème avec l'appareil, veuillez vous adresser uniquement à nos partenaires de service agréés. 92 / 242 3.1. Sécurité de fonctionnement • Cet appareil n'est pas destiné à être utilisé par des personnes (y compris les enfants) dont les capacités physiques, sensorielles ou mentales sont limitées ou qui manquent d'expérience et/ou de connaissances, sauf si elles sont surveillées par une personne responsable de leur sécurité ou ont reçu de cette personne les instructions pour utiliser l'appareil. Surveillez les enfants afin de garantir qu'ils ne jouent pas avec l'appareil. • Respectez également les modes d'emploi des appareils que vous connectez à ce disque dur WiFi. • Utilisez exclusivement l'adaptateur secteur fourni (KSAS0060500100VEU, fabricant : Ktec, Chine). N'essayez pas de brancher la fiche de l'adaptateur secteur sur d'autres prises : vous pourriez endommager l'appareil. • Ne posez aucun récipient contenant du liquide (p. ex. un vase) sur ou à proximité de l'appareil. Le récipient pourrait se renver93 / 242 DE DK FR NL EN G N U • • • • • ser et le liquide porter atteinte à la sécurité électrique. Conservez l'appareil à l'abri de l'humidité, des gouttes d'eau et éclaboussures. Protégez l'appareil des secousses, de la poussière, de la chaleur et du rayonnement direct du soleil afin d'éviter tout dysfonctionnement. L'appareil peut fonctionner à une température de 5 à 35° C. N'ouvrez jamais le boîtier. La garantie serait annulée et vous risqueriez en outre de détruire l'appareil. Après avoir transporté l'appareil, attendez qu'il soit à température ambiante avant de l'allumer. En cas de fortes variations de température ou d'humidité, il est possible que, par condensation, de l'humidité se forme dans l'appareil, ce qui peut provoquer un court-circuit. L'appareil est prévu pour être raccordé à des ordinateurs respectant les exigences de la norme EN60950 (sources de courant à puissance limitée). Disposez les câbles de manière à ce que personne ne puisse marcher ou trébucher 94 / 242 dessus. • Ne posez aucun objet sur les câbles, ils pourraient être endommagés. • Pour éviter les charges statiques, n'utilisez pas l'appareil dans des conditions extrêmement sèches. • Dans des conditions avec décharge électrostatique, des dysfonctionnements de l'appareil peuvent se produire. Dans ce cas, il est nécessaire de restaurer les paramètres par défaut sur l'appareil. 3.2. Sauvegarde des données Toute demande de dommages et intérêts en cas de perte de données et de dommages consécutifs en résultant est exclue. Avant chaque actualisation, faites des copies de sauvegarde de vos données sur des supports de stockage externes (p. ex. CD-R). 95 / 242 DE DK FR NL EN G N U 3.3. Alimentation • Utilisez l'adaptateur secteur du disque dur WiFi uniquement sur des prises de terre de 100-240 V~ 50 Hz à courant alternatif facilement accessibles. 4. Remarques relatives à la conformité Cet appareil respecte les exigences de compatibilité électromagnétique et de sécurité électrique. Le présent appareil est livré avec les équipements radio suivants : • WiFi (en option) Par la présente, la société Medion AG déclare que le produit est conforme aux exigences européennes suivantes : • Directive R&TTE 1999/5/CE • Directive sur l'écoconception 2009/125/CE • Directive RoHS 2011/65/UE Vous pouvez obtenir les déclarations de conformité complètes sur www.medion.com/conformity. 96 / 242 5. Avant la mise en service DE 5.1. Vérifier le contenu de la livraison DK FR Veuillez vérifier si la livraison est complète et nous informer dans un délai de quinze jours à compter de la date d'achat si ce n'est pas le cas. Au cours du déballage, assurez-vous que les éléments suivants ont bien été livrés : • Disque dur WiFi • Adaptateur secteur (KSAS0060500100VEU, fabricant : Ktec, Chine) avec câble USB • Mode d'emploi et documents relatifs à la garantie DANGER ! Conservez les films d'emballage hors de la portée des enfants : risque d'asphyxie ! 5.2. Configuration système requise • • WiFi standard 802.11b/g/n Windows 8/Microsoft Windows® 7/Windows Vista® SP1 Mac OS 10.6 ou plus récent Android 2.2 ou plus récent, iOS 4.0 ou plus récent 97 / 242 NL EN G N U 6. Vue d'ensemble de l'appareil 1 9 1) 2) 3) 4) 5) 6) 7) 8) 9) 1 2 3 4 5 6 7 8 LED d'état de charge de la batterie LED d'activité du disque dur LED WiFi LED Internet Port LAN (prise RJ45) Touche RESET Port USB 3.0 Micro B de recharge de la batterie interne/d'échange de données Bouton ON/OFF Port USB de recharge d'un autre appareil1 Pour recharger d'autres appareils, le disque dur WiFi doit être éteint. 98 / 242 6.1. Vue d'ensemble des LED LED Couleur État DE Description Allumée Batterie est pleine Verte LED d'état de charge Rouge Batterie en cours de Clignote chargement Batterie doit être reAllumée chargée Allumée Disque dur prêt LED d'activité Blanche du disque dur Clignote Disque dur est actif Le point d'accès WiFi est prêt Le point d'accès WiFi Clignote démarre Le point d'accès WiFi Éteinte est désactivé Allumée Connexion Internet Pas de connexion InÉteinte ternet Allumée LED WiFi Bleue LED Internet Verte 99 / 242 DK FR NL EN G N U 7. Mise en service 7.1. Chargement de la batterie Le disque dur WiFi comporte une batterie intégrée. Vous pouvez charger la batterie soit avec l'adaptateur secteur USB fourni soit sur le port USB de votre ordinateur ou d'un autre appareil doté d'un port USB. Raccordez le câble USB au port USB 3.0 Micro B du disque dur WiFi. Raccordez l'autre extrémité à l'adaptateur secteur USB et branchez ce dernier sur une prise de courant. Vous pouvez aussi en alternative raccorder le câble USB au port USB de votre ordinateur ou d'un autre appareil fournissant une tension de sortie de 5 V au port USB. LED d'état de charge • • Pendant le chargement, la LED d'état de charge de la batterie clignote en continu. Une fois la batterie complètement chargée, la LED d'état de charge reste allumée en permanence. 100 / 242 7.2. Connectique DE Port USB sur le côté droit de l'appareil DK Vous pouvez recharger sur le port USB situé sur le côté de l'appareil les batteries d'autres périphériques tels que smartphones. FR Port USB 3.0 Micro B Le port USB 3.0 Micro B sert à recharger la batterie interne. L'appareil étant éteint, vous pouvez accéder par ce port au disque dur depuis un ordinateur. 7.3. Prise LAN RJ45 La prise LAN RJ45 vous permet de raccorder le disque dur WiFi directement à un routeur. Les appareils qui se connectent au point d'accès du disque dur WiFi peuvent ainsi utiliser sans fil l'accès Internet du routeur. REMARQUE ! L'accès Internet doit pour cela être réglé sur « Accés filaire » dans les paramètres (voir « Paramètres d’Internet » à la page 110). 7.4. Mise en marche de l'appareil Pour mettre le disque dur WiFi en marche, maintenez le bouton ON/OFF enfoncé jusqu'à ce que la LED de chargement s'allume. • La LED de CHARGE clignote pendant que le système démarre. 101 / 242 NL EN G N U • Une fois le système démarré, la LED de CHARGE reste allumée en permanence. Le disque dur WiFi est maintenant prêt à fonctionner. Arrêt de l'appareil • Pour éteindre le disque dur WiFi, maintenez le bouton ON/OFF enfoncé pendant 3 secondes. Toutes les LED s'éteignent. 8. Fonctionnement Ce disque dur WiFi est configuré comme Access-Point (AP), c'est-à-dire comme point d'accès sans fil. D'autres appareils de communication sans fil (clients) tels que tablettes PC, smartphones ou ordinateurs portables peuvent se connecter au point d'accès et accéder ainsi via la connexion WiFi aux données contenues sur le disque dur. REMARQUE ! Lors de la première mise en service comme point d'accès, placez le client le plus près possible du disque dur WiFi. Une fois l'installation réussie, vous pouvez positionner le disque dur à un endroit quelconque dans la zone de portée. 102 / 242 8.1. Connexion réseau à un ordinateur de bureau ou portable DE Allumez le disque dur WiFi. Recherchez parmi les réseaux sans fil disponibles sur votre ordinateur portable/de bureau le réseau « WLAN-HDD XXXX » et connectez l'appareil à ce réseau. FR DK NL EN G N U Exemple de connexion sous Windows Lorsque vous y êtes invité, saisissez le mot de passe d'accès au réseau (Password) indiqué sur la plaque signalétique au dos du disque dur WiFi. Le client WiFi se connecte alors au disque dur WiFi. Vous pouvez maintenant utiliser le gestionnaire de fichiers via l'interface Web, comme décrit à la section « 10. Interface Web du disque dur WiFi » à la page 111. 103 / 242 8.2. Installation de l'application sur un smartphone/une tablette PC Android/Apple Pour pouvoir utiliser les fonctions de menu essentielles ainsi que l'accès aux fichiers du disque dur WiFi sur une tablette PC ou un smartphone, vous devez tout d'abord installer sur votre tablette/smartphone l'application correspondante mise à disposition via le Playstore (Android) ou l'AppStore (Apple). Tapez pour cela « http://www.medion.com/wlanhddtool/ » dans la ligne d'adresse du navigateur Web de votre tablette/smartphone. Puis téléchargez l'application Android/Apple correspondante sur ce site Web. Téléchargement de l'application via lien direct : Le code QR ci-contre vous permet d'accéder au domaine de téléchargement de l'application iOS dans l'AppStore. Le code QR ci-contre vous permet d'accéder au domaine de téléchargement de l'application Android dans Google Play. 104 / 242 Une fois l'application installée, vous devez activer la fonction WiFi sur votre smartphone/tablette et connecter l'appareil au réseau « WLAN-HDDXXXX ». 8.3. Connexion réseau à un smartphone ou à une tablette Allumez le disque dur WiFi. Activez la fonction WiFi sur votre smartphone/ tablette et connectez votre appareil au réseau « WLAN-HDD-XXXX ». Lorsque vous y êtes invité, saisissez le mot de passe d'accès au réseau (Password) indiqué sur la plaque signalétique au dos du disque dur WiFi. Le client WiFi se connecte alors au disque dur WiFi. REMARQUE ! Pour pouvoir utiliser le gestionnaire de fichiers sur un smartphone ou une tablette, installez l'application correspondante pour Android/Apple, comme décrit à la section « 8.2. Installation de l’application sur un smartphone/une tablette PC Android/ Apple » à la page 104. 105 / 242 DE DK FR NL EN G N U 9. Gestionnaire de fichiers via l'application Android/Apple Lorsque vous ouvrez l'application sur votre smartphone/tablette, vous voyez apparaître le menu Home. 9.1. Sélection d'appareil • L'option WLAN HDD est activée sur le bord inférieur de l'écran. Dans cette vue, tous les dossiers du disque dur WiFi sont affichés. • Pour passer à la vue des fichiers et dossiers contenus sur le smartphone ou la tablette, tapotez sur l'option Mon Appareil située sur le bord inférieur de l'écran. 106 / 242 9.2. Icônes de menu DE Les icônes de menu en haut de l'écran vous permettent d'exécuter les fonctions suivantes : Avec Home, vous revenez au niveau de fichiers supérieur. Voir vous permet d'alterner entre tuiles et liste dans l'affichage des fichiers et dossiers. Avec Réglages, vous ouvrez le menu Paramètres (voir « 9.4. Menu Réglages » à la page 109). Utilisez Retour pour revenir une vue en arrière. Avec Gérer, vous ouvrez le gestionnaire de fichiers. Le bouton passe à « Sortir ». Tapotez sur Chercher pour rechercher directement des noms de fichier dans le dossier actuel. 107 / 242 DK FR NL EN G N U 9.3. Gestionnaire de fichiers Tapotez sur le bouton . La barre de menus suivante s'affiche sur le bord inférieur de l'écran : Tapotez sur un fichier que vous voulez déplacer, télécharger ou supprimer. Tout sél./Désélect. Pour sélectionner tous les fichiers contenus dans le dossier actuel, tapotez sur Tout sél. et sur Désélect. pour redésélectionner tous les fichiers marqués. Téléchrg Pour télécharger (vue « WLAN HDD ») ou téléverser (vue « Mon Appareil ») le fichier, tapotez sur le bouton correspondant puis sélectionnez un emplacement de stockage. Statut Tapotez sur Statut pour voir l'état des transferts de fichiers en cours et terminés. Supprimer Pour supprimer le fichier, tapotez sur Supprimer. 108 / 242 Fermer le gestionnaire de fichiers Pour fermer le gestionnaire de fichiers et revenir à la sélection d'appareil, tapotez sur Sortir. DE DK 9.4. Menu Réglages FR Dans l'application pour smartphones/tablettes PC, le menu Réglages englobe les options essentielles pour la configuration du disque dur WiFi. NL REMARQUE ! Pour pouvoir procéder à la configuration complète, ouvrez le menu Réglages dans l'interface Web du disque dur WiFi via un navigateur Web (voir « 10. Interface Web du disque dur WiFi » à la page 111). Paramètres HDD-n-go WiFi Nom appareil Vous pouvez ici donner un nom au disque dur WiFi. Options sécurité Réglez ici le chiffrement pour la connexion au point d'accès du disque dur WiFi. Firmware Upgrade Vous pouvez ici vérifier directement si une actualisation est disponible pour l'application et peut être téléchargée. 109 / 242 EN G N U Paramètres d’Internet Vous pouvez ici régler l'accès Internet à un réseau WiFi (Accès sans fil) ou via la prise LAN RJ45 (Accès filaire). Après la sauvegarde, le disque dur WiFi met cette connexion Internet à la disposition des clients qui lui sont connectés. Pour lancer la recherche des réseaux WiFi dispodans le champ nibles, cliquez sur le bouton Configurer votre connexion Wi-Fi. Saisissez ensuite sous l'option Password le mot de passe d'accès au réseau et cliquez sur Login. Oublier ce réseau Tapotez sur la flèche à côté de l'entrée du réseau via lequel le disque dur WiFi doit établir une connexion Internet. Vous pouvez régler ici si les adresses IP doivent être obtenues automatiquement du réseau (DHCP) ou attribuer manuellement une adresse IP (Statique). 110 / 242 10. Interface Web du disque dur WiFi Pour pouvoir modifier les paramètres système du disque dur WiFi et accéder aux contenus des supports de données raccordés, ouvrez l'interface Web sur le navigateur Web de votre ordinateur portable/de bureau ou terminal mobile. Tapez pour cela l'adresse IP indiquée sur la plaque signalétique au dos du disque dur WiFi dans la ligne d'adresse du navigateur Web sur votre ordinateur portable/de bureau. REMARQUE ! Sur un ordinateur Windows ou Apple, vous pouvez aussi ouvrir l'interface Web avec l'outil de recherche (voir « 14. WLAN HDD Tool » à la page 122). Le mot de passe de l'interface Web vous est demandé. 111 / 242 DE DK FR NL EN G N U Lors de la première connexion, saisissez les données d'accès indiquées sur la plaque signalétique au dos du disque dur WiFi (à la livraison, nom d'utilisateur : admin, mot de passe : [pas de mot de passe]). Régler la langue pour l'interface Web Réglez dans la fenêtre de demande du mot de passe également la langue pour l'interface Web. REMARQUE ! Afin de protéger vos données, attribuez un mot de passe pour l'accès administrateur après la première connexion (voir « 11.1. Utilisateur » à la page 114). Lorsque vous vous êtes connecté avec succès sur l'interface Web, vous voyez s'afficher la page Paramètres. 112 / 242 11. Paramètres DE Sur la page Paramètres, vous accédez aux différents sous-menus, où vous pouvez régler des paramètres pour Utilisateur, Disque, Rèseau, Services, Système ainsi que démarrer l'Assistant. Les sous-menus s'ouvrent dans une nouvelle fenêtre. Pour quitter un sous-menu, cliquez sur le X situé en haut à droite du sous-menu. Vous devez confirmer la plupart des paramètres avec Enregistrer pour qu'ils soient actualisés. 113 / 242 DK FR NL EN G N U 11.1. Utilisateur Vous pouvez ici attribuer le mot de passe administrateur. Confirmez tout nouveau mot de passe attribué avec Enregistrer. 11.2. Disque Vous pouvez consulter ici des informations sur l'occupation de la mémoire et le système de fichiers du disque dur interne. 11.3. Réseau Nom d’hôte Vous pouvez ici donner un nom d'appareil au disque dur WiFi. Confirmez tout nouveau nom donné avec Enregistrer. 114 / 242 Wi-Fi & LAN Vous pouvez ici régler les paramètres pour le point d'accès du disque dur WiFi. SSID Saisissez ici le SSID avec lequel le point d'accès du disque dur WiFi doit être identifiable pour d'autres appareils WiFi. DE DK FR NL EN Mode Réglez ici la norme radio WiFi. Mot de passe Attribuez ici un mot de passe avec lequel d'autres appareils WiFi doivent se connecter au point d'accès du disque dur WiFi. Adresse MAC Vous voyez ici l'adresse MAC de votre disque dur WiFi. Adresse IP Saisissez ici l'adresse IP permettant d'ouvrir l'interface Web du disque dur WiFi. Masque sous réseau Saisissez ici le masque de sous-réseau pour le point d'accès du disque dur WiFi. Canal WiFi Si d'autres réseaux WiFi perturbent le point d'accès et le fonctionnement du disque dur WiFi, vous pouvez régler ici un autre canal sur lequel le signal WiFi soit émis. 115 / 242 G N U Sécurité Réglez ici le chiffrement pour la connexion au point d'accès du disque dur WiFi. Cacher SSID Réglez ici si le nom du réseau (SSID) du disque dur WiFi doit être visible dans le réseau (réglage ON). Serveur DHCP Vous pouvez ici activer ou désactiver le serveur DHCP pour le disque dur WiFi. • Activé le serveur DHCP pour utiliser le disque dur WiFi comme point d'accès qui attribue activement des adresses IP aux clients se connectant au serveur DHCP. • Désactivé le serveur DHCP pour définir manuellement les adresses IP attribuées aux clients. L'adresse IP doit se trouver dans la plage d'adresses que vous pouvez définir lorsque le serveur DHCP est activé (voir prochaine section). Serveur DHCP activé : Le serveur DHCP étant activé, vous pouvez voir avec l'option Liste de clients les appareils qui sont actuellement connectés au disque dur WiFi. Avec les options Adresse de début et Adresse de fin, vous pouvez définir la plage d'adresses IP dans laquelle le serveur DHCP attribue des adresses IP aux clients. 116 / 242 Attribuez sous Passerelle l'adresse IP sous laquelle le point d'accès du disque dur WiFi doit être accessible. REMARQUE ! L'adresse IP de la passerelle (gateway) doit se trouver en dehors de la plage d'adresses IP du serveur DHCP. DNS primaire Si, dans l'option de menu « Internet » suivante, vous avez indiqué un point d'accès via lequel une connexion Internet peut être établie, l'adresse IP de ce point d'accès apparaît ici. Vous pouvez ici également indiquer manuellement l'adresse IP pour le serveur DNS primaire. DNS secondaire S'il existe dans le réseau un deuxième serveur DNS attribuant des adresses IP, indiquez ici l'adresse IP de ce deuxième serveur DNS. Internet Vous pouvez ici rechercher les réseaux WiFi avec une connexion Internet disponibles. Cliquez pour cela sur le champ « Scan ». Saisissez ensuite le mot de passe d'accès au réseau sous l'option Mot de passe et attribuez le cas échéant une Adresse IP (uniquement avec adresse IP manuelle). Après la sauvegarde, le disque dur WiFi met cette connexion Internet à la disposition des clients qui lui sont connectés. 117 / 242 DE DK FR NL EN G N U 11.4. Services Vous pouvez ici activer et désactiver Samba sur le disque dur WiFi (le service Samba est activé par défaut sur l'appareil). • Si Samba est activé, les clients Windows peuvent afficher dans l'explorateur Windows les fichiers des appareils connectés au disque dur WiFi. • Si Samba est désactivé, les fichiers peuvent être affichés et gérés uniquement via les applications ou l'interface Web. 11.5. Système Réglages de l’heure Vous pouvez ici régler la date, l'heure et le fuseau horaire. Vous pouvez en outre définir si l'heure doit être reçue automatiquement d'un serveur de temps via Internet ou si l'heure actuelle de l'ordinateur doit être reprise pour le réglage de l'heure et de la date. Réglages sauveg. Vous pouvez ici enregistrer les paramètres actuels du disque dur WiFi dans un fichier de configuration et sauvegarder ce fichier sur votre appareil. • L'option Rétablir vous permet d'indiquer l'emplacement de stockage d'un ancien fichier de configuration et de charger cette configuration. 118 / 242 MàJ du firmware Si vous avez reçu une actualisation du microprogramme, vous pouvez l'installer avec cette option. Réinit. réglages Sélectionnez cette option puis cliquez sur Enregistrer pour restaurer les paramètres par défaut sur l'appareil. DE DK FR NL EN 11.6. Assistant Vous pouvez avec l'assistant régler étape par étape tous les paramètres de base du disque dur WiFi. Suivez les instructions à l'écran et cliquez chaque fois sur Suivant pour passer au paramètre suivant. Une fois les paramètres réglés, le disque dur WiFi redémarre. 12. Informations Sur cette page, vous voyez l'état de l'appareil, de la mémoire et du réseau. 119 / 242 G N U 13. Explorer Vous pouvez ici gérer les fichiers contenus sur le disque dur WiFi. Sélectionnez dans l'arborescence des fichiers (10/11) un support de données et un dossier dont vous souhaitez afficher le contenu. Sélectionnez un fichier. Les boutons 1 à 9 vous permettent d'exécuter les fonctions du gestionnaire de fichiers. 1 10 1) Actualiser 2) Téléverser 3) Créer 4) Copier 5) Déplacer 120 / 242 2 3 4 5 6 7 8 9 6) Télécharger DE 7) Supprimer DK 8) Renommer 9) 10) FR Démarrer la visionneuse de photos Disque dur interne NL EN G N U 121 / 242 14. WLAN HDD Tool Vous pouvez télécharger le WLAN HDD Tool sur le site Internet « http://www.medion.com/ wlanhddtool/ ». Cet outil de recherche vous permet ensuite de rechercher le disque dur WiFi dans le réseau et d'ouvrir directement l'interface Web dans le navigateur. Double-cliquez sur le fichier WLAN HDD TOOL. exe pour démarrer l'outil de recherche. REMARQUE ! Le disque dur WiFi ne peut être trouvé que si une connexion au réseau WLanHDD XXXX a été établie. L'outil de recherche cherche alors le disque dur WiFi. Si ce dernier n'a pas pu être trouvé, rapprochez-le de l'ordinateur puis cliquez sur Refresh pour lancer une nouvelle recherche. Une fois que l'outil de recherche a trouvé le disque dur WiFi, cliquez sur Log In pour accéder directement à l'interface Web. Le navigateur de votre ordi122 / 242 nateur Windows s'ouvre et la page Paramètres s'affiche. Pour afficher le disque dur WiFi directement dans l'explorateur Windows, cliquez sur My Storage. DE DK FR REMARQUE ! Les fichiers contenus sur les supports de données raccordés au disque dur WiFi ne peuvent être affichés dans l'explorateur Windows que si le serveur Samba est activé sur le disque dur WiFi (voir « 11.4. Services » à la page 118). Si vous ne voulez pas utiliser l'outil de recherche, ouvrez votre navigateur Web et saisissez « http://10.10.10.254 » dans la ligne d'adresse. 15. Réinitialisation de l'appareil La touche RESET située sur le côté du disque dur WiFi vous permet de réinitialiser ce dernier si le système ne réagit plus ou si vous avez oublié votre mot de passe administrateur. Appuyez sur la touche RESET avec un objet pointu (p. ex. un trombone déplié) et maintenez la touche enfoncée pendant environ 5 secondes. Les paramètres par défaut ont été restaurés, le disque dur WiFi redémarre. 123 / 242 NL EN G N U 16. Vous avez besoin d'aide ? En cas de problème avec votre disque dur WiFi, veuillez nous contacter. Les informations suivantes nous seraient alors très utiles : • Quels périphériques externes sont raccordés à l'appareil ? • Au cours de quelle commande le problème s'est-il produit ? • Qu'avez-vous déjà tenté pour résoudre le problème ? • Si vous possédez déjà un numéro de client, veuillez nous le communiquer. 17. Nettoyage Vous pouvez prolonger la durée de vie de l'appareil en respectant les consignes suivantes : • Avant de nettoyer l'appareil, débranchez toujours l'adaptateur secteur et tous les câbles de connexion. • N'utilisez ni solvants ni détergents corrosifs ou gazeux. • Nettoyez l'appareil avec un chiffon doux et non pelucheux. Veuillez conserver soigneusement les emballages et utiliser uniquement ceux-ci pour transporter l'appareil. ATTENTION ! L'intérieur de l'appareil ne comporte aucune pièce nécessitant un entretien ou un nettoyage. 124 / 242 18. Recyclage DE Emballage Votre appareil se trouve dans un emballage de protection afin d'éviter qu'il ne soit endommagé au cours du transport. Les emballages sont des matières premières et peuvent être recyclés ou réintégrés dans le circuit des matières premières. Appareil Une fois l'appareil arrivé en fin de vie, ne le jetez en aucun cas avec les déchets domestiques ! Informez-vous auprès de votre municipalité des possibilités de recyclage écologique et adapté. 125 / 242 DK FR NL EN G N U 19. Caractéristiques techniques Généralités Poids total (env.) : 280 g Température en fonctionnement : 5° C à 35° C Humidité de l'air en fonctionnement : 5 % à 65 % Dimensions : Env. 85 x 25 x 130 mm Batterie interne Capacité : Disque dur WiFi Capacité de stockage: Standard WiFi : Adaptateur secteur Modèle : Fabricant : Tension d'entrée : Tension de sortie : Connectique : 3000 mAh 1 To (=1000 Go)2 802.11 b/g/n KSAS0060500100VEU Ktec, Chine 100 – 240 V ~ 50/60 Hz 0,18 A 5,0 V 1000 mA LAN (100 Mbit/s) USB 2.0 microUSB 3.0 Sous réserve de modifications techniques et visuelles ainsi que d'erreurs d'impression. 2 1 Go correspond à 1 milliard d’octets. La capacité mémoire réellement utilisable peut varier. 126 / 242 20. Glossaire DE Access Point (AP), Wireless AP Aussi appelé station de base ou point d'accès sans fil, est un appareil électronique faisant fonction d'interface pour des appareils de communication sans fil. Les terminaux établissent par Wireless Adapter (adaptateur sans fil) une connexion radio avec le Wireless Access Point, qui peut lui être raccordé à un réseau de communication fixe à l'aide d'un câble. DK Système d'exploitation Un logiciel avec lequel l'utilisateur et les logiciels installés sur le système peuvent communiquer avec le matériel de l'ordinateur, tel que le disque dur. BSSID (MAC) Le Basic Service Set Identification (BSSID) correspond à l'adresse MAC du Wireless Access Point. Mode Client Le mode Client est un mode de fonctionnement d'un Wireless Access Point (ici : le disque dur WiFi), avec lequel celui-ci se comporte comme un Wireless Adapter vis-à-vis de l'AP supérieur. Avec un AP fonctionnant en mode Client, des ordinateurs individuels sans propre Wireless Adapter peuvent être raccordés à des réseaux supérieurs. 127 / 242 FR NL EN G N U DHCP – Dynamic Host Configuration Protocol Un protocole pour assigner une adresse IP à des appareils dans le réseau. Avec les adresses dynamiques, un appareil peut avoir une autre adresse IP chaque fois qu'il se connecte à un réseau. Dans certains systèmes, l'adresse IP se modifie d'elle-même pendant que l'appareil est connecté. DHCP supporte aussi une combinaison d'adresses IP statiques et dynamiques. Voir aussi protocole. DNS – Domain Name Service Un système avec lequel un serveur de noms de domaine en réseau peut convertir des noms d'hôte sous forme de texte en adresses IP numériques pour identifier sans équivoque un appareil connecté à Internet. ESSID Avec l'attribution de différentes identifications de réseau, on peut aussi faire fonctionner plusieurs Wireless LAN au même endroit. Le SSID est réglé sur la station de base. Pour raccorder plusieurs stations de base en un réseau, on règle sur ces dernières le même SSID, qui est alors appelé ESSID (Extended SSID). Gateway Ou passerelle. La passerelle standard indique l'ordinateur/le routeur dans le réseau auquel toutes les demandes qui n'ont pas comme destination une adresse dans le réseau local (demandes à Internet) sont adressées. Elle transmet alors ces demandes à un ordinateur/routeur qui peut éventuellement y répondre. 128 / 242 Vous saisissez généralement comme passerelle standard l'adresse IP de votre routeur domestique (routeur DSL). Adresse IP Un numéro binaire de 32 bits qui identifie sans équivoque chaque ordinateur connecté à Internet. LAN – Local Area Network (réseau local) Un système avec lequel les utilisateurs d'ordinateurs au sein d'une entreprise ou d'une organisation sont connectés entre eux et souvent aussi à des compilations de données sauvegardées de manière centralisée sur des serveurs LAN. Adresse MAC L'adresse MAC (Media Access Control) est l'adresse de matériel de chaque adaptateur réseau individuel servant à identifier sans équivoque l'appareil dans un réseau d'ordinateurs. Passphrase Key La clé de réseau qui sert à l'authentification d'un réseau chiffré avec WEP/WPA2. SSID Avec l'attribution de différentes identifications de réseau, on peut aussi faire fonctionner plusieurs Wireless LAN au même endroit. Le SSID est réglé sur la station de base. Pour raccorder plusieurs stations de base en un réseau, on règle sur ces dernières le même SSID, qui est alors appelé ESSID (Extended SSID). 129 / 242 DE DK FR NL EN G N U Masque de sous-réseau On appelle masque de sous-réseau un réseau partiel d'un réseau. Il regroupe plusieurs adresses IP successives au moyen d'un masque de sous-réseau. 130 / 242 21. Mentions légales DE Copyright © 2014 Tous droits réservés. Le présent mode d‘emploi est protégé par le copyright. La reproduction sous forme mécanique, électronique ou sous toute autre forme que ce soit est interdite sans l‘autorisation écrite du fabricant. Le copyright est la propriété de la société : Medion AG Am Zehnthof 77 45307 Essen Allemagne Le mode d‘emploi peut être à nouveau commandé via la hotline de service et téléchargé sur le portail de service www.medion.com/fr/service/accueil/. Vous pouvez aussi scanner le code QR ci-dessus et charger le mode d‘emploi sur votre terminal mobile via le portail de service. 131 / 242 DK FR NL EN G N U Inhoudsopgave 1. Opmerkingen over deze handleiding .......... 134 1.1. In deze handleiding gebruikte waarschuwingssymbolen en -woorden ..........................134 2. Gebruik voor het beoogde doel.................... 136 3. Veiligheidsinstructies .................................... 136 3.1. Veilige werking ......................................................137 3.2. Gegevensbescherming.......................................139 3.3. Stroomvoorziening ..............................................140 4. Opmerkingen over de conformiteit ............. 140 5. Vóór ingebruikname...................................... 141 5.1. De inhoud van de verpakking controleren .141 5.2. Systeemeisen..........................................................141 6. Overzicht van het apparaat........................... 142 6.1. Overzicht led-indicatoren ..................................143 7. Ingebruikname............................................... 144 7.1. Accu opladen..........................................................144 7.2. Aansluitingen .........................................................145 7.3. RJ45-LAN aansluiting...........................................145 7.4. Apparaat inschakelen ..........................................145 8. Gebruik ........................................................... 146 8.1. Netwerkverbinding met een notebook/pc .147 8.2. App op een Android/Apple-smartphone/tablet-pc installeren .................................................148 8.3. Netwerkverbinding op een smartphone of tablet ............................................................................149 9. Bestandsbeheer via de Android/Apple app 150 9.1. Apparaatkeuze .......................................................150 9.2. Menupictogrammen ...........................................151 132 van 242 9.3. Bestandsbeheer.....................................................152 9.4. Menu Instellingen .................................................153 10. Webinterface van de WLAN harde schijf ...... 155 11. Instellingen..................................................... 157 11.1. Gebruikers ...............................................................158 11.2. Schijf ..........................................................................158 11.3. Netwerk ....................................................................158 11.4. Services.....................................................................162 11.5. Systeem ....................................................................162 11.6. Wizard .......................................................................163 12. Informatie ....................................................... 163 13. Verkenner ....................................................... 164 14. Informatie ....................................................... 165 15. WLAN HDD Tool .............................................. 166 16. Apparaat resetten .......................................... 167 17. Heeft u verder nog ondersteuning nodig? .. 168 18. Reiniging......................................................... 168 19. Afvoer.............................................................. 169 20. Technische gegevens ..................................... 170 21. Woordenlijst ................................................... 171 22. Colofon............................................................ 175 133 van 242 DE DK FR NL EN G N U 1. Opmerkingen over deze handleiding Lees de veiligheidsinstructies zorgvuldig door voordat u het apparaat in gebruik neemt. Neem de waarschuwingen op het apparaat en in de gebruiksaanwijzing in acht. Bewaar de handleiding altijd binnen handbereik. Geef deze handleiding en het garantiebewijs mee wanneer u het apparaat verkoopt of aan iemand anders doorgeeft. 1.1. In deze handleiding gebruikte waarschuwingssymbolen en -woorden GEVAAR! Waarschuwing voor direct levensgevaar! WAARSCHUWING! Waarschuwing voor mogelijk levensgevaar en/of ernstig onherstelbaar letsel! 134 van 242 VOORZICHTIG! Neem alle aanwijzingen in acht om letsel en materiële schade te voorkomen! LET OP! Neem de aanwijzingen in acht om materiële schade te voorkomen! OPMERKING! Nadere informatie over het gebruik van het apparaat. OPMERKING! Neem de aanwijzingen in de handleiding in acht! WAARSCHUWING! Waarschuwing voor gevaar van een elektrische schok • Opsommingsteken/informatie over voorvallen die zich tijdens de bediening kunnen voordoen Advies over uit te voeren handelingen 135 van 242 DE DK FR NL EN G N U 2. Gebruik voor het beoogde doel Dit apparaat is een harde schijf waarvan de gegevens via een ingebouwd WLAN-accesspoint aan andere, draadloos communicerende apparatuur beschikbaar kunnen worden gesteld. Daarnaast is het apparaat voorzien van USB-aansluitingen voor gegevensoverdracht resp. voor het opladen van de accu en een ander apparaat. Gebruik het apparaat niet voor andere doeleinden. Gebruik het apparaat uitsluitend binnenshuis. Het apparaat is bedoeld voor privégebruik en is niet geschikt voor zakelijke toepassingen. 3. Veiligheidsinstructies Lees dit hoofdstuk en de volledige handleiding zorgvuldig door en neem alle instructies in acht. Hiermee garandeert u een betrouwbare werking en een lange levensduur van uw apparaat. Bewaar deze gebruiksaanwijzing bij uw apparaat en geef deze bij verkoop door aan de nieuwe eigenaar. Neem bij problemen met het apparaat uitsluitend contact op met onze erkende servicepartners. 136 van 242 3.1. Veilige werking DE • Dit apparaat mag niet worden gebruikt door personen (inclusief kinderen) met beperkte lichamelijke, zintuiglijke of intellectuele vermogens en/of onvoldoende ervaring en/of kennis, tenzij dit gebeurt onder toezicht van een voor hun veiligheid verantwoordelijke persoon of de personen zijn geïnstrueerd in het juiste gebruik van het apparaat. Kinderen moeten onder toezicht staan om ervoor te zorgen dat ze niet met het apparaat spelen. • Neem ook de gebruiksaanwijzingen in acht van de apparaten die u met het WLAN-repeater verbindt. • Gebruik uitsluitend de meegeleverde netadapter (KSAS0060500100VEU, fabrikant: Ktec, China). Probeer de stekker van de netadapter nooit aan te sluiten op een andere aansluiting, want daardoor kan schade worden veroorzaakt. • Plaats geen met vloeistof gevulde voorwerpen zoals bv. vazen op het apparaat of in de directe omgeving. Deze voorwerpen 137 van 242 DK FR NL EN G N U • • • • • • kunnen omvallen, waarbij de vloeistof de elektrische veiligheid kan aantasten. Houd het apparaat uit de buurt van vocht, druip- of spatwater. Vermijd schokken, stof, hitte en rechtstreeks zonlicht om storingen te vermijden. De bedrijfstemperatuur ligt tussen 5 en 35 °C. De behuizing mag niet worden geopend. Hierdoor vervalt uw recht op garantie en zou het apparaat kunnen worden beschadigd. Wacht na vervoer met de ingebruikname tot het apparaat de omgevingstemperatuur heeft aangenomen. Bij grote schommelingen in de temperatuur of luchtvochtigheid kan er door condensatie vocht ontstaan waardoor kortsluiting kan ontstaan. Het apparaat is bedoeld voor aansluiting op computers met een gezekerde aansluiting (Limited Power Source conform EN60950). Leg de kabels zo neer dat niemand erop kan trappen of erover kan struikelen. Plaats geen voorwerpen op de snoeren 138 van 242 omdat deze daardoor beschadigd kunnen raken. • Om statische opladingen te voorkomen, mag u het apparaat niet gebruiken onder extreem droge omstandigheden. • In een omgeving met elektrostatische ontlading kunnen er storingen in de werking optreden. In dat geval moeten de fabrieksinstellingen van het apparaat worden teruggezet. 3.2. Gegevensbescherming In geen geval kan aanspraak worden gemaakt op schadevergoeding vanwege verlies van gegevens en daardoor ontstane schade. Voor elke aanpassing dient u reservekopieën van uw gegevens op te slaan op externe opslagmedia (bv. cd-r). 139 van 242 DE DK FR NL EN G N U 3.3. Stroomvoorziening • Sluit de netvoeding van de WLAN harde schijf uitsluitend aan op een goed bereikbaar en geaard stopcontact met 100-240 V~ / 50 Hz. 4. Opmerkingen over de conformiteit Dit apparaat voldoet aan de richtlijnen voor elektromagnetische compatibiliteit en elektrische veiligheid Bij dit apparaat wordt de volgende draadloze apparatuur geleverd: • Wireless LAN (optioneel) Hierbij verklaart Medion AG dat dit product voldoet aan de volgende Europese eisen: • R&TTE richtlijn 1999/5/EG • Ecodesign richtlijn 2009/125/EG • RoHS richtlijn 2011/65/EU. De complete verklaring van conformiteit is te vinden op www.medion.com/conformity. 140 van 242 5. Vóór ingebruikname DE 5.1. De inhoud van de verpakking controleren DK Controleer de inhoud van de verpakking op volledigheid en stel ons binnen 14 dagen na de aanschaf op de hoogte van eventuele ontbrekende onderdelen. Controleer na het uitpakken of de volgende onderdelen aanwezig zijn: • WLAN harde schijf • Netvoedingsadapter (KSAS0060500100VEU, fabrikant Ktec, China) met USB-kabel • Handleiding en garantiebewijs GEVAAR! Houd de verpakkingsfolie uit de buurt van kinderen. Hierbij bestaat gevaar voor verstikking! 5.2. Systeemeisen • • WLAN-standaard 802.11b/g/n Windows 8/Microsoft Windows® 7/Windows Vista® SP1, Mac OS 10.6 of nieuwer Android 2.2 of nieuwer, iOS 4.0 of nieuwer 141 van 242 FR NL EN G N U 6. Overzicht van het apparaat 1 9 1) 2) 3) 4) 5) 6) 7) 8) 9) 1 2 3 4 5 6 7 8 Batterij-led Led harde schijf WLAN-led Internet-led LAN-aansluiting (RJ45 bus) RESET knop USB 3.0 micro-B aansluiting voor het opladen van de ingebouwde accu/gegevensoverdracht AAN/UIT schakelaar USB-aansluiting voor het opladen van een ander apparaat1 Voor het opladen van andere apparaten moet de WLAN harde schijf zijn uitgeschakeld. 142 van 242 6.1. Overzicht led-indicatoren Led Batterij-led Kleur Groen Rood Status Beschrijving De accu is volledig opBrandt geladen Batterij wordt opgelaKnippert den De accu moet worden Brandt opgeladen Brandt Led harde schijf Harde schijf gereed Wit Knippert Harde schijf actief Het WLAN-accesspoint is gereed. Het WLAN-accesspoint Knippert wordt opgestart Het WLAN-accesspoint Uit is uitgeschakeld Brandt Internetverbinding Geen internetverbindUit ing Brandt WLANBlauw led InterGroen net-led 143 van 242 DE DK FR NL EN G N U 7. Ingebruikname 7.1. Accu opladen De WLAN harde schijf is uitgerust met een ingebouwde accu. U kunt de accu opladen met de meegeleverde USB-lichtnetadapter of via de USB-aansluiting van uw pc of een ander apparaat met een USB-aansluiting. Sluit de USB-kabel aan op de USB 3.0 Micro-B aansluiting van de WLAN harde schijf. Sluit het andere uiteinde aan op de USB-netvoeding en steek deze in het stopcontact. Eventueel kunt u de USB-kabel aansluiten op de USB-aansluiting van uw pc of een ander apparaat dat via de USB-aansluiting een spanning van 5 V levert. Leds voor de oplaadstatus • • Tijdens het laadproces knipperen de leds voor de laadstatus continu. Wanneer de accu volledig is opgeladen, brandt de accu-led permanent. 144 van 242 7.2. Aansluitingen DE USB-aansluiting aan de rechterzijkant DK Via de USB-aansluiting aan de zijkant van het apparaat kunnen accu's van andere apparaten zoals bv. smartphones worden opgeladen. FR USB 3.0 microB-aansluiting De USB 3.0 microB-aansluiting dient voor het opladen van de interne accu. In uitgeschakelde toestand heeft u via deze aansluiting op de pc toegang tot de kaartlezer. 7.3. RJ45-LAN aansluiting De WLAN harde schijf kan via de RJ45-LAN bus direct op een router worden aangesloten. Apparaten die zich aanmelden op het accesspoint van de WLAN harde schijf, kunnen op die manier draadloos gebruik maken van de internettoegang van de router. OPMERKING! Hiervoor moet de internettoegang bij de instellingen op "Kabelverbinding" staan (zie “Internetinstellingen” op pagina 154). 7.4. Apparaat inschakelen Houd de schakelaar AAN/UIT ingedrukt tot de led voor opladen gaat branden om de WLAN harde schijf in te schakelen. 145 van 242 NL EN G N U • • De led OPLADEN knippert terwijl het systeem wordt opgestart. Daarna brandt de led OPLADEN permanent. De WLAN harde schijf is nu klaar voor gebruik. Apparaat uitschakelen • Om de WLAN harde schijf uit te schakelen, houdt u de schakelaar AAN/UIT opnieuw 3 seconden lang ingedrukt. Alle leds gaan uit. 8. Gebruik De WLAN harde schijf is geconfigureerd als accesspoint (AP), een draadloos toegangspunt. Andere draadloze communicatieapparatuur (clients), zoals tablet-pc's, smartphones of notebooks kunnen zich bij het accesspoint aanmelden en op die manier via de WLAN-verbinding toegang krijgen tot de gegevensdragers die op de WLAN harde schijf zijn aangesloten. OPMERKING! Bij de eerste ingebruikname als accesspoint plaatst u de client zo dicht mogelijk bij de WLAN harde schijf. Na correcte installatie kunt u de harde schijf dan op een willekeurige plaats binnen het bereik opstellen. 146 van 242 8.1. Netwerkverbinding met een notebook/pc DE Zet de WLAN harde schijf aan. Zoek op uw notebook/pc in de beschikbare draadloze netwerken naar het netwerk "WLAN-HDD XXXX" en verbind het apparaat met dit netwerk. FR DK NL EN G N U Verbindingsvoorbeeld onder Windows Voer na het verzoek het netwerkwachtwoord (Password) in dat vermeld staat op het typeplatje op de achterkant van de WLAN harde schijf. De WLAN-client brengt nu een verbinding met de WLAN harde schijf tot stand. U kunt nu het bestandsbeheer via de webinterface gebruiken, zoals beschreven staat onder “10. Webinterface van de WLAN harde schijf” op pagina 155. 147 van 242 8.2. App op een Android/Applesmartphone/tablet-pc installeren Om de belangrijkste menufuncties en de toegang tot de bestanden via de WLAN harde schijf op een tablet-pc of smartphone te kunnen gebruiken, moet u eerst de app op uw tablet-pc/smartphone installeren. Deze app is beschikbaar via de Playstore (Android), resp. AppStore (Apple). Ga met de webbrowser op uw smartphone/tablet-pc naar het adres "http://www.medion.com/ wlanhddtool/". Download daar de juiste Android/Apple app van de website. Download de app via de directe link: Via de QR-code hiernaast komt u bij de download van de iOS-app in de AppStore. Via de QR-code hiernaast komt u bij de download van de Android-app in Google Play. 148 van 242 Nadat u de app heeft geïnstalleerd, moet u de WLAN-functie op uw smartphone/tablet inschakelen en het apparaat verbinden met het netwerk "WLAN-HDD XXX". 8.3. Netwerkverbinding op een smartphone of tablet Zet de WLAN harde schijf aan. Schakel de WLAN-functie op uw smartphone/tablet in en verbind het apparaat met het netwerk "WLAN-HDD XXXX". Voer na het verzoek het netwerkwachtwoord (Password) in dat vermeld staat op het typeplatje op de achterkant van de WLAN harde schijf. De WLAN-client brengt nu een verbinding met de WLAN harde schijf tot stand. OPMERKING! Om het bestandsbeheer op een smartphone/tablet-pc te kunnen gebruiken, installeert u de juiste app voor Android/Apple, zoals beschreven onder “8.2. App op een Android/ Apple-smartphone/tablet-pc installeren” op pagina 148. 149 van 242 DE DK FR NL EN G N U 9. Bestandsbeheer via de Android/Apple app Nadat u de app op uw smartphone/tablet-pc heeft geopend, wordt het menu Home weergegeven. 9.1. Apparaatkeuze • Aan de onderste rand van het scherm wordt de vermelding WLAN HDD weergegeven. In deze weergave worden alle mappen van de WLAN harde schijf getoond. • Om naar de weergave van bestanden en mappen van de smartphone/tablet-pc te wisselen, tikt u op de onderste schermrand op de vermelding Dit apparaat. 150 van 242 9.2. Menupictogrammen DE Met behulp van de menupictogrammen in de bovenste schermrand kunt u de volgende functies uitvoeren: Via Home keert u terug naar het hoogste bestandsniveau. Met Weerg. schakelt u de weergave van de bestanden en mappen om tussen tegels en lijsten. Via Inst. opent u het menu Instellingen (zie “9.4. Menu Instellingen” op pagina 153). Gebruik Terug om terug te gaan naar een vorige weergave. Met Beheer start u het bestandsbeheer. De knop verandert in de knop "Einde" Tik op Zoeken om direct naar bestandsnamen in de huidige map te zoeken. 151 van 242 DK FR NL EN G N U 9.3. Bestandsbeheer Tik op de knop . In de onderste schermrand wordt de volgende menubalk weergegeven: Tik op een bestand dat u wilt verplaatsen, downloaden of wissen. Alle selecteren/Alle deselecteren Om alle bestanden in de huidige map te selecteren, tikt u op Alles en om alle bestanden weer te deselecteren, tikt u op Deselect.. Download/Upload Om het bestand te downloaden (weergave "WLAN HDD") of te uploaden (weergave "Dit apparaat", tikt u op de betreffende knop en kiest u vervolgens de opslaglocatie. Status Tik op Status om de status van de actieve en voltooide bestandsoverdrachten te bekijken. Wissen Om het bestand te wissen, tikt u op Wissen. 152 van 242 Bestandsbeheer beëindigen Om het bestandsbeheer te beëindigen en terug te keren naar de apparaatkeuze, tikt u op Ende. 9.4. Menu Instellingen DE DK FR In het menu Einstellungen zijn in de app voor smartphones/tablet-pc's de belangrijkste opties opgenomen voor het configureren van de WLAN HDD harde schijf. OPMERKING! Om de volledige configuratie te kunnen uitvoeren, opent u het menu Einstellungen in de webinterface van de WLAN harde schijf via een webbrowser (zie “10. Webinterface van de WLAN harde schijf” op pagina 155). WLAN HDD-n-go instellingen Apparaatnaam Hier kunt u een naam voor de WLAN harde schijf opgeven. Beveiligingsopties Stel hier de encryptie voor aanmelding bij het accesspoint van de WLAN harde schijf in. Firmware Upgrade Hier kunt u controleren of er een update voor de app beschikbaar is voor download. 153 van 242 NL EN G N U Internetinstellingen Hier kunt u de internettoegang naar een WLAN-netwerk (draadloze toegang) of via de RJ45 LAN-aansluiting (Bedrade toegang) instellen. Wanneer deze internetverbinding is opgeslagen, stelt de WLAN harde schijf de verbinding beschikbaar aan clients die bij de adapter zijn aangemeld. Om het zoeken naar de beschikbare WLAN-netwerin het veld ken te starten, klikt u op de knop Configurer uw netwerkverbinding. Vervolgens voert u in het veld Wachtwoord het netwerkwachtwoord in en klikt u op Verb.. Uitgebreide instellingen Tik op de pijl naast de naam van het netwerk via welke de WLAN harde schijf verbinding met internet moet maken. Hier kunt u instellen of IP-adressen automatisch door het netwerk moet worden toegewezen (DHCP) of dat een IP-adres handmatig moet worden ingesteld (Statisch). 154 van 242 10. Webinterface van de WLAN harde schijf Om de systeeminstellingen van de WLAN harde schijf te kunnen bewerken en toegang te krijgen tot de inhoud van de aangesloten gegevensdragers, opent u de webinterface via de webbrowser van uw notebook, pc of mobiele toestel. Hiervoor voert u het IP-adres in de adresregel van uw webbrowser in op uw notebook/pc. Dit adres staat vermeld op het typeplaatje aan de achterzijde van de WLAN harde schijf. OPMERKING! U kunt de webinterface op een Windows- of Apple-pc ook openen door deze in de zoekbalk in te voeren (zie “15. WLAN HDD Tool” op pagina 166). In de webinterface wordt om een wachtwoord gevraagd. 155 van 242 DE DK FR NL EN G N U Voer tijdens de eerste aanmelding de inloggegevens in die op het typeplaatje op de achterzijde van de WLAN harde schijf staan vermeld. (bij levering: User: admin, Password: [geen wachtwoord]). Taal voor de webinterface instellen In het venster voor de wachtwoordvraag wordt ook de taal voor de webinterface ingesteld. OPMERKING! Voer na de eerste aanmelding een wachtwoord in voor toegang als administrator (beheerder), om uw gegevens te beveiligen (zie “11.1. Gebruikers” op pagina 158). Nadat uw aanmelding bij de webinterface is geslaagd, verschijnt de pagina Instellingen. 156 van 242 11. Instellingen DE Op de pagina instellingen heeft u toegang tot de verschillende submenu's waarin u opties voor Gebruier, Schijf, Netwerk, Services, Systeem kunt instellen en de Wizard kunt starten. De submenu's worden in een nieuw scherm geopend. U verlaat een submenu door op de X te klikken in de rechterbovenrand van het submenu. De meeste opties moet u met OPSLAAN bevestigen om de instellingen te activeren. 157 van 242 DK FR NL EN G N U 11.1. Gebruikers Hier kunt u het wachtwoord voor de beheerder opgeven. Bevestig een nieuw opgegeven wachtwoord met OPSLAAN. 11.2. Schijf Hier kunt u informatie over het gebruik van de opslag en het bestandssysteem van de momenteel aangesloten gegevensdragers weergeven. 11.3. Netwerk Hostnaam Hier kunt u een apparaatnaam voor de WLAN harde schijf opgeven. Bevestig een nieuw opgegeven naam met OPSLAAN. 158 van 242 WiFi & LAN Hier kunt u de instellingen voor het accesspoint van de WLAN harde schijf invoeren. SSID Voer hier de SSID in, waaraan het accesspoint van de WLAN harde schijf voor andere WLAN-apparaten te herkennen is. DE DK FR NL EN Modus Stel hier de WLAN-standaard in. Wachtwoord Geef hier een wachtwoord op waarmee andere WLAN-apparaten zich bij het accesspoint van de WLAN harde schijf moeten aanmelden. MAC-adres Hier kunt u het MAC-adres van uw WLAN harde schijf bekijken. IP-adres Voer hier het IP-adres in waaronder de webinterface van de WLAN harde schijf bereikbaar is. Subnetmasker Voer hier het subnetmasker in voor het accesspoint van de WLAN harde schijf. Kanaal Indien andere WLAN-netwerken de werking van het accesspoint en de WLAN harde schijf beïnvloeden, 159 van 242 G N U kunt u hier een ander kanaal instellen waarop het WLAN-signaal moet worden uitgezonden. Veiligheid Stel hier de encryptie voor aanmelding bij het accesspoint van de WLAN harde schijf in. SSID verbergen Stel hier in of de netwerknaam (SSID) van de WLAN harde schijf in het netwerk zichtbaar moet zijn (instelling ON). DHCP-server Hier kunt u de DHCP-server voor de WLAN harde schijf in- of uitschakelen. • Actief gebruik deze instelling voor de DHCP-server om de WLAN harde schijf als accesspoint te gebruiken, zodat clients die zich bij de DHCP-server aanmelden, een IP-adres krijgen toegewezen. • Niet actief gebruik deze instelling om de IP-adressen voor de clients handmatig vast te leggen. Het IP-adres moet zich binnen het adresbereik bevinden dat u bij de ingeschakelde DHCP-server kunt vastleggen (zie volgende paragraaf ). DHCP-server ingeschakeld: Bij een ingeschakelde DHCP-server kunt u via de optie Client-lijst de apparaten bekijken die momenteel bij de WLAN harde schijf zijn aangemeld. Via de vermeldingen Startadres en Eindadres stelt u het IP-adresbereik in binnen welk 160 van 242 de DHCP-server IP-adressen aan clients toewijst. Geef onder Gateway het IP-adres op waaronder het accesspoint van de WLAN harde schijf bereikbaar moet zijn. DE DK OPMERKING! FR Het IP-adres van de gateway moet buiten het IP-bereik van de DHCP-server liggen. NL Primaire DNS Wanneer u in de volgende menuoptie "Internet" een accesspoint heeft opgegeven, via welk een internetverbinding tot stand kan worden gebracht, verschijnt hier het IP-adres van dit accesspoint. U kunt het IP-adres voor de primaire DNS-server hier ook handmatig opgeven. Secundaire DNS Als er zich nog een tweede DNS-server in het netwerk bevindt die IP-adressen toewijst, kunt u hier het IPadres van de tweede DNS-server opgeven. Internet Hier kunt u zoeken naar de beschikbare WLAN-netwerken met een internetverbinding. Klik daarvoor op het veld "Scan". Voer vervolgens in het veld Wachtwoord het wachtwoord van het netwerk in en geef zo nodig een IP-Adres op (alleen bij handmatige IP). De WLAN harde schijf stel deze internetverbinding na 161 van 242 EN G N U het opslaan beschikbaar aan de clients die op de harde schijf zijn aangemeld. 11.4. Services Hier kunt u Samba op de WLAN harde schijf activeren en deactiveren (bij levering: Samba-dienst ingeschakeld). • Bij ingeschakelde Samba kunnen Windows-clients de bestanden van de apparaten die op de WLAN harde schijf zijn aangesloten weergeven in de Windows Verkenner. • Bij uitgeschakelde Samba kunnen de bestanden alleen via de apps resp. via de webinterface worden weergegeven en beheerd. 11.5. Systeem Tijdinstellingen Hier kunt u de datum, de tijd en de tijdzone instellen. Bovendien kunt u instellen of de tijdinstelling automatisch via internet van een tijdserver moet worden opgehaald of dat de huidige tijd van de pc voor het instellen van klok en datum moet worden overgenomen. Back-up-inst. Hier kunt u de huidige instelling van de WLAN harde schijf vastleggen in een configuratiebestand en op uw apparaat opslaan. • Via de optie Herstellen kunt u de opslaglocatie 162 van 242 van een eerder configuratiebestand opgeven en deze configuratie laden. DE Firmware-upgrade DK Wanneer u een firmware-update heeft ontvangen, kunt u deze via de optie Update installeren. FR Reset-instellingen NL Kies deze optie en klik vervolgens op OPSLAAN om het apparaat terug te zetten naar de fabrieksinstellingen. EN 11.6. Wizard Via de assistent kunt u alle basisinstellingen van de WLAN harde schijf stap voor stap uitvoeren. Volg de aanwijzingen en klik telkens op VOLGENDE om naar de volgende instelling te gaan. Na het voltooien van de instellingen start de WLAN harde schijf opnieuw op. 12. Informatie Via de pagina "Informatie" kunt u de status van het apparaat, de opslagapparaten en het netwerk laten weergeven. 163 van 242 G N U 13. Verkenner Via de Verkenner kunt u de bestanden op de WLAN harde schijf beheren. Kies in de bestandsstructuur (10/11) een gegevensdrager en een map waarvan u de inhoud wilt weergeven. Kies een bestand. Via de knoppen 1-9 voert u de functies voor het bestandsbeheer uit. 1 10 1) Vernieuwen 2) Uploaden 3) Maken 4) Kopiëren 5) Verplaatsen 164 van 242 2 3 4 5 6 7 8 9 6) Downloaden DE 7) Wissen DK 8) Hernoemen 9) 10) FR Fotoviewer starten Interne harde schijf NL EN 14. Informatie Hier kunt u informatie over het gebruik van de opslagcapaciteit, de omvang van de ingebouwde harde schijf en een aangesloten gegevensdrager weergeven. 165 van 242 G N U 15. WLAN HDD Tool Op de website "http://www.medion.com/ wlanhddtool/" kunt u de WLAN HDD Tool downloaden. Met dit zoekprogramma kunt u zoeken naar de WLAN harde schijf in het netwerk en de webinterface rechtstreeks in de browser openen. Dubbelklik op het bestand WLAN HDD TOOL.exe om het zoekprogramma te starten. OPMERKING! De WLAN harde schijf kan alleen worden gevonden wanneer er verbinding is met het netwerk WLanHDD XXXX. Het zoekprogramma zoekt nu naar de WLAN harde schijf. Wanneer de WLAN harde schijf niet kan worden gevonden, plaatst u hem dichter bij de pc en klikt u vervolgens op Refresh om opnieuw te zoeken. Wanneer het zoekprogramma de WLAN harde schijf heeft gevonden, klikt u op Log In om rechtstreeks naar de webinterface te gaan. De browser 166 van 242 van uw Windows-pc wordt geopend en de pagina Einstellungen wordt weergegeven. Om de WLAN harde schijf rechtstreeks weer te geven in de Verkenner van Windows, klikt u op My Storage. OPMERKING! De bestanden van de gegevensdragers die aangesloten zijn op de WLAN harde schijf kunnen alleen in de Verkenner van Windows worden weergegeven wanneer de Samba-server op de WLAN harde schijf ingeschakeld is (zie “11.4. Services” op pagina 162). Wanneer u het zoekprogramma niet wilt gebruiken, opent u uw webbrowser en voert u "http://10.10.10.254" in op de adresregel. 16. Apparaat resetten Met de knop RESET aan de zijkant van de WLAN harde schijf kunt u de WLAN harde schijf weer resetten voor het geval het systeem niet meer reageert of u uw beheerderswachtwoord bent kwijtgeraakt. Druk met een puntig voorwerp (bv. een paperclip) de RESET knop in en houd de knop ongeveer 5 seconden lang ingedrukt. De WLAN harde schijf start nu op met de fabrieksinstellingen. 167 van 242 DE DK FR NL EN G N U 17. Heeft u verder nog ondersteuning nodig? Als u uw probleem niet heeft kunnen oplossen aan de hand van de suggesties in de voorgaande secties, kunt u contact met ons opnemen. Wij verzoeken u de volgende informatie bij de hand te houden: • Welke externe apparaten zijn aangesloten? • Tijdens welke bedieningsstap is het probleem opgetreden? • Welke stappen heeft u reeds ondernomen om het probleem op te lossen? • Geef ons uw klantnummer door als u dit heeft. 18. Reiniging De levensduur van het apparaat kan worden verlengd door de volgende maatregelen in acht te nemen: • Trek voor het reinigen altijd de netadapter en alle aansluitkabels los. • Gebruik geen oplosmiddelen, bijtende of gasvormige schoonmaakmiddelen. • Reinig het apparaat met een zachte, pluisvrije doek. Bewaar het verpakkingsmateriaal goed en gebruik alleen dit om het apparaat te transporteren. LET OP! Het apparaat bevat geen onderdelen die moeten worden gereinigd of moeten worden onderhouden. 168 van 242 19. Afvoer DE Verpakking Uw apparaat bevindt zich in een verpakking ter bescherming tegen schade tijdens transport. Verpakkingen zijn grondstoffen en kunnen worden hergebruikt of teruggebracht in de grondstoffenkringloop. Apparaat Gooi het apparaat aan het einde van de levensduur in geen geval bij het gewone huisvuil! Informeer bij de lokale autoriteiten naar mogelijkheden om het op een milieubewuste en correcte wijze af te voeren. 169 van 242 DK FR NL EN G N U 20. Technische gegevens Algemeen Totaalgewicht (ca.) 280 g Bedrijfstemperatuur 5 °C tot 35 °C Luchtvochtigheid tijdens bedrijf 5 % tot 65 % Afmetingen ca. 85 x 25 x 130 mm Ingebouwde accu Li-ionen 3000 mAh WLAN harde schijf Opslagcapaciteit: WLAN-standaard: Netadapter Model Fabrikant: Ingangsspanning: Uitgangsspanning: Aansluitingen: 1 TB (= 1000 GB)2 802.11 b/g/n KSAS0060500100VEU Ktec, China 100 - 240 V~ / 50/60 Hz; 0,18 A 5.0 V 1000 mA LAN (100 Mbit/s) USB 2.0 microUSB 3.0 Onder voorbehoud van technische en optische wijzigingen en drukfouten! 2 1 GB komt overeen met 1 miljard bytes. De daadwerkelijk bruikbare opslagcapaciteit kan afwijken. 170 van 242 21. Woordenlijst DE Access Point (AP), Wireless AP Ook basisstation genoemd, is een elektronisch apparaat dat als interface fungeert voor draadloze communicatieapparaten. Eindapparaten brengen via een Wireless Adapter (draadloze adapter) een draadloze verbinding tot stand met het Wireless Access Point (draadloos accesspoint), dat op zijn beurt weer via een kabel verbonden kan zijn met een vast geïnstalleerd communicatienetwerk. DK Besturingssysteem Software waarmee de gebruiker en software die op het systeem is geïnstalleerd, met de computerhardware kan communiceren, zoals bv. een harde schijf. BSSID (MAC) De Basic Service Set Identification (BSSID) komt overeen met het MAC-adres van het Wireless Access Point. Client Mode De Client Mode is een bedrijfsmodus van een Wireless Access Point (hier: van de WLAN harde schijf ), waarbij het zich als een Wireless Adapter gedraagt ten opzichte van een bovenliggend accesspoint. Met een AP in de Client Mode kunnen afzonderlijke computers zonder een eigen Wireless Adapter worden verbonden met een bovenliggend netwerk. 171 van 242 FR NL EN G N U DHCP – Dynamic Host Configuration Protocol Een protocol waarmee apparaten in een netwerk een IP-adres krijgen toegewezen. Met de dynamische adressen kan een apparaat telkens een ander IP-adres hebben, wanneer er een verbinding met een netwerk wordt gemaakt. In veel systemen wijzigt het IP-adres zichzelf, terwijl het apparaat aangesloten is. DHCP ondersteunt ook een combinatie van statische en dynamische IP-adressen. Zie ook Protocol. DNS – Domain Name Service Een systeem waarmee een netwerk-nameserver hostnamen kan vertalen in numerieke IP-adressen om een apparaat dat met internet is verbonden, eenduidig te identificeren. ESSID Met het toewijzen van verschillende netwerknamen kunnen ook verschillende draadloze LAN's op dezelfde locatie actief zijn. De SSID wordt ingesteld op het basisstation. Om meerdere basisstations met een netwerk te verbinden, stelt u dezelfde SSID in; deze wordt dan aangeduid als ESSID (Extended SSID) Gateway De standaardgateway geeft de computer/router in het netwerk aan, waaraan alle aanvragen worden gericht die geen adres in het lokale netwerk als doel hebben (aanvragen naar internet). Die stuurt deze aanvragen dan verder naar een computer/router die eventueel deze aanvraag kan beantwoorden. Gewoonlijk voert u 172 van 242 als standaardgateway het IP-adres van uw router thuis (DSL-router) in. IP-adres Een binair 32-bitsnummer waarmee elke computer die verbonden is met internet eenduidig wordt geïdentificeerd. LAN – Local Area Network (lokaal netwerk) Een systeem waarbij computergebruikers binnen een onderneming of een organisatie met elkaar en vaak ook met centraal op LAN-servers opgeslagen gegevensbestanden zijn verbonden. MAC-adres Het MAC-adres (Media-Access-Control-adres) is het hardwareadres van elke afzonderlijke netwerkadapter die dient voor de eenduidige identificatie van het apparaat in het computernetwerk. Passphrase Key De netwerksleutel die dient voor de authenticatie bij een netwerk met WEP/WPA2-encryptie. SSID Met het toewijzen van verschillende netwerknamen kunnen ook verschillende draadloze LAN's op dezelfde locatie actief zijn. De SSID wordt ingesteld op het basisstation. Om meerdere basisstations met een netwerk te verbinden, stelt u dezelfde SSID in; deze wordt dan aangeduid als ESSID (Extended SSID) 173 van 242 DE DK FR NL EN G N U Subnetmasker Een deelnetwerk van een netwerk wordt aangeduid als subnetwerk. Deze vat meerdere opeenvolgende IP-adressen samen met behulp van een subnetmasker. 174 van 242 22. Colofon DE Copyright © 2014 Alle rechten voorbehouden. Deze handleiding is auteursrechtelijk beschermd. Vermenigvuldiging in mechanische, elektronische of enige andere vorm zonder schriftelijke toestemming van de fabrikant is verboden. Het copyright berust bij de firma: Medion AG Am Zehnthof 77 45307 Essen Duitsland De handleiding is via de Service Hotline te bestellen en is via het serviceportal www.medion.com/nl/service/start/ beschikbaar voor download. U kunt ook de bovenstaande QR-code scannen en de handleiding via het serviceportal naar uw mobiele toestel downloaden. 175 van 242 DK FR NL EN G N U Contents 1. Notes on how to use these instructions ....... 178 1.1. Symbols and keywords used in these instructions .............................................................178 2. Proper use....................................................... 180 3. Safety instructions ......................................... 180 3.1. Operating safety....................................................181 3.2. Data backup ............................................................183 3.3. Power supply ..........................................................183 4. Notes on conformity ...................................... 183 5. Before use ....................................................... 184 5.1. Check package contents ....................................184 5.2. System requirements...........................................185 6. Overview of the device .................................. 186 6.1. Overview of the LED displays ...........................187 7. Start of operation........................................... 188 7.1. Charging the battery ...........................................188 7.2. Connections ............................................................189 7.3. RJ45 LAN connection ..........................................189 7.4. Switching on the device .....................................190 8. Operation........................................................ 190 8.1. Notebook/PC network connection ................191 8.2. Installing the app on an Android/Apple smart phone/tablet PC ....................................................192 8.3. Smart phone or tablet network connection ..... 193 176 of 242 9. File management via the Android/ Apple app ....................................................... 194 9.1. Device selection ....................................................194 9.2. Menu icons ..............................................................195 9.3. File management ..................................................196 9.4. Settings menu ........................................................197 10. Web interface of the WLAN hard drive ......... 199 11. Settings ........................................................... 200 11.1. User ............................................................................201 11.2. Disk.............................................................................202 11.3. Network ....................................................................202 11.4. Services.....................................................................205 11.5. System.......................................................................205 11.6. Wizard .......................................................................206 12. Information .................................................... 206 13. Explorer .......................................................... 207 14. WLAN HDD Tool ............................................. 209 15. Resetting the device ...................................... 210 16. Do you need more help?................................ 211 17. Cleaning .......................................................... 212 18. Disposal .......................................................... 213 19. Technical data................................................. 214 20. Glossary .......................................................... 215 21. Legal notice .................................................... 218 177 of 242 DE DK FR NL EN G N U 1. Notes on how to use these instructions Read the safety instructions carefully before use. Note the warnings on the device and in the operating instructions. Always keep the operating instructions close to hand. If you sell the device or give it away, make sure you also hand over these instructions and the guarantee card. 1.1. Symbols and keywords used in these instructions DANGER! Warning of immediate risk of fatal injury! WARNING! Warning of possible risk of fatal injury and/or serious irreversible injuries! 178 of 242 CAUTION! Please follow the instructions to prevent injuries and property damage! ATTENTION! Please follow the instructions to prevent property damage! NOTE! Additional information on using the device. NOTE! Please follow the guidelines in the operating instructions! WARNING! Warning of risk of electric shock! • Bullet point/information on operating steps and results Instructions to be carried out 179 of 242 DE DK FR NL EN G N U 2. Proper use This device is a USB hard drive whose data can be made available to other wireless communicating devices via the built-in WLAN access point. The device also has USB connections for data transfer/charging the internal battery and for charging another device. Never use the device for any other purpose. Only use the device indoors. This device is only designed for private use and is not suitable for commercial purposes. 3. Safety instructions Please read through this section and all of the documentation carefully and follow all of the instructions given. The instructions will help you to operate the device reliably and help increase its service life. Always keep these operating instructions near at hand to the device, but store them safely so that you can pass them on to a new owner should you sell the device. Should you have any problems with the device, please only contact our authorised service partners. 180 of 242 3.1. Operating safety DE • This device is not intended for use by people (including children) with reduced physical, sensory or mental abilities or by those without experience and/or knowledge, unless they are supervised by a person responsible for their safety or they have been instructed in its use by that person. Children should be supervised to ensure they do not play with this device. • Always adhere to the user instructions of the devices that you connect to the WLAN hard drive. • Use only the mains adapter supplied (KSAS0060500100VEU, manufacturer: Ktec, China). Never try to plug the mains adapter into other sockets as this may cause damage. • Do not place liquid containers, for example, vases, on or near the device. The container may tip over and the liquid may impair the electrical safety of the product. • Keep the device away from moisture and 181 of 242 DK FR NL EN G N U • • • • • • • from water in droplet or spray form. Avoid vibrations, dust, heat and direct sunlight in order to prevent malfunction. The operating temperature is 5-35° C. Never open the housing of the device. This would invalidate the guarantee and may render the device unusable. After transporting the device, wait until it has reached room temperature before switching it on. Major fluctuations in temperature or humidity can lead to condensation which could cause an electrical short-circuit. The device is intended to be connected to computers with power supply fuse protection (limited power source according to EN60950). Position the cable so that it cannot be stepped on or tripped over. Do not place any objects on the cables to avoid damaging them. To avoid static charges, you should not operate the device in extremely dry conditions. In circumstances where there are 182 of 242 electrostatic discharges, the device could malfunction. In this case, the device must be reset to the factory settings. DE DK 3.2. Data backup FR We do not accept any liability for claims for compensation due to loss of data or any damages that are incurred. Always back up your data onto an external storage device (for example, CD-R) before updating it. NL 3.3. Power supply • Only operate the mains adapter for the WLAN hard drive from an easily accessible and earthed socket with an AC 100-240 V~ 50 Hz power supply. 4. Notes on conformity The product fulfils the requirements for electromagnetic compatibility and electrical safety. This device is supplied with the following wireless features: • Wireless LAN (optional) Medion AG hereby declares that the product conforms to the following European requirements: • R&TTE Directive 1999/5/EC 183 of 242 EN G N U • Ecodesign Directive 2009/125/EC • RoHS Directive 2011/65/EU. Full declarations of conformity are available at www. medion.com/conformity. 5. Before use 5.1. Check package contents Please check your purchase to ensure that all items are included. If anything is missing, please contact us within 14 days of purchase. After unpacking, ensure that the following parts have been supplied: • WLAN hard drive • Mains adapter (KSAS0060500100VEU, manufacturer: Ktec, China) with USB cable • Operating instructions and guarantee documents DANGER! Keep the plastic packaging out of the reach of children as it can cause suffocation! 184 of 242 5.2. System requirements DE • • DK WLAN standard 802.11b/g/n Windows 8/Microsoft Windows® 7/Windows Vista® SP1, Mac OS 10.6 or newer version, Android 2.2 or newer, iOS 4.0 or newer FR NL EN G N U 185 of 242 6. Overview of the device 1 9 1) 2) 3) 4) 5) 6) 7) 8) 9) 1 2 3 4 5 6 7 8 Battery LED Hard drive LED WLAN LED Internet LED LAN connection (RJ45 socket) RESET button USB 3.0 Micro-B connection for charging the internal battery/data exchange ON/OFF switch USB connection for charging another device1 To charge other devices, the WLAN hard drive must be switched off. 186 of 242 6.1. Overview of the LED displays LED Colour Status Description Permanently Battery is charged Battery LED Green Hard drive LED FR Permanently Hard drive is ready G N U White Flashes Hard drive activity The WLAN access point is ready. The WLAN access Flashes point is starting. The WLAN access Off point is switched off. Internet Permanently connection No Internet Off connection Permanently WLAN LED Blue Internet Green LED DK Battery is being charged Battery needs Permanently charging Flashes Red DE 187 of 242 NL EN 7. Start of operation 7.1. Charging the battery The WLAN hard drive has an in-built battery. You can charge the battery either using the USB mains adapter included in the delivery or via a USB connection on your PC or another device with a USB connection. Connect the USB cable to the USB 3.0 Micro-B connection on the WLAN hard drive. Connect the other end of the cable to the USB mains adapter and plug it into the mains socket. Alternatively, connect the USB cable to the USB connection on your PC or another device that delivers 5 V output voltage at its USB connection. Charge status LEDs • • The battery LED flashes continuously while charging. Once the battery has been completely charged, the battery LED will be permanently lit. 188 of 242 7.2. Connections DE USB connection on the right side of the device DK The USB connection on the side of the device can be used to charge the batteries of other devices, such as smart phones, for example. FR USB 3.0 Micro-B connection EN The USB 3.0 Micro-B connection is used for charging the internal battery. When the device is switched off, you can use this connection to access the hard drive from a PC. 7.3. RJ45 LAN connection You can use the RJ45 LAN socket to connect the WLAN hard drive directly to a router. WLAN devices that log into the access point on the WLAN hard drive can thus connect to the Internet through the router. NOTE! For this purpose, Internet access must be set to "Wired connection" in the settings (see “Internet Settings” on page 198). 189 of 242 NL G N U 7.4. Switching on the device To switch on the WLAN hard drive, press and hold the ON/OFF switch until the charge LED lights up. • The CHARGE LED flashes while the system boots up. • The CHARGE LED is then permanently lit. The WLAN hard drive is now ready for use. Switching off the device • To switch off the WLAN hard drive, press and hold the ON/OFF switch for about three seconds. All LEDs switch off. 8. Operation The WLAN hard drive is configured as a wireless access point (AP). Other wireless communication devices (clients) such as tablet PCs, smart phones or notebooks can log into the access point and thus access the data of the hard drive via the WLAN connection. NOTE! When using the device as an access point for the first time, place the client as near as possible to the WLAN hard drive. After successful installation, you can then set up the hard drive at any position within range. 190 of 242 8.1. Notebook/PC network connection DE Switch the WLAN hard drive on. Search for the WLAN-HDD XXXX network in the list of available wireless networks on your notebook/PC and connect the device to this network. DK FR NL EN G N U Connection under Windows: example When prompted, enter the network password (Password) given on the type plate on the rear of the WLAN hard drive. The WLAN client will now connect to the WLAN hard drive. You can now use the file manager function via the web interface, as described under “10. Web interface of the WLAN hard drive” on page 199. 191 of 242 8.2. Installing the app on an Android/Apple smart phone/ tablet PC To be able to use the main menu functions and access files on the WLAN hard drive from a tablet PC or smart phone, you first need to install the relevant app on your tablet PC/smart phone. This app is available via the Play Store (Android) or AppStore (Apple). Call up the following site using the web browser on your smart phone/tablet PC: "http://www.medion.com/wlanhddtool/". Download the relevant Android/Apple app from the website. Download the app via a direct link: Scan the adjacent QR code to be directed to the download page for the iOS app on the AppStore. Scan the adjacent QR code to be directed to the download page for the Android app on Google Play. 192 of 242 Once you have installed the app, you need to activate the WLAN functionality on your smart phone/tablet and connect the device to the WLAN-HDD-XXXX network. DE DK 8.3. Smart phone or tablet network FR NL connection Switch the WLAN hard drive on. Activate the WLAN functionality on your smart phone/tablet and connect your device to the WLAN-HDD-XXXX network. When prompted, enter the network password (Password) given on the type plate on the rear of the WLAN hard drive. The WLAN client will now connect to the WLAN hard drive. NOTE! To be able to use the file manager function on your smart phone/tablet PC, install the relevant app for your Android/Apple device as described under “8.2. Installing the app on an Android/Apple smart phone/tablet PC” on page 192. 193 of 242 EN G N U 9. File management via the Android/Apple app When you have opened the app on your smart phone/ tablet PC, the Home menu will be displayed. 9.1. Device selection • • The WLAN HDD icon is active at the lower edge of the display. All the folders on the WLAN hard drive are displayed in this view. To switch the view to display the files and folders on your smart phone/ tablet PC, tap My Device at the lower edge of the display. 194 of 242 9.2. Menu icons DE You can use the menu icons at the upper edge of the display to perform the following functions: The Home icon will return you to the top level of the file structure. The View icon changes the files and folders display between tile and list view. The Settings icon is used to call up the Settings menu (see “9.4. Settings menu” on page 197). Use Back to scroll back to the previous screen. The Manage icon starts the file manager function. The button will change to the Exit button. Tap Search to directly search for file names in the current folder. 195 of 242 DK FR NL EN G N U 9.3. File management Tap the button. The following menu bar will be shown at the lower edge of the display: Tap a file that you want to move, download or delete. Select All/Unselect All In order to select all files in the current folder, tap Select All; tap Unselect All to unselect all of the files again. Download/Upload In order to download the file (view: WLAN HDD) or upload it (view: My Device), tap the relevant button and then select a location to save the file. Status Tap Status to see the status of the active and complete file transfers. Delete Tap Delete to delete the file. 196 of 242 Exit file management To exit file management and return to the device selection screen, tap Exit. DE DK 9.4. Settings menu FR The Settings menu in the app for smart phones/ tablet PCs contains the most important options for configuring the WLAN hard drive. NL NOTE! To be able to carry out a full configuration, call up the Settings menu in the web interface for the WLAN hard drive via a web browser (see “10. Web interface of the WLAN hard drive” on page 199). WLAN HDD-n-go Settings Device name Here you can enter a name for the WLAN hard drive. Security opt. Set the encryption for logging into the access point on the WLAN hard drive. Firmware Upgrade Here you can directly check whether an update for the app is available and can be downloaded. 197 of 242 EN G N U Internet Settings Here you can specify whether to connect to the Internet via a wireless LAN (Wireless connection) or via the RJ45 LAN socket (Wired connection). The WLAN hard drive will make this Internet connection available once the client registered on the WLAN hard drive has been saved. To start the search for available WLAN networks, button in the Network click the configuration field. Then enter the network password under Password and click Login. Advanced settings Tap the arrow next to the entry for the network that the WLAN hard drive should use to set up an Internet connection. Here you can select whether IP addresses are automatically taken from the network (DHCP) or if you set the IP address manually (Static). 198 of 242 10. Web interface of the WLAN hard drive In order to edit the system settings on the WLAN hard drive and be able to access the content on the attached data storage devices, call up the web interface via the web browser on your notebook/PC/ mobile device. To do this, locate the IP address on the type plate on the rear of the WLAN hard drive. Then enter this IP address into the address bar of your web browser. NOTE! To open the web interface on a Windows PC or Apple computer, you can also use the finder tool (see “14. WLAN HDD Tool” on page 209). You will be prompted to enter the password for the web interface. 199 of 242 DE DK FR NL EN G N U When logging in for the first time, enter the login data given on the type plate on the rear of the WLAN hard drive. (Default user: admin, default password: [no password]) Setting the language for the web interface Set the language for the web interface in the password prompt window. NOTE! After logging in for the first time, enter a password for administrator access in order to protect your data (see “11.1. User” on page 201). After you have successfully logged into the web interface, the Settings page will be displayed. 11. Settings The Settings page lets you access various submenus in which you can change the settings for User, Disk, Network, Services and System, as well as start the Wizard. The submenus will open in a new window. Exit a submenu by clicking the X symbol at the upper right-hand edge of the submenu. 200 of 242 Most settings need to be confirmed by clicking SAVE in order for them to become effective. DE DK FR NL EN G N U 11.1. User Here you can set the administrator password. Confirm the password by clicking SAVE. 201 of 242 11.2. Disk Here you can display information about the storage usage and file system of the internal hard drive. 11.3. Network Host name Here you can enter a device name for the WLAN hard drive. Confirm the name by clicking SAVE. Wi-Fi & LAN Here you can change the settings for the access point on the WLAN hard drive. SSID Enter the SSID that allows other WLAN devices to identify the access point on the WLAN hard drive. Mode Set the WLAN wireless standard here. Password Enter a password that other WLAN devices require to log into the access point on the WLAN hard drive. MAC address Here you can check the MAC address of your WLAN hard drive. IP address Enter the IP address for accessing the web interface for 202 of 242 the WLAN hard drive. DE Subnet mask Enter the subnet mask for the access point on the WLAN hard drive. Wi-Fi channel If other WLAN networks are affecting the access point and the operation of the WLAN hard drive, you can set a different channel here for transmitting the WLAN signal. Security Set the encryption for logging into the access point on the WLAN hard drive. Hide SSID Here you can set whether the network name (SSID) of the WLAN hard drive is to be visible in the network (ON setting). DHCP server Here you can enable or disable the DHCP server for the WLAN hard drive. • Enable the DHCP server to operate the WLAN hard drive as an access point that actively allocates IP addresses to clients that log into the DHCP server. • Disable the DHCP server to manually allocate the IP addresses to the clients. The IP address must be within the address range that you can define for the enabled DHCP server (see next section). 203 of 242 DK FR NL EN G N U DHCP server enabled: With an enabled DHCP server, you can use the Client List option to view the devices currently logged into the WLAN hard drive. You can set the IP address range within which the DHCP server allocates IP addresses to clients under Start address and End address. Enter the IP address for accessing the access point on the WLAN hard drive under Gateway. NOTE! The IP address of the gateway must be outside of the IP address range of the DHCP server. Pri DNS server If, in the next menu option "Internet", you have entered an access point that can be used to connect to the Internet, then the IP address of this access point will appear here. You can also manually enter the IP address for the primary DNS server here. Sec DNS server If there is a second DNS server in the network that allocates IP addresses, enter the IP address of the second DNS server here. Internet Here you can search for available WLAN networks with an Internet connection. To do this, click Scan. 204 of 242 Then enter the network password under Password and, if required, allocate an IP address (only for manual IP addresses). The WLAN hard drive will make this Internet connection available once the client registered on the hard drive has been saved. DE DK FR NL 11.4. Services Here you can enable and disable the Samba services on the WLAN hard drive (factory setting: Samba service is enabled). • With Samba enabled, Windows clients can display the files on those devices connected to the WLAN hard drive in Windows Explorer. • With Samba disabled, the files can be displayed and managed only via the apps or the web interface. 11.5. System Time settings Here you can set the date and time, as well as the time zone. In addition, you can select whether the time setting is automatically configured from a time server via the Internet or whether the current time on the PC is used for setting the time and date. Save Setting Here you can back up the current setting of the WLAN 205 of 242 EN G N U hard drive in a configuration file and save it on your device. • The RESTORE option allows you to specify the location where an earlier configuration file has been saved and then load this configuration. Firmware Upgrade If you have received a firmware update, you can install the update using this menu option. Reset Settings Select this menu option and then click SAVE to reset the device to its factory settings. 11.6. Wizard This wizard takes you through the necessary steps to configure the basic settings for the WLAN hard drive. Follow each step of the instructions and click NEXT to move to the next setting. The WLAN hard drive will restart after the settings have been completed. 12. Information The Information page lets you display the device, storage and network status. 206 of 242 13. Explorer DE You can use the Explorer to manage the files on the WLAN hard drive. Select a data storage device and a folder in the file structure (10/11) to display its contents. Select a file. The buttons 1-9 are used to perform the functions of file management. DK FR NL EN G N U 207 of 242 1 2 3 10 1) Refresh 2) Upload 3) Create 4) Copy 5) Move 6) Download 7) Delete 8) Rename 9) 10) Start Photo Viewer Internal hard drive 208 of 242 4 5 6 7 8 9 14. WLAN HDD Tool DE You can download the WLAN HDD Tool from the website "http://www.medion.com/wlanhddtool/". This finder tool can be used to locate the WLAN hard drive on the network and to directly open the web interface in your browser. Double click the file WLAN HDD TOOL.exe to start the finder tool. DK FR NL EN NOTE! The WLAN hard drive can only be found if there is a connection to the WLanHDD XXXX network. The finder tool will now search for the WLAN hard drive. If the WLAN hard drive cannot be found, place it nearer to the PC and then click Refresh to start the search again. When the finder tool has found the WLAN hard drive, click Log In to go directly to the web interface. The browser on your Windows PC will open and the Settings page will be displayed. 209 of 242 G N U In order to display the WLAN hard drive directly in Windows Explorer, click My Storage. NOTE! The files on the data storage device connected to the WLAN hard drive can only be displayed in Windows Explorer if the Samba server is enabled on the WLAN hard drive (see “11.4. Services” on page 205). If you do not want to use the finder tool, open your web browser and enter http://10.10.10.254 in the address bar. 15. Resetting the device The RESET button on the side of the WLAN hard drive can be used to reset the WLAN hard drive in the event that the system no longer responds or you have lost your administrator password. Press the RESET button with a pointed object (such as a paper clip) and keep the button pressed for about five seconds. The WLAN hard drive will now start with the original factory settings. 210 of 242 16. Do you need more help? If the above suggestions did not solve a specific problem, please contact us. The following information would help us: • What external devices are connected? • When operating the product, at which step did the problem occur? • What steps have you already taken to try and rectify the problem? • Please provide your customer number if you have one. 211 of 242 DE DK FR NL EN G N U 17. Cleaning Follow the instructions below to increase the service life of the product: • Always unplug the mains adapter and disconnect all the cables before cleaning the product. • Do not use solvents, corrosive agents or aerosolbased detergents to clean the product. • Clean the product with a soft, lint-free cloth. Please keep the packaging and do not use anything other than this packaging to transport the product. ATTENTION! None of the parts inside the device require cleaning or maintenance. 212 of 242 18. Disposal DE Packaging The product is packaged to protect it from damage in transit. Packaging materials are raw materials and can therefore be reused or recycled. Hardware Do not under any circumstances dispose of the product with the household rubbish at the end of its service life. Please consult your local authority for advice on correct and ecofriendly methods of disposal. 213 of 242 DK FR NL EN G N U 19. Technical data General data Total weight (approx.) 280 g Operating temperature 5°C to 35°C Humidity during operation 5% to 65% Dimensions: approx. 85 x 25 x 130 mm Internal battery Capacity WLAN hard drive Storage capacity: WLAN standard: Mains adapter Model Manufacturer: Input voltage: Output voltage: Connections: 3000 mAh 1 TB (= 1000 GB)2 802.11 b/g/n KSAS0060500100VEU Ktec, China 100–240 V ~ 50/60 Hz 0.18 A 5.0 V 1000 mA LAN (100 Mbit/s) USB 2.0 Micro-USB 3.0 Subject to technical and optical changes as well as printing errors. 2 1 GB corresponds to 1 billion bytes. The actual storage capacity can vary. 214 of 242 20. Glossary DE Access point (AP), wireless AP Also known as a base station, this is an electronic device that functions as an interface for wireless communications devices. End devices make a radio connection to the wireless access point via a wireless adapter. The access point can also be connected by cable to a permanently installed communications network. DK Operating system Software with which the user and the other software installed on the system can communicate with the computer hardware, such as the hard drive. BSSID (MAC) The basic service set identification (BSSID) corresponds to the MAC address of the wireless access point. Client mode Client mode is an operating mode of a wireless access point (here: the WLAN hard drive) in which the device behaves like a wireless adapter towards the higher-level AP. With an AP operated in client mode, individual computers can be connected to a higherlevel network without their own wireless adapter. DHCP – Dynamic Host Configuration Protocol A protocol for assigning an IP address to devices in 215 of 242 FR NL EN G N U the network. Dynamic addresses allow a device to have a different IP address each time it connects to a network. In some systems, the IP address changes automatically while the device is connected. DHCP also supports a combination of static and dynamic IP addresses. See also Protocol. DNS – Domain Name Service A system used by a network name server to translate text host names into numerical IP addresses in order to uniquely identify a device connected to the Internet. ESSID By providing different network IDs, it is possible to operate various wireless LANs at the same location. The SSID is set at the base station. To connect several base stations to the same network, they need to be set to the same SSID; this is then known as an ESSID (extended SSID). Gateway The standard gateway is the computer/router in the network to which all requests that have no destination address in the local network are sent (requests to the Internet). It forwards these requests to a computer/ router that may be able to answer them. Normally, you enter the IP address of your home router (DSL router) as the standard gateway. 216 of 242 IP address A binary 32-bit number that uniquely identifies any computer connected to the Internet. LAN – Local Area Network A system in which computer users are connected to each other within a company or an organisation and are often also connected to data collections stored centrally on LAN servers. MAC address The MAC address (media access control address) is the hardware address of every individual network adapter. It serves as a unique identifier for the device in a computer network. Passphrase key The network key that is used for authentication on a WEP/ WPA2 encrypted network. SSID By providing different network IDs, it is possible to operate various wireless LANs at the same location. The SSID is set at the base station. To connect several base stations to the same network, they need to be set to the same SSID; this is then known as an ESSID (extended SSID). Subnet mask A subnet is a subordinate part of a network. It collates several consecutive IP addresses by means of a subnet mask. 217 of 242 DE DK FR NL EN G N U 21. Legal notice Copyright © 2014 All rights reserved. This operating manual is protected by copyright. Mechanical, electronic and any other form of reproduction is prohibited without the written permission of the manufacturer. The owner of the copyright is: Medion AG Am Zehnthof 77 45307 Essen Germany These instructions can be reordered from the Service Hotline and are available for download via the service portal at www.medionservice.de. You can also scan the QR code above to download the instructions onto your mobile device via the service portal. 218 of 242 Lizenzinformation DE HINWEIS! DK Sehr geehrte Kundin, sehr geehrter Kunde, Im Folgenden wird hier aus juristischen Gründen die GPL/LGPL-Lizenz in der englischen Originalfassung abgebildet. Übersetzungen in andere Sprachen stellen keine von der FSF (Free Software Foundation) autorisierte Versionen der GPL dar. Die Kenntnisnahme der GPL/LGPL-Lizenz ist für den Gebrauch des Gerätes unerheblich, sondern dient der Verpflichtung zur Veröffentlichung bei der Verwendung von Open-Source Software. Bei Interesse können Sie den Quelltext der verwendeten GPL/LGPL unter folgendem Link herunterladen: http://www.medion.com. Bitte geben Sie im Download Center die entsprechende MD Nummer oder MSN Nummer an. Diese Nummern finden Sie auf dem jeweiligen Gerät. Weitere Informationen über die GPL/LGPL-Lizenzen finden Sie unter www.gnu.org. 219 of 242 FR NL G N U Information relative à la licence REMARQUE ! Chère Cliente, Cher Client, Pour des raisons juridiques, la licence GPL/ LGPL est reproduite ici dans la version originale anglaise. Les traductions dans d’autres langues ne sont pas des versions de la GPL autorisées par la FSF (Free Software Foundation). La prise de connaissance de la licence GPL/LGPL n’est pas importante pour l’utilisation de l’appareil, mais sert à l’obligation de publication en cas d’utilisation de logiciels Open Source. Si cela vous intéresse, vous pouvez télécharger le texte source des GPL/LGPL utilisées sous le lien suivant : http://www.medion.com. Veuillez indiquer le numéro MD ou MSN correspondant dans le centre de téléchargement. Vous trouverez ces numéros sur l’appareil respectif. Vous trouverez de plus amples informations sur les licences GPL/LGPL sur www.gnu.org. 220 of 242 Licentiegegevens DE OPMERKING! DK Geachte klant, Hieronder is om juridische redenen de GPL/LGPL-licentie in de Originele Engelse versie opgenomen. Vertalingen vormen voor de FSF (Free Software Foundation) geen geautoriseerde versie van de GPL. De kennisname van de GPL/LGPL-licentie is voor het gebruik van het apparaat niet van belang maar dient om te voldoen aan de verplichting van publicatie bij toepassing van Open Source software. Indien u interesse hebt in de originele tekst van de gebruikte GPL/LGPL, kunt u deze downloaden via de volgende link: http://www.medion.com. Voer in het Download Center het juiste MD-nummer of MSN-nummer in. Deze nummers vindt u op het betreffende apparaat. Verdere informatie over de GPL/LGPL-licenties vindt u op www.gnu.org. 221 of 242 FR NL G N U Licensinformation BEMÆRK! Kære kunde. I det følgende anføres af juridiske grunde GPL/LGPL-licensen i den engelske originaludgave. Oversættelser til andre sprog udgør ikke en af FSF (Free Software Foundation) autoriseret version af GPL. Accept af GPL/LGPL-licensen er ikke en forudsætning for brugen af enheden. Licensen er anført på grund af forpligtelsen til at offentliggøre den ved anvendelse af Open Source-software. Hvis du er interesseret, kan du hente kildeteksten for den anvendte GPL/LGPL via følgende link: http://www. medion.com. I Download Center skal du angive det tilsvarende MD-nummer eller MSN-nummer. Disse numre finder du på den relevante enhed. Vi kan også sende dig et datamedie med kildetekstindholdet gratis med posten. I den forbindelse bedes du sende en e-mail til [email protected] eller ringe til os på telefonnummeret (+45) 70212024. Yderligere oplysninger om GPL/LGPL-licensen finder du på www.gnu.org. 222 of 242 GNU General Public Licence DE Version 2, June 1991 Copyright (C) 1989, 1991 Free Software Foundation, Inc. 51 Franklin Street, Fifth Floor, Boston, MA 02110-1301, USA Everyone is permitted to copy and distribute verbatim copies of this license document, but changing it is not allowed. Preamble The licenses for most software are designed to take away your freedom to share and change it. By contrast, the GNU General Public License is intended to guarantee your freedom to share and change free software--to make sure the software is free for all its users. This General Public License applies to most of the Free Software Foundation‘s software and to any other program whose authors commit to using it. (Some other Free Software Foundation software is covered by the GNU Lesser General Public License instead.) You can apply it to your programs, too. When we speak of free software, we are referring to freedom, not price. Our General Public Licenses are designed to make sure that you have the freedom to distribute copies of free software (and charge for this service if you wish), that you receive source code or can get it if you want it, that you can change the software or use pieces of it in new free programs; and that you know you can do these things. To protect your rights, we need to make restrictions that forbid anyone to deny you these rights or to ask you to surrender the rights. These restrictions translate to certain responsibilities for you if you distribute copies of the software, or if you modify it. For example, if you distribute copies of such a program, whether gratis or for a fee, you must give the recipients all the rights that you have. You must make sure that they, too, receive or can get the source code. And you must show them these terms so they know their rights. We protect your rights with two steps: (1) copyright the software, and (2) offer you this license which gives you legal permission to copy, distribute and/or modify the software. 223 of 242 DK FR NL G N U Also, for each author‘s protection and ours, we want to make certain that everyone understands that there is no warranty for this free software. If the software is modified by someone else and passed on, we want its recipients to know that what they have is not the original, so that any problems introduced by others will not reflect on the original authors‘ reputations. Finally, any free program is threatened constantly by software patents. We wish to avoid the danger that redistributors of a free program will individually obtain patent licenses, in effect making the program proprietary. To prevent this, we have made it clear that any patent must be licensed for everyone‘s free use or not licensed at all. The precise terms and conditions for copying, distribution and modification follow. TERMS AND CONDITIONS FOR COPYING, DISTRIBUTION AND MODIFICATION 0. This License applies to any program or other work which contains a notice placed by the copyright holder saying it may be distributed under the terms of this General Public License. The „Program“, below, refers to any such program or work, and a „work based on the Program“ means either the Program or any derivative work under copyright law: that is to say, a work containing the Program or a portion of it, either verbatim or with modifications and/or translated into another language. (Hereinafter, translation is included without limitation in the term „modification“.) Each licensee is addressed as „you“. Activities other than copying, distribution and modification are not covered by this License; they are outside its scope. The act of running the Program is not restricted, and the output from the Program is covered only if its contents constitute a work based on the Program (independent of having been made by running the Program). Whether that is true depends on what the Program does. 1. You may copy and distribute verbatim copies of the Program‘s source code as you receive it, in any medium, provided that you conspicuously and appropriately publish on each copy an appropriate copyright notice and disclaimer of warranty; keep intact all the notices that refer to this License and to the absence of any warranty; and give any other recipients of the Program a copy of this License along with the Program. 224 of 242 You may charge a fee for the physical act of transferring a copy, and you may at your option offer warranty protection in exchange for a fee. 2. You may modify your copy or copies of the Program or any portion of it, thus forming a work based on the Program, and copy and distribute such modifications or work under the terms of Section 1 above, provided that you also meet all of these conditions: a) You must cause the modified files to carry prominent notices stating that you changed the files and the date of any change. b) You must cause any work that you distribute or publish, that in whole or in part contains or is derived from the Program or any part thereof, to be licensed as a whole at no charge to all third parties under the terms of this License. c) If the modified program normally reads commands interactively when run, you must cause it, when started running for such interactive use in the most ordinary way, to print or display an announcement including an appropriate copyright notice and a notice that there is no warranty (or else, saying that you provide a warranty) and that users may redistribute the program under these conditions, and telling the user how to view a copy of this License. (Exception: if the Program itself is interactive but does not normally print such an announcement, your work based on the Program is not required to print an announcement.) These requirements apply to the modified work as a whole. If identifiable sections of that work are not derived from the Program, and can be reasonably considered independent and separate works in themselves, then this License, and its terms, do not apply to those sections when you distribute them as separate works. But when you distribute the same sections as part of a whole which is a work based on the Program, the distribution of the whole must be on the terms of this License, whose permissions for other licensees extend to the entire whole, and thus to each and every part regardless of who wrote it. Thus, it is not the intent of this section to claim rights or contest your rights to work written entirely by you; rather, the intent is to exercise the right to control the distribution of derivative or collective works based on the Program. 225 of 242 DE DK FR NL G N U In addition, mere aggregation of another work not based on the Program with the Program (or with a work based on the Program) on a volume of a storage or distribution medium does not bring the other work under the scope of this License. 3. You may copy and distribute the Program (or a work based on it, under Section 2) in object code or executable form under the terms of Sections 1 and 2 above provided that you also do one of the following: a) Accompany it with the complete corresponding machine-readable source code, which must be distributed under the terms of Sections 1 and 2 above on a medium customarily used for software interchange; or, b) Accompany it with a written offer, valid for at least three years, to give any third party, for a charge no more than your cost of physically performing source distribution, a complete machine-readable copy of the corresponding source code, to be distributed under the terms of Sections 1 and 2 above on a medium customarily used for software interchange; or, c) Accompany it with the information you received as to the offer to distribute corresponding source code. (This alternative is allowed only for noncommercial distribution and only if you received the program in object code or executable form with such an offer, in accord with Subsection b above.) The source code for a work means the preferred form of the work for making modifications to it. For an executable work, complete source code means all the source code for all modules it contains, plus any associated interface definition files, plus the scripts used to control compilation and installation of the executable. However, as a special exception, the source code distributed need not include anything that is normally distributed (in either source or binary form) with the major components (compiler, kernel, and so on) of the operating system on which the executable runs, unless that component itself accompanies the executable. If distribution of executable or object code is made by offering access to copy from a designated place, then offering equivalent access to copy the source code from the same place counts as distribution of the source code, even though third parties are not compelled to copy the source along with the object code. 226 of 242 4. You may not copy, modify, sublicense, or distribute the Program except as expressly provided under this License. Any attempt otherwise to copy, modify, sublicense or distribute the Program is void, and will automatically terminate your rights under this License. However, parties who have received copies, or rights, from you under this License will not have their licenses terminated so long as such parties remain in full compliance. 5. You are not required to accept this License, since you have not signed it. However, nothing else grants you permission to modify or distribute the Program or its derivative works. These actions are prohibited by law if you do not accept this License. Therefore, by modifying or distributing the Program (or any work based on the Program), you indicate your acceptance of this License to do so, and all its terms and conditions for copying, distributing or modifying the Program or works based on it. 6. Each time you redistribute the Program (or any work based on the Program), the recipient automatically receives a license from the original licensor to copy, distribute or modify the Program subject to these terms and conditions. You may not impose any further restrictions on the recipients‘ exercise of the rights granted herein. You are not responsible for enforcing compliance by third parties to this License. 7. If, as a consequence of a court judgment or allegation of patent infringement or for any other reason (not limited to patent issues), conditions are imposed on you (whether by court order, agreement or otherwise) that contradict the conditions of this License, they do not excuse you from the conditions of this License. If you cannot distribute so as to satisfy simultaneously your obligations under this License and any other pertinent obligations, then as a consequence you may not distribute the Program at all. For example, if a patent license would not permit royalty-free redistribution of the Program by all those who receive copies directly or indirectly through you, then the only way you could satisfy both it and this License would be to refrain entirely from distribution of the Program. If any portion of this section is held invalid or unenforceable under any particular circumstance, the balance of the section is intended to apply and the section as a whole is intended to apply in other circumstances. 227 of 242 DE DK FR NL G N U It is not the purpose of this section to induce you to infringe any patents or other property right claims or to contest validity of any such claims; this section has the sole purpose of protecting the integrity of the free software distribution system, which is implemented by public license practices. Many people have made generous contributions to the wide range of software distributed through that system in reliance on consistent application of that system; it is up to the author/ donor to decide if he or she is willing to distribute software through any other system and a licensee cannot impose that choice. This section is intended to make thoroughly clear what is believed to be a consequence of the rest of this License. 8. If the distribution and/or use of the Program is restricted in certain countries either by patents or by copyrighted interfaces, the original copyright holder who places the Program under this License may add an explicit geographical distribution limitation excluding those countries, so that distribution is permitted only in or among countries not thus excluded. In such case, this License incorporates the limitation as if written in the body of this License. 9. The Free Software Foundation may publish revised and/or new versions of the General Public License from time to time. Such new versions will be similar in spirit to the present version, but may differ in detail to address new problems or concerns. Each version is given a distinguishing version number. If the Program specifies a version number of this License which applies to it and „any later version“, you have the option of following the terms and conditions either of that version or of any later version published by the Free Software Foundation. If the Program does not specify a version number of this License, you may choose any version ever published by the Free Software Foundation. 10. If you wish to incorporate parts of the Program into other free programs whose distribution conditions are different, write to the author to ask for permission. For software which is copyrighted by the Free Software Foundation, write to the Free Software Foundation; we sometimes make exceptions for this. Our decision will be guided by the two goals of preserving the free status of all derivatives of our free software and of promoting the sharing and reuse of software generally. 228 of 242 NO WARRANTY 11. BECAUSE THE PROGRAM IS LICENSED FREE OF CHARGE, THERE IS NO WARRANTY FOR THE PROGRAM, TO THE EXTENT PERMITTED BY APPLICABLE LAW. EXCEPT WHEN OTHERWISE STATED IN WRITING THE COPYRIGHT HOLDERS AND/OR OTHER PARTIES PROVIDE THE PROGRAM „AS IS“ WITHOUT WARRANTY OF ANY KIND, EITHER EXPRESSED OR IMPLIED, INCLUDING, BUT NOT LIMITED TO, THE IMPLIED WARRANTIES OF MERCHANTABILITY AND FITNESS FOR A PARTICULAR PURPOSE. THE ENTIRE RISK AS TO THE QUALITY AND PERFORMANCE OF THE PROGRAM IS WITH YOU. SHOULD THE PROGRAM PROVE DEFECTIVE, YOU ASSUME THE COST OF ALL NECESSARY SERVICING, REPAIR OR CORRECTION. 12. IN NO EVENT UNLESS REQUIRED BY APPLICABLE LAW OR AGREED TO IN WRITING WILL ANY COPYRIGHT HOLDER, OR ANY OTHER PARTY WHO MAY MODIFY AND/OR REDISTRIBUTE THE PROGRAM AS PERMITTED ABOVE, BE LIABLE TO YOU FOR DAMAGES, INCLUDING ANY GENERAL, SPECIAL, INCIDENTAL OR CONSEQUENTIAL DAMAGES ARISING OUT OF THE USE OR INABILITY TO USE THE PROGRAM (INCLUDING BUT NOT LIMITED TO LOSS OF DATA OR DATA BEING RENDERED INACCURATE OR LOSSES SUSTAINED BY YOU OR THIRD PARTIES OR A FAILURE OF THE PROGRAM TO OPERATE WITH ANY OTHER PROGRAMS), EVEN IF SUCH HOLDER OR OTHER PARTY HAS BEEN ADVISED OF THE POSSIBILITY OF SUCH DAMAGES. END OF TERMS AND CONDITIONS 229 of 242 DE DK FR NL G N U LGPL VERSION 2.1 GNU LESSER GENERAL PUBLIC LICENSE Version 2.1, February 1999 Copyright (C) 1991, 1999 Free Software Foundation, Inc. 51 Franklin Street, Fifth Floor, Boston, MA 02110-1301 USA Everyone is permitted to copy and distribute verbatim copies of this license document, but changing it is not allowed. [This is the first released version of the Lesser GPL. It also counts as the successor of the GNU Library Public License, version 2, hence the version number 2.1.] Preamble The licenses for most software are designed to take away your freedom to share and change it. By contrast, the GNU General Public Licenses are intended to guarantee your freedom to share and change free software--to make sure the software is free for all its users. This license, the Lesser General Public License, applies to some specially designated software packages--typically libraries--of the Free Software Foundation and other authors who decide to use it. You can use it too, but we suggest you first think carefully about whether this license or the ordinary General Public License is the better strategy to use in any particular case, based on the explanations below. When we speak of free software, we are referring to freedom of use, not price. Our General Public Licenses are designed to make sure that you have the freedom to distribute copies of free software (and charge for this service if you wish); that you receive source code or can get it if you want it; that you can change the software and use pieces of it in new free programs; and that you are informed that you can do these things. To protect your rights, we need to make restrictions that forbid distributors to deny you these rights or to ask you to surrender these rights. These restrictions translate to certain responsibilities for you if you distribute copies of the library or if you modify it. 230 of 242 For example, if you distribute copies of the library, whether gratis or for a fee, you must give the recipients all the rights that we gave you. You must make sure that they, too, receive or can get the source code. If you link other code with the library, you must provide complete object files to the recipients, so that they can relink them with the library after making changes to the library and recompiling it. And you must show them these terms so they know their rights. We protect your rights with a two-step method: (1) we copyright the library, and (2) we offer you this license, which gives you legal permission to copy, distribute and/or modify the library. To protect each distributor, we want to make it very clear that there is no warranty for the free library. Also, if the library is modified by someone else and passed on, the recipients should know that what they have is not the original version, so that the original author‘s reputation will not be affected by problems that might be introduced by others. Finally, software patents pose a constant threat to the existence of any free program. We wish to make sure that a company cannot effectively restrict the users of a free program by obtaining a restrictive license from a patent holder. Therefore, we insist that any patent license obtained for a version of the library must be consistent with the full freedom of use specified in this license. Most GNU software, including some libraries, is covered by the ordinary GNU General Public License. This license, the GNU Lesser General Public License, applies to certain designated libraries, and is quite different from the ordinary General Public License. We use this license for certain libraries in order to permit linking those libraries into non-free programs. When a program is linked with a library, whether statically or using a shared library, the combination of the two is legally speaking a combined work, a derivative of the original library. The ordinary General Public License therefore permits such linking only if the entire combination fits its criteria of freedom. The Lesser General Public License permits more lax criteria for linking other code with the library. We call this license the „Lesser“ General Public License because it does Less to protect the user‘s freedom than the ordinary General Public License. It also provides other free software developers Less 231 of 242 DE DK FR NL G N U of an advantage over competing non-free programs. These disadvantages are the reason we use the ordinary General Public License for many libraries. However, the Lesser license provides advantages in certain special circumstances. For example, on rare occasions, there may be a special need to encourage the widest possible use of a certain library, so that it becomes a de-facto standard. To achieve this, non-free programs must be allowed to use the library. A more frequent case is that a free library does the same job as widely used non-free libraries. In this case, there is little to gain by limiting the free library to free software only, so we use the Lesser General Public License. In other cases, permission to use a particular library in non-free programs enables a greater number of people to use a large body of free software. For example, permission to use the GNU C Library in non-free programs enables many more people to use the whole GNU operating system, as well as its variant, the GNU/Linux operating system. Although the Lesser General Public License is Less protective of the users‘ freedom, it does ensure that the user of a program that is linked with the Library has the freedom and the wherewithal to run that program using a modified version of the Library. The precise terms and conditions for copying, distribution and modification follow. Pay close attention to the difference between a „work based on the library“ and a „work that uses the library“. The former contains code derived from the library, whereas the latter must be combined with the library in order to run. TERMS AND CONDITIONS FOR COPYING, DISTRIBUTION AND MODIFICATION 0. This License Agreement applies to any software library or other program which contains a notice placed by the copyright holder or other authorized party saying it may be distributed under the terms of this Lesser General Public License (also called „this License“). Each licensee is addressed as „you“. A „library“ means a collection of software functions and/or data prepared so as to be conveniently linked with application programs (which use some of those functions and data) to form executables. The „Library“, below, refers to any such software library or work 232 of 242 which has been distributed under these terms. A „work based on the Library“ means either the Library or any derivative work under copyright law: that is to say, a work containing the Library or a portion of it, either verbatim or with modifications and/or translated straightforwardly into another language. (Hereinafter, translation is included without limitation in the term „modification“.) „Source code“ for a work means the preferred form of the work for making modifications to it. For a library, complete source code means all the source code for all modules it contains, plus any associated interface definition files, plus the scripts used to control compilation and installation of the library. Activities other than copying, distribution and modification are not covered by this License; they are outside its scope. The act of running a program using the Library is not restricted, and output from such a program is covered only if its contents constitute a work based on the Library (independent of the use of the Library in a tool for writing it). Whether that is true depends on what the Library does and what the program that uses the Library does. 1. You may copy and distribute verbatim copies of the Library‘s complete source code as you receive it, in any medium, provided that you conspicuously and appropriately publish on each copy an appropriate copyright notice and disclaimer of warranty; keep intact all the notices that refer to this License and to the absence of any warranty; and distribute a copy of this License along with the Library. You may charge a fee for the physical act of transferring a copy, and you may at your option offer warranty protection in exchange for a fee. 2. You may modify your copy or copies of the Library or any portion of it, thus forming a work based on the Library, and copy and distribute such modifications or work under the terms of Section 1 above, provided that you also meet all of these conditions: a) The modified work must itself be a software library. b) You must cause the files modified to carry prominent notices stating that you changed the files and the date of any change. c) You must cause the whole of the work to be licensed at no charge to all third parties under the terms of this License. 233 of 242 DE DK FR NL G N U d) If a facility in the modified Library refers to a function or a table of data to be supplied by an application program that uses the facility, other than as an argument passed when the facility is invoked, then you must make a good faith effort to ensure that, in the event an application does not supply such function or table, the facility still operates, and performs whatever part of its purpose remains meaningful. (For example, a function in a library to compute square roots has a purpose that is entirely well-defined independent of the application. Therefore, Subsection 2d requires that any application-supplied function or table used by this function must be optional: if the application does not supply it, the square root function must still compute square roots.) These requirements apply to the modified work as a whole. If identifiable sections of that work are not derived from the Library, and can be reasonably considered independent and separate works in themselves, then this License, and its terms, do not apply to those sections when you distribute them as separate works. But when you distribute the same sections as part of a whole which is a work based on the Library, the distribution of the whole must be on the terms of this License, whose permissions for other licensees extend to the entire whole, and thus to each and every part regardless of who wrote it. Thus, it is not the intent of this section to claim rights or contest your rights to work written entirely by you; rather, the intent is to exercise the right to control the distribution of derivative or collective works based on the Library. In addition, mere aggregation of another work not based on the Library with the Library (or with a work based on the Library) on a volume of a storage or distribution medium does not bring the other work under the scope of this License. 3. You may opt to apply the terms of the ordinary GNU General Public License instead of this License to a given copy of the Library. To do this, you must alter all the notices that refer to this License, so that they refer to the ordinary GNU General Public License, version 2, instead of to this License. (If a newer version than version 2 of the ordinary GNU General Public License has appeared, then you 234 of 242 can specify that version instead if you wish.) Do not make any other change in these notices. Once this change is made in a given copy, it is irreversible for that copy, so the ordinary GNU General Public License applies to all subsequent copies and derivative works made from that copy. This option is useful when you wish to copy part of the code of the Library into a program that is not a library. 4. You may copy and distribute the Library (or a portion or derivative of it, under Section 2) in object code or executable form under the terms of Sections 1 and 2 above provided that you accompany it with the complete corresponding machine-readable source code, which must be distributed under the terms of Sections 1 and 2 above on a medium customarily used for software interchange. If distribution of object code is made by offering access to copy from a designated place, then offering equivalent access to copy the source code from the same place satisfies the requirement to distribute the source code, even though third parties are not compelled to copy the source along with the object code. 5. A program that contains no derivative of any portion of the Library, but is designed to work with the Library by being compiled or linked with it, is called a „work that uses the Library“. Such a work, in isolation, is not a derivative work of the Library, and therefore falls outside the scope of this License. However, linking a „work that uses the Library“ with the Library creates an executable that is a derivative of the Library (because it contains portions of the Library), rather than a „work that uses the library“. The executable is therefore covered by this License. Section 6 states terms for distribution of such executables. When a „work that uses the Library“ uses material from a header file that is part of the Library, the object code for the work may be a derivative work of the Library even though the source code is not. Whether this is true is especially significant if the work can be linked without the Library, or if the work is itself a library. The threshold for this to be true is not precisely defined by law. If such an object file uses only numerical parameters, data structure layouts and accessors, and small macros and small inline functions (ten lines or less in length), then the use of the object file is unre- 235 of 242 DE DK FR NL G N U stricted, regardless of whether it is legally a derivative work. (Executables containing this object code plus portions of the Library will still fall under Section 6.) Otherwise, if the work is a derivative of the Library, you may distribute the object code for the work under the terms of Section 6. Any executables containing that work also fall under Section 6, whether or not they are linked directly with the Library itself. 6. As an exception to the Sections above, you may also combine or link a „work that uses the Library“ with the Library to produce a work containing portions of the Library, and distribute that work under terms of your choice, provided that the terms permit modification of the work for the customer‘s own use and reverse engineering for debugging such modifications. You must give prominent notice with each copy of the work that the Library is used in it and that the Library and its use are covered by this License. You must supply a copy of this License. If the work during execution displays copyright notices, you must include the copyright notice for the Library among them, as well as a reference directing the user to the copy of this License. Also, you must do one of these things: a) Accompany the work with the complete corresponding machine-readable source code for the Library including whatever changes were used in the work (which must be distributed under Sections 1 and 2 above); and, if the work is an executable linked with the Library, with the complete machine-readable „work that uses the Library“, as object code and/or source code, so that the user can modify the Library and then relink to produce a modified executable containing the modified Library. (It is understood that the user who changes the contents of definitions files in the Library will not necessarily be able to recompile the application to use the modified definitions.) b) Use a suitable shared library mechanism for linking with the Library. A suitable mechanism is one that (1) uses at run time a copy of the library already present on the user‘s computer system, rather than copying library functions into the executable, and (2) will operate properly with a modified version of the library, if the user installs one, as long as the modified version is interface-compatible with the version that the work was made with. 236 of 242 c) Accompany the work with a written offer, valid for at least three years, to give the same user the materials specified in Subsection 6a, above, for a charge no more than the cost of performing this distribution. d) If distribution of the work is made by offering access to copy from a designated place, offer equivalent access to copy the above specified materials from the same place. e) Verify that the user has already received a copy of these materials or that you have already sent this user a copy. For an executable, the required form of the „work that uses the Library“ must include any data and utility programs needed for reproducing the executable from it. However, as a special exception, the materials to be distributed need not include anything that is normally distributed (in either source or binary form) with the major components (compiler, kernel, and so on) of the operating system on which the executable runs, unless that component itself accompanies the executable. It may happen that this requirement contradicts the license restrictions of other proprietary libraries that do not normally accompany the operating system. Such a contradiction means you cannot use both them and the Library together in an executable that you distribute. 7. You may place library facilities that are a work based on the Library side-by-side in a single library together with other library facilities not covered by this License, and distribute such a combined library, provided that the separate distribution of the work based on the Library and of the other library facilities is otherwise permitted, and provided that you do these two things: a) Accompany the combined library with a copy of the same work based on the Library, uncombined with any other library facilities. This must be distributed under the terms of the Sections above. b) Give prominent notice with the combined library of the fact that part of it is a work based on the Library, and explaining where to find the accompanying uncombined form of the same work. 8. You may not copy, modify, sublicense, link with, or distribute the Library except as expressly provided under this License. Any attempt otherwise to copy, modify, sublicense, link with, or distribu- 237 of 242 DE DK FR NL G N U te the Library is void, and will automatically terminate your rights under this License. However, parties who have received copies, or rights, from you under this License will not have their licenses terminated so long as such parties remain in full compliance. 9. You are not required to accept this License, since you have not signed it. However, nothing else grants you permission to modify or distribute the Library or its derivative works. These actions are prohibited by law if you do not accept this License. Therefore, by modifying or distributing the Library (or any work based on the Library), you indicate your acceptance of this License to do so, and all its terms and conditions for copying, distributing or modifying the Library or works based on it. 10. Each time you redistribute the Library (or any work based on the Library), the recipient automatically receives a license from the original licensor to copy, distribute, link with or modify the Library subject to these terms and conditions. You may not impose any further restrictions on the recipients‘ exercise of the rights granted herein. You are not responsible for enforcing compliance by third parties with this License. 11. If, as a consequence of a court judgment or allegation of patent infringement or for any other reason (not limited to patent issues), conditions are imposed on you (whether by court order, agreement or otherwise) that contradict the conditions of this License, they do not excuse you from the conditions of this License. If you cannot distribute so as to satisfy simultaneously your obligations under this License and any other pertinent obligations, then as a consequence you may not distribute the Library at all. For example, if a patent license would not permit royalty-free redistribution of the Library by all those who receive copies directly or indirectly through you, then the only way you could satisfy both it and this License would be to refrain entirely from distribution of the Library. If any portion of this section is held invalid or unenforceable under any particular circumstance, the balance of the section is intended to apply, and the section as a whole is intended to apply in other circumstances. It is not the purpose of this section to induce you to infringe any patents or other property right claims or to contest validity of any such 238 of 242 claims; this section has the sole purpose of protecting the integrity of the free software distribution system which is implemented by public license practices. Many people have made generous contributions to the wide range of software distributed through that system in reliance on consistent application of that system; it is up to the author/donor to decide if he or she is willing to distribute software through any other system and a licensee cannot impose that choice. This section is intended to make thoroughly clear what is believed to be a consequence of the rest of this License. 12. If the distribution and/or use of the Library is restricted in certain countries either by patents or by copyrighted interfaces, the original copyright holder who places the Library under this License may add an explicit geographical distribution limitation excluding those countries, so that distribution is permitted only in or among countries not thus excluded. In such case, this License incorporates the limitation as if written in the body of this License. 13. The Free Software Foundation may publish revised and/or new versions of the Lesser General Public License from time to time. Such new versions will be similar in spirit to the present version, but may differ in detail to address new problems or concerns. Each version is given a distinguishing version number. If the Library specifies a version number of this License which applies to it and „any later version“, you have the option of following the terms and conditions either of that version or of any later version published by the Free Software Foundation. If the Library does not specify a license version number, you may choose any version ever published by the Free Software Foundation. 14. If you wish to incorporate parts of the Library into other free programs whose distribution conditions are incompatible with these, write to the author to ask for permission. For software which is copyrighted by the Free Software Foundation, write to the Free Software Foundation; we sometimes make exceptions for this. Our decision will be guided by the two goals of preserving the free status of all derivatives of our free software and of promoting the sharing and reuse of software generally. NO WARRANTY 239 of 242 DE DK FR NL G N U 15. BECAUSE THE LIBRARY IS LICENSED FREE OF CHARGE, THERE IS NO WARRANTY FOR THE LIBRARY, TO THE EXTENT PERMITTED BY APPLICABLE LAW. EXCEPT WHEN OTHERWISE STATED IN WRITING THE COPYRIGHT HOLDERS AND/OR OTHER PARTIES PROVIDE THE LIBRARY „AS IS“ WITHOUT WARRANTY OF ANY KIND, EITHER EXPRESSED OR IMPLIED, INCLUDING, BUT NOT LIMITED TO, THE IMPLIED WARRANTIES OF MERCHANTABILITY AND FITNESS FOR A PARTICULAR PURPOSE. THE ENTIRE RISK AS TO THE QUALITY AND PERFORMANCE OF THE LIBRARY IS WITH YOU. SHOULD THE LIBRARY PROVE DEFECTIVE, YOU ASSUME THE COST OF ALL NECESSARY SERVICING, REPAIR OR CORRECTION. 16. IN NO EVENT UNLESS REQUIRED BY APPLICABLE LAW OR AGREED TO IN WRITING WILL ANY COPYRIGHT HOLDER, OR ANY OTHER PARTY WHO MAY MODIFY AND/OR REDISTRIBUTE THE LIBRARY AS PERMITTED ABOVE, BE LIABLE TO YOU FOR DAMAGES, INCLUDING ANY GENERAL, SPECIAL, INCIDENTAL OR CONSEQUENTIAL DAMAGES ARISING OUT OF THE USE OR INABILITY TO USE THE LIBRARY (INCLUDING BUT NOT LIMITED TO LOSS OF DATA OR DATA BEING RENDERED INACCURATE OR LOSSES SUSTAINED BY YOU OR THIRD PARTIES OR A FAILURE OF THE LIBRARY TO OPERATE WITH ANY OTHER SOFTWARE), EVEN IF SUCH HOLDER OR OTHER PARTY HAS BEEN ADVISED OF THE POSSIBILITY OF SUCH DAMAGES. END OF TERMS AND CONDITIONS. Free BSD-license Copyright 1992-2013 The FreeBSD Project. All rights reserved. Redistribution and use in source and binary forms, with or without modification, are permitted provided that the following conditions are met: 1. Redistributions of source code must retain the above copyright notice, this list of conditions and the following disclaimer. 2. Redistributions in binary form must reproduce the above copyright notice, this list of conditions and the following disclaimer in the documentation and/or other materials provided with the distribution. THIS SOFTWARE IS PROVIDED BY THE FREEBSD PROJECT ``AS IS‘‘ 240 of 242 AND ANY EXPRESS OR IMPLIED WARRANTIES, INCLUDING, BUT NOT LIMITED TO, THE IMPLIED WARRANTIES OF MERCHANTABILITY AND FITNESS FOR A PARTICULAR PURPOSE ARE DISCLAIMED. IN NO EVENT SHALL THE FREEBSD PROJECT OR CONTRIBUTORS BE LIABLE FOR ANY DIRECT, INDIRECT, INCIDENTAL, SPECIAL, EXEMPLARY, OR CONSEQUENTIAL DAMAGES (INCLUDING, BUT NOT LIMITED TO, PROCUREMENT OF SUBSTITUTE GOODS OR SERVICES; LOSS OF USE, DATA, OR PROFITS; OR BUSINESS INTERRUPTION) HOWEVER CAUSED AND ON ANY THEORY OF LIABILITY, WHETHER IN CONTRACT, STRICT LIABILITY, OR TORT (INCLUDING NEGLIGENCE OR OTHERWISE) ARISING IN ANY WAY OUT OF THE USE OF THIS SOFTWARE, EVEN IF ADVISED OF THE POSSIBILITY OF SUCH DAMAGE. BSD 2-Clause Copyright (c) 1994-2007, Mark Lord All rights reserved. Redistribution and use in source and binary forms, with or without modification, are permitted provided that the following conditions are met: 1. Redistributions of source code must retain the above copyright notice, this list of conditions and the following disclaimer. 2. Redistributions in binary form must reproduce the above copyright notice, this list of conditions and the following disclaimer in the documentation and/or other materials provided with the distribution. THIS SOFTWARE IS PROVIDED BY THE COPYRIGHT HOLDERS AND CONTRIBUTORS „AS IS“ AND ANY EXPRESS OR IMPLIED WARRANTIES, INCLUDING, BUT NOT LIMITED TO, THE IMPLIED WARRANTIES OF MERCHANTABILITY AND FITNESS FOR A PARTICULAR PURPOSE ARE DISCLAIMED. IN NO EVENT SHALL THE COPYRIGHT HOLDER OR CONTRIBUTORS BE LIABLE FOR ANY DIRECT, INDIRECT, INCIDENTAL, SPECIAL, EXEMPLARY, OR CONSEQUENTIAL DAMAGES (INCLUDING, BUT NOT LIMITED TO, PROCUREMENT OF SUBSTITUTE GOODS OR SERVICES; LOSS OF USE, DATA, OR PROFITS; OR BUSINESS INTERRUPTION) HOWEVER CAUSED AND ON ANY THEORY OF LIABILITY, WHETHER IN CONTRACT, STRICT LIABILITY, OR TORT (INCLUDING NE- 241 of 242 DE DK FR NL G N U GLIGENCE OR OTHERWISE) ARISING IN ANY WAY OUT OF THE USE OF THIS SOFTWARE, EVEN IF ADVISED OF THE POSSIBILITY OF SUCH DAMAGE. MIT License (MIT) Copyright (c) 2001-2007 Expat maintainers. Permission is hereby granted, free of charge, to any person obtaining a copy of this software and associated documentation files (the „Software“), to deal in the Software without restriction, including without limitation the rights to use, copy, modify, merge, publish, distribute, sublicense, and/or sell copies of the Software, and to permit persons to whom the Software is furnished to do so, subject to the following conditions: The above copyright notice and this permission notice shall be included in all copies or substantial portions of the Software. THE SOFTWARE IS PROVIDED „AS IS“, WITHOUT WARRANTY OF ANY KIND, EXPRESS OR IMPLIED, INCLUDING BUT NOT LIMITED TO THE WARRANTIES OF MERCHANTABILITY, FITNESS FOR A PARTICULAR PURPOSE AND NONINFRINGEMENT. IN NO EVENT SHALL THE AUTHORS OR COPYRIGHT HOLDERS BE LIABLE FOR ANY CLAIM, DAMAGES OR OTHER LIABILITY, WHETHER IN AN ACTION OF CONTRACT, TORT OR OTHERWISE, ARISING FROM, OUT OF OR IN CONNECTION WITH THE SOFTWARE OR THE USE OR OTHER DEALINGS IN THE SOFTWARE. 242 of 242 Medion B.V. John F. Kennedylaan 16a 5981 XC Panningen Nederland MTC - Medion Technologie Center 45467 Mülheim / Ruhr Deutschland Hotline: 01805 - 633 466 Fax: 01805 - 654 654 (0,14 Euro/Minute aus dem dt. Festnetz, Mobilfunk max. 0,42 Euro/Min) Bitte benutzen Sie das Kontaktformular unter www.medionservice.de Hotline: 0900 - 2352534 (€ 1 per gesprek) Fax: 0900 - 3292534 (€ 1 per fax) Gebruikt u a.u.b. het contactformulier op onze website www.medion.nl onder „service“ en „contact“. www.medion.de Medion Service Nordic A/S Naverland 29A 2600 Glostrup Danmark Medion France 75 Rue de la Foucaudière 72100 LE MANS France Hotline: (+45) 70212024 Fax: (+45) 70212029 Hotline SAV : 02 43 16 60 30 (appel non surtaxé) SAV PREMIUM hors garantie : 08 92 35 05 40 E-Mail: [email protected] (0,34 EUR/min.) www.medion.dk Email : Pour nous contacter, merci de vous rendre sur notre site internet (www.medion.fr) à la rubrique « Service » puis « Contact » www.medion.fr Medion B.V. John F. Kennedylaan 16a 5981 XC Panningen Nederland Medion Electronics Ltd. 120 Faraday Park, Faraday Road, Dorcan Swindon SN3 5JF, Wiltshire United Kingdom BE Hotline: 022006198 Fax: 022006199 LUX Hotline: 34-20 808 664 Fax: 34-20 808 665 Hotline: 0333 32 12 106 (National rate) Fax: 01793 71 57 16 Gebruikt u a.u.b. het contactformulier op onze website www.medion.com/be onder „service“ en „contact“. Bitte benutzen Sie das Kontaktformular unter www.medion.com/be unter „service“ und „contact“. Pour nous contacter, merci de vous diriger sur notre site internet www.medion.com/be, rubrique „service“ et „contact“. To contact us by email please visit the “Service and Support” section of our website at www.medion.co.uk. www.medion.co.uk