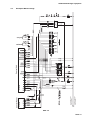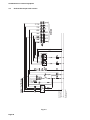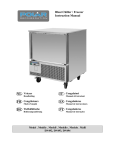
1
Aufdachklimaanlage
Einbau- und
Serviceanweisung
Roof Top Air
Conditioning System
Installation and
Service Instructions
Climatisation sur
toiture
Instructions de montage
et d’entretien
Citysphere
Stand: 12/2010
Ident-Nr. 11112716C
Citysphere
Inhaltsverzeichnis
1. EINLEITUNG
1
1.1.Bedeutung der Hervorhebungen
1
1.2.Zusätzlich anzuwendende Dokumente
1
1.3.Sicherheitshinweise und -bestimmungen
1
1.4.Zertifizierung
2
1.5.Verbesserungs- und Änderungsvorschläge
2
2. ALLGEMEINE BESCHREIBUNG
3
2.1.Komponenten
4
2.2.Elektrik
6
2.3.Funktionsweise der Klimaanlage
6
2.4.Aufbau, Aufgabe und Funktionsweise der Baugruppen
8
3. TECHNISCHE DATEN
10
3.1.Klimaanlage
10
3.2.Elektrische Sicherungen
11
3.3.Verdichter Bitzer ECH 209
11
3.4.Verbindungsschema
12
3.5.Schaltplan Master-Anlage
13
3.6.Schaltplan Slave-Anlage
14
4. EINBAU
15
4.1.Sicherheitshinweise
15
4.2.Voraussetzungen für Aufbau
15
4.3.Montagebausatz für Master-Anlage
15
4.4.Montagebausatz für Slave-Anlage
15
4.5.Nicht im Montagebausatz enthalten und selbst anzufertigen
15
4.6.Erforderliche Betriebsmittel, Sonderwerkzeug und Zubehör
16
4.7.Vorbereitende Maßnahmen am Fahrzeugdach
16
4.8.Aufkleben der Anlage
18
4.9.Elektrische Verbindungen herstellen
22
4.10.Luftverteiler montieren
24
4.11.Haube montieren
26
5. INBETRIEBNAHME
27
5.1.Sicherheitshinweise
27
5.2.Bedienerhinweise
27
5.3.Bedien- und Anzeigeelemente
27
I
Citysphere
5.4.Erstinbetriebnahme
27
5.5.Zusatzfunktionen des Bedienteiles
28
6. INSTANDHALTUNG
6.1.Sicherheitshinweise
32
6.2.Allgemeines
32
6.3.Wartung und Pflege
32
6.4.Checkliste Wartung und Pflege
33
6.5.Prüfungen vor Instandsetzung
33
6.6.Fehlersuche und Maßnahmen zur Beseitigung
34
6.7.Instandsetzungsarbeiten
35
6.8.Prüfungen und Arbeiten nach Instandsetzung
35
7. GARANTIEABWICKLUNG
II
32
37
Citysphere
Contents
1. INTRODUCTION
39
1.1.Meaning of emphases
39
1.2.Additional applicable documentation
39
1.3.Safety information and regulations
39
1.4.Certification
40
1.5.Suggestions for corrections and improvements
40
2. GENERAL DESCRIPTION
41
2.1.Components
42
2.2.Electrical system
44
2.3.Principle of operation of the air conditioning system
44
2.4.Design, purpose and principle of operation of the assemblies
46
3. TECHNICAL DATA
48
3.1.Air conditioning system
48
3.2.Electrical fuses
49
3.3.Compressor Bitzer ECH 209
49
3.4.Connecting scheme
50
3.5.Circuit diagram master unit
51
3.6.Circuit diagram slave unit
52
4. INSTALLATION
53
4.1.Safety instructions
53
4.2.Conditions for assembly
53
4.3.Installation kit for master unit
53
4.4.Installation kit for slave unit
53
4.5.The following are not included in the installation kit and must be produced on site
53
4.6.Required equipment, special tools and accessories
54
4.7.Preparations on vehicle’s roof
54
4.8.Adhesive bonding of the unit
56
4.9.Establish electrical connections
60
4.10.Mount air-diffusor
62
4.11.Mount hood
64
5. STARTUP
65
5.1.Safety instructions
65
5.2.Operator instructions
65
5.3.Controls and indicators
65
III
Citysphere
5.4.Putting into service for the first time
65
5.5.Additional control panel functions
66
6. MAINTENANCE
IV
70
6.1.Safety instructions
70
6.2.General
70
6.3.Maintenance and Care
70
6.4.Maintenance and service checklist
71
6.5.Inspections before repair
71
6.6.Troubleshooting
72
6.7.Repairs
73
6.8.Post-repair procedures and testing
73
7. WARRANTY CLAIMS PROCESSING
75
Citysphere
Sommaire
1. INTRODUCTION
77
1.1.Signification des signalisations
77
1.2.Autre documentation à utiliser
77
1.3.Instructions et prescriptions de sécurité
77
1.4.Certification
78
1.5.Suggestions d'amélioration ou de modification
78
2. DESCRIPTION GENERALE
79
2.1.Composantes
80
2.2.Système électrique
82
2.3.Mode de fonctionnement de la climatisation
82
2.4.Conception, fonction et mode de fonctionnement des sous-ensembles
84
3. DONNEES TECHNIQUES
86
3.1.Climatisation
86
3.2.Fusibles électriques
87
3.3.Compresseur Bitzer ECH 209
87
3.4.Schéma de raccordement
88
3.5.Schéma électrique Unité maître
89
3.6.Schéma électrique Unité esclave
90
4. MONTAGE
91
4.1.Consignes de sécurité
91
4.2.Conditions pour le montage
91
4.3.Kit de montage pour l'unité maître
91
4.4.Kit de montage pour l'unité esclave
91
4.5.Non compris dans le kit de montage et à réaliser soi-même
91
4.6.Matériel d'équipement nécessaire, outillage spécifique et accessoires
92
4.7.Préparation de la toiture du véhicule
92
4.8.Coller l'installation
94
4.9.Effectuer les raccordements électriques
98
4.10.Monter le répartiteur d'air
100
4.11.Monter le capot
102
5. MISE EN SERVICE
103
5.1.Consignes de sécurité
103
5.2.Instructions pour l'utilisateur
103
5.3.Eléments de commande et d'affichage
103
V
Citysphere
5.4.Première mise en service
103
5.5.Autres fonctions de la commande
104
6. ENTRETIEN
6.1.Consignes de sécurité
108
6.2.Généralités
108
6.3.Maintenance et entretien
108
6.4.Check-list de maintenance et d'entretien
109
6.5.Contrôles avant réparation
109
6.6.Recherche des défauts et mesures pour leur élimination
110
6.7.Travaux de réparation
111
6.8.Contrôles et travaux après réparation
111
7. CONDITIONS DE GARANTIE
VI
108
113
Aufdachklimaanlage Citysphere
1.
EINLEITUNG
Diese Einbau- und Serviceanweisung enthält zur Unterstützung von eingewiesenem Personal wichtige
Informationen für Montage, Bedienung, Betrieb und Instandhaltung der Aufdachklimaanlage.
1.1.
Bedeutung der Hervorhebungen
In dieser Anleitung haben die Hervorhebungen VORSICHT, ACHTUNG und HINWEIS folgende Bedeutung:
VORSICHT
Diese Überschrift wird benutzt, wenn ungenaues Befolgen oder Nichtbefolgen von Anweisungen oder Verfahren zu Verletzungen oder tödlichen
Unfällen führen kann.
ACHTUNG
Diese Überschrift wird benutzt, wenn ungenaues Befolgen oder Nichtbefolgen von Anweisungen oder Verfahren zur Beschädigung von Bauteilen
führen kann.
HINWEIS
Diese Überschrift wird benutzt, wenn auf eine Besonderheit aufmerksam
gemacht werden soll.
1.2.
Zusätzlich anzuwendende Dokumente
Betriebsanweisung Aufdachklimaanlage Citysphere
1.3.
Sicherheitshinweise und -bestimmungen
Die Aufdachklimaanlage wurde nach den EG-Richtlinien konstruiert und wird auch nach diesen produziert.
Bei sachgerechter Montage und Nutzung, entsprechend der Einbau- und Serviceanweisung, ist die Anlage
betriebssicher.
Wird das in den Fahrzeugpapieren angegebene Höhenmaß durch den Einbau der Aufdachklimaanlage
überschritten, so ist dies durch eine Abnahme nach § 19 StVZO zu legalisieren.
Grundsätzlich sind die allgemeinen Unfallverhütungsvorschriften zu beachten. Über den Rahmen dieser
Vorschriften hinausgehende „Allgemeine Sicherheitsbestimmungen“ sind nachfolgend aufgeführt.
Die speziellen Sicherheitsbestimmungen sind in den einzelnen Abschnitten bzw. Verfahren in Form von
Hervorhebungen angegeben.
Allgemeine Sicherheitsbestimmungen
Die Nichtbeachtung der Einbauanweisung und der darin enthaltenen Hinweise führen zum Haftungsausschluss seitens Spheros. Gleiches gilt für nicht fachmännisch oder nicht unter Verwendung von Originalersatzteilen durchgeführte Reparaturen.
Elektrische Leitungen und Bedienelemente der Klimaanlage müssen im Fahrzeug so angeordnet sein, dass
ihre einwandfreie Funktion unter normalen Betriebsbedingungen nicht beeinträchtigt werden kann.
Seite 1
Aufdachklimaanlage Citysphere
Sicherheitshinweise für Instandhaltungsarbeiten
Treten Fehler im Kältemittelkreislauf auf, so muss die Anlage von einem Fachbetrieb geprüft und ordnungsgemäß instand gesetzt werden. Auf keinen Fall darf das Kältemittel in die freie Atmosphäre abgelassen
werden.
Kältemittelflaschen auf keinen Fall mit einer offenen Flamme erwärmen!
Flüssiges Kältemittel darf nicht mit Körperteilen in Berührung kommen. Das Sicherheitsdatenblatt ist zu
beachten.
Beim Umgang mit Kältemittel Schutzbekleidung und eine Schutzbrille tragen.
ACHTUNG
Die Zuladung verringert sich um das Gewicht der zusätzlichen Einbauten.
VORSICHT
Keine Löt- oder Schweißarbeiten direkt an den Teilen des geschlossenen
Kältekreislaufs oder in näherer Umgebung ausführen. Durch die starke
Erwärmung steigt der Druck in der Anlage. Es besteht Explosionsgefahr.
Vor Beginn von Arbeiten sollte die Anlage vollständig abgekühlt sein. Es
besteht Verbrennungsgefahr am Verflüssiger, Verdichter, den Kältemittelrohren und dem elektrischen Heizer.
Montage-, Wartungs- und Reparaturarbeiten sind von sachkundigem
Personal durchzuführen. Sie dürfen nur bei stehendem Motor und ausgeschalteter Stromversorgung vorgenommen werden.
Vor Arbeiten an der Elektrik ist die Batterie abzuklemmen.
Beim Arbeiten an der Klimaanlage keinen Metallschmuck tragen
(Armreifen, Uhren, Ketten, Ringe abnehmen).
1.4.
Zertifizierung
Die elektromagnetische Verträglichkeit wurde geprüft.
Die Standards der ECE-Regelung R10 Rev. 03 werden erfüllt.
1.5.
Verbesserungs- und Änderungsvorschläge
Beanstandungen, Verbesserungen oder Vorschläge zur Berichtigung dieser Anweisung richten Sie bitte an:
Spheros GmbH
Friedrichshafener Straße 9 - 11
D-82205 Gilching
Seite 2
Telefon:
+49 (0) 8105 7721 887
Telefax:
+49 (0) 8105 7721 889
Aufdachklimaanlage Citysphere
2.
ALLGEMEINE BESCHREIBUNG
Die Aufdachklimaanlage ist zur Kühlung/Klimatisierung und Heizung (nur Comfortversion) von Stadtbussen
ausgelegt.
Die Aufdachklimaanlage gibt es als Master- und als Slaveversion. Die Master-Anlage enthält alle zum
Einbau und Betrieb notwendigen Dokumente und alle zum Betrieb der Anlage notwendigen Komponenten
wie Steuergerät, Kabel Bedienteil (2), Bedienteil (3) und Temperatursensoren.
Pro Fahrzeug muss immer eine Master-Anlage eingesetzt werden. Als Position für das Bedienteil bietet sich
der Fahrerplatz und davon abhängend als Position für die Master-Anlage (1) die vordere an.
Von der Master-Anlage können bis zu fünf Slave-Anlagen (5) mit Signalen für den Betrieb versorgt werden.
Jede Slave-Anlage enthält deshalb ein Adapterkabel (6) mit dem die Verbindung zur davor platzierten
Anlage hergestellt werden kann.
Die elektrische Versorgung der Anlagen erfolgt über die Kabel (4, nicht im Lieferumfang) von der Fahrzeugversorgung aus. Die Anlagen sind für eine Betriebspannung von 24 V ausgelegt.
Die Anlagen sind mit Kältemittel (R134a) befüllt und müssen bei der Montage nur an das Bordnetz angeschlossen werden.
5
5
6
1
6
4
2
4
4
1
2
3
4
Master-Anlage
Kabel Bedienteil
Bedienteil
Kabel elektrische
Versorgung
5 Slave-Anlage
6 Adapterkabel
3
Abb. 2.1
Seite 3
Aufdachklimaanlage Citysphere
2.1.
Komponenten
Die Aufdachklimaanlage ist in Abb. 2.3 dargestellt.
1 - Haube (äußeres Konturteil)
2 - Grundwanne, als tragendes Strukturteil
3 - Verflüssiger
4 - Verdichter
5 - Verflüssigergebläse
6 - Druckschalter
7 - Sammler/Trockner/Filter für Kältemittel
8 - Füllanschluss HD
9 - Füllanschluss ND
10 - Vereisungsschutzschalter
11 - Expansionsventil
12 - Verdampfer
13 - Luftfilter
14 - Verdampfergebläse
15 - Elektrischer Heizer (nur Comfortversion)
16 - Außentemperaturfühler (nur Master-Anlage)
17 - Elektroplatte (siehe Abb. 2.2)
18 - Luftverteiler
19 - Gitter
20 - Wasser-Ablauföffnungen
21 - Griffmulden bzw. Flächen für Hebevorrichtung
b
f
c
GL-W550
M8
15 Nm
+
d
K1
g
F5=60 A
e
17a) Sicherungen
17b) Steuergerät (nur Master-Anlage)
17c) Elektrische Schnittstelle zum Bedienteil (nur Master-Anlage)
17d) Elektrische Schnittstelle zu weiteren Anlagen
17e) Relais für elektrische Heizung
(nur Comfortversion)
¯
F1= 5 A
F2=15 A
F3=15 A
F4= 5 A
M10
20 Nm
17f)
Sensor Innentemperaturfühler
(nur Master-Anlage)
17g) Anschlussbolzen Spannungsversorgung
a
Abb. 2.2 Elektroplatte (vereinfacht)
Seite 4
Aufdachklimaanlage Citysphere
5
13
12
1
2
16
10
3
6
4
7
9
20
8
11
21
17
15
14
18
19
Abb. 2.3
Seite 5
Aufdachklimaanlage Citysphere
2.2.
Elektrik
Einen Überblick über die Zusammenschaltung der einzelnen Module gibt das Schema in Abb. 3.1.
Der elektrische Anschluß der Anlagen erfolgt gemäß Schaltplan in Abb. 3.2 bzw. in Abb. 3.3.
Die Aufdachklimaeinheit ist mit einer Batterieentlade-Schutzeinrichtung ausgestattet. Erneute Inbetriebnahme erfolgt durch wiederholtes Einschalten.
Ohne laufenden Fahrzeugmotor kann die Anlage nur in einer Lüftungsfunktion betrieben werden. Diese
Funktion kann auch gesperrt werden (siehe Abschnitt 5.5.3).
Die Elektronik des Verdichtermotors verfügt über einen Sanftanlauf zur Vermeidung von Stromspitzen auf
das Bordnetz. Weiterhin wird der Elektromotor bei Überlastung (aufgrund eventueller Beschädigungen der
Anlage) automatisch abgeschaltet. Erneute Inbetriebnahme erfolgt durch wiederholtes Einschalten der
Anlage.
2.3.
Funktionsweise der Klimaanlage
Ab dem Einschalten der Anlage misst die Steuerung die Außentemperatur und die Innenraumtemperatur.
Sobald folgende Bedingungen erfüllt sind, beginnt die Kühlfunktion der Anlage:
–
–
–
–
Fahrzeugmotor läuft (Signal von D+/61)
Außentemperatur größer als 17°C
Innenraumtemperatur größer als 22°C
Innenraumtemperatur größer als Außentemperatur minus Temperatursolldifferenz, TSD (angezeigter
Wert auf dem Display des Bedienteiles)
Frischluft
Kaltluft
Kaltluft
Umluft
* siehe Abb. 2.3
Abb. 2.4 Kühlbetrieb der Anlage
Seite 6
Aufdachklimaanlage Citysphere
Der Verdichter mit integriertem Elektromotor läuft an. Er komprimiert das Kältemittelgas und fördert es in
den Verflüssiger, wo es unter Wärmeabgabe kondensiert.
Die entstehende Kondensationswärme überträgt der Verflüssiger an die durch ihn strömende Außenluft.
Dabei sorgt das Axialgebläse auch bei stehendem Fahrzeug für ausreichende Lüftung. Das flüssige Kältemittel strömt durch den Sammler-Trockner zum Expansionsventil, es entspannt durch geregelten Druckabfall und geht unter starker Wärmeaufnahme im Verdampfer wieder in den gasförmigen Zustand über.
Die warme Umluft des Fahrgastinnenraumes wird vom Verdampfergebläse angesaugt, mit Frischluft
vermischt, im Verdampfer gekühlt und getrocknet und dann über den Luftverteiler in den Fahrgastinnenraum zurückgefördert. Dabei entstehendes Kondenswasser wird abgeschieden und über die Ablauföffnungen nach außen geleitet.
Im Betrieb wird der Kältekreislauf durch den Vereisungsschutzschalter und den Druckschalter überwacht.
Diese beiden Schalter können den Verdichter abschalten (bei Bedarf).
Beim Auftreten eines Fehlers an einer Anlage laufen die anderen Anlagen im normalen Betrieb weiter.
Beim Ausschalten der Klimaanlage am Bedienteil werden die Gebläse und der Verdichter gestoppt, die
Spannungsversorgung aller Komponenten bleibt jedoch erhalten.
In die Aufdachanlage eindringendes Regenwasser wird über die Ablauföffnungen (20, Abb. 2.3) abgeleitet.
Funktionsweise der Heizung (nur Comfortversion)
Ab dem Einschalten der Anlage misst die Steuerung die Außentemperatur und die Innentemperatur. Sobald
folgende Bedingungen erfüllt sind, beginnt die Heizfunktion der Anlage:
– Fahrzeugmotor läuft (Signal von D+/61)
– Außentemperatur kleiner als 17°C
– Innenraumtemperatur zwischen 10°C und 22°C
Frischluft
Warmluft
Warmluft
Umluft
* siehe Abb. 2.3
Abb. 2.5 Heizbetrieb der Anlage
Seite 7
Aufdachklimaanlage Citysphere
2.4.
Aufbau, Aufgabe und Funktionsweise der Baugruppen
Verflüssiger
Der Verflüssiger (3, Abb. 2.3) besteht aus Aluminium-Flachrohren und Aluminium-Lamellen, die zu einer
großen Wärmetauscherfläche miteinander verbunden sind.
Er kühlt das heiße Kältemittelgas so ab, dass es verflüssigt und unterkühlt, und er überträgt die Kondensationswärme über die Lamellen an die ihn durchströmende Außenluft.
Sammler-Trockner
Der Sammler-Trockner (7, Abb. 2.3) ist ein Ausgleichs- und Vorratsbehälter für Kältemittel. Er enthält im
mittleren Bereich ein Trockner-Granulat, das dem Kältemittel geringe Mengen Wasser entzieht und
chemisch bindet. Außerdem filtert er Schmutzpartikel aus dem Kältekreislauf, die ansonsten zu Störungen
führen könnten.
Thermostatisches Expansionsventil
Das thermostatische Expansionsventil (11, Abb. 2.3) mit äußerem Druckausgleich reguliert den Kältemittelfluss zum Verdampfer, entsprechend dem Kältemittelbedarf bzw. der Temperatur im Verdampfer. Das thermostatische Expansionsventil ist das Regelelement zwischen Hoch- und Niederdruckteil des Kältemittelkreises.
Verdampfer
Der Verdampfer (12, Abb. 2.3) besteht aus Kupferrohren und Aluminiumlamellen die zu einer großen
Wärmetauscherfläche miteinander verbunden sind. Um den zur Verfügung stehenden Bauraum optimal
auszunutzen ist der Verdampfer U-förmig gebogen. In ihm geht das vom Expansionsventil durch die Rohrleitung strömende Kältemittel vom flüssigen in den gasförmigen Zustand über und wird überhitzt. Die dazu
erforderliche Verdampfungswärme wird über die Lamellen der durchströmenden Luft entzogen und über
die Rohrwandung auf das Kältemittel übertragen. Dabei wird die erkaltende Luft getrocknet und entstehendes Kondenswasser nach außen abgeleitet.
Druckschalter
Der Druckschalter (6, Abb. 2.3) enthält einen Hoch- und Niederdruckschalter. Er misst den Druck im Hochdruckteil des Kältemittelkreises und schaltet bei zu geringem Druck (durch Kältemittelmangel) oder zu
hohem Druck (z. B. durch Überhitzung des Verflüssigers) den E-Motor und somit den Verdichter aus.
Vereisungsschutzschalter
Der Vereisungsschutzschalter (10, Abb. 2.3) ist ein Temperaturschalter. Er misst die Temperatur des Kältemittels an den Einspritzrohren des Verdampfers und schaltet bei Vereisungsgefahr und bei Kältemittelmangel den Verdichter ab.
Verflüssigergebläse
Das Verflüssigergebläse (5, Abb. 2.3) besteht aus einem bürstenlosen EC-Motor, Lüfterrad, Gehäuse und
Schutzgitter. Sobald die Kühlfunktion aktiv ist, wird das Gebläse über Pin 3 (gelbe Leitung) von der Regelung aktiviert und versorgt den Verflüssiger mit der erforderlichen Außenluft (keine Drehzahlregelung - nur
Ein/Aus).
Verdampfergebläse
Das Verdampfergebläse (14, Abb. 2.3) besteht aus einem bürstenlosen EC-Motor und dem Lüfterrad. Es
saugt Luft aus dem Innenraum und Frischluft durch den Verdampfer und den elektrischen Heizer (nur
Comfortversion) und bläst sie durch den Luftverteiler in den Innenraum zurück. Die Drehzahl des Gebläses
wird über Pin 3 (gelbe Leitung) von der Regelung vorgegeben (PWM-Signal). Die Wahl der Gebläsedrehzahl erfolgt automatisch oder auf Wunsch manuell.
Seite 8
Aufdachklimaanlage Citysphere
Verdichter
Der Verdichter (4, Abb. 2.3) besteht aus einem halbhermetischen Gehäuse mit integriertem Scrollverdichter, bürstenlosen EC-Motor und Elektronik. Sobald die Kühlfunktion aktiv ist, wird der Verdichter über
Pin 1 des Verdichterkabels aktiviert und mit dem erforderlichen Drehzahlsignal angesteuert (PWM-Signal).
Dabei verdichtet er das Kältemittel auf den zur Verflüssigung erforderlichen Druck.
Der integrierte Elektromotor verfügt über einen Sanftanlauf zur Vermeidung von Stromspitzen auf das Bordnetz, einer Spannungsüberwachung (21 V bis 31 V), einen Überlastschutz und eine Temperaturüberwachung der Elektronik (+5°C bis 96°C). Außerhalb der Grenzen wird der Verdichter abgeschaltet. Erneute
Inbetriebnahme erfolgt durch wiederholtes Einschalten der Anlage.
HINWEIS
Die Funktion des Verdichters ist gesperrt, wenn an Pin 4 des VerdichterKabels keine Bordspannung anliegt (Sicherheitskette Druckschalter und
Vereisungssensor).
Seite 9
Aufdachklimaanlage Citysphere
3.
TECHNISCHE DATEN
3.1.
Klimaanlage
Benennung
Citysphere
Abmessungen (Aufdachklimaeinheit)
Länge x Breite x Höhe
1200 mm x 860 mm x 250 mm
Gewicht
ca. 55 kg
Betriebsspannung (entspr. Fahrzeug-Bordnetz)
24 VDC
Stromaufnahme
Gesamte Stromaufnahme
72 A (max.)
– Verdichtermotor
– Verflüssigergebläse
– Verdichtergebläse
55 A
10 A
7A
Schaltpunkte Niederdruckschalter
– Ein
– Aus
2,1 ± 0,3 bar
2,0 ± 0,2 bar
Schaltpunkte Hochdruckschalter
– Aus
– Ein
26,5 ± 2 bar
20 ± 2 bar
Nennleistung bei Innentemperatur 25°C,
Außentemperatur 29°C
3,8 kW
Verdampfergebläse – Luftvolumenstrom (frei blasend)
1350 m3/h
Schaltpunkt Vereisungsschalter
–
–
Aus
Ein
1°C ± 1
3,5°C (Max)
Kältemittel
R134a, 800g (bereits vorbefüllt)
Heizleistung (nur Comfortversion)
ca. 1 kW
Seite 10
Aufdachklimaanlage Citysphere
3.2.
Elektrische Sicherungen
Abgesicherte Bauteile
Sicherung
Kurzzeichen
Sicherungswert
F1
5A
Verdampfergebläse
F2
15 A
Verflüssigergebläse
F3
15 A
Relais für elektrische Heizung (nur Comfortversion)
F4
5A
Verdichter und falls vorhanden elektrische Heizung
F5
60 A
Druckschalter, Vereisungsschutzschalter,
digitaler Eingang Verdichter
3.3.
Verdichter Bitzer ECH 209
Kältemaschinenöl (Typ / Menge)
BSE55 / 120 ml
Drehzahl (Ansteuerung über PWM-Signal)
1200 bis 2100 U/min
Seite 11
Control Panel
Seite 12
Wire Harness
Abb. 3.1
Wago
4pol.
Ident No. 2710687
Master
Wago
7pol.
Wago
7pol.
Wago
7pol.
Adapter Cable
Ident No. 2710699
Adapter Cable
Ident No. 2710699
Up to max. 6 Units
Adapter Cable
Slave
Ident No. 2710699
Slave
3.4.
Ident No. 2710688
Aufdachklimaanlage Citysphere
Verbindungsschema
Positive terminal bolt
Electric plate G1+
Ground terminal bolt
Electric plate G2-
GL-W560
GL-W550
Control Unit
Compressor
Motor
3.5.
Control Panel
Aufdachklimaanlage Citysphere
Schaltplan Master-Anlage
Abb. 3.2
Seite 13
Abb. 3.3
Seite 14
Positive terminal bolt
Electric plate G1+
3.6.
Ground terminal bolt
Electric plate G2-
Compressor
Motor
Aufdachklimaanlage Citysphere
Schaltplan Slave-Anlage
Aufdachklimaanlage Citysphere
4.
EINBAU
4.1.
Sicherheitshinweise
Die Sicherheitshinweise gemäß Abschnitt 1.3 sind vor Beginn der Arbeiten zu lesen und zu beachten.
Der Einbau soll durch Personen erfolgen, die auf dem Gebiet der Kraftfahrzeugtechnik/Kraftfahrzeugelektrik sachkundig sind.
4.2.
Voraussetzungen für Aufbau
– Vor Aufbau und Betrieb der Klimaanlage(n) muss die Stromversorgung des Fahrzeugs auf ausreichende
Kapazität überprüft und gegebenenfalls erweitert werden.
Je aufzubauender Anlage muss eine freie Generatorkapazität von 72 A (max. Stromaufnahme pro
Anlage) zur Verfügung stehen.
Diese Kapazität muss auch bei Leerlaufdrehzahl und gleichzeitig maximaler Motorraumtemperatur
sichergestellt sein (Niedrige Drehzahl und hohe Umgebungstemperatur mindern die Leistungsabgabe
der Generatoren).
– Vorhandener Lukenausschnitt je aufzubauender Anlage 530/564 x 970 mm.
– Die gemäß der Betriebserlaubnis erforderliche Anzahl von Notausstiegsluken darf durch die aufzubauenden Anlagen nicht verringert werden.
4.3.
–
–
–
–
Aufdachklimaeinheit Master
Luftverteiler
Befestigungssatz
Bedienteil + Kabel
4.4.
–
–
–
–
Montagebausatz für Master-Anlage
Montagebausatz für Slave-Anlage
Aufdachklimaeinheit Slave
Luftverteiler
Befestigungssatz
Adapterkabel zur vorhergehenden Anlage (Master oder Slave)
4.5.
Nicht im Montagebausatz enthalten und selbst anzufertigen
–
–
–
–
–
–
Elektrische Anschlusskabel und Elemente (fahrzeugseitig)
Befestigungselemente zum Verlegen der Anschlusskabel
Sicherungshalter und Sicherungen zur Absicherung der elektrischen Anschlusskabel
Sicherungshalter und Sicherung zum Anschluss des Bedienteiles an Klemme 15
Kleber (Sika 252), Reiniger (Sika-Cleaner 205), Aktivator (Sika-Primer 215), Schleifpapier
Schaumstoff zur Abdichtung des Luftspaltes zwischen Dach und Innendecke, umlaufend der Anlage
(Vermeidung Luftkurzschluss) mit folgender Qualifikation:
– geschlossenzellig
– geringe Wasseraufnahme
– Brandverhalten nach FMVSS 302 bzw. 95/28/EG Anhang IV
Zum Beispiel: D2600 von Cellofoam
– Eventuell notwendige zusätzliche Generatoren mit Montagekit
Seite 15
Aufdachklimaanlage Citysphere
4.6.
Erforderliche Betriebsmittel, Sonderwerkzeug und Zubehör
a)
Aufbau auf bestehenden Lukenausschnitt
– Schwingsäge zum Entfernen des bestehenden Lukenrahmens
– Silikonspray zum Schmieren des Sägeblattes
b)
Für Service (Evakuierung, Befüllung und Prüfung des Kältemittelkreislaufs)
–
–
–
–
–
–
–
–
4.7.
Service-Recyclingstation für Kältemittel R134a
Vakuumpumpe, Saugleistung min. 5 m3/h, Enddruck 1 mbar
Füllschläuche mit Schnellverschlussstutzen für R134a
Lecksuchgerät
Digitalthermometer
Kältemittel R134a
Kältemaschinenöl BSE55
Prüfarmaturen mit Saugdruck- und Hochdruckmanometern
Vorbereitende Maßnahmen am Fahrzeugdach
– Der Einbau ist vom Fahrzeugtyp abhängig, deshalb sind Vorgaben des Fahrzeugherstellers zu
beachten.
Aufbau auf bestehenden Lukenausschnitt
– Deckeninnenverkleidung entfernen.
Abb. 4.1
Seite 16
Aufdachklimaanlage Citysphere
– Dachlukenrahmen mit Schwingsäge entfernen. Dazu den Kleber horizontal und vertikal durchtrennen (Sägeblatt mit Silikonspray schmieren).
Abb. 4.2
Abb. 4.3
ACHTUNG
Keine tragenden Teile (z. B. Spriegel, Versteifungen) oder Einbauten
beschädigen.
Seite 17
Aufdachklimaanlage Citysphere
– Klebereste entfernen und neue Klebefläche reinigen.
Abb. 4.4
4.8.
Aufkleben der Anlage
Die erste Anlage in Fahrtrichtung vorn sollte die Master-Anlage (erkennbar an Steuergerät und Temperaturfühler) sein. Verflüssiger zeigt in Fahrtrichtung.
Die weiteren Anlagen sind Slave-Anlagen und werden von der Master-Anlage gesteuert.
– Anlage aufsetzen, ausmitteln und anzeichnen.
Abb. 4.5
HINWEIS
Der Radius des Lukenausschnittes passt nicht zwingend mit der Kontur der
Klebefläche der Grundwanne zusammen. Deshalb ist es zweckmäßig, die
Innenkontur der Grundwanne auf das Busdach zu übertragen.
Seite 18
Aufdachklimaanlage Citysphere
1010
R55
R100
(970)
604
(564)
Fahrtrichtung
Lukenausschnitt 970x564, R80
20
20
(R80)
Mitte Klebenaht
20 bei 970x564
37 bei 970x530
Abb. 4.6
Auf gleichmäßigen Abstand der Halter zum Dach achten.
Abb. 4.7
Seite 19
Aufdachklimaanlage Citysphere
– Grundwanne und Dachhaut im Klebebereich aufrauhen analog der Klebenaht (Abb. 4.6 und 4.10), mit
Sika-Cleaner reinigen und mit Sika-Primer vorbehandeln (Produkthinweise beachten).
Abb. 4.8
Abb. 4.9
Seite 20
Aufdachklimaanlage Citysphere
– Sika-Raupe auf die Dachhaut auftragen und Anlage aufsetzen. Der Klebespalt ergibt sich durch
Abstands-Beulen in der Klebefläche der Grundwanne.
Abb. 4.10
– Von der Businnenseite aus ringsum prüfen, ob alles richtig abgedichtet ist.
Abb. 4.11
– Hintere und mittlere Halter mit Sika fixieren und mit Innensechskantschraube am oberen Gegenhalter
festschrauben. Vordere Halter mit Gewindestange und Kontermuttern am Gewindebolzen befestigen.
Klebeverbindung während des Aushärtens des Klebers nicht beanspruchen!
hinterer Halter
mittlerer Halter
vorderer Halter
Abb. 4.12
Seite 21
Aufdachklimaanlage Citysphere
4.9.
Elektrische Verbindungen herstellen
Die Anlage ist fahrzeugseitig mit maximal 100 A direkt nach der Batterie abzusichern. Der Kabelquerschnitt
ist folgendermaßen festzulegen:
Mindestquerschnitt 25 mm2, ab einer Kabellänge (einfache Länge) von 19 m ist ein Querschnitt von 35 mm2
zu verwenden und ab einer Länge von 26 m bis zu 38 m ist ein Querschnitt von 50 mm2 zu verwenden.
Siehe auch „Elektrische Kupferleitungen für Kraftfahrzeuge“ DIN VDE 0298-Teil 4.
a)
Fahrzeugbatterie abklemmen.
ACHTUNG
Zum Anschluss der Stromversorgung für die Klimaanlage sind die
Vorgaben des Fahrzeugherstellers zu beachten.
Es sind nur für den Einbau in Kfz zugelassene Kabel mit ausreichendem
Querschnitt zu verwenden.
Die Elektroarbeiten sind von einer dazu autorisierten Person auszuführen.
Zum Verlegen der Kabel durch Bleche geeignete Kabeltüllen / Kantenschutz verwenden.
b)
Kabelverbindungen zwischen Fahrzeugbatterie und Anlagen herstellen.
– Kabel in Schutzhüllen verlegen und mit Kabelbindern ausreichend befestigen.
– Die Stromversorgung der Anlage ist an den dafür vorgesehenen Kabelbolzen an der Elektroanschlußplatte anzuschließen (Abb. 2.2).
ACHTUNG
Dabei ist unbedingt auf die richtige Polarität zu achten! (+Pol: M8 Kabelbolzen, -Pol: M10 Kabelbolzen). Ein Vertauschen der Polarität zerstört das
Steuergerät!
– Zugentlastungen vorsehen.
c)
Kabelverbindung zwischen Bedienteil und Master-Anlage mit dem beiliegenden Kabelbaum herstellen.
– Bedienteil an geeigneter Stelle montieren und Kabelbaum anstecken.
57
40
45
40
21
52
24 29 35
Abb. 4.13
Seite 22
Aufdachklimaanlage Citysphere
Abb. 4.14
Abb. 4.15
– Kabelbaum mit Klemme 15 und D+ (Klemme 61) verbinden (bei Klemme 15 Sicherungshalter
und Sicherung 5 A zwischenschalten).
– Kabel in Schutzhüllen verlegen und mit Kabelbindern ausreichend befestigen.
– Kabel gemäß Farbcodierung an den 4-poligen Klemmverbinder der Master-Anlage anschließen.
d)
Beiliegenden Innenraumsensor an der Elektroplatte befestigen und anstecken.
e)
Kabelverbindung zwischen Master-Anlage und Slave-Anlage oder zwischen Slave-Anlage und einer weiteren Slave-Anlage herstellen.
– Beiliegende Adapterkabel entsprechend der Nummerierung an den 7-poligen Klemmverbinder
der beiden Anlagen anschließen.
– Kabel in Schutzhüllen verlegen und mit Kabelbindern ausreichend befestigen.
Seite 23
Aufdachklimaanlage Citysphere
4.10.
Luftverteiler montieren
– Zuerst die vorderen Gewindestangen einstellen und kontern. Danach die restlichen Gewindestangen auf
die gleiche Höhe einstellen und kontern.
20 Nm*
20 Nm*
66
Innenverkleidung
* Achtung: Beim Festziehen an der oberen Mutter gegenhalten.
Abb. 4.16
– Innenverkleidung ausschneiden, Abstand zu den Gewindestangen ca. 20-30 mm (820x530).
Abb. 4.17
Seite 24
Aufdachklimaanlage Citysphere
– Schaumstoff rundum zwischen Dach und Deckeninnenverkleidung einbringen, um zu vermeiden, dass
Luft aus dem Deckenbereich angesaugt wird.
Abb. 4.18
– Hut auf dem Luftverteiler ausrichten und festnieten.
– Luftverteiler montieren. Darauf achten, dass er mit der Innenverkleidung des Daches fluchtet und dass
der Hut umlaufend an der Dichtung der Grundwanne anliegt.
– Befestigung des Luftverteilers bei den mittleren Gewindestangen mit Muttern M8 und an den anderen
Gewindestangen mit den Adaptern M6/M8 (siehe Abb. 2.3).
Abb. 4.19
Seite 25
Aufdachklimaanlage Citysphere
– Gebläsestecker verbinden und mit Kabelband gegen Scheuern sichern.
– Luftansauggitter befestigen.
Abb. 4.20
4.11.
Haube montieren
– Luftfilter auf richtigen Sitz kontrollieren.
Luftfilter
Abb. 4.21
– Nach Aufsetzen der Haube das Verflüssigergebläse anstecken. Das Kabel möglichst weit auf die in
Fahrtrichtung gesehen rechte Seite ziehen. Das Gebläsekabel mit dem Kabelclip an der Trennwand
rechts befestigen, um während des Betriebes eine Kollision des Kabels mit dem Laufrad des Gebläses
zu vermeiden.
– Das Verflüssigergebläse und das Gitter einsetzen und die 4 Schrauben ansetzen. Danach die Haube
mit den 7 Flachkopfschrauben befestigen. Abschließend alle Schrauben festziehen.
– Gebläse: 4 Nm (Torx30)
– Haube : 3 Nm (Schlitz)
Seite 26
Aufdachklimaanlage Citysphere
5.
INBETRIEBNAHME
5.1.
Sicherheitshinweise
Die Sicherheitshinweise gemäß Kap. 1.3 sind zu beachten.
VORSICHT
Inbetriebnahme der Anlage nur mit montierter Haube und montiertem Luftverteiler. Verletzungsgefahr durch die Gebläse.
5.2.
Bedienerhinweise
ACHTUNG
Die Klimaanlage kann nur bei laufendem Fahrzeugmotor in Betrieb
genommen werden.
5.3.
Bedien- und Anzeigeelemente
4
7
1
6
2
3
1
2
3
4
5
6
7
Gebläse
Aussentemperatur
Ein/ Aus
Anzeigefeld
Punkt
Abwärts
Aufwärts
5
Abb. 5.1
5.4.
Erstinbetriebnahme
a)
Zündung am Fahrzeug einschalten und dabei das Bedienteil beobachten. Im Anzeigefeld muss für
ca. 1 Sekunde die Anzeige
und anschließend die aktuelle Versionsnummer des Bedienteils erscheinen. Nach ca. 3 Sekunden erlischt die Anzeige und ein blinkender Punkt rechts unten im Anzeigefeld signalisiert die Bereitschaft des Systems.
b)
Fahrzeugmotor nach Herstellerangaben starten.
c)
Anlage über Taste 3 einschalten.
Je nach Außentemperatur und Temperatur im Fahrgastraum ist die Anlage im Kühl-, Heiz- oder Lüftungsbetrieb (Heizbetrieb nur bei Comfortversion).
Seite 27
Aufdachklimaanlage Citysphere
5.5.
Zusatzfunktionen des Bedienteiles
Um alle Funktionen der Anlage unabhängig von den Temperaturen prüfen zu können gibt es einen Testmodus und einen Visualisierungsmodus.
Für eine individuelle Konfiguration des Bedienteiles gibt es einen Parametermodus.
5.5.1. Testmodus
HINWEIS
Um die Fahrzeugbatterien nicht zu belasten sollte der Testmodus nur bei
laufendem Fahrzeugmotor betrieben werden. Der Betrieb ohne Fahrzeugmotor ist nur zum Prüfen der Gebläse empfehlenswert.
Bei Außentemperaturen unter 17°C darf die Anlage nur eingeschränkt im
Kühlbetrieb laufen:
Temperatur
Beschreibung
Unter 5°C
Kein Kühlbetrieb zulässig
Zwischen 5°C und 12°C
Maximale Betriebsdauer 3 Minuten
Zwischen 13°C und 17°C
Maximale Betriebsdauer 15 Minuten
ACHTUNG
Nichtbeachtung kann eine Beschädigung des Verdichters zur Folge
haben.
Bedienung
Um in den Testmodus zu gelangen, muss die Taste
für einige Sekunden gedrückt werden, bis das
Display
anzeigt. Das Passwort um Zugang zum Testmodus zu erhalten lautet
. Die Eingabe des
Passwortes erfolgt über die Tasten
und
. Mit der Taste
wird das Passwort bestätigt.
Ist die Passworteingabe nicht korrekt erscheint wieder die Temperatur-Soll-Differenz. Bei korrekter Eingabe
kann mit den Tasten
und
zwischen Ausgängen
und Eingängen
gewechselt werden, durch
Bestätigen mit
gelangt man in das entsprechende Menü.
Um den Testmodus zu verlassen, muss die Taste
Eingangs/Ausgangs erfolgt mit den Tasten
und
Seite 28
gedrückt werden. Die Auswahl des gewünschten
und wird mit der Taste
bestätigt.
Aufdachklimaanlage Citysphere
Ausgänge
Parameter
Beschreibung
Das Verdampfergebläse läuft mit 25% Leistung und kann über die Tasten
verändert werden.
und
Der Verdichter, das Verdampfergebläse und das Verflüssigergebläse laufen auf
Maximalstufe. Das Verdampfergebläse kann über die Tasten
und
verändert
werden.
Achtung: bei Betrieb ohne Fahrzeugmotor kann die Fahrzeugbatterie sehr schnell
entladen werden
Achtung: Bei Außentemperaturen unter 17°C ist dieser Modus nur für eine Betriebsdauer gemäß obenstehender Tabelle zulässig.
Das Verflüssigergebläse läuft auf Maximalstufe
Das elektrische Heizelement ist eingeschaltet und das Verdampfergebläse läuft mit
Heizungsdrehzahl. Das Verdampfergebläse kann über die Tasten
und
verändert werden.
Achtung: Bei Betrieb ohne Fahrzeugmotor kann die Fahrzeugbatterie sehr schnell
entladen werden.
Ein blinkender Punkt rechts unten im Anzeigefeld bedeutet, dass der gewählte Ausgabemodus ausgeschaltet ist. Ein dauerhaft leuchtender Punkt bedeutet, dass der Ausgang eingeschaltet ist. Um die
Ausgänge ein/auszuschalten muss die Taste
oder die Taste
gedrückt werden.
Eingänge
Parameter
Beschreibung
Zustand
Punkt
Bedeutung
0V
Blinken
Fehler
Z oder 24 V
Ein
OK
Z oder 0 V
Blinken
Kein elektr.
Heizer vorh.
24 V
Ein
Elektr. Heizer
vorhanden
Z oder 0 V
Blinken
Fehler
24 V
Ein
OK
24 V
Blinken
Fehler
Z oder 0 V
Ein
OK
24 V
Blinken
Fehler
Z oder 0 V
Ein
OK
Diagnoseausgang Verdichtermotor
Automatische Erkennung des
elektr. Heizelementes
(bei montiertem Relais)
D + (Klemme 15)
Verflüssigergebläse
Verdampfergebläse
Z bedeutet hochohmig
Seite 29
Aufdachklimaanlage Citysphere
5.5.2. Visualisierungsmodus
In den Visualisierungsmodus gelangt man durch zeitgleiches Drücken der Tasten
und
für einige
Sekunden. Mit den Tasten
und
kann der gewünschte Betriebzustand angewählt werden, dessen
Wert durch Bestätigen mit der Taste
angezeigt wird.
Mit der Taste
gelangt man zurück zur Betriebzustandsauswahl, durch erneutes Drücken kann der
Visualisierungsmodus verlassen werden.
Betriebszustand
Beschreibung
Fahrgastraumtemperatur
Aussentemperatur
Bordspannung [V]
PWM [%] Verdampfergebläse
PWM [%] Kompressor
Software Version Bedienteil
Software Version Steuergerät
Regler Teilberechnung (Proportionalanteil)
Regler Teilberechnung (Integralanteil)
Temperatur Sollwert
Stundenzähler Verdichter*
Stundenzähler el. Heizelement*
(nur bei Comfortversion)
Stundenzähler gesamte Anlage*
D+ (Klemme 61) Spannung [V]
* Für die Stundenzähler werden die Betriebszeiten in drei aufeinanderfolgenden blinkenden Zahlenwerten
angezeigt. z.B. zeigt das Display nach Wahl von Parameter
die Zahlenwerte
. Dies
bedeutet, dass der Verdichter insgesamt für 129112 Stunden gelaufen ist.
Seite 30
Aufdachklimaanlage Citysphere
5.5.3. Parametermodus
Um in den Parametermodus zu gelangen muss die Taste
für einige Sekunden gedrückt werden, bis
das Display
anzeigt. Das Passwort um Zugang zu den Parametern zu erhalten lautet
. Die Eingabe
des Passwortes erfolgt über die Tasten
und
. Mit der Taste
wird das Passwort bestätigt. Ist die
Passworteingabe nicht korrekt, erscheint wieder die Temperatur-Soll-Differenz.
Um den Parametermodus zu verlassen, muss die Taste
gewünschten Parameters erfolgt mit den Tasten
und
Parameter
Beschreibung
Zeit, die das Verdampfergebläse ohne
D+ (Klemme 61) Signal arbeitet
gedrückt werden. Die Auswahl des
und wird mit der Taste
bestätigt.
Voreinstellung
Max
Min
30 min
90 min
0 min
1
2
0
0
1
0
25%
40%
10%
1
1
0
Auswahl der Temperatur-Soll-Differenz
(TSD)-Funktion:
0: TSD wird fest auf den aktuellen Wert
festgelegt und kann im Normalbetrieb
nicht verändert werden
1: TSD kann im Normalbetrieb verändert
werden
2: TSD wird auf einen Wert von 3 fest
eingestellt und kann im Normalbetrieb
nicht verändert werden
Autostart
0: Aus
1:Ein
Leistungsstufe Verdampfergebläse im
Heizmodus
Manuelle Verstellung des Verdampfergebläses
0: Gesperrt
1: Freigegeben
Seite 31
Aufdachklimaanlage Citysphere
6.
INSTANDHALTUNG
6.1.
Sicherheitshinweise
Die Sicherheitshinweise und –vorschriften gemäß Abschnitt 1.3 sind zu beachten.
6.2.
Allgemeines
a)
Alle Arbeiten am Kältemittelkreislauf sind nur von sachkundigem Personal autorisierter Fachwerkstätten auszuführen.
b)
Zu Instandhaltungsarbeiten am Klimakreislauf sind die in Kapitel 4.6 aufgeführten speziellen Betriebsmittel, Sonderwerkzeuge sowie Zubehörteile erforderlich und einzusetzen.
c)
Wie alle Teile eines Fahrzeuges ist auch die Klimaanlage einer ständigen Belastung ausgesetzt.
Um einen einwandfreien Betrieb der Anlage zu gewährleisten und um Beschädigungen von Teilen
zu vermeiden, müssen regelmäßig die vorgeschriebenen Wartungsarbeiten durchgeführt werden.
d)
Die richtige Behandlung der Anlage mit Nachweis über die Durchführung aller vorgeschriebenen
Wartungsarbeiten sind Voraussetzung für die Anerkennung eventueller Gewährleistungsansprüche bei Schäden an Teilen, die der Wartung unterliegen.
e)
Um das Festsetzen beweglicher Teile innerhalb des Kältemittel-Kreislaufes infolge Ölverharzung
zu vermeiden, ist bei Betriebspausen mindestens einmal im Monat die Klimaanlage für einen Zeitraum von ca. 10 Minuten einzuschalten. Voraussetzung: (Mindest-Außentemperatur > 12°C oder
beheizte Halle)
6.3.
Wartung und Pflege
a)
Unabhängig von nachfolgendem Zeitplan sind innerhalb der ersten 4 Wochen nach erstmaliger Inbetriebnahme der Aufdachklimaanlage alle Gerätebefestigungen auf festen Sitz zu prüfen.
b)
Auch wenn die Klimaanlage nicht betrieben wird, kann ein Verschleiß von einzelnen Komponenten
durch normale Alterung oder Beanspruchung durch den Fahrbetrieb auftreten. Daher sind die im
Wartungs- und Serviceplan aufgeführten Kontrollen unabhängig von der Betriebszeit der Anlage
durchzuführen.
c)
Unabhängig von der Betriebszeit der Anlage ist auch ein Verlust an Kältemittel trotz dichter Leitungsanschlüsse möglich. Bei relativ großem Kältemittelverlust kann jedoch eine Undichtigkeit in
der Anlage angenommen werden.
d)
Das Reinigen der Verflüssiger- oder Verdampferlamellen erfolgt bei geringer Verschmutzung mit
Pressluft gegen die normale Luftströmungsrichtung.
Bei starker Verschmutzung oder fettigem Belag ist erst mit Seifenlauge oder geeigneter Reinigungslösung (nicht aggressiv gegen Kupfer oder Aluminium) zu reinigen und mit Pressluft oder
Wasserstrahl nachzubehandeln.
e)
Bei Arbeiten am Kältemittelkreislauf ist der Sammler-Trockner grundsätzlich zu wechseln.
f)
Die Filtermatte ist regelmäßig zu erneuern.
g)
Die Ablauföffnungen für Regenwasser in der Grundwanne sind freizuhalten.
ACHTUNG
Das Kältemittel darf nie in die freie Atmosphäre abgelassen werden.
Seite 32
Aufdachklimaanlage Citysphere
6.4.
Checkliste Wartung und Pflege
Anlagenteil
Wartungsarbeiten
Häufigkeit
m
6m
a
Kältemittelkreislauf
–
–
–
–
Anschlüsse
Verflüssiger
Kondenswasserablauf
Aufdachklimaeinheit
Dichtigkeitsprüfung mit Lecksuchgerät durchführen
Lamellen auf Zustand prüfen (bei Verschmutzung reinigen)
Öffnungen prüfen und ggf. reinigen
Gesamtzustand und Anschlußstellen auf festen Sitz prüfen
X
X
X
X
Verdichter
– Verdichter
Auf abnormale Geräusche während des Laufes prüfen
– Befestigungselemente Auf Zustand und Funktion prüfen
– elektr. Anschlüsse
Auf Oxidation prüfen
X
X
X
Elektr. Anschlüsse
– Anschlussleitungen
– Steckverbindungen
Auf einwandfreien Zustand prüfen
Auf einwandfreien Zustand und festen Sitz prüfen
X
X
Legende: m - monatlich, a – jährlich (6m – bei ganzjährigem Betrieb halbjährlich durchführen)
6.5.
Prüfungen vor Instandsetzung
Zur Vermeidung von unnötigen Demontage- bzw. Doppelarbeiten ist die Klimaanlage vor Beginn von
Instandsetzungsarbeiten auf Gesamtzustand zu prüfen.
Sichtprüfung
a)
Äußerer Zustand Aufdachklimaeinheit:
–
–
–
–
–
b)
Haube keine Risse, Lackschäden
Luftein- und -auslässe sauber und unbeschädigt
Befestigungspunkte auf festen Sitz, keine Korrosion
Kabelanschlüsse einwandfrei
Blechdurchführungen einwandfrei.
Luftverteiler auf Zustand
– Befestigungspunkte/-schrauben auf festen Sitz
– Umluftansauggitter unbeschädigt, sauber.
c)
Verdichter auf Zustand
– Rohranschlüsse unbeschädigt, fester Sitz
– Befestigungselemente/-schrauben auf festen Sitz
– Elektrischer Anschluss unbeschädigt.
Seite 33
Aufdachklimaanlage Citysphere
6.6.
Fehlersuche und Maßnahmen zur Beseitigung
6.6.1. Allgemeines
a)
Bei der Fehlersuche und deren Beseitigung ist eine systematische Vorgehensweise zweckmäßig.
Entsprechende Maßnahmen bei Störungen allgemeiner Art oder Abweichungen von Sollzuständen
bei der Druckprüfung sind wie unten beschrieben durchzuführen.
b)
Bestimmte Fehler können nur durch sachkundiges Personal mit Spezialwerkzeug festgestellt und
behoben werden.
6.6.2. Ursachen bei Störungen an der Elektrik
Hierbei sind systematisch die einzelnen Stromkreise anhand des Schaltplans (siehe Abb. 3.2) zu überprüfen und der Fehler einzukreisen. Vorzugsweise sind dabei die Steckanschlüsse, Schalter, Relais etc. auf
Durchgang zu überprüfen.
Folgende Störungsursachen sollten grundsätzlich geprüft bzw. eine Störung aus diesem Grunde ausgeschlossen werden:
–
–
–
–
–
–
Defekte Sicherungen
Korrosion an Steckerkontakten
Wackelkontakt an Steckern
Crimpfehler an Steckern
Korrosion an Leitungen und Sicherungen
Korrosion an Batteriepolen
6.6.3. Ursachen bei Störungen im Klimasystem
– defektes Verdampfer- oder Verflüssigergebläse
– verschmutzter oder verstopfter Luftfilter, verschmutzte Verflüssiger- oder Verdampferlamellen
– zu geringe Kältemittelmenge in der Anlage
Erfolgt eine kontinuierliche Abschaltung, empfehlen wir, die Anlage von einem autorisierten Fachbetrieb
prüfen zu lassen.
6.6.4. Maßnahmen bei Störungen im Kältemittelkreislauf
Treten Fehler im Kältemittelkreislauf auf, so muss die Anlage von einem autorisierten Fachbetrieb geprüft
und ordnungsgemäß instand gesetzt werden. Auf keinen Fall darf das Kältemittel in die freie Atmosphäre
abgelassen werden.
6.6.5. Ursachen, wenn Sollzustände während der Druckprüfung nicht erreicht werden
Werden bei der Druckprüfung (Kap. 6.8) Abweichungen zum Sollzustand festgestellt, können folgende
Ursachen dazu geführt haben. Diese Ursachen prüfen, lokalisieren, defekte Teile ggf. instand setzen oder
austauschen.
Druck am Hochdruckmanometer zu hoch
– zu geringer Luftdurchsatz am Verflüssiger
– Kältemittelmenge zu hoch
Druck am Hochdruckmanometer zu gering
– Kältemittelmenge zu gering
– Verdichterdrehzahl zu niedrig (Anlage im Regelbetrieb, Maximaldrehzahl kann im Testmodus (5.5.1)
erzwungen werden)
– Verdichter defekt
Seite 34
Aufdachklimaanlage Citysphere
Druck am Niederdruckmanometer zu hoch
– Expansionsventil fehlerhaft
– Verdichterdrehzahl zu niedrig
– Verdichter defekt
Druck am Niederdruckmanometer zu gering
–
–
–
–
–
Drosselung in der Saug- oder Druckleitung z.B. durch Leitungsknicke
Expansionsventil fehlerhaft
Kältemittelmenge zu gering
zu geringer Luftdurchsatz am Verdampfer
Sammler-Trockner verstopft
6.7.
Instandsetzungsarbeiten
ACHTUNG
Kältemittel darf nie in die freie Atmosphäre abgelassen werden.
HINWEIS
Die Sicherheitshinweise und –vorschriften gemäß Kapitel 1.3 und
Vorgaben gemäß Kapitel 6.2 sind zu beachten.
a)
Zur Instandsetzung sind grundsätzlich Originalersatzteile bzw. Normteile zu verwenden.
b)
Bei der Durchführung von Arbeiten ist der Originalzustand der Anlage wieder herzustellen.
c)
Vor dem Öffnen / Zerlegen von Teilen aus dem Kältemittelkreislauf ist das Kältemittel in die dafür
vorgesehene Recyclingstation abzufüllen und vorschriftsmäßig zu entsorgen bzw. wieder zu verwenden.
d)
Nach Abschluss von Arbeiten am Kältemittelkreislauf die Anlage gemäß
– Bedienungsanleitung Recyclingstation evakuieren,
– mit Kältemittel über die Druckseite befüllen (bei stehender Anlage)
6.8.
Prüfungen und Arbeiten nach Instandsetzung
6.8.1. Prüfung der Kältemitteldrücke
Allgemeines
Grundsätzlich steht jede mit Kältemittel gefüllte Klimaanlage unter Druck, der im gesamten Kreislauf gleich
und dessen Höhe von der Umgebungstemperatur abhängig ist.
Bei Betrieb der Anlage ist der Arbeitsdruck unterschiedlich auf der Saugseite und der Druckseite des
Verdichters. Die Drücke differieren und werden beeinflusst durch die Drehzahl des Verdichters, die Innentemperatur im Fahrzeug, die Außentemperatur und die relative Luftfeuchtigkeit. Arbeitsdrücke, die von der
Regel abweichen, geben Hinweis auf Fehler in der Anlage.
Die Arbeitsdrücke sollten bei einer Fahrzeugbordspannung von 25-26 V und bei Lufttemperaturen von 17°C
bis maximal 35°C geprüft werden. Dabei muss die Anlage im Testmodus
betrieben werden. Die Haube
muss zur Druckprüfung aufgebaut sein, da die Luftbeaufschlagung der Wärmetauscher für das Erreichen
der Betriebsdrücke entscheidenden Einfluss hat.
Seite 35
Aufdachklimaanlage Citysphere
Es müssen sich folgende ca. Werte ergeben:
Außentemperatur
= Innentemperatur
Niederdruckmanometer
Hochdruckmanometer
17°C
2,7 ± 0,2 bar
8,4 ± 2 bar
20°C
2,9 ± 0,2 bar
9,0 ± 2 bar
25°C
3,3 ± 0,2 bar
10,3 ± 2 bar
30°C
4,1 ± 0,2 bar
11,4 ± 2 bar
35°C
4,7 ± 0,2 bar
12,8 ± 2 bar
Bei Abweichung der gemessenen Drücke von diesen Werten ist eine Fachwerkstatt mit der Überprüfung
der Ursachen zu beauftragen.
Nach Beendigung der Druckprüfung die Prüfmanometer demontieren und Dichtkappen aufschrauben.
6.8.2. Sichtprüfung
Nach erfolgter Instandsetzung ist eine Sichtprüfung gemäß Kapitel 6.5 durchzuführen.
Seite 36
Aufdachklimaanlage Citysphere
7.
GARANTIEABWICKLUNG
Im Garantiefall an die zuständige Handelsorganisation wenden.
Seite 37
Aufdachklimaanlage Citysphere
Seite 38
Rooftop Air Conditioning System Citysphere
1.
INTRODUCTION
This installation and service instructions contains important information to assist trained personnel in the
installation, operation and maintenance of the rooftop air conditioning system.
1.1.
Meaning of emphases
WARNINGS, CAUTIONS and NOTES in this manual have the following meaning:
WARNING
This heading is used to highlight that improper compliance or noncompliance with instructions or procedures may cause injuries or fatal
accidents.
IMPORTANT
This heading is used to highlight that improper compliance or noncompliance with instructions or procedures may cause damage to
components.
NOTE
This heading is used to draw specific attention to information.
1.2.
Additional applicable documentation
Operating instructions for the rooftop air conditioning system
1.3.
Safety information and regulations
The rooftop air conditioning system has been designed and built in accordance with EC Directives.
The system is safe if it is installed properly and used according to the installation and service instructions.
If the vehicle height specified in the vehicle's licensing documents is exceeded by installation of the rooftop
air conditioning system, this must be legalized by an official acceptance inspection in accordance with
Section 19 of the German Road Traffic Licensing Regulations (StVZO).
The general safety regulations for the prevention of accidents have to be observed strictly. “General safety
regulations” beyond the scope of these regulations are detailed below.
The specific safety regulations are highlighted in the individual chapters resp. procedures.
General safety regulations
Non-compliance with the installation manual and its included notes will lead to liability exclusion by Spheros.
The same applies to unskilled repairs or repairs not using original spare parts.
Electrical wiring and operating elements of the air conditioning system must be arranged in the vehicle in
such a way that their correct functioning cannot be impaired under normal operating conditions.
Page 39
Rooftop Air Conditioning System Citysphere
Safety instructions for maintenance
If faults develop in the refrigerant circuit, the system must be tested and repaired by an authorized specialist
repair shop according to the rules. Under no circumstances may refrigerant be discharged into the
atmosphere.
Never heat refrigerant cylinders with a naked flame.
Liquid refrigerant must never be allowed to come into contact with body parts. The safety data sheet must
be observed.
Always wear protective clothing and goggles when handling refrigerant.
IMPORTANT
The vehicle load capacity is diminished by the weight of the additional
components.
WARNING
Do not perform soldering or welding directly on components of the closed
refrigerant circuit or in its vicinity. The heating will cause a rise in the circuit
pressure. There is a danger of explosion.
Before performing any work allow the system to cool down completely.
Risk of injury due to burns on the condenser, compressor and refrigerant
hoses.
Installation, maintenance and repair work must be carried out by duly
qualified personnel. Such work may only be undertaken with the engine off
and the power supply switched off.
The battery must be disconnected before starting the work.
Do not wear metal jewellery (bracelets, watches, necklaces, rings) when
working on the air conditioning system.
1.4.
Certification
a)
The electro-magnetic compatibility (EMC) has been checked.
b)
The standards of the ECE Regulation R10 Rev. 03 are complied.
1.5.
Suggestions for corrections and improvements
Complaints, improvements and suggestions for correcting this manual should be addressed to:
Spheros GmbH
Friedrichshafener Straße 9 - 11
D-82205 Gilching
Page 40
Phone:
+49 (0) 8105 7721 887
Fax:
+49 (0) 8105 7721 889
Rooftop Air Conditioning System Citysphere
2.
GENERAL DESCRIPTION
The rooftop air conditioning system is designed for the cooling / air conditioning and heating (comfort
version only) of city buses.
The rooftop air conditioning system is available as master- and as slave-version. With the master unit come
all the documents required for installation and all components necessary for operation such as the control
device, control panel cables (2), the control panel (3) and the temperature sensors.
Exactly one master unit has always to be mounted per vehicle. The preferred position for the control panel
is the driver's area, and dependent on that, the foremost the preferred position for the master unit (1).
The master unit can provide up to five slave units (5) with operation signals. Each slave unit therefore
comprises an adapter cable (6), which connects the unit located before it.
The electrical supply of the units is done from the vehicle's power supply via the cables (4, not included in
the scope of delivery). The units are laid out for 24 V operating voltage.
The units are prefilled with refrigerant (R134a) and need only be connected to the on-board power supply
when installed.
5
5
6
1
6
4
2
4
4
3
1
2
3
4
5
6
Master unit
Cable, control panel
Control panel
Cable, electrical supply
Slave unit
Adapter cable
Fig. 2.1
Page 41
Rooftop Air Conditioning System Citysphere
2.1.
Components
The rooftop airconditioner-unit is shown in Fig. 2.3.
1 - Hood (external contour element)
2 - Baseplate as the load-bearing structural element
3 - Condenser
4 - Compressor
5 - Condenser fan
6 - Pressure switch
7 - Collector/Drier/Filter for refrigerant
8 - Filling port HP
9 - Filling port LP
10 - Anti-icing switch
11 - Expansion valve
12 - Evaporator
13 - Air filter
14 - Evaporator fan
15 - Electrical heater (comfort version only)
16 - Outside temperature sensor (master unit only)
17 - Electrical plate (see Fig. 2.2)
18 - Air-diffuser
19 - Grille
20 - Drain outlets
21 - Recessed grips and surfaces for lifting appliances, respectively.
b
f
c
GL-W550
M8
15 Nm
+
d
K1
g
17a)
Fuses
17b)
Control unit (Master unit
only)
17c)
Electrical interface to
distribution panel (Master
unit only)
17d)
Electrical interface to other
units
17e)
Relays for heating (comfort
version only)
17f)
Sensor for room temperature
(Master unit only)
e
F5=60 A
¯
F1= 5 A
F2=15 A
F3=15 A
F4= 5 A
M10
20 Nm
a
Fig. 2.2 Electrical plate (simplified)
Page 42
Rooftop Air Conditioning System Citysphere
5
13
12
1
2
16
10
3
6
4
7
9
20
8
11
21
17
15
14
18
19
Fig. 2.3
Page 43
Rooftop Air Conditioning System Citysphere
2.2.
Electrical system
An overview about the connection of the modules among each other is given in diagram Fig. 3.1.
The hook-up of the units shall be accomplished according to the circuit diagrams in Fig. 3.2 and Fig. 3.3.
The rooftop air conditioning system features a battery-discharge protection system. The system can be
restarted by switching it on again.
If the vehicle engine does not run, the system can only be operated in ventilation mode. This function can
also be blocked (see chapter 5.5.3).
The electronic system of the compressor motor includes a soft-start function to prevent current peaks in the
vehicle electrical system. In addition, the electric motor is switched off automatically in the event of
overloads (due to possible system damages). Restarting is effected by repeatedly switching on the system.
2.3.
Principle of operation of the air conditioning system
Once the system is switched on, the outside air temperature and the inside air temperature will be measured
by the control system. A soon as the following conditions are complied the cooling function of the unit starts:
–
–
–
–
The vehicle motor is running (signal from D+/61)
The outside temperature is higher than +17°C
The inside temperature is higher than +22°C
The inside temperature is higher than outside temperature minus temperature nominal difference, TSD
(value shown on the panel display)
Fresh air
Cold air
Cold air
Circulating air
* Ref. to Fig. 2.3
Fig. 2.4 Cooling operation of the unit
Page 44
Rooftop Air Conditioning System Citysphere
The compressor with integrated electric motor runs up. It compresses the refrigerant gas and delivers it to
the condenser where it condenses and gives off heat.
The resultant condensation heat is transferred to the outside air flowing through the condenser. In this
process the axial fan maintains a sufficient ventilation even when the vehicle is stationary. The liquid
refrigerant flows through the receiver-drier to the expansion valve, where it expands as a result of the
controlled pressure drop and then reverts to the gaseous state in the evaporator.
The warm circulating air in the passenger cabin is drawn in by the evaporator fan, mixed with fresh air,
cooled in the evaporator, dried and returned to the cabin via the air-diffusor. Resulting condensation water
is discharged via drains.
During operation, the refrigerant circuit is monitored by the anti-icing switch and the pressure switch. These
switches may switch off the compressor (if required).
If a defect occurs at one of the units, the other units continue normal operation.
When the air conditioning system is switched off at the control panel, the fan motors and the compressor
are stopped, the power supply of all components however, will be maintained.
Rainwater entering the rooftop system is discharged via several drain holes (20, Fig. 2.3).
Heating operation (comfort version only)
Once the system is switched on, the outside air temperature and the inside air temperature will be measured
by the control system. A soon as the following conditions are complied the heating function of the unit starts:
– The vehicle motor is running (signal from D+/61)
– The outside temperature is less than +17°C
– The inside temperature is between +10°C and +22°C
Fresh air
Warm air
Warm air
Circulating air
* Ref. to Fig. 2.3
Fig. 2.5 Heating operation of the unit
Page 45
Rooftop Air Conditioning System Citysphere
2.4.
Design, purpose and principle of operation of the assemblies
Condenser
The condenser (3, Fig. 2.3) consists of aluminium flat pipes and fins interconnected to form a large heat
exchanger surface.
It cools the hot refrigerant gas so that the latter liquefies and undercools. And transfers the condensation
heat to the outside air flowing through it via the fins, at the same time.
Receiver-drier
The receiver-drier (7, Fig. 2.3) is an expansion and storage reservoir for refrigerant. Its lower part contains
a granulated desiccant, which extracts and chemically binds small amounts of water from the refrigerant. In
addition it filters out particles of dirt from the refrigerant circuit which otherwise could lead to faults.
Thermostatic block valve
The thermostatic block valve (11, Fig. 2.3) with outer pressure compensation regulates the flow of
refrigerant to the evaporator in accordance with the need for refrigerant resp. the temperature in the
evaporator. The thermostatic expansion valve represents the control element between high and lowpressure part of the refrigerant circuit.
Evaporator
The evaporator (12, Fig. 2.3) consists of copper pipes and aluminium fins interconnected to form a large
heat exchanger surface. In order to use the available space for construction best possible, the evaporator
is bent U-shaped. The refrigerant flowing through the pipe from the expansion valve changes from the liquid
to the gaseous state and superheats. The required evaporation heat is extracted from the cabin air flowing
through the fins and is transmitted through the pipe to the refrigerant. The air dries as it cools and
condensation water is drained overboard.
Pressure switch
The pressure switch (6, Fig. 2.3) includes a high-pressure and a low-pressure switch. It measures the
pressure in the high-pressure part of the refrigerant circuit and switches off both the electric motor and the
compressor if the pressure is too low (e.g. due to loss of refrigerant) or too high (e.g. due to overheating in
the condenser).
Anti-icing switch
The anti-icing switch (10, Fig. 2.3) is a temperature switch. It measures the temperature of the refrigerant
at the injection pipes of the evaporator and switches off the compressor if there is any risk of ice forming or
lack of refrigerant.
Condenser fan
The axial fan (5, Fig. 2.3) comprises a brushless DC motor, a fan wheel, a housing and a protective grille.
Once the air conditioning system is switched on, the fan will be activated by the control system via pin 3
(yellow wire) and will supply the condenser with the required outside air (no speed regulation - On/Off only).
Evaporator fan
The evaporator fan (14, Fig. 2.3) comprises a brushless DC motor and a fan wheel. It draws cabin air and
fresh air through the evaporator and the electrical heater (comfort version only), and blows the air back into
the cabin via the air-diffusor. Fan speed control by the control system is accomplished through a digital
signal (PWM-signal) via pin 3 (yellow wire). The fan speed is controlled automatically, or if desired,
manually.
Page 46
Rooftop Air Conditioning System Citysphere
Compressor
The compressor (4, Fig. 2.3) comprises a semi-hermetic housing with integrated scroll compressor,
brushless DC motor, and electronics. When the air conditioning system is switched on, the compressor will
be activated via pin 1 of the compressor's cable harness, and driven with the required revs per minute
(PWM-signal). When in operation, it compresses the refrigerant to the required condensation pressure.
The integrated electric motor includes a soft-start function to prevent current peaks being transmitted to the
on-board supply, a voltage monitoring (21 V to 31 V), an overload protection, and a temperature monitoring
of electronics (+0°C to 105°C). Outboard limits the compressor is switched off. Restarting is effected by
repeatedly switching on the system.
NOTE
The functions of the compressor is blocked, if there is no supply of power
from the on-board system via pin 4 of the compressor's cable harness
(chain of safety pressure switch and icing sensor).
Page 47
Rooftop Air Conditioning System Citysphere
3.
TECHNICAL DATA
3.1.
Air conditioning system
Designation
Type Citysphere
Dimensions, rooftop air conditioning unit
Length x width x height
1,200 mm x 860mm x 250mm
Weight
approx. 55 kg
Operating voltages (depending on vehicle's electr.
system)
24 VDC
Current consumption
Total current consumption
max. 72 A
– Compressor motor
– Condenser fan
– Compressor fan
55 A
10 A
7A
Switching points, low-pressure switch
– On
– Off
2.1 ± 0.3 bar
2.0 ± 0.2 bar
Switching points, high-pressure switch
– Off
– On
26.5 ± 2 bar
20 ± 2 bar
Refrigerant, max. ambient temperature 45 °C
R134a
Power rating at inside temperature 25 °C,
outside temperature 29 °C
3.8 kW
Evaporator fan - air flow rate (air flow unobstructed)
1,350 m3/h
Switching point, anti-icing thermostat
–
–
Off
On
1 °C ± 1
3.5 °C (Max)
Refrigerant
R134a, 800g (already prefilled)
Heating capacity (comfort version only)
approx. 1 kW
Page 48
Rooftop Air Conditioning System Citysphere
3.2.
Electrical fuses
Protected components
Fuse
Letter symbol
Fuse ratings
F1
5A
Radial fan
F2
15 A
Axial fan
F3
15 A
Relays for heating (comfort version only)
F4
5A
Compressor and heating, if present
F5
60 A
Pressure switch, anti-icing switch,
Digital input compressor
3.3.
Compressor Bitzer ECH 209
Lubricating oil for refrigerating compressors (type / quantity)
BSE55 / 120 ml
Revs per minute from to (heading for via PWM-signal)
1,200 to 2,100 1/min
Page 49
Control Panel
Page 50
Wire Harness
Fig. 3.1
Wago
4pol.
Ident No. 2710687
Master
Wago
7pol.
Wago
7pol.
Wago
7pol.
Adapter Cable
Ident No. 2710699
Adapter Cable
Ident No. 2710699
Up to max. 6 Units
Adapter Cable
Slave
Ident No. 2710699
Slave
3.4.
Ident No. 2710688
Rooftop Air Conditioning System Citysphere
Connecting scheme
Positive terminal bolt
Electric plate G1+
Ground terminal bolt
Electric plate G2-
GL-W560
GL-W550
Control Unit
Compressor
Motor
3.5.
Control Panel
Rooftop Air Conditioning System Citysphere
Circuit diagram master unit
Fig. 3.2
Page 51
Fig. 3.3
Page 52
Positive terminal bolt
Electric plate G1+
3.6.
Ground terminal bolt
Electric plate G2-
Compressor
Motor
Rooftop Air Conditioning System Citysphere
Circuit diagram slave unit
Rooftop Air Conditioning System Citysphere
4.
INSTALLATION
4.1.
Safety instructions
The safety instructions set out in chapter 1.3 must be read and noted before starting work.
Installation should be performed by someone well versed in auto mechanics/auto electrics.
4.2.
Conditions for assembly
– Before assembling and operating the air conditioning system(s), the vehicle's power supply must be
checked for sufficient capacity, and must be upgraded if necessary.
A free generator capacity of 72 A (max. current consumption per unit) must be at disposal per unit to be
constructed.
This capacity must be guaranteed at idle speed, and at the same time at maximum engine compartment
temperature (low speed and high ambient temperature diminish the output of generators).
– Existing roof hatch cut-out per unit to be installed 530/564 x 970 mm.
– The required number of escape hatches according to the operating license, may not be reduced by the
units to be constructed.
4.3.
–
–
–
–
rooftop air conditioning unit master
air-diffusor
fastening set
control panel + cable
4.4.
–
–
–
–
Installation kit for master unit
Installation kit for slave unit
rooftop air conditioning unit slave
air-diffusor
fastening set
Adapter cable to preceding unit (master or slave)
4.5.
The following are not included in the installation kit and must be produced on site
–
–
–
–
–
–
Connecting cables and elements (vehicle side)
Fastening elements for routing the connecting cables
Fuse brackets and fuses to protect connecting cables
Fuse bracket and fuse to connect the distribution panel to terminal 15
Adhesion (Sika 252), cleaner (Sika Cleaner 205), activator (Sika Primer 215), sand paper
Foam for sealing the air gap between roof and inner ceiling, circulating the unit (to avoid an air shortcircuit) with the following qualifications:
– closed cellular
– little absorption of water
– Fire behavior according to FMVSS 302 resp. 95/28/EC attachment IV
For example: D2600 from Cellofoam
– Possibly necessary additional generators with installation kit
Page 53
Rooftop Air Conditioning System Citysphere
4.6.
Required equipment, special tools and accessories
a)
Installation on existing hatch cut-out
– Jigsaw to remove existing hatch frame
– Silicone spray for lubricating the saw blade
b)
For service (evacuation, filling and testing the refrigerant circuit)
–
–
–
–
–
–
–
–
4.7.
Servicing / recycling station for refrigerant R134a
Vacuum pump, suction rate min. 5 m3/h, final pressure 1 mbar
Filler hoses with quick-disconnect couplings for R134a
Leakage tester
Digital thermometer
Refrigerant R134a
Lubricating oil for refrigerating compressors BSE55
Test fittings with intake-pressure and high-pressure gauges
Preparations on vehicle’s roof
– Installation depends on the type of vehicle. The vehicle manufacturer's instructions must
therefore be observed.
Installation on existing roof hatch cut-out
– Remove inner lining of ceiling.
Fig. 4.1
Page 54
Rooftop Air Conditioning System Citysphere
– Remove dormer window frame with jigsaw. To that, sever adhesion horizontally and vertically
(lubricate saw blade with silicone spray).
Fig. 4.2
Fig. 4.3
IMPORTANT
Ensure that load-bearing elements (e.g. roof hoops, reinforcements) and
installed parts are not damaged.
Page 55
Rooftop Air Conditioning System Citysphere
– Remove adhesion remainder and clean new adhesion surface.
Fig. 4.4
4.8.
Adhesive bonding of the unit
The first unit in front in direction of travel should be the master unit (recognizable by control and temperature
sensor). Condenser pointing to direction of travel.
The other units are slave units, and are controlled by the master unit.
– Place unit, put it in the center and draw.
Abb. 4.5
NOTE
The radius of the roof hatch cutout doesn't match necessarily with the
contour of the adhesion surface of the baseplate. Therefore it is advisable
to transfer the inner contour of the baseplate to the roof of the bus.
Page 56
Rooftop Air Conditioning System Citysphere
1010
R55
R100
(970)
604
(564)
Direction of travel
Roof hatch size 970x564, R80
20
20
(R80)
Adhesive joint center line
20 at 970x564
37 at 970x530
Fig. 4.6
Keep an eye on an equal distance of the brackets to the roof.
Fig. 4.7
Page 57
Rooftop Air Conditioning System Citysphere
– Roughen bonding area of baseplate and roof surface according to the adhesive joint (Ref. Fig. 4.6 and
Fig. 4.10), clean with Sika Cleaner, and preprocess with Sika Primer (follow product information).
Fig. 4.8
Fig. 4.9
Page 58
Rooftop Air Conditioning System Citysphere
– Spread Sika adhesive on the roof surface and place unit. The required bonding gap results from the
spacer dents in the bonding surface of the baseplate.
Fig. 4.10
– From inside of the bus check all around whether all is sealed up properly.
Fig. 4.11
– Fix rear and middle brackets with Sika and screw them tight to their respective counter brackets using
allen screws. Secure forward bracket including thread rod and counter nuts onto the thread bolt.
Do not stress adhesive joint during curing time of adhesive!
Rear bracket
Middle bracket
Forward bracket
Fig. 4.12
Page 59
Rooftop Air Conditioning System Citysphere
4.9.
Establish electrical connections
The system must be protected on the vehicle side with max. 100 A direct after the battery. The cable crosssection must be determined as follows:
Minimum cross-section 25 mm2, from a cable length (single length) of 19 m a cross-section of 35 mm2 has
to be used, and from a length of 26 m to 38 m a cross-section of 50 mm2.
Refer also to “Copper cables for use in motor vehicles” DIN VDE 0298 Part 4.
a)
Disconnect vehicle battery.
IMPORTANT
Note the vehicle manufacturer's instructions when connecting the power
supply for the air conditioning system.
Only adequately dimensioned cables approved for use in motor vehicles
may be used.
Work on the electrical system may only be performed by authorized
personnel.
Suitable rubber grommets / edge protectors must be used when routing
cables through metal sheets.
b)
Make cable connections between vehicle battery and systems.
– Route cables through protective sleeves and secure them appropriately with cable ties.
– The power supply for the system must be connected to the bulkhead with the cable bolts
provided for this purpose (Fig. 2.2).
IMPORTANT
Correct polarity must be ensured without fail! (+ pole: M8 cable bolt, - pole:
M10 cable bolt). The control device will be destroyed if the polarity is
reversed!
– Provide strain reliefs.
c)
Make cable connection between control and master unit with enclosed cable harness.
– Mount control panel to a suitable place and plug in cable harness.
57
40
45
40
21
52
24 29 35
Fig. 4.13
Page 60
Rooftop Air Conditioning System Citysphere
Fig. 4.14
Fig. 4.15
– Connect cable harness with terminal 15 and D+ (terminal 61) (interpose fuse bracket at
terminal 15 and fuse 5A).
– Route cables through protective sleeves and secure them appropriately with cable ties.
– Connect cable according to the color code to the 4-pole clamp coupling of the master unit.
d)
Fix delivered inside temperature sensor to electrical panel and plug in.
e)
Connect cable between master unit and slave unit, or between a slave unit and another slave unit.
– Connect enclosed cable harness adapter according to numbering to 7-pole clamp coupling of
the two units.
– Route cables through protective sleeves and secure them appropriately with cable ties.
Page 61
Rooftop Air Conditioning System Citysphere
4.10.
Mount air-diffusor
– First adjust the forward thread rods in height and lock. Then adjust the remaining thread rods to the same
height and lock.
20 Nm*
20 Nm*
66
Lining
* Attention: While tightening, fix the upper nut.
Fig. 4.16
– Cut out the ceiling lining, distance to the thread rods approx. 20 - 30 mm (820x530).
Fig. 4.17
Page 62
Rooftop Air Conditioning System Citysphere
– Affix foam outright in the gap between roof and inner ceiling lining to avoid that air is drawn from the ceiling
area.
Fig. 4.18
– Align hood on the air-diffusor and rivet.
– Install air-diffusor. Pay attention that it aligns with the inner ceiling lining, and that the hood fits closely
round about to the seal of the baseplate.
– Attach the air-diffusor to the middle thread rods using nuts M8 and to the other thread rods using
adapters M6/M8 (Ref. Fig. 2.3).
Fig. 4.19
Page 63
Rooftop Air Conditioning System Citysphere
– Connect fan plug and secure with cable tape against chafing.
– Fasten intake air grille.
Fig. 4.20
4.11.
Mount hood
– Check air filter for correct fit..
Air filter
Fig. 4.21
– After hood installation plug in the electrical connector of the condenser fan. Pull the cable as far as
possible to the right side facing the direction of travel. Secure the condenser fan cable using a cable
clamp to the right partition wall to avoid a collision of the cable with the fan wheel during operation.
– Insert the condenser fan and position the grid and the 4 attaching screws. After that secure the hood with
the 7 flathead screws. Finally tighten all screws.
– Condenser fan: 4 Nm (Torx30
– Hood
: 3 Nm (slotted)
Page 64
Rooftop Air Conditioning System Citysphere
5.
STARTUP
5.1.
Safety instructions
The safety instructions in chapter 1.3 must be observed.
WARNING
The system may only be started when the hood and air-distribution panel
have been fitted. Risk of injury due to motor fans.
5.2.
Operator instructions
IMPORTANT
The air conditioning system can only be put into operation with the vehicle
engine running.
5.3.
Controls and indicators
4
7
1
6
2
3
1
2
3
4
5
6
7
Fan
Outside temperature
On/Off
Display
Point
Downwards
Upwards
5
Fig. 5.1
5.4.
Putting into service for the first time
a)
Start the vehicle engine and with it, observe the control panel. On the display for approximately
1 second
, and after that the actual version number of control panel should appear.
Approximately 3 seconds later it disappears and a steadily flashing point in the lower right of the
display signals the standby mode of the system.
b)
Start the vehicle engine as described in the owner's manual.
c)
Switch on system using On/Off button.
Depending on ambient temperature and temperature in the cabin, the system will operate in the cooling,
heating or ventilation mode (heating mode only comfort version).
Page 65
Rooftop Air Conditioning System Citysphere
5.5.
Additional control panel functions
To be able to check all options of the system independent of temperatures, there is a test mode and a
visualization mode.
There is a parameter mode for an individual configuration of the control panel.
5.5.1. Test mode
NOTE
To avoid stress to the vehicle batteries, the test mode should only be run
with the vehicle engine running. Operation with the engine off is only
advisable when checking the fan.
At ambient temperatures below 17 °C the system may only be operated
restricted in the cooling operation:
Temperature
Description
Below 5 °C
No cooling operation permissible
Between 5 °C and 12 °C
Maximum operating time 3 minutes
Between 13 °C and 17 °C
Maximum operating time 15 minutes
IMPORTANT
Non-compliance may lead to damage of the compressor.
Operating
To get to the test mode you have to press the button
for a few seconds until the display
displays.
The password for access to the test mode is
. You enter the password by pressing the buttons
and
. To confirm the password, press the
button.
If you entered a wrong password, the temperature-setpoint-difference will be displayed again. If the entry
was correct, you can switch with the buttons
and
from outputs
to inputs
, by pressing
you will come to the corresponding menu.
To leave the test mode, the button
buttons
and
and the button
Page 66
has to be pressed. To select the desired inputs/outputs, press the
.
Rooftop Air Conditioning System Citysphere
Outputs
Parameter
Description
The radial fan is operating at 25% capacity and can be modified with the buttons
and
.
The compressor, the radial fan, and the axial fan run on maximum level. The radial
fan can be modified with the buttons
and
.
Important: operation with the engine off can discharge the vehicle battery very
quickly.
Important: At ambient temperatures below 17 °C this mode is only permissible for a
maximum operating time in accordance with the table above.
The axial fan runs on maximum level.
The electrical heating element is switched on and the radial fan is operating at
heating speed. The radial fan can be modified with the buttons
and
.
Important: Operation with the engine off can discharge the vehicle battery very
quickly.
A flashing point in the lower right of the display signifies that the selected output mode is disabled. A
permanently lighted point signifies that the output is switched on. In order to switch the outputs on/off, the
button
or the button
must be pressed.
Inputs
Parameter
Description
Condition
Point
Significance
0V
Flashing
Fault
Z or 24 V
On
OK
Z or 0 V
Flashing
No elec. heating
element present
24 V
On
Elec. heating
element present
Z or 0 V
Flashing
Fault
24 V
On
OK
24 V
Flashing
Fault
Z or 0 V
On
OK
24 V
Flashing
Fault
Z or 0 V
On
OK
Diagnostic output compressor motor
Automatic electrical heating element
identification (with relay installed)
D + (terminal 15)
Axial fan
Radial fan
Z stands for high-resistance
Page 67
Rooftop Air Conditioning System Citysphere
5.5.2. Visualization mode
You will reach the visualization mode by simultaneously pressing the buttons
and
for a few
seconds. With the buttons
and
the desired operation mode can be selected. Its value will be
displayed by pressing the
button.
With button
you will get back to the selection of operation status, by pressing once again you can leave
the visualization mode.
Operation status
Description
Inside temperature
Outside temperature
On-board voltage [V]
PWM [%] radial fan
PWM [%] compressor
Software version control panel
Software version control device
Control partial calculation (proportional
quota)
Control partial calculation (integral
quota)
Temperature nominal value
Hour meter compressor*
Hour meter electrical heating element*
(comfort version only)
Hour meter entire system*
D + (terminal 61) voltage [V]
* For the hour meters the operation times are displayed in three successively flashing numerical values e.g.
after selecting parameter
the numerical values
will be displayed. This means that the
compressor had run in total for 129112 hours.
Page 68
Rooftop Air Conditioning System Citysphere
5.5.3. Parameter mode
To get to the parameter mode you have to press the button
for a few seconds until the display
displays. The password for access to the parameters is
. You enter the password by pressing the
buttons
and
. To confirm the password, press the
button. If you entered a wrong password, the
temperature-setpoint-difference will be displayed again.
To leave the parameter mode, the button
the buttons
and
and the button
Parameter
has to be pressed. To select the desired parameter, press
.
Description
Pre-setting
Max
Min
Time period, the radial fan has been
operating without D+ (terminal 61) signal
30 min
90 min
0 min
1
2
0
0
1
0
25%
40%
10%
1
1
0
Selecting the temperature-setpointdifference (TSD)-function:
0: TSD is firmly set to the current value
and cannot be changed during normal
operation
1: TSD can be changed during normal
operation
2: TSD is set to value 3, and cannot be
changed during normal operation
Autostart
0: Off
1: On
Output stage radial fan in the heating
mode
Manual adjustment of the radial fan
0: Blocked
1: Enabled
Page 69
Rooftop Air Conditioning System Citysphere
6.
MAINTENANCE
6.1.
Safety instructions
The safety instructions and regulations in chapter 1.3 must be observed.
6.2.
General
a)
All work on the refrigerant circuit may only be carried out by qualified personnel from duly authorized
specialist repair shops.
b)
The special equipment, tools and accessories listed in chapter 4.6 are required and must be used
for maintenance work on the refrigerant circuit.
c)
Like all parts of the vehicle, the air conditioning system is subject to constant stresses. The specified
maintenance work must be carried out regularly in order to ensure trouble free operation of the
system and avoid damage to the components.
d)
Proper handling of the system and a complete record of all the required scheduled maintenance are
essential for acceptance of possible warranty claims concerning damaged components subject to
maintenance.
e)
To prevent moving parts in the refrigerant circuit from seizing up due to resinification of the oil, the
air conditioning system must be switched on for approx. 10 minutes at least once per month when
it is not in regular use. Requirement: (Minimum outside temperature > 12 °C or heated hall.)
6.3.
Maintenance and Care
a)
Regardless of the following schedule, all screw connections securing the rooftop air conditioning
system must be checked within four weeks of using the system for the first time in order to ensure
that they are secure.
b)
Even if the air conditioning system is not operated, individual components are subject to wear due
to normal ageing or stress due to vehicle operation. All checks listed in the maintenance and
servicing plan must therefore be performed regardless of the system operating hours.
c)
Even if hose connections do not leak, refrigerant may be lost regardless of operating hours.
However, a leak must be assumed to exist somewhere in the system if relatively large quantities of
refrigerant are lost.
d)
Slight contamination of evaporator and condenser fins is removed with compressed air applied
against normal direction of airflow.
Major contamination or greasy deposits must first be removed with soapy water or a suitable
cleaning solvent (not aggressive for copper or aluminium) before cleaning with compressed air or
a water jet.
e)
The receiver-drier must be replaced principally whenever work has been performed on the
refrigerant circuit.
f)
The filter mat must be replaced at regular intervals
g)
The drain holes for rain water in the baseplate must be unobstructed.
IMPORTANT
Under no circumstances may refrigerant be discharged into the atmosphere.
Page 70
Rooftop Air Conditioning System Citysphere
6.4.
Maintenance and service checklist
System component
Maintenance tasks
Frequency
m
6m
a
Refrigerant circuit
– Connections
– Condenser
– Condensation water
drain
– rooftop air conditioner
unit
Test for leaks with leak tester
Check condition of fins (must be cleaned if soiled)
Check openings and clean if necessary
X
X
X
Check overall condition and secure attachment of
connections
X
Compressor
– Compressor
– supports
– elec. connections
Check for abnormal noises during operation
Check condition and function
Check for signs of oxydation
X
Check for unobjectionable condition
Check for unobjectionable condition and secure attachment
X
X
X
X
Electrical connections
– Power supply wires
– Connectors
Abbreviations: m – monthly, a – yearly (a – every six months if operated throughout the year)
6.5.
Inspections before repair
In order to avoid unnecessary disassembly or duplication of work, the overall condition of the airconditioning
system must be checked before starting any repairs.
Visual inspection
a)
Outer condition of rooftop unit:
–
–
–
–
–
b)
Hood without cracks and no damage to paint finish
Air inlets and outlets clean and undamaged
Attachment points secure and without corrosion
Wiring connections serviceable
Openings in metal undamaged.
Condition of air-diffusor
– Attachment points / screws secure
– Circulating air inlet undamaged and clean.
c)
Condition of compressor
– Hose connections undamaged and secure
– Attachment parts / screws secure.
– Electrical connection undamaged.
Page 71
Rooftop Air Conditioning System Citysphere
6.6.
Troubleshooting
6.6.1. General
a)
A systematic approach is advisable for troubleshooting. Appropriate action must be undertaken as
described below for faults of a general nature or when normal conditions are not obtained during
the pressure test.
b)
Certain faults can only be located and remedied by skilled personnel using special tools.
6.6.2. Cause of faults in the electrical system
The individual circuits must be systematically checked with the aid of the circuit diagram (see Fig. 3.2) and
the fault localized. Above all plug connections, switches, relays, etc., should be checked for continuity.
The following possibilities must always be checked and excluded as a possible cause of the malfunction:
–
–
–
–
–
–
Defective fuses
Corrosion of plug contacts
Loose contact in plug connectors
Wrong crimping on connector
Corrosion on wiring and fuses
Corrosion on battery poles
6.6.3. Cause of faults in the air conditioning system
– defective evaporator or condenser fan
– contaminated or clogged air filter, soiled evaporator or condenser fins
– shortage of refrigerant in the system
If the system is deactivated continuously, we recommend that it be checked by an authorized workshop.
6.6.4. Dealing with problems in the refrigerant circuit
If faults develop in the refrigerant circuit, the system must be tested and repaired by an authorized specialist
repair shop according to the rules. Refrigerant must never be discharged into the atmosphere.
6.6.5. Cause of faults making it impossible to reach the required states during pressure tests
Divergences from the required state during pressure tests (chapter 6.8) may be due to the following causes.
These causes must be checked, the trouble located and defective components repaired or replaced.
High pressure gauge reading too high
– Condenser air flow restricted
– Too much refrigerant
High pressure gauge reading too low
– Not enough refrigerant (check sight glass)
– Compressor speed too low. (System in standard operation, maximum number of revs can be forced in
test mode (5.5.1))
– Compressor defective
Low pressure gauge reading too high
– Expansion valve defective
– Compressor speed too low
– Compressor defective
Page 72
Rooftop Air Conditioning System Citysphere
Low pressure gauge reading too low
–
–
–
–
–
Intake or delivery line restricted, e.g. by kinks
Expansion valve defective
Not enough refrigerant
Evaporator air flow restricted
Collector/drier clogged
6.7.
Repairs
IMPORTANT
Under no circumstances may refrigerant be discharged into the atmosphere.
NOTE
The safety precautions and regulations contained in chapter 1.3 and 6.2
must be observed.
Only genuine spare parts may be used for repairs and the original condition
must be restored.
a)
Always use genuine spare parts or standard parts for repairs.
b)
The system's original condition must always be restored when performing repairs.
c)
Before opening / disassembling components in the refrigerant circuit, the refrigerant must be
drained into the recycling station provided and disposed of properly or reused.
d)
After completing repairs on the refrigerant circuit, the system must be
– evacuated in accordance with the operating instructions of the recycling station
– filled with refrigerant on the high pressure side, with the system at rest
6.8.
Post-repair procedures and testing
6.8.1. Check refrigerant pressures
General
As a rule, every air conditioning system filled with refrigerant is a pressurized system. The pressure is the
same throughout the system circuit and depends on ambient temperature.
During operation of the system, the working pressure on the intake side differs from that on the delivery side
of the compressor. The pressures differ and are influenced by the compressor operating speed, the
temperature inside the vehicle, the outside air temperature and relative humidity. Abnormal working
pressures indicate that there is a fault in the system.
The working pressure should be tested with an on-board power supply of 24-26 V and at air temperatures
between 17°C and max. 35°C. The system must be operated in the test mode
. The hood must be fitted
for the pressure test since the air pressure of the heat exchangers has a decisive influence on whether or
not the operating pressure is reached.
Page 73
Rooftop Air Conditioning System Citysphere
The following approx. values must be obtained:
Outside air
temperature
=Indoor temperature
Low pressure gauge
High pressure gauge
62.60°F
2.7 ± 0.2 bar
8.4 ± 2 bar
68.00°F
2.9 ± 0.2 bar
9.0 ± 2 bar
77.00°F
3.3 ± 0.2 bar
10.3 ± 2 bar
86.00°F
4.1 ± 0.2 bar
11.4 ± 2 bar
95.00°F
4.7 ± 0.2 bar
12.8 ± 2 bar
If different pressure values are obtained, an authorized repair shop must be consulted to investigate the
reasons.
When the pressure test is complete, disconnect the pressure gauges and refit the sealing caps.
6.8.2. Visual inspection
The system must be inspected visually as described in chapter 6.5 when the repairs are complete.
Page 74
Rooftop Air Conditioning System Citysphere
7.
WARRANTY CLAIMS PROCESSING
In the event that a warranty claim arises, contact your local distributor.
Page 75
Rooftop Air Conditioning System Citysphere
Page 76
Climatisation sur toiture Citysphere
1.
INTRODUCTION
Cette notice de montage et d’entretien contient des informations importantes à l’attention du personnel
formé pour le montage, l’utilisation et l’entretien de l’unité de climatisation pour toiture.
1.1.
Signification des signalisations
Dans cette notice les mises en garde AVERTISSEMENT, ATTENTION et NOTA ont les significations
suivantes:
AVERTISSEMENT
Cette mise en garde est utilisée lorsque le non-respect ou le respect insuffisant des instructions ou des procédures peut provoquer des lésions ou
des accidents mortels.
ATTENTION
Cette mise en garde est utilisée lorsque le non-respect ou le respect insuffisant des instructions ou des procédures peut provoquer des dommages
matériels.
NOTA
Cette mise en garde est utilisée pour attirer l'attention sur une particularité.
1.2.
Autre documentation à utiliser
Notice d'utilisation climatisation sur voiture
1.3.
Instructions et prescriptions de sécurité
L'unité de climatisation sur toiture a été conçue et fabriquée conformément aux directives CE.
Le fonctionnement sûr de l'unité est assuré si le montage a été effectué conformément à la notice de
montage et d'entretien.
Si le montage de l'unité de climatisation sur toiture entraîne une augmentation de la hauteur du véhicule
par rapport à celle indiquée dans les papiers du véhicule, une homologation selon le § 19 du StVZO (Code
de la route allemand) est nécessaire.
Les prescriptions générales de prévention des accidents doivent toujours être respectées. Des « Prescriptions
générales de sécurité » supplémentaires sortant du cadre de ces prescriptions sont indiquées ci-après.
Les règlements de sécurité spéciaux sont mentionnés dans chaque partie ou procédé sous forme de mises
en évidence.
Dispositions générales relatives à la sécurité
Le non-respect de la notice de montage et d'entretien et des indications qu'elle contient entraîne l'exclusion de toute
responsabilité de la part de la société Spheros. Il en est de même pour les travaux de réparation non conformes
ou pour des réparations effectuées avec des pièces qui ne sont pas des pièces de rechange originales.
Les conducteurs électriques et les organes de commande de la climatisation doivent être installés dans le
véhicule de manière que rien ne puisse entraver leur bon fonctionnement dans des conditions de
fonctionnement normales.
Page 77
Climatisation sur toiture Citysphere
Instructions de sécurité pour les travaux d'entretien
En cas de perturbations dans le circuit de réfrigérant, l'installation doit être vérifiée et remise en état par un
atelier spécialisé. Le réfrigérant ne doit en aucun cas être rejeté dans l'atmosphère.
Ne jamais chauffer les bouteilles de réfrigérant à l'aide d'une flamme.
Le réfrigérant liquide ne doit pas entrer en contact avec des parties du corps. Tenir compte des instructions de
sécurité.
Lors de la manipulation du liquide réfrigérant, porter des vêtements et des lunettes de protection.
ATTENTION
La charge utile diminue du poids des équipements supplémentaires.
AVERTISSEMENT
Ne pas effectuer des travaux de brasage ou de soudage directement sur
les composants du circuit de réfrigération fermé ou à proximité du circuit.
Un échauffement important fait augmenter la pression dans l'équipement.
Il y a risque d'explosion.
Avant de commencer les travaux, l'équipement doit être complètement
refroidi. Il y a risque de brûlure au contact du condenseur, du compresseur
et des tuyaux.
Les travaux de montage, de maintenance et de réparation doivent être
exécutés par un personnel qualifié. Lors des travaux, le moteur doit être
arrêté et l'alimentation électrique coupée.
Avant de commencer les travaux sur le système électrique, il est nécessaire de déconnecter la batterie.
Lors de travaux sur les composants électriques, ne pas porter de bijoux
métalliques (enlever bracelets, montres, chaînes, bagues).
1.4.
Certification
a)
La compatibilité électromagnétique a été vérifiée.
b)
Les normes du règlement ECE R10 Rev. 03 sont remplies.
1.5.
Suggestions d'amélioration ou de modification
Veuillez adresser vos réclamations, suggestions d'amélioration ou de rectification de cette notice à :
Spheros GmbH
Friedrichshafener Straße 9 - 11
D-82205 Gilching
Page 78
Téléphone :
+49 (0) 8105 7721 887
Téléfax :
+49 (0) 8105 7721 889
Climatisation sur toiture Citysphere
2.
DESCRIPTION GENERALE
La climatisation sur toiture est conçue pour le refroidissement/la climatisation et le chauffage (uniquement
la version Comfort) des bus.
La climatisation sur toiture existe en version maître et en version esclave. L'unité maître contient tous les
documents nécessaires à son montage et à son utilisation, comme le boîtier de commande, le faisceau de
câbles de la commande (2), la commande (3) et les sondes de température.
Il faut toujours utiliser exactement une unité maître par véhicule. Le siège conducteur est un bon emplacement pour la commande et, en relation, l'unité maître (1) peut alors occuper la position la plus en avant.
L'unité maître peut alimenter en signaux de fonctionnement jusqu'à cinq unités esclaves (5). Chaque unité
esclave est dotée d'un faisceau adaptateur de câbles (6) pour le raccordement à l'unité placée devant elle.
L'alimentation électrique des unités se fait à partir de l'alimentation du véhicule via les câbles (4, non livrés).
Les unités sont conçues pour une tension de 24 V.
L'équipement est déjà rempli avec du réfrigérant (R134a) et il ne reste plus qu'à le brancher au réseau de
bord lors du montage.
5
5
6
1
6
4
2
4
4
1
2
3
4
5
6
3
Unité maître
Câble dispositif de commande
Commande
Câble alimentation électrique
Unité esclave
Faisceau de câbles
Fig. 2.1
Page 79
Climatisation sur toiture Citysphere
2.1.
Composantes
La climatisation sur toiture est représentée à la Fig. 2.3.
1 - Capot (partie du bord extérieur)
2 - Plaque de base constituant la partie portante
3 - Condenseur
4 - Compresseur
5 - Ventilateur du condenseur
6 - Pressostat
7 - Collecteur / déshydrateur / filtre pour réfrigérant
8 - Raccord de charge HP
9 - Raccord de charge BP
10 - Thermostat anti-givre
11 - Détendeur
12 - Évaporateur
13 - Filtre à air
14 - Ventilateur de l'évaporateur
15 - Élément chauffant électrique (seulement sur la version Comfort)
16 - Sonde de température air extérieur (uniquement unité maitre)
17 - Plaque électrique (voir Fig. 2.2)
18 - Répartiteur d'air
19 - Grille de sécurité
20 - Ouvertures d'écoulement d'eau
21 - Creux de prise ou surfaces pour dispositif de levage
b
f
17a)
Fusibles
17b)
Appareil de commande
(seulement sur l'unité maître)
17c)
Interface électrique vers
l'appareil de commande
(seulement l'unité maître)
17d)
Interface électrique vers les
autres unités
17e)
Relais de chauffage (seulement sur la version Comfort)
17f)
Sonde de température ambiante (seulement sur l'unité
maître)
17g)
Boulons de raccordement
alimentation électrique
c
GL-W550
M8
15 Nm
+
d
K1
g
e
F5=60 A
¯
F1= 5 A
F2=15 A
F3=15 A
F4= 5 A
M10
20 Nm
a
Fig. 2.2 Plaque électrique (simplifiée)
Page 80
Climatisation sur toiture Citysphere
5
13
12
1
2
16
10
3
6
4
7
9
20
8
11
21
17
15
14
18
19
Fig. 2.3
Page 81
Climatisation sur toiture Citysphere
2.2.
Système électrique
Le schéma Fig. 3.1 donne une vue d'ensemble de la commutation des différents modules.
Le branchement électrique de l'équipement s'effectue selon les schémas électriques des Fig. 3.2 et
Fig. 3.3.
La climatisation sur toiture est équipée d'un circuit de protection contre la décharge de la batterie. La remise
en service s'effectue par simple redémarrage.
Lorsque le moteur du véhicule est à l'arrêt, seule la fonction de ventilation de la climatisation peut
fonctionner. Cette fonction peut également être inhibée (voir chapitre 5.5.3).
Le circuit électronique du moteur dispose d'un dispositif de démarrage en douceur pour éviter les pointes
de courant sur le réseau de bord. En outre, le moteur électrique s'éteint automatiquement lors de surcharge
(en raison de dommages éventuels de l'unité). La remise en service s'effectue par simple redémarrage de
l'équipement.
2.3.
Mode de fonctionnement de la climatisation
AbDès le démarrage de l'équipement, la commande surveille la température extérieure et la température
ambiante. Aussitôt que les conditions suivantes sont remplies, la fonction de refroidissement de l'unité
commence:
–
–
–
–
Le moteur du véhicule tourne (signal de D+/61)
La température extérieure est supérieure à 17°C
La température ambiante est supérieure à 22°C
La température ambiante est supérieure à la température extérieure moins la différence température consigne, TSD (valeur affichée sur l'afficheur de l'appareil de commande)
Air chaud
Air froid
Air froid
Air de circulation
* voir Fig. 2.3
Fig. 2.4 Mode refroidissement de l'équipement
Page 82
Climatisation sur toiture Citysphere
Le compresseur à moteur électrique intégré se met en marche. Il comprime le gaz réfrigérant et le refoule
vers le condenseur, où il se condense en dégageant de la chaleur.
Le condenseur transmet la chaleur de condensation produite à l'air extérieur qui le traverse. Le ventilateur
axial assure une ventilation suffisante même lorsque le véhicule est à l'arrêt. Le réfrigérant liquide traverse
le collecteur / déshydrateur pour arriver au détendeur qui en assure la détente par chute de pression
contrôlée puis revient à l'état gazeux dans l'évaporateur après forte absorption de chaleur.
L'air chaud de la cabine est aspiré par le ventilateur axial, mélangé à l'air frais, refroidi et séché dans
l'évaporateur puis réacheminé dans la cabine par le répartiteur d'air. L'eau de condensation produite est
séparée et évacuée vers l'extérieur par les ouvertures d'écoulement.
En fonctionnement, le circuit de réfrigération est surveillé par le thermostat anti-givre et par le pressostat.
Ces deux interrupteurs peuvent arrêter le compresseur (en cas de besoin).
Lors d'apparition de défauts sur une unité, les autres unités continuent à fonctionner normalement.
Lors de l'arrêt de la climatisation par la commande, les ventilateurs et le compresseur s'arrêtent, tous les
composants restent cependant sous tension.
L'eau de pluie qui pénètre dans la climatisation sur toiture est évacuée par les ouvertures d'écoulement
(20, Fig. 2.3).
Fonctionnement du chauffage (seulement sur la version Comfort)
Dès le démarrage de l'équipement, la commande surveille la température extérieure et la température
ambiante. Aussitôt que les conditions suivantes sont remplies, la fonction de chauffage de la climatisation
se met en marche:
– Le moteur du véhicule tourne (signal de D+/61)
– La température extérieure est inférieure à 17°C
– La température ambiante est comprise entre 10°C et 22°C.
Air frais
Air chaud
Air chaud
Air de circulation
* voir Fig. 2.3
Fig. 2.5 Mode chauffage de l'équipement
Page 83
Climatisation sur toiture Citysphere
2.4.
Conception, fonction et mode de fonctionnement des sous-ensembles
Condenseur
Le condenseur (3, Fig. 2.3) est composé de serpentins et d'ailettes en aluminium reliés entre eux pour
former une grande surface d'échangeur thermique.
Il refroidit le gaz réfrigérant chaud de manière à ce que celui-ci se liquéfie et devienne très froid et il transmet
la chaleur produite par la condensation à l'air extérieur qui le traverse par le biais des ailettes.
Collecteur / déshydrateur
Le collecteur / déshydrateur (7, Fig. 2.3) est un réservoir de compensation et d'accumulation du réfrigérant.
Il contient, dans sa partie médiane, un dessiccatif qui capture les petites quantités d'eau contenues dans le
réfrigérant et les lie chimiquement. Il filtre de plus les particules de poussière du circuit de réfrigération qui
pourraient entraîner des défauts.
Détendeur thermostatique
Le détendeur thermostatique (11, Fig. 2.3) à compensation de pression extérieure, régule le débit de réfrigérant
vers l'évaporateur en fonction du besoin ou de la température dans l'évaporateur. Le détendeur thermostatique
est l'élément de régulation entre les parties haute et basse pression du circuit de réfrigération.
Evaporateur
L'évaporateur (12, Fig. 2.3) est composé de serpentins et d'ailettes en aluminium reliés entre eux pour former
une grande surface d'échangeur thermique. Afin d'utiliser de manière optimale l'espace mis à disposition,
l'évaporateur est en forme de U. Sa fonction est de transformer de l'état liquide à l'état gazeux et à chauffer le
réfrigérant en provenance du détendeur et traversant la tuyauterie. La chaleur de condensation nécessaire est
retirée de l'air circulant par les ailettes et transmise au liquide réfrigérant par le plongeur de contact. L'air ainsi
refroidi est asséché et l'eau condensée est évacuée vers l'extérieur.
Pressostat
Le pressostat (6, Fig. 2.3) est constitué d'un contacteur haute pression et d'un contacteur basse pression.
Il contrôle la pression dans la partie haute pression du circuit de réfrigération et il coupe le moteur électrique
et donc le compresseur en cas de pression trop faible (parmanque de réfrigérant) ou de pression trop forte
(suite, par exemple, à une surchauffe du condenseur).
Thermostat anti-givre
Le thermostat anti-givre (10, Fig. 2.3) est un thermocontact. Il mesure la température du réfrigérant sur les
tuyaux d'injection de l'évaporateur et il coupe l'alimentation du compresseur en cas de risque de gel ou de
manque de réfrigérant.
Ventilateur du condenseur
Le ventilateur de l'évaporateur (5, Fig. 2.3) est constitué d'un moteur à courant continu sans balai, d'un rotor,
d'un boîtier et d'une grille de protection. Dès que la fonction de refroidissement est en marche, le ventilateur
est activé par la commande via la broche 3 (câble jaune) et alimente le condenseur en air frais nécessaire (pas
de réglage de la vitesse de rotation, uniquement marche/arrêt).
Ventilateur de l'évaporateur
Le ventilateur de l'évaporateur (14, Fig. 2.3) se compose d'un moteur à courant continu sans balais et du
rotor. Il aspire l'air de l'habitacle et de l'air frais à travers l'évaporateur et la résistance de chauffage (seulement sur la version Comfort) et le réinjecte dans l'habitacle à travers le répartiteur d'air. La vitesse de rotation du ventilateur est définie par la commande (signal PWM) via la broche 3 (câble jaune du faisceau du
ventilateur). La sélection de la vitesse de rotation du ventilateur peut être automatique ou manuelle, au
choix.
Page 84
Climatisation sur toiture Citysphere
Compresseur
Le compresseur (4, Fig. 2.3) est constitué d'un boîtier semi-hermétique à compresseur scroll intégré, d'un
moteur à courant continu sans balais et de composants électroniques. Dès la mise en marche de la
fonction, le compresseur est activé via la broche 1 du faisceau de câbles et piloté à la vitesse de rotation
nécessaire (signal PWM). Il comprime alors le réfrigérant à la pression nécessaire à sa liquéfaction.
Le moteur électrique intégré est doté d'un démarrage en douceur pour éviter les pointes de courant sur le
réseau de bord, d'une surveillance de tension (de 21 V à 31 V), d'une protection anti-surcharge et d'une
surveillance de température du circuit électronique (+0°C bis 105°C). Le compresseur est arrêté lorsqu'il se
trouve en dehors des limites. La remise en service s'effectue par simple redémarrage de l'équipement.
NOTA
Le fonctionnement du compresseur est inhibé, lorsqu'il n'y a pas de tension
sur la broche 4 de son faisceau de câbles (chaîne de sécurité du pressostat
et de la sonde de gel).
Page 85
Climatisation sur toiture Citysphere
3.
DONNEES TECHNIQUES
3.1.
Climatisation
Désignation
Citysphere
Dimensions (unité de climatisation sur toiture)
Longueur x largeur x hauteur
1200 mm x 860 mm x 250 mm
Poids
environ 55 kg
Tension de service (suivant réseau de bord véhicule)
24 VDC
Consommation
Consommation totale
72 A (max)
– Moteur Compresseur
– Ventilateur Condenseur
– Ventilateur Evaporateur
55 A
10 A
7A
Points de commutation du contacteur basse pression
– Marche
– Arrêt
2,1 ± 0,3 bars
2,0 ± 0,2 bars
Points de commutation du contacteur haute pression
– Arrêt
– Marche
26,5 ± 2 bars
20 ± 2 bars
Réfrigérant, température ambiante maxi 45°C
R134a
Puissance nominale avec une température ambiante de 25°C
température extérieure de 29°C
3,8 kW
Evaporateur - Débit d'air (circulation libre)
1350 m3/h
Point de commutation du thermostat anti-givre
– Arrêt
– Marche
1°C ± 1
3,5°C (max)
Réfrigérant
R134a, 800g (déjà prérempli)
Puissance du chauffage (seulement sur la version
Comfort)
environ 1 kW
Page 86
Climatisation sur toiture Citysphere
3.2.
Fusibles électriques
Sous-ensembles protégés
Fusible
Abréviation
Intensité
F1
5A
Ventilateur de l'évaporateur
F2
15 A
Ventilateur du condenseur
F3
15 A
Relais de chauffage (seulement sur la version Comfort)
F4
5A
Compresseur et chauffage, le cas échéant
F5
60 A
Pressostat, thermostat anti-gel
Entrée numérique compresseur
3.3.
Compresseur Bitzer ECH 209
Huile frigorifique (Type / Qté)
BSE55 / 120 ml
Vitesse de rotation de à (pilotage par signal PWM)
1200 à 2100 1/min
Page 87
Control Panel
Page 88
Wire Harness
Fig. 3.1
Wago
4pol.
Ident No. 2710687
Master
Wago
7pol.
Wago
7pol.
Wago
7pol.
Adapter Cable
Ident No. 2710699
Adapter Cable
Ident No. 2710699
Up to max. 6 Units
Adapter Cable
Slave
Ident No. 2710699
Slave
3.4.
Ident No. 2710688
Climatisation sur toiture Citysphere
Schéma de raccordement
Positive terminal bolt
Electric plate G1+
Ground terminal bolt
Electric plate G2-
GL-W560
GL-W550
Control Unit
Compressor
Motor
3.5.
Control Panel
Climatisation sur toiture Citysphere
Schéma électrique Unité maître
Fig. 3.2
Page 89
Fig. 3.3
Page 90
Positive terminal bolt
Electric plate G1+
3.6.
Ground terminal bolt
Electric plate G2-
Compressor
Motor
Climatisation sur toiture Citysphere
Schéma électrique Unité esclave
Climatisation sur toiture Citysphere
4.
MONTAGE
4.1.
Consignes de sécurité
Lire les consignes de sécurité du chapitre « 1.3 » avant de commencer les travaux et les respecter.
Le montage doit être effectué par un personnel spécialisé dans les domaines de l'automobile et de
l'électricité automobile.
4.2.
Conditions pour le montage
– Vérifier avant le montage et la mise en service de l'unité (des unités) de climatisation, que l'alimentation
électrique du véhicule possède une capacité suffisante, l'augmenter si nécessaire.
Suivant l'unité à monter, la capacité de générateur disponible doit être de 72 A (puissance absorbée
maximale par installation).
Cette capacité doit également être assurée en vitesse de rotation au point mort ainsi qu'à température
maximale du moteur (une vitesse de rotation faible et de fortes températures ambiantes diminuent les
capacités des générateurs).
– Nombre d'issues de secours en fonction de l'installation à monter 530/564 x 970 mm.
– Le nombre d'issues de secours exigé par l'autorisation de circulation ne doit pas se trouver diminué par
l'installation à monter.
4.3.
Kit de montage pour l'unité maître
Unité de climatisation sur toiture maitre:
– Répartiteur d'air
– Kit de fixation
– Dispositif de commande + câble
4.4.
Kit de montage pour l'unité esclave
Unité de climatisation sur toiture esclave:
– Répartiteur d'air
– Kit de fixation
– Faisceau de câble pour unité précédente (maitre ou esclave)
4.5.
Non compris dans le kit de montage et à réaliser soi-même
–
–
–
–
–
–
Câbles et éléments de raccordement électrique (côté véhicule)
Eléments de fixation pour la pose des câbles de raccordement
Porte-fusible et fusibles pour la sécurisation des câbles de raccordement électriques
Porte-fusible et fusibles pour le raccordement de la commande sur la borne 15
Colle (Sika 252), nettoyant (Sika Cleaner 205), agent activant (Sika Primer 215), toile émeri
Mousse d'étanchéité pour les espaces entre le toit et les toits extérieur et intérieur autour de l'installation
(pour éviter les courts circuits) et avec la qualification requise suivante :
– à cellules fermées
– faible absorption d'eau
– Comportement au feu FMVSS 302 ou 95/28/CE Annexe IV
Par exemple: D2600 de Cellofoam
– Générateurs supplémentaires pouvant s'avérer nécessaires avec le kit de montage
Page 91
Climatisation sur toiture Citysphere
4.6.
Matériel d'équipement nécessaire, outillage spécifique et accessoires
a)
Montage sur ouverture de secours existante
– Scie pour enlever le cadre de l'ouverture de secours existante
– Spray silicone pour lubrifier la lame de scie
b)
Pour l'entretien (évacuation, remplissage et contrôle du circuit de réfrigération)
–
–
–
–
–
–
–
–
4.7.
Station de récupération du réfrigérant R134a
Pompe à vide, capacité d'aspiration de 5 m/h min, pression de sortie 1 mbar
Flexibles de remplissage avec raccords rapides pour R134a
Détecteur de fuites
Thermomètre numérique
Réfrigérant R134a
Huile frigorifique BSE55
Equipement de contrôle avec manomètre de pression d'aspiration et manomètre de haute pression
Préparation de la toiture du véhicule
– Le montage dépendant du type de véhicule, il convient de tenir compte des consignes du constructeur du véhicule.
Montage sur ouverture de secours existante
– Enlever l'habillage intérieur du toit.
Fig. 4.1
Page 92
Climatisation sur toiture Citysphere
– Enlever le cadre de l'ouverture de secours à l'aide de la scie. Pour cela, séparer le joint horizontal du joint vertical (graisser la lame de la scie à l'aide du spray silicone).
Fig. 4.2
Fig. 4.3
ATTENTION
N'endommager aucun élément porteur (par exemple arceau, raidisseurs)
ni élément intégré.
Page 93
Climatisation sur toiture Citysphere
– Enlever les traces de colle et nettoyer les nouvelles surfaces collantes.
Fig. 4.4
4.8.
Coller l'installation
La première unité dans le sens de la conduite devrait être l'unité maître (reconnaissable à l'appareil de
commande et à la sonde de température). Le condenseur est à monter dans le sens de la conduite.
Les unités suivantes sont les unités esclaves pilotées par l'unité maître.
– Installer l'équipement, le centrer et marquer les repères.
Abb. 4.5
NOTA
Le rayon de l'ouverture de secours n'est pas obligatoirement adaptée au
contour de la surface collante de la plaque de base. C'est pourquoi il est
conseillé de reporter le contour intérieur de la plaque de base sur le toit du bus.
Page 94
Climatisation sur toiture Citysphere
1010
R55
R100
(970)
Découpe de l'ouverture
970x564, R80
20
604
(564)
Sens de la conduite
20
(R80)
Milieu couture collée
20 pour 970x564
37 pour 970x530
Fig. 4.6
Veiller à ce que les supports soient à égale distance du toit.
Fig. 4.7
Page 95
Climatisation sur toiture Citysphere
– Dépolir la plaque de base et le toit dans la zone de collage (Fig. 4.6 et Fig. 4.10), les nettoyer avec du
nettoyant Sika Cleaner et les pré-traiter avec Sika Primer (respecter les indications du produit).
Fig. 4.8
Fig. 4.9
Page 96
Climatisation sur toiture Citysphere
– Mettre une couche de Sika-Raupe sur le toit et y déposer l'équipement. L'espace de collage nécessaire
est créé par des encoches dans la surface collante de la plaque de base.
Fig. 4.10
– Vérifier de l'intérieur du bus si tout est bien étanché tout autour.
Fig. 4.11
– Fixer les supports arrière et centraux avec de la colle Sika et les visser au contre-support haut à l'aide
de vis six pans creux. Fixer le support avant avec la tige filetée et le contre-écrou au goujon fileté.
Ne pas solliciter les raccords collés avant que la colle ne soit durcie !
Support arrière
Support central
Support avant
Fig. 4.12
Page 97
Climatisation sur toiture Citysphere
4.9.
Effectuer les raccordements électriques
L'équipement doit être protégé, côté véhicule, directement après la batterie, à 100 A maxi. La section des
câbles est déterminée de la façon suivante:
Section minimale 25 mm2, à partir d'une longueur de câble (longueur simple) de 19 m, utiliser une section
de 2 et à partir d'une longueur de câble de 26 m jusqu'à 38 m, utiliser une section de 50 mm2.
Voir également « Conducteurs électriques en cuivre pour véhicules automobiles » DIN VDE 0298 - Partie 4.
a)
Débrancher la batterie du véhicule.
ATTENTION
Pour le branchement électrique de l'équipement, se conformer aux instructions du constructeur du véhicule.
N'utiliser que des câbles pour véhicules ayant une section suffisante.
Les travaux électriques ne doivent être effectués que par un personnel habilité.
Utiliser des passe-câbles/des protège-arrêtes appropriés pour la pose des
câbles en travers des tôles..
b)
Câbler les raccordements entre la batterie du véhicule et l'équipement.
– Poser les câbles dans des gaines de protection et les fixer avec des attache-câbles.
– Brancher l'alimentation électrique de l'équipement aux bornes de câblage prévues sur la platine
de raccordement électrique (Fig. 2.3).
ATTENTION
Il faut ici impérativement respecter la polarité ! (pôle +: borne de câblage
M8, pôle - : borne de câblage M10). Toute inversion de polarité risque de
détruire la commande électronique !
– Prévoir des dispositifs anti-traction.
c)
Effectuer le câblage entre la commande et l'unité maître à l'aide du faisceau de câbles fourni.
– Monter la commande à un emplacement approprié et brancher le faisceau de câbles.
57
40
45
40
21
52
24 29 35
Fig. 4.13
Page 98
Climatisation sur toiture Citysphere
Fig. 4.14
Fig. 4.15
– Raccorder le faisceau de câbles avec la borne 15 et D+ (borne 61) (sur la borne 15, interconnecter le porte-fusible et le fusible 5 A).
– Poser les câbles dans des gaines de protection et les fixer avec des attache-câbles.
– Raccorder les câbles conformément au code couleur au bornier 4 pôles de l'unité maître.
d)
Fixer la sonde de température ambiante fournie à la plaque électrique et la brancher.
e)
Effectuer le câblage entre l'unité maître et l'unité esclave ou entre une unité esclave et une autre
unité esclave.
– Raccorder le faisceau de câbles fourni correspondant à la numérotation aux borniers 7 pôles
des deux unités.
– Poser les câbles dans des gaines de protection et les fixer avec des attache-câbles.
Page 99
Climatisation sur toiture Citysphere
4.10.
Monter le répartiteur d'air
– Monter d'abord les tiges filetées avant et les arrêter. Puis monter les autres tiges filetées à la même
hauteur et les arrêter.
20 Nm*
20 Nm*
66
Habillage intérieur
* Attention: En serrant, bien tenir l'écrou supérieur.
Fig. 4.16
– Découper l'habillage intérieur, distance jusqu'aux tiges filetées env. 20-30 mm (820x530).
Fig. 4.17
Page 100
Climatisation sur toiture Citysphere
– Apposer de la mousse tout autour de l'ouverture entre les toits extérieur et intérieur afin d'empêcher
l'aspiration d'air du toit.
Fig. 4.18
– Ajuster le couvercle sur le répartiteur d'air et le fixer à l'aide de rivets.
– Monter le répartiteur d'air Veiller à ce qu'il soit jointif avec l'habillage intérieur du toit et à ce que le
couvercle soit posé sur le joint d'étanchéité de la plaque de base.
– Fixer le répartiteur d'air aux tiges filetées centrales à l'aide d'écrous auto-bloquants et aux autres tiges
filetées avec les adaptateurs M6/M8 (Voir Fig. 2.3).
Fig. 4.19
Page 101
Climatisation sur toiture Citysphere
– Raccorder les prises du ventilateur et les protéger des frottements avec du ruban pour câbles.
– Fixer la tôle d'aspiration d'air.
Fig. 4.20
4.11.
Monter le capot
– Contrôler le bon positionnement du filtre à air.
Filtre à air
Fig. 4.21
– Après la pose du capot, brancher le ventilateur du condenseur. Tirer le faisceau de câbles le plus loin
possible vers la droite dans le sens de la conduite. Fixer le câble du ventilateur à droite sur la cloison à
l'aide de la pince à câble pour éviter tout risque de collision du câble avec le rotor du ventilateur pendant
le fonctionnement.
– Monter le ventilateur du condenseur et la tôle, poser les 4 vis. Puis fixer le capot à l'aide des 7 vis à tête
plate. En dernier lieu, serrer toutes les vis.
– ventilateur: 4 Nm (portex30)
– capot
: 3 Nm (fente)
Page 102
Climatisation sur toiture Citysphere
5.
MISE EN SERVICE
5.1.
Consignes de sécurité
Respecter les consignes de sécurité indiquées au chapitre 1.3.
AVERTISSEMENT
L'équipement ne doit être mis en service que lorsque le capot est fermé et
le répartiteur d'air monté. Risque de blessure par les ventilateurs.
5.2.
Instructions pour l'utilisateur
ATTENTION
La climatisation ne peut être mise en service que lorsque le moteur du véhicule est en marche.
5.3.
Eléments de commande et d'affichage
4
7
1
6
2
3
1
2
3
4
5
6
7
Ventilateur
Température extérieure
Marche / Arrêt
Afficheur
LED
Descendant
Ascendant
5
Fig. 5.1
5.4.
Première mise en service
a)
Allumer le contact du véhicule et observer la commande Sur l'afficheur, l'affichage
doit apparaître pendant 1 seconde environ, puis le numéro de la version actuelle de la commande. Après 3
seconde environ, l'affichage s'éteint et la LED de l'afficheur clignote régulièrement et indique ainsi
que le système est prêt à fonctionner.
b)
Démarrer le moteur du véhicule conformément aux instructions du constructeur.
c)
Mettre l'équipement en marche à l'aide de la touche 3.
En fonction de la température extérieure et de la température dans l'habitacle, l'installation est en mode
refroidissement, chauffage ou ventilation (chauffage seulement sur la version Comfort).
Page 103
Climatisation sur toiture Citysphere
5.5.
Autres fonctions de la commande
Afin de pouvoir vérifier toutes les fonctions, indépendamment des températures, il y a le mode test et un
mode visualisation.
Pour la configuration personnalisée de la commande, il y a un mode paramétrage.
5.5.1. Mode test
NOTA
Afin de ne pas solliciter la batterie du véhicule, il est conseillé de faire
fonctionner le mode test avec le moteur du véhicule allumé. Le fonctionnement sans moteur de véhicule n'est conseillé que pour le contrôle du ventilateur.
Lors de températures extérieures inférieures à 17°C, l'installation ne doit
fonctionner que peu de temps en mode refroidissement :
Température
Description
Sous 5°C
Refroidissement proscrit
Entre 5°C et 12°C
Durée maximale de fonctionnement 3 minutes
Entre 13°C et 17°C
Durée maximale de fonctionnement 15 minutes
ATTENTION
Le non-respect peut conduire à un endommagement du compresseur.
Utilisation
Pour accéder au mode test, appuyer quelques secondes sur la touche
, jusqu'à ce que l'afficheur affiche
. Le mode de passe d'accès au mode test est le suivant
L'introduction du mot de passe est effectuée
par les touches
et
. La touche
permet de valider le mot de passe.
Lorsque le mot de passe inscrit n'est pas correct, la différence température - consigne apparaît de nouveau.
Lorsque le mot de passe est bon, on peut, avec les touches
et
basculer entre les sorties
et
les entrées
, en validant avec
, on parvient au menu correspondant.
Pour quitter le mode test, appuyer sur la touche
. La sélection de la sortie / entrée souhaitée se fait avec
les touches
et
est validée avec la touche
.
Page 104
Climatisation sur toiture Citysphere
Sorties
Paramètre
Description
Le ventilateur de l'évaporateur fonctionne à 25% de sa capacité et peut être modifié
avec les touches
et
.
Le compresseur, le ventilateur de l'évaporateur et le ventilateur du condenseur fonctionnent à puissance maximale. Le ventilateur de l'évaporateur peut être modifié
avec les touches
et
.
Attention : le fonctionnement sans moteur du véhicule peut décharger très rapidement la batterie du véhicule
Attention : Lors de températures inférieures à 17°C, ce mode n'est autorisée que
pour la durée inscrite au tableau plus haut.
Le ventilateur du condenseur fonctionne à puissance maximale
L'élément chauffant électrique est allumé, le ventilateur de l'évaporateur tourne au
régime du chauffage. Le ventilateur de l'évaporateur peut être modifié avec les
touches
et
.
Attention : le fonctionnement sans moteur du véhicule peut décharger très rapidement la batterie du véhicule
Le clignotement de la LED de l'afficheur indique que le mode sélectionné est arrêté. Lorsqu'une LED de
l'afficheur reste allumée, cela signifie que la sortie est activée. Pour activer / désactiver les sorties, appuyer
sur la touche
ou sur la touche
.
Entrées
Paramètre
Description
Sortie diagnostic du moteur du
compresseur
Reconnaissance automatique du
dispositif de chauffage élec.
(relais monté)
Etat
LED
Signification
0V
Clignotement
Défaut
Z ou 24 V
Marche
OK
Z ou 0 V
Clignotement
Pas de dispositif
de chauffage
disponible
24 V
Marche
Dispositif de
chauffage
disponible
Z ou 0 V
Clignotement
Défaut
24 V
Marche
OK
24 V
Clignotement
Défaut
Z ou 0 V
Marche
OK
24 V
Clignotement
Défaut
Z ou 0 V
Marche
OK
D + (Borne 15)
Ventilateur du condenseur
Ventilateur de l'évaporateur
Z signifie un grand nombre de Ohm
Page 105
Climatisation sur toiture Citysphere
5.5.2. Mode visualisation
On accède au mode visualisation, en appuyant en même temps sur les touches
et
pendant quelques secondes. Avec les touches
et
on peut sélectionner le mode de fonctionnement souhaité,
dont la valeur est affichée par appui sur la touche
.
Avec la touche
on revient à la sélection du mode de fonctionnement, un nouvel appui sur la touche
permet de quitter le mode visualisation.
Mode de fonctionnement
Description
Température ambiante de l'habitacle
température extérieure
Tension de bord [V]
Ventilateur de l'évaporateur PWM [%]
Compresseur PWM [%]
Version logicielle de la commande
Version logicielle de l'appareil de
commande
Calcul partiel du régulateur
(portion proportionnelle)
Calcul partiel du régulateur
(portion intégrale)
Consigne de température
Compteur d'heures compresseur*
Compteur d'heures du chauffage élec.*
(seulement sur la version Comfort)
Compteur d'heures de l'installation
complète*
D + (Borne 61) Tension [V]
* Pour les compteurs d'heures, les temps de fonctionnement sont indiqués par trois chiffres clignotants
successifs. Par exemple, l'afficheur indique après sélection du paramètre
les valeurs
.
Ceci signifie que le compresseur a fonctionné au total 129112 heures.
Page 106
Climatisation sur toiture Citysphere
5.5.3. Mode paramétrage
Pour accéder au mode paramétrage, appuyer quelques secondes sur la touche
jusqu'à ce que
l'afficheur affiche
Le mode de passe d'accès au mode paramétrage est le suivant
. L'introduction
du mot de passe est effectuée par les touches
et
. La touche
permet de valider le mot de
passe. Lorsque le mot de passe inscrit n'est pas correct, la différence température - consigne apparaît de
nouveau.
Pour quitter le mode paramétrage, appuyer sur la touche
avec les touches
et
est validée avec la touche
Paramètre
La sélection du paramètre souhaité se fait
.
Description
Pré-réglage
Max
Min
Durée pendant laquelle le ventilateur de
l'évaporateur fonctionne sans signal D+
(Borne 61)
30 min
90 min
0 min
1
2
0
0
1
0
25%
40%
10%
1
1
0
Sélection de la fonction différence température - consigne (DTC) :
0: La DTC est fixée sur la valeur actuelle
et ne peut pas être modifiée.
1: La DTC peut être modifiée en fonctionnement normal
2: La DTC est fixée sur la valeur 3 et ne
peut pas être modifiée en fonctionnement
normal.
Démarrage automatique
0: Arrêt
1: Marche
Intensité du ventilateur de l'évaporateur
en mode chauffage
Réglage manuel du ventilateur de l'évaporateur
0: Inhibé
1: Libéré
Page 107
Climatisation sur toiture Citysphere
6.
ENTRETIEN
6.1.
Consignes de sécurité
Respecter les consignes et les prescriptions de sécurité indiquées au chapitre 1.3.
6.2.
Généralités
a)
Tous les travaux sur le circuit de réfrigération ne sont à effectuer que par un personnel compétent
et qualifié dans des ateliers homologués.
b)
Pour effectuer des travaux d'entretien sur le circuit de réfrigération, utiliser les consommables spéciaux, les outillages spécifiques ainsi que les accessoires indiqués au chapitre 4.6.
c)
Comme toutes les parties d'un véhicule, la climatisation est sollicitée par une charge permanente.
Afin d'assurer un fonctionnement optimal de l'installation et pour éviter un endommagement des
composants, les travaux d'entretien prescrits doivent être effectués régulièrement.
d)
L'utilisation correcte de l'installation ainsi que les justificatifs des travaux d'entretien prescrits sont
les conditions permettant un recours en garantie en cas de dommages de pièces soumises à l'entretien.
e)
Pour éviter un grippage des pièces mobiles dans le circuit de réfrigération suite à la résinification
de l'huile, faire tourner la climatisation, pendant les arrêts prolongés, au moins une fois par mois
pendant environ 10 min. Condition préalable : (Température extérieure minimale 12°C ou local
chauffé)
6.3.
Maintenance et entretien
a)
Indépendamment du calendrier ci-après, vérifier le serrage de toutes les fixations de l'appareil dans
les 4 semaines après la première mise en service de l'installation.
b)
Même en dehors des périodes de fonctionnement de la climatisation, les différents composants de
celle-ci sont soumis à l'usure par l'altération ou sollicitation lors de l'utilisation du véhicule. Pour cette raison, les contrôles indiqués dans la liste des travaux maintenance et d'entretien de la notice de
montage doivent être effectués indépendamment de la durée de service.
c)
Indépendamment de la durée de service de l'installation, une perte de réfrigérant est possible malgré des raccords de conduite étanches. Lors d'une perte de liquide réfrigérant relativement importante, on peut toutefois supposer une fuite dans l'unité.
d)
En cas de faible encrassement, le nettoyage des ailettes du condensateur et de l'évaporateur se
fait à l'aide d'air sous pression à contresens du sens d'écoulement de l'air.
En cas d'encrassement important ou de dépôt de graisse, utiliser une solution savonneuse ou un
liquide nettoyant approprié (n'agressant ni le cuivre, ni l'aluminium) et rincer au jet d'eau ou sécher
à l'air sous pression.
e)
Lors de travaux sur le circuit de réfrigérant, le collecteur / déshydrateur doit toujours être échangé.
f)
Il faut régulièrement remplacer l'élément filtrant.
g)
Les ouvertures d'écoulement de l'eau de pluie dans la plaque de base doivent toujours être libres.
ATTENTION
Le réfrigérant ne doit en aucun cas être rejeté dans l'atmosphère.
Page 108
Climatisation sur toiture Citysphere
6.4.
Check-list de maintenance et d'entretien
Partie de l'installation
Travaux de maintenance
Fréquence
m
6m
a
Circuit de réfrigération
– Raccords
– Condenseur
– Ecoulement de l'eau
de condensation
– Unité de climatisation
sur toiture
Vérifier l'étanchéité à l'aide d'un détecteur de fuites
Vérifier le bon état des ailettes (nettoyer si encrassées)
Vérifier les ouvertures et les nettoyer si nécessaire
X
X
X
Vérifier l'état général et le serrage des raccords
X
Compresseur
– Compresseur
– Elément de fixation
– Raccords électriques
Vérifier les bruits anormaux pendant la marche
Vérifier l'état et la fonction
Vérifier la corrosion
X
Vérifier leur bon état
X
Vérifier leur bon état et s'ils sont bien connectés
X
X
X
Branchements électriques
– Câbles de raccordement
– Connecteurs
Légende : m - mensuel, a - annuel (6 m - en cas de fonctionnement toute l'année, 2 fois par an)
6.5.
Contrôles avant réparation
Afin d'éviter des travaux de démontage inutiles ou d'effectuer deux fois le même travail, vérifier l'état général
de l'équipement avant de commencer les interventions de réparation.
Contrôle visuel
a)
Etat extérieur de la climatisation sur toiture :
–
–
–
–
–
b)
Pas de fissures dans le capot, pas de dommages de peinture
Entrées et sorties d'air propres et en bon état
Serrage des fixations, pas de corrosion
Raccords de câbles en bon état
Passages dans la tôle en bon état
Etat du répartiteur d'air
– Points de fixation / vis de fixation serrés correctement
– Grille d'aspiration d'air ambiant en bon état, propre
c)
Etat du compresseur
– Raccords des flexibles non endommagés et serrés correctement
– éléments de fixation / vis de fixation serrés correctement
– Branchement électrique en bon état.
Page 109
Climatisation sur toiture Citysphere
6.6.
Recherche des défauts et mesures pour leur élimination
6.6.1. Généralités
a)
Une méthode systématique est à adopter pour la recherche de défauts et leur élimination. Les mesures correspondantes en cas de perturbations à caractère général ou d'écarts par rapport aux valeurs théoriques lors du contrôle de la pression sont à mettre en œuvre comme décrit ci-dessous.
b)
Seul un personnel compétent équipé d'un outillage spécifique est qualifié pour rechercher et éliminer certains défauts.
6.6.2. Causes en cas de défauts de la partie électrique
Vérifier systématiquement les différents circuits électriques à l'aide du schéma électrique (voir fig. 3.1) et
localiser le défaut. Vérifier de préférence le passage du courant au niveau des connexions, des interrupteurs, des relais, etc.
Vérifier principalement les causes suivantes pouvant être à l'origine de l'incident :
–
–
–
–
–
–
Fusibles défectueux
Corrosion des contacts enfichables
Mauvais contact des connecteurs
Défaut de sertissage des connecteurs
Corrosion des conducteurs et des fusibles
Corrosion des pôles de batterie
6.6.3. Causes en cas de perturbations dans la climatisation
– Ventilateur de l'évaporateur ou du condenseur défectueux
– Filtres à air encrassés ou bouchés, ailettes de l'évaporateur ou du condenseur encrassées
– Quantité insuffisante de réfrigérant dans l'installation
Si l'installation s'arrête en permanence, consulter un atelier spécialisé pour la faire contrôler.
6.6.4. Mesures en cas de perturbations dans la climatisation
S'il y a des défauts dans le circuit de réfrigérant, l'installation doit être vérifiée et remise en état par un atelier
spécialisé. Le réfrigérant ne doit en aucun cas être rejeté dans l'atmosphère.
6.6.5. Causes si les consignes ne sont pas atteintes lors du contrôle de pression
En cas d'écart par rapport aux consignes lors du contrôle de pression (Chap. 6.8), ceci peut avoir les causes
suivantes. Vérifier et localiser les causes, remettre en état ou remplacer, le cas échéant les pièces défectueuses.
Pression du manomètre de haute pression trop élevée
– Débit d'air dans le condenseur trop faible
– Quantité trop importante de réfrigérant
Pression du manomètre de haute pression trop basse
– Quantité trop faible de réfrigérant (vérifier le verre-regard)
– Régime du compresseur trop faible (installation en mode régulation, la vitesse de rotation maximale peut
être forcée en mode test (5.5.1)
– Compresseur défectueux
Pression du manomètre de basse pression trop élevée
– Détendeur défectueux
– Régime du compresseur trop faible
– Compresseur défectueux
Page 110
Climatisation sur toiture Citysphere
Pression du manomètre de basse pression trop basse
–
–
–
–
–
Obstruction dans la conduite d'aspiration ou de pression dû, par exemple, à un coude dans le flexible
Détendeur défectueux
Quantité trop faible de réfrigérant
Débit d'air dans l'évaporateur trop faible
Collecteur/déshydrateur bouché
6.7.
Travaux de réparation
ATTENTION
Le réfrigérant ne doit en aucun cas être rejeté dans l'atmosphère.
NOTA
Respecter les consignes et les prescriptions de sécurité indiquées au
chapitre 1.3 et les indications données au chapitre 6.2.
N'utiliser que des pièces de rechange d'origine et remettre en état identique à l'origine.
a)
Il fut systématiquement utiliser des pièces de rechange d'origine ou des pièces normalisées pour
les réparations.
b)
Il faut remettre l'équipement dans son état d'origine lors de l'exécution des travaux.
c)
Avant toute ouverture / dépose de pièces du circuit de réfrigération, aspirer le réfrigérant et le stokker dans la station de récupération prévue à cet effet puis l'éliminer ou le réutiliser.
d)
Après l'exécution des travaux sur le circuit de réfrigération, il faut
– évacuer la station de récupération conformément aux instructions ,
– remplir l'installation avec du réfrigérant côté pression, installation à l'arrêt
6.8.
Contrôles et travaux après réparation
6.8.1. Contrôle des pressions du réfrigérant
Généralités
Une installation de climatisation remplie de réfrigérant est systématiquement sous pression. Cette pression
est la même dans tout le circuit et dépend de la température ambiante.
Lors du fonctionnement de l'installation, la pression est différente côté aspiration et côté pression du
compresseur. Les pressions diffèrent et dépendent du régime du compresseur, des températures
intérieures et extérieures du véhicule et de l'humidité relative de l'air. Les pressions de service hors normes
indiquent la présence de défauts dans l'installation.
Vérifier les pressions de service avec une tension de bord entre 25 et 26 V et une température de l'air entre
17°C et 35°C max. L'installation doit pour cela être en mode test
Il faut déposer le capot pour contrôler
la pression car le courant d'air qui traverse l'échangeur de chaleur a une influence notable sur l'atteinte des
pressions de service.
Page 111
Climatisation sur toiture Citysphere
On doit obtenir des valeurs proches des valeurs suivantes :
Température
extérieure
=température
intérieure
Manomètre basse pression
Manomètre haute pression
17°C
2,7 ± 0,2 bars
8,4 ± 2 bars
20°C
2,9 ± 0,2 bars
9,0 ± 2 bars
25°C
3,3 ± 0,2 bars
10,3 ± 2 bars
30°C
4,1 ± 0,2 bars
11,4 ± 2 bars
35°C
4,7 ± 0,2 bars
12,8 ± 2 bars
En cas d'écart entre les valeurs mesurées et ces valeurs, s'adresser à un atelier spécialisé pour le
dépistage de l'origine des défauts.
Après le contrôle de la pression, démonter les manomètres de contrôle et revisser les capuchons.
6.8.2. Contrôle visuel
Après la remise en état, effectuer un contrôle visuel conformément au chapitre 6.5.
Page 112
Climatisation sur toiture Citysphere
7.
CONDITIONS DE GARANTIE
En cas de garantie, s'adresser à l'instance appropriée.
Page 113