1
Internet-Radio Adapter
ALBRECHT DR 460-C
Bedienungsanleitung
Deutsch / English / Français
VORSICHT
ZUR VERMEIDUNG VON FEUER UND STROMSCHLAG BENUTZEN SIE DEN STECKER NICHT
MIT EINER STECKDOSE ODER EINEM VERLÄNGERUNGSKABEL, WENN ER SICH NICHT
VOLLSTÄNDIG EINSTECKEN LÄSST. ZUR VERMEIDUNG VON FEUER UND STROMSCHLAG
SETZEN SIE DAS NICHT REGEN ODER FEUCHTIGKEIT AUS.
Der Blitz im gleichseitigen
WARNUNG: Zur
Dreieck weist auf gefährliche
Vermeidung von Stromschlag
gleichseitigen Dreieck weist
Hochspannung im Gerät hin,
Gerätegehäuse nicht öffnen. Es
auf wichtige Bedienungs- und
die zu einem Stromschlag
befinden sich keine vom
Wartungsanleitungen hin.
führen kann.
Verbraucher wartbaren Teile im
Innern des Geräts. Reparatur
und Wartung nur durch
Fachpersonal.
2
Das Ausrufungszeichen im
Deutsch
1 Wichtige Sicherheitshinweise
1.)
Lesen Sie die Anleitung.
2.)
Bewahren Sie die Anleitung auf.
3.)
Lesen Sie alle Warnhinweise.
4.)
Befolgen Sie die Anleitung.
5.)
Benutzen Sie das Gerät nicht in unmittelbarer Nähe von Wasser.
6.)
Reinigen Sie das Gerät nur mit einem trockenen Tuch.
7.)
Blockieren Sie keine Lüftungsschlitze. Installieren Sie das Gerät entsprechend der Anleitung.
8.)
Installieren Sie das Gerät nicht in unmittelbarer Nähe von Wärmequellen wie Heizungen,
Heizkörper, Öfen oder sonstigen Wärme erzeugenden Geräten (einschließlich Verstärker).
9.)
Schützen Sie das Netzkabel, damit nicht darauf getreten wird und es nicht eingeklemmt wird,
insbesondere am Netzstecker und am Austritt des Kabels am Gerät.
10.) Benutzen Sie nur vom Hersteller empfohlenes Zubehör.
11.) Ziehen Sie während eines Gewitters und bei längerer Nichtbenutzung den Netzstecker.
12.) Wenden Sie sich mit Reparaturen stets an den autorisierten Kundendienst. Eine Wartung ist
erforderlich, wenn Gerät, Netzkabel oder Stecker beschädigt wurden, Flüssigkeiten oder
Fremdkörper in das Gerät eingedrungen sind, das Gerät Regen oder Feuchtigkeit ausgesetzt
war, nicht wie gewöhnlich funktioniert oder fallen gelassen wurde.
13.) Setzen Sie das Gerät nicht Spritzwasser oder Tropfwasser aus und stellen Sie keine mit Wasser
gefüllten Gegenstände auf dem Gerät ab.
14.) Überlasten Sie Steckdosen nicht. Benutzen Sie nur die spezifizierte Spannungsversorgung.
15.) Benutzen Sie ausschließlich von Hersteller spezifizierte Ersatzteile.
2
Herzlich Willkommen
Vielen Dank, dass Sie sich für das DR 460-C entschieden haben. Ihr DR 460-C ist als ein digitaler
Musikadapter konzipiert, der Ihr bestehendes Audiosystem erweitert und Sie durch einfachen und
bequemen Zugriff auf weltweit tausende Internet-Radiosender sowie weitere Streaming-Optionen mit
vielen Stunden Unterhaltung versorgt. Ob Sie nun in Hamburg sind und Musik aus Brasilien hören
möchten oder ein Genre wie Klassik, Hard Rock oder Jazz wählen, das DR 460-C bringt den
Radiosender Ihrer Wahl in Ihr Heim.
Deutsch
3
3 Inhalt
1
Wichtige Sicherheitshinweise........................................................................................................ 3
2
Herzlich Willkommen .................................................................................................................... 3
3
Inhalt ............................................................................................................................................ 4
4
Lieferumfang................................................................................................................................. 6
4.1
DR 460-C an bestehendem Audiosystem anschließen ............................................................... 7
4.2
Ausstattungsmerkmale ............................................................................................................... 7
5
Frontblende .................................................................................................................................. 7
6
Rückseite...................................................................................................................................... 8
7
Fernbedienung ............................................................................................................................. 8
8
DR 460-C einschalten................................................................................................................. 10
8.1
Erstmalige Konfiguration ........................................................................................................... 10
8.2
Sprache wählen ........................................................................................................................ 12
8.3
Texteingabe .............................................................................................................................. 13
8.4
Drahtlosverbindung herstellen .................................................................................................. 13
9
Internet Radio ............................................................................................................................. 15
9.1
Radiosender suchen ................................................................................................................. 15
9.1.1
Suche nach Genre .................................................................................................................... 15
9.1.2
Suche nach Land/Standort ........................................................................................................ 16
9.1.3
Suche nach Sendername ......................................................................................................... 17
9.1.4
10
10.1
Suche mit Eingabe der Adresse ................................................................................................ 18
Sender aufrufen .......................................................................................................................... 18
Sender unter My Favorite hinzufügen ....................................................................................... 19
10.1.1
Aktuell spielenden Radiosender hinzufügen ......................................................................... 19
10.1.2
Radiosender aus der Liste hinzufügen ................................................................................. 19
10.1.3
My Favorite verwalten .......................................................................................................... 20
10.2
11
11.1
My MediaU ............................................................................................................................... 22
Media-Center .............................................................................................................................. 23
UPnP ........................................................................................................................................ 23
12
Informations-Center .................................................................................................................... 25
13
Einstellungen .............................................................................................................................. 25
13.1
Netzwerk .................................................................................................................................. 25
13.2
Datum und Uhrzeit .................................................................................................................... 26
13.3
Alarm ........................................................................................................................................ 27
13.3.1
2. Alarm programmieren ...................................................................................................... 28
13.3.2
Nickerchenalarm (NAP Alarm) programmieren..................................................................... 28
13.3.3
Alarmlautstärke einstellen .................................................................................................... 28
4
Deutsch
13.4
Sprache .................................................................................................................................... 29
13.5
Dimmer..................................................................................................................................... 29
13.6
Sleeptimer ................................................................................................................................ 30
13.7
Pufferspeicher .......................................................................................................................... 30
13.8
Wetter ....................................................................................................................................... 31
13.9
DLNA-Einstellungen ................................................................................................................. 31
13.10
Software-Update ....................................................................................................................... 33
13.11
Rückstellung zu den Werkseinstellungen .................................................................................. 33
14
Spezifikationen ........................................................................................................................... 34
15
Gewährleistungs- und Recyclinginformationen............................................................................ 35
Deutsch
5
4 Lieferumfang
Vergewissern Sie sich, dass folgende Artikel mitgeliefert wurden:
6
1.
DR 460-C
2.
Netzteil
3.
Fernbedienung
4.
DR 460-C Bedienungsanleitung
5.
Cinch-Anschlusskabel
Deutsch
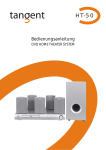
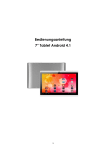
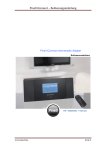
4.1 DR 460-C an bestehendem Audiosystem anschließen
Aktive Lautsprecher
RCA-Kabel
4.2 Ausstattungsmerkmale
•
Einzelgerät
•
Drahtlosanschluss
•
Aktuelle Liste mit mehr als 10.000 Onlinesendern
•
250 Favoriten
•
Radioalarm
•
Wettervorhersage
5 Frontblende
Ihr DR 460-C hat keine Tasten auf der Frontblende. Durch die einfache und benutzerfreundliche
Menüführung können Sie alle Funktionen des Radios über die mitgelieferte Fernbedienung
steuern.
Deutsch
7
6 Rückseite
Die Anschlüsse dieses Modells sind: 2 x Stereo Cinch und Netzteileingang
USB nur für Firmware-Upgrade
Schließen Sie das Cinch (RCA) Kabel an Ihrem Audiosystem an.
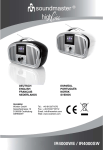
7 Fernbedienung
8
Deutsch
Ein/Aus
Gerät ein- und ausschalten (Standby).
Menü
Hauptmenü aufrufen.
Lautstärke-
Lautstärke verringern.
Stummschaltung
Audioausgang stumm schalten.
Lautstärke+
Lautstärke erhöhen.
Sleeptimer
Automatische Ausschaltzeit wählen.
Alarm
Alarmfunktion ein- und ausschalten.
Sprache
Systemsprache wählen.
Licht
Lichtmodus wählen.
Enter
Auswahl einer Menüoption bestätigen.
Navigation aufwärts
Navigation abwärts
Aufwärts durch Menüpunkte scrollen.
Text eingeben.
Abwärts durch Menüpunkte scrollen.
Text eingeben.
Navigation links
Rückkehr in das vorherige Menü
Navigation rechts
Auswahl einer Option bestätigen und Untermenü aufrufen.
Senderspeicher 0~9
Senderspeicher des Radios aufrufen.
Favoriten
Favoritenliste anzeigen.
Favorit+
Aktuellen Radiosender in der Favoritenliste speichern.
Deutsch
9
8 DR 460-C einschalten
Zum erstmaligen Einschalten des DR 460-C gehen Sie wie folgt vor:
1.
Schließen Sie das mitgelieferte Netzteil an der Steckdose an.
2.
Schließen Sie das Netzteil am Netzteileingang auf der Geräterückseite an.
3.
Verbinden Sie den Audioausgang des DR 460 C und den Aux-Eingang Ihrer Stereoanlage
mit Hilfe des mitgelieferten Audiokabels.
8.1 Erstmalige Konfiguration
Beim ersten Einschalten des DR 460-C wählen Sie zunächst die Sprache:
Mit den Navigationstasten aufwärts/abwärts auf der Fernbedienung wählen Sie die gewünschte
Sprache, dann drücken Sie OK.
Wählen Sie dann, ob das DR 460-C „Check Network When Power On“ (Netzwerkprüfung beim
Einschalten) aktivieren soll, benutzen Sie hierzu die Navigationstasten links/rechts und drücken
Sie OK. Bei Aktivierung dieser Option überprüft das Radio, ob es bereits bekannte Netzwerke
erkennt. Ist das nicht der Fall, so zeigt das Radio eine Liste aller verfügbaren Netzwerks an.
10
Deutsch
Wählen Sie wie Ihre Netzwerkverbindung konfiguriert werden soll:
Bei Auswahl von Yes werden Ihnen zunächst alle in der Umgebung verfügbaren
Drahtlosnetzwerke angezeigt. Wählen Sie Ihr Netzwerk aus und bestätigen mit OK. Geben Sie Ihr
Passwort ein, falls Ihre WLAN-Verbindung verschlüsselt ist.
Unterstützt Ihr Router WPS und Yes (WPS) wurde gewählt, so drücken Sie die WPS-Taste auf
Ihrem Router innerhalb von 120 Sekunden.
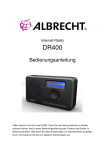
Herzlichen Glückwünsch, Sie haben Ihr Radio nun mit Ihrem Netzwerk verbunden! Das
Netzwerkstatussymbol in der oberen linken Ecke hat sich entsprechend nachstehender Abbildung
geändert.
Deutsch
11
Netzwerkstatus
Uhrzeit
Drücken Sie die
Menüoptionen
Navigationstaste
rechts, um das
Untermenü anzuzeigen
Das Menü umfasst vier Optionen und
die erste Option ist markiert.
8.2 Sprache wählen
Das DR 460-C unterstützt bis zu acht Sprachen für die Menüoptionen.
Zur Änderung der Sprache gehen Sie wie folgt vor:
1.
Wählen Sie im Hauptmenü Configure > Language.
2.
Drücken Sie die Navigationstasten aufwärts/abwärts, um durch die Sprachoptionen zu
scrollen und drücken Sie Enter, um die gewählte Sprache anzuwenden.
3.
Alternativ drücken Sie einfach die Taste LANG auf der Fernbedienung um direkt in das
Sprachenmenü zu gelangen.
12
Deutsch
BITTE BEACHTEN SIE: Die gewählte Sprache betrifft nur die DR 460-C Menüs und
Systemmitteilungen. Die Sendernamen werden entsprechend der verschiedenen Standorte
angezeigt.
8.3 Texteingabe
Zur Eingabe der Adresse eines Online-Radiosenders oder eines WEP-Schlüssels für die
Drahtlosnetzwerk-Sicherheit muss Text eingegeben werden. Uhrzeit, Datum und Alarm werden
auf gleiche Weise eingestellt. Hier können Sie natürlich nur Ziffern wählen.
Zur Eingabe von Groß-/Kleinbuchstaben, Symbolen oder Zahlen gehen Sie wie folgt vor:
1.
Drücken Sie die Navigationstasten aufwärts/abwärts, um eines der folgenden
Schriftzeichen zu wählen: A a B b…Z z $ % & # _ ^ ~ ` “ ‘, . : ; ? ! * - + @ < = > { ¦ } [ \ ] ( / )
0 1…9
2.
Drücken Sie die Navigationstaste rechts, um zum nächsten Schriftzeichen zu gehen.
Drücken Sie am Ende Enter.
BITTE BEACHTEN SIE: Zur Zahleneingabe können auch die Zifferntasten der Fernbedienung
benutzt werden.
8.4 Drahtlosverbindung herstellen
BITTE BEACHTEN SIE: Dies ist nur notwendig, wenn eine Verbindung nicht bereits beim ersten
Einschalten hergestellt wurde oder das DR 460-C sich mit einem anderen Netzwerk verbinden
soll.
1.
Stellen Sie sicher, dass der Zugangspunkt bereit ist weitere Teilnehmer in das Funknetz
aufzunehmen. Falls das Netzwerk gesichert ist benötigen Sie das Zugangspasswort.
2.
Wählen Sie im Hauptmenü Configure > Network > WiFi Configure. Die Namen der
verfügbaren Zugangspunkte werden aufgeführt. Markieren Sie ein geschütztes Netzwerk,
so wird ein Schlüsselsymbol vor dem Namen des Drahtlosnetzwerks angezeigt.
Deutsch
13
3.
Wählen Sie ein Netzwerk, zu dem Sie Zugang haben. Ist das Netzwerk nicht gesichert, so
drücken Sie Enter, um die Verbindung herzustellen. Ist es gesichert, so müssen Sie erst
den Schlüssel eingeben.
4.
Geben Sie den entsprechenden Schlüssel ein und drücken Sie Enter, um die Verbindung
herzustellen. Einzelheiten zur Texteingabe finden Sie im Kapitel 8.3 Texteingabe
5.
Folgende Symbole werden oben links zur Identifizierung des Netzwerkstatus angezeigt:
Verbindungsaufbau läuft
Drahtlosverbindung erfolgreich
Drahtlosverbindung fehlgeschlagen
BITTE BEACHTEN SIE: Bei erfolgreichem Aufbau einer Verbindung wird der Schlüssel
gespeichert. Mit unveränderten Netzwerkeinstellungen verbindet sich das Gerät beim
Einschalten automatisch mit dem Netzwerk.
14
Deutsch
9 Internet Radio
Mit der Auswahl von Internet Radio im Hauptmenü können Sie folgende Untermenüs aufrufen:
Meine Favoriten: Hier sind alle von Ihnen hinzugefügten Favoritensender aufgeführt.
Radiosender/Musik: Hier suchen Sie nach Radiosendern.
Lokale Station: Hier werden Ihnen die Sender des Landes angezeigt, in dem Sie das Gerät
betreiben.
Zuletzt gehörte Sender: Hier werden die zuletzt gehörten Sender angezeigt, um sie schnell
wieder aufrufen zu können.
Service: Hier können Sie Sender manuell suchen und hinzufügen.
9.1 Radiosender suchen
Das DR 460-C hat eine aktuelle, klassifizierte Liste von weltweiten Online-Radiosendern. Sie
können nach einem Sender mit dem Musikgenre oder dem Standort des Senders suchen. Sie
können die kategorisierten Sender auch in alphabetischer Reihenfolge durchlaufen oder manuell
die Adresse eines Senders eingeben.
9.1.1
1.
Suche nach Genre
Wählen Sie im Hauptmenü Radio Station/Music > Genre, damit wird eine Liste von
Musikgenres in alphabetischer Reihenfolge angezeigt.
Deutsch
15
2.
Drücken Sie die Navigationstaste aufwärts/abwärts, um ein Genre zu markieren. Möchten
Sie beispielsweise Hits hören, so gehen Sie wie folgt vor:
Drücken Sie die
Drücken Sie die
Navigationstaste rechts,
Navigationstaste links,
um in das vorherige
um alle Hitsender
anzuzeigen
Menü zurückzukehren
Hits ist das 15. von insgesamt 43 Genres.
3.
Drücken Sie die Navigationstaste rechts, um die verfügbaren Hitsender anzuzeigen.
Markieren Sie einen Sender und drücken Sie Enter, um den Sender aufzurufen.
9.1.2
1.
Suche nach Land/Standort
Wählen Sie im Hauptmenü Radiosender/Musik > Land/Region, dann wird eine Liste von
geografischen Regionen in alphabetischer Reihenfolge angezeigt:
Die Liste umfasst: Afrika, Asien, Europa, Lateinamerika, Mittlerer Osten, Nordamerika,
Ozeanien/Pazifik, nur Internet (Sender, die nur über das Internet übertragen werden).
2.
Wählen Sie eine geografische Region und dann ein Land in der Region. Eine Liste von
Sendern in diesem Land wird angezeigt.
3.
Markieren Sie einen Sender und drücken Sie Enter, um den Sender aufzurufen.
BITTE BEACHTEN SIE:
•
Bei Auswahl einer Sprache anders als Englisch, wird das Land der jeweiligen
Landessprache im Radiosender/Musikmenü angezeigt. Markieren Sie das Land und
drücken Sie Enter, um die Sender in diesem Land direkt anzuzeigen, ohne zunächst die
Region zu wählen.
16
Deutsch
9.1.3
Suche nach Sendername
1.
Wählen Sie im Hauptmenü Service > Search Radio Station.
2.
Die Sender sind in 10 Kategorien entsprechend ihrer Anfangsbuchstaben eingeteilt: 0-9,
A-C, D-F, G-I, J-L, M-O, P-R, S-U, V-Z. Wählen Sie eine Kategorie zur Anzeige einer Liste
von Sendern.
BITTE BEACHTEN SIE: Sender mit japanischen, koreanischen, traditionellen und
vereinfachten chinesischen Namen befinden sich in der Other Gruppe.
3.
Wählen Sie einen der Sender, um weitere Sender anzuzeigen. Die Sender sind nach den
beiden ersten Buchstaben alphabetisch sortiert.
4.
Markieren Sie einen Sender und drücken Sie Enter, um den Sender aufzurufen.
Deutsch
17
9.1.4
Suche mit Eingabe der Adresse
1.
Wählen Sie im Hauptmenü Service > Add New Radio Station.
2.
Geben Sie die Adresse eines Senders ein. Einzelheiten zur Texteingabe finden Sie im
Kapitel „8.3 Texteingabe“.
3.
Anschließend drücken Sie Enter, um den Sender aufzurufen.
10 Sender aufrufen
Ist das DR 460-C erfolgreich mit einem Sender verbunden, so haben Sie folgende Anzeige im
Display:
Netzwerkstatus
Verbindungsstatus
Dateninformationen
Pufferstatus
Balken zeigen
Verfügbarkeit eines
Senders an
18
Sendername
Deutsch
BITTE BEACHTEN SIE:
•
Der Verbindungsstatus kann sich von „Connecting“ zu „Buffering“ zu „Playing“ ändern.
•
Siehe Seite 30 für Einzelheiten zur Einstellung des Pufferspeichers.
•
Schalten Sie während der Verbindung zu einem Sender zu anderen Menüs um, so wird
unten rechts im Display ein Countdown-Timer angezeigt. Nach 10 Sekunden ohne Befehl
verlässt das System automatisch das Menü und schaltet zum verbundenen Sender
zurück.
10.1 Sender unter My Favorite hinzufügen
Sie können einen aktuell spielenden Radiosender zu My Favorite hinzufügen oder auch einen
Sender als Favoriten einstellen, nachdem Sie ihn in der Liste gefunden haben. Das DR 460-C
hat einen Speicher für 250 Sender.
10.1.1
Aktuell spielenden Radiosender hinzufügen
1.
Drücken Sie FAV+ auf der Fernbedienung.
2.
Folgende Symbole werden neben dem Netzwerkstatussymbol für den Favoritenstatus
angezeigt:
Der Sender wird zu My Favorite hinzugefügt.
Der Sender befand sich bereits in My Favorite.
Es sind bereits 250 Favoriten gespeichert.
10.1.2
1.
Radiosender aus der Liste hinzufügen
Suchen Sie einen Sender mit einer der drei erstgenannten Methoden im Kapitel
„Radiosender suchen“.
2.
Markieren Sie einen Sender und drücken Sie die Navigationstaste rechts, um das
nachstehende Untermenü anzuzeigen:
Deutsch
19
Add to My Favorite: Fügt den Sender Ihrer Favoritenliste hinzu.
Auto Scan (Down)/(Up): Aufwärts/abwärts durch die Senderliste scrollen, beginnend mit dem
markierten Sender. Jeder Sender wird für 30 Sekunden angespielt, während derer Sie ihn mit
Tastendruck auf FAV+ unter My Favorite hinzufügen können.
Play: Verbindet mit dem Sender.
Use As Alarm Sound: Benutzt diesen Sender als Alarm.
Siehe Tabelle unter Kapitel 9.3.1 zum Favoritenstatus.
10.1.3
My Favorite verwalten
Das DR 460-C speichert bis zu 250 Sender unter My Favorite, damit Sie einen schnellen Zugriff
auf Ihre Lieblingssender haben.
Zur Verwaltung Ihrer Favoritenliste gehen Sie wie folgt vor:
1.
Drücken Sie FAV auf der Fernbedienung oder wählen Sie im Hauptmenü My Favorite.
Eine Liste mit gespeicherten Sendern wird angezeigt.
20
Deutsch
2.
Markieren Sie einen Sender in der Liste und drücken Sie die Navigationstaste rechts, um
das nachstehende Untermenü anzuzeigen:
3.
Delete: Sender löschen.
Shift Up/Down: Reihenfolge im Senderspeicher ändern.
Verschieben Sie die meistgespielten Sender in die oberen 5 oder 10 Positionen, damit Sie
sie direkt mit den Senderspeichertasten umschalten können.
Rename: Sender umbenennen.
Play: Verbindet mit dem Sender.
Use as Alarm Sound: Benutzt diesen Sender als Alarm.
Sie können sich wie folgt mit einem gespeicherten Sender verbinden:
•
Markieren Sie einen Sender in der Favoritenliste und drücken Sie Enter.
•
In einem beliebigen Menü drücken Sie die Zifferntasten auf der Fernbedienung, um die
gewünschte Speichernummer aufzurufen.
Deutsch
21
10.2 My MediaU
Mit der Auswahl von My MediaU im Hauptmenü können Sie die Sender aufrufen, welche Sie im
MediaU Portal hinzugefügt haben. Auf der Website http://www.mediayou.net können Sie einfach
Sender, Favoriten usw. hinzufügen. Erstellen Sie ein Konto und registrieren Sie Ihr DR 460-C für
dieses Konto. Bei der Registrierung wird die Seriennummer des Radios erfragt. Dies ist die
MAC-Adresse des Radios, navigieren Sie zu Information Center > System Information > Wireless
Info, um diese Informationen anzuzeigen.
Anschließend können Sie die hinzugefügten Sender direkt über Ihr DR 460-C My MediaU Menü
aufrufen.
22
Deutsch
11 Media-Center
11.1 UPnP
Die Option Media Center > UPnP ermöglicht Ihnen die Wiedergabe von freigegebener Musik von
PCs aus Ihrem Netzwerk.
Um Musik vom PC streamen zu können, führen Sie zunächst die folgenden Schritte auf dem
PC aus:
•
Verbinden Sie den PC mit dem Netzwerk.
•
Achten Sie darauf, dass Ihr DR460-C eingeschaltet und am gleichen Netzwerk
angeschlossen ist.
•
Aktivieren Sie die UPnP-Funktion des Windows Media Player (Version 10 oder später). Sie
finden diese Funktion im Menü Streaming -> Medien-Streaming aktivieren. Sobald das
Streaming aktiviert ist, können Sie Musik von Ihrem Computer auf dem DR 460 C
wiedergeben. Darüber hinaus gibt es eine Reihe anderer Programme zum Hosten eines
Mediaservers.
Ermöglicht die Freigabe Ihrer Medien für das DR 460-C.
Deutsch
23
Fügen Sie die Audiodateien und Ordner hinzu, welche Sie für das DR460-C in der
Medienbibliothek freigeben möchten.
Bei korrekter Einstellung des Medienservers können Sie die dort gespeicherte Musik durch
Auswahl der Menüs, wie nachstehend dargestellt, abspielen.
24
Deutsch
12 Informations-Center
Wenn Sie das Informationscenter im Hauptmenü auswählen wird Ihnen das Informationsmenü
angezeigt. Mit den Navigationstasten aufwärts/abwärts wählen Sie zwischen:
Weather information: Wählen Sie Region > Country > City, um die Wetterinformationen
einzustellen.
Financial information: Anzeige finanzieller Informationen.
System information: Anzeige von Systeminformationen: Softwareversion, MAC-Adresse
(gleichzeitig Seriennummer für das MediaU Konto) und IP-Adresse.
13 Einstellungen
Wählen Sie Configuration im Hauptmenü, um das DR 460-C einzustellen. Folgende Menüs
stehen Ihnen zur Verfügung: Netzwerk, Uhr, Alarm, Sprache, Dimmer, Sleeptimer, Pufferspeicher,
Wetter, Software-Update und Rückstellung.
13.1 Netzwerk
Wireless Network Configuration: Automatische Suche nach Drahtlosnetzwerken (empfohlen).
Wireless Network (WPS PBC): Auswahl, wenn Ihr Router WPS (Wi-Fi Protected Setup)
unterstützt.
Manual configuration: Auswahl, wenn Sie Ihr Netzwerk manuell konfigurieren möchten.
Check Network when Power On: Netzwerkprüfung beim Einschalten aktivieren/deaktivieren.
BITTE BEACHTEN SIE: Einzelheiten zur Drahtlosnetzwerkeinstellung finden Sie auf
Seite 13
Deutsch
25
13.2 Datum und Uhrzeit
Die Option Configuration > Date & Time ermöglicht Ihnen die Einstellung und Formatierung von
Datum und Uhrzeit. Stellen Sie die Uhrzeit ein, wenn Sie das Gerät das erste Mal einschalten,
von da an synchronisiert das Gerät die Uhr automatisch, solange es mit dem Netzwerk
verbunden ist.
•
Set Date and Time: Uhrzeit und Datum einstellen. Siehe Einzelheiten zur Zifferneingabe
im Kapitel „Texteingabe“.
•
Set Time Format: Wählen Sie zwischen 12- und 24-Stundenformat.
•
Set Date Format: Wählen Sie zwischen YY/MM/DD (Jahr/Monat/Tag), DD/MM/YY
(Tag/Monat/Jahr) und MM/DD/YY (Monat/Tag/Jahr).
26
Deutsch
13.3 Alarm
Diese Option ermöglicht Ihnen das Ein- und Ausschalten und die Programmierung eines Alarms.
Mit der Taste Alarm auf der Fernbedienung können Sie das Menü ebenfalls aufrufen. Bitte
beachten Sie, dass zur Nutzung der Alarmfunktion der angeschlossenen Lautsprecher bzw. das
Stereosystem eingeschaltet sein muss.
Gehen Sie zur Programmierung eines Alarms wie folgt vor:
1.
Navigieren Sie zu Configuration > Alarm > Turn On.
2.
Wählen Sie Set Alarm Time und geben Sie die Werte ein. Siehe Einzelheiten zur
Zifferneingabe im Kapitel „8.3 Texteingabe“.
Deutsch
27
3.
Wählen Sie Set Alarm Sound, um den Weckton zwischen Beep (Signalton), Melody
(Melodie) und Radio zu wählen (der zuletzt gehörte Sender oder der unter „Use as
Alarm Sound“ eingestellte Sender).
4.
Das Symbol
wird oben rechts im Display angezeigt, wenn die Alarmfunktion aktiviert
ist.
5.
13.3.1
Zum Unterbrechen des Alarms drücken Sie eine beliebige Taste.
2. Alarm programmieren
1.
Navigieren Sie zu Configuration > Alarm 2 > Turn On.
2.
Wiederholen Sie die Schritte zur Programmierung eines Alarms.
13.3.2
Nickerchenalarm (NAP Alarm) programmieren
1.
Navigieren Sie zu Configuration > NAP Alarm.
2.
Der NAP Alarm schaltet das Radio nach der vorprogrammierten Zeit ein.
3.
Wählen Sie zwischen Off (Aus), 5 , 10 , 20 , 30 , 60 , 90 und 120 Minuten.
13.3.3
Alarmlautstärke einstellen
1.
Navigieren Sie zu Configuration > Alarm volume.
2.
Mit den Navigationstasten links/rechts stellen Sie die Alarmlautstärke ein.
Bitte beachten Sie, um die Alarmfunktion zu nutzen muss der angeschlossene
Lautsprecher/Stereoanlage eingeschaltet sein.
28
Deutsch
13.4 Sprache
Siehe Seite 12 für Einzelheiten zur Sprachwahl.
13.5 Dimmer
Die Option Configuration > Dimmer ermöglicht Ihnen die Einstellung der Helligkeit des Displays.
Sie können den Lichtmodus ebenfalls mit der Taste LIGHT auf der Fernbedienung umstellen.
Zwei Lichtmodi stehen zur Verfügung:
•
Power Saving: Mit dieser Option verdunkelt sich das Display nach 15 Sekunden ohne
Eingabe. Wird ein Befehl von der Fernbedienung empfangen, so schaltet sich die
Beleuchtung wieder automatisch ein. Sie können die Verdunkelungsstufe der
Hintergrundbeleuchtung einstellen.
•
Turn On: Mit dieser Option ist die Hintergrundbeleuchtung ständig eingeschaltet.
Deutsch
29
13.6 Sleeptimer
Die Option Configuration > Sleep Timer ermöglicht Ihnen die Einstellung eines Zeitraums, nach
dem sich das Gerät ausschaltet. Diese Funktion steht Ihnen ebenfalls mit SLEEP auf der
Fernbedienung zur Verfügung. Bei Aktivierung dieser Funktion wird
oben rechts im Display
angezeigt, links davon sehen Sie die verbleibenden Minuten. Es stehen Ihnen sechs Optionen
zur Verfügung: Turn Off (ausschalten), 15, 30, 60, 90, 120, 150 und 180 Minuten.
13.7 Pufferspeicher
Die Option Configuration > Buffer ermöglicht Ihnen die Einstellung des Pufferspeichers für
empfangene Daten für einen bestimmten Zeitraum. Bei Verbindung mit einem Radiosender zeigt
ein Symbol die eingestellte Pufferzeit an (siehe Abbildung auf Seite 18):
•
2 Sekunden:
•
4 Sekunden:
•
8 Sekunden:
30
Deutsch
13.8 Wetter
Diese Option ermöglicht Ihnen die Wahl, ob Wetterinformationen im Standby angezeigt werden
sollen. Sie können auch zwischen den Temperatureinheiten Celsius und Fahrenheit umschalten.
13.9 DLNA-Einstellungen
Der DR 460 C ist ebenfalls mit der DLNA-Funktion ausgestattet, wodurch Musik von anderen, mit
dem gleichen Drahtlosnetzwerk verbundenen Geräten, an den Adapter übertragen werden kann.
Sie können ebenfalls Ihr Telefon zum Durchsuchen der verfügbaren Sender benutzen und wählen,
welcher im Radio gespielt werden soll. Während der Wiedergabe können Sie das Sender-Logo im
Display Ihres Telefons sehen.
Zur Nutzung dieser Funktion müssen Sie nur eine App auf Ihrem Telefon installieren, welche die
DLNA-Funktion unterstützt. Im App Store und im Play Store sind mehrere kostenlose Apps
erhältlich. Bitte beachten Sie, dass nicht jede App die gleichen Funktionen bietet.
Für weitere Informationen zu den verschiedenen Apps besuchen Sie bitte unsere Website
www.albrecht-audio.de. Auf der Produktseite bieten wir Bedienungsanleitungen zu einigen Apps an,
die gut mit unserem Radio arbeiten.
Deutsch
31
Fernbedienung:
1.
Zur Nutzung Ihres Telefons als Fernbedienung müssen Radio und Telefon mit dem
gleichen Drahtlosnetzwerk verbunden sein.
2.
Dann starten Sie die DLNA-App.
3.
Bei Erstgebrauch müssen Sie einen Player wählen (manchmal auch als Renderer
bezeichnet). Hier wählen Sie das Radio mit der Standardbezeichnung AirMusic.
Gewöhnlich wird es nach 5 bis 30 Sekunden automatisch erkannt.
4.
Sie müssen ebenfalls die Mediathek wählen, von welcher die Musik gespielt werden soll.
Zur Fernbedienung des vom Radio übertragenen Senders wählen Sie AirMusic sowie die
Mediathek.
5.
Sie haben nun Zugriff auf die Ordner des Radios und können die Sender auf Ihrem
Telefon durchsuchen.
Musik von Ihrem Netzwerk auf das Radio übertragen:
1.
Zur Wiedergabe von Musik von Ihem Telefon oder anderen mit Ihrem Netzwerk
verbundenen Geräten auf dem Radio durchlaufen Sie die gleichen Schritte 1-3 wie für die
Fernbedienung.
2.
Zur Auswahl der Mediathek wählen Sie das Gerät, dessen Musik Sie abspielen möchten.
Zur Wiedergabe von Musik von Ihrem Telefon müssen Sie Lokale Medien wählen.
3.
Die App zeigt Ihnen Ihre Mediendateien an und Sie wählen die der Wiedergabeliste
hinzuzufügenden Audiodateien.
Bitte beachten Sie, dass diese beiden Verfahren beschrieben werden, da sie gut mit der Bubble
UPnP App arbeiten, die auf Android-Telefonen zur Verfügung steht. Die Nutzung anderer Apps
kann unterschiedlich sein.
32
Deutsch
13.10 Software-Update
Diese Option ermöglicht Ihnen den Download der neuesten Firmwareversion für das Gerät. Zur
Aktualisierung der Firmwareversion gehen Sie wie folgt vor:
Navigieren Sie zu Configuration > Software Update und wählen Sie den herunterzuladenden
Menüpunkt.
Mit Auswahl von Yes beginnen Sie den Download. Warten Sie einige Sekunden ab, bis das Gerät
wieder hochfährt.
BITTE BEACHTEN SIE: Schalten Sie das Gerät während der Aktualisierung nicht aus. Stehen
keine Aktualisierungen zu Verfügung, so wird im Display „No update available“ angezeigt.
13.11 Rückstellung zu den Werkseinstellungen
Die Option Configuration > Reset to Default ermöglicht Ihnen, das Gerät zu den
Werkseinstellungen zurückzustellen.
BITTE BEACHTEN SIE: Ihre Favoritenliste wird hierbei nicht gelöscht.
Deutsch
33
14 Spezifikationen
Konnektivität
Drahtlos-Zugangspunkt
Datenübertragungsraten
54 Mbit/s (WLAN)
WLAN-Sicherheit
WPA und WPA2-AES
64/128-Bit WEP
Audioformat Decoder
Real/MP3/WMA/Flac/Ogg.
32 Kbit/s~320 Kbit/s
Rauschabstand
>90 dB
Display
128 x 64 FSTN grafisches Display
Blau mit weißer LED
Eingänge/Ausgänge
Line Out (Cinch-Buchse)
Netzteileingang
Sprachen
Netzteil
USB (nur für Firmware-Upgrade)
English, Deutsch, Français, Nederlands, русский, Svenska,
Norske, Dansk
Eingang: AC 110-240 V (50-60 Hz)
Ausgang: DC 5 V/500 mA
34
Fernbedienung
27 Tasten
Abmessungen
190 (L) x 73 (B) x 45 (H) mm
Deutsch
15 Gewährleistungs- und Recyclinginformationen
Wir sind verpflichtet, jedem Gerät Informationen über die Entsorgung, über die gesetzlichen
Gewährleistungsbestimmungen und die EG Konformitätserklärungen mit Hinweisen über das
Benutzen der Geräte in den verschiedenen Ländern beizufügen.
Sie finden daher diese Informationen im folgenden Text.
Gesetzliche Gewährleistung von 2 Jahren nach Kaufdatum
Der Verkäufer dieses Geräts gewährt Ihnen eine gesetzliche Gewährleistung von zwei Jahren
nach Kaufdatum des Geräts. Diese Gewährleistung umfasst alle Fehler, die durch defekte
Bauteile oder fehlerhafte Funktionen innerhalb der Gewährleistungsfrist auftreten sollten, nicht
jedoch Fehler, die auf normaler Abnutzung beruhen, wie z.B. verbrauchte Akkus, Kratzer im
Display, Gehäusedefekte, abgebrochene Antennen, sowie Defekte durch äußere Einwirkung, wie
Korrosion,
Überspannung
Verwendung
ungeeigneten
durch
unsachgemäße
Zubehörs.
Ebenso
externe
sind
Fehler
Spannungsversorgung
von
der
oder
Gewährleistung
ausgeschlossen, die auf nicht bestimmungsgemäßen Umgang mit dem Gerät beruhen.
Bitte wenden Sie sich bei Gewährleistungsansprüchen zunächst unmittelbar an den Händler, bei
dem Sie das Gerät erworben haben, oder auch gleich an unseren Servicepartner. Der Händler
wird Ihr Gerät entweder reparieren oder austauschen, oder er wird Ihnen eine für das Gerät
spezialisierte Serviceadresse nennen.
Falls Sie Ihr Gerät einschicken, vergessen Sie Ihre Kaufquittung als Nachweis über das
Kaufdatum nicht und beschreiben Sie bitte den aufgetretenen Fehler möglichst genau.
Elektroschrottgesetz und Recycling
Europäische Gesetze verbieten das Entsorgen von defekten oder nicht mehr
brauchbaren Geräten über den Hausmüll. Sollten Sie eines Tages Ihr Gerät
entsorgen wollen, dann geben Sie es bitte nur bei den überall eingerichteten
kommunalen Sammelstellen zum Recycling ab. Dieses Sammelsystem wird von der
Industrie finanziert und sichert auch die umweltgerechte Entsorgung und das Recycling
wertvoller Rohstoffe.
Deutsch
35
Serviceanschrift und technische Hotline
PST professional support technologies GmbH
Breitscheider Weg 117a
40885 Ratingen
Die Servicehotline ist unter 02102-1459546 (normale Festnetzpreise)
unter [email protected] erreichbar.
bzw.
per
e-mail
Bevor Sie bei einem Problem ein vermeintlich defektes Gerät zurückschicken, können Sie Zeit
und Versandkosten sparen, indem Sie sich per Hotline helfen lassen
Konformitätserklärung
Wir erklären hiermit, dass unser Gerät den europäischen Richtlinien (R&TTE, LVD und EMC) und
Normen (EN 300 328 V1.8.1, EN 301 489-1, EN 301 489-17, EN 60 950-1) entspricht. Sie finden
die aktuelle Konformitätserklärung unter http://service.alan-electronics.de
Druckfehler vorbehalten.
Die Informationen in diesem Handbuch können ohne vorherige
Ankündigung geändert werden.
© 2014 Alan Electronics GmbH
36
Deutsch
Internet Radio
Adapter
ALBRECHT DR 460-C
Instruction Manual
English
CAUTION
TO PREVENT FIRE OR SHOCK HAZARD, DO NOT USE THIS PLUG WITH AN EXTENSION CORD, RECEPTACLE OR
OTHER OUTLET UNLESS THE BLADES CAN BE FULLY INSERTED TO PREVENT BLADE EXPOSURE. TO PREVENT
FIRE OR SHOCK HAZARD, DO NOT EXPOSE THIS APPLIANCE TO RAIN OR MOISTURE.
The lightning flash with
arrowhead symbol, within
an equilateral triangle is
intended to alert the user
of the presence of insulated
‘dangerous voltage’ within
the product’s enclosure
that may be of sufficient
magnitude to constitute a
risk of electric shock to
persons.
1
The exclamation point
within an equilateral
triangle is intended to
alert the user to the
presence of important
operating and maintenance
(servicing) instructions in the
literature accompanying the
appliance.
Important safety instructions
1.)
2.)
3.)
4.)
5.)
6.)
7.)
8.)
9.)
10.)
11.)
12.)
13.)
14.)
15.)
16.)
38
WARNING:
To reduce the risk of
electric shock, do not
remove cover (or back).
No user serviceable parts
are inside. Refer servicing
to qualified personnel.
Read the instruction manual.
Keep the instruction manual.
Read all warnings.
Follow the instruction manual.
Do not use this device near water.
Clean only with a dry cloth.
Do not block any ventilation openings. Install in accordance with the manufacturer’s instructions.
Do not install near any heat sources such as radiators, heat registers, stoves, or other devices
(including amplifiers) that produce heat.
Protect the power cord from being walked on or pinched particularly at plugs, convenience
receptacles, and the point where they exit from the device.
Only use attachments / accessories specified by the manufacturer.
Unplug this device during lightning storms or when unused for long periods of time.
Refer all servicing to qualified service personnel. Servicing is required when the device has been
damaged in any way, such as power-supply cord or plug is damaged, liquid has been spilled or
objects have fallen into the device, the device has been exposed to rain or moisture, does not
operate normally, or has been dropped.
This appliance shall not be exposed to dripping or splashing water and no object filled with liquids
such as vases shall be placed on the apparatus.
Do not overload wall outlet. Use only power source as indicated.
Use replacement parts as specified by the manufacturer.
English
1 Content
1
Content
39
2
Welcome
40
3
Package contents
41
4
Connecting DR 460-C to your existing Hi-Fi
41
5
Features
42
6
Specifications
42
7
Front panel
43
8
Back panel
43
9
Remote control
44
10
Turning on the DR 460-C
45
10.1
First time configuration ............................................................................................45
10.2
Language selection .................................................................................................47
10.3
Text entry.................................................................................................................47
10.4
Establishing a wireless connection ..........................................................................48
11
Listening to the radio
49
11.1
Searching for a radio station ....................................................................................49
11.2
Searching by genre .................................................................................................49
11.2.1
Searching by country/location ............................................................................ 50
11.2.2
Searching by station name ................................................................................ 51
11.2.3
Searching by entering the address .................................................................... 51
11.3
Connecting to a station ............................................................................................52
11.4
Adding a station to My Favorite................................................................................52
11.4.1
Adding a currently played radio station .............................................................. 53
11.4.2
Adding a radio station from the list ..................................................................... 53
11.4.3
Managing My Favorite ....................................................................................... 54
11.5
12
12.1
My MediaU ..............................................................................................................55
Media Center
55
UPnP.......................................................................................................................55
13
Information Center
57
14
Configuration
58
14.1
Network ...................................................................................................................58
14.2
Date & Time.............................................................................................................59
14.3
Alarm .......................................................................................................................60
14.3.1
To program the 2nd alarm: ................................................................................. 61
14.3.2
To program NAP alarm: ..................................................................................... 61
English
39
14.3.3
Set Alarm volume: ............................................................................................. 61
14.4
Language ................................................................................................................61
14.5
Dimmer....................................................................................................................62
14.6
Sleep Timer .............................................................................................................62
14.7
Buffer ......................................................................................................................63
14.8
Weather...................................................................................................................63
14.9
DLNA Setup ............................................................................................................64
14.10
Software Update......................................................................................................65
14.11
Reset to Default .......................................................................................................65
15
Warranty and Recycling Information
66
2 Welcome
Thank you for purchasing the DR 460-C. Your DR 460-C is designed as a
digital music adapter to add to your existing Audio system and to provide you
with hours of music enjoyment with simple, convenient access to thousands of
Internet radio stations worldwide and furthermore music streaming options. No
matter whether you are in Zürich and want to listen to Brazilian music or select
a genre such as classical music, hard rock or jazz, the DR 460-C brings the
radio station of your choice in your home.
40
English
3 Package contents
Please make sure that the following contents are included in the package:
1. DR 460-C Adapter
2. Power supply
3. Remote control
4. DR 460-C User Manual
5. RCA connection cable
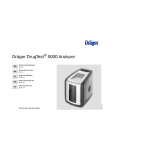
4 Connecting DR 460-C to your existing Hi-Fi
English
41
5 Features
•
•
•
•
•
•
Stand-alone device
Wireless connection
Up-to-date list of more than 10,000 online stations
250 favorites
Radio alarm
Weather forecast
6 Specifications
Connectivity
Wireless access point
Data rates
54 Mbits ( WLAN)
Wireless LAN security
WPA and WPA2-AES
64/128-bit WEP
Audio format decoder
Real/MP3/WMA/Flac/Ogg.
32Kbps~320Kbps
SNR
>90dB
Display
128 x 64 FSTN graphics display
Blue color with white LED
I/O ports
Line Out (RCA jack)
DC power jack
USB(USB only for firmware upgrade)
Language
English, Deutsch, Français, Nederlands, русский, Svenska,
Norske, Dansk
AC power adapter
Input: AC 110-240V (50-60Hz) Output: DC 5V/500mA
Remote control
27 keys
Dimension
190 (L) x 73 ( W ) x 45 (H) mm
42
English
7 Front panel
There is no keypad or buttons on your DR 460-C. All is working entirely from the
enclosed remote control. The design is made simple and user - friendly so the
navigation is handled completely by the R/C.
8 Back panel
Connectors on this current model are: 2 x Stereo RCA & power connector
USB only for firmware upgrade.
Connect the RCA (phono) cable to your existing audio system
English
43
9 Remote control
Power button
Press to switch the device between standby and on mode.
Menu button
Press to return to the main menu.
Volume- button
Press to decrease the output volume.
Mute button
Press to mute the audio output.
Volume+ button
Press to increase the output volume.
Sleep button
Press to select a preset amount of time after which
the device shuts off.
Alarm button
Press to turn the alarm clock on/off.
Language button
Press to select a system language.
Light button
Press to select a light mode.
Enter button
Press to confirm your selection of a menu option.
Up navigation
button
Down navigation
button
Left navigation
button
Right navigation
button
44
Press to scroll up through menu items. Press to enter text.
Press to scroll down through menu items. Press to
enter text.
Press to go back to the previous menu
Press to confirm your selection of an option and go to
the submenu.
Preset button
0~9
Press to recall a preset radio station.
Favorite button
Press to display your favorites list.
+Favorite button
Press to store the currently played radio station to
your favorites list.
English
10 Turning on the DR 460-C
To turn on the DR 460-C for the first time:
1. Plug the supplied power adapter in a power outlet.
2. Connect the power adapter to the DC power jack on the rear panel
3. Connect RCA cables to your existing Hi-Fi stereo.
10.1 First time configuration
The first time the DR 460-C is powered on you have to choose the language first:
Use the up/down navigation buttons on your remote control to choose your
preferred language and press OK.
Then choose whether or not the DR 460-C should enable “Check network when power
on” Use the left/right navigation buttons to choose and press OK. If you enable this
option the radio will check if there are networks which the radio already knows. If that is
not the case the radio will display a list of all networks available.
Choose how you wish to configure your network.
If Yes was chosen first, find your network on the list shown on the screen and press ok.
English
45
Enter your password if your wi-fi connection is encrypted.
If your router supports WPS and Yes (WPS) was chosen simply press the WPS
button on your router within 120 seconds.
Congratulations you have now connected your radio to your network! The network status
icon should have changed according to the picture below.
Network status
Time
Menu options
Press the right
navigation button to
open the selected
menu
The menu contains five options and
the first one is selected.
46
English
10.2 Language selection
The DR 460-C supports up to eight languages for the menu options.
To change the language:
1. From the main menu, select Configure > Language
2. Press the up/down navigation button to scroll through the language
options and press the enter button to apply the selected language.
3. Or simply press the LANG button on the remote and cycle through the
available languages.
NOTE: The language selected applies to the DR 460-C menus and system messages
only. The station names shown vary according to the different station locations.
10.3 Text entry
When you add the address of an online radio station or use a WEP key for
wireless network security, you need to enter text. It is the same procedure to set
the time, date or the alarm. But of course you can only select numbers.
To enter upper/lower case letters, symbols, or numbers:
1.
Press the up/down navigation button to select a character from the
following: A a B b…Z z $ % & # _ ^ ~ ` “ ‘, . : ; ? ! * - + @ < = > { ¦ } [ \ ] ( / )
0 1…9
2.
Press the right navigation button to proceed to the next. Press the enter
button when done.
NOTE: When entering numbers the numeric keys on the remote control can also be
used.
English
47
10.4 Establishing a wireless connection
NOTE! This is only needed if a connection has not already been established on the
first power on or the DR 460-C needs to connect to a different network.
1.
2.
Set up your access point (AP) to receive/broadcast a wireless signal.
From the main menu, select Configure > Network > WiFi Configure. The names of
the receivable access points are listed. If you highlight a protected network, a key
icon will show in front of the SSID of the wireless network.
3.
Select a network you have access to. If the network is not secured, press the
enter button to make a connection. If it is secured, you will be asked to enter the
passphrase.
4.
Input the appropriate passphrase and press Enter to make a connection. Refer to
the “10.3 Text entry” section for details about inputting text.
48
English
5.
The following icons will appear at the upper left corner of the display to indicate
network status:
Connecting
Wireless connection successful
Wireless connection failed
NOTE: If a connection is established successfully, the passphrase will be memorized.
With network settings unchanged, the device will automatically connect to the network
when powered on.
11 Listening to the radio
Selecting Internet Radio from the main menu allows you to enter following submenus:
My Favorite: Here you can see all the added favorite stations.
Radio Station/Music: Here you can search for radio stations.
History: Here you can see the latest listened stations and quickly connect to these.
Service: Here you can search and add stations manually.
11.1 Searching for a radio station
The DR 460-C has an up-to-date, well-classified list of online radio stations worldwide.
You can search for a station by music genre or the location of the station. You can also
go through the stations categorized in alphabetical order or manually enter the
address of a station.
11.2 Searching by genre
1.
From the main menu, select Radio Station/Music > Genre, and a list of music
genres is displayed in alphabetical order.
English
49
3. Press the up/down navigation button to highlight a genre. For example, if you
want to listen to jazz music:
Press the
navigation button left
to return to the
previous menu
Press the navigation
button right to return
to display all Jazz
stations
Jazz is 15th of total 43
genres.
3.
11.2.1
1.
Press the right navigation button to display all jazz stations available.
Highlight a station and press the enter button to connect to the station.
Searching by country/location
From the main menu, select Radio Station/Music > Country/Location, and a list of
geographical regions is displayed in alphabetical order:
The list includes: Africa, Asia, Europe, Latin America, Middle East, North America,
Oceania/Pacific, Internet Only (for stations broadcasting via the Internet only).
2.
3.
Select a geographical region and then select a country in the region. A list of
stations located in the country will be displayed.
Highlight a station and press Enter to connect to the station.
NOTE:
•
If you select a language other than English, you will see the name of a country
where that language is spoken in the Radio Station/Music menu. Highlight the
country name and press Enter to display the stations located in this country
directly without selecting the region first.
50
English
11.2.2
Searching by station name
1.
From the main menu, select Service > Search Radio Station.
2.
The stations are divided into 10 categories by their name initial: 0-9, A-C, D-F, G-I,
J-L, M-O, P-R, S-U, V-Z. Select a category and a list of stations is displayed.
NOTE: Stations with names in Japanese, Korean, Traditional Chinese, and Simplified
Chinese are in the Other group.
3.
4.
11.2.3
Select any of the stations again to display more stations. The stations are listed
according to the first two letters of their names alphabetically.
Highlight a station and press Enter to connect to the station.
Searching by entering the address
1.
From the main menu, select Service > Add New Radio Station.
2.
Enter the address of a station. Refer to the “Text entry” section for details about
inputting text.
English
51
3.
When finished, press Enter to connect to the station.
11.3 Connecting to a station
If the DR 460-C is successfully connected to a station, the display shows the following:
Network status
Station name
Data information
Connection status
Bars show connection
Strength of the station
Buffer status
NOTE:
•
•
•
The connection status may change from “Connecting” to “Buffering” to “Playing.”
Refer to page 63 for details about setting the buffer.
If you shift to other menus while connecting to a station, a countdown timer will
appear at the bottom right corner of the display. After 10 seconds without any
commands, the system automatically leaves the menu and shifts back to the
station connected.
11.4 Adding a station to My Favorite
You can add a currently played radio station to My Favorite or set a station as your
favorite immediately after you found it on the list. The DR 460-C has a memory of
250 stations.
52
English
11.4.1
1.
2.
Adding a currently played radio station
Press the Fav+ button on the remote control.
The following icons will appear next to the network status icon to indicate favorite’s
status:
The station is being added to My Favorite.
The station has already been in My Favorite.
Favorites exceed the maximum of 250.
11.4.2
1.
2.
Adding a radio station from the list
Search for a station using any of the first three methods mentioned in the “Searching
for a radio station” section.
Highlight a station and press the right navigation button to display the submenu as
you can see it below:
Add to My Favorite: Select to add the station to your favorites list.
Auto Scan (Down)/(Up): Select to connect to the stations on the list consecutively
up/down starting with the highlighted station. Each station will be played for 30 seconds
during which you can add it to My Favorite by pressing the Fav+ button.
Play: Select to connect to the station.
Use As Alarm Sound: Select to use this station as the alarm sound.
Refer to the table on top of the page for favorite’s status.
English
53
11.4.3
Managing My Favorite
The DR 460-C saves up to 250 stations to My Favorite so that you have a quick
access to these stations.
To manage your favorites list:
1. Press the Favorite button on the remote control or select My Favorite from the main
menu. A list of preset stations is now displayed.
4.
Highlight a station on the list and press the right navigation button to display the
submenu as you can see it below:
3.
Delete: Select to delete the station.
Shift Up/Down: Select to change the order of the preset stations.
Move the stations played the most frequently to the top 5 or 10 so that you can
press the preset buttons to switch to them.
Rename: Select to rename the station.
Play: Select to connect to the station.
Use as Alarm Sound: Select to use as this station as the alarm sound.
You can connect to a preset station by doing the following:
• From your favorites list, highlight a station and press Enter to connect.
• From any menus, press the numeric buttons on the remote control to connect to the
preset number desired.
54
English
11.5 My MediaU
Selecting My MediaU from the main menu allows you to go to the stations added on the
MediaU portal. From the website http://www.mediayou.net you can add stations, favorites
etc. easily. Create an account and register your DR 460-C to be associated with your
account. When you register the radio you will be asked for a serial number. This is the
MAC address of the radio, go to Information Center > System Information > Wireless Info
to display this information.
When this is done you can access added stations etc. directly from your DR 460-C My
MediaU menu.
12 Media Center
12.1 UPnP
The Media Center > UPnP option allows you to playback music from your shared
network.
To enjoy streaming music from the PC, the following steps are to be done on the PC:
•
Connect the PC to the network.
•
Ensure the DR460-C is powered on and connected to the same network.
•
You can activate the UPnP feature of the Windows Media Player (version 10 or later).
You can find this feature in the menu Streaming->Enable Media Streaming. As soon as
the streaming is activated you can play the music from your computer on the DR 460 C.
There are several other programs available to host a media server.
English
55
Allows to share your media to the DR 460-C.
Add the audio files and folders you want to share with DR460-C to the media library.
56
English
When the media server was set up properly you can play the music from it by selecting
the menus as you can see below.
13 Information Center
Selecting the Information Center from the main menu allows you to enter the
information menu. Use the navigation keys up/down to choose between:
Weather information: Choose Region > Country > City to setup weather information.
Financial information: Choose to see financial informations.
System information: See informations regarding the system: Software Version,
Wireless MAC Address (also used as serial number for the Mediayou account)
and Wireless IP Address.
English
57
14 Configuration
Selecting Configuration from the main menu allows you to configure the DR 460-C.
These menus are available: network, clock, alarm, language, dimmer, sleep timer,
buffer, weather, software update and reset.
14.1 Network
Wireless Network Configuration: Choose to automatically search for wireless networks
(Recommended)
Wireless Network (WPS PBC): Choose this if your router supports WPS (Wi-fi Protected
Setup)
Manual configuration: Choose this if you want to manually configure your network.
Check Network when Power On: Enable or disable network check when power on.
NOTE: Refer to page 48 for details about wireless network setup.
58
English
14.2 Date & Time
The Configuration > Date & Time option allows you to set the time/date and a format for
displaying time. Set the time for the device when you turn it on for the first time, and the
device will synchronize the clock as long as it is connected to the network.
• Set Date and Time: Select to set the time and date. Refer to the “Text entry”
section for details about inputting numbers.
• Set Time Format: Select between the 12Hour and 24Hour format.
• Set Date Format: Select between YY/MM/DD, DD/MM/YY or MM/DD/YY format.
English
59
14.3 Alarm
This option allows you to turn on/off the alarm and program an alarm. You can access
this menu by pressing the alarm button on the remote control too.
Please note that in order to use the alarm function the connected speaker/stereo system
needs to be switched on.
To program an alarm:
1. Go to Configuration > Alarm > Turn On.
2.
Select Set Alarm Time and enter values. Refer to the “Text entry” section for details
about inputting numbers.
3.
Select Set Alarm Sound to choose a sound type from Beep, Melody, and Radio
(the station you last listen to or if a station has been selected as Use as Alarm
Sound).
4.
The
icon will appear at the upper right corner of the display to indicate that the
alarm function is activated.
When the alarm sounds, press any button to stop it.
5.
60
English
14.3.1
To program the 2nd alarm:
1.
2.
14.3.2
Go to Configuration > Alarm 2 > Turn On.
Repeat steps from program an alarm.
To program NAP alarm:
1. Go to Configuration > NAP Alarm
2. NAP Alarm switches the radio on after the programmed period of time is over.
3. Choose between Off, 5 Minutes, 10 Minutes, 20 Minutes, 30 Minutes, 60
Minutes, 90 Minutes and 120 Minutes.
14.3.3
Set Alarm volume:
1.
2.
Go to Configuration > Alarm volume.
Use navigation keys left/right to adjust alarm volume.
14.4 Language
Refer to page 47 for details about language selection.
English
61
14.5 Dimmer
The Configuration > Dimmer option allows you to adjust the brightness of the
light. You can also shift the light mode by pressing the light button on the remote
control. Two modes are available:
• Power Saving: With this option the display gets dimmed after 15 seconds without
command. When a command from the remote control is received the light is turned
back on automatically. You can select how much the backlight shall be dimmed.
• Turn On: Select to turn the light always on.
14.6 Sleep Timer
The Configuration > Sleep Timer option allows you to select a preset amount of time
after which the device shuts off. You can also set the sleep timer by pressing the
Sleep button on the remote control. When this function is activated, the
icon will
appear at the upper right corner of the display, left of this icon you will see the
minutes left. Six options are available: Turn Off, 15 Minutes, 30 Minutes, 60 Minutes,
90 Minutes, 120 Minutes, 150 Minutes and 180 Minutes.
62
English
14.7 Buffer
The Configuration > Buffer option allows you to set the buffer to hold data received for a
certain amount of time. If you are connecting to a station, there will be an icon showing
the buffer length you set (see the figure on page 52):
• 2Seconds:
• 4Seconds:
• 8Seconds:
14.8 Weather
This option allows you to choose if weather information should be shown on the standby
screen. You can also choose between Celsius and Fahrenheit.
English
63
14.9 DLNA Setup
The DR 460 C also features DLNA which means that it is possible to push music to the
adapter from other devices which are also connected to the same wireless network.
You can also use your phone to browse through the available stations and remotely select
which one the radio shall play. During playback you will be able to see the station cover on
the display of your phone.
To use this feature you simply need to install an application on your phone which supports
DLNA. There are several applications available for free in the App or Play Store. Please
note that not every application is offering the same set of features.
To get more information about different applications please have a look at our website
www.albrecht-audio.de. At the product page we are offering manuals about some
applications which are working well with our radio.
Remote Control:
1.
To use your phone as a remote control you have to make sure that both the radio
and the telephone are registered in the same wireless network.
2.
Then you start the DLNA application.
3.
On the first use you need to select a player or sometimes also called renderer.
Here you need to select the radio whose default name is AirMusic. Normally it is
automatically detected after 5-30 seconds.
4.
You also need to select the library from where the music shall be played. To
remotely control the station played by the radio you need to select AirMusic as
the library as well.
5.
Now you have access to the folders of the radio and can browse through the
stations on your phone.
Push music from your network to the radio:
1.
To play music from your phone or any other device in the network on the radio
you need to go through the steps 1-3 like in the Remote Control example.
2.
When you select the library you need to select the device whose music you want
to play. When you want to play music from your phone you need to select Local
Media.
64
English
3.
Now the application will show you your media files and you can select the audio
files which shall be added to the playlist.
Please note that these two procedures are described as they are working with the Bubble
UPnP application available on Android phones. This may differ when using other
applications.
14.10 Software Update
This option allows you to download the latest firmware version for the device. To
update the firmware version:
Go to Configuration > Software Update and select the item you are allowed to
download.
Select Yes to begin downloading it. Wait for a few seconds until the device reboots.
NOTE: Do not turn off the device while the update is proceeding. If no updates are
available the display will show “No update available”.
14.11 Reset to Default
The Configuration > Reset to Default option allows you to reset the device to its factory
defaults.
NOTE: Your favorite’s lists will not be erased.
English
65
15 Warranty and Recycling Information
We are legally obliged to include disposal and warranty information as well as EU
declaration of conformity with the use instructions in different countries for every unit.
Please find this information on the following pages.
2-Year Warranty from Date of Purchase
The manufacturer/retailer guarantees this product for two years from date of purchase.
This warranty includes all malfunctions caused by defective components or incorrect
functions within the warranty period excluding wear and tear, such as exhausted batteries,
scratches on the display, defective casing, broken antenna and defects due to external
effects such as corrosion, over voltage through improper external power supply or the use
of unsuitable accessories. Defects due to unintended use are also excluded from the
warranty.
Please contact your local dealer for warranty claims. The dealer will repair or exchange
the product or forward it to an authorized service center.
You can also contact our service partner directly. Please include your proof of purchase
with the product and describe the malfunction as clearly as possible.
WEEE and Recycling
The European laws do not allow any more the disposal of old or defective
electric or electronic devices with the household waste. Return your product to
a municipal collection point for recycling to dispose of it. This system is financed
by the industry and ensures environmentally responsible disposal and the
recycling of valuable raw materials.
Service Address And Technical Hotline (for units sold in Germany)
PST professional support technologies GmbH
Breitscheider Weg 117a
D - 40885 Ratingen
Contact our service hotline by phone 02102 - 1459546 (regular costs for German fixed
network) or e-mail at [email protected].
Conformity Declaration
We declare herewith that our radio corresponds to the European Directives
(R&TTE, LVD and EMC) and Standards (EN 300 328 V1.8.1, EN 301 489-1,
EN 301 489-17, EN 60 950-1). The actual Declaration of Conformity may be
downloaded any time from http://service.alan-electronics.de
Printing errors reserved.
Information in this user manual are subject to change without prior notice.
© 2014 Alan Electronics GmbH
66
English