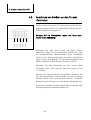
1
User Manual UM2 Bedienungsanleitung UM2 Cluster Controller CC1 Interface Adapter IA1 Fuel Cartridge Sensor FS1 GB D 2 English User Manual UM1 Deutsch Bedienungsanleitung UM2 3 5 43 4 User Manual UM2 Cluster Controller CC1 Interface Adapter IA1 Fuel Cartridge Sensor FS1 GB 5 6 1. Introduction Introduction 1.1 Foreword Thank you for purchasing an SFC Smart Fuel Cell product. We are sure that you will enjoy your new source of power. Please read these instructions completely before first use. In case of additional questions about installation or operation, please consult your dealer or the EFOY hotline. SFC Smart Fuel Cell AG Eugen-Saenger-Ring 4 D-85649 Brunnthal-Nord, Germany Hotline: +49 89 673 5920 Freecall: +800 732 762 78 Fax: +49 89 673 592 369 [email protected] www.efoy.eu 7 UM2-GB-D-060704 User Manual Bedienungsanleitung CC1-IA1-FS1 1. 1. Introduction 1.2 Intended Use The cluster controller CC1, the interface adapter IA1 and the fuel cartridge sensor FS1 are intended for use with EFOY 600, EFOY 1200 or EFOY 1600 devices. They extend the devices’ data interface and can only be used in combination with it. 1.3 Declaration of Conformity SFC Smart Fuel Cell AG, Eugen-Sänger-Ring 4, 85649 Brunnthal-Nord declares that the Cluster Controller CC1, the Interface Adapter IA1 and the FS1 fuel cartridge Sensor conform to the European Community’s 89/336/EWG guidelines for electromagnetic compatibility. The following standards apply: DIN EN 61000-6-1, DIN EN 61000-6-3 8 2. Table of Contents 2. Table of Contents 1. Introduction 7 1.1 Foreword 7 1.2 Intended Use 8 1.3 Declaration of Conformity 8 2. Table of Contents 9 3. Overview 10 3.1 Applications 10 3.2 Assembly 11 3.3 Specifications 12 Cluster Controller CC1 14 4.1 General 14 4.2 Connecting Devices to the Cluster Controller 15 4.3 Parallel Operation 16 4.4 Use of the “Remote On“ Contacts 18 Interface Adapter IA1 21 5.1 Connecting to a PC 21 5.2 Monitoring, Controlling and Configuring Devices 22 Fuel Cartridge Sensor FS1 25 6.1 Connecting Fuel Cartridge Sensors 25 6.2 Fuel Cartridge Sensor Functions 26 Hyperterminal 27 7.1 Setting up the Hyperterminal 27 7.2 Commands 33 4. 5. 6. 7. 9 3. Overview 3. Overview 3.1 Applications Operating your device(s) in conjunction with the cluster Ccntroller CC1, the interface adapter IA1 and the fuel cartridge sensor FS1 will afford you several additional functions. The following will provide you with a brief survey of how you can use these three components. Cluster Controller CC1 The cluster controller CC1 provides the following options: operate up to 5 devices in parallel operate, control and check the status of every device by means of a PC connect fuel cartridge sensor FS1s to every device control devices using an external charge controller or similar device Interface Adapter IA1 The interface adapter IA1 allows you to connect a device or the cluster controller CC1 to your PC’s serial interface. Fuel Cartridge Sensor FS1 The fuel cartridge sensor FS1 monitors the fuel level and signals when it drops below a preset level. 10 3. Overview 3.2 Assembly 3 2 1 4 6 5 Cluster Controller CC1 1 2 3 4 5 6 RJ45 jack for EFOY-device (5 x) RJ45 jack for fuel cartridge sensor FS1 (5 x) RJ45 jack for communication (PC) (5 x) Frame Housing Cable inlet for “Remote On“ connection 2 1 Interface Adapter IA1 1 2 RJ45 jack for connecting a patch cable Sub-D jack, 9-pole, for connection to a PC 11 3. Overview 4 2 3 1 Fuel Cartridge Sensor FS1 1 2 3 4 3.4 Sensor surface Mounting holes Connecting cable RJ45 plug for connection to device or CC1 Specifications Cluster Controller CC1 General Specifications Dimensions (L x W x H) 149 x 76.5 x 270 mm Weight 160 g Operating temperature -55 to +100 °C / -67 to + 212 F Storage temperature -55 to +125 °C / -67 to + 257 F 12 3. Overview Instrumentation Operation Plug and Play RJ45 connection jacks 5 x devices, 5 x fuel cartridge sensor, 5 x PC Contacts for remote control Galvanized and separated 3V to 40V Interface Adapter IA1 Dimensions (L x W x H) 53 x 33 x 16 mm Operating temperature -35 to +45 °C / -31 to + 113 F Storage temperature -35 to +45 °C / -31 to + 113 F Fuel Cartridge Sensor FS1 Dimensions (L x W x H) 50 x 20 x 5 mm Operating temperature -25 to +70 °C / -13 to + 158 F Storage temperature -40 to +85 °C / -40 to + 185 F 13 4. CC1 Cluster Controller 4. Cluster Controller CC1 4.1 General The cluster controller CC1 accepts up to five EFOY 1200 or 1600 devices. You will need at least one DL1 data line (CAT. 5) or a commercially available network cable (Cat. 5 patch cable) for each device. If the device is to interface with a computer, you will need a second data line and one interface adapter IA1 per device. As an option, you many also utilize one fuel cartridge sensor FS1 per device. The built-in “Remote On“contact permits remote control by means of an external charge controller. The following explains in detail how to connect and operate the cluster controller CC1. Mount the cluster controller CC1 near the fuel cell(s). Position the fuel cartridge(s) so that the distance between the cluster controller and the fuel cartridge sensor(s) FS1 does not exceed the length of the cord(s). Use the drilling and sawing templates of the interface for flush mounting. Electrical connections and the cluster controller housing should be easily accessible. The device is not watertight. Make sure that no water gets inside. 14 4. CC1 Cluster Controller 4.2 Connecting Devices to the Cluster Controller Up to five devices can be connected to the cluster controller CC1. There are three RJ45 ports for each device. Unit 5 Unit 4 Unit 3 Unit 2 Unit 1 Always connect from left to right (see illustration). Connect the first device with the cluster controller by attaching a DL1 data line (CAT. 5) or a commercially available network cable (Cat. 5 patch cable) to the device’s data interface (see also Chapter 3.2 of the UM1 user’s manual). Connect the end of the cable to the first RJ45 port on the lower left. It is marked with “1”. Should you wish to connect several devices, proceed as above, attaching one device after another. Device No. 2 connects to the second port, device No. 3 connects to the third port, etc. A maximum of 5 devices may be connected: Any unused ports can remain open. 15 4. CC1 Cluster Controller 4.3 Parallel Operation The cluster controller CC1 enables you to charge a battery using several EFOY devices simultaneously. Observe the permissible battery capacity indicated in the UM1 user’s manual. The formula for operation with (n) devices is: permissible capacity x n For example, if you wish to operate two EFOY 1200 devices on the cluster controller, you must connect a battery with at least 40 Ah x 2 = 80 Ah. The maximum permissible capacity in this case is 200 Ah x 2 = 400 Ah. Please note that devices operating in parallel must be configured identically. New devices will always have factory default settings (in parentheses). The following parameters can be set: Switch on voltage (12.5V) Switch off voltage (14.2V) Switch off current (2.0A) Reaction time (10 s) Maximum output energy (1200 Wh/1560 Wh) Altitute of site (500 m) Battery capacity (50 Ah) The numbers in parentheses are the default values. All modifications to these values can be performed via the terminal interface. If you are not using the PC interface, your devices will automatically be configured correctly. If you wish to modify one or more of the above parameters, you may do so using the hyperterminal program on your PC (command: “CONFIG“). Your devices must be connected to the PC via the cluster controller. You will find instructions for using the data interface and the hyperterminal in Chapters 5 and 7. 16 4. CC1 Cluster Controller Always choose the same settings for all devices. You can check your devices’ configuration by using the “VALUE“ command. You can set the standard parameters by using the “DEFAULT“ command. To start autonomous parallel operation, use the remote control to switch all connected devices to automatic mode. All devices monitor the battery voltage independently. If a device notices that the voltage has dipped below the threshold, it will switch to charge mode. “Charging“ will appear on the second line of the display. A “P“ (Parallel) will appear on the first line of the other devices’ displays on the right. The devices will switch to charging mode after a three-minute delay in order to prevent the voltage from dropping too radically should the battery be very low. “Charging“ will likewise appear on the second line of the displays. Once the battery is fully charged, all devices will switch back to the monitoring mode. The “P“ will disappear from the upper-right corner of all remote controls. “Automatic“ and “Standby“ will continue to appear on the first and second lines respectively. Should you wish to charge the battery manually now and then, you can do so by using the “on/off“ switch to switch the device “On“. All the other devices will automatically turn on. The battery will now charge until the cutoff threshold is reached, after which all devices will switch back to automatic mode. During operation, should an error message appear on a device (e.g. empty fuel cartridge), the device will remain in error mode. All other devices will continue to charge the battery. Once the error has been corrected, pressing the “Reset“ button will return the device to parallel operation. 17 4. CC1 Cluster Controller If the error is self-correcting, the affected device will return itself to parallel operation. It is not necessary to reset it in this case. The antifreeze mode will likewise continue. There is no parallel operation here, i.e., every device switches to antifreeze mode independently of the others whenever necessary. All of the functions described in the UM1 user’s manual will also function in parallel operation. 4.4 Use of the “Remote On“ Contacts The cluster controller CC1 enables you to operate one or more devices remotely. This is of particular interest if you are using other energy sources such as photovoltaic cells, and wish to use the fuel cell(s) exclusively as a backup. If you wish to use this option, you should prepare the connection before starting up the cluster controller and the fuel cells for the first time. First remove the frame from the cluster controller and loosen the four screws that secure the plate to the housing (see illustration). Remove the plate from the housing. 18 4. CC1 Cluster Controller There is a two-pin terminal clamp on the left side of the plate next to the ports for device 1. In order to control your device(s) manually, you must apply voltage to these contacts. Connect the outputs of your voltage regulator to the cluster controller using the clamp. Make sure that the polarity of the wire is correct (see markings on the plate). Make sure that there is no voltage flowing to the clamps at this point. Do not apply a voltage above 40V to the clamps at any time. Excessive voltage may damage the cluster controller. Replace the plate in the housing and pass the two attached wires through the opening to the exterior. Tighten the four screws on the housing and snap the frame onto the cluster controller. Now connect your device(s) to the cluster controller as described in chapters 4.1 and 4.2. In order to use the functions of the “Remote On“ contacts, a device must be connected to the first port (on the left side, marked with “EFOY” and “1”). If a voltage between 3V and 40V is applied to the “Remote On“ contacts, the device that is connected to the first port on the cluster controller will automatically switch to charge mode. An “R“ (for “Remote“) will appear on the first line of the display on the right. If additional devices have been connected to the cluster controller, they will come on line after a three-minute delay. 19 4. CC1 Cluster Controller The thresholds set in the device are not observed in this case. A safety threshold (dependent on voltage and current) remains active in order to prevent overcharging of the battery. Make sure that the “Remote On“ signal disappears after you have finished charging. If the signal remains on for a long time when the battery is fully charged, the device will restart after just a slight dip in battery voltage. This could result in increased wear and tear of the device(s). 20 5. Interface Adapter IA1 Interface Adapter IA1 5.1 Connecting to a PC If you wish to monitor and control your device(s) via a PC, you will need an interface adapter IA1 and a DL1 data line (CAT. 5) or a commercially available network cable (Cat. 5 patch cable) for each device. PC Port 5 PC Port 4 PC Port 3 PC Port 2 PC Port 1 Attach one end of the data line to the interface adapter IA1 and attach the adapter to a free Type RS232 serial interface on your PC. Attach the free end of the data line to the PC port on your device. If you are using the cluster controller CC1, you must attach the free end of the data line to the first port in the uppermost row of the cluster controller (marked “PC” and “1”, see illustration). Gerät 5 Gerät 4 Gerät 3 Gerät 2 If several devices are to be connected to a PC via the cluster controller CC1, proceed as described above to connect the remaining devices. Select the proper PC port for each device. Use the second port on the uppermost row for device No. 2, the third port for device No. 2, etc. Any unused ports can remain free. Gerät 1 5. A separate serial interface on the PC is required for each device. Check the connection between the PC and the device by selecting the hyperterminal program on your PC and configuring as described in chapter 7.4.1. If the prompt SFC> appears after pressing the Enter-key nection to the device is intact. ↵ , the con- A separate terminal is necessary for each device, i.e. the hyperterminal program must be reopened every time. Then select and configure the proper serial interface in each window. Two devices cannot occupy the same serial interface. 21 5. Interface Adapter IA1 5.2 Monitoring, Controlling and Configuring Devices You can use the interface adapter to monitor, control and configure one or more devices from a PC. If you have connected your device(s) to your PC as described, you will be able to use the following functions for each device: call up run-time data, operating status and operating parameters operation (On/Off, Auto, Reset, etc.) configure the device Various commands for the terminal interface exist. Chapter 7.4.2 describes the exact function of each command; this is just a brief survey. Some of the commands are purely informative, i.e., they summon up various types of data without modifying anything in the actual configuration or the operation of the device: ? LIMITS SFC STDVALUE VALUE VER 22 Summary of commands Limits for operating parameters Current operating data Default values for operating parameters Current values for operating parameters Firmware version 5. Interface Adapter IA1 The second group of commands serves to operate the device. You can use these commands to perform all the functions (keys) of the remote control per PC: BUTTON LANGUAGE LOCKED REMOTE RESET On/Off or activate Auto key Select language Lock remote On contacts Switch remote function on/off Activate reset key The last group of commands serve to configure the device. You can set different parameters such as thresholds, battery size or location. CONFIG DEFAULT Configure operating parameters Set standard operating parameters Enter all commands in capital letters. You can use the backspace key to correct any errors. Some commands can and/or must be entered using transfer parameters. Transfer parameters are attached to the command by a space. The device will acknowledge all entries and will then display the prompt SFC> on a new line. (Exception: the reset command). If this is not the case, the connection to the device has been interrupted. Check the connections between the device and the PC or among device, cluster controller and PC. It may be necessary to close other programs that might interfere with the serial interface. 23 5. Interface Adapter IA1 Directions for connecting several devices to your PC: A separate serial interface is necessary for every device. All serial interfaces must be Type RS232. A separate hyperterminal is necessary for each device (hence for each serial interface), i.e. it will be necessary to open the program each time. The operating parameters of all devices must be configured identically when they are operating in tandem. 24 6. Fuel Cartridge Sensor FS1 Fuel Cartridge Sensor FS1 6.1 Connecting Fuel Cartridge Sensors You can use one fuel cartridge sensor per device. Sensors may be attached directly to the device or, as an alternative, you may attach them to the cluster controller CC1. First, mount the fuel cartridge sensor according to instructions to the fuel cartridge holder and secure the fuel cartridge to the holder as described in the UM1 user manual. Connect the fuel cartridge to the device. In the case of multiple devices, proceed as directed, mounting a fuel cartridge sensor for each device on its holder. Connect the wire on the fuel cartridge sensor to the PC interface of your device. If you are using the cluster controller, you will have to connect the fuel cartridge sensor to it. The middle row of ports is intended for this purpose. FC-Sensor FC-Sensor FC-Sensor FC-Sensor Extend the wire of the fuel cartridge sensor from the device connected to the first port to the cluster controller. Connect it to the first port in the middle row. FC-Sensor 6. If you have connected several devices, continue with the remaining fuel cartridge sensors in the same fashion. Connect the sensor of the second device to the second port, the sensor of the third device to the third port, etc. Any unused ports can remain free. Make sure that the devices and the fuelcartridge sensors fit together. Devices and fuel cartridge sensors must be connected to the cluster controller one above the other so that each device can monitor its fuel cartridge sensor. 25 6. Fuel Cartridge Sensor FS1 6.2 Fuel Cartridge Sensor Functions Each device monitors automatically. its fuel cartridge sensor You can obtain the status via the terminal interface. To do so, enter the command “SFC“. The fuel cartridge status will appear in the bottom line of the display. Two kinds of status are possible: „cartridge level above sensor or no sensor“ „cartridge level below sensor“ The first message will appear if you have not attached a fuel cartridge sensor. The second message will appear if the methanol level in the fuel cartridge falls below the level marked by the sensor. Additionally, a fuel cartridge symbol with blinking content will appear on the upper right of the display on the remote control. If you have attached the fuel cartridge sensor directly to the device’s data interface, messages will appear only through the remote control (blinking content of the fuel cartridge symbol) when the sensor trips. The fuel cartridge sensor serves only as an early warning; it does not influence the empty-tank-recognition feature of the device. The fuel cartridge symbol will also appear on the display when the empty-tank recognition feature is activated. In this case, however, the entire symbol will blink. A message will also appear on the second line. If the fuel cartridge sensor trips, only the inner portion of the symbol will blink. No error message will appear. 26 7. Hyperterminal 7. Hyperterminal 7.1 Setting up the Hyperterminal You need no additional software to operate an EFOY 1200 or an EFOY 1600 device with the aid of a PC. The “Hyperterminal“ program is part of the Windows operating system and is installed automatically whenever Windows is installed. The following screen shots will show you step by step how to configure the hyperterminal so that you can control your device(s). First, start the “hyperterminal“ program. In most Windows installations, you will find it in the start menu under Program\Communication\Hyperterminal or Program\Accessories\Communication\Hyperterminal. After the program has opened, you will see the following dialog box: 27 7. Hyperterminal Enter a name into the input field. If you wish to connect several devices to your PC, it is recommended that you name the connections chronologically so that the order is clear between the device and the terminal interface. Close the dialog box by clicking on OK. The dialog box for selecting the interface will appear: Select from the “Connect using“ menu the interface to which you have connected your device. If you are not sure as to which interface your device is connected to, you can modify this setting later. Confirm the dialog with “OK“. The dialog for configuring the interface will then appear: 28 7. Hyperterminal Choose the settings as shown and confirm by clicking on “OK“. All the settings shown here must be correct. Otherwise, the connection between the hyperterminal and the device will not arise or will be flawed. After you confirm the dialog, you should see the empty console of the hyperterminal. You should perform the following steps to obtain correct output later: Select the point “Properties“ in the “File“ menu. 29 7. Hyperterminal The following dialog box will appear: 30 7. Hyperterminal Select “Settings“ in the upper left and then select the “ASCII Setup“ button. Perform the settings as illustrated in the following menu: 31 7. Hyperterminal Close the dialog box with “OK“ and also confirm the “Attributes“ dialog box with “OK“. Your hyperterminal is now configured and ready to operate. Use the two telephone symbols at the upper left to activate or deactivate the connection. After the initial configuration, the connection will automatically be activated. You can verify this by viewing the status bar below. Activate/deactivate connection Status bar Test the connection to the device by pressing the “Enter“ key. The device will answer with the prompt SFC> If you receive no response, the connection has not been properly established. Check that the device is connected to the set interface (Com-Port) and that there is an active connection. You may modify the interface in the “File\Attributes“ menu. In order to do this though, the connection must be cut. If you need to change the interface, you will have to reperform the configuration as described above. You can 32 7. Hyperterminal open the appropriate menu by selecting the “Configure“ button. 7.2 Commands You can view the operating status, modify the operating parameters and establish external control via your device’s terminal interface. Communication is via an RS232 standard serial interface with the following parameters: - 9600 bit/s 8 bits/byte 1 stop bit no parity no flow control You can verify whether you have successfully established a connection by sending a “Return“ sign (ASCII-Code 13; represented by ↵) to the fuel cell. If the connection has been established, the device will respond with the following prompt: SFC>↵ SFC> Thirteen commands are available. In the examples below, signs sent to the device are shaded in gray, all other signs are those that the device has issued. ? [] This command (just a question mark) delivers the instruction set with brief descriptions. Example: SFC>?↵ ? BUTTON CONFIG DEFAULT LANGUAGE LIMITS LOCKED REMOTE RESET Set of commands shows the set of commands software controlling of device setting customized operation parameters setting default operation parameters setting language for panel reading out limits of operation parameters locking control contacts remote controlling via software interface restarts the device 33 7. Hyperterminal SFC reading STDVALUE reading parameters VALUE reading parameters VER reading ... SFC> out actual operation state out default values for operation out actual set of operation out version of firmware... BUTTON [1/0 / AUTO] This command can replace pressing a button on the service panel. It is always necessary to indicate a parameter to correspond to the button to be “pressed“. Example: SFC>BUTTON AUTO↵ OK SFC>BUTTON↵ no valid parameter SFC>BUTTON 1/0↵ OK SFC> In this example, the device has first been switched to automatic operation. No parameter was indicated in the second command thus prompting an error message. The third entry toggles the ON (1) and OFF (0) states. In the case at hand (prior status was AUTO), the device will switch to OFF. CONFIG [] This command prompts output of all operating parameters, one after the other, with their current values. The system then waits for the next value. If not modified, all that is necessary is to send a return sign (ASCII-Code 13) to the device. Example: SFC>CONFIG↵ switch on voltage (actual 12500mV, min 12000mV, max 12800mV)?↵ switch off voltage (actual 14200mV, min 13600mV, max 14600mV)?↵ switch off current (actual 2000mA, min 500mA, max 10000mA)?↵ reaction time (actual 10s, min 1s, max 300s)?20↵ maximal output energy (actual 1560Wh, min 50Wh, max 3000Wh)?↵ altitude of site (actual 500m, min 0m, max 2000m)?↵ capacity of battery (actual 50Ah, min 40Ah, max 200Ah)?↵ switch on voltage: 12.5V switch off voltage: 14.2V 34 7. Hyperterminal switch off current: 1.5A reaction time: 20s maximal output energy: 1560Wh altitude of site: 500m capacity of battery: 50Ah SFC> In the example at hand, the reaction time was changed from 10 seconds to 20 seconds. All other values remain unchanged. DEFAULT [] This sets all operating parameters back to the factory settings and also generates these values. Example: SFC>DEFAULT↵ switch on voltage: 12,5V switch off voltage: 14,2V switch off current: 2,0A reaction time: 10s maximal output energy: 1200Wh altitude of site: 500m capacity of battery: 50Ah OK SFC> LANGUAGE [? / Sprache] Changes the language of the control panel or displays the language currently selected. If the command is sent with parameters, the device answers in the language currently selected. If a language has been transferred as a parameter, it will become the new language. Add the “?“ parameter to the command to obtain a display of all available languages. Example: SFC>LANGUAGE↵ english SFC>LANGUAGE deutsch↵ OK SFC>LANGUAGE↵ deutsch SFC>LANGUAGE ?↵ english Deutsch 35 7. Hyperterminal français italiano nederlands SFC> LIMITS [] This command displays the permissible range of all operating parameters. Example: SFC>LIMITS↵ switch on voltage: min 12.0V max 12.8V switch off voltage: min 13.6V max 14.6V switch off current: min 0.5A max 10.0A reaction time: min 1s max 300s maximal output energy: min 50Wh max 3000Wh altitude of site: min 0m max 2000m capacity of battery: min 40Ah max 200Ah SFC> LOCKED [ON / OFF] This command locks control of the device via the “remote on“ contact or by parallel operation of several devices. If the command is entered without parameters, the device displays the current software status window. Example: SFC>LOCKED↵ OFF SFC>LOCKED ON↵ OK SFC>LOCKED↵ ON SFC>LOCKED OFF↵ OK SFC> 36 7. Hyperterminal REMOTE [on / off] This command can replace connecting the remote-on contact of the cluster controller CC1 for external control. Using this command without parameters, will check the current status of the “software contact“. Example: SFC>REMOTE↵ OFF SFC>REMOTE ON↵ OK SFC>REMOTE↵ ON SFC> RESET [] This command replaces pressing the “reset“ button on the control panel. Example: SFC>RESET↵ Note: This is the only command that does not elicit a response because it immediately triggers a restart. SFC [] This allows monitoring of the operating status in the form of different measurements. The device transmits a mostly unformatted string with all available metrics and their current values. Example: 37 7. Hyperterminal SFC>SFC↵ battery voltage: 12.08V output current: 0.0A operating time: 5.8h cumulative output energy: 290.1Wh operating state: error operating mode: auto change cartridge cartridge level below sensor SFC> In the example at hand, the device is set for automatic operation. However, the fuel cartridge is empty, so operation was interrupted. STDVALUE [] This command indicates the standard values for all operating parameters on the terminal interface. It does not, however, set them as valid for operation. If these values are to be set, use the DEFAULT command. Example: SFC>STDVALUE↵ switch on voltage: 12.5V switch off voltage: 14.2V switch off current: 2.0A reaction time: 20s maximal output energy: 1200Wh altitude of site: 500m capacity of battery: 50Ah SFC> VALUE [] This command displays the current set of operating parameters without modifying them. Example: SFC>VALUE↵ switch on voltage 12.5V switch off voltage 14.2V switch off current 2.0A reaction time 20s maximal output energy 1200Wh altitude of site: 500m capacity of battery: 50Ah SFC> 38 7. Hyperterminal In the example at hand, the device switches on when the battery voltage drops below 12.5V. The device will shut off, if the voltage exceeds 14.2V and the charging current drops below 2A. Even if the shut-off criterion is not satisfied, the device will shut down after generating 1.2 kilowatt hours. Once the switch on criterion is reached, the device will come back on. Please note that this may also occur immediately after being shut off. The device is calibrated to an atmospheric pressure equal to 500 meters above sea level and a battery with a capacity of 50 Ampere hours. VER [] This comman displays the version of the firmware that has been programmed into the device. Example: SFC>VER↵ Firmwareversion A50-1 4.03L12V date 2005-08-31 SFC> 39 SFC Smart Fuel Cell AG Eugen-Saenger-Ring 4 D-85649 Brunnthal-Nord, Germany Hotline: +49 89 673 5920 Freecall: +800 732 762 78 Fax: +49 89 673 592 369 [email protected] www.efoy.eu Bedienungsanleitung UM2 Cluster Controller CC1 Interface-Adapter IA1 Tankpatronensensor FS1 D 43 44 1. Einleitung Einleitung 1.4.1 Vorwort Vielen Dank, dass Sie sich für ein SFC Smart Fuel Cell Produkt entschieden haben. Wir wünschen Ihnen viel Freude an Ihrer neuen Energieversorgung. Lesen Sie bitte vor der ersten Benutzung diese Bedienungsanleitung. Sollten Sie dennoch Fragen zur Bedienung oder zur Installation haben, so wenden Sie sich bitte an Ihren Fachhändler oder an die SFC Hotline. SFC Smart Fuel Cell AG Eugen-Saenger-Ring 4 D-85649 Brunnthal-Nord, Germany Hotline: +49 89 673 5920 Freecall: +800 732 762 78 Fax: +49 89 673 592 369 [email protected] www.efoy.eu 45 UM2-GB-D-060704 User Manual Bedienungsanleitung CC1-IA1-FS1 1. 1. Einleitung 1.2 Bestimmungsgemäßer Gebrauch Der Cluster Controller CC1, der Interface Adapter IA1 und der Tankpatronensensor FS1 sind für den Betrieb an EFOY 600, EFOY 1200 bzw. EFOY 1600 Geräten geeignet. Sie erweitern die Datenschnittstellen der Geräte und können nur in Kombination mit diesen eingesetzt werden. 1.3 Konformitätserklärung Die Firma SFC Smart Fuel Cell AG, Eugen-Sänger-Ring 4, 85649 Brunnthal-Nord erklärt, dass die Produkte Cluster Controller CI1, Interface Adapter IA1 und Tankpatronensensor FS1 den Bestimmungen der EG-Richtlinie über die elektromagnetische Verträglichkeit 89/336/EWG entsprechen. Folgende harmonisierte Normen wurden angewandt: DIN EN 61000-6-1, DIN EN 61000-6-3 46 2. Inhaltsverzeichnis 2. Inhaltsverzeichnis 1. Einleitung 45 1.1 Vorwort 45 1.2 Bestimmungsgemäßer Gebrauch 46 1.3 Konformitätserklärung 46 2. Inhaltsverzeichnis 47 3. Überblick 48 3.1 Einsatzmöglichkeiten 48 3.2 Aufbau 49 3.3 Technische Daten 50 Cluster Controller CC1 52 4.1 Allgemeines 52 4.2 Anschluss von Geräten an das Cluster Controller 53 4.3 Parallelbetrieb 54 4.4 Nutzung der „Remote-On“ Kontakte 56 Interface Adapter IA1 59 5.1 Anschluss an den PC 59 5.2 Überwachen, Steuern und Konfigurieren von Geräten 60 Tankpatronensensor FS1 63 6.1 Anschluss von Tankpatronensensoren 63 6.2 Funktion des Tankpatronensensors 64 Hyperterminal 66 7.1 Hyperterminal einrichten 66 7.2 Kommandos 72 4. 5. 6. 7. 47 3. Überblick 3. Überblick 3.1 Einsatzmöglichkeiten Wenn Sie Ihr(e) Gerät(e) in Kombination mit dem Cluster Controller CC1, dem Interface Adapter IA1 oder dem Tankpatronensensor FS1 betreiben, stehen Ihnen einige Zusatzfunktionen zur Verfügung. Nachfolgend finden Sie einen kurzen Überblick über den Einsatzzweck dieser drei Komponenten. Cluster Controller CC1 Der Cluster Controller CC1 bietet Ihnen folgende Möglichkeiten: Parallelbetrieb von bis zu 5 Geräten Bedienung, Steuerung und Abruf des Betriebsstatus für jedes Gerät über einen PC Anschluss von Tankpatronensensoren FS1 für jedes Gerät Fremdsteuerung des Geräts/der Geräte durch externen Ladekontroller o.ä. Interface Adapter IA1 Der Interface Adapter IA1 ermöglicht den Anschluss eines Gerätes oder des Cluster Controller CC1 an die serielle Schnittstelle Ihres PCs. Tankpatronensensor FS1 Der Tankpatronensensor FS1 dient zur Überwachung des Tankpatroneninhalts und signalisiert die Unterschreitung des eingestellten Füllstands. 48 3. Überblick 3.2 Aufbau 3 2 1 4 6 5 Cluster Controller CC1 1 2 3 4 5 6 RJ45 Anschluss für EFOY-Gerät (5 x) RJ45 Anschluss für Tankpatronensensor FS1 (5 x) RJ45 Anschluss Kommunikation (PC) (5 x) Gehäuseabdeckung Gehäuseschale Kabeldurchführung für Remote-On Anschluss 2 1 Interface Adapter IA1 1 2 RJ45 Buchse für Anschluss eines Patchkabels Sub-D Buchse, 9-polig für den Anschluss am PC 49 3. Überblick 4 2 3 1 Tankpatronensensor FS1 1 Sensorfläche 2 Montagelöcher für Montage am Tankpatronenhalter 3 Verbindungskabel 4 RJ45 Stecker für den Anschluss am Gerät bzw. CC1 3.4 Technische Daten Cluster Controller CC1 Allgemeine Daten Abmessung (L x B x H) 149 x 76,5 x 270 mm Gewicht 160 g Betriebstemperatur -55 bis +100 °C Lagertemperatur -55 bis +125 °C 50 3. Überblick Ausstattung Bedienung Plug and Play Anschlussbuchsen RJ45 5 x Geräte, 5 x Tankpatronensensor, 5 x PC Kontakte für Fremdsteuerung Galvanisch getrennt 3 V bis 40 V Interface Adapter IA1 Abmessung (L x B x H) 53 x 33 x 16 mm Betriebstemperatur -35 bis +45 °C Lagertemperatur -35 bis +45 °C Tankpatronensensor FS1 Abmessung (L x B x H) 50 x 20 x 5 mm Betriebstemperatur -25 bis +70 °C Lagertemperatur -40 bis +85 °C 51 4. Cluster Controller CC1 4. Cluster controller CC1 4.1 Allgemeines An der Cluster Controller CC1 können bis zu fünf EFOY Geräte angeschlossen werden. Für jedes anzuschließende Gerät wird mindestens ein Datenkabel (CAT.5) DL1 oder ein handelsübliches Netzwerkkabel (Typ: Patchkabel Cat.5) benötigt. Soll eine Kommunikation zwischen Gerät und Rechner realisiert werden, ist ein zweites Datenkabel sowie ein Interface-Adapter IA1 (jeweils pro Gerät) notwendig. Optional kann für jedes angeschlossene Gerät ein Tankpatronensensor FS1 ausgewertet werden. Mit dem integrierten Remote-On Kontakt kann eine Fremdsteuerung mit einem externen Ladekontroller realisiert werden. Anschluss und Funktion des Cluster Controller CC1 werden im Folgenden genauer erklärt. Montieren Sie der Cluster Controller CC1 in der Nähe der Brennstoffzelle(n). Platzieren Sie ggf. die Tankpatrone(n) so, dass der Abstand zwischen Cluster Controller CC1und Tankpatronensensor(en) FS1 die Kabellänge(n) nicht überschreitet. Für die Unterputzmontage können Sie die Bohr- und Sägeschablone des Bedienteils verwenden. Die elektrischen Anschlüsse und die Abdeckung des Cluster Controller sollten leicht zugänglich sein Das Gerät ist nicht wasserdicht. Achten Sie darauf, dass kein Wasser eindringen kann. 52 4. Cluster Controller CC1 4.2 Anschluss von Geräten an den Cluster Controller An den Cluster Controller CC1 können bis zu fünf Geräte angeschlossen werden. Für jedes Gerät sind hierzu drei RJ45 Steckplätze vorgesehen. Gerät 5 Gerät 4 Gerät 3 Gerät 2 Gerät 1 Belegen Sie die Steckplätze immer von links nach rechts (siehe Abbildung). Verbinden Sie das erste Gerät mit dem Cluster Controller, indem Sie ein Datenkabel (CAT.5) DL1 oder ein handelsübliches Netzwerkkabel (Typ: Patchkabel Cat.5) an der Datenschnittstelle des Gerät anschließen (siehe hierzu auch Kapitel 3.2 der Bedienungsanleitung UM1) und dieses zu dem Cluster Controller führen. Schließen Sie das Kabelende an dem ersten RJ45 Steckplatz links in der untersten Reihe an. Dieser ist mit „1“ markiert. Möchten Sie mehrere Geräte anschließen, verfahren Sie wie oben beschrieben nacheinander mit allen weiteren Geräten. Gerät zwei wird an dem zweiten Steckplatz angeschlossen, Gerät drei an dem dritten Steckplatz usw. Es können maximal 5 Geräte angeschlossen werden. Alle nicht benötigten Steckplätze bleiben frei. 53 4. Cluster Controller CC1 4.3 Parallelbetrieb Der Cluster Controller CC1 ermöglicht Ihnen, eine Batterie mit mehreren EFOY 1200 oder EFOY 1600 gleichzeitig zu laden. Beachten Sie hierbei die in der Bedienungsanleitung UM1 angegebenen zulässigen Batteriekapazitäten. Für einen Betrieb mit mehreren (n) Geräten gilt: Zulässige Kapazität x n Wollen Sie z.B. zwei Geräte EFOY 1200 am Cluster Controller betreiben, müssen Sie eine Batterie mit mindestens 40 Ah x 2 = 80 Ah anschließen. Die maximal zulässige Kapazität ist in diesem Fall 200 Ah x 2 = 400 Ah. Beachten Sie, dass alle parallel betriebenen Geräte identisch konfiguriert werden müssen. Neugeräte sind ab Werk immer mit den Default-Werten (in Klammern) programmiert. Folgende Parameter können eingestellt werden: Einschaltspannung (12,5 V) Ausschaltspannung (14,2 V) Ausschaltstrom (2,0 A) Reaktionszeit (10 s) Maximale Ausgangsenergie (1200 Wh / 1560 Wh) Einsatzhöhe (500 m) Batteriekapazität (50 Ah) Möchten Sie einen oder mehrere der oben aufgeführten Parameter ändern, können Sie dies mit dem Programm Hyperterminal an Ihrem PC tun (Befehl „CONFIG“). Hierzu müssen Ihre Geräte über den Cluster Controller an den PC angeschlossen sein. Hinweise zur Nutzung der Datenschnittstelle und des Hyperterminals finden Sie in Kapitel 5 und 7. Nehmen Sie die gewünschten Einstellungen immer an allen Geräten vor. Sie können die Konfiguration ihrer Geräte mit dem „VALUE“ Befehl überprüfen. Die 54 4. Cluster Controller CC1 Standartparameter können Sie mit dem „DEFAULT“Befehl setzen. Um den selbstständigen Parallelbetrieb zu starten, schalten Sie alle angeschlossenen Geräte mit der Fernbedienung in den Automatikmodus. Alle Geräte überwachen unabhängig von einander die Batteriespannung. Stellt ein Gerät fest, dass die Einschaltschwelle unterschritten ist, schaltet es in den Ladebetrieb um. „Ladebetrieb“ erscheint in der zweiten Zeile des Displays. Auf den Displays der anderen angeschlossenen Geräte erscheint in der ersten Zeile rechts ein „P“ (Parallelbetrieb). Um zu vermeiden, dass im Falle eines sehr leeren Akkus die Spannung zu stark einbricht, schalten diese erst mit 3 Minuten Zeitverzögerung in den Ladebetrieb. Auf den Displays wird dann in der zweiten Zeile ebenfalls „Ladebetrieb“ angezeigt. Ist die Batterie voll geladen, schalten alle Geräte zurück in den Überwachungsmodus. Auf allen Fernbedienungen erlischt das „P“ rechts oben. „Automatik“ wird weiterhin in der ersten und „Standby“ in der zweiten Zeile des Displays angezeigt. Möchten Sie die Batterie zwischenzeitlich manuell laden, können Sie dies tun, indem Sie ein beliebiges Gerät mit dem Ein/Aus Schalter auf „EIN“ schalten. Alle anderen Geräte werden automatisch zugeschaltet. Die Batterie wird nun geladen, bis die Ausschaltschwelle erreicht ist. Danach schalten sich alle Geräte wieder in den Automatik-Modus. Sollte während des Betriebs an einem Gerät ein Fehler auftreten (z.B. Tankpatrone leer), bleibt dieses Gerät im Fehlermodus. Alle anderen Geräte laden weiterhin die Batterie. Nach Behebung des Fehlers kann das Gerät durch Drücken der „RESET“-Taste wieder in den Parallelbetrieb eingegliedert werden. 55 4. Cluster Controller CC1 Bei selbstrückstellenden Fehlern gliedert sich das betroffene Gerät selbständig wieder in den Parallelbetrieb ein. Ein Reset ist in diesem Fall nicht notwendig. Der Frostschutzmodus ist ebenfalls weiterhin aktiv. In diesem Fall findet kein Parallelbetrieb statt, d.h. jedes Gerät schaltet unabhängig von den anderen angeschlossenen Geräten in den Frostschutzbetrieb wenn erforderlich. Alle Funktionen, die in der Bedienungsanleitung UM1 beschrieben sind, funktionieren auch bei parallel betriebenen Geräten. 4.4 Nutzung der „Remote-On“ Kontakte Der Cluster Controller CC1 bietet Ihnen auch die Möglichkeit, ein oder mehrere Geräte fremdzusteuern. Dies ist insbesondere dann interessant, wenn Sie weitere Energiequellen, z.B. Photovoltaik, benutzen und die Brennstoffzelle(n) nur als Back-up Energieversorgung nutzen wollen. Wollen Sie diese Option nutzen, bereiten Sie den Anschluss vor Inbetriebnahme des Cluster controller und der Brennstoffzelle(n) wie folgt vor. Entfernen Sie zunächst die Abdeckung des Cluster Controller und lösen Sie dann die vier Schrauben die Platine und Gehäuseschale verbinden (siehe Abbildung). Nehmen Sie die Platine aus der Gehäuseschale. 56 4. Cluster Controller CC1 Auf der linken Seite der Platine, neben den Steckplätzen für Gerät 1 befindet sich eine zweipolige Anschlussklemme. Um Ihr(e) Gerät(e) später manuell zu steuern, müssen Sie an diesen Kontakten eine Spannung anlegen. Verbinden Sie die entsprechenden Ausgänge ihres Ladereglers über die Anschlussklemme mit dem Cluster Controller. Achten Sie auf die korrekte Polung der Kabel (siehe Beschriftung auf der Platine). Stellen Sie sicher, dass zu diesem Zeitpunkt keine Spannung an den Klemmen anliegt. Legen Sie zu keinem Zeitpunkt eine Spannung größer 40 V an den Klemmen an. Zu hohe Spannungen können den Cluster Controller schädigen. Setzen Sie die Platine wieder in die Gehäuseschale und führen Sie die zwei angeschlossenen Kabel durch die Kabeldurchführung nach außen. Schrauben Sie die Platine mit den vier Schrauben an der Gehäuseschale fest und schnappen Sie danach die Abdeckung auf denCluster Controller. Schließen Sie nun Ihr(e) Gerät(e) wie unter 4.1 und 4.2 beschrieben an den Cluster Controller an. Um die Funktion der „Remote-On“ Kontakte nutzen zu können, muss ein Gerät an dem ersten Steckplatz (auf der linken Seite, mit „EFOY“ und „1“ markiert) angeschlossen sein. Wird an den „Remote-On“ Kontakten eine Spannung zwischen 3 V und 40 V angelegt, wird das an erster Stelle am Cluster Controller angeschlossene Geräte sofort in den Ladebetrieb geschaltet. Auf der ersten Zeile des Displays erscheint rechts ein „R“ (Remote-Betrieb). Sind weitere Geräte am Cluster Controller angeschlossen, werden diese mit 3 (drei) Minuten Verzögerung ebenfalls zugeschaltet. 57 4. Cluster Controller CC1 Die im Gerät eingestellten Ladeschwellen werden in diesem Fall nicht beachtet. Eine Sicherheitsschwelle (Spannungs- und Stromabhängig) ist weiterhin aktiv, um ein Überladen der Batterie zu vermeiden. Stellen Sie sicher, dass das Remote-On Signal nach der gewünschten Ladezeit weggeschaltet wird. Liegt das Signal über einen längeren Zeitraum bei voller Batterie permanent an, läuft das Gerät nach nur geringfügigem Absinken der Batteriespannung wieder an. Es kann hierdurch zu erhöhtem Verschleiß des Gerätes kommen. 58 5. Interface Adapter IA1 Interface Adapter IA1 5.1 Anschluss an den PC Möchten Sie Ihr(e) Gerät(e) mittels PC überwachen und steuern, benötigen Sie für jedes Gerät einen Interface Adapter IA1 sowie ein Datenkabel (CAT.5) DL1 oder ein handelsübliches Netzwerkkabel (Typ: Patchkabel Cat.5). PC Port 5 Gerät 5 PC Port 4 Gerät 4 PC Port 3 Gerät 3 PC Port 2 Gerät 2 PC Port 1 Verbinden Sie ein Ende des Datenkabels mit dem Interface-Adapter IA1 und befestigen Sie diesen an einer freien seriellen Schnittstelle (RS232 Typ) an Ihrem PC. Schließen Sie das freie Ende des Datenkabels an dem PC-Steckplatz Ihres Gerätes an. Gerät 1 5. Nutzen Sie den Cluster Controller CC1, müssen Sie das freie Ende des Datenkabels an dem ersten Steckplatz der obersten Reihe am Cluster Controller anschließen (mit „PC“ und „1“ markiert, siehe Abbildung). Sollen mehrere Geräte über den Cluster Controller CC1 an den PC angeschlossen werden, verfahren Sie wie oben beschrieben um auch diese an den PC anzuschließen. Wählen Sie jeweils den zum angeschlossenen Gerät passenden PC Steckplatz. Für Gerät zwei wird der zweite Steckplatz der obersten Reihe verwendet, für Gerät drei der dritte Steckplatz usw. Alle nicht benötigten Steckplätze bleiben frei. Für jedes einzelne Gerät ist eine separate serielle Schnittstelle am PC notwendig. Prüfen Sie die Verbindung zwischen PC und Gerät, indem Sie auf Ihrem PC das Programm Hyperterminal aufrufen und gemäß Kapitel 7.4.1 konfigurieren. Erscheint bei geöffneter Verbindung nach Betätigung der Enter-Taste der ↵ Prompt SFC> so ist die Verbindung zum Gerät intakt. Für jedes Gerät ist ein separates Terminal notwendig, d.h. das Programm Hyperterminal muss jeweils neu 59 5. Interface Adapter IA1 geöffnet werden. In jedem Programmfenster muss dann die zugehörige serielle Schnittstelle ausgewählt und konfiguriert werden. Eine serielle Schnittstelle kann nicht doppelt belegt werden. 5.2 Überwachen, Steuern und Konfigurieren von Geräten Mit Hilfe des Interface Adapters können Sie ein oder mehrere Geräte mit einem PC überwachen, steuern und konfigurieren. Haben Sie Ihr(e) Gerät(e) wie beschrieben an den PC angeschlossen, können Sie folgende Funktionen für jedes Gerät nutzen: Abrufen von Laufzeitdaten, Betriebsstatus und Betriebsparametern Bedienung des Gerätes (An/Aus, Auto, Reset etc.) Konfiguration des Gerätes Hierzu sind verschiedene Befehle für die Terminalschnittstelle hinterlegt. Die genaue Funktion aller Befehle ist in Kapitel 7.4.2 beschrieben. An dieser Stelle soll nur ein kurzer Überblick gegeben werden. Ein Teil der Befehle ist rein informativ, d.h. hier können diverse Daten abgerufen werden, ohne dass an der aktuellen Konfiguration oder dem Betrieb des Gerätes etwas geändert wird: ? LIMITS SFC STDVALUE VALUE VER 60 Übersicht der Befehle Grenzwerte der Betriebsparameter Aktuelle Betriebsdaten Default Werte der Betriebsparameter Aktuelle Werte der Betriebsparameter Firmwareversion 5. Interface Adapter IA1 Die zweite Gruppe Befehle dient der Bedienung des Gerätes. Sie können mit diesen Befehlen alle Funktionen (Tasten) der Fernbedienung per PC ausführen: BUTTON LANGUAGE LOCKED REMOTE RESET Ein/Aus bzw. Auto-Taste betätigen Sprache wählen Remote-On Kontakte sperren Fernsteuerung ein/ausschalten Reset-Taste betätigen Der letzte Teil der Befehle dient der Konfiguration des Geräts. Hier können verschiedene Parameter wie Ladeschwellen, Batteriegröße oder Einsatzort eingestellt werden. CONFIG DEFAULT Betriebsparameter Konfigurieren Standart Betriebsparameter setzen Alle Kommandos müssen in Großbuchstaben eingegeben werden. Um eine Eingabe zu korrigieren, können Sie die Rücklöschtaste verwenden. Einige Befehle können bzw. müssen mit Übergabeparametern eingegeben werden. Diese werden dem Kommando jeweils mit einem Leerzeichen angehängt. Das Gerät quittiert alle Eingaben und zeigt dann in einer neuen Zeile den Prompt SFC> an (Ausnahme: Reset-Befehl). Sollte dies nach einer Eingabe nicht der Fall sein, ist die Verbindung zum Gerät unterbrochen. Überprüfen Sie die Verbindung zwischen Gerät und PC, bzw. zwischen Gerät, Cluster Controller und PC. Schließen Sie ggf. andere Programme, die auf die serielle Schnittstelle zugreifen. Hinweise zum Anschluss mehrerer Geräte an einen PC: Für jedes Gerät ist eine separate serielle Schnittstelle notwendig Alle seriellen Schnittstellen müssen vom Typ RS232 sein. 61 5. Interface Adapter IA1 Für jedes Gerät (also für jede serielle Schnittstelle) ist ein separates Hyperterminal notwendig, d.h. das Programm muss entsprechend oft geöffnet sein. Bei Nutzung des Parallelbetriebs (Cluster Controller) müssen die Betriebsparameter aller Geräte identisch konfiguriert sein. 62 6. Tankpatronensensor FS1 Tankpatronensensor FS1 6.1 Anschluss von Tankpatronensensoren Sie können pro Gerät einen Tankpatronensensor verwenden. Dieser kann direkt am Gerät angeschlossen werden. Alternativ können Tankpatronensensoren auch am Cluster Controller CC1 angeschlossen werden. Montieren Sie den Tankpatronensensor zunächst gemäß beiliegender Anleitung an dem Tankpatronenhalter und befestigen Sie die Tankpatrone wie in der Bedienungsanleitung UM1 beschrieben in dem Halter. Schließen Sie die Tankpatrone am Gerät an. Bei mehreren Geräten montieren Sie wie beschrieben für jedes Gerät einen Tankpatronensensor an den dazugehörigen Tankpatronenhalter. Schließen Sie das Kabel des Tankpatronensensors an der PC Schnittstelle Ihres Gerätes an. TP-Sensor TP-Sensor TP-Sensor TP-Sensor Nutzen Sie den Cluster Controller, müssen Sie den Tankpatronensensor an diesem anschließen. Hierfür ist die mittlere Anschlussreihe vorgesehen. TP-Sensor 6. Führen Sie das Kabel des Tankpatronensensors des auf dem ersten Steckplatz angeschlossenen Gerätes zum Cluster Controller und schließen Sie es am ersten Steckplatz der mittleren Reihe an. Haben Sie mehrere Geräte angeschlossen, verfahren Sie mit allen weiteren Tankpatronensensoren analog. Der Sensor des zweiten Gerätes wird am zweiten Steckplatz angeschlossen, der Sensor des dritten Gerätes am dritten Steckplatz usw. Alle nicht benötigten Steckplätze bleiben frei. Achten Sie darauf, dass Geräte und Tankpatronensensoren zusammenpassen. Gerät und Tankpatronensensor müssen jeweils direkt übereinander am Cluster Controller angeschlossen sein, damit jedes Gerät auch den zu ihm gehörenden Tankpatronensensor auswertet. 63 6. Tankpatronensensor FS1 6.2 Funktion des Tankpatronensensors Jeder angeschlossene Tankpatronensensor automatisch von dem entsprechenden ausgewertet. wird Gerät Der Status kann über die Terminalschnittstelle abgefragt werden. Geben Sie hierzu den Befehl „SFC“ ein. In der untersten Zeile der Ausgabe wird der Status des Tankpatronensensors angegeben. Die zwei möglichen Zustände sind „cartridge level above sensor or no sensor“ (Übersetzung: Füllstand über Sensor oder kein Sensor“ „cartridge level below sensor“ (Übersetzung: Füllstand unter Sensor) Haben Sie keinen Tankpatronensensor angeschlossen erscheint immer die erste Meldung. Fällt der Methanolspiegel in der Tankpatrone unter die vom Sensor markierte Schwelle wird die zweite Meldung ausgegeben. Zusätzlich erscheint auf dem Display der Fernbedienung rechts oben ein Tankpatronensymbol mit blinkendem Inhalt. Haben Sie den Tankpatronensensor direkt an das Daten Interface des Gerätes angeschlossen, erfolgt die Rückmeldung nur über die Fernbedienung (Tankpatronensymbol mit blinkendem Inhalt), wenn der Sensor auslöst. Der Tankpatronensensor dient lediglich der Früherkennung und beeinflusst die automatische Tank-LeerErkennung des Geräts nicht. Das Tankpatronensymbol erscheint auch auf dem Display wenn die automatische Tank-Leer-Erkennung anspricht. In diesem Fall blinkt jedoch das ganze Symbol. Zusätzlich wird eine entsprechende Meldung in der zweiten Zeile ausgegeben. Wenn der Tankpatronensensor auslöst 64 6. Tankpatronensensor FS1 blinkt nur der Inhalt des Symbols. Es wird keine Fehlermeldung ausgegeben. 65 7. Hyperterminal 7. Hyperterminal 7.1 Hyperterminal einrichten Es ist keine zusätzliche Software nötig, um ein EFOY 1200 oder A1600 Gerät mit Hilfe eines PCs bedienen zu können. Das Terminalprogramm „Hyperterminal“ ist Bestandteil des Betriebssystems Windows und wird mit jeder Windowsinstallation automatisch mit installiert. Die folgenden Bilder zeigen Ihnen Schritt für Schritt, wie Sie das Hyperterminal konfigurieren müssen, um Ihr(e) Gerät(e) ansteuern zu können. Starten Sie zunächst das Programm „Hyperterminal“. Bei den meisten Windows Installationen finden Sie dieses im Startmenü unter Programme\Kommunikation\Hyperterminal oder Programme\Zubehör\Kommunikation\Hyperterminal. Nachdem sich das Programm geöffnet hat, erscheint folgender Dialog: 66 7. Hyperterminal Geben Sie einen Namen in das Eingabefeld ein. Möchten Sie mehrere Geräte am PC anschließen, empfiehlt es sich, die Verbindungen chronologisch zu benennen, so dass eine eindeutige Zuordnung zwischen Gerät und Terminalschnittstelle möglich ist. Schließen Sie den Dialog mit der OK Taste. Es öffnet sich automatisch der Dialog zur Auswahl der Schnittstelle: Wählen Sie im Menü „Verbinden über“ die Schnittstelle aus, an der Sie Ihr Gerät angeschlossen haben. Falls Sie nicht sicher sind, an welcher Schnittstelle Ihr Gerät angeschlossen ist, können Sie diese Einstellung auch später noch ändern. Bestätigen Sie den Dialog mit „OK“. Es erscheint im Anschluss der Dialog zur Konfiguration der Schnittstelle: 67 7. Hyperterminal Nehmen Sie die in der Darstellung gezeigten Einstellungen vor und bestätigen Sie den Dialog mit „OK“. Alle hier dargestellten Werte müssen richtig eingestellt sein, sonst kann mit dem Hyperterminal keine oder nur eine fehlerhafte Verbindung zum Gerät aufgenommen werden. Nach Bestätigung des Dialogs sollten Sie die leere Konsole des Hyperterminals vor sich haben. Um später saubere Ausgaben zu bekommen, sollten Sie noch folgende Einstellung vornehmen: Wählen Sie im Menü „Datei“ den Punkt „Eigenschaften“. 68 7. Hyperterminal Es erscheint folgender Dialog: 69 7. Hyperterminal Selektieren Sie den Reiter „Eigenschaften“ links oben und selektieren dann die Schaltfläche „ASCIIKonfiguration“. Im folgenden Menü nehmen Sie die dargestellten Einstellungen vor: 70 7. Hyperterminal Verlassen Sie den Dialog mit „OK“ und bestätigen Sie auch den „Eigenschaften“ Dialog mit „OK“. Ihr Hyperterminal ist jetzt konfiguriert und betriebsbereit. Mit den zwei Telefonsymbolen links oben können Sie die Verbindung aktivieren oder deaktivieren. Nach der erstmaligen Konfiguration ist die Verbindung automatisch aktiviert. Dies kann anhand der Statusleiste links unten verifiziert werden. Verbindung aktivieren/deaktivieren Statusleiste Testen Sie die Verbindung zum Gerät in dem Sie die „Enter“-Taste betätigen. Das Gerät antwortet mit dem Prompt SFC> Erhalten Sie keine Antwort, ist die Verbindung nicht korrekt aufgebaut. Überprüfen Sie, dass das Gerät an der eingestellten Schnittstelle (Com-Port) angeschlossen ist und dass eine aktive Verbindung vorliegt. Sie können die Schnittstelle im Menü „Datei\Eigenschaften“ ändern. Hierzu muss die Verbindung jedoch getrennt sein. 71 7. Hyperterminal Wenn Sie die Schnittstelle wechseln, müssen Sie die Konfiguration wie oben beschrieben erneut durchführen. Das entsprechende Menü können Sie durch Selektieren der Schaltfläche „Konfigurieren“ öffnen. 7.2 Kommandos Über die Terminalschnittstelle Ihres Gerätes können der Betriebszustand gelesen, Betriebsparameter geändert und eine externe Steuerung realisiert werden. Die Kommunikation erfolgt über eine serielle Schnittstelle nach RS232 Standard, mit folgenden Schnittstellen Parametern: - 9600 bit/s 8 bits/byte 1 stop bit keine Parität keine Flußkontrolle Der Erfolg des Verbindungsaufbaus kann durch Senden eines Return-Zeichen (ASCII-Code 13; durch ↵ dargestellt) an die Brennstoffzelle überprüft werden. Bei bestehender Verbindung antwortet das Gerät mit folgendem Prompt: SFC>↵ SFC> Es stehen 13 Befehle zur Verfügung. In den Beispielen sind an das Gerät gesendete Zeichen grau unterlegt, alle anderen Zeichen hat das Gerät ausgegeben. ? [] Dieser Befehl (nur ein Fragezeichen) liefert als Antwort den verfügbaren Befehlssatz mit Kurzbeschreibungen. Beispiel: SFC>?↵ ? BUTTON CONFIG DEFAULT LANGUAGE Set of commands shows the set of commands software controlling of device setting customized operation parameters setting default operation parameters setting language for panel 72 7. Hyperterminal LIMITS reading out limits of operation parameters LOCKED locking control contacts REMOTE remote controlling via software interface RESET restarts the device SFC reading out actual operation state STDVALUE reading out default values for operation parameters VALUE reading out actual set of operation parameters VER reading out version of firmware... ... SFC> BUTTON [1/0 / AUTO] Mit diesem Befehl kann ein Tastendruck auf die im Bedienpaneel vorhandenen Taster ersetzt werden. Es muss immer ein Parameter mit angegeben werden, um den jeweiligen Taster der „gedrückt“ werden soll, anzusprechen. Beispiel: SFC>BUTTON AUTO↵ OK SFC>BUTTON↵ no valid parameter SFC>BUTTON 1/0↵ OK SFC> In dem Beispiel wurde das Gerät zunächst in den Automatikbetrieb geschaltet. Beim zweiten Befehl wurde kein Parameter angegeben. Deshalb wird dieser mit einer Fehlermeldung erwidert. Die dritte Eingabe toggelt die Zustände EIN (1) und AUS (0). Im gezeigten Fall (vorheriger Status ist AUTO) wird das Gerät auf AUS geschaltet. CONFIG [] Nach Eingabe dieses Befehls werden alle Betriebsparameter nacheinander mit ihrem aktuellen Wert ausgegeben und es wird die Eingabe eines neuen Wertes erwartet. Soll der Wert nicht verändert werden, reicht es aus, ein Return-Zeichen (ASCII-Code 13) an das Gerät zu senden. Beispiel: 73 7. Hyperterminal SFC>CONFIG↵ switch on voltage (actual 12500mV, min 12000mV, max 12800mV)?↵ switch off voltage (actual 14200mV, min 13600mV, max 14600mV)?↵ switch off current (actual 2000mA, min 500mA, max 10000mA)?↵ reaction time (actual 10s, min 1s, max 300s)?20↵ maximal output energy (actual 1560Wh, min 50Wh, max 3000Wh)?↵ altitude of site (actual 500m, min 0m, max 2000m)?↵ capacity of battery (actual 50Ah, min 40Ah, max 200Ah)?↵ switch on voltage: 12.5V switch off voltage: 14.2V switch off current: 1.5A reaction time: 20s maximal output energy: 1560Wh altitude of site: 500m capacity of battery: 50Ah SFC> In dem gezeigten Beispiel wurde die Reaktionszeit von 10s auf 20s verändert. Alle anderen Werte sind unverändert geblieben. DEFAULT [] Setzt alle Betriebsparameter auf Werkseinstellungen zurück und gibt diese Werte auch aus. Beispiel: SFC>DEFAULT↵ switch on voltage: 12,5V switch off voltage: 14,2V switch off current: 2,0A reaction time: 10s maximal output energy: 1200Wh altitude of site: 500m capacity of battery: 50Ah OK SFC> LANGUAGE [? / Sprache] Ändert die Sprache des Bedienpaneels oder zeigt die aktuell gesetzte Sprache an. Wird der Befehl ohne Parameter gesendet, antwortet das Gerät mit der aktuell gesetzten Sprache. Wird eine Sprache als Parameter übergeben, wird diese als neue Sprache verwendet. Um alle verfügbaren Sprachen anzuzeigen, muss der Parameter ? dem Befehl angehängt werden. Beispiel: 74 7. Hyperterminal SFC>LANGUAGE↵ english SFC>LANGUAGE deutsch↵ OK SFC>LANGUAGE↵ deutsch SFC>LANGUAGE ?↵ english Deutsch français italiano nederlands SFC> LIMITS [] Zeigt den jeweils zulässigen Betriebsparameter an. Bereich für alle Beispiel: SFC>LIMITS↵ switch on voltage: min 12.0V max 12.8V switch off voltage: min 13.6V max 14.6V switch off current: min 0.5A max 10.0A reaction time: min 1s max 300s maximal output energy: min 50Wh max 3000Wh altitude of site: min 0m max 2000m capacity of battery: min 40Ah max 200Ah SFC> LOCKED [ON / OFF] Sperrt die Steuerung des Gerätes durch den „RemoteOn“ Kontakt oder durch eine Parallelschaltung mehrerer Geräte. Wird der Befehl ohne Parameter eingegeben, gibt das Gerät den aktuellen Zustand des Softwareriegels aus. Beispiel: SFC>LOCKED↵ OFF SFC>LOCKED ON↵ OK SFC>LOCKED↵ ON SFC>LOCKED OFF↵ OK SFC> 75 7. Hyperterminal REMOTE [on / off] Mit diesem Befehl kann ein Beschalten des im Zubehöranschluss vorhandenen Kontakts zur externen Steuerung des Geräts ersetzt werden. Wird der Befehl ohne Parameter verwendet, kann der aktuelle Zustand des „Softwarekontakts“ überprüft werden. Beispiel: SFC>REMOTE↵ OFF SFC>REMOTE ON↵ OK SFC>REMOTE↵ ON SFC> RESET [] Dieser Befehl ersetzt den Druck auf die Reset-Taste am Bedienpaneel. Beispiel: SFC>RESET↵ Hinweis: Dies ist der einzige Befehl, der keine Rückmeldung liefert, da er unmittelbar einen Neustart des Geräts auslöst. SFC [] Mit diesem Befehl kann der aktuelle Betriebszustand in Form verschiedener Messwerte überwacht werden. Das Gerät sendet eine weitestgehend unformatierte Zeichenkette mit allen verfügbaren Messgrößen und deren aktuellen Werten. Beispiel: SFC>SFC↵ battery voltage: 12.08V output current: 0.0A operating time: 5.8h cumulative output energy: 290.1Wh 76 7. Hyperterminal operating state: error operating mode: auto change cartridge cartridge level below sensor SFC> In dem dargestellten Beispiel ist das Gerät für automatischen Betrieb eingestellt, jedoch ist die Tankpatrone leer und der Betrieb wurde deshalb unterbrochen. STDVALUE [] Dieser Befehl gibt die Standardwerte für alle Betriebsparameter auf der Terminalschnittstelle aus, setzt diese aber nicht als gültig für den Betrieb. Sollen diese Werte gesetzt werden, ist der Befehl DEFAULT zu verwenden. Beispiel: SFC>STDVALUE↵ switch on voltage: 12.5V switch off voltage: 14.2V switch off current: 2.0A reaction time: 20s maximal output energy: 1200Wh altitude of site: 500m capacity of battery: 50Ah SFC> VALUE [] Dieser Befehl liest den aktuellen Satz Betriebsparameter aus, ohne diese zu verändern. der Beispiel: SFC>VALUE↵ switch on voltage 12.5V switch off voltage 14.2V switch off current 2.0A reaction time 20s maximal output energy 1200Wh altitude of site: 500m capacity of battery: 50Ah SFC> In dem Beispiel schaltet das Gerät bei Unterschreiten einer Batteriespannung von 12,5 V ein. Das Gerät schaltet 77 7. Hyperterminal sich ab, wenn eine Spannung von 14,2V überschritten wird und der Ladestrom gleichzeitig unter 2,0 A sinkt. Wird die Ausschaltbedingung nicht erreicht, schaltet das Gerät nach Abgabe von 1.2 Kilowattstunden trotzdem ab. Sobald die Einschaltbedingung wieder erreicht ist, schaltet das Gerät wieder ein, dies kann unmittelbar nach dem Ausschalten der Fall sein. Das Gerät geht von den Luftdruckverhältnissen, die 500 Meter über dem Meer herrschen, aus und erwartet eine Batterie mit einer Kapazität von 50 Amperestunden am Ausgang. VER [] Gibt die Version der in dem Gerät programmierten Firmware aus. Beispiel: SFC>VER↵ Firmwareversion A50-1 4.03L12V date 2005-08-31 SFC> 78 SFC Smart Fuel Cell AG Eugen-Saenger-Ring 4 D-85649 Brunnthal-Nord, Germany Hotline: +49 89 673 5920 Freecall: +800 732 762 78 Fax: +49 89 673 592 369 [email protected] www.efoy.eu